
🕒 Reading Time: 4 minutes
This guide outlines how to get subtitles on Kodi with OpenSubtitles.org. The methods described here work for Kodi on FireStick, FireStick 4K, FireStick 4K Max, Windows PC, Mac, Nvidia Shield, Android, and all other Kodi-supported devices.

Nowadays, as TV shows and films become global, getting subtitles on Kodi is a simple way to enhance your viewing experience.
Streaming services like Netflix have bolstered the consumption of international content. The world is becoming a global village, and social media and the internet expose consumers to content from different countries.
Subtitles have made it easier for users to watch and understand international content regardless of language barriers.
I have watched an entire season of a Norwegian TV show, relying on English subtitles. The same goes for Japanese anime.
However, subtitles aren’t just helpful in understanding foreign languages. They also come in handy when you need to keep the volume low, such as when watching content in public. Other instances that demand subtitles are when the dialogue is low or when someone has a hearing impairment.
This post explains how to configure subtitles with Kodi addons.
Important: Some addons require subtitles to be enabled within addon settings for the subtitles to work. You may allow the subtitles within the addon if they don’t work. I have provided the steps later in this guide.
For Kodi Users!
ISPs, hackers, and other third-party entities worldwide may monitor your online activities. For security, privacy, and smooth streaming, it is recommended to use a reliable VPN for Kodi. Your IP address is visible to sites you visit.
I recommend ExpressVPN, a fast and secure VPN. It is very easy to install on any device, including Amazon Fire TV Stick, PC, Mac, and Smartphones. Also, it comes with a 30-day money-back guarantee. If you're not satisfied with their service, you can request a refund. ExpressVPN also has a special deal where you can get 4 months free and save 81% on the 2-year plan.
Read: How to Install and Use the Best VPN for Kodi
How to Get Kodi Subtitles Using OpenSubtitles
OpenSubtitles is probably the best subtitle service for Kodi. It offers subtitles in various languages for nearly all the movies and TV shows.
Let’s learn how to get subtitles on Kodi from OpenSubtitles.org.
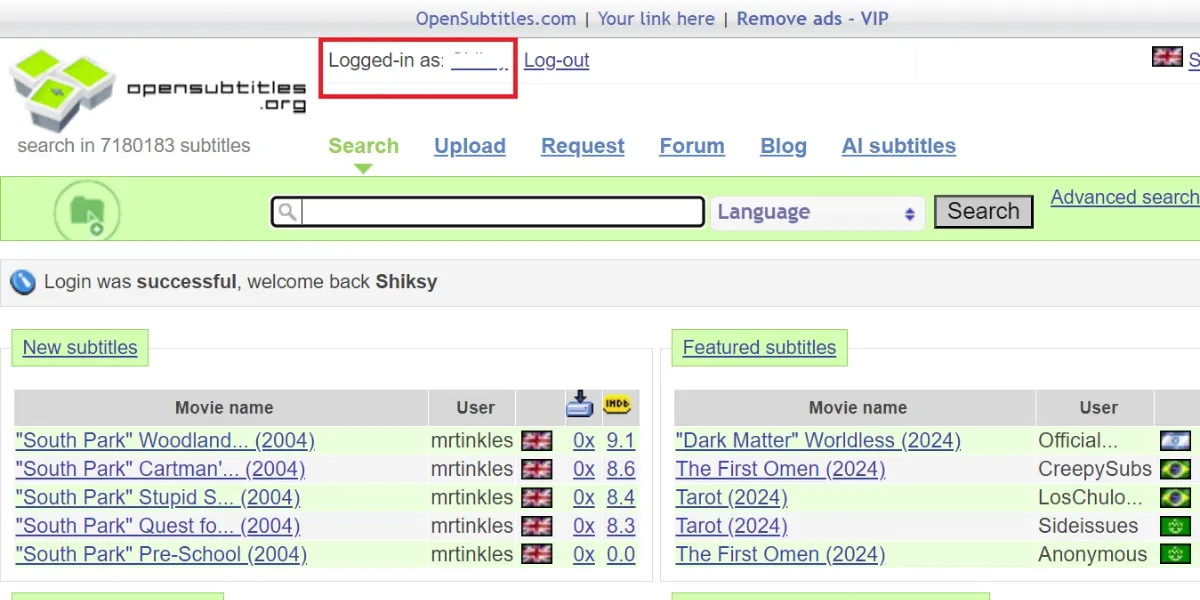
1. Go to https://www.opensubtitles.org and click the Register link at the top of the page.

2. Enter your username, email, and password, and confirm the password. Select the checkbox to agree to the terms of use and the captcha box to confirm you’re not a robot. Next, click Register.

3. Open your email and click the confirmation link to confirm your account. Then, follow the on-screen instructions to log in.
Now that you have an OpenSubtitles account, you can configure the subtitles on Kodi.
4. Launch Kodi and select Add-ons on the left panel on the home screen.
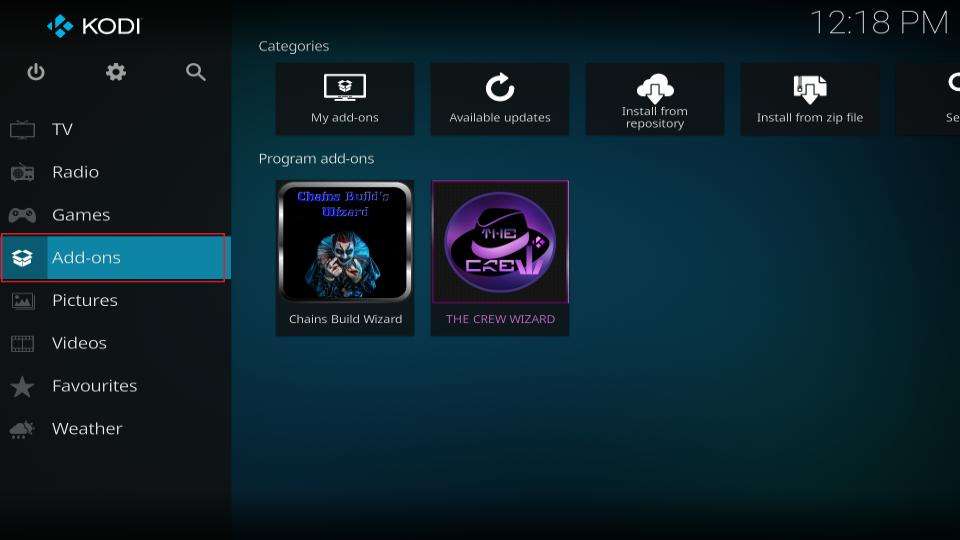
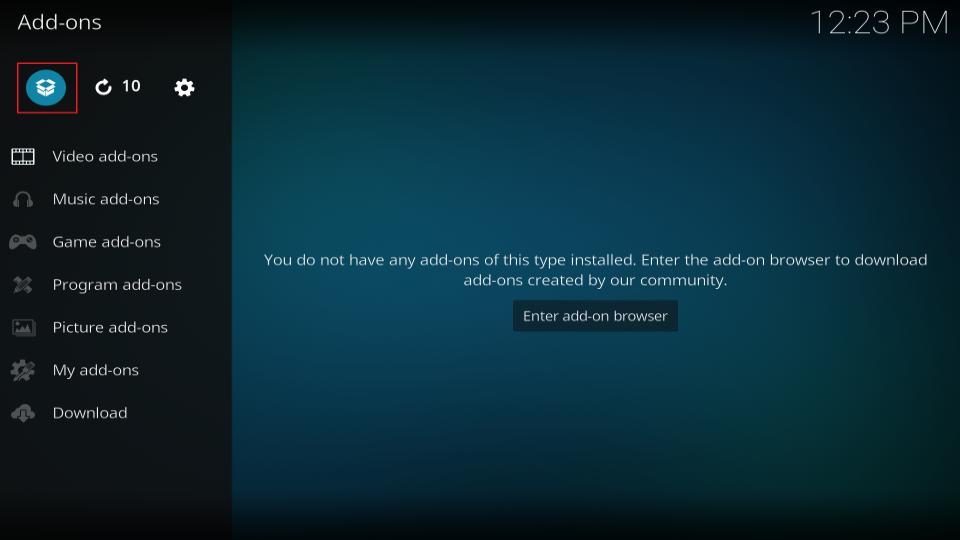
5. Open the Package Installer option at the top left of the screen. It looks like an open box.
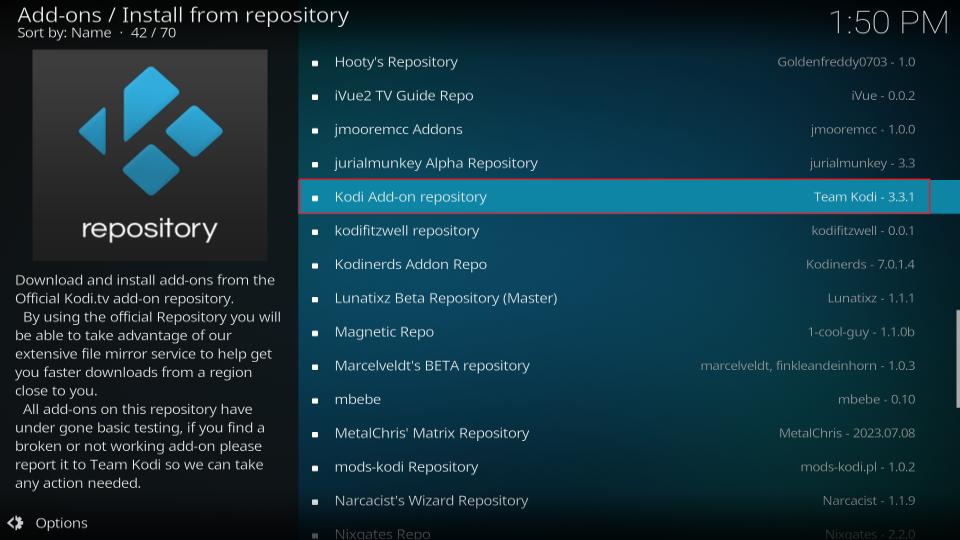
6. Click Install from repository on the next screen.
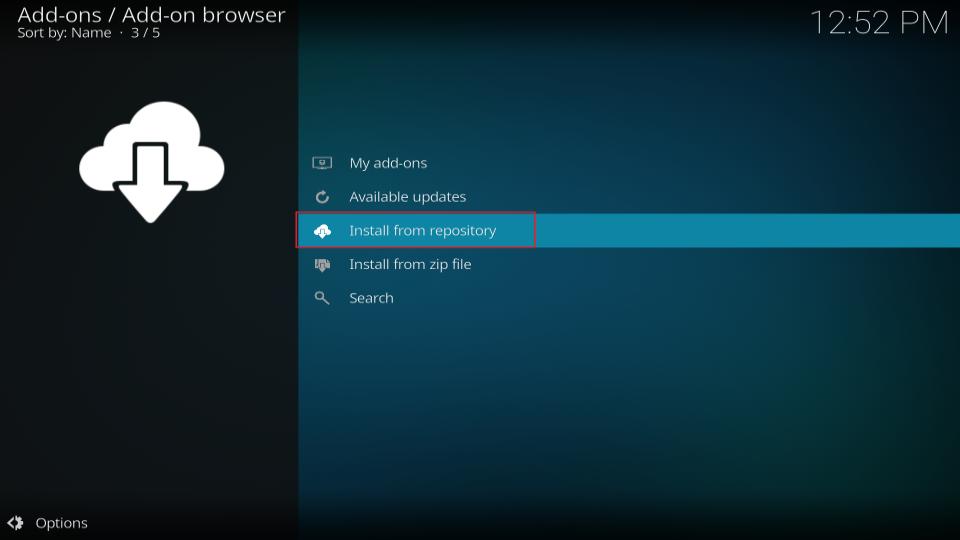
7. When you see the list of repositories, click Kodi Add-on repository. This is the official Kodi repository that comes pre-installed with Kodi.
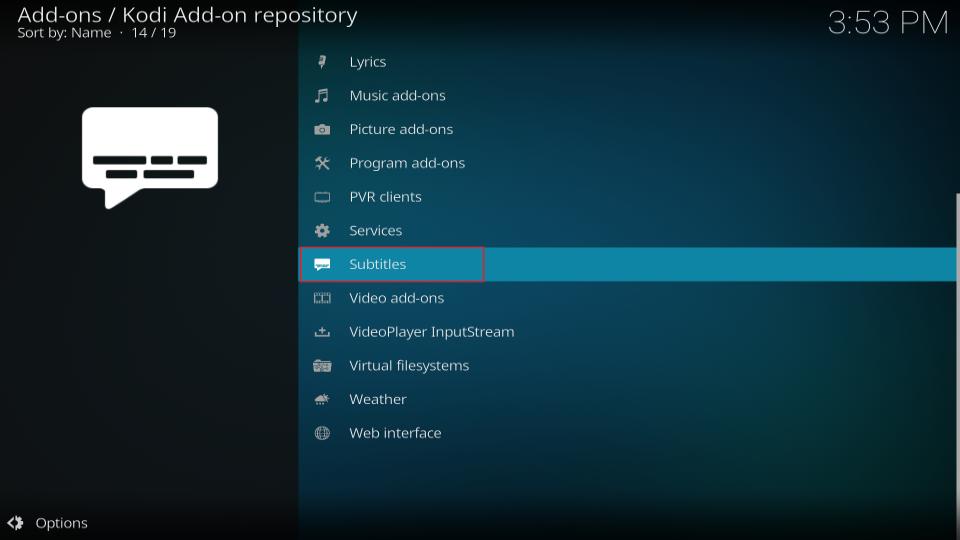
8. Click Subtitles when you see this window.
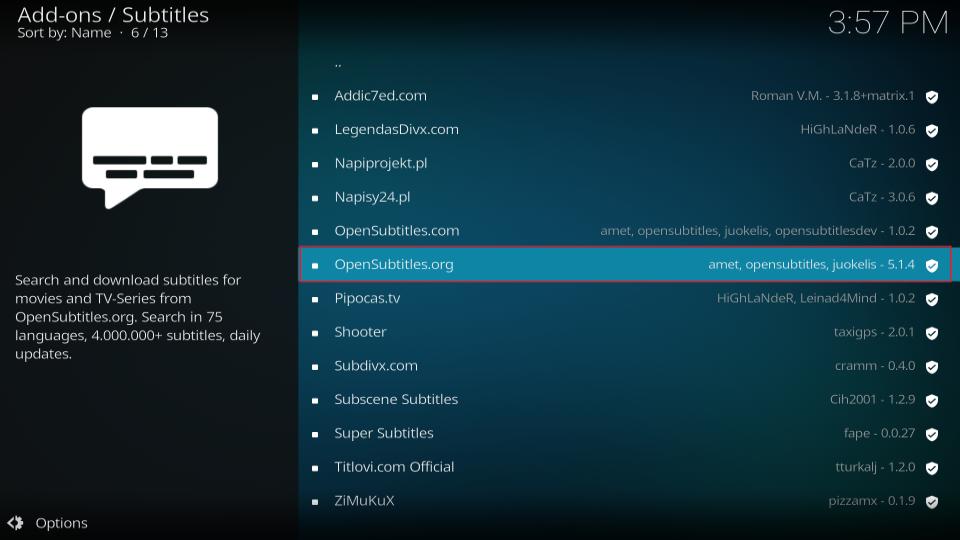
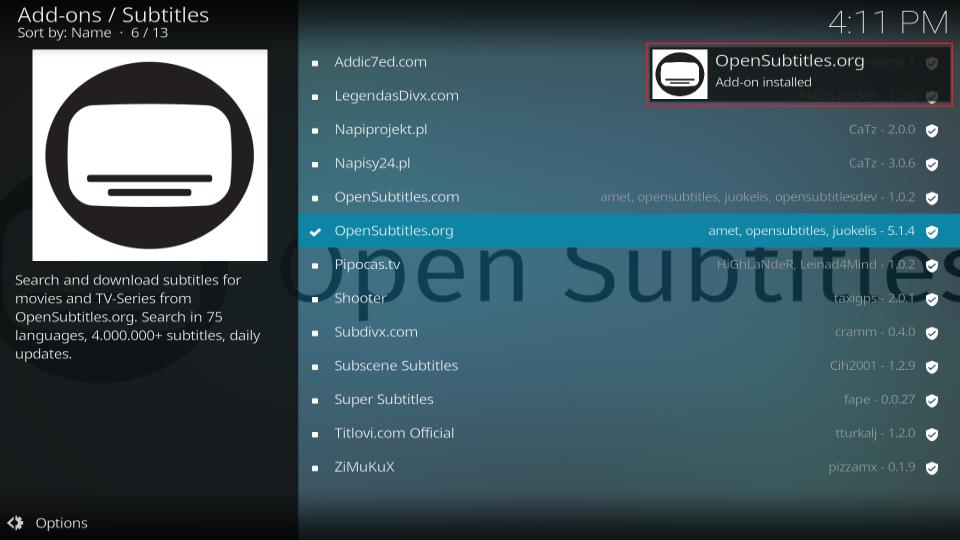
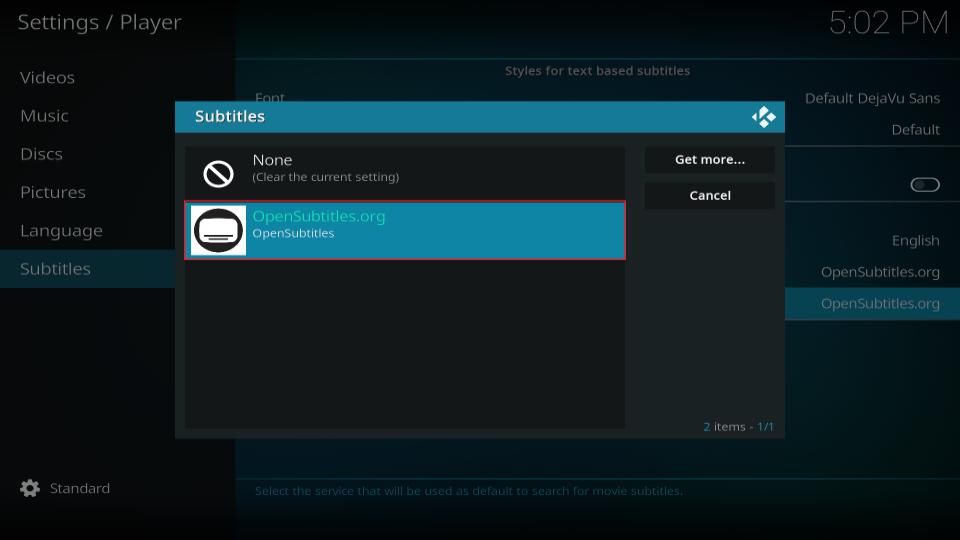
9. Click OpenSubtitles.org from the list.
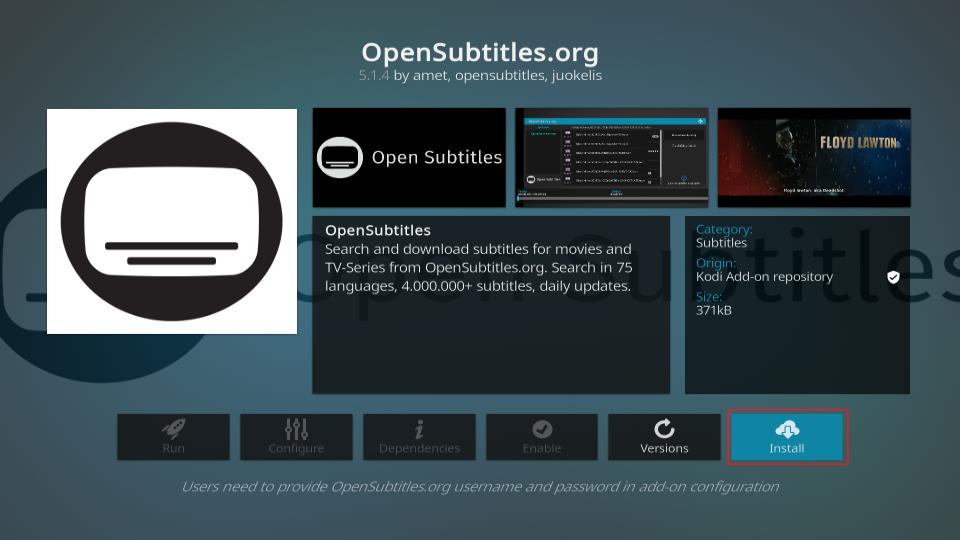
10. Click the Install button on the next screen’s bottom-right.
11. Now wait for the Opensubtitles.org add-on installed notification (seen below in the top-right corner of the screen).
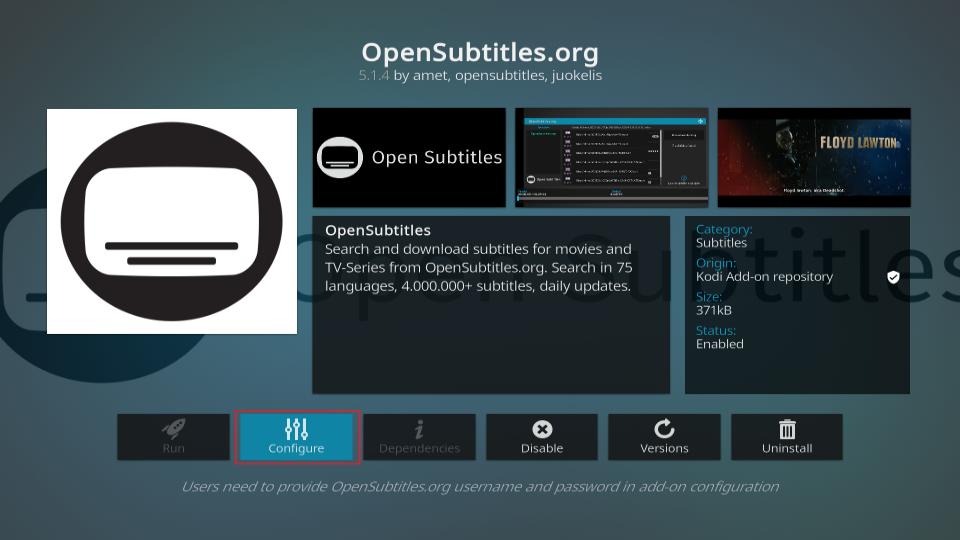
12. Now, click OpenSubtitles.org again and click the Configure button on the next window.
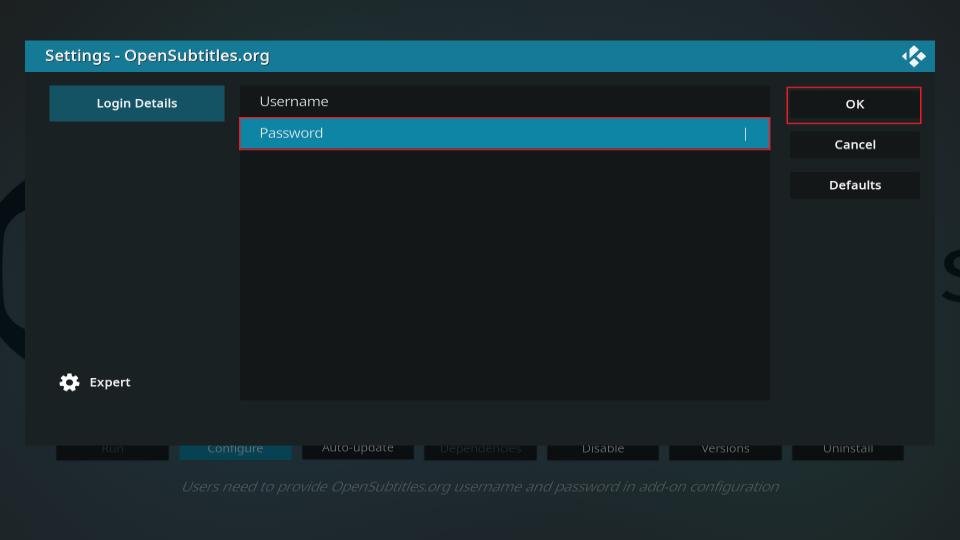
13. You will now see the following dialogue box. Click Username and enter the username you created for Kodi subtitles at OpenSubtitles.org in Step 1.
Click Password and enter your OpenSubtitles account password. Click OK once done.
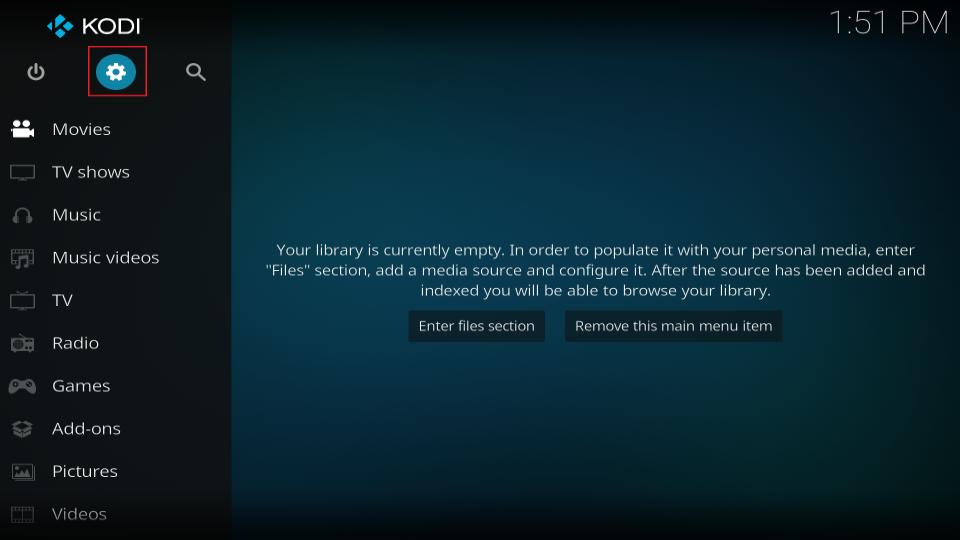
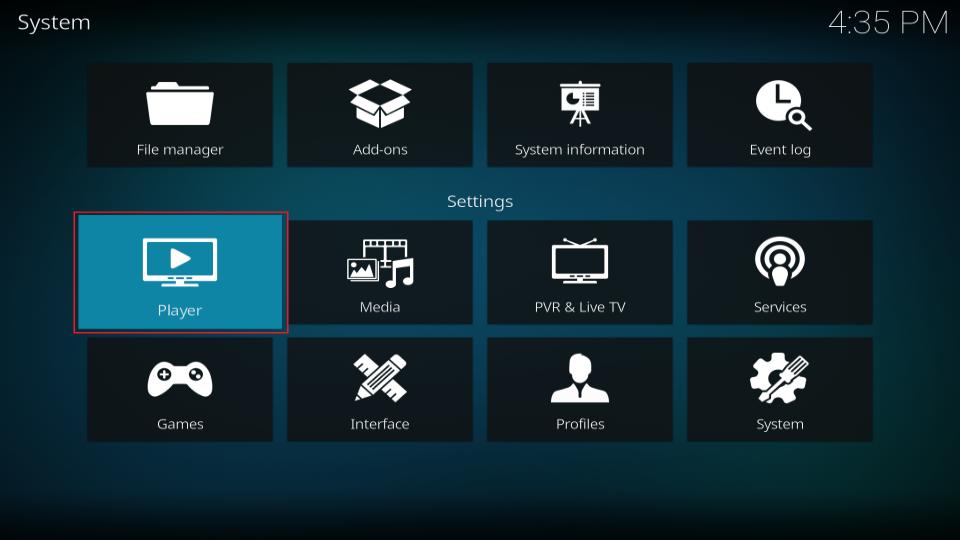
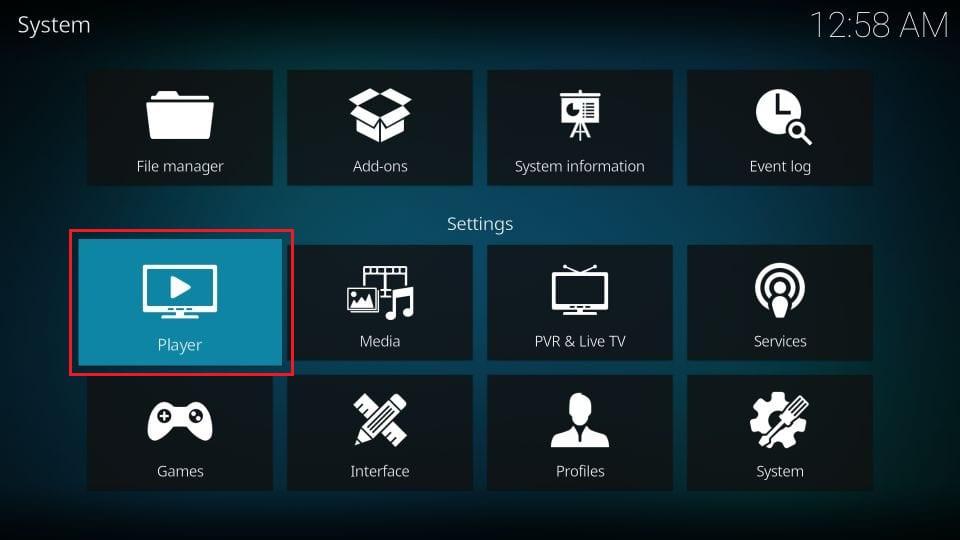
14. Return to the Kodi home screen and click Settings (the gear icon).
15. Open Player.
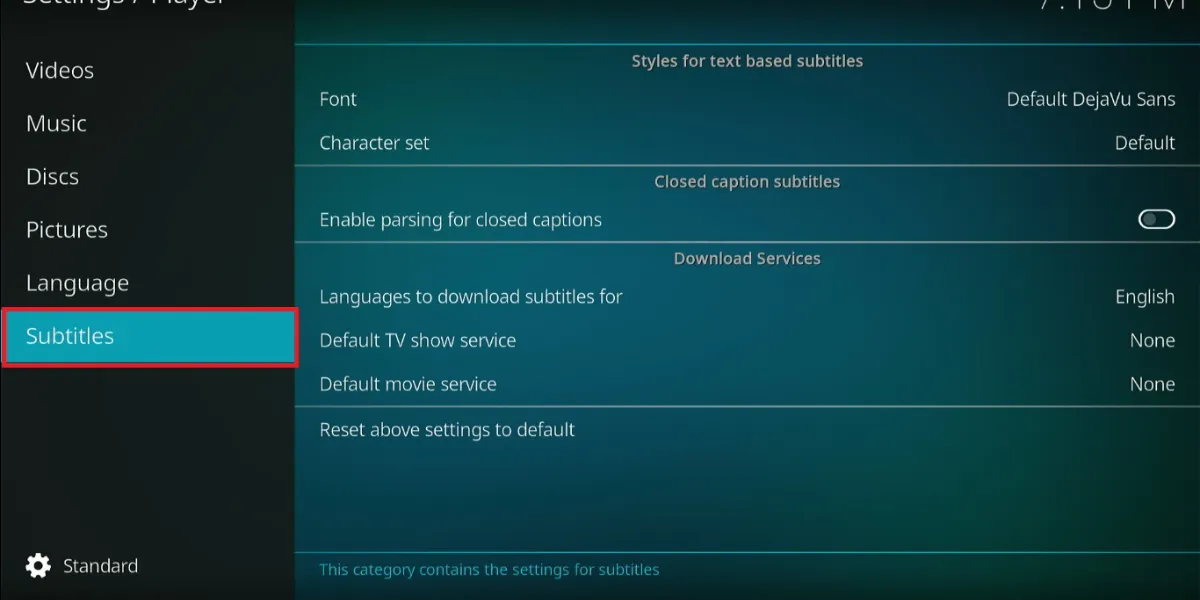
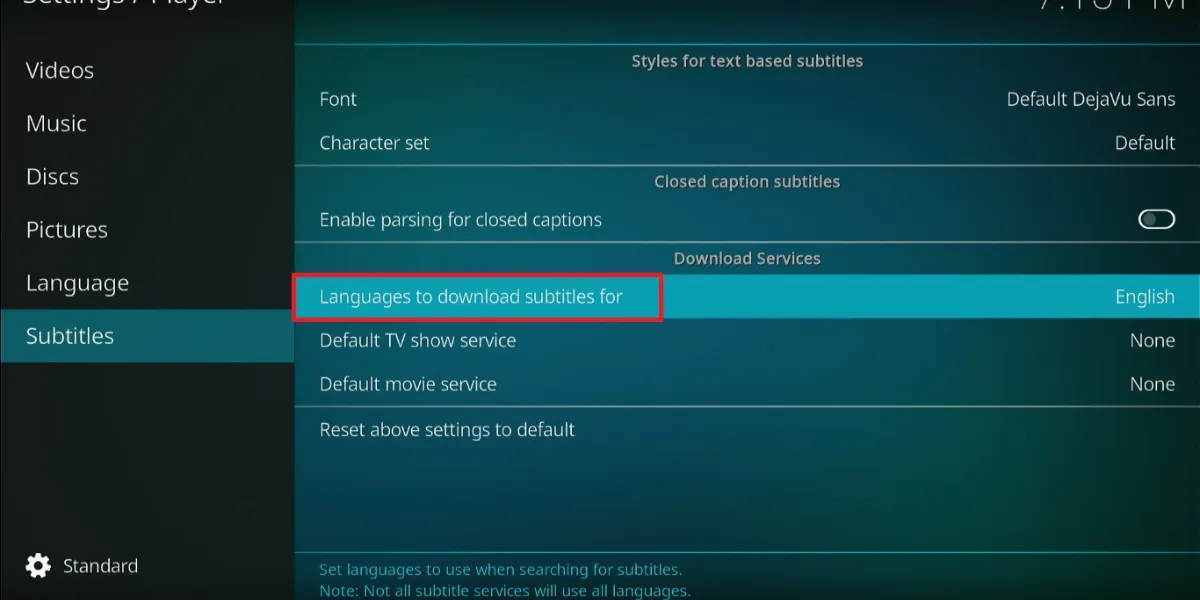
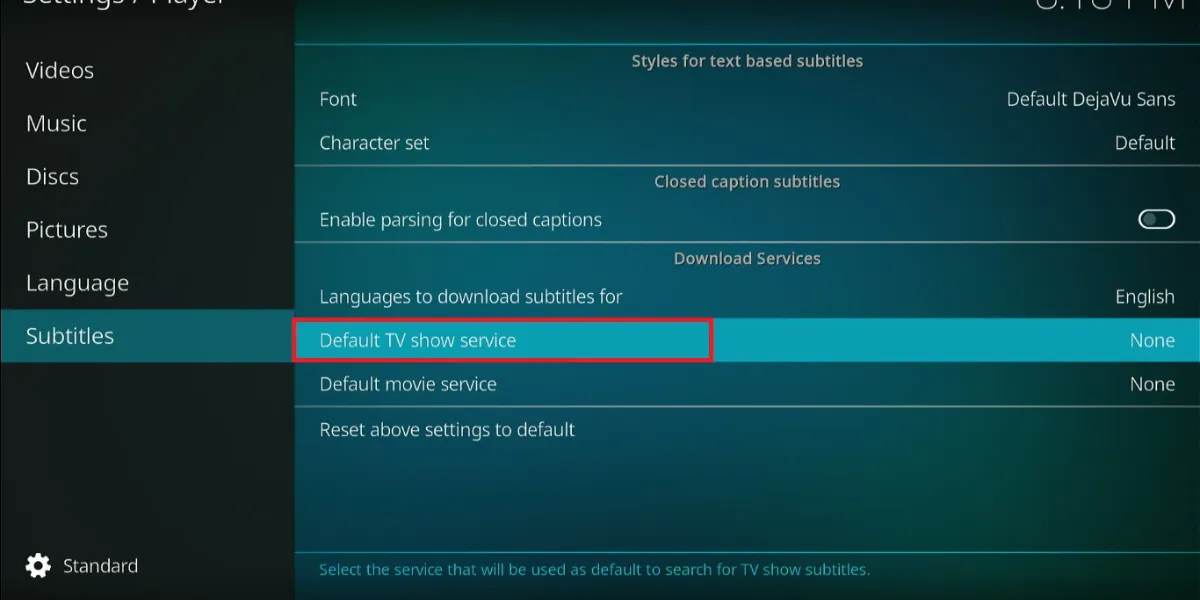
16. On the bottom left, where you see the gear icon, ensure Standard is selected. Select Subtitles.
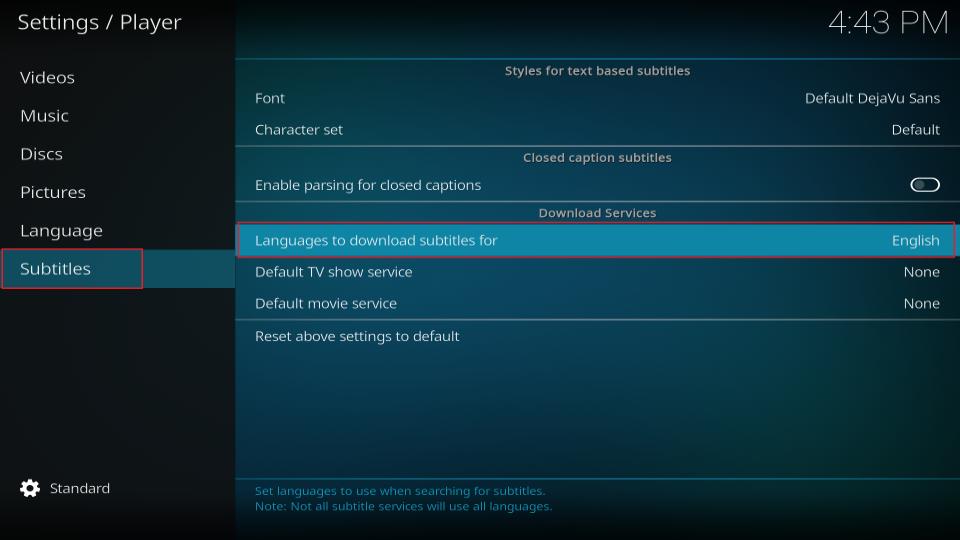
17. On the right, click Languages to download subtitles for Kodi. Then, select your preferred language.
18. Click Default TV show service to set up Kodi subtitles for TV shows.
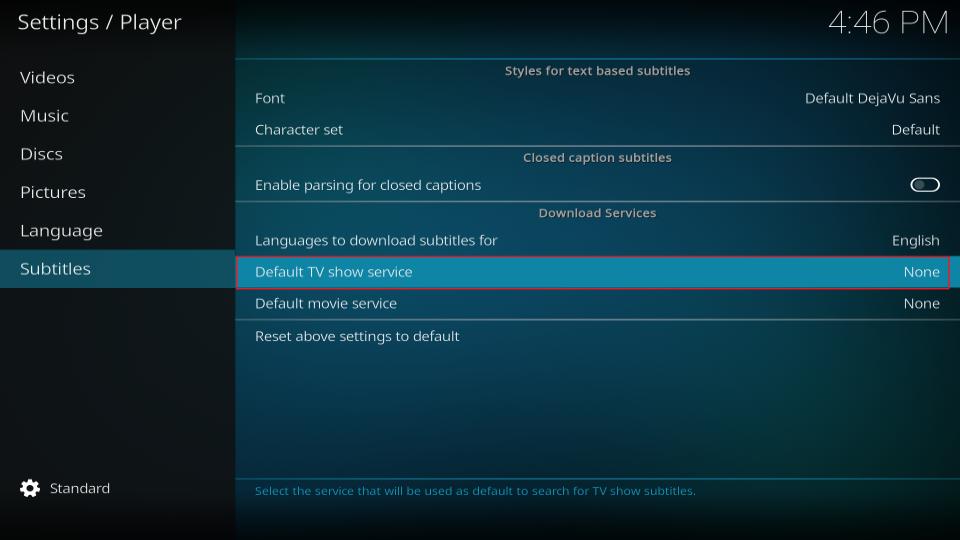
19. Select OpenSubtitles.org and click it. As you can see, I have already downloaded OpenSubtitles.org. Therefore, it appears on the list.
20. Click Default Movie Service and select OpenSubtitles.org.
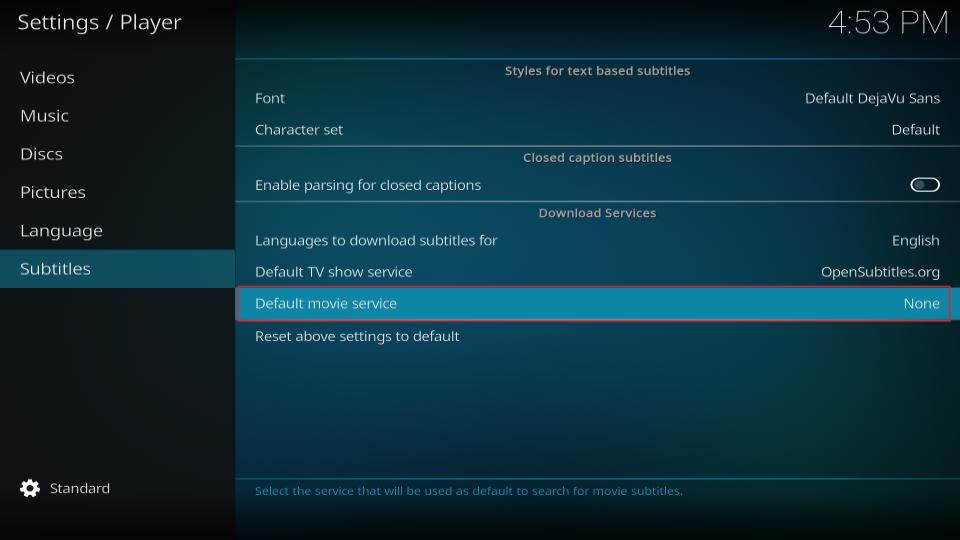
21. This is how the screen will look once you install and set up OpenSubtitles on Kodi.

To add Kodi subtitles, simply play the movie or TV show and click the CC icon in the media player settings. Then, you can stream your content with subtitles.
You’re now all set. A quick reminder: your internet provider and many websites/apps can see your IP address and some details about your connection. Using a VPN encrypts your traffic and masks your IP address, which helps protect your online privacy.
I recommend ExpressVPN. It’s a reputable VPN with strong encryption and fast connections, and it’s straightforward to install on Fire TV/FireStick and other devices.
Next, I’ll show you how to set up and use ExpressVPN.
Step 1: Get the ExpressVPN subscription HERE. It comes with a 30-day money-back guarantee. Meaning you can use it for free for the first 30 days, and if you are not satisfied with the performance (which is highly unlikely), you can request a full refund.
Step 2: Click HERE to download and install the ExpressVPN app on your streaming device. If you are using a FireStick, I have given the exact steps starting with Step 4 below.
Step 3: Click the Power icon to connect to a VPN server. That's all. Your connection is now secure with the fastest and best VPN for Kodi.

The following steps will help you install Kodi VPN on your Fire TV devices. If you have other streaming devices, follow Step 1-3 above.
Step 4: Subscribe to ExpressVPN HERE (if you are not already subscribed).
Step 5: Go to the Fire TV Stick home screen. Click Find, then select the Search option (see image below).

Step 6: Type Expressvpn in the search bar and select it when it shows up.

Step 7: Click Download.

Step 8: Open the ExpressVPN app and Sign in using the email ID and password that you created while buying the ExpressVPN subscription.

Step 9: Click the Power icon to connect to a VPN server. That’s all. Your FireStick is now secured with the fastest VPN.

How to Get Subtitles on Kodi Without Registration
Kodi offers several subtitle options, but the top ones are OpenSubtitles and Subscene. While OpenSubtitles is a great choice, its setup process is somewhat complicated. It requires you to create an account on the OpenSubtitles website and then log in through Kodi.
If you are looking for a hassle-free alternative, Subscene Subtitles is a good option. The setup process is simple and takes place directly within Kodi, eliminating the need to create a separate account on an external website.
However, Subscene subtitles sometimes fail to sync with the audio. Despite this, it remains a viable alternative to OpenSubtitles.
Follow these steps to set up Subscene Subtitles on Kodi:
1. Open Kodi and click Settings.
2. Select Player.
3. Select Subtitles.

4. Under Download Services on the right, click Languages to download subtitles and select your desired language.
5. Click Default TV show service.
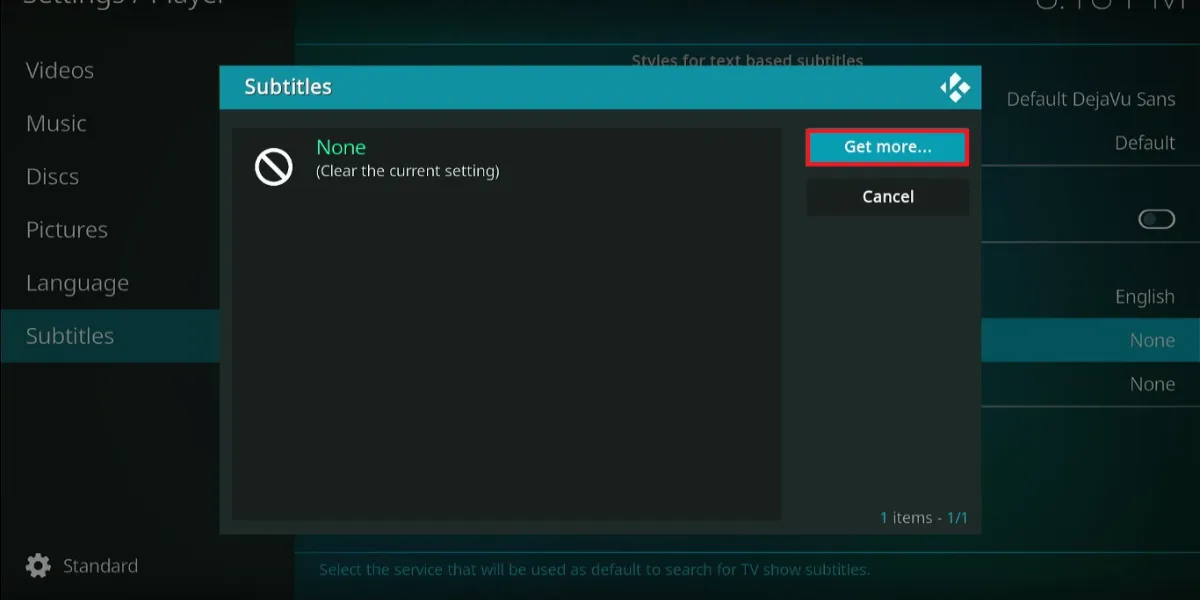
6. Click Get more.
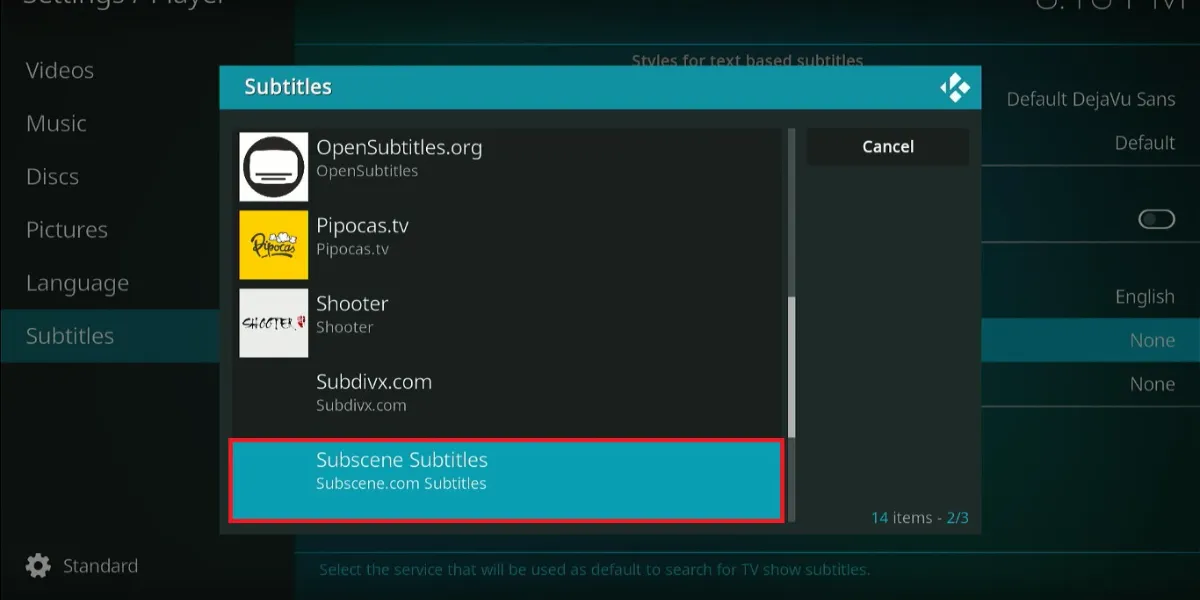
7. Scroll down the options and select Subscene.com (Subscene Subtitles).
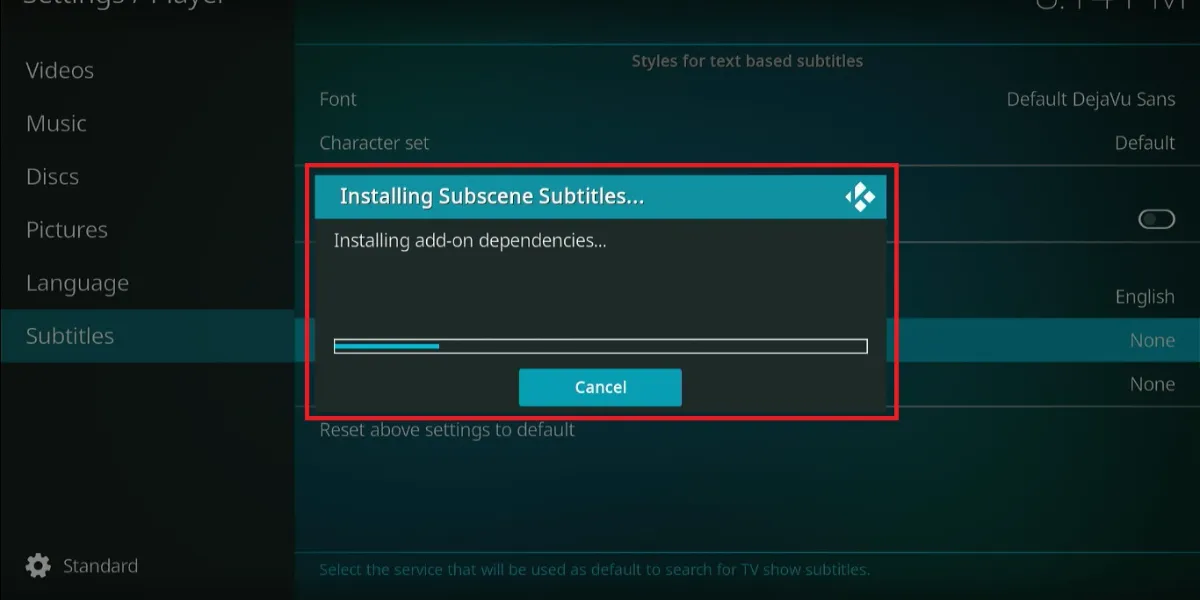
8. Wait a few moments for the Subscene Subtitles service to be downloaded.
9. Click Default movie service and select Subscene.com (Subscene Subtitles) again to make it the default.
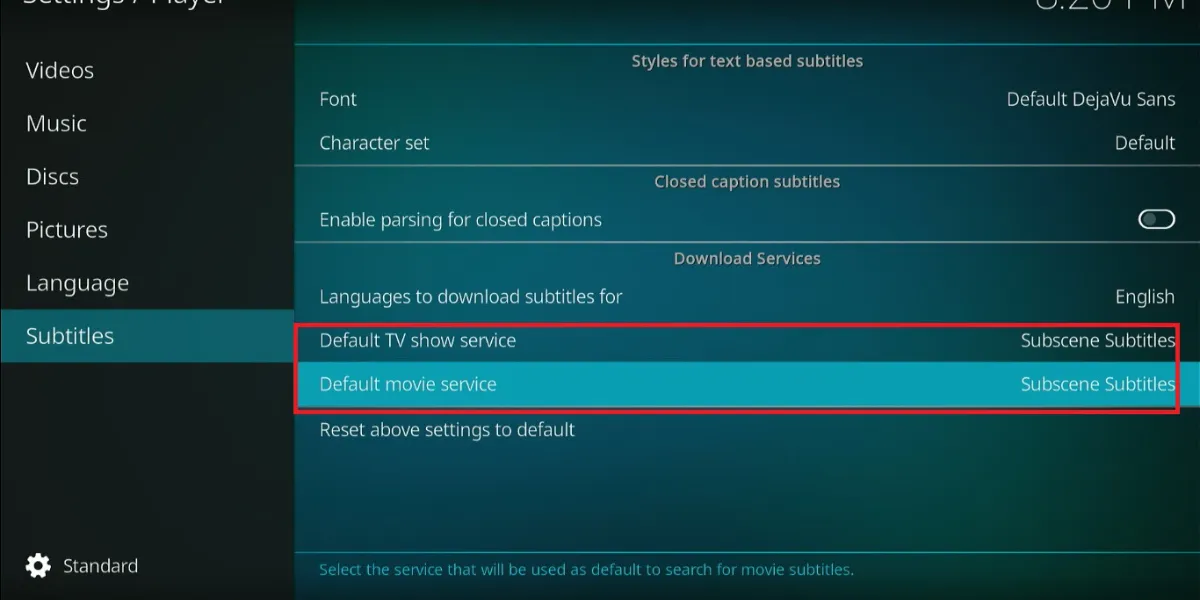
You have successfully set up Subscene Subtitles; it will fetch the available subtitles for Kodi for any specific title you play.
Note: Selecting Subscene Subtitles as your default subtitle service for Kodi does not mean you can no longer use OpenSubtitles. When looking for the subtitle while the title plays, you can always choose OpenSubtitles or any other service you may have installed.
Wrapping Up
Subtitles make content more accessible, especially when watching a foreign-language movie, keeping the volume down, or when someone is hearing impaired. This post explains how to set up subtitles on Kodi using two of the best options: OpenSubtitles and Subscene. OpenSubtitles offers better subtitles than Subscene, but the latter is easier to set up.
Kindly share your experience with subtitles on Kodi and your preferred subtitling service.

Suberboost Your FireStick with My Free Guide
Stay Ahead: Weekly Insights on the Latest in Free Streaming!
No spam, ever. Unsubscribe anytime.

Hi after selecting and playing the only subtitles is a message from opensubtitles.org something about subscribe to VIP subtitles
Hi Mike, please try OpenSubtitles.com instead of OpenSubtitles.org and let me know if it works.
I’m also facing the same .if I become vip member does the subtitles work
Hi Ra, please try OpenSubtitles.com instead of OpenSubtitles.org and let me know if it works.
After following every single step to install Opensubtitles.Org as you describe the result appear on my 2 TV show ( no subtitles found ) but it works fine on my PC.I,m using the same version 15.0.16 and Kodi 19 Matrix. I kept trying to do it many times but couldn’t get it working at all ( no subtitles found ) do I miss any ???
Hi Minh,
Did you remember to select Opensubtitles.org as the default TV show subtitles for Kodi as detailed in steps 16 through 18? If you have already completed these steps, I recommend following the article’s directions on how to enable subtitles in the addon settings. Please let me know if you continue to experience this issue after taking these steps.
Hi
I can’t get Chinese subs to work for my inlaws. I can get English on opensubtitles but not Chinese. Any ideas on that?
Hi Todd, it depends on whether or not the content your inlaws are watching has any Chinese subtitles available.
I was able to add the subtitles but when i put on a show and download the subtitles are for different shows than what i am watching. How do i fix that?
Hi Anthony, it could be a bit of “trial and error” when it comes to using subtitles with third-party addons. If the chosen subtitle doesn’t work, try another.
it doesn’t work for me, i play the movie but it doesn’t show me the option to add subtitles. maybe because i can’t configurate opensubtitles.org.
Hi Luna, are you getting any specific error while trying to configure Opensubtitles?
In answer to my own comment, the problem was with the user and password. They needed to be done in the opensubtitles.org. After that all is well.
I have used opensubtitles on another kodi device. So I have registered. My question is how to get the subtitles on my new device, I can’t follow the instructions here because ?m revistered already and the help screens don’t match what I have on my kodi.
Please explain where to find how to install opensubtitles without registering again.
Will Open subtitles work even if the movie is English/American? Can’t get it to work.
Hi Roseann, it should. Are you getting any specific error message?
Kodi Xenon Diggz build works great, except…..the subtitles…….When I select the subtitle the sound is still ok, video becomes unstable, interface starts lagging and …..No subtitles. After disabling subtitles video and interface restores normality. Please help !
Hi, I would rather suggest you try another build. Here is our list: https://www.firesticktricks.com/best-kodi-builds.html
Thank you for your suggestion ! Am on T95Q tvbox, what build would you recommend or better….are you using ? Thx in advance !
Hi. Titanium, Streamline, and Misfit Mods Lite are my personal favorites. I keep using them in turn.
I cannot get opensubtitles or subscene to work on my fire tv box.error code appears
Hi, I just checked and it works fine for me. When exactly are you getting the error message?