This guide outlines how to get subtitles on Kodi with OpenSubtitles.org. The methods described here work for Kodi on FireStick, FireStick 4K, FireStick 4K Max, Windows PC, Mac, Nvidia Shield, Android, and all other Kodi-supported devices.
Nowadays, as TV shows and films become global, getting subtitles on Kodi is a simple way to enhance your viewing experience.
Streaming services like Netflix have bolstered the consumption of international content. The world is becoming a global village, and social media and the internet expose consumers to content from different countries.
Subtitles have made it easier for users to watch and understand international content regardless of language barriers.
I have watched an entire season of a Norwegian TV show, relying on English subtitles. The same goes for Japanese anime.
However, subtitles aren’t just helpful in understanding foreign languages. They also come in handy when you need to keep the volume low, such as when watching content in public. Other instances that demand subtitles are when the dialogue is low or when someone has a hearing impairment.
This post explains how to configure subtitles with Kodi addons.
Important: Some addons require subtitles to be enabled within addon settings for the subtitles to work. You may allow the subtitles within the addon if they don’t work. I have provided the steps later in this guide.
Attention Kodi Users!
Governments and ISPs across the world monitor your online activities. If you use third-party Kodi addons, you should always use a good Kodi VPN and hide your identity so your streaming experience doesn’t take a bad turn. Currently, your IP is visible to everyone.
I use ExpressVPN, the fastest and most secure VPN in the industry. It is very easy to install on any device, including Amazon Fire TV Stick, PC, Mac, and Smartphones. Also, it comes with a 30-day money-back guarantee. If you don't like their service, you can always ask for a refund. ExpressVPN also has a special deal where you can get 4 months free and save 61% on the 2-year plan.
Read: How to Install and Use Best VPN for Kodi
How to Get Kodi Subtitles Using OpenSubtitles
OpenSubtitles is probably the best subtitle service for Kodi. It offers subtitles in various languages for nearly all the movies and TV shows.
Let’s learn how to get subtitles on Kodi from OpenSubtitles.org.
1. Go to https://www.opensubtitles.org and click the Register link at the top of the page.

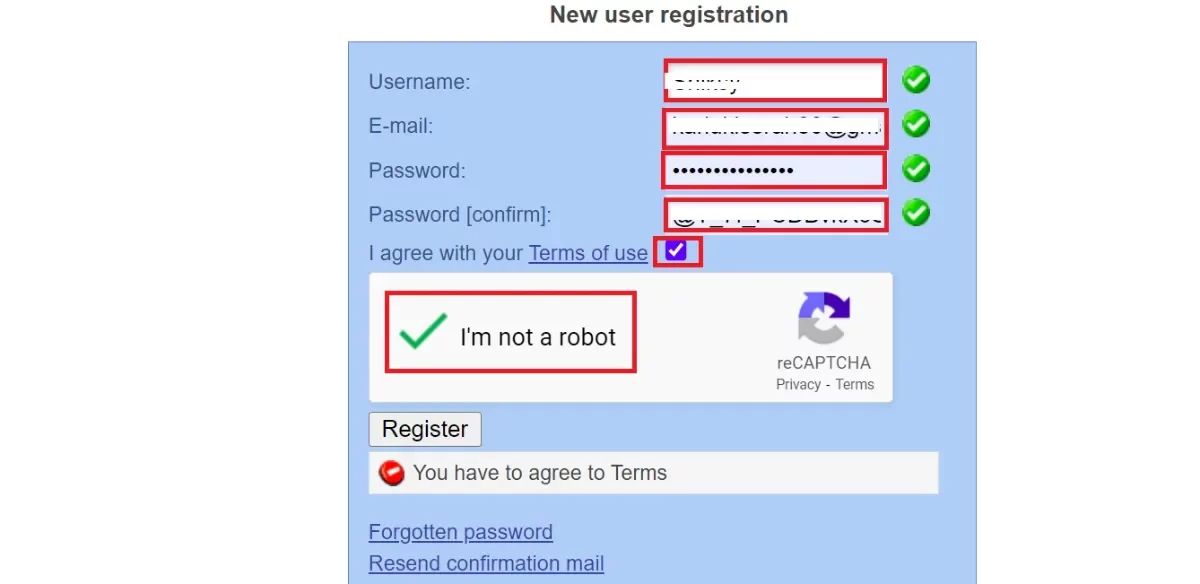
2. Enter your username, email, and password, and confirm the password. Select the checkbox to agree to the terms of use and the captcha box to confirm you’re not a robot. Next, click Register.
3. Open your email and click the confirmation link to confirm your account. Then, follow the on-screen instructions to log in.
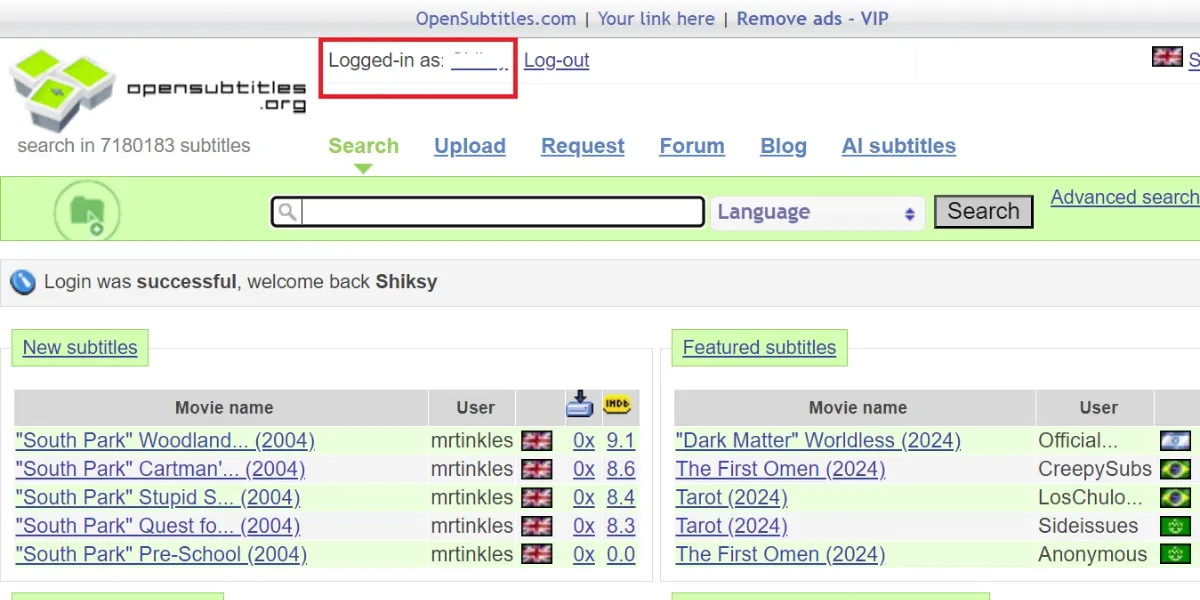
Now that you have an OpenSubtitles account, you can configure the subtitles on Kodi.
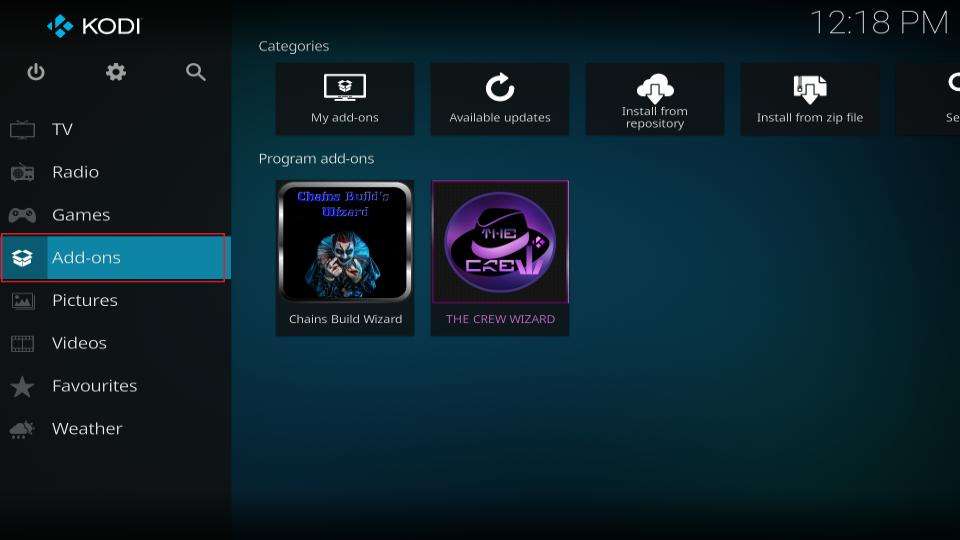
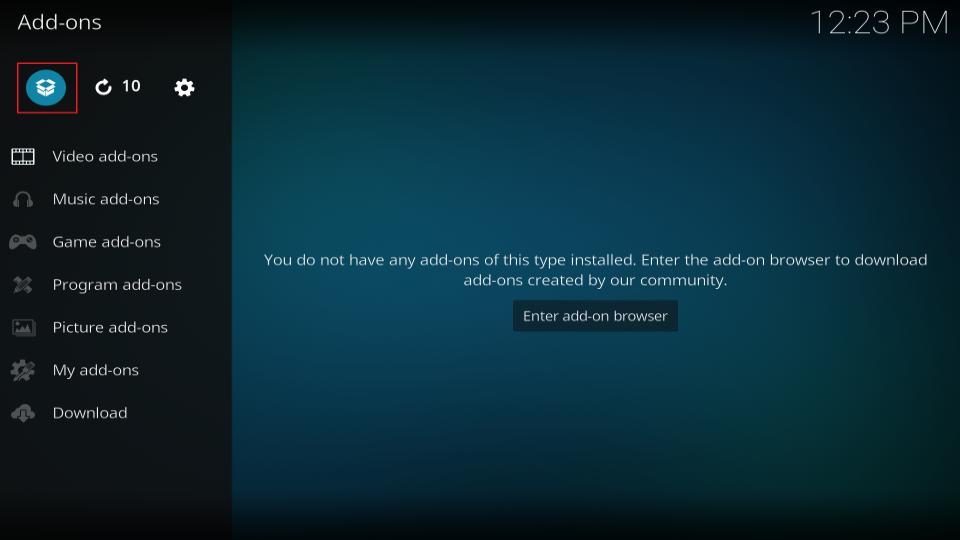
4. Launch Kodi and select Add-ons on the left panel on the home screen.
5. Open the Package Installer option at the top left of the screen. It looks like an open box.
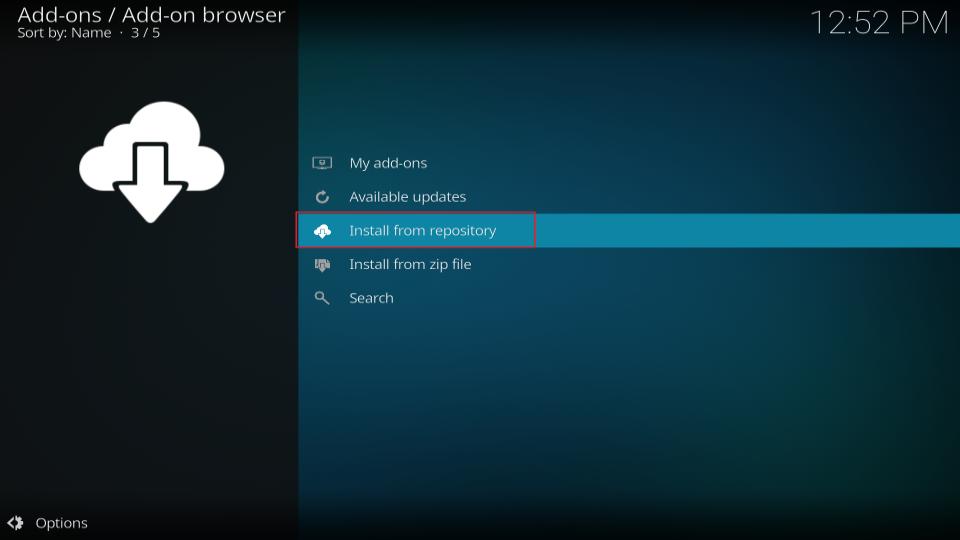
6. Click Install from repository on the next screen.
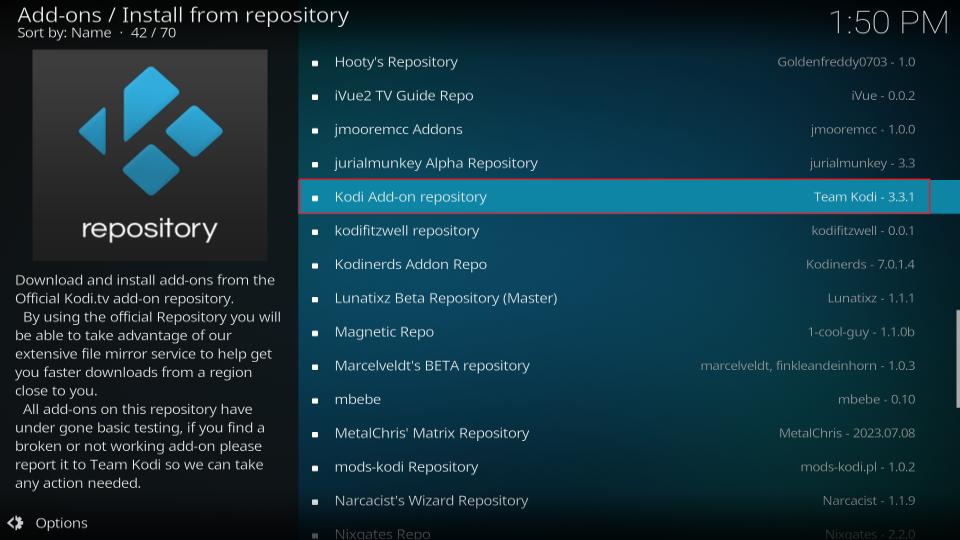
7. When you see the list of repositories, click Kodi Add-on repository. This is the official Kodi repository that comes pre-installed with Kodi.
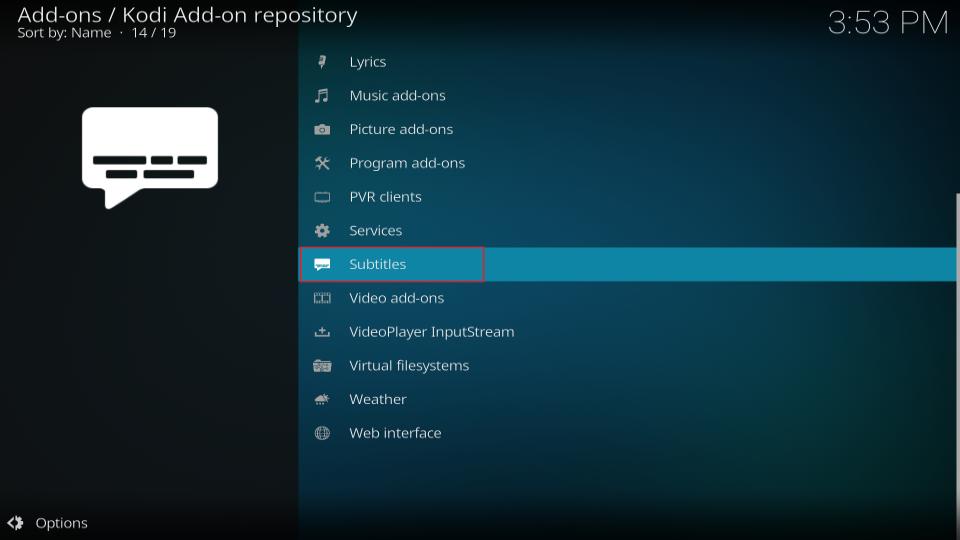
8. Click Subtitles when you see this window.
9. Click OpenSubtitles.org from the list.
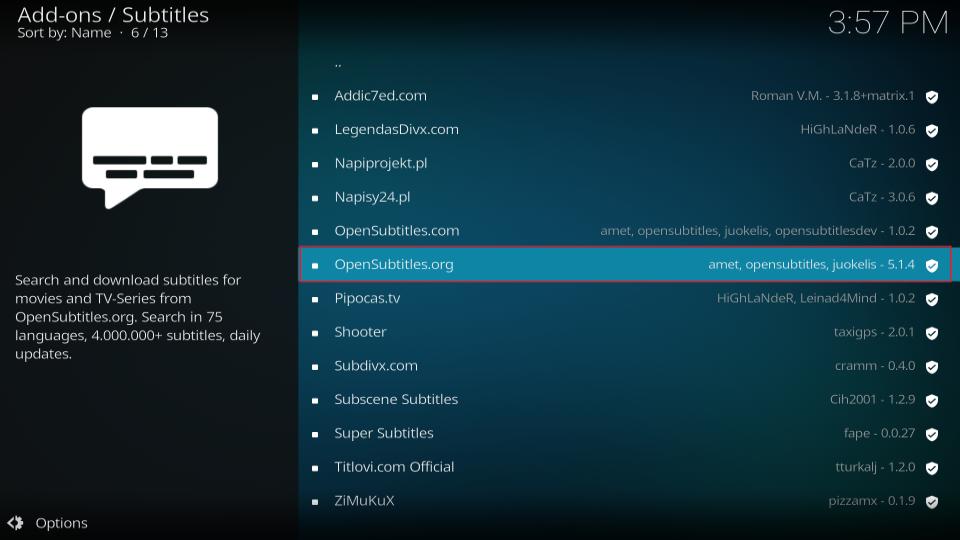
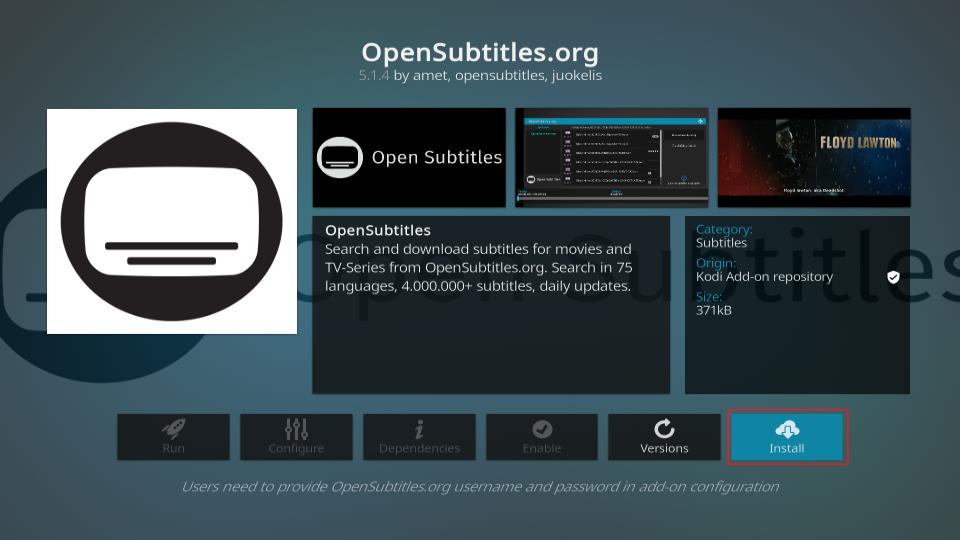
10. Click the Install button on the next screen’s bottom-right.
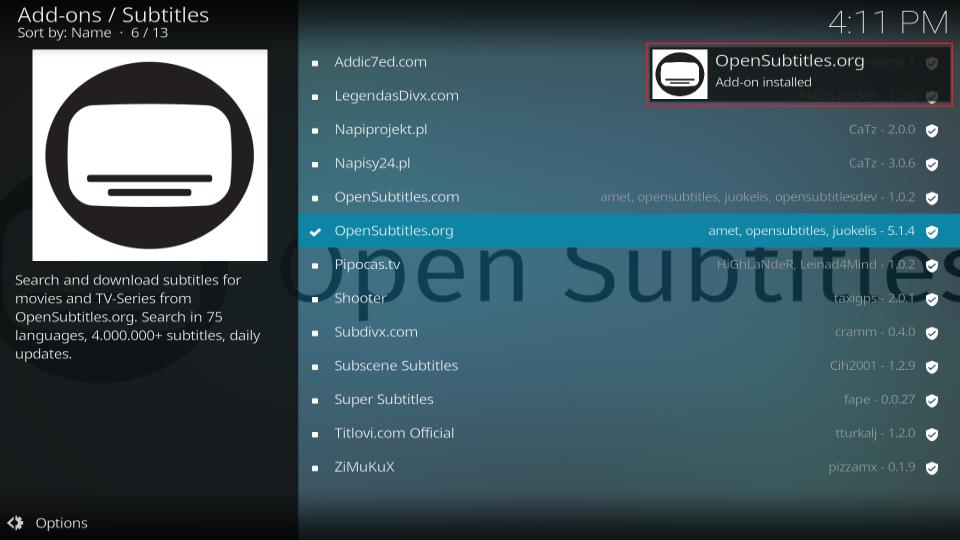
11. Now wait for the Opensubtitles.org add-on installed notification (seen below in the top-right corner of the screen).
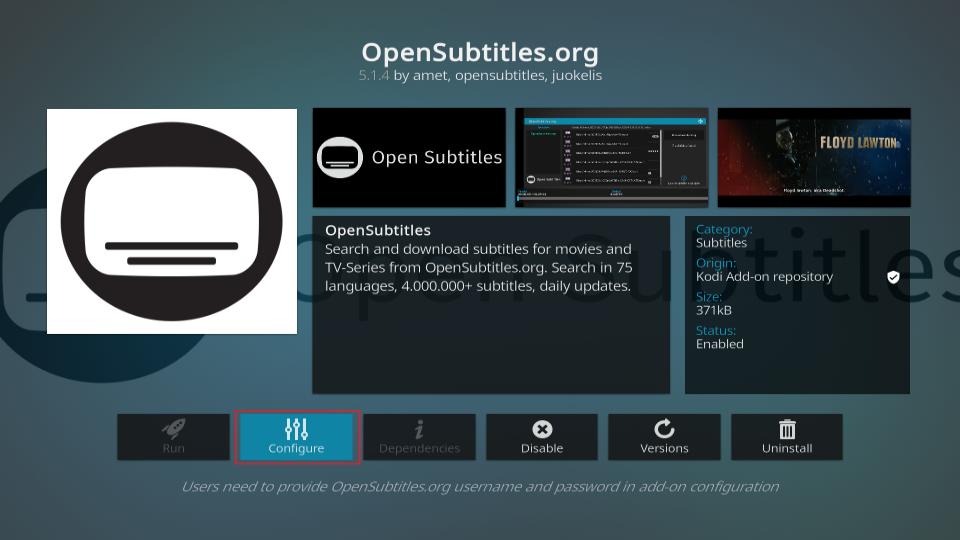
12. Now, click OpenSubtitles.org again and click the Configure button on the next window.
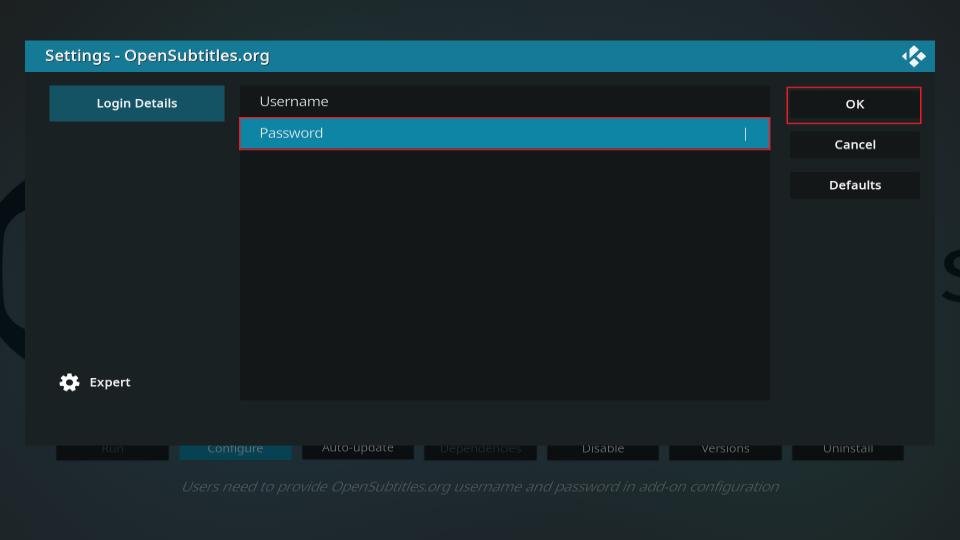
13. You will now see the following dialogue box. Click Username and enter the username you created for Kodi subtitles at OpenSubtitles.org in Step 1.
Click Password and enter your OpenSubtitles account password. Click OK once done.
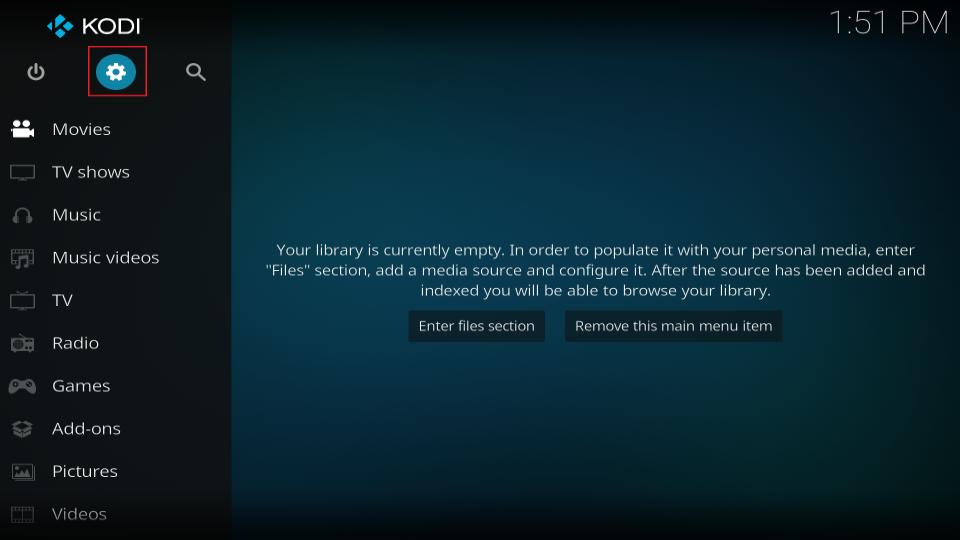
14. Return to the Kodi home screen and click Settings (the gear icon).
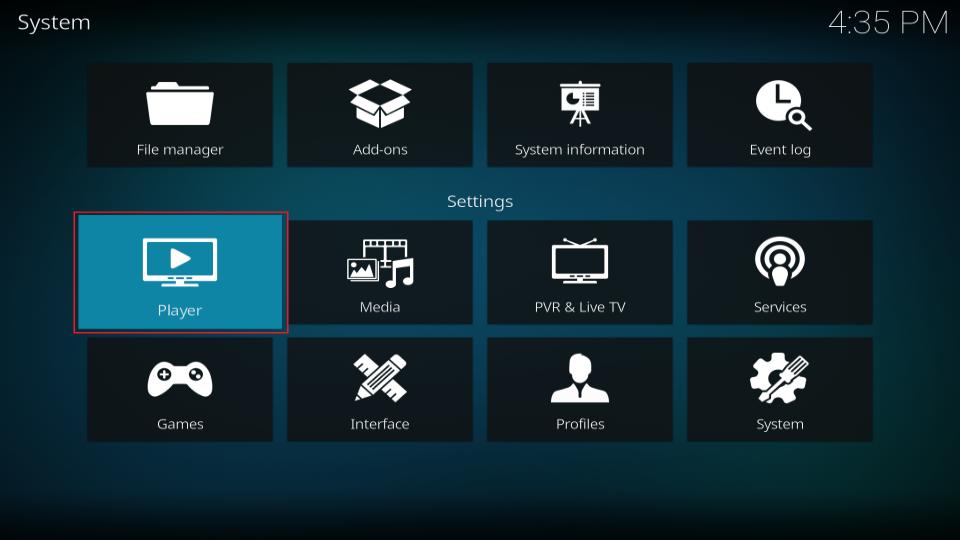
15. Open Player.
16. On the bottom left, where you see the gear icon, ensure Standard is selected. Select Subtitles.
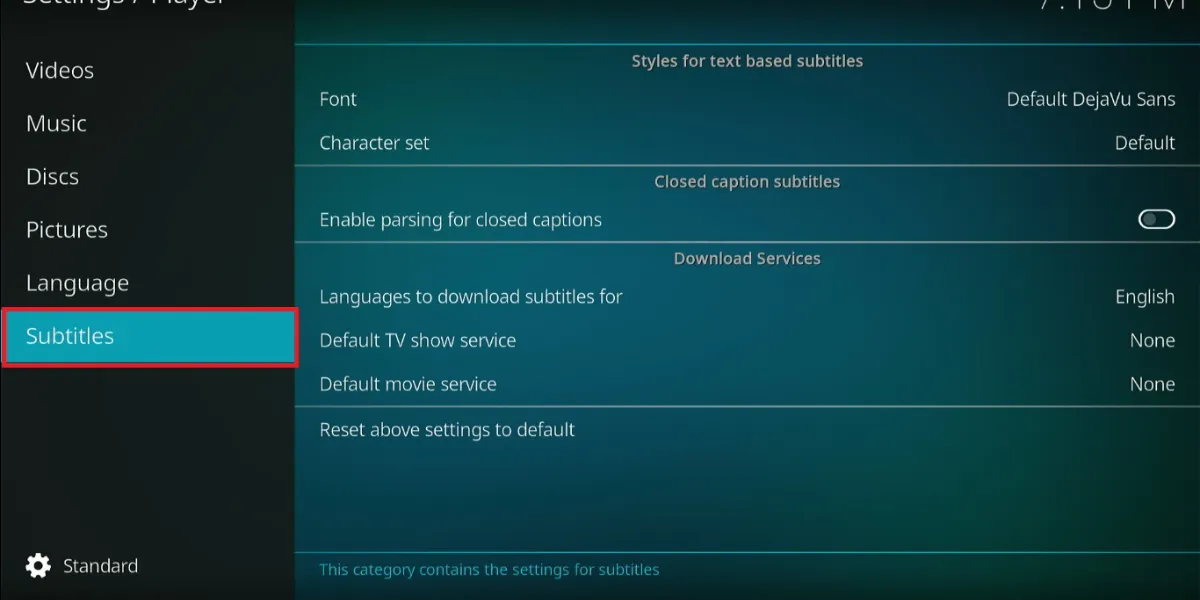
17. On the right, click Languages to download subtitles for Kodi. Then, select your preferred language.
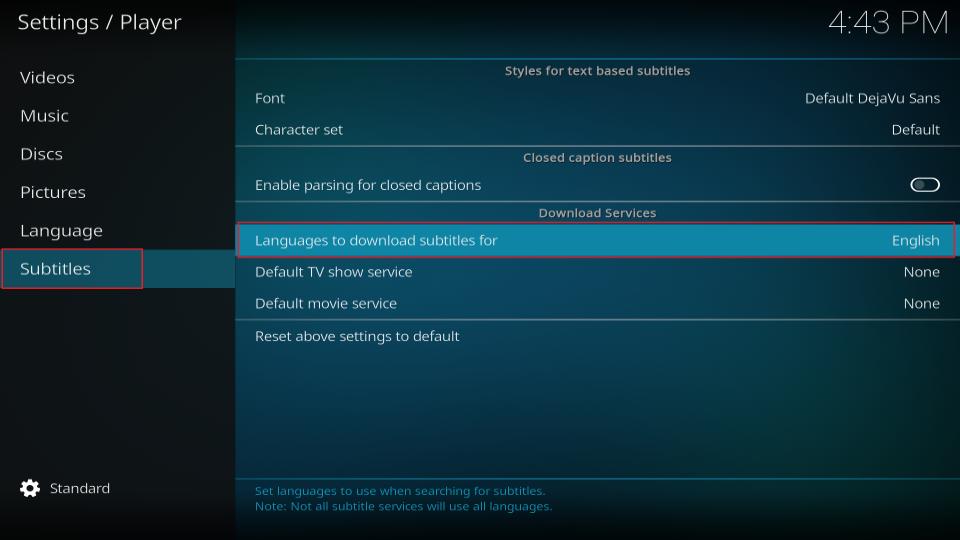
18. Click Default TV show service to set up Kodi subtitles for TV shows.
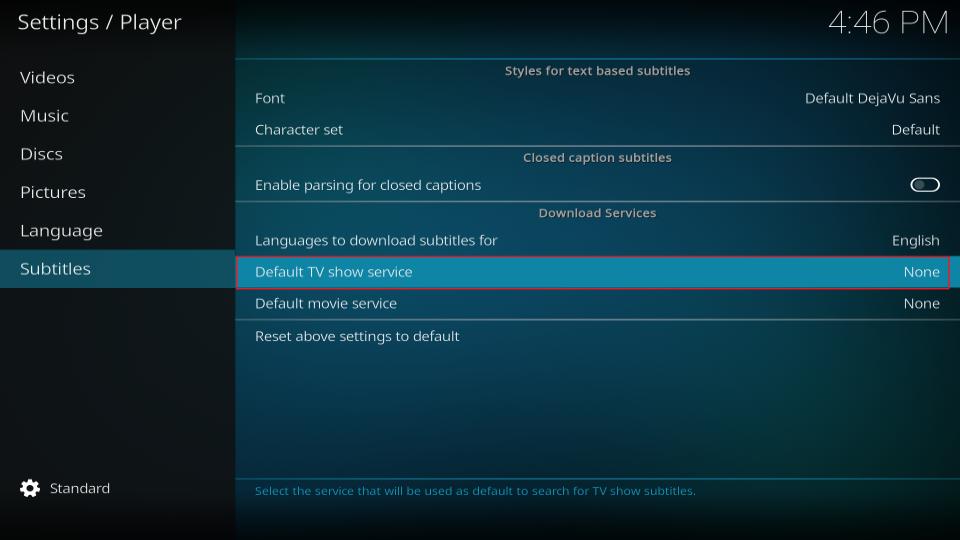
19. Select OpenSubtitles.org and click it. As you can see, I have already downloaded OpenSubtitles.org. Therefore, it appears on the list.
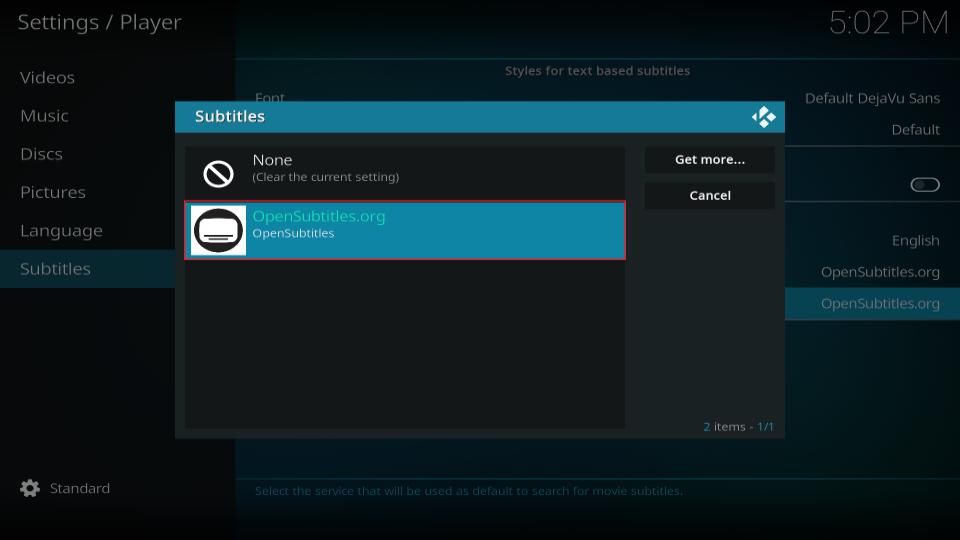
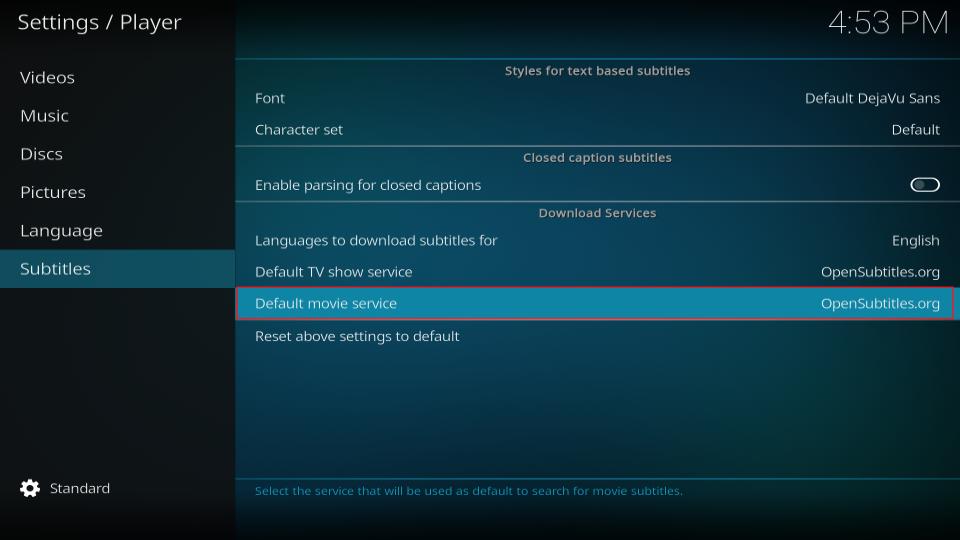
20. Click Default Movie Service and select OpenSubtitles.org.
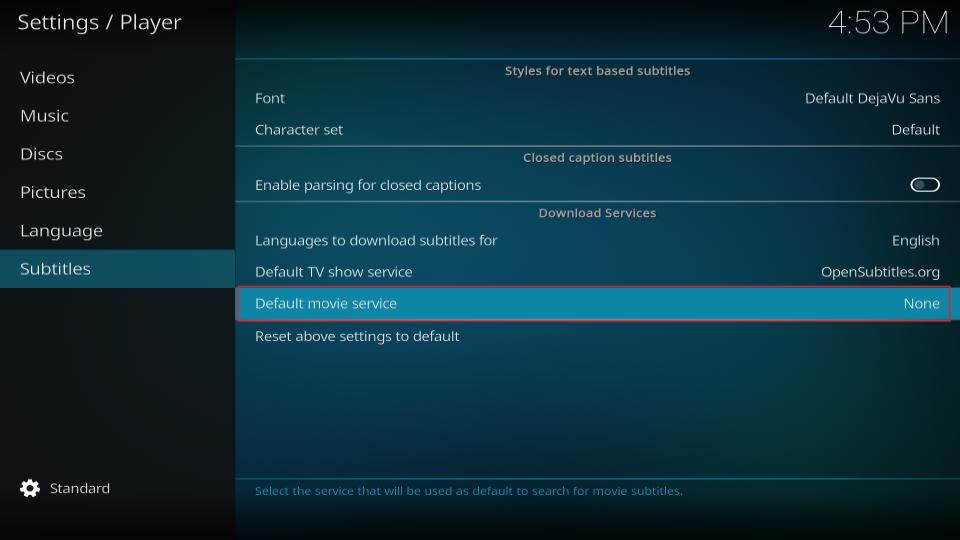
21. This is how the screen will look once you install and set up OpenSubtitles on Kodi.
To add Kodi subtitles, simply play the movie or TV show and click the CC icon in the media player settings. Then, you can stream your content with subtitles.
Before you start streaming with Kodi Addons or Builds, I would like to warn you that everything you stream on Kodi is visible to your ISP and Government. This means, streaming copyrighted content (free movies, TV shows, live TV, and Sports) might get you into legal trouble.
Thankfully, there is a foolproof way to keep all your streaming activities hidden from your ISP and the Government. All you need is a good VPN for Kodi. A VPN will mask your original IP which is and will help you bypass Online Surveillance, ISP throttling, and content geo-restrictions.
I personally use and recommend ExpressVPN, which is the fastest and most secure VPN. It is compatible with all kinds of streaming apps and devices.
NOTE: We do not encourage the violation of copyright laws. But, what if you end up streaming content from an illegitimate source unintentionally? It is not always easy to tell the difference between a legit and illegal source.
So, before you start streaming on Kodi, here's how to get VPN protection in 3 simple steps.
Step 1: Get the ExpressVPN subscription HERE. It comes with a 30-day money-back guarantee. Meaning, you can use it free for the first 30-days and if you are not satisfied with the performance (which is highly unlikely), you can ask for a full refund.
Step 2: Click HERE to download and install the ExpressVPN app on your streaming device. If you are using a FireStick, I have given the exact steps starting with Step 4 below.
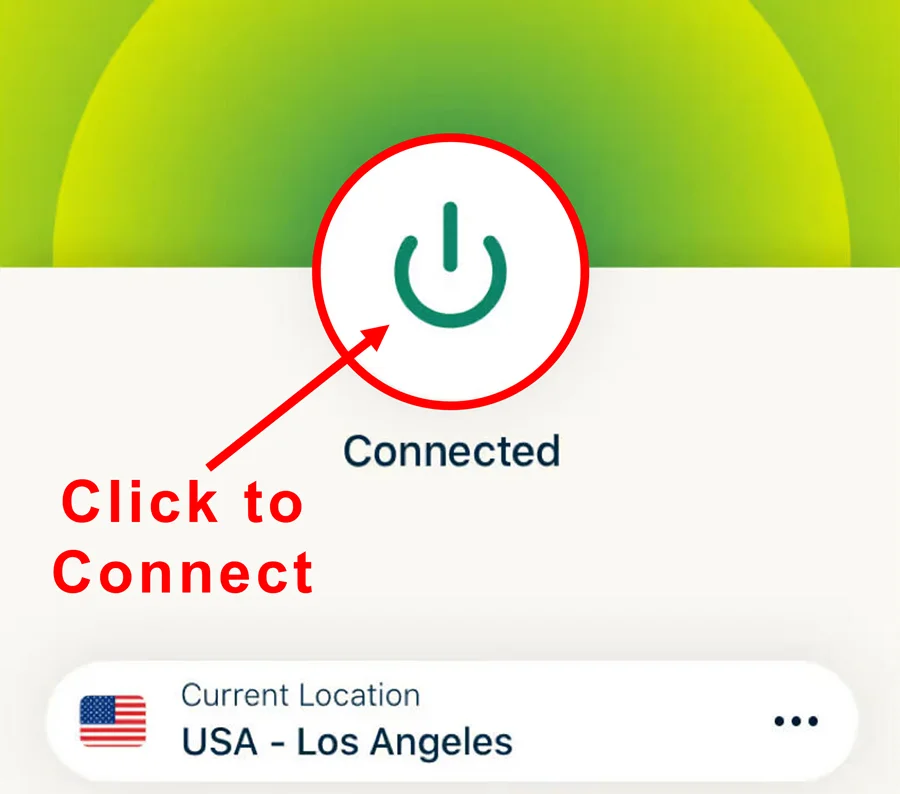
Step 3: Click the Power icon to connect to a VPN server. That's all. Your connection is now secure with the fastest and best VPN for Kodi.
The following are the steps to install Kodi VPN on your Fire TV devices. If you have other streaming devices, follow Step 1-3 above.
Step 4: Subscribe to ExpressVPN HERE (if not subscribed already).
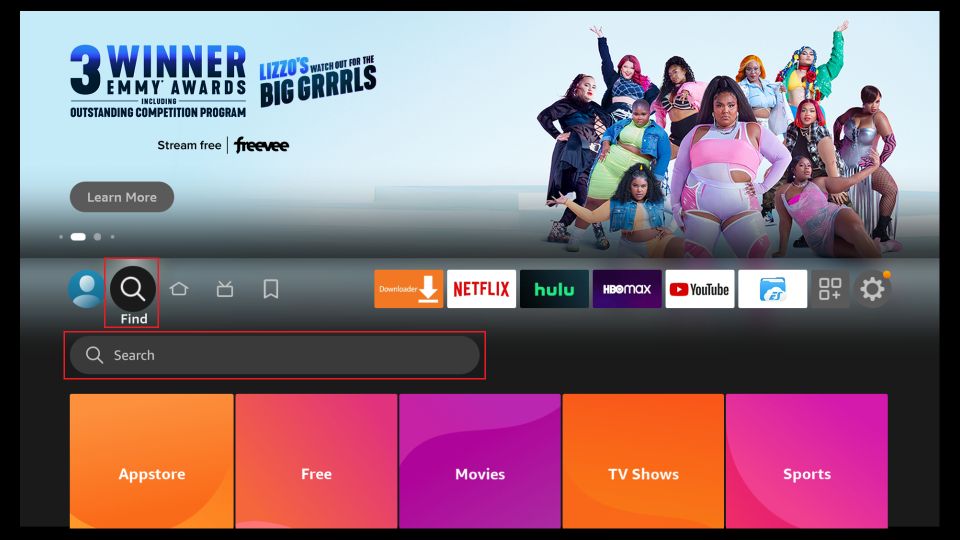
Step 5: Go to Fire TV Stick home screen. Click Find followed by Search option (see image below).
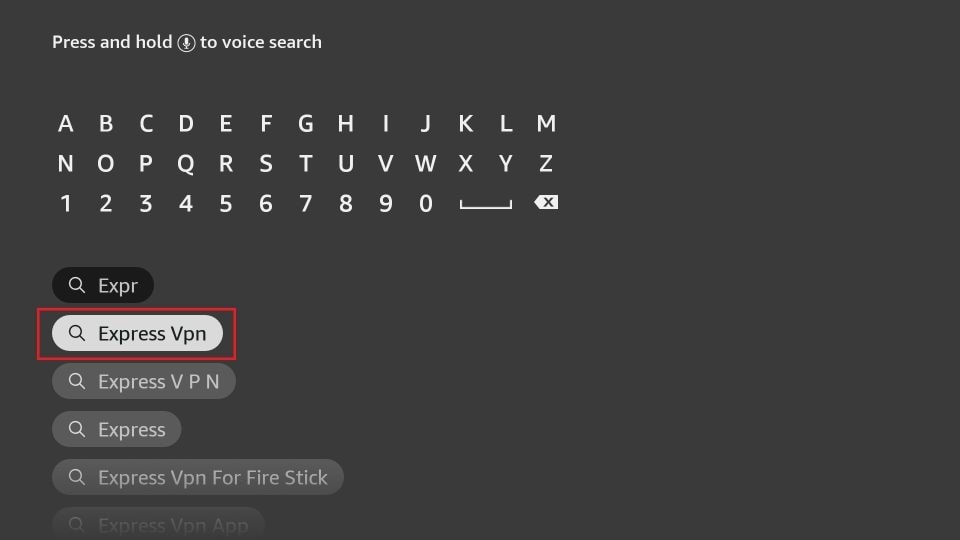
Step 6: Type Expressvpn in the search bar and select when it shows up.
Step 7: Click Download.

Step 8: Open the ExpressVPN app and Sign in using the email ID and password that you created while buying the ExpressVPN subscription.

Step 9: Click the Power icon to connect to a VPN server. That’s all. Your FireStick is now secured with the fastest VPN.
Subtitles Not Working? Enable Subtitles in the Addon Settings
For some addons, you must enable the subtitles in the addon settings for them to work. If you’re having issues with subtitles on Kodi, adjust the subtitle settings within the addon settings. I am using The Crew addon in this example. However, the steps work much the same for other addons. Here are the steps:
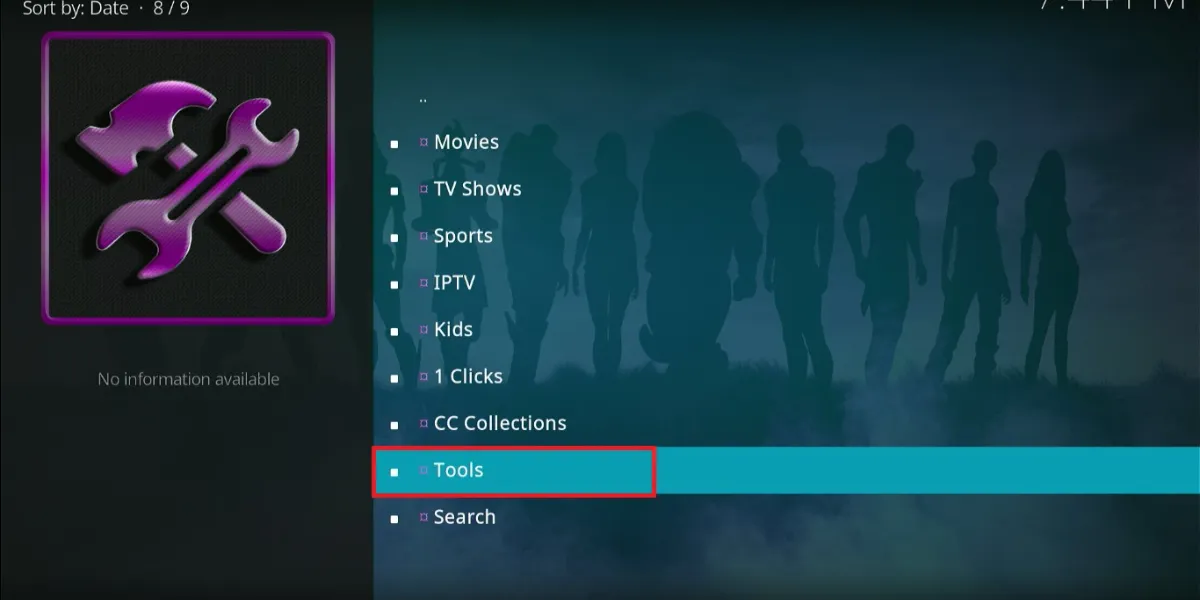
1. Go to Add-ons > Video add-ons from the Kodi home screen and open The Crew addon. Scroll down on the main screen and click Tools.
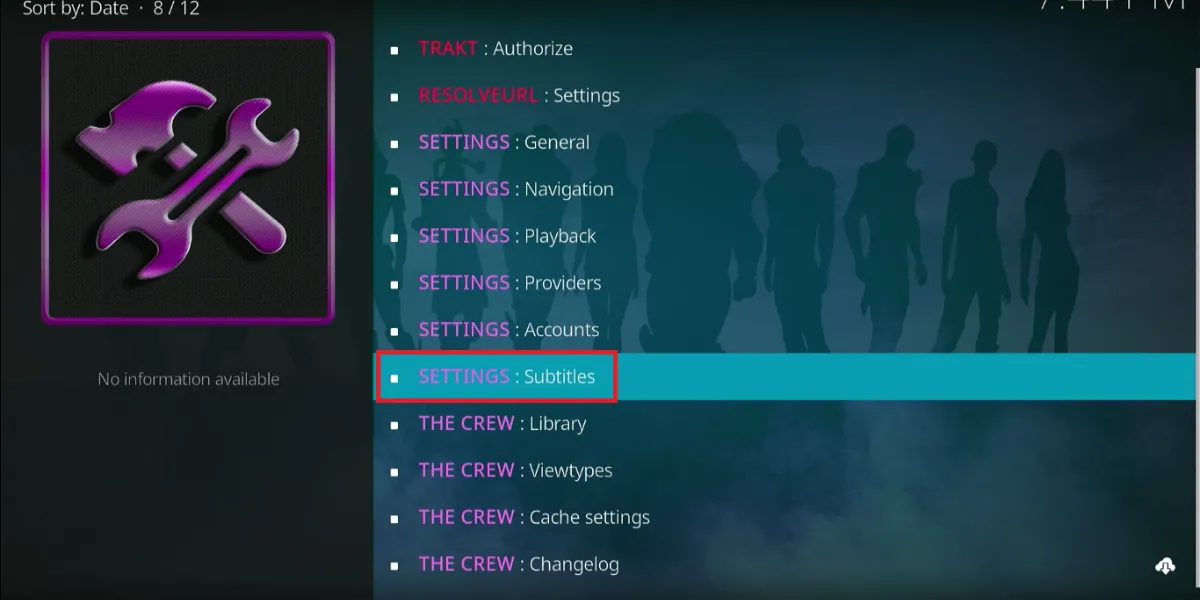
2. On the next window, click SETTINGS: Subtitles
3. Ensure the Subtitles option is still selected in the left menu. On the right, turn on the Enable Subtitles toggle.
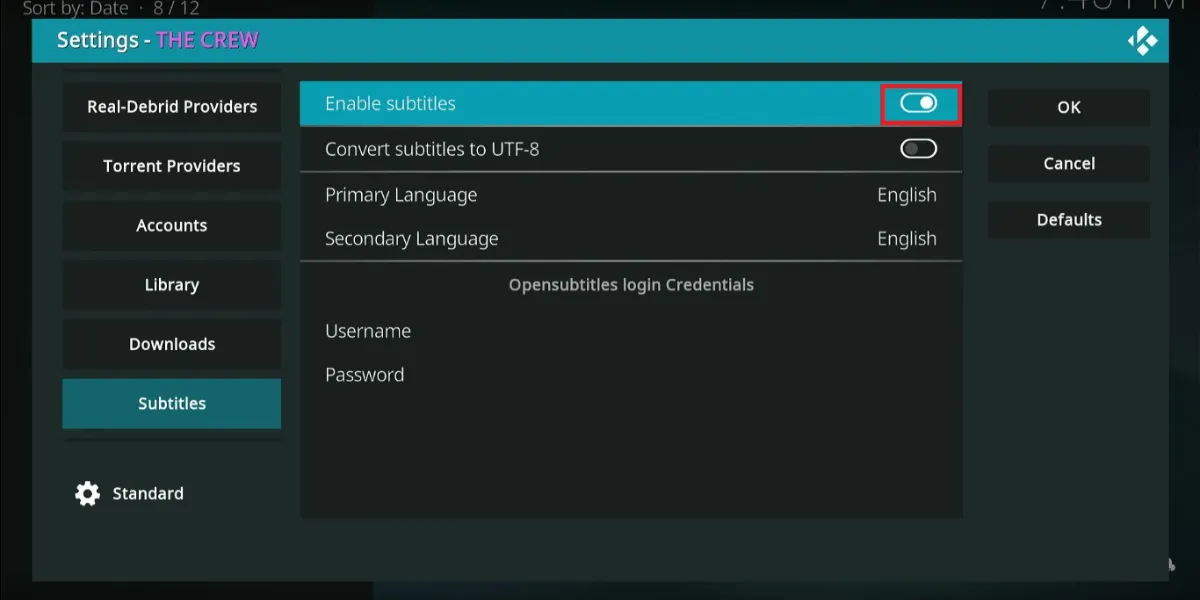
4. Click OK to save the changes.
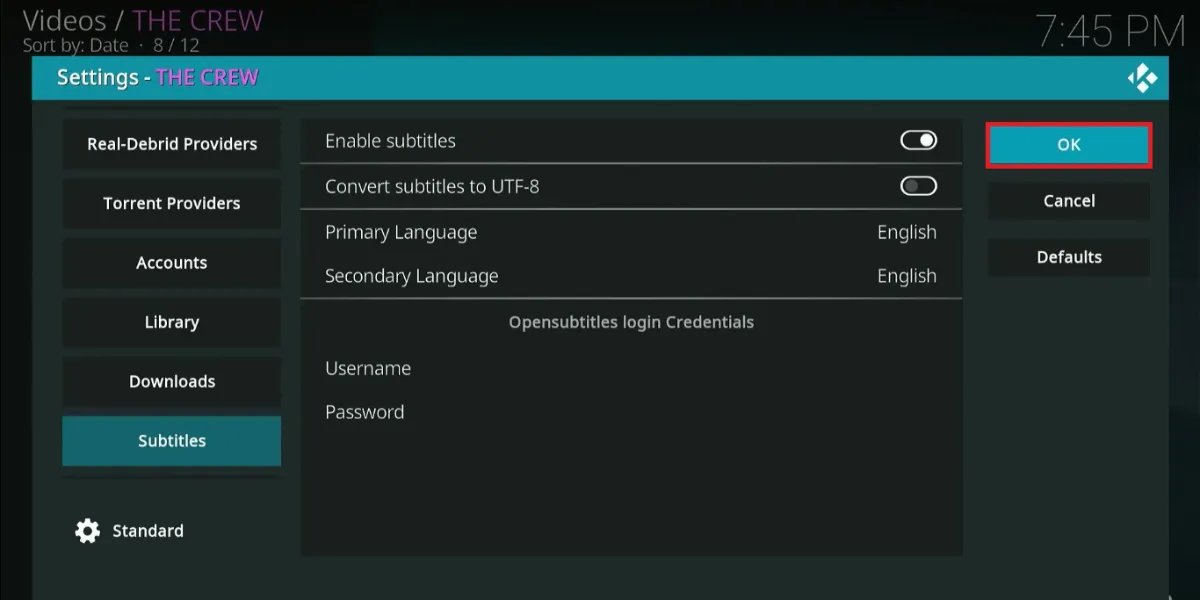
With the subtitles enabled in the addon settings, you should see subtitles when you play your content on Kodi.
How to Get Subtitles on Kodi Without Registration
Kodi offers several subtitle options, but the top ones are OpenSubtitles and Subscene. While OpenSubtitles is a great choice, its setup process is somewhat complicated. It requires you to create an account on the OpenSubtitles website and then log in through Kodi.
If you are looking for a hassle-free alternative, Subscene Subtitles is a good option. The setup process is simple and takes place directly within Kodi, eliminating the need to create a separate account on an external website.
However, Subscene subtitles sometimes fail to sync with the audio. Despite this, it remains a viable alternative to OpenSubtitles.
Follow these steps to set up Subscene Subtitles on Kodi:
1. Open Kodi and click Settings.

2. Select Player.
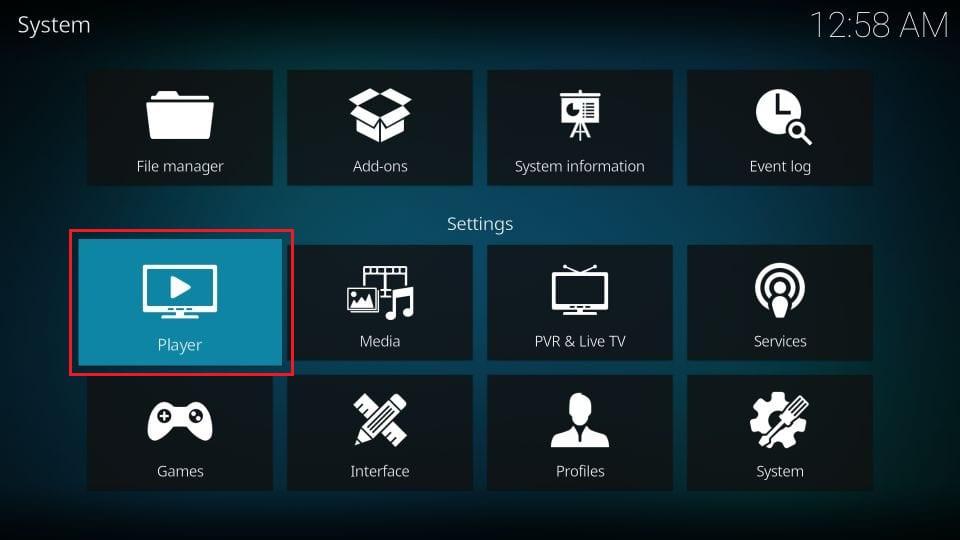
3. Select Subtitles.
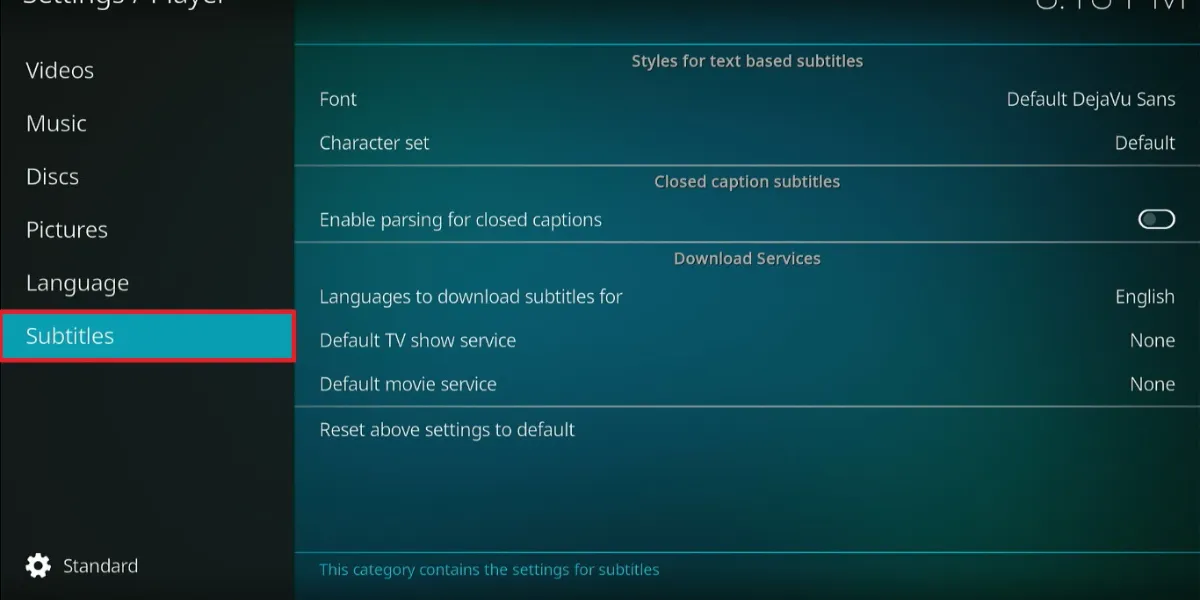
4. Under Download Services on the right, click Languages to download subtitles and select your desired language.
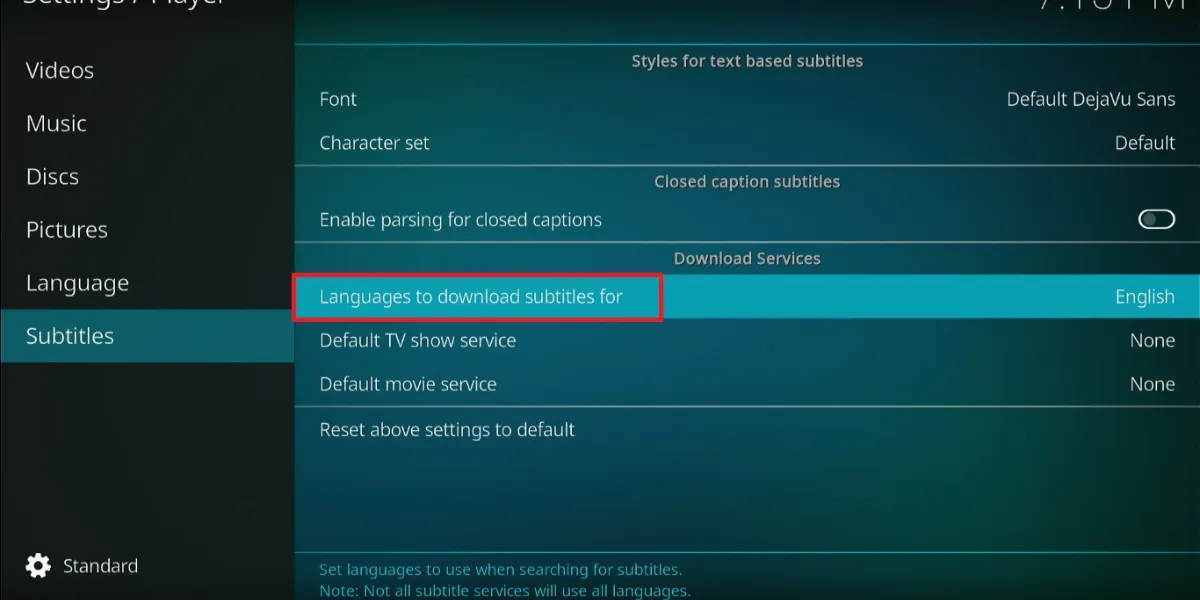
5. Click Default TV show service.
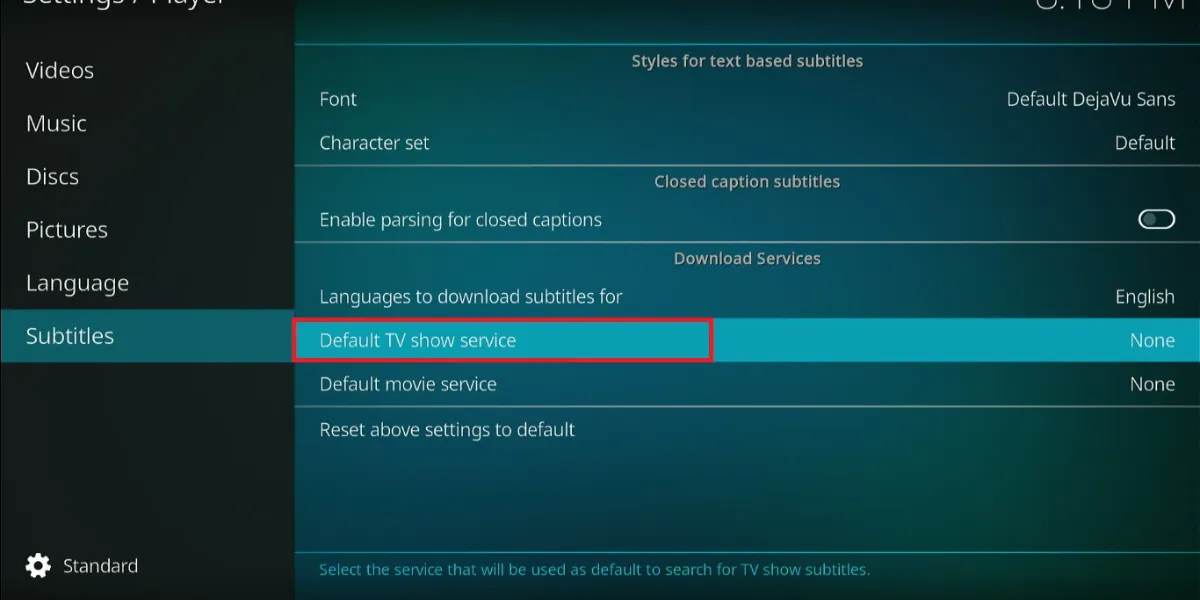
6. Click Get more.
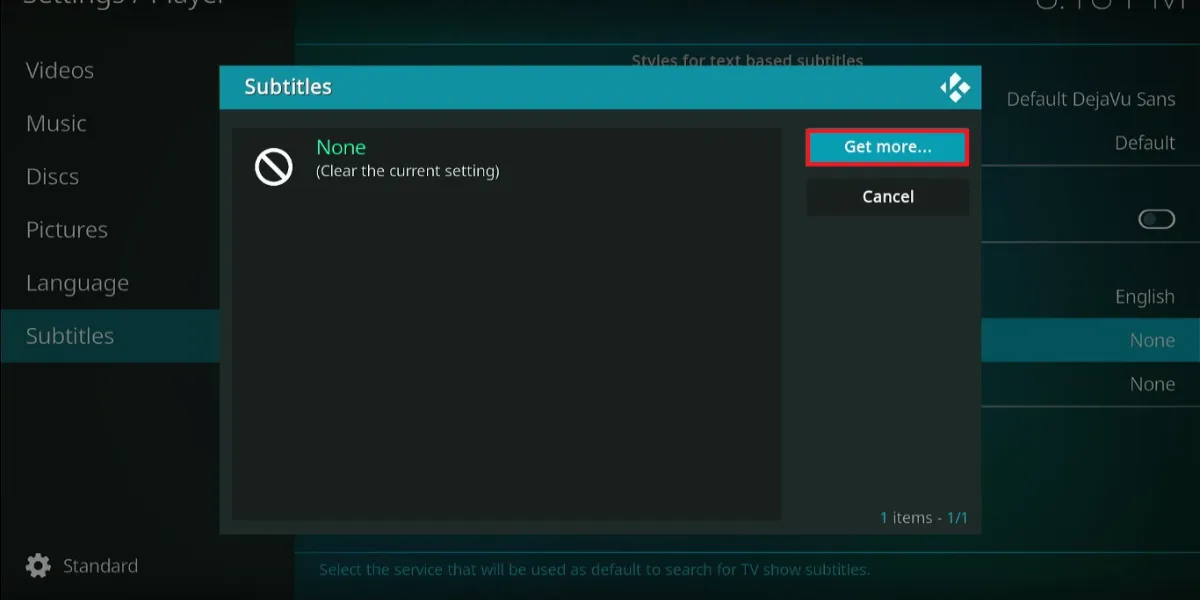
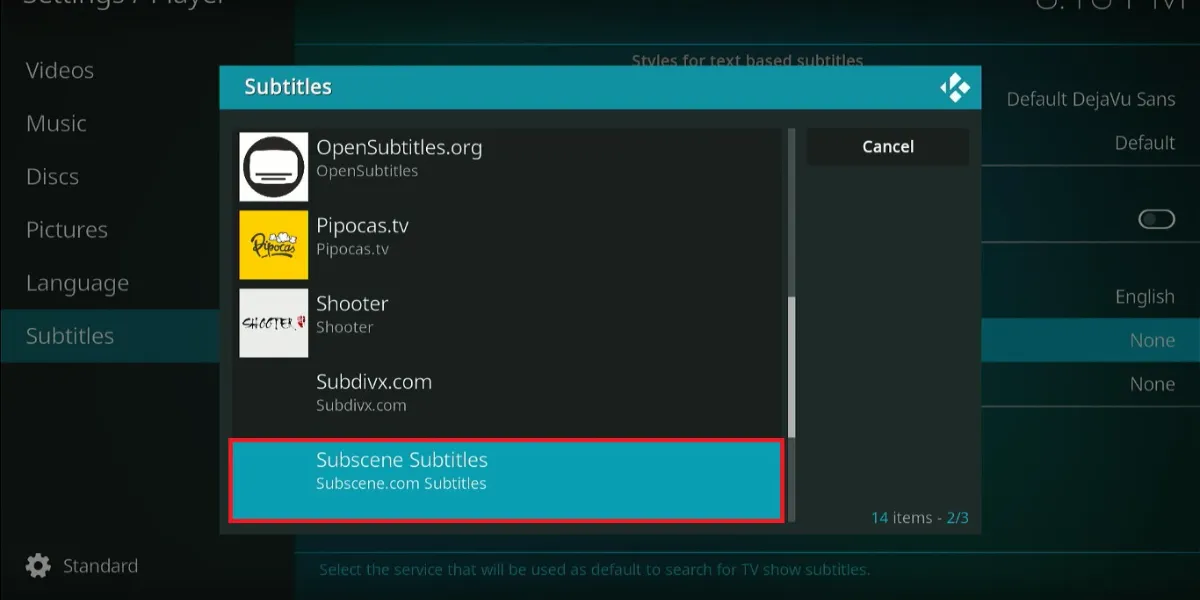
7. Scroll down the options and select Subscene.com (Subscene Subtitles).
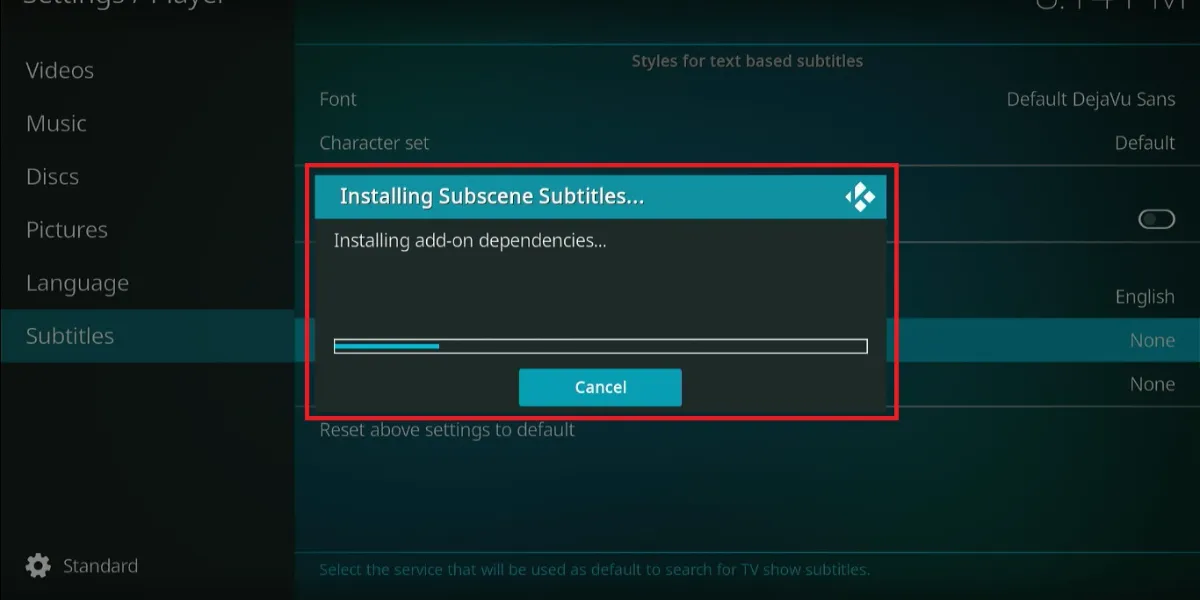
8. Wait a few moments for the Subscene Subtitles service to be downloaded.
9. Click Default movie service and select Subscene.com (Subscene Subtitles) again to make it the default.
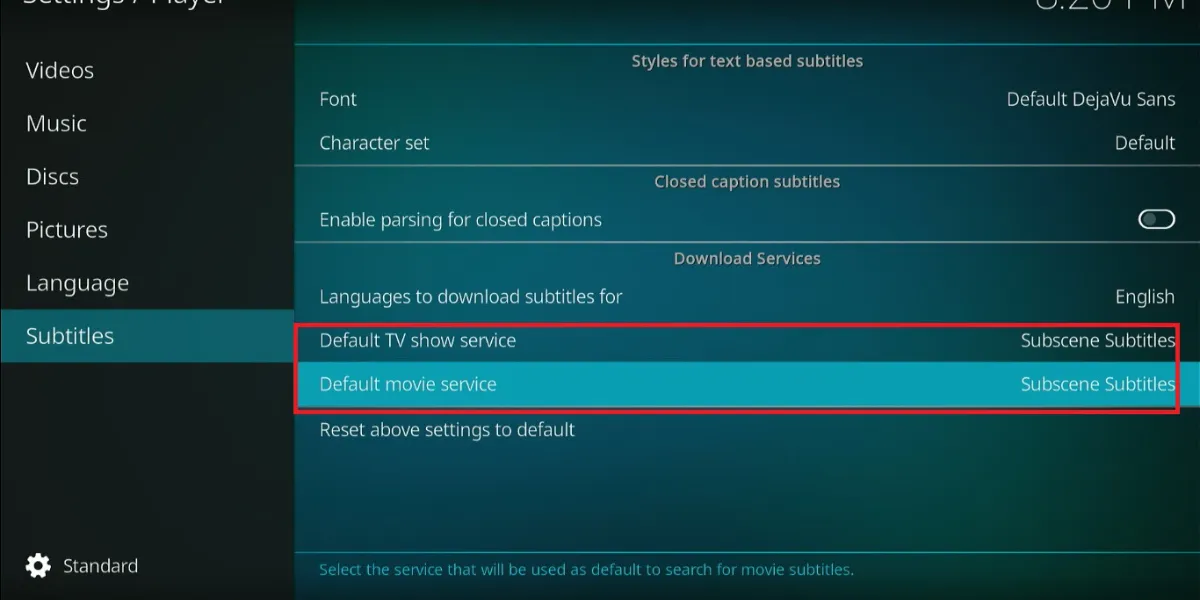
You have successfully set up Subscene Subtitles; it will fetch the available subtitles for Kodi for any specific title you play.
Note: Selecting Subscene Subtitles as your default subtitle service for Kodi does not mean you can no longer use OpenSubtitles. When looking for the subtitle while the title plays, you can always choose OpenSubtitles or any other service you may have installed.
Wrapping Up
Subtitles make content more accessible, especially when watching a foreign-language movie, keeping the volume down, or when someone is hearing impaired. This post explains how to set up subtitles on Kodi using two of the best options: OpenSubtitles and Subscene. OpenSubtitles offers better subtitles than Subscene, but the latter is easier to set up.
Kindly share your experience with subtitles on Kodi and your preferred subtitling service.
Related:
- How to Install Kodi on FireStick
- Best Working Kodi Addons
- Best Kodi Builds
- How to Update Kodi on FireStick
- How to Stop Buffering on Kodi

Suberboost Your FireStick with My Free Guide
Stay Ahead: Weekly Insights on the Latest in Free Streaming!
No spam, ever. Unsubscribe anytime.


thanks for your sharing, I used to use wonderfox hd video converter factory to add subtitles to video, now, I’d like to add subtitles on kodi, this is useful.
I love you!! These instructions are so specific I did this myself, without my IT hubby!! Yay!! THANK YOU SO MUCH
**I am a bit hard of hearing & have to have subtitles in order to understand/enjoy most anything I watch
Hi Jennifer, I am really glad I could help
I’m still very new to using kodi, I don’t even know how to reset it. I just followed the instructions I found to install it, I don’t know anything about different builds or whatever. Then I just tried installing subtitles by following the instructions on this site but it didn’t work.
Hi Amanda, let me address your queries one by one.
Here is our guide on how to reset Kodi: https://www.firesticktricks.com/reset-kodi-firestick.html
You can learn about different builds here: https://www.firesticktricks.com/best-kodi-builds.html
About the subtitles, I just tried and they worked for me. Where exactly are you getting stuck? Let me know and I will try to assist you.
I can’t get subtitles to work on the actual kodi app or cinema hd app .. but they do work on morph tv app and bee tv and I think they work on popcorn times as well. I don’t have any idea why they work on some apps and not on others but I’ve only been using morph tv, bee tv , and occasionally popcorn time since it only works on those. I actually like those apps better than the kodi app because they have a search function. Idk if kodi has a search feature, but I couldn’t find one. Anyways, if you can’t get the subtitles on kodi and you still want them, I would try morph tv, bee tv, and/or popcorn time instead… they’re wicked easy to install and use. Hope this helps!
Hi Amanda, I am not sure why subtitles aren’t working for you on Kodi. They do fine for me. Did you try resetting Kodi? That should fix the hidden issues of Kodi app.
Also, some Kodi addons do offer a search feature. You will find that on the main screen of the addon. Just click it and look up for the content you want to watch.
Amanda did this ever work for you? I am experiencing the same issues and feel like I’ve tried everything
Hi Mariah, it works for me!
I keep getting the same error message that my username or password are empty or invalid. Have unimstunins, installed etc. I noticed when I logged onto the website that Google has their robot checker there. Is that causing issues?
Hi John, I just tried and it worked for me. You might want to go to Opensubtitles.org and reset your password
Both of those subtitle websites have been shutdown by the authorities and have been for months. Did you even check?
Just wondering the same — did you even check before commenting here? Because these are working fine for everyone else.
I’ve tried to install both open opensubtitles and subscene and neither will work. The opensubtitles add on keeps telling me “error searching for subtitles your username or password is empty or not valid” even though I entered the correct login information. I double checked by logging in on my cellphone and re-entered it several times. The subscene just tells me “no subtitles found” for every single movie/ show I’ve tried it on. Maybe i’m doing something wrong?
Hi Amanda, I just tried OpenSubtitles and SubScene and both worked for me. There is a chance you ran into a temporary glitch. Please try again and let me know
Please excuse my ignorance, I’m a newbie. My previous post and your instructions both need amending. Under Settings/Player, Left side, at the very bottom is another cog Basic. Clicking the cog changes the options in all the above settings. Choices are: Basic, Standard, Advanced, Expert. By clicking the cog to
‘Standard’ the DOWNLOAD SERVICES option will appear in ‘Language’. FYI
Hi Tommy, that’s a good observation. I clearly missed it. Probably because ‘Standard’ option is selected by default. In fact, Download Services does not appear only when ‘Basic’ is selected. I am editing the guide to make the instructions clearer.
I won’t fib, I use subtitles much of the time especially when the background music drowns out the dialog.
Here’s the rub…..Kodi, System, Player settings, language……There is no ‘DOWNLOAD SERVICES’. All that appears is Audio: Preferred Audio Language, and Subtitles: Preferred subtitle language, then of course, Reset above settings to default. That’s it! Accessibility (on left) contains subtitle for hearing and visually impaired but DOWNLOAD SERVICES appears in either. Your thoughts?