
🕒 Reading Time: 5 minutes
Through this guide, I’ll show you how to install the Disney+ Kodi addon on Amazon FireStick, Android TV boxes, NVIDIA SHIELD, computers, smartphones, tablets, and other Kodi-compatible devices. After some background information on the service, I provide step-by-step installation instructions with screenshots.
What is Disney+?
Disney is an entertainment platform loved by millions. It is hard for anyone today not to associate Disney with early childhood entertainment. Needless to say, Disney has a monopoly on nostalgia. When paired with all the holdings that it has managed to assimilate over the years, including Pixar and Marvel, it has become a powerhouse of media content. The titles range from children’s favorites such as Toy Story to classics like Star Wars.
With the growing demand for video streaming, it is no surprise that Disney, too, now has a platform of its own. Called Disney+, it hosts millions of movies and series. As such, it is able to offer a complete entertainment solution for the whole family.
Disney+ is a subscription-based service. While I’ll walk you through installing the Disney+ Kodi Addon, you will still have to purchase a subscription. For pricing information, visit the official Disney+ website.
Note: If you have an Amazon FireStick, you can install the official Disney+ app directly on FireStick.
For Kodi Users!
ISPs, hackers, and other third-party entities worldwide may monitor your online activities. For security, privacy, and smooth streaming, it is recommended to use a reliable VPN for Kodi. Your IP address is visible to sites you visit.
I recommend ExpressVPN, a fast and secure VPN. It is very easy to install on any device, including Amazon Fire TV Stick, PC, Mac, and Smartphones. Also, it comes with a 30-day money-back guarantee. If you're not satisfied with their service, you can request a refund. ExpressVPN also has a special deal where you can get 4 months free and save 81% on the 2-year plan.
Read: How to Install and Use the Best VPN for Kodi
Is the Disney+ Kodi Addon Safe and Legal?
Please note that the Disney+ Kodi addon is not available in the official Kodi Addon repository. That means Kodi doesn’t endorse the addon, which raises red flags for some users.
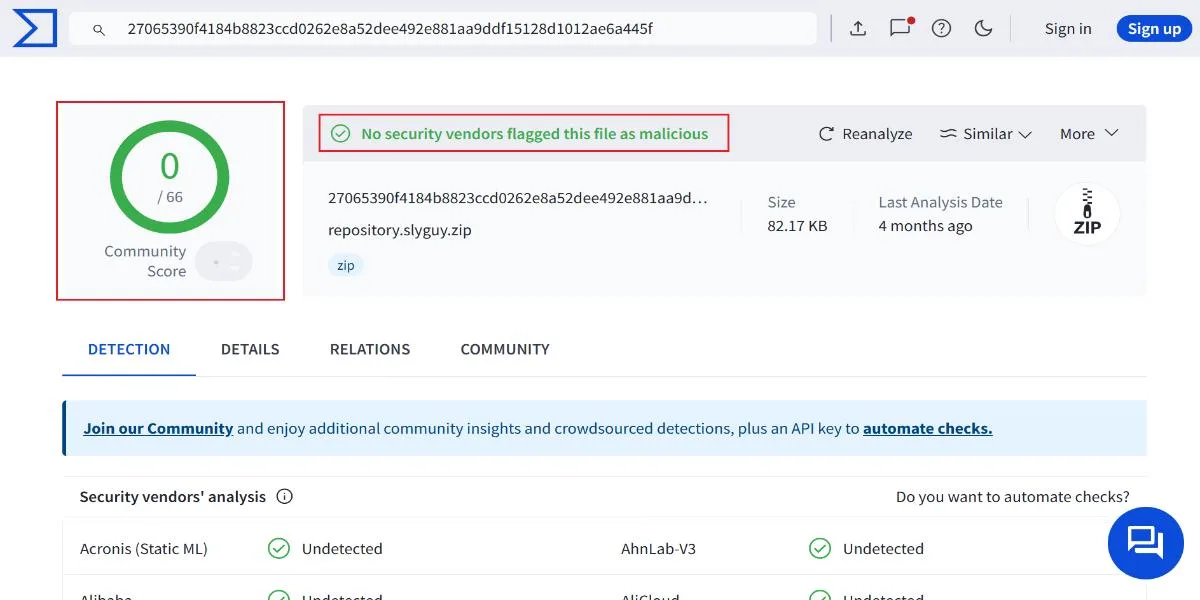
Since we can’t download the Disney+ addon from the official source, we’ll have to download it from a third-party source Sly Guy. I ran the zip file of the Sly Guy through Virus Total. The antivirus declared it safe. Here is the screenshot:
Disney+ is an official and verified streaming service. Even though this addon is installed from an external repository, I believe that Disney+ is a legal addon because it requires you first to buy the Disney+ subscription and sign in with your account.
How to Install Disney+ Kodi Addon
I divided this process into three parts to make it easier to follow and understand. First, we’ll change a necessary setting that allows us to install third-party repositories on Kodi. Then, we’ll install the SlyGuy Repository. Finally, we’ll install the Disney+ addon, which is hosted in the SlyGuy Repository. Let’s get started with the first part.
Legal Disclaimer: This tutorial is purely educational. FireStickTricks.com doesn’t own, host, operate, resell, or distribute any streaming apps, addons, websites, IPTV or services. The page contains some unverified services, and we are not certain whether they hold legal licenses to distribute the content. FireStickTricks.com does not verify the legality of each app/service in all regions. Do your due diligence if you use any of the unverified apps/services, and stream only content that is available in the public domain. The end-user shall be solely responsible for the media accessed.
Part 1: Enable Unknown Sources
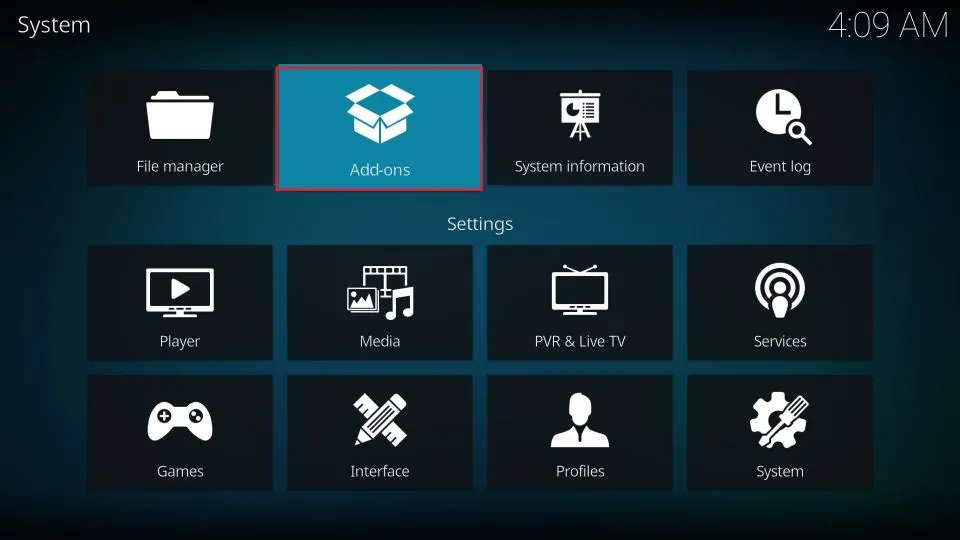
1. Click on the gear icon in the top-left corner of the Kodi home screen.
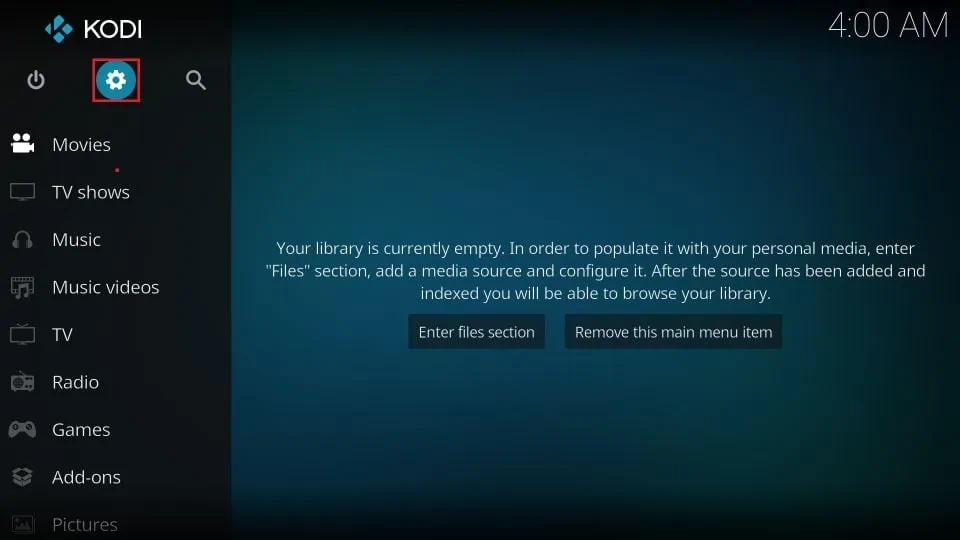
2. Select System.
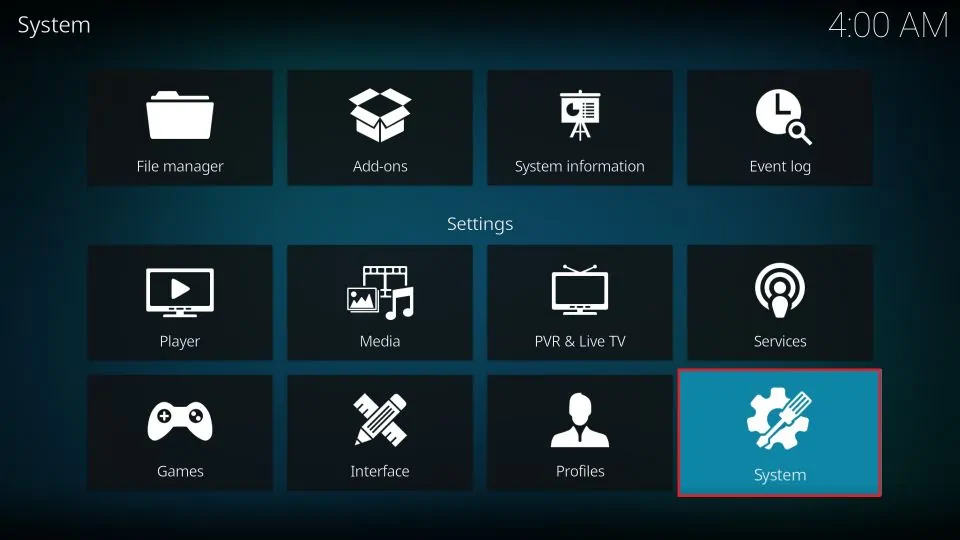
3. Click on the Add-ons tab on the left.
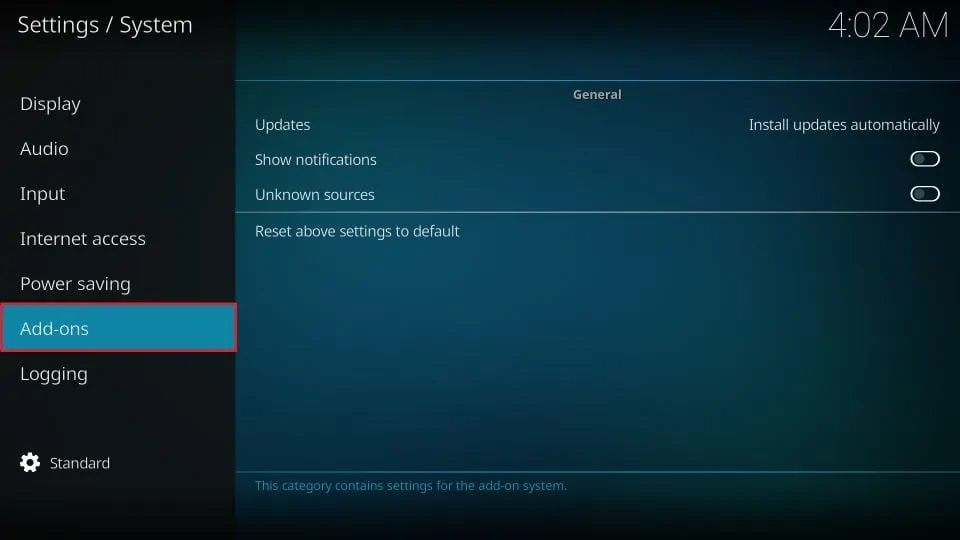
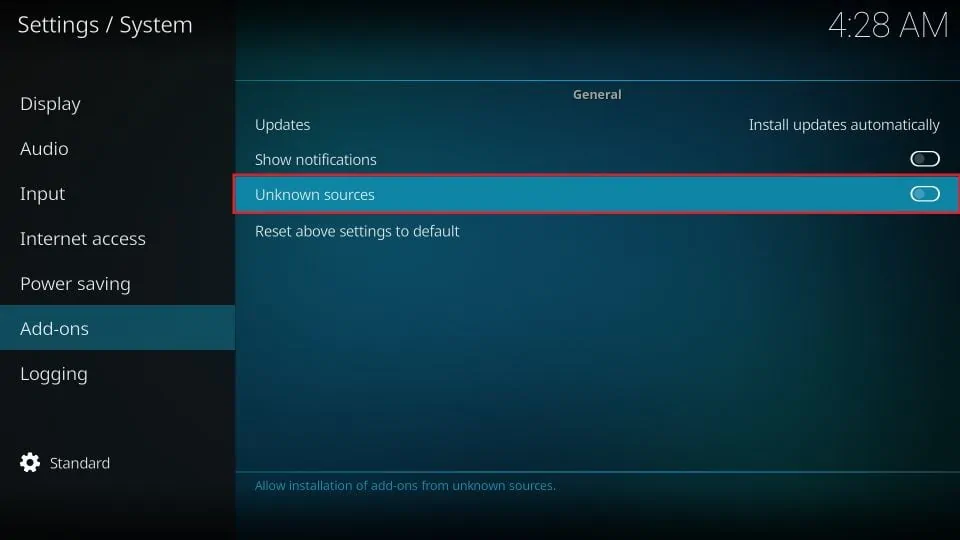
4. We want Unknown sources to be enabled. If it’s disabled (the switch is on the left), select it to enable it.
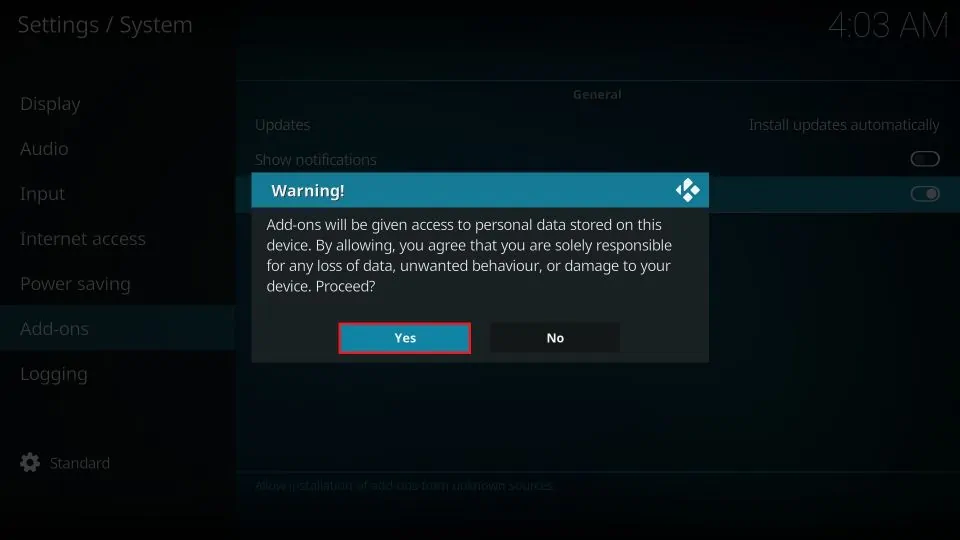
5. When you enable the setting, you’ll see a warning. Select Yes.
With unknown sources enabled, we can now install the repository that contains the Disney+ addon. Let’s go ahead and do that.
Part 2: Install SlyGuy Repository
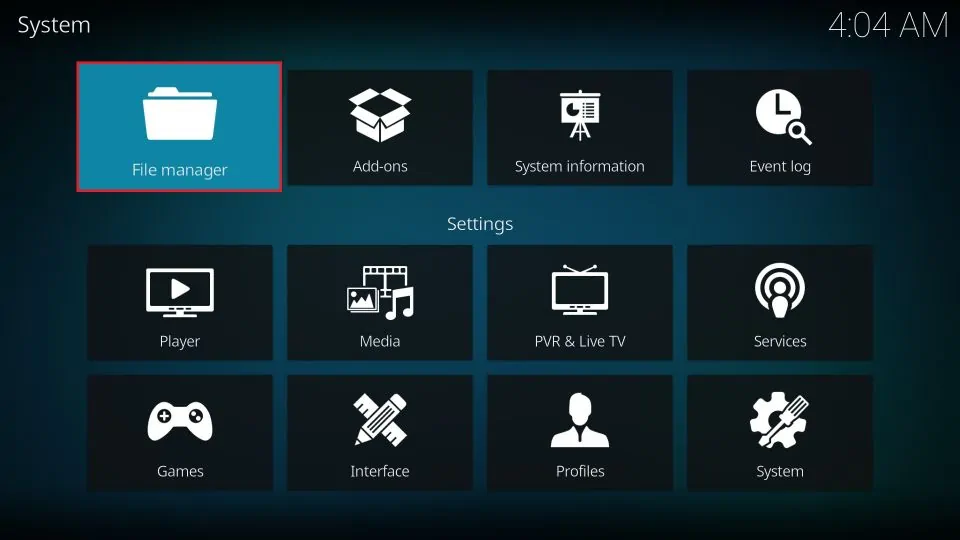
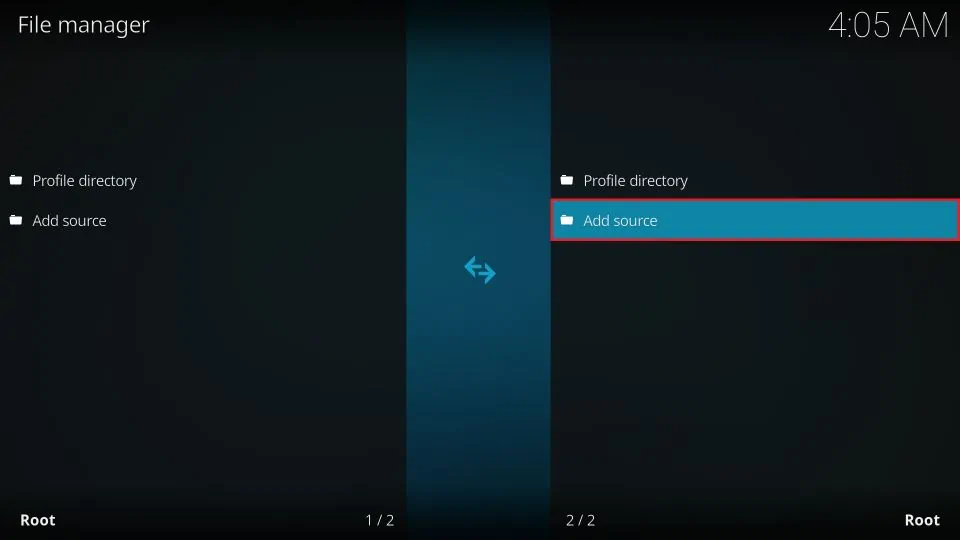
1. Press your back button to go back to the settings screen. Then click on File manager.
2. Select Add source on either side of the screen.
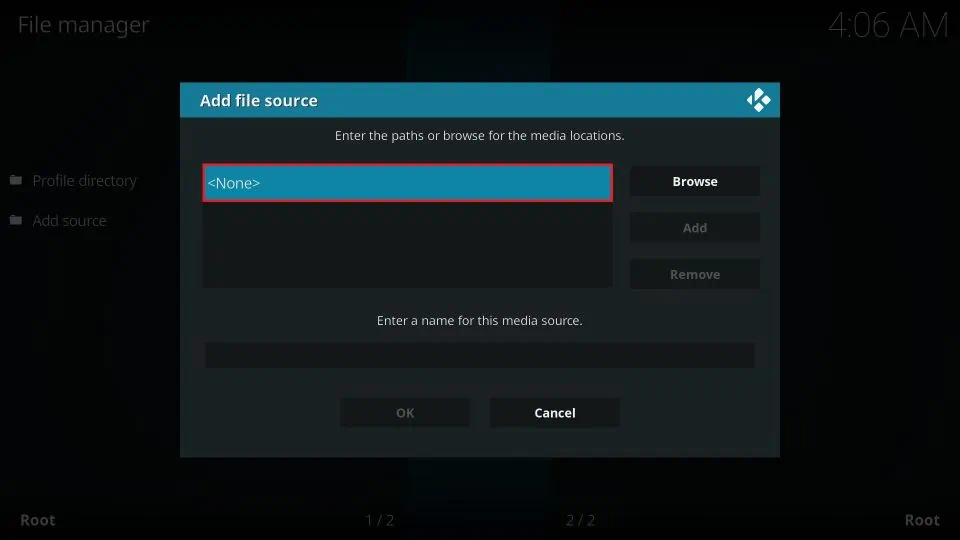
3. Click the area that says <None>.
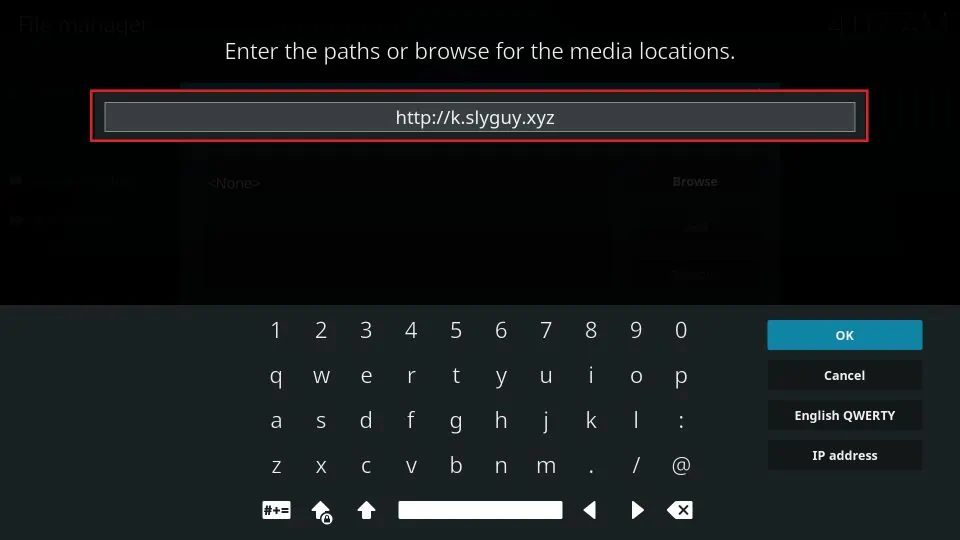
4. Enter http://k.slyguy.xyz exactly as I’ve written it here. Then press OK.
Note: FireStickTricks.com doesn’t host or distribute this repository. It’s hosted at the link I provided.
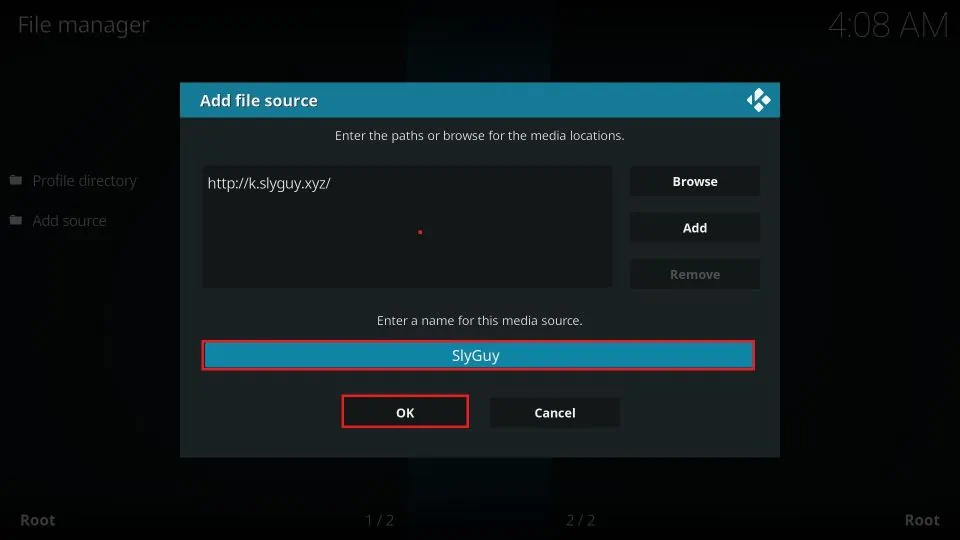
5. Select the name field and use the name SlyGuy. Then press OK to confirm the new source.
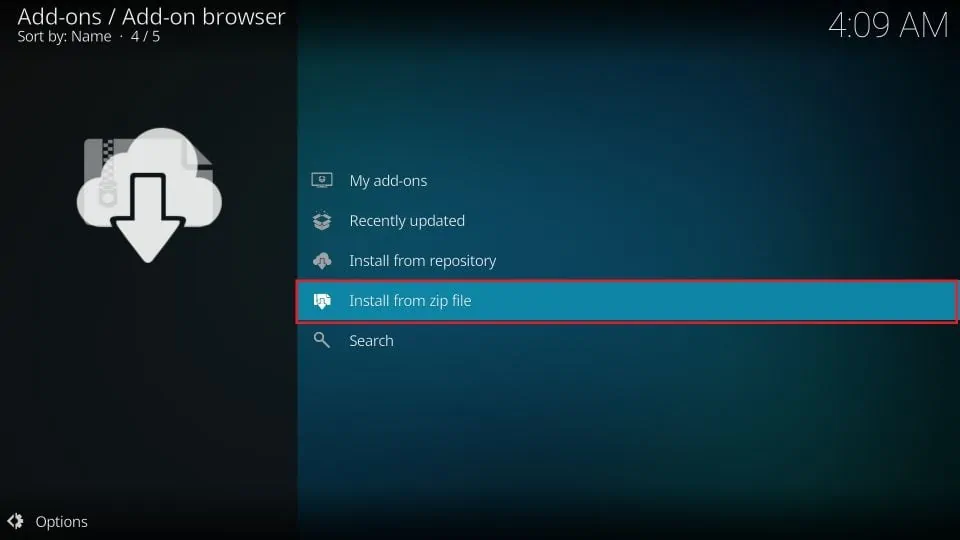
6. Press your device’s back button once to return to the settings menu. Go to Add-ons.
7. Click Install from zip file.
8. Click on SlyGuy.
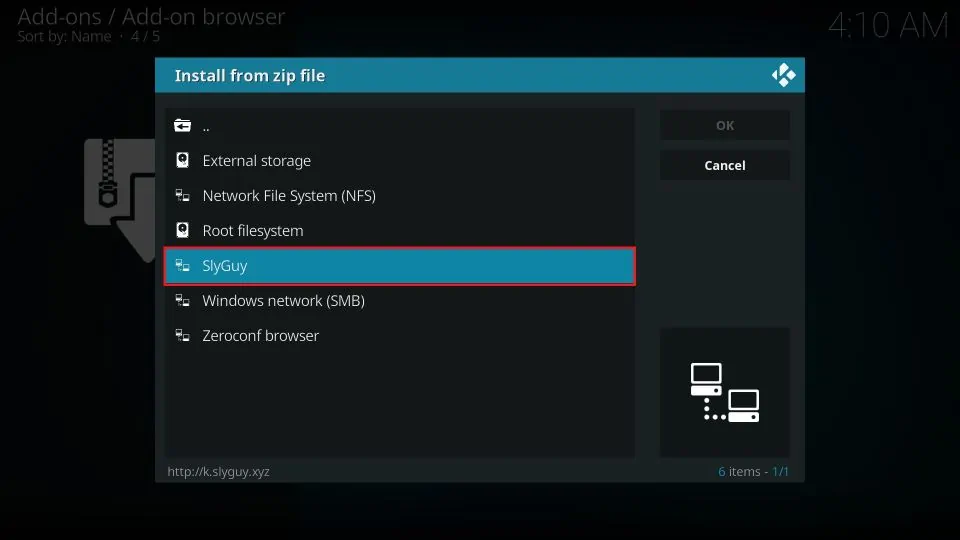
9. Select the zip file. You’ll then need to click OK on some devices.

10. Wait a few moments. You will receive an Add-on installed message when the repository is installed. Stay on this screen for the next part.
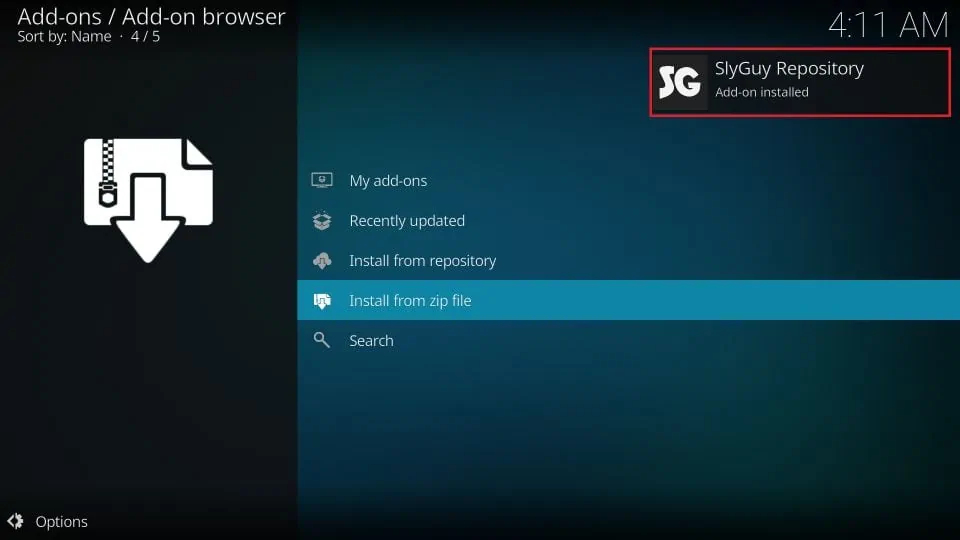
After installing the SlyGuy repository, we can install the Disney+ addon that it contains. Let’s finish this installation so you can start streaming!
Part 3: Install Disney+ Addon From SlyGuy Repository
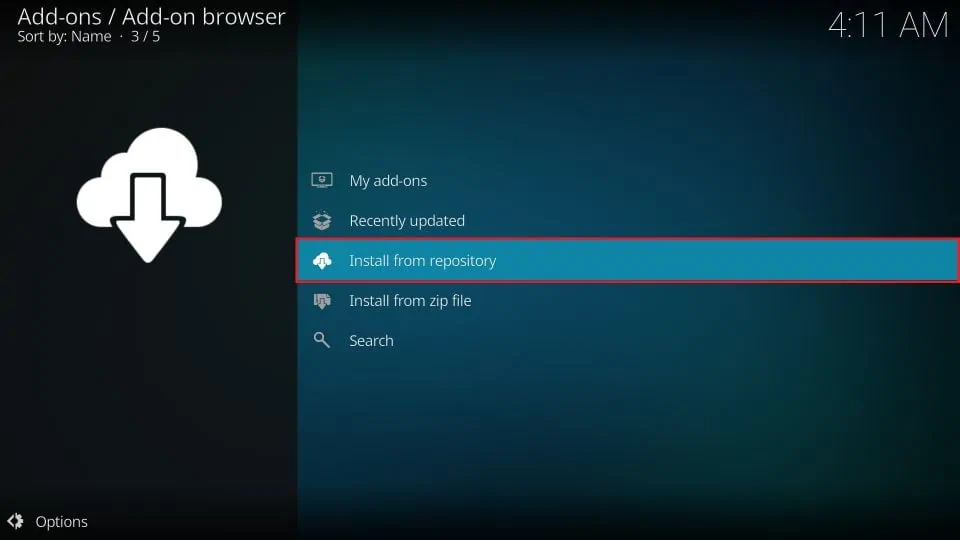
1. Click on Install from repository.
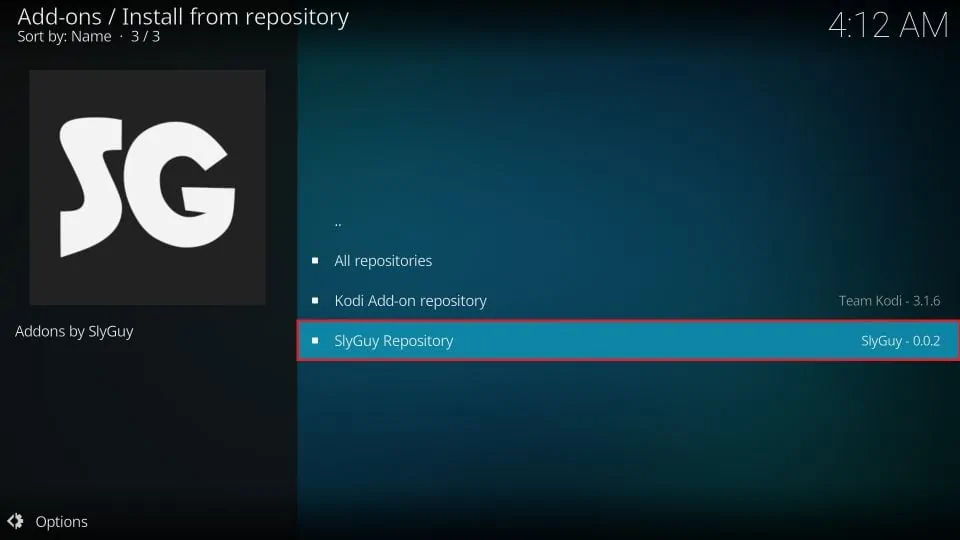
2. Click on SlyGuy Repository.
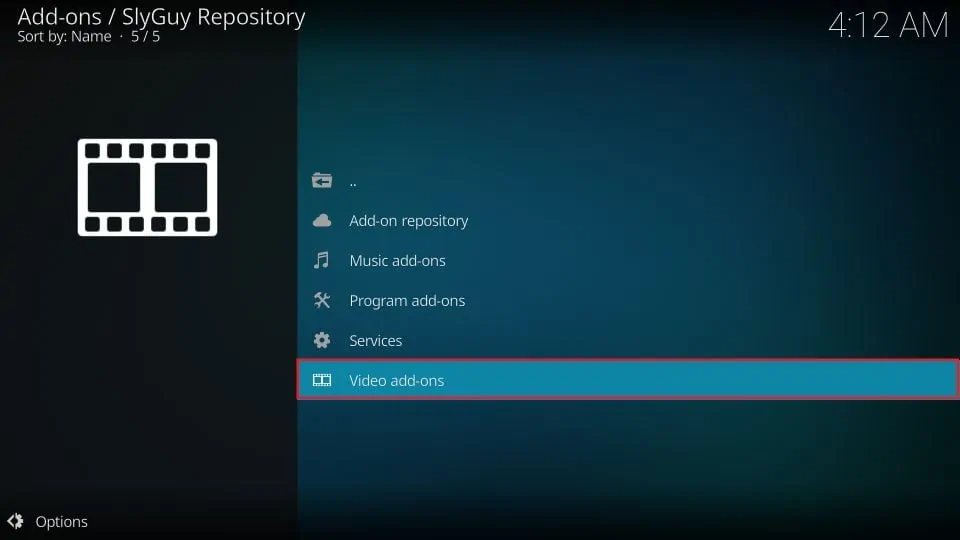
3. Go to Video add-ons.
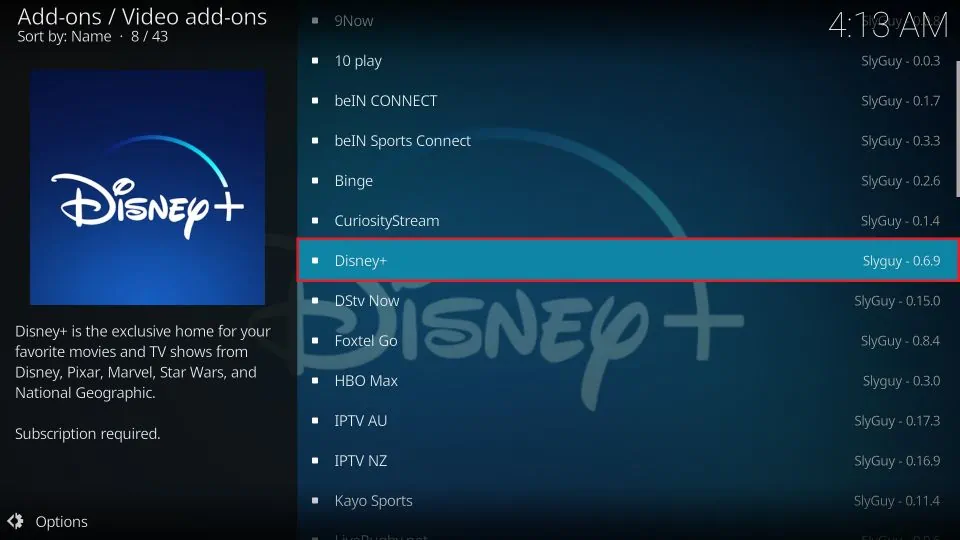
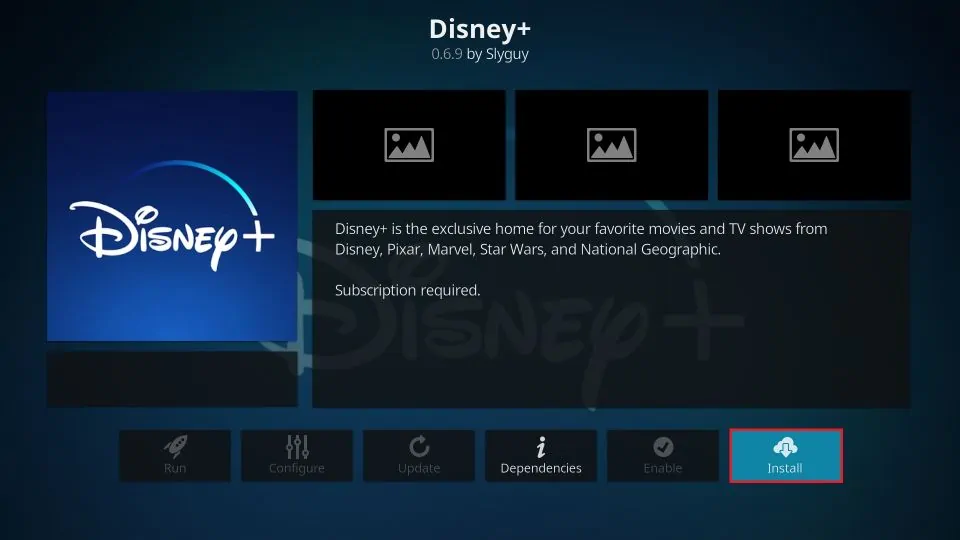
4. Choose Disney+.
5. Click Install.
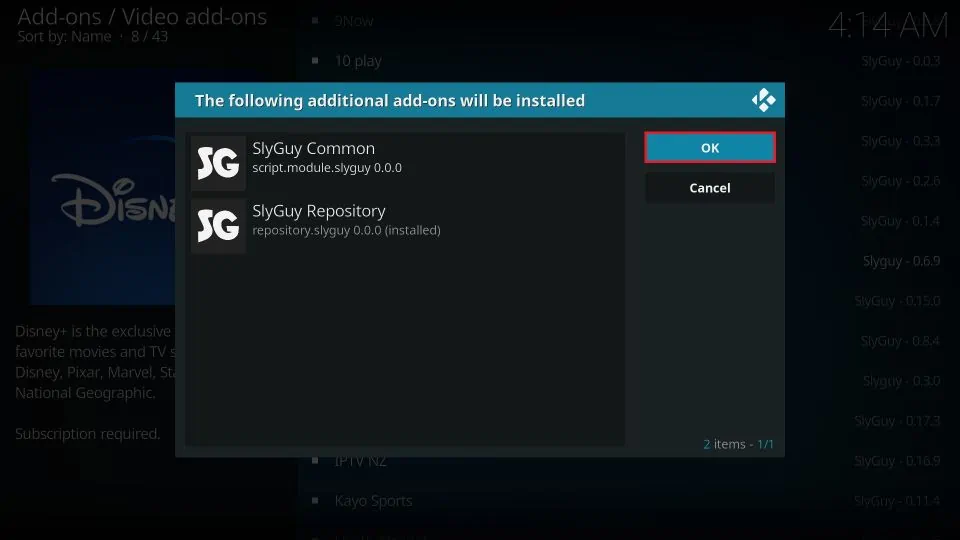
6. When prompted to install additional required addons, press OK.
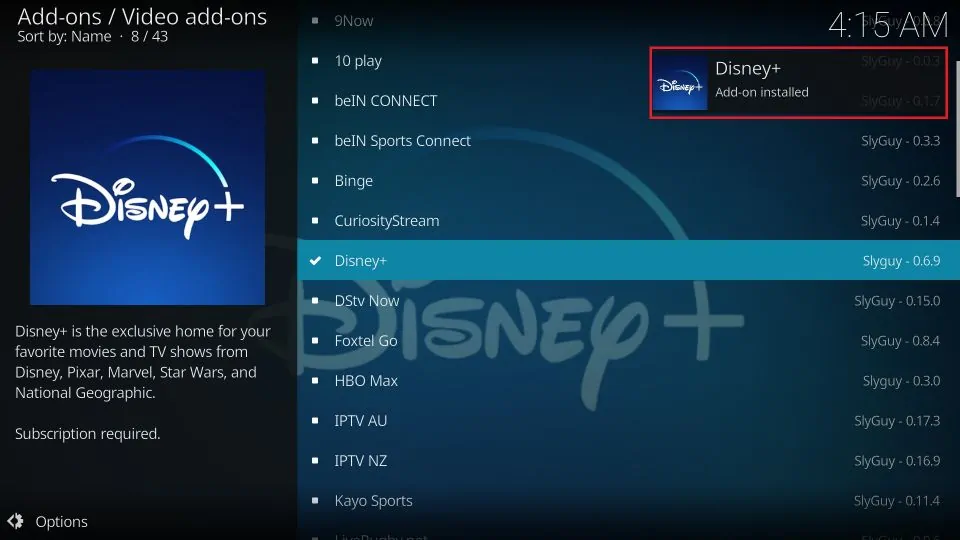
7. After a few moments, you should see the message Disney+ Add-on installed.
That’s it! You installed the Disney+ addon on Kodi. Next, I’ll show you how to start using it.
You’re now all set. A quick reminder: your internet provider and many websites/apps can see your IP address and some details about your connection. Using a VPN encrypts your traffic and masks your IP address, which helps protect your online privacy.
I recommend ExpressVPN. It’s a reputable VPN with strong encryption and fast connections, and it’s straightforward to install on Fire TV/FireStick and other devices.
Next, I’ll show you how to set up and use ExpressVPN.
Step 1: Get the ExpressVPN subscription HERE. It comes with a 30-day money-back guarantee. Meaning you can use it for free for the first 30 days, and if you are not satisfied with the performance (which is highly unlikely), you can request a full refund.
Step 2: Click HERE to download and install the ExpressVPN app on your streaming device. If you are using a FireStick, I have given the exact steps starting with Step 4 below.
Step 3: Click the Power icon to connect to a VPN server. That's all. Your connection is now secure with the fastest and best VPN for Kodi.

The following steps will help you install Kodi VPN on your Fire TV devices. If you have other streaming devices, follow Step 1-3 above.
Step 4: Subscribe to ExpressVPN HERE (if you are not already subscribed).
Step 5: Go to the Fire TV Stick home screen. Click Find, then select the Search option (see image below).

Step 6: Type Expressvpn in the search bar and select it when it shows up.

Step 7: Click Download.

Step 8: Open the ExpressVPN app and Sign in using the email ID and password that you created while buying the ExpressVPN subscription.

Step 9: Click the Power icon to connect to a VPN server. That’s all. Your FireStick is now secured with the fastest VPN.

How to Use Disney+ Kodi Addon
In this section, I’ll show you how to access the Disney+ addon and log in. The Disney+ addon will be stored among your video addons within Kodi. Let’s see how to navigate there.
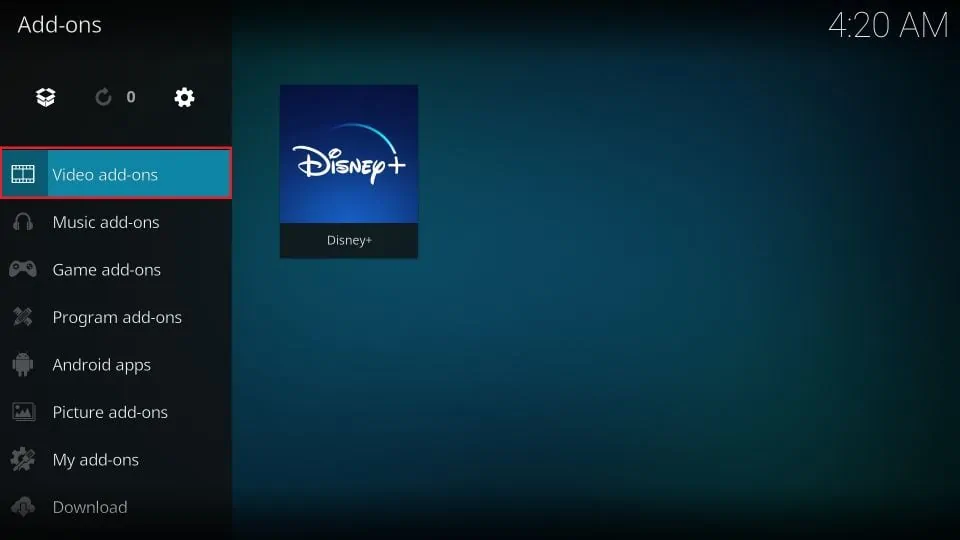
1. Go back to Kodi’s home screen. Click on the Add-ons tab.
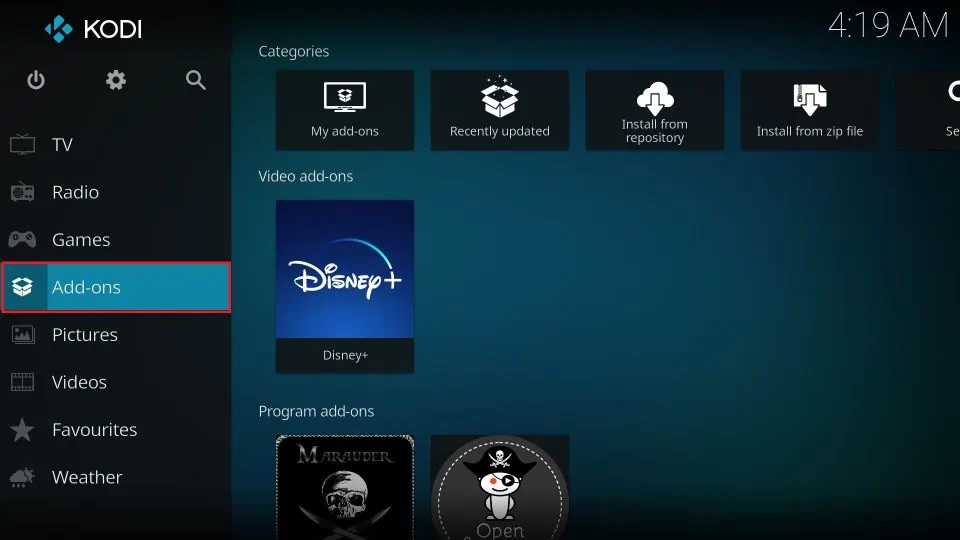
2. Select Video add-ons.
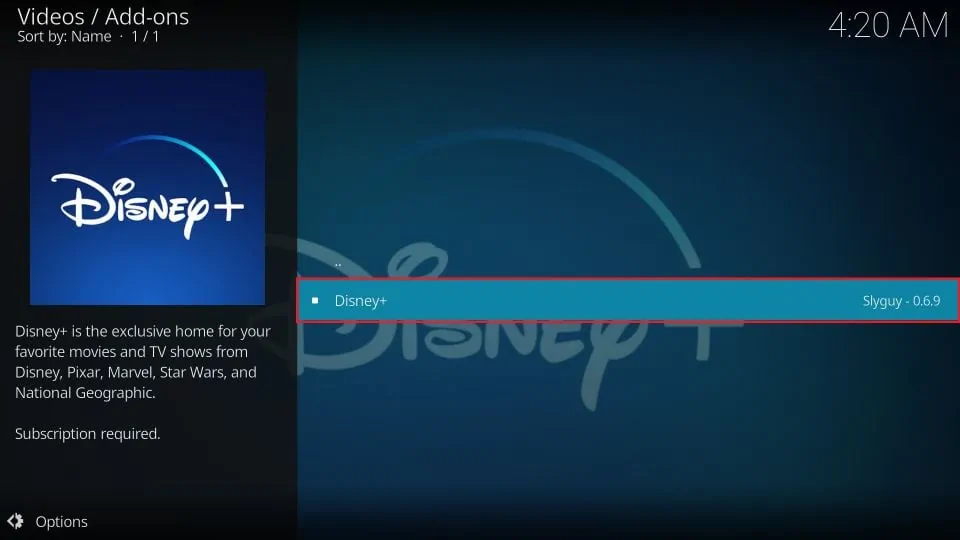
3. Click on Disney+.
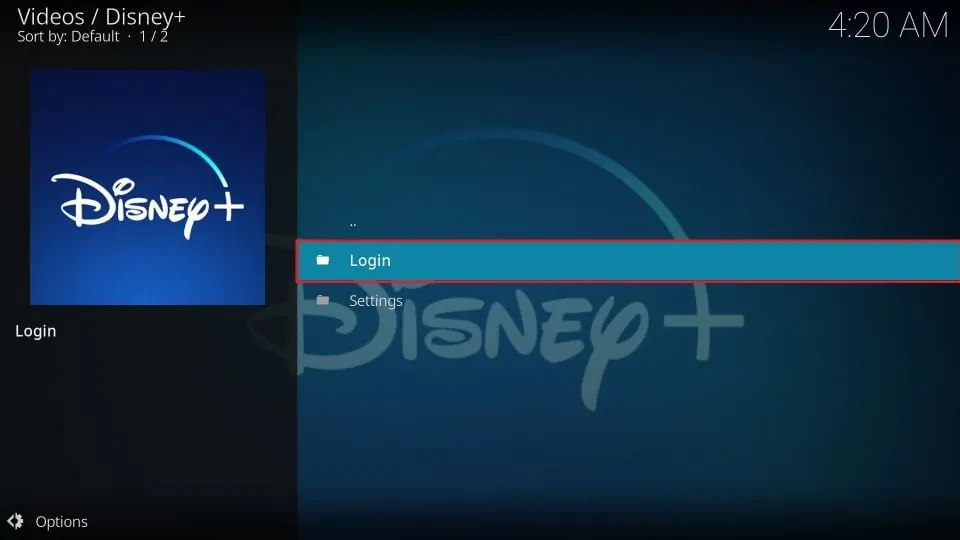
4. Select Login and enter the username and password associated with your Disney+ subscription.
Now you can enjoy Disney+ content on Kodi!
You may need to take a minute to get used to the way the folders of content are organized within the addon. However, you’ll notice that the folders represent the same categories of content you can find on the Disney+ website or the official Disney+ apps.
Wrapping Up
This guide showed you step-by-step how to install the Disney+ Kodi addon and log in to start using it. The sheer volume of titles at your disposal means you’ll never go hungry for entertainment on Kodi again.
But if you do get bored, you can always check out my list of the best addons for Kodi and install a few more.
As always, if you’re confused about anything in this article, or if you would just like to share your thoughts about watching Disney+ on Kodi, let me know in the comments below.

Suberboost Your FireStick with My Free Guide
Stay Ahead: Weekly Insights on the Latest in Free Streaming!
No spam, ever. Unsubscribe anytime.

Leave a Reply