In this definitive guide, I’ll show you how to set up and use AllDebrid on Kodi and FireStick. The steps will work on all Kodi-compatible devices, including the Amazon Fire TV devices, Android TV, and Windows PC.
 What is AllDebrid?
 What is AllDebrid?
In simple terms, AllDebrid is a premium link generator and torrent downloader.
It makes downloading and streaming files from online sources easier.
With AllDebrid, you can find more functional links than the users using the services for free, giving you more options.
Additionally, the links are high quality, with better playback and no buffering.
AllDebrid is commonly paired with services and apps that let you access free online content, like Kodi addons, Stremio addons, and third-party apps.
It also comes in handy when torrenting, providing premium links with fast download speeds.
Multiple apps and add-ons support AllDebrid. At the time of writing, this service supports 75 file hosts and 1336 streams.
Attention Kodi Users!
Governments and ISPs worldwide monitor your online activities. If you use third-party Kodi addons, you should always use a reliable Kodi VPN to hide your identity and prevent issues with your streaming experience. Currently, your IP is visible to everyone.
I use ExpressVPN, the fastest and most secure VPN in the industry. It is very easy to install on any device, including Amazon Fire TV Stick, PC, Mac, and Smartphones. It also includes a 30-day money-back guarantee. If you're not satisfied with their service, you can request a refund. ExpressVPN is offering a special NEW YEAR deal: get 4 months free and save 78% on the 2-year plan.
Install and Use Best Kodi VPN | Why you must use a VPN at all times
How to Set Up AllDebrid Account Online
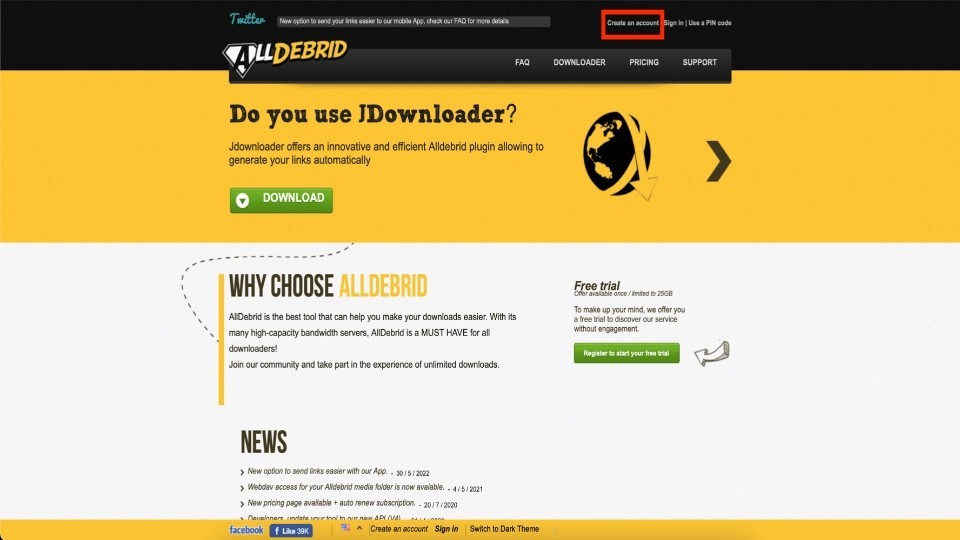
To get started with AllDebrid, create an account on the official website. Open a web browser and go to www.alldebrid.com. Click the Create an account button on the top-middle side of your screen.
Note: FireStickTricks.com does not own or manage All Debrid. A third-party developer owns the All Debrid service.
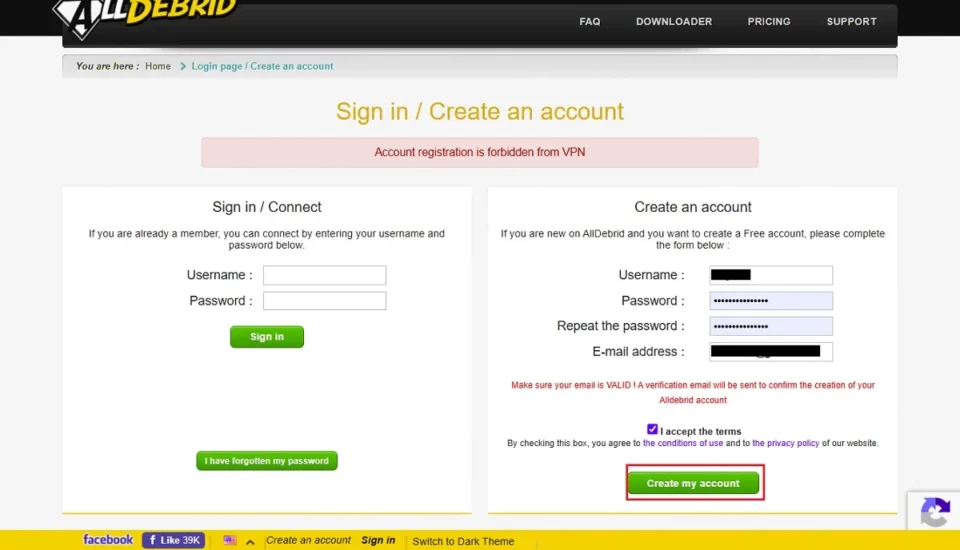
Navigate to the Create an account section and enter the required details: username, password, and Email address. Check the I accept the terms box and click “Create my account.”
AllDebrid will confirm your account creation and ask you to check your email box for further confirmation.
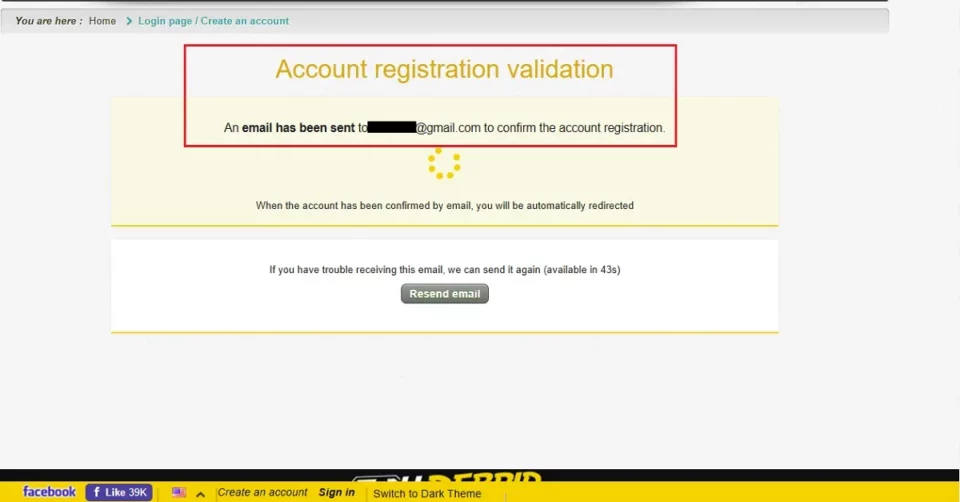
Go to your email account and find the mail sent by AllDebrid. Open it and select the green Confirm button. Alternatively, you can open the link directly inside the mail to confirm your account.
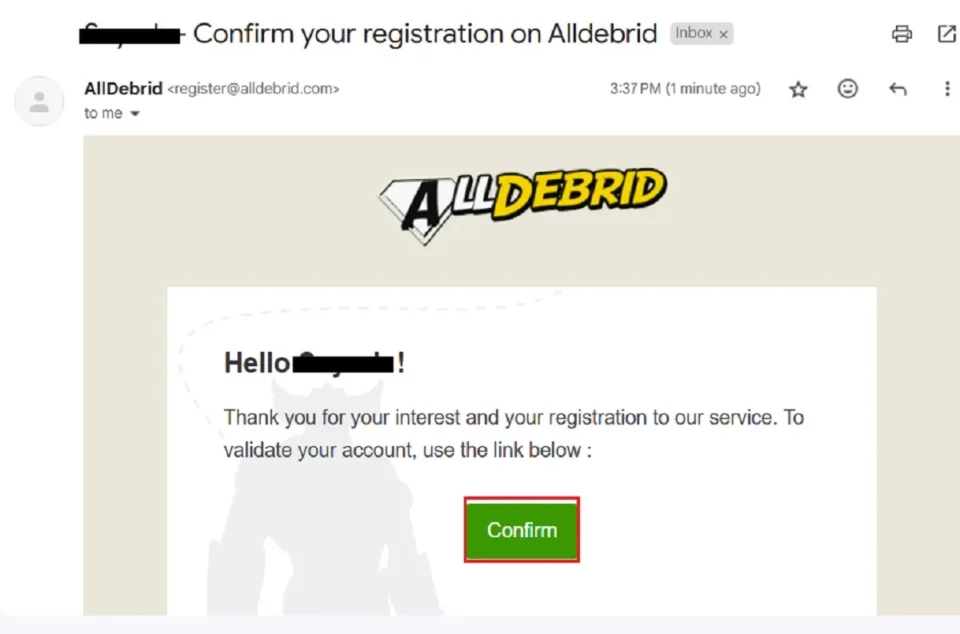
After successfully verifying your account, the confirmation link will redirect you to the AllDebrid page.
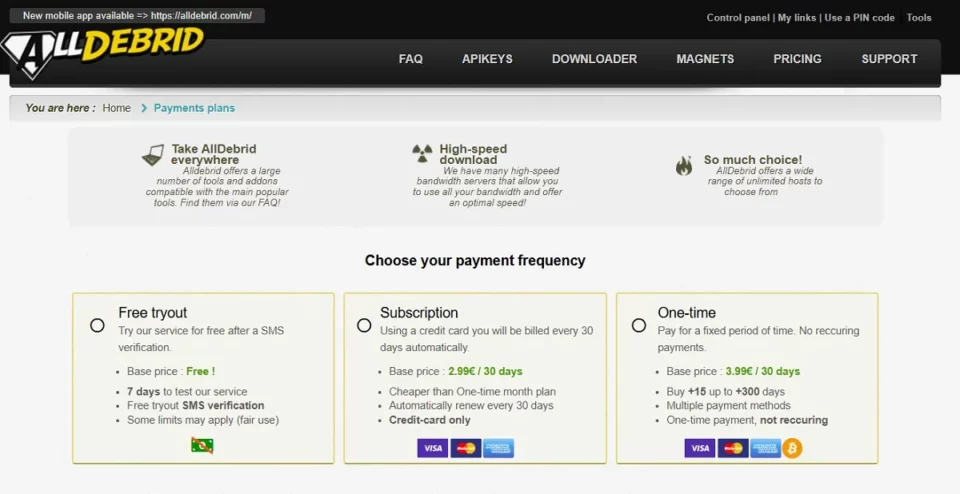
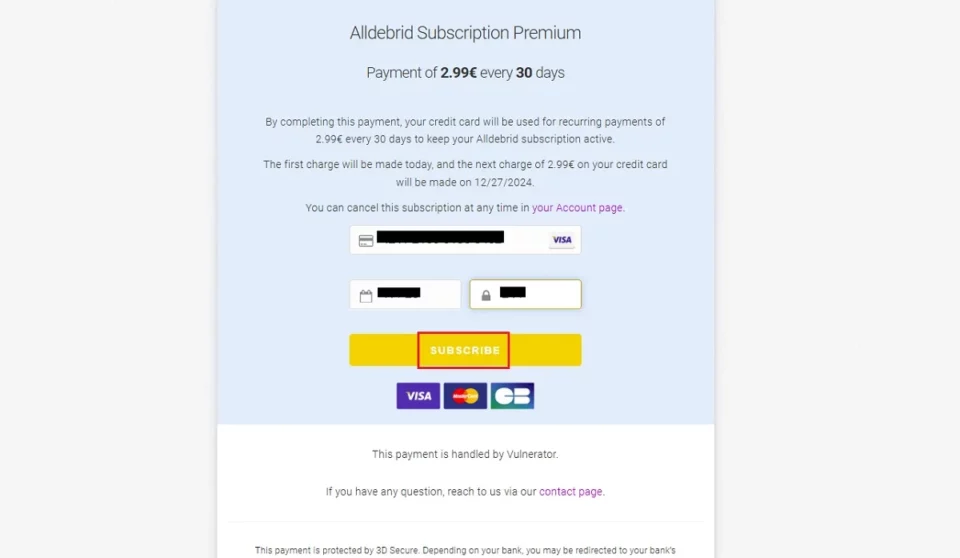
You can now choose a subscription plan or a free trial. You’ll be redirected to the payment page if you choose the plan. Enter your billing details and click Subscribe.
AllDebrid will request that a verification code be sent via email or text. Choose your preferred method and click Continue.
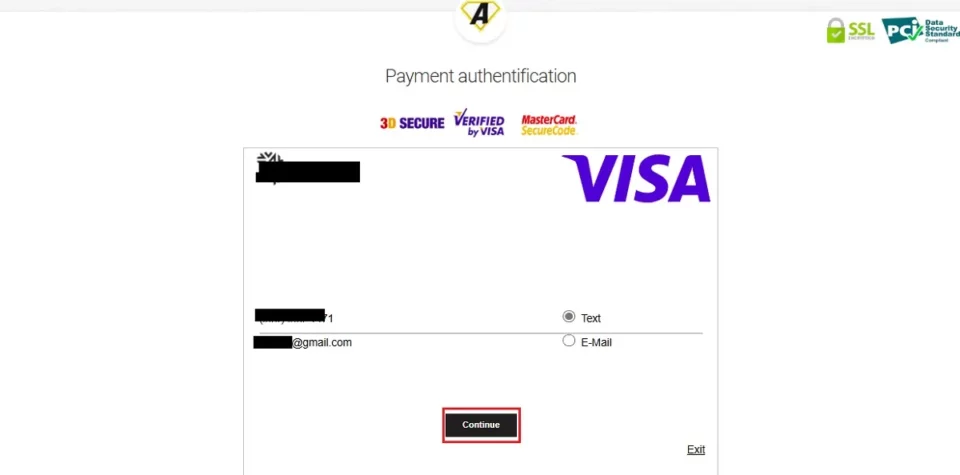
Enter the code in the provided field and click Submit.
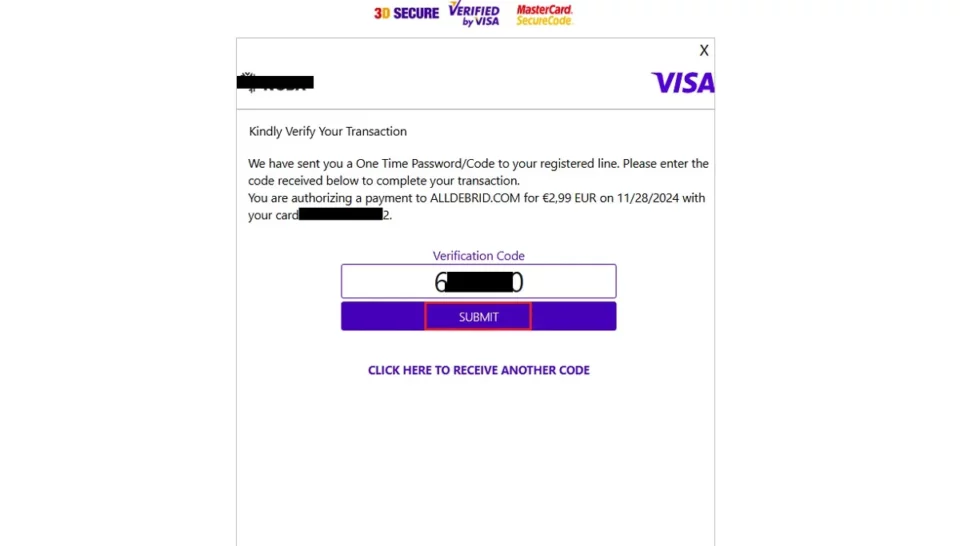
AllDebrid will process your payment. You’ve successfully subscribed to the premium package.
AllDebrid Membership Pricing & Features
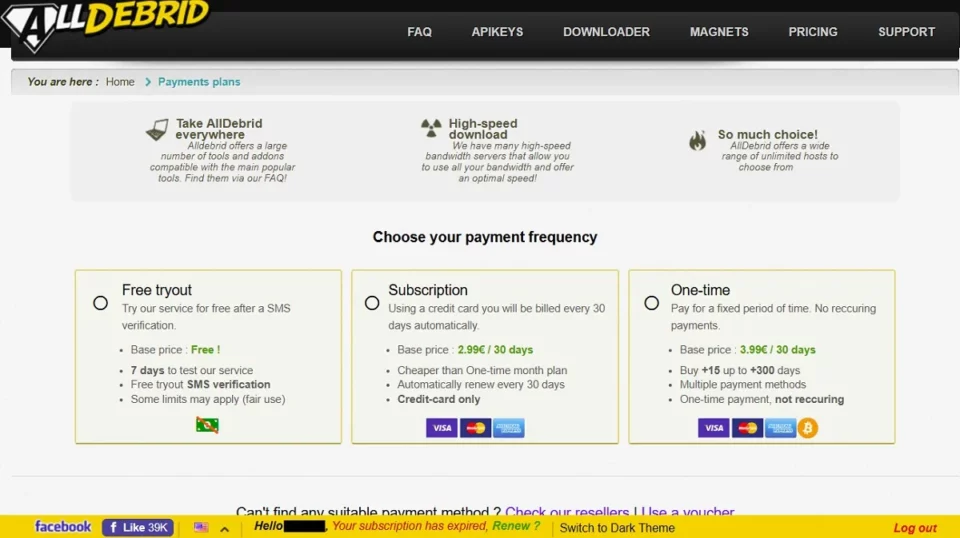
AllDebrid is a premium service, so you must purchase a subscription to use it. However, the premium hoster offers a 7-day free trial.
Here are the available payment frequencies with AllDebrid:
- Free tryout – get a free 7-day trial.
- Subscription – billed 2.99€ every month until canceled.
- One-time – pay for a fixed period from 2.99€ for 15 days to 24.99€ for 300 days.
Here are the top features you get with AllDebrid Premium:
- 75 hosts
- 1336 streams
- Unlimited bandwidth
- Works with a large number of tools + addons
AllDebrid supports the following payment methods:
- Visa
- Mastercard
- American Express
- Cryptocurrencies
How to Set Up AllDebrid on Kodi
AllDebrid is officially supported by the majority of third-party Kodi addons. Here’s the step-by-step guide to integrating AllDebrid on Kodi:
Legal Disclaimer: This guide is for informational purposes only. FireStickTricks.com does not own, host, operate, resell, or distribute any apps, services, or content mentioned.
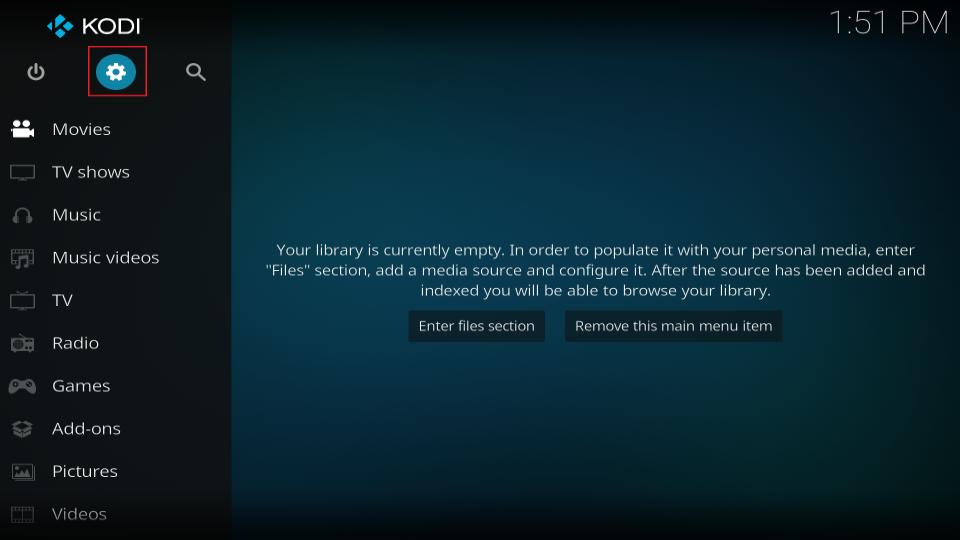
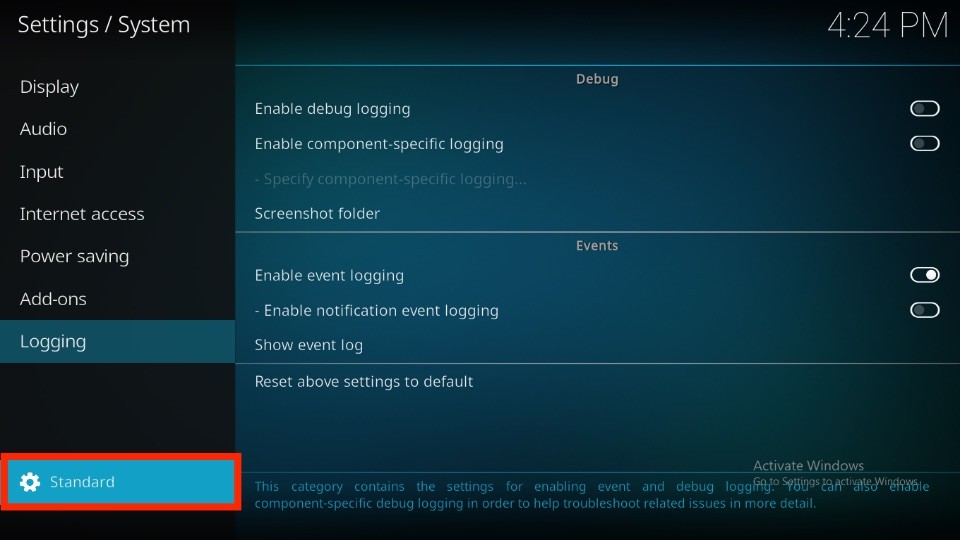
1. Launch the Kodi settings menu by selecting the Cog icon on the app’s home.
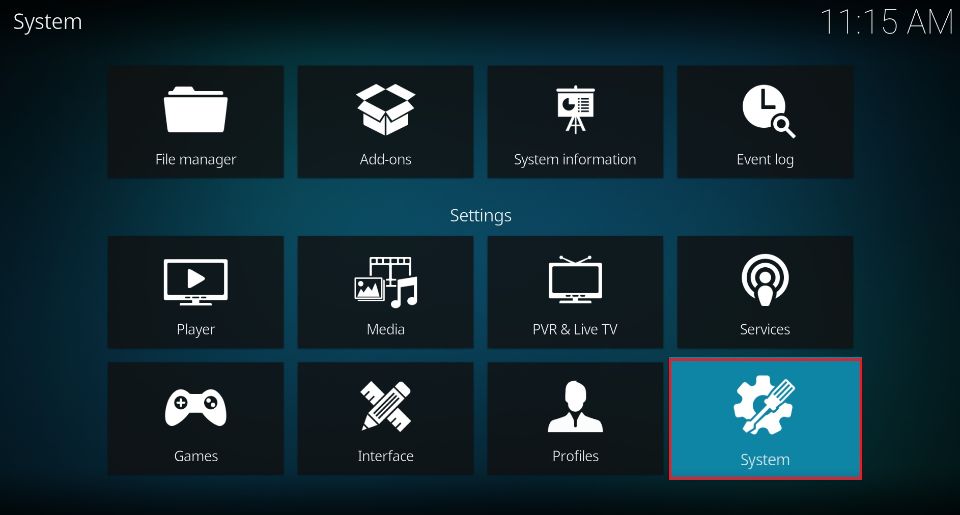
2. Browse the System tab.
3. Click the Standard option at the bottom left of your screen. Then, select it twice to change it to Expert.
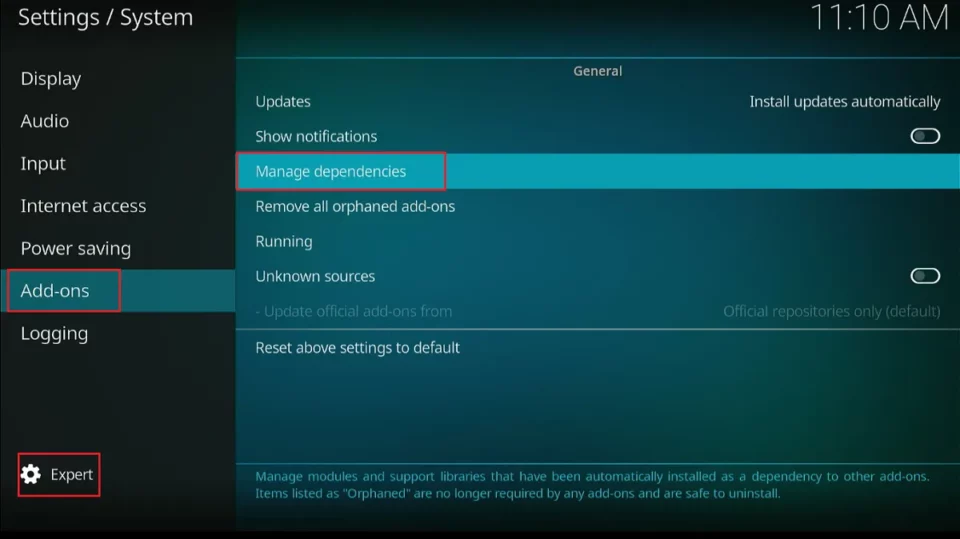
4. After changing the settings menu to Expert, go to the Add-ons tab and open Manage Dependencies.
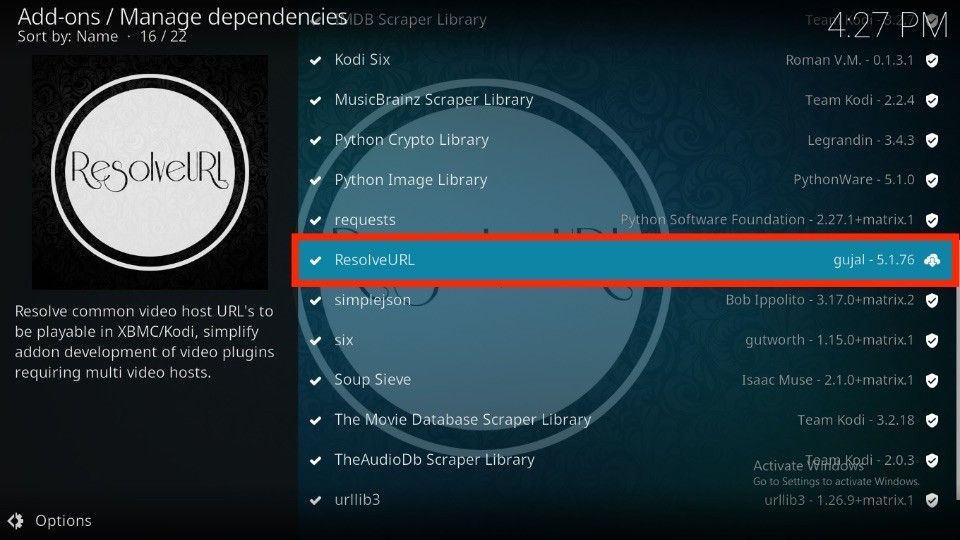
5. Choose the ResolveURL addon from the list.
Note: Is the ResolveURL addon missing? Install a third-party Kodi addon, which will automatically appear in the list.
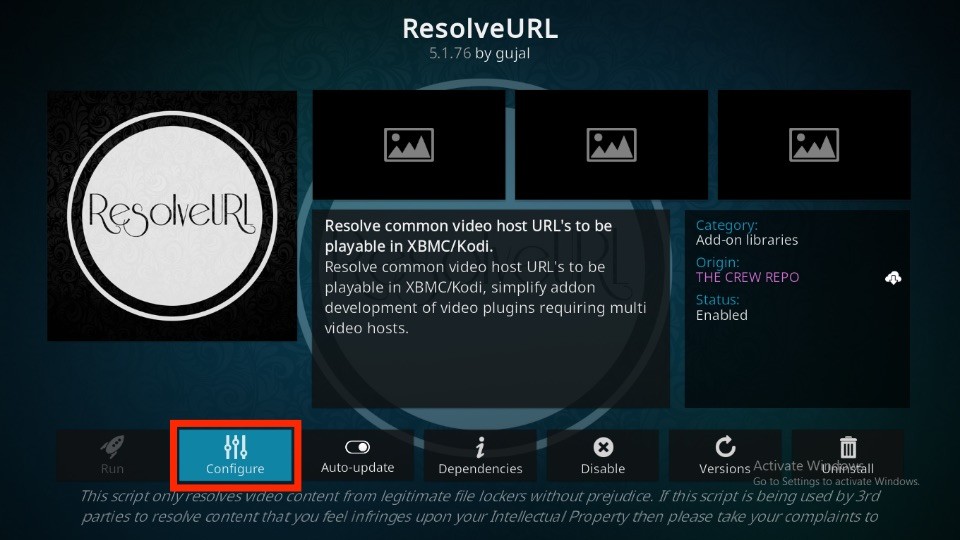
6. On the ResolveURL dashboard, select Configure.
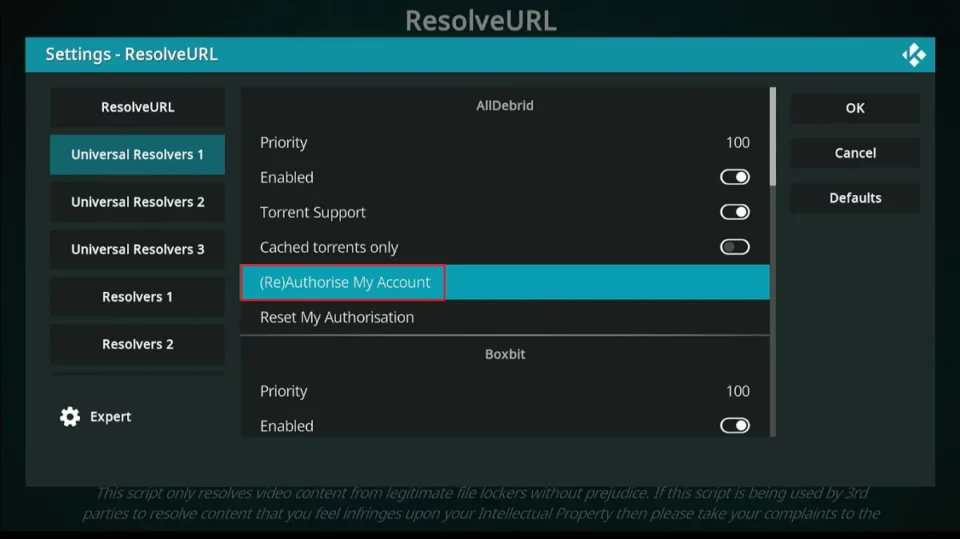
7. When the ResolveURL Settings menu appears, choose the Universal Resolvers 1 tab from the side pane.
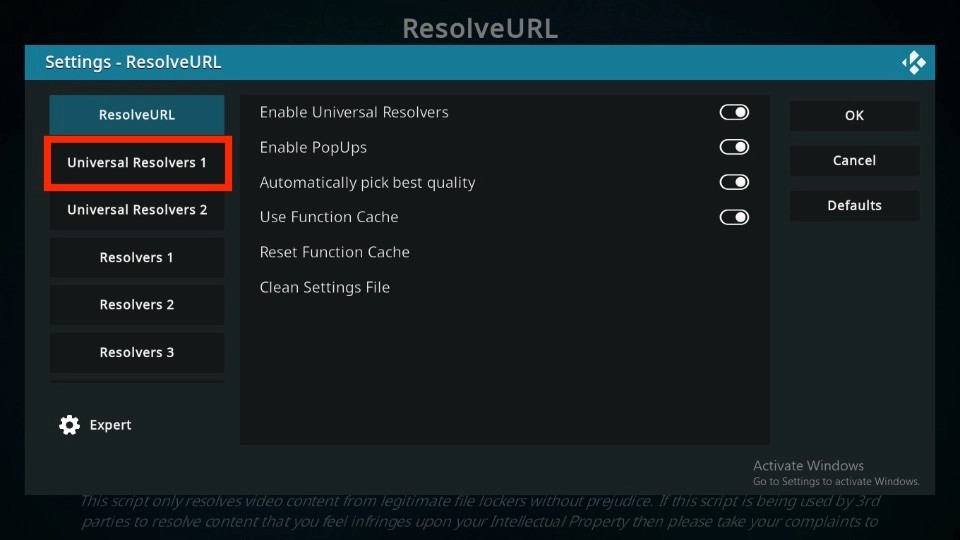
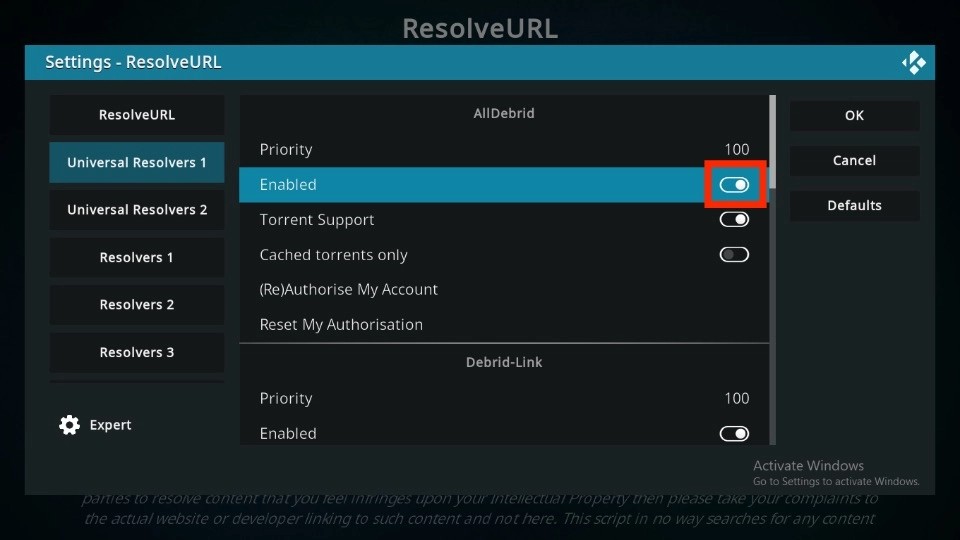
8. The AllDebrid section will be on the top; select the (Re)Authorise My Account option.
9. A ResolveURL AllDebrid Authorisation prompt will pop up on your screen. Go to https://alldebrid.com/pin/ using a smartphone and a web browser like Google Chrome.
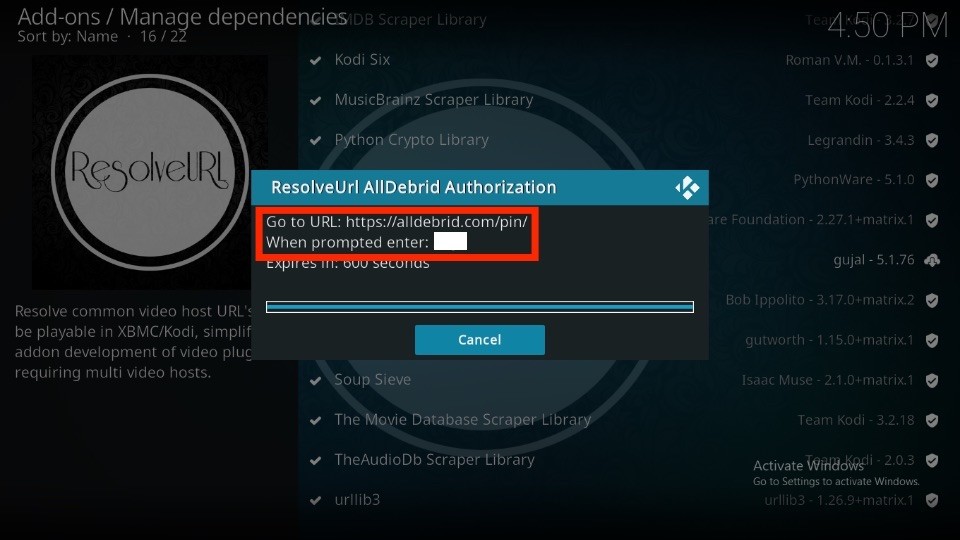
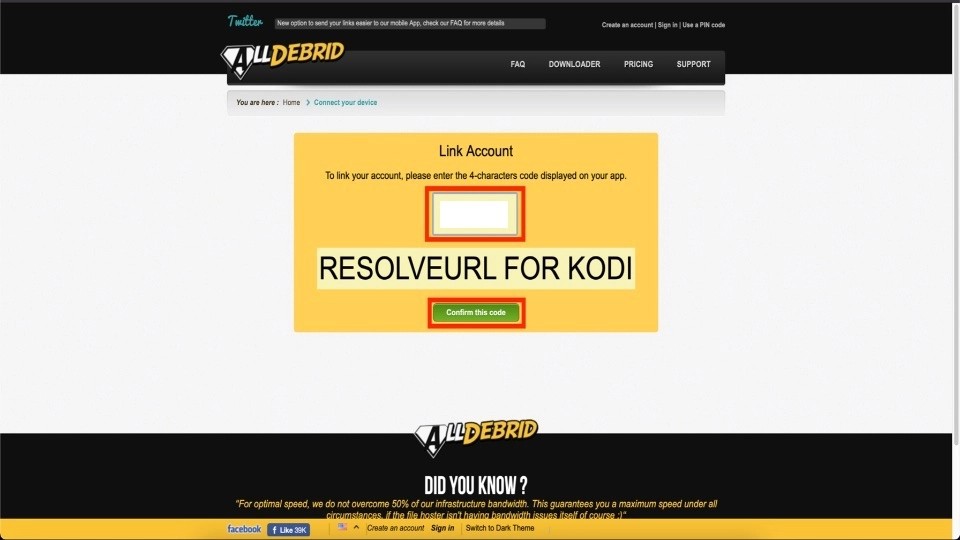
10. Enter the 4-character code displayed on your Kodi app. AllDebrid will automatically identify the app we use to integrate—ResolveURL for Kodi. Then, click the green Confirm this code button.
Note: You’ll receive an error on the AllDebrid pin page if you haven’t purchased a plan.
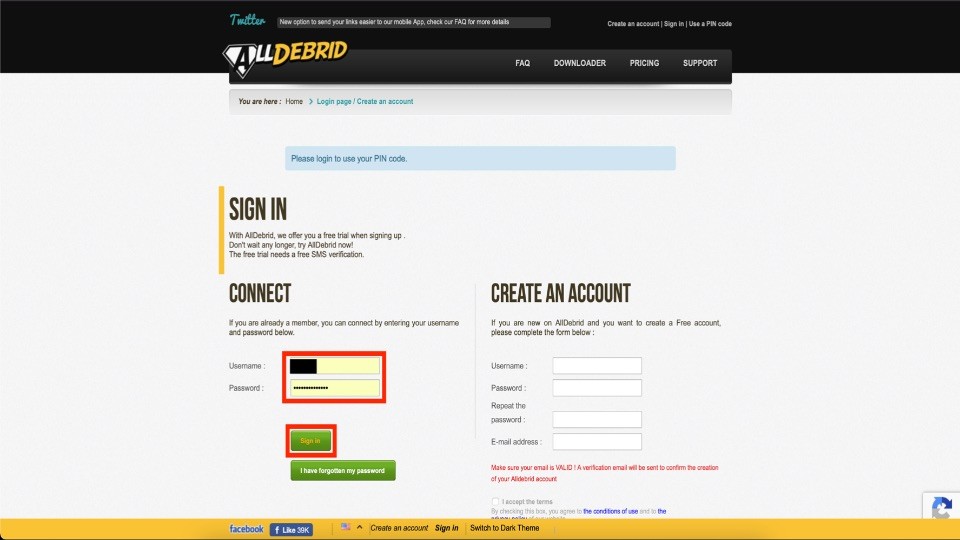
11. Login to your AllDebrid account by entering your username and password and clicking the green Sign in button.
Note: You’ll only see this screen if you aren’t logged into your AllDebrid account.
12. Enter the code once again and click Confirm this code.

13. The AllDebrid website will send you a confirmation message – Your device has been activated, and you should be connected [sic].
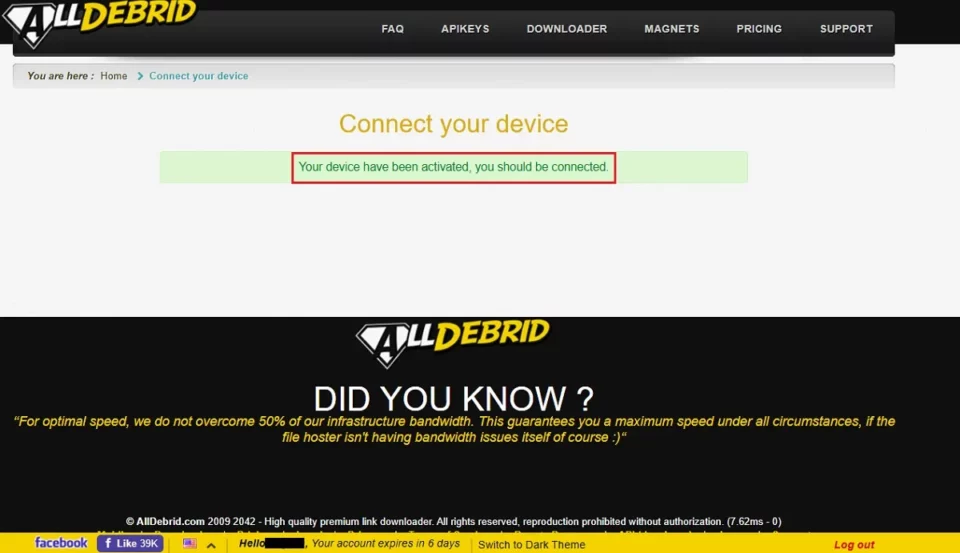
14. On your Kodi app, you’ll see a notification – ResolveURL AllDebrid Resolver Authorised.

AllDebrid is all set on your Kodi app to work with your favorite addons and provide unlimited high-quality links!
Before you start streaming with Kodi Addons or Builds, I would like to warn you that everything you stream on Kodi is visible to your ISP and Government. This means, streaming copyrighted content (free movies, TV shows, live TV, and Sports) might get you into legal trouble.
Thankfully, there is a foolproof way to keep all your streaming activities hidden from your ISP and the Government. All you need is a good VPN for Kodi. A VPN will mask your original IP which is and will help you bypass Online Surveillance, ISP throttling, and content geo-restrictions.
I personally use and recommend ExpressVPN, which is the fastest and most secure VPN. It is compatible with all kinds of streaming apps and devices.
NOTE: We do not encourage the violation of copyright laws. But, what if you end up streaming content from an illegitimate source unintentionally? It is not always easy to tell the difference between a legit and illegal source.
So, before you start streaming on Kodi, here's how to get VPN protection in 3 simple steps.
Step 1: Get the ExpressVPN subscription HERE. It comes with a 30-day money-back guarantee. Meaning, you can use it free for the first 30-days and if you are not satisfied with the performance (which is highly unlikely), you can ask for a full refund.
Step 2: Click HERE to download and install the ExpressVPN app on your streaming device. If you are using a FireStick, I have given the exact steps starting with Step 4 below.
Step 3: Click the Power icon to connect to a VPN server. That's all. Your connection is now secure with the fastest and best VPN for Kodi.

The following are the steps to install Kodi VPN on your Fire TV devices. If you have other streaming devices, follow Step 1-3 above.
Step 4: Subscribe to ExpressVPN HERE (if not subscribed already).
Step 5: Go to Fire TV Stick home screen. Click Find followed by Search option (see image below).

Step 6: Type Expressvpn in the search bar and select when it shows up.

Step 7: Click Download.

Step 8: Open the ExpressVPN app and Sign in using the email ID and password that you created while buying the ExpressVPN subscription.

Step 9: Click the Power icon to connect to a VPN server. That’s all. Your FireStick is now secured with the fastest VPN.

How to Use AllDebrid on Kodi
Here’s a sneak peek of what you get with and without AllDebrid on Kodi:
Before AllDebrid on Kodi
Before connecting my AllDebrid account on Kodi, I didn’t get many links using free built-in scrapers of third-party addons.
Here’s what THE CREW was capable of doing on its own:
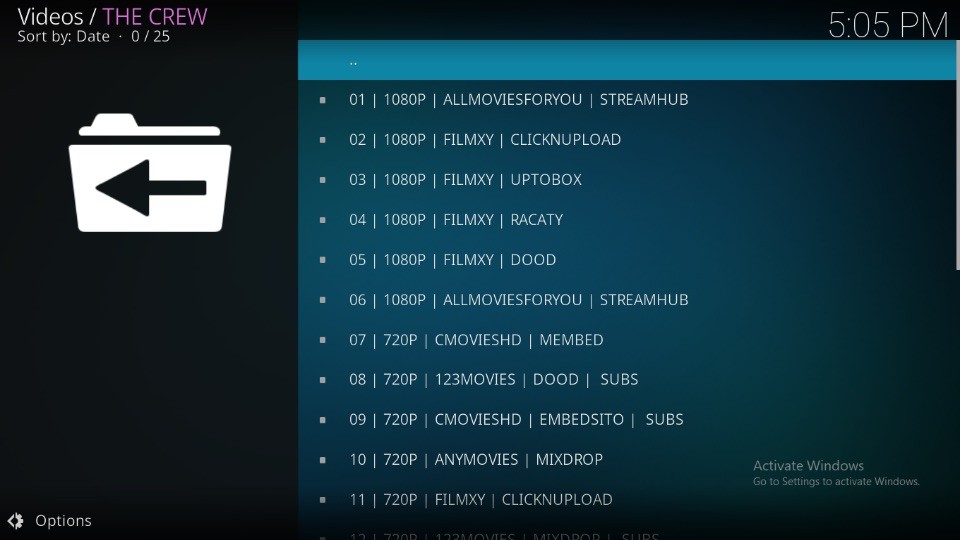
The famous THE CREW addon could only provide me with 25 free links. And I’ll tell you what: most of them were not working.
After AllDebrid on Kodi
On the split side, integrating AllDebrid with Kodi felt like a total game-changer to me.
Here’s a screenshot displaying the number of links I was able to find using the same addon for the same content:
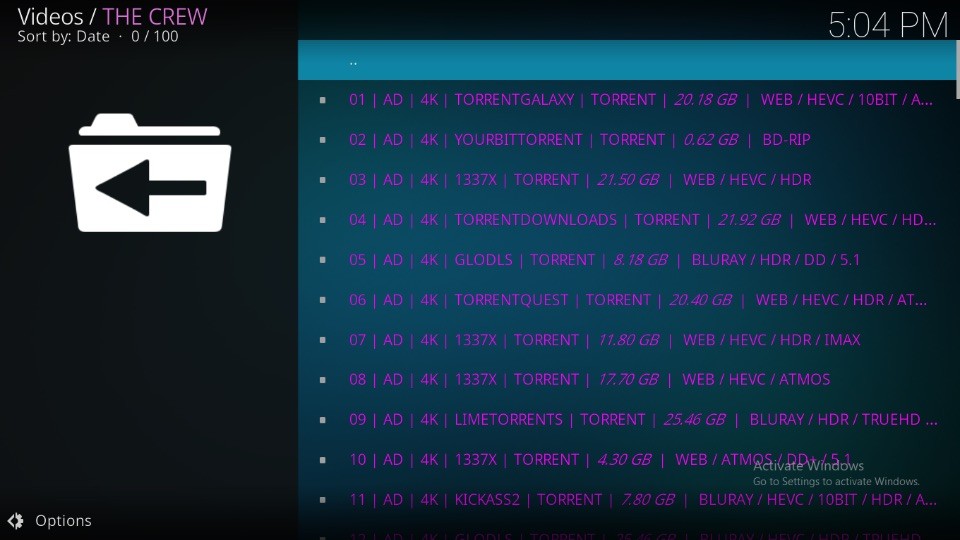
AllDebrid brought me a whopping 100 premium links! That’s simply great.
I have checked all the links one by one. And guess what? All were playing with almost zero lag and buffering.
Using Kodi third-party addons without AllDebrid is not a great idea, especially if you want to maximize your streaming experience.
What if AllDebrid is Not Auto-Enabled
Is AllDebrid not auto-enabled on your Kodi addon? Here’s how to manually turn it on:
Open an addon on Kodi that supports All Debrid and go to its settings/tools page.
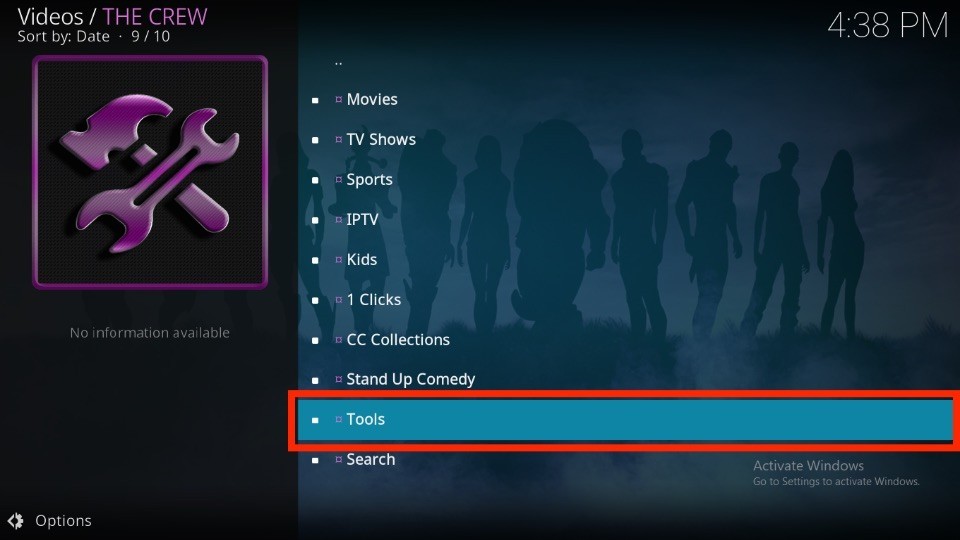
Next, choose RESOLVEURL: SETTINGS.
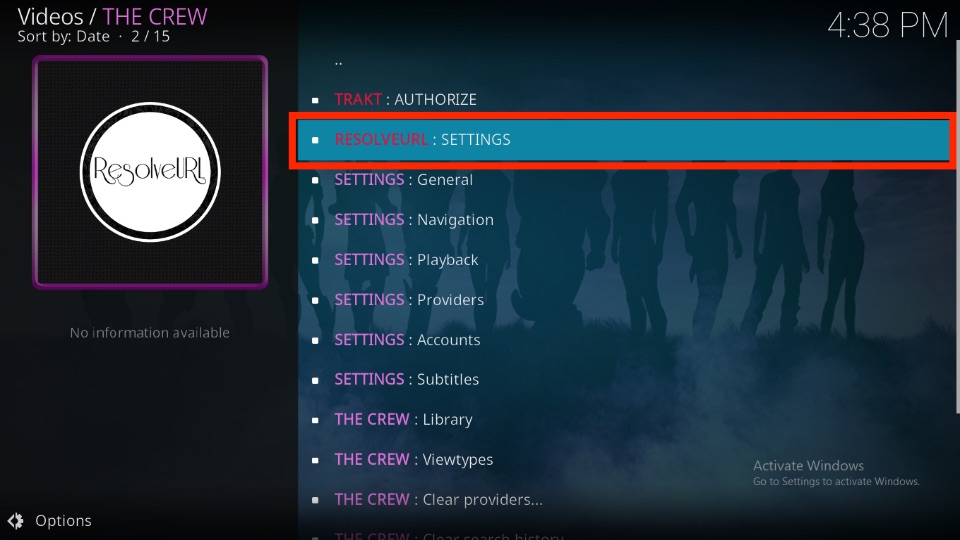
Open the Universal Resolvers 1 tab when the settings menu appears.
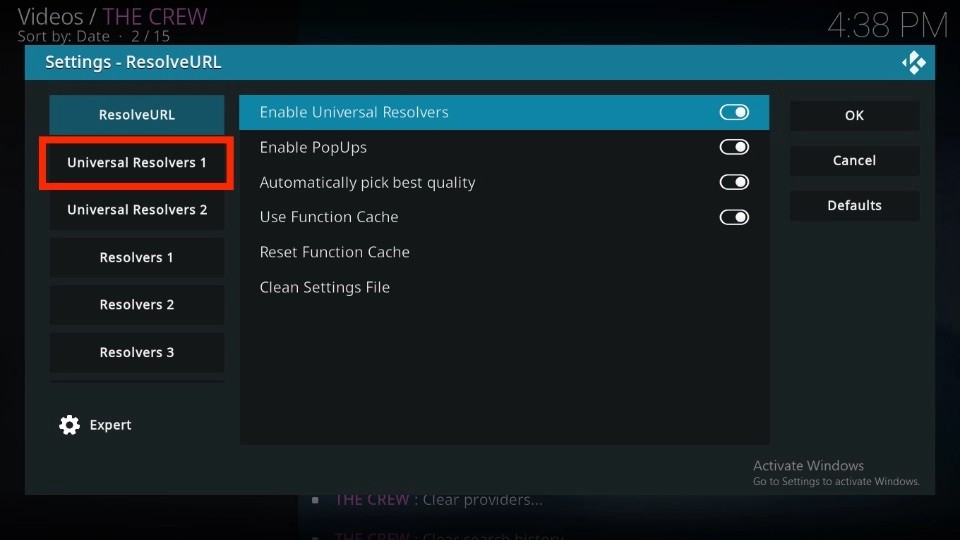
On the AllDebrid section, make sure the Enabled option is turned on.
That’s how you enable AllDebrid if it’s not auto-enabled on a third-party Kodi addon.
How to Use AllDebrid with FireStick Apps
Some FireStick streaming apps also support AllDebrid. Here’s how to use AllDebrid with the supported apps:
Launch a FireStick app that supports AllDebrid – I’m using Cinema HD v2. Then, go to its Settings/Tools page.
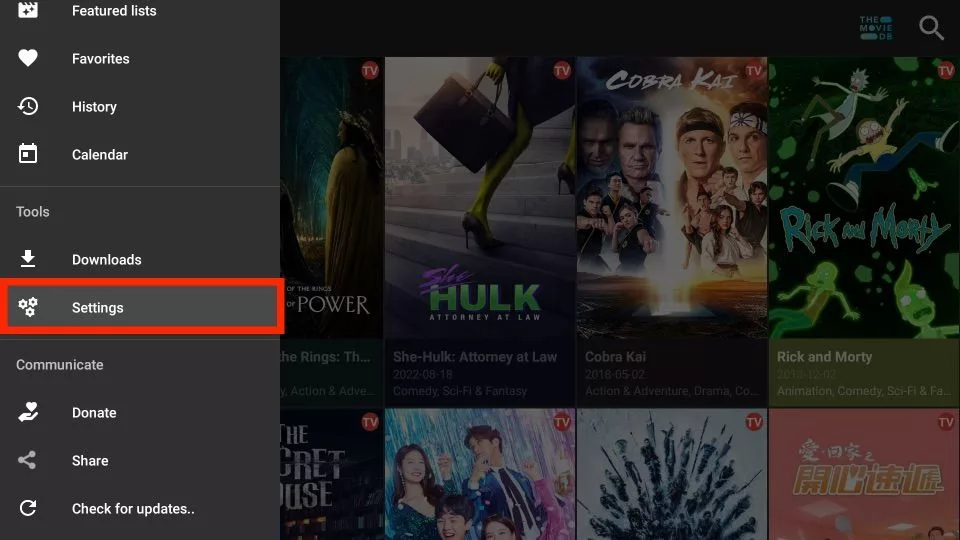
Go to the Account section.
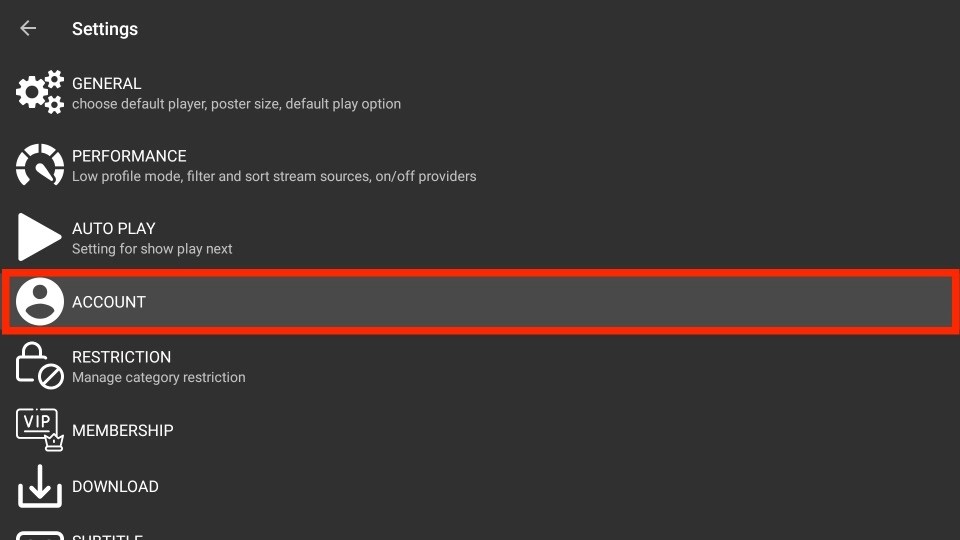
Select Login to All-Debrid.
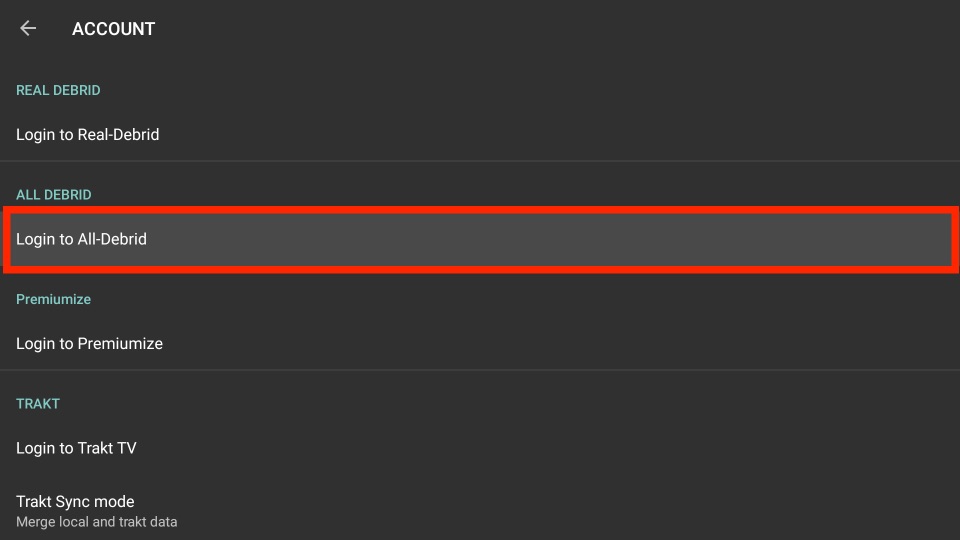
Next, visit https://alldebrid.com/pin/ in a browser of any of your smart devices.
After that, enter the code and follow the on-screen instructions.
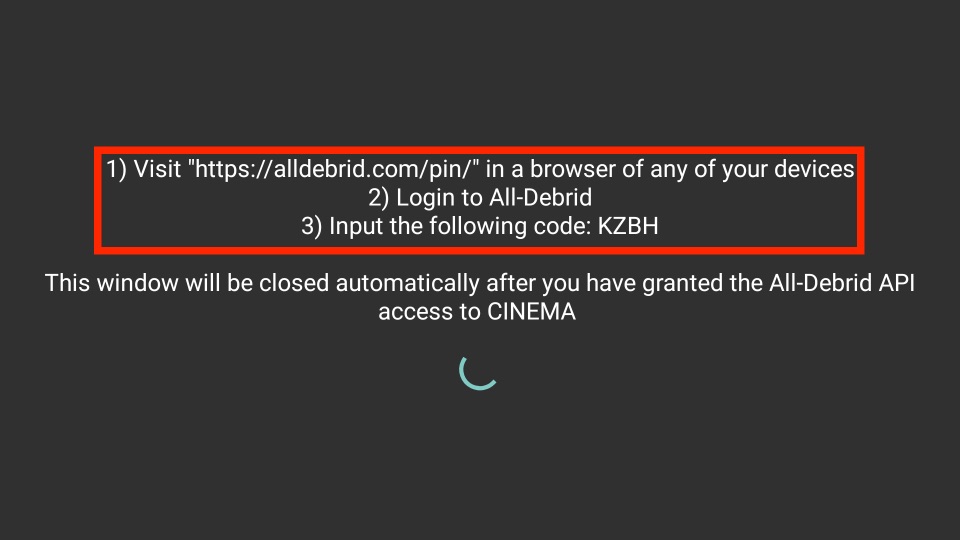
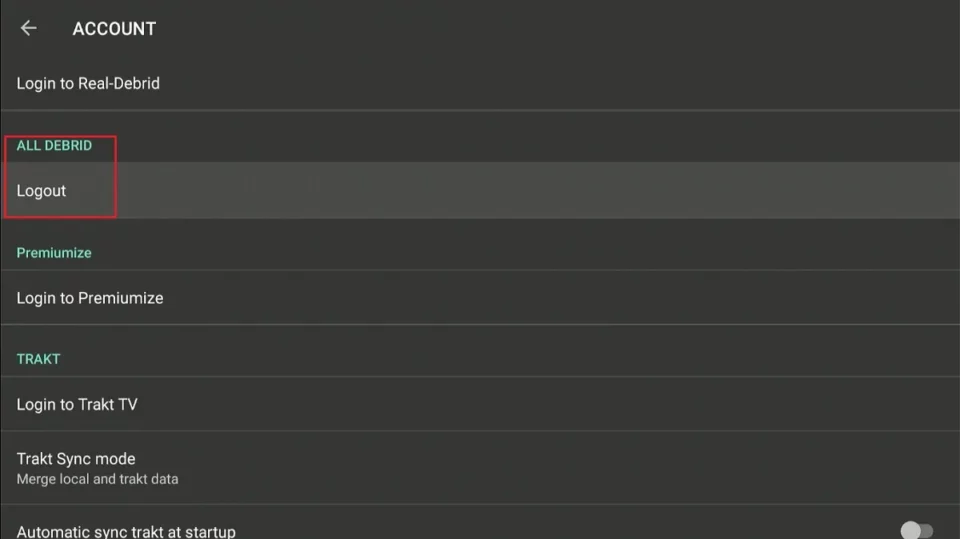
Once authorized, the loading screen will automatically close, and you’ll see the Logout option under the All Debrid section.
Winding Up
That’s how to set up and use AllDebrid on Kodi and FireStick. Let us know if you are stuck somewhere or have further questions about the file hosting service. You can also share your experience with the service in the comments section below.
Related:
- How to Install & Use Real Debrid on Kodi/FireStick
- How to Get FREE Netflix Account
- Best APKs for Streaming Free Movies & TV Shows
- Best FireStick Remote Apps and How to Use them

Suberboost Your FireStick with My Free Guide
Stay Ahead: Weekly Insights on the Latest in Free Streaming!
No spam, ever. Unsubscribe anytime.

I started to use it with Kodi today. It worked well and then stopped . I got a message about reaching the 1000 limit on magnets. I don’t understand what that means or how to fix it.
Can you help. I want to buy a subscription.
Hi Deb, the 1000 magnet limit is part of the free trial. To continue enjoying the service without restrictions, you’ll need to purchase a subscription to All Debrid. You can do this directly from their official site.