What is YouTube?
YouTube is a platform that hardly warrants an introduction. First launched in 2005, it has become a regular fixture. From funny videos to critical thinking pieces, YouTube videos have something for everyone.
While YouTube’s primary concern has always been video streaming, its offerings have expanded exponentially over the past two decades. The website now hosts music, original series, documentaries, news outlets, etc.
Furthermore, it has become a hub not just for content consumers but also for content creators. Now international sensations the Weeknd and Shawn Mendes trace their roots to YouTube.
YouTube’s appeal is not just its monthly audience of more than 2 billion but also its free service. The low barriers to entry mean that anyone can use it to watch or upload videos.
Now, look at the steps to install YouTube on Kodi.
For Kodi Users!
ISPs, hackers, and other third-party entities worldwide may monitor your online activities. For security, privacy, and smooth streaming, it is recommended to use a reliable VPN for Kodi. Your IP address is visible to sites you visit.
I recommend ExpressVPN, a fast and secure VPN in the industry. It is very easy to install on any device, including Amazon Fire TV Stick, PC, Mac, and Smartphones. Also, it comes with a 30-day money-back guarantee. If you're not satisfied with their service, you can request a refund. ExpressVPN also has a special deal where you can get 4 months free and save 73% on the 2-year plan.
Read: How to Install and Use the Best VPN for Kodi
How to Install YouTube on Kodi
To install YouTube on Kodi, follow these steps.
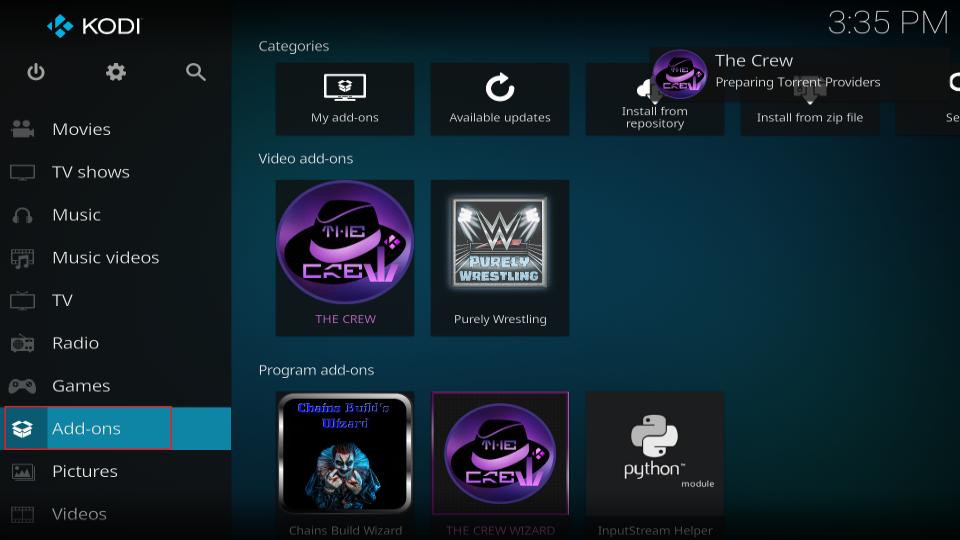
1. Select addons section on Kodi’s home screen.
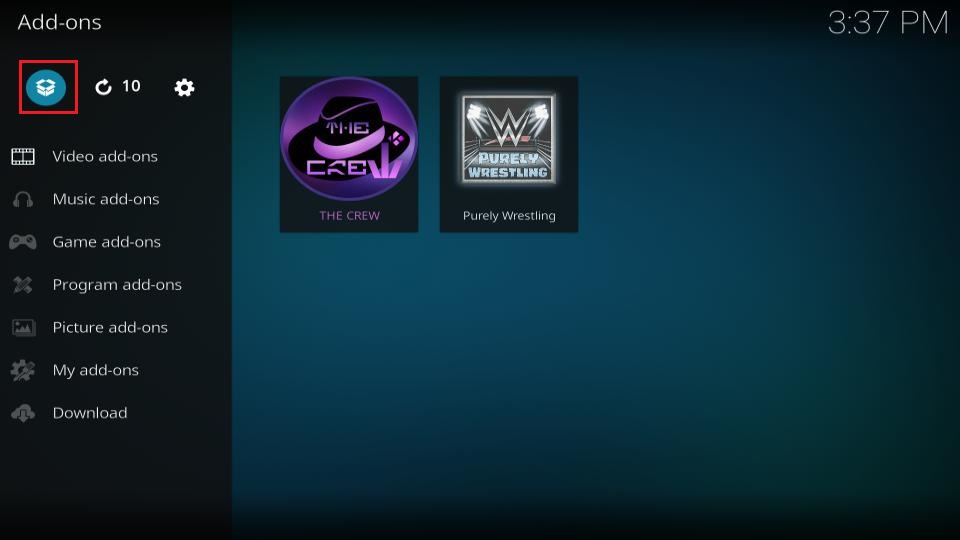
2. On the top left of the page, you’ll see three icons. An open box, a turning arrow, and a gear. Click on the open box.
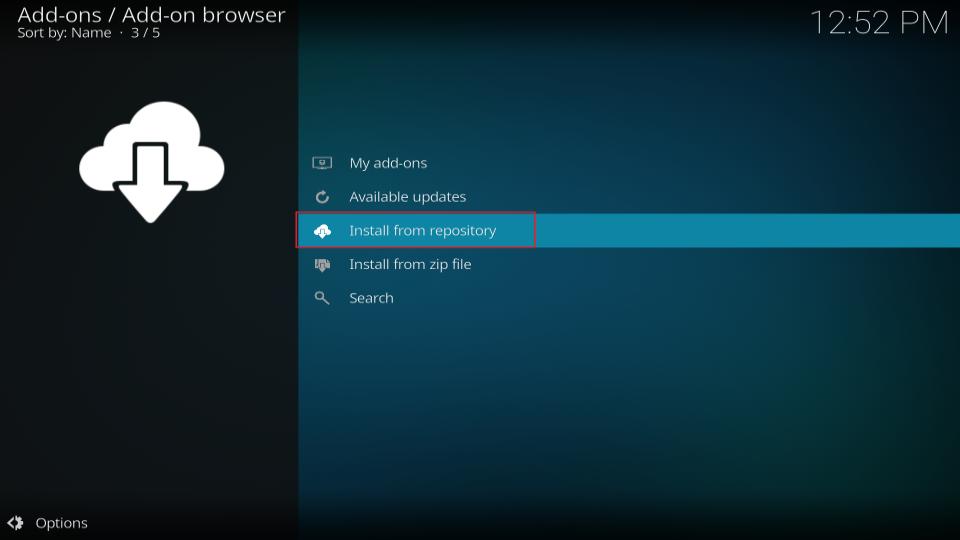
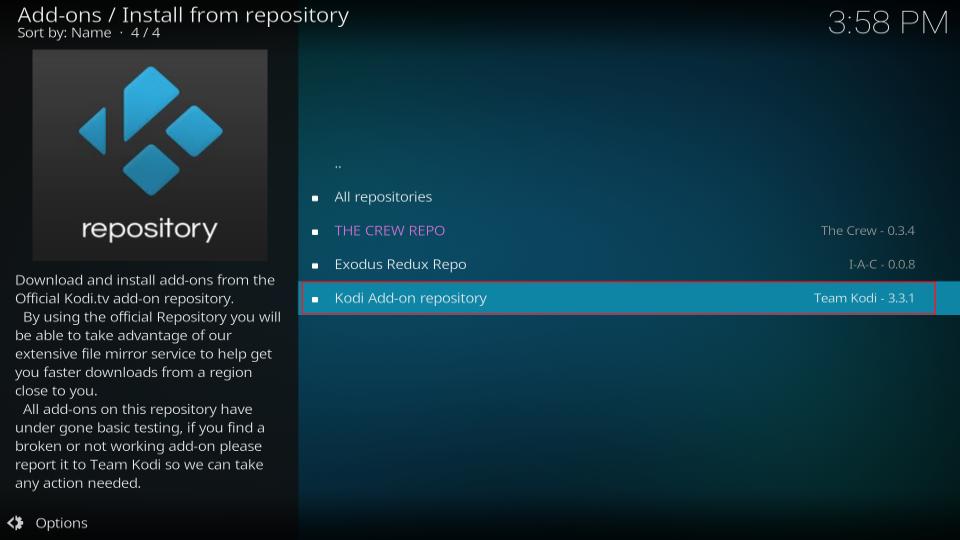
3. Select Install from Repository.
4. Select Kodi Add-on Repository.
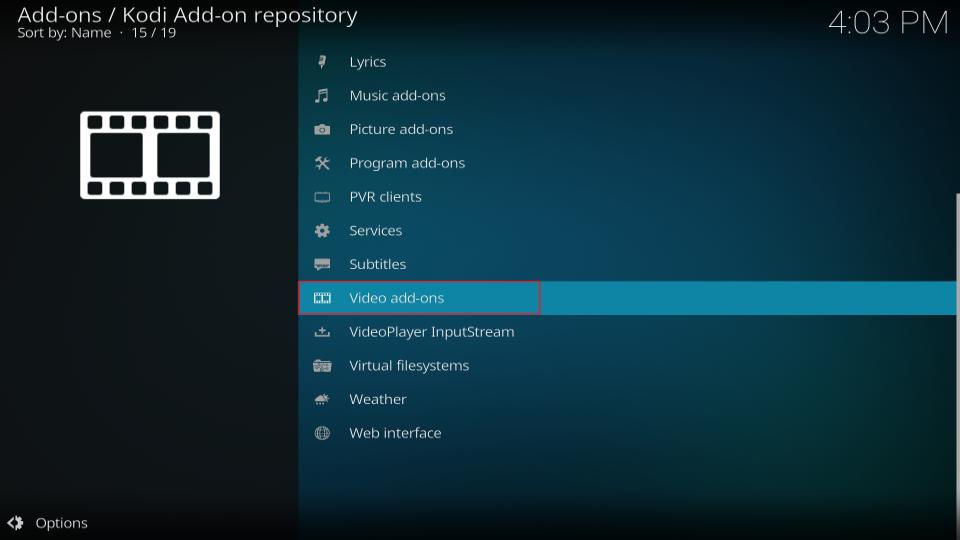
5. Click on Video Addons.
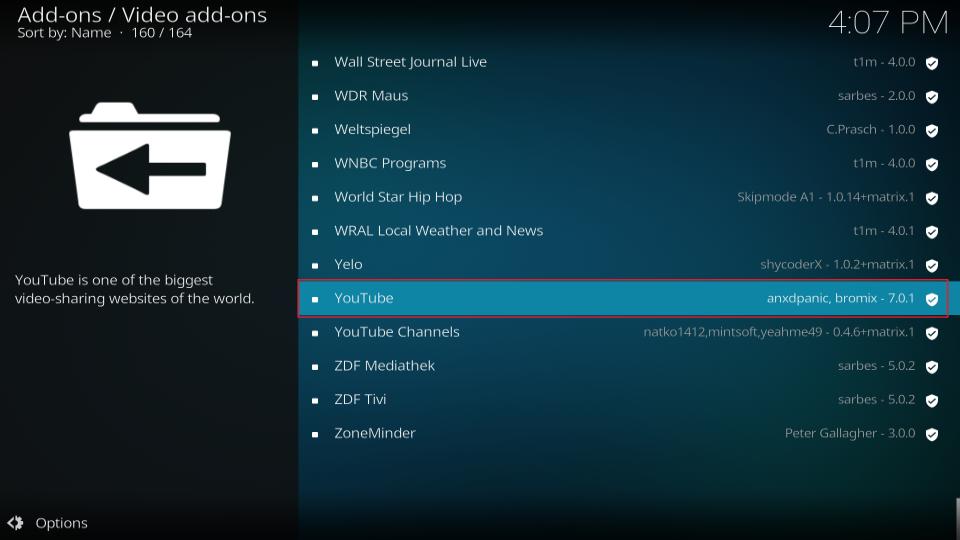
6. Select YouTube.
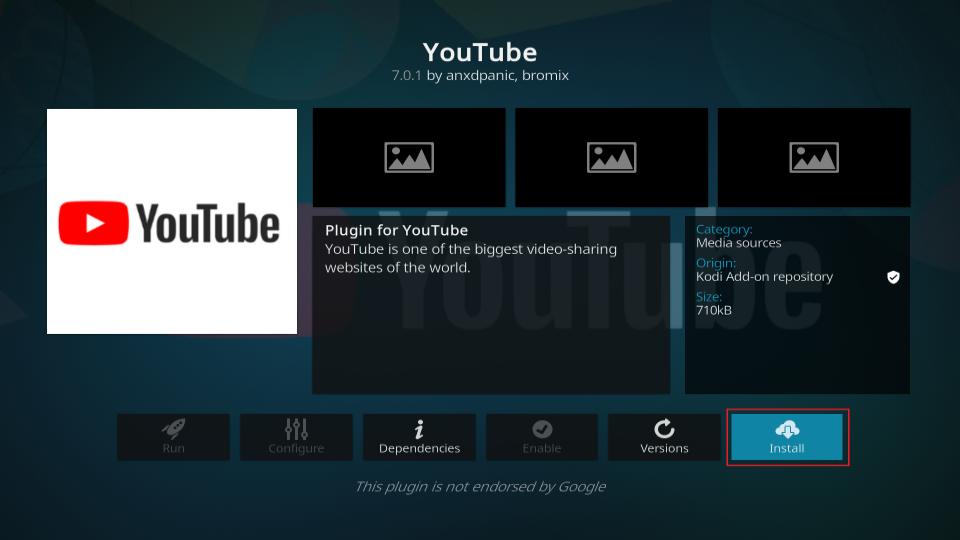
7. Click on Install.
8. Wait until a confirmation message stating “YouTube addon installed” appears on the top right corner of the screen.
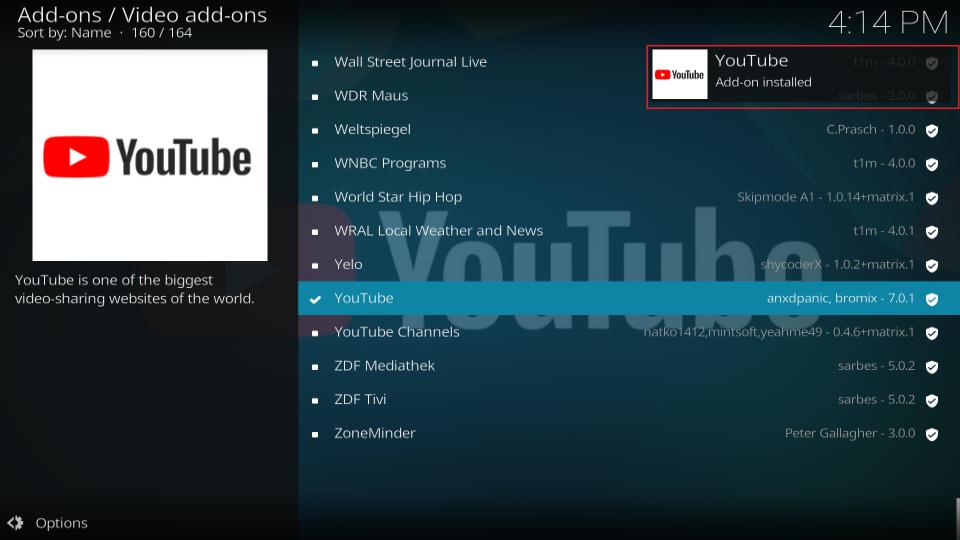
9. Go back to the home screen, and choose addons.
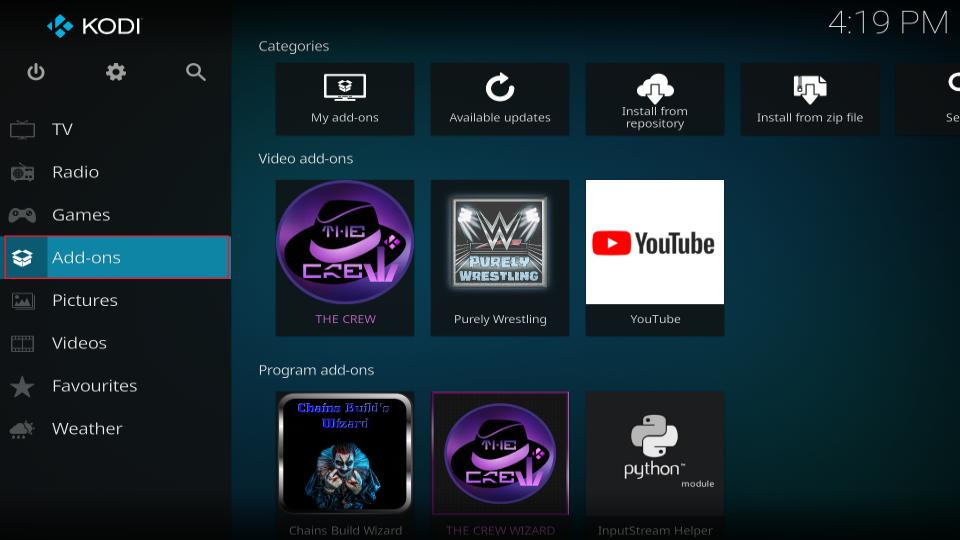
10. Select video addons.
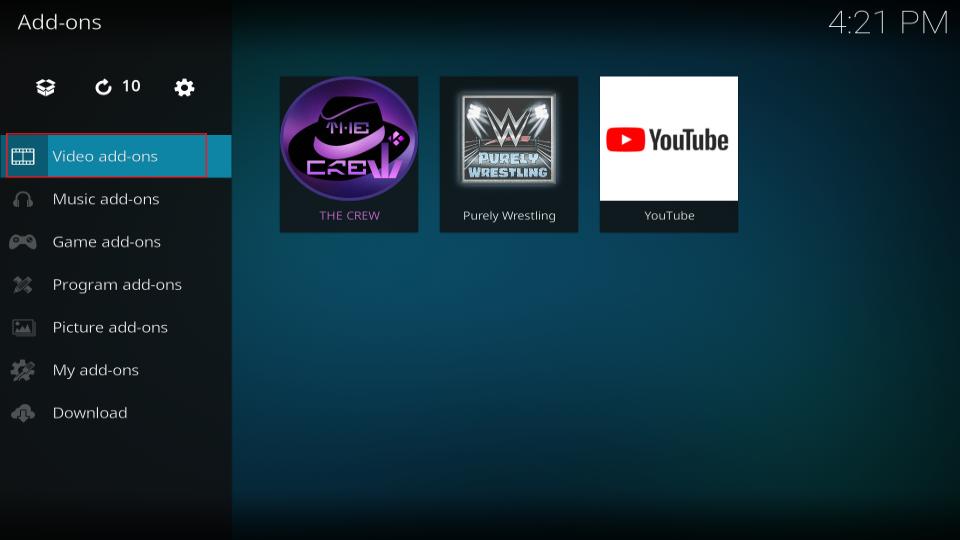
11. Choose YouTube.
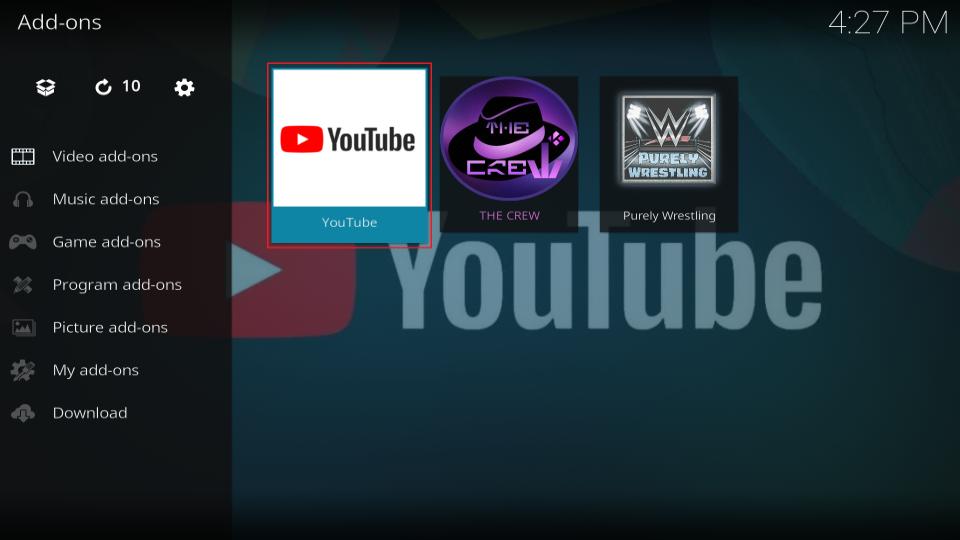
12. Congratulations! You have successfully installed the YouTube Kodi addon.
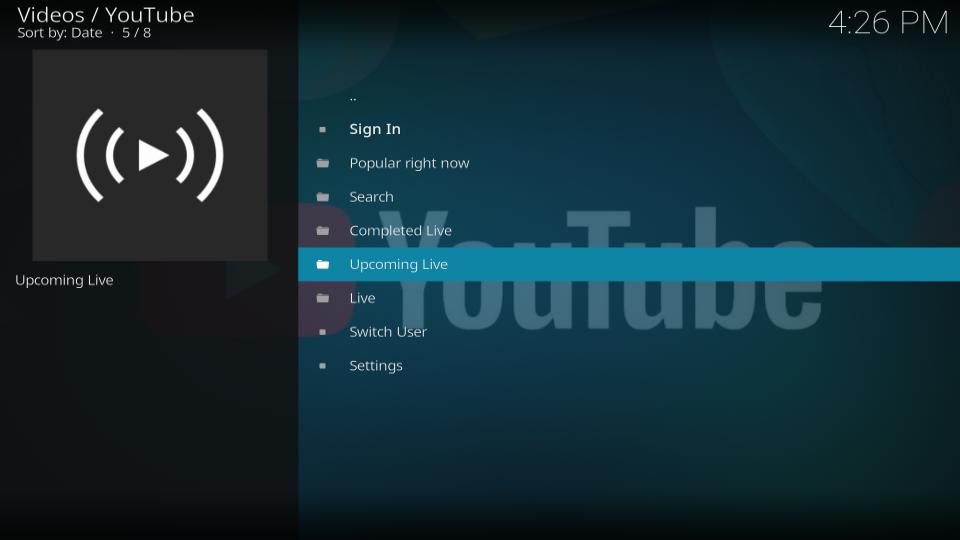
Important Note: Due to the way YouTube on Kodi works by default, you use a public API. This shouldn’t be a monumental issue on its own, but occasionally, you receive an error message.
The message states that the quota limit has been reached. This means that too many people are using the public API right now, so you won’t be able to use YouTube in this situation.
Don’t worry; I’ll show you how to set up the API for the YouTube Kodi addon.
How to Setup YouTube Kodi API
Fair warning before we begin. This process is a bit tricky for complete beginners. I’ve tried to keep it as detailed and simple as possible, so make sure you pay close attention. Here are the steps to install the YouTube Kodi API:
1. Visit https://console.cloud.google.com/ and select Create Project. This will be in the upper left-hand corner of the screen, next to the Google logo. (I already have the YouTube Kodi API.)
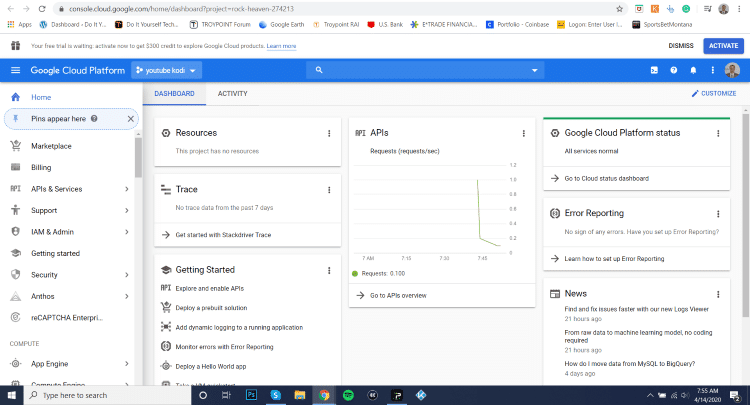
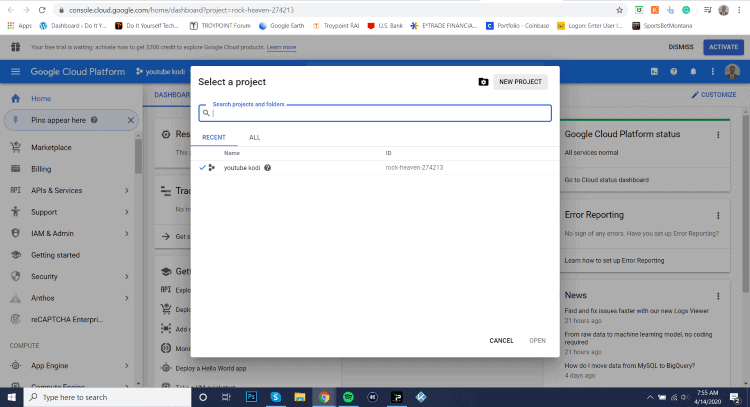
2. Click on Create New Project.
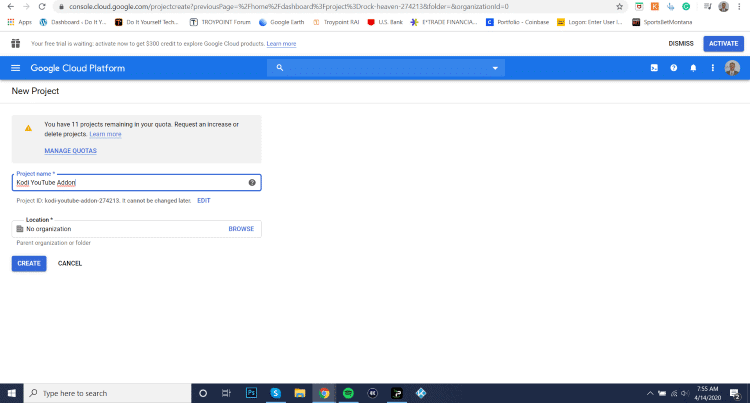
3. Insert Project Name and press Create. I have named it Kodi YouTube Addon.
4. Visit https://console.cloud.google.com/apis/library YouTube Data API v3.
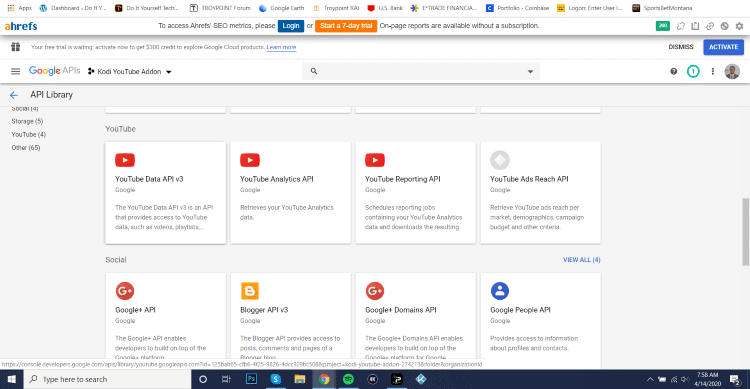
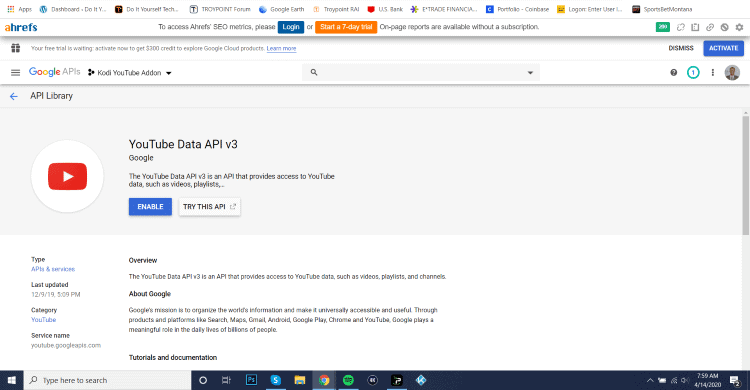
5. Press Enable
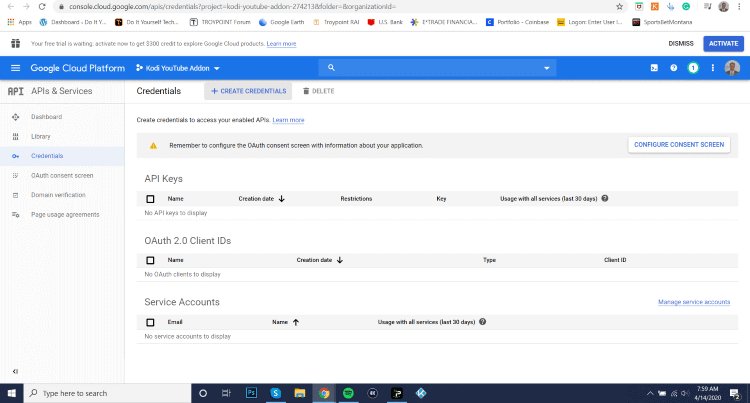
6. Visit https://console.cloud.google.com/apis/credentials and click on Create Credentials.
7. Select API Key.
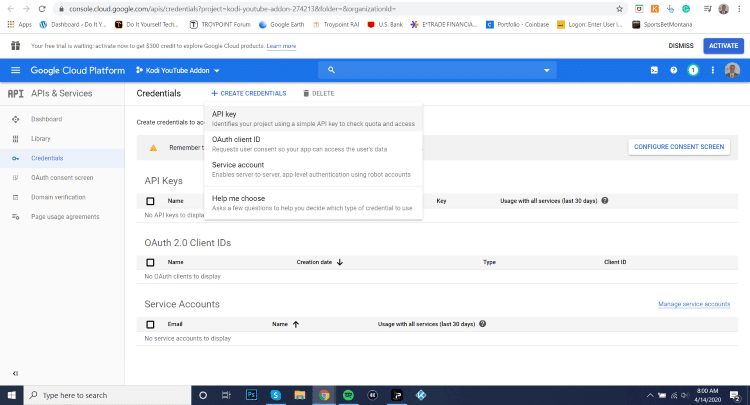
8. Copy the API Key and store it somewhere for later.
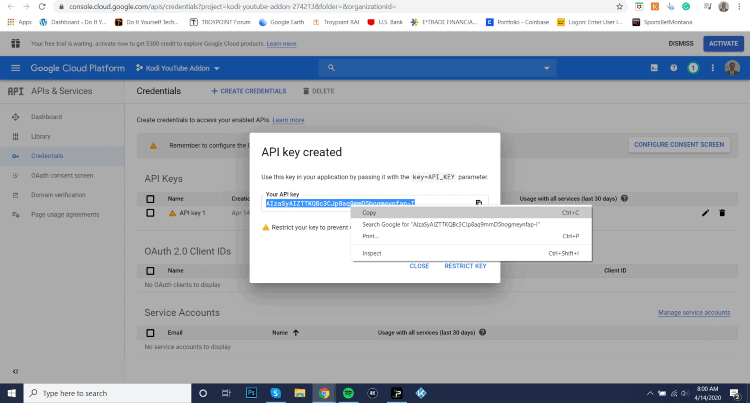
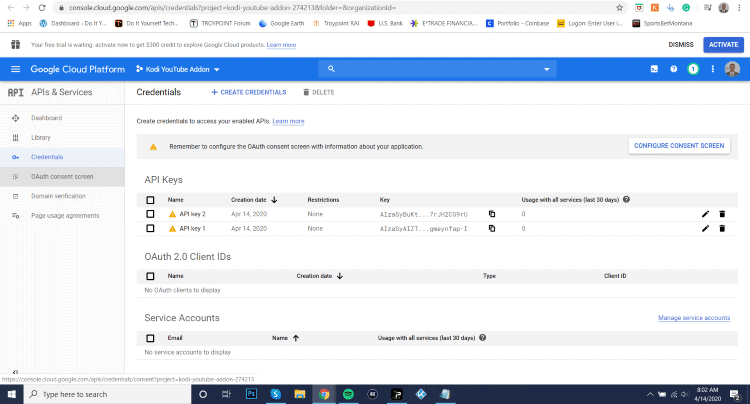
9. Click OAuth Consent which should be visible on the menu bar to your left.
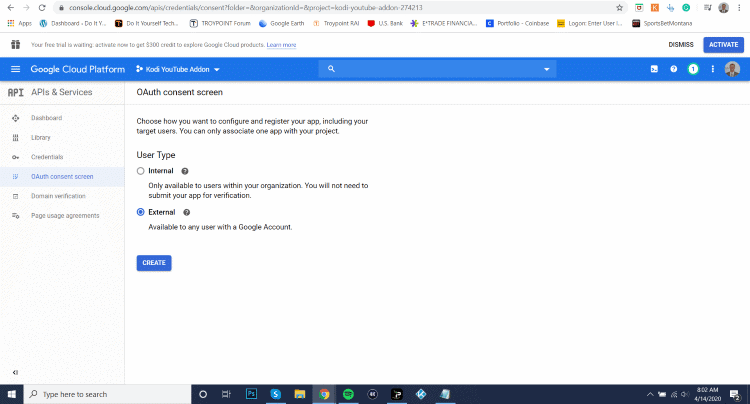
10. Select External and press Create.
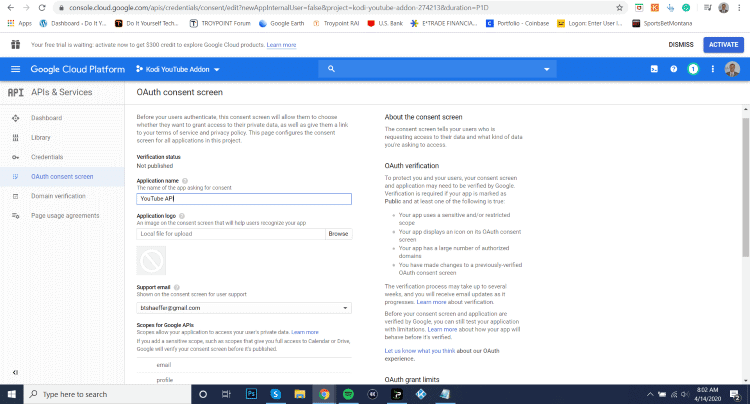
11. Choose an appropriate Name for the API, such as YouTube API. Move down and press Save.
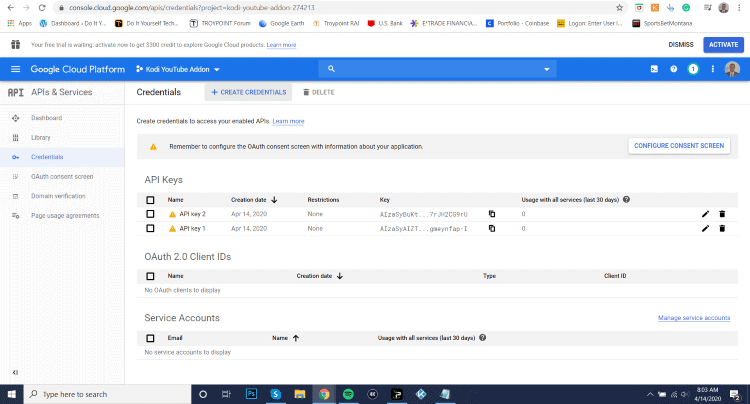
12. Select Credentials, the option should be on the left side of the screen. Click on Create Credentials.
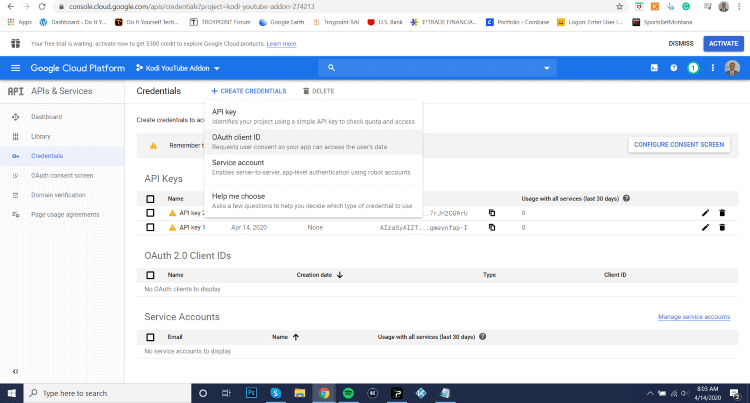
13. Press OAuth Client ID
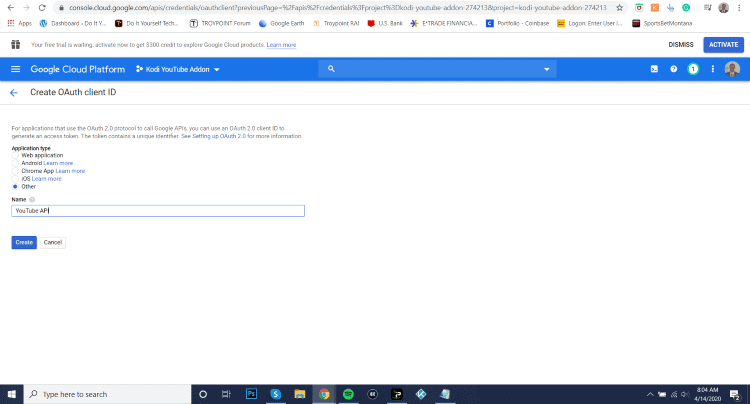
14. Select Other and choose an appropriate name. Once finished, press Create.
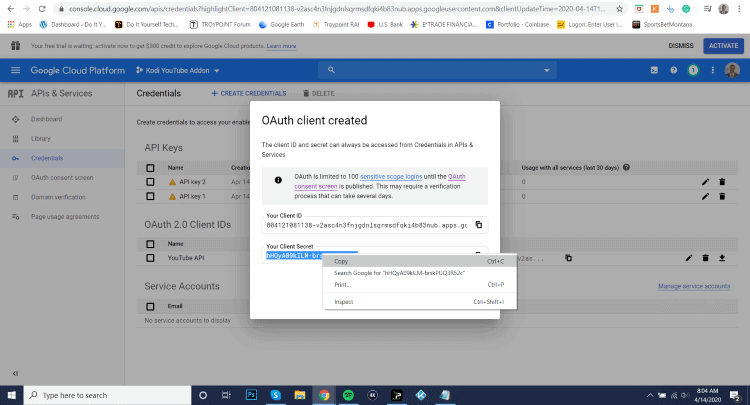
15. Copy the Client ID and Client Secret, for later use. You may use Notepad for this.
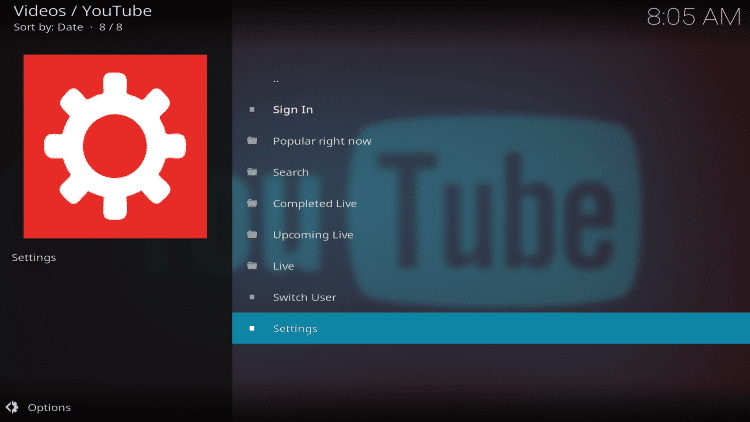
16. Start up the YouTube addon for Kodi, and go to Settings.
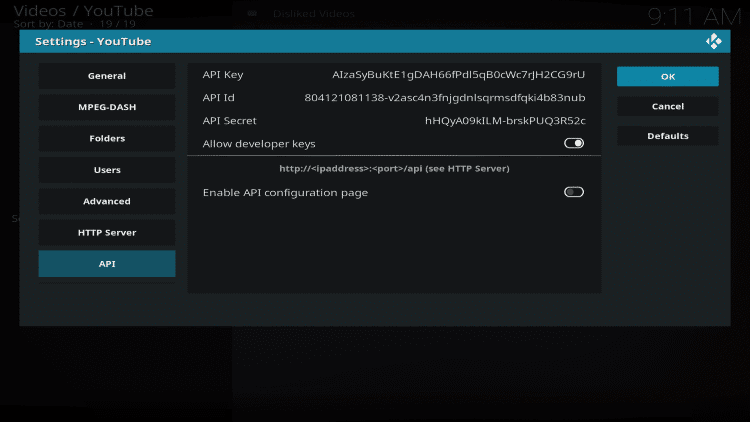
17. Select API. Enter your API Key, API ID, and API Secret in this section.
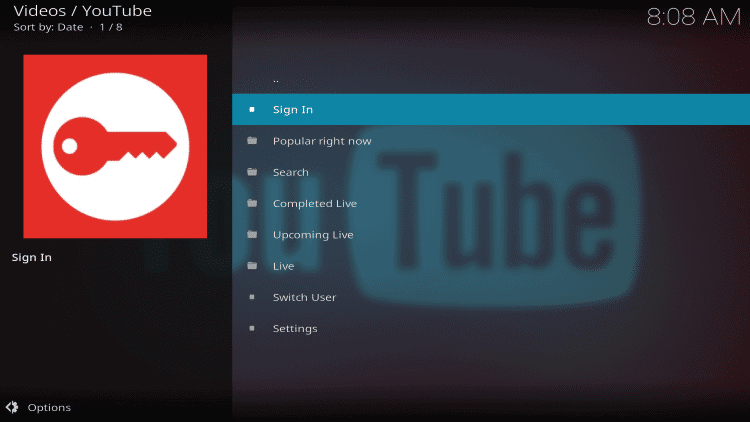
18. Go to the Main Menu, and Sign In.
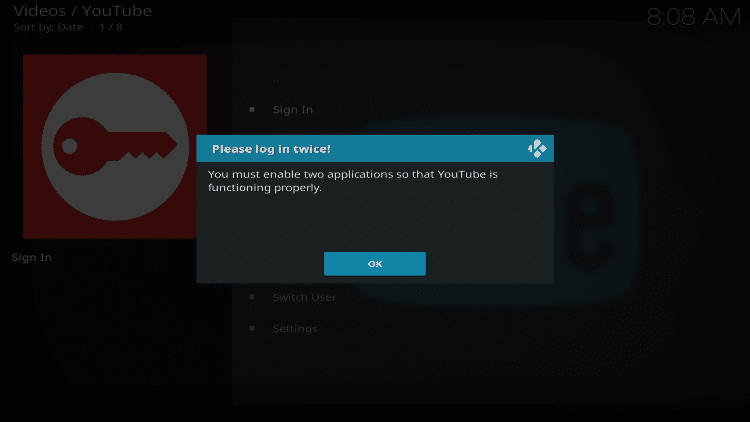
19. You will be prompted by a message stating, “You must enable two applications so that YouTube is functioning properly.” Press OK.
20. Note down the Authorization Code that has appeared on the screen.
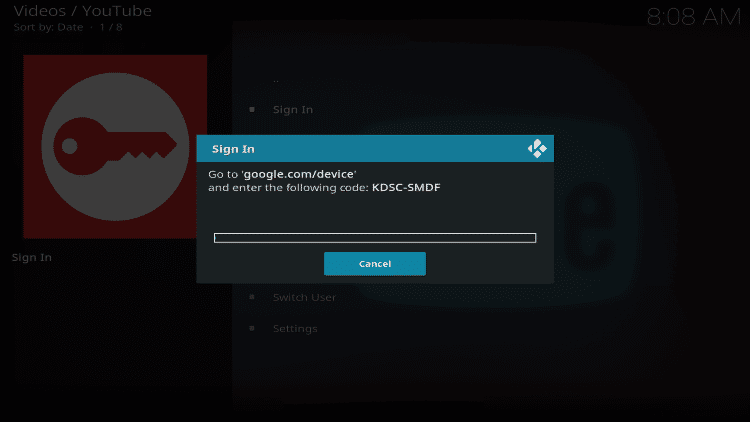
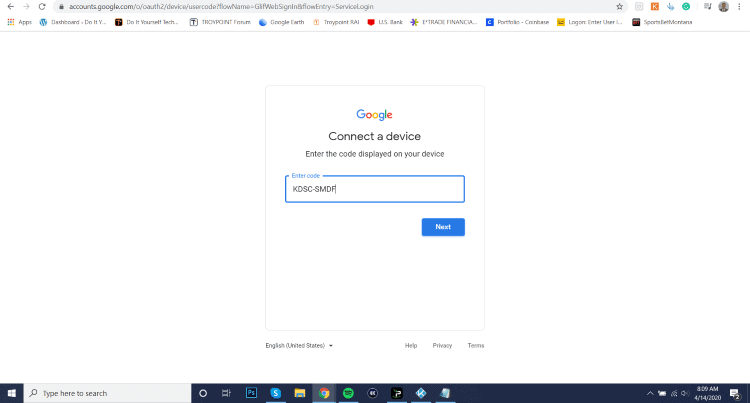
21. Visit www.google.com/device and enter the Authorization Code you received in the previous step. Then press Next.
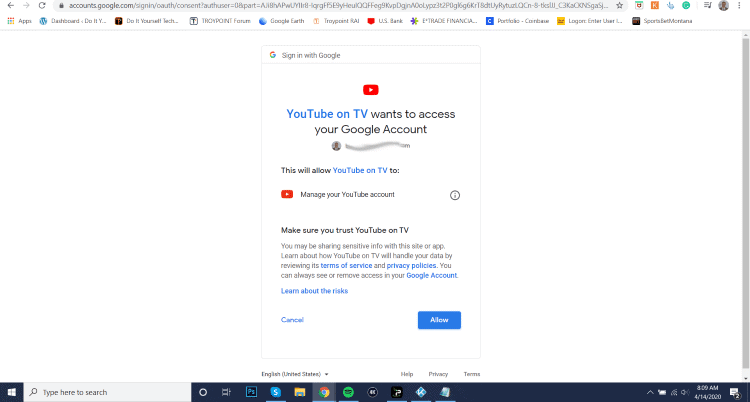
22. Click Allow.
23. You will receive another Authorization Code. Note this down somewhere.
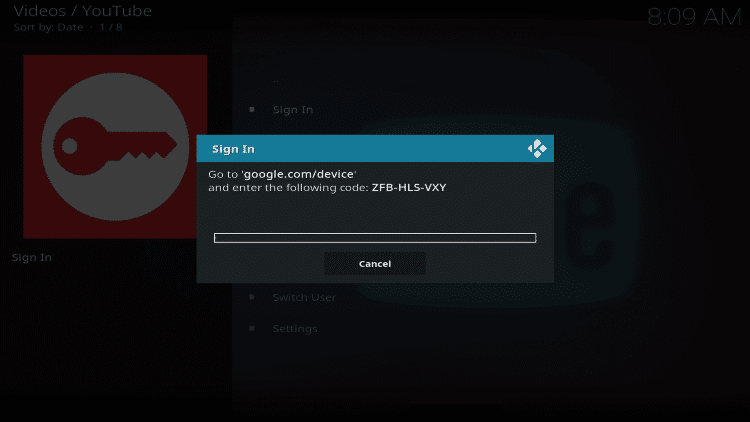
24. Go to www.google.com/device again and enter the second Code you just received.
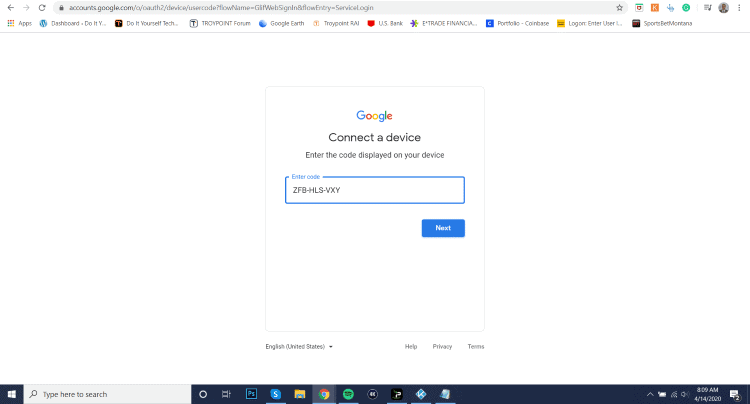
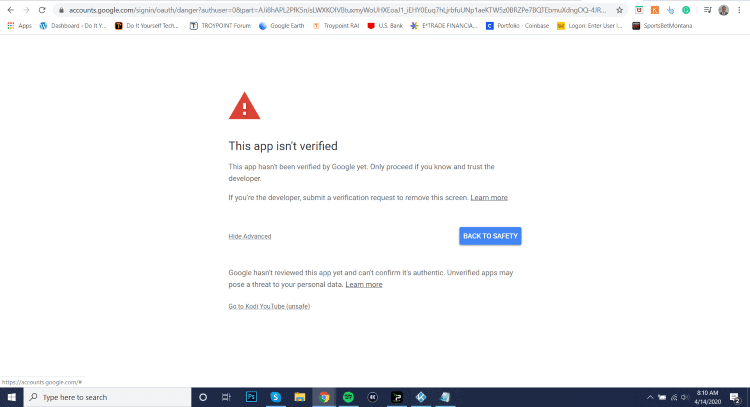
25. You may receive a warning from Google. Click on Advanced Settings and select Go to Kodi Youtube.
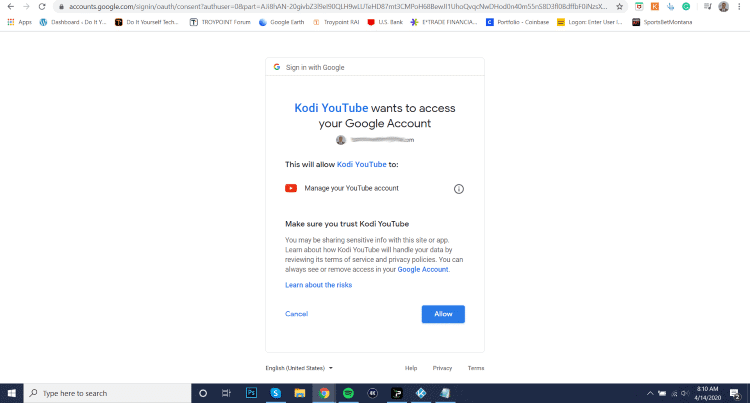
26. Select Allow.
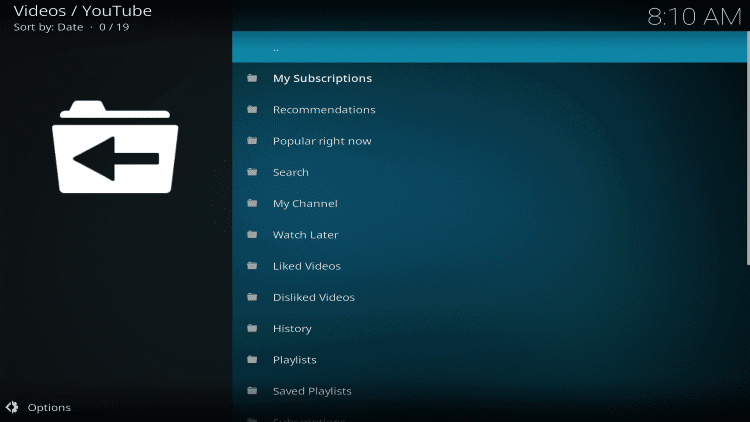
27. Congratulations! You are now signed in and have access to all your subscriptions.
Wrapping Up
This was my guide to installing the YouTube Kodi addon. By installing this addon to your Kodi, you can enjoy the variety of services that YouTube has to offer, such as:
- YouTube Red
- YouTube Music
- YouTube Originals
- Millions of free songs, videos, documentaries, podcasts, and more
- Access to a community of more than 2 billion people
I hope you’ve found this guide to be useful. For more useful guides, tips and tricks keep visiting my site!
Today I will show you how to install the YouTube Kodi addon. Most of the guide is straightforward, but some steps can be tricky if you don’t know what you’re doing. To help you out, I’ve tried to be as detailed as possible. Follow the steps in this guide to enjoy using YouTube on Kodi.
What is YouTube?
YouTube is a platform that hardly warrants an introduction. First launched in 2005, it has become a regular fixture. From funny videos to critical thinking pieces, YouTube videos have something for everyone.
While YouTube’s primary concern has always been video streaming, its offerings have expanded exponentially over the past two decades. The website now hosts music, original series, documentaries, news outlets, etc.
Furthermore, it has become a hub not just for content consumers but also for content creators. Now international sensations the Weeknd and Shawn Mendes trace their roots to YouTube.
YouTube’s appeal is not just its monthly audience of more than 2 billion but also its free service. The low barriers to entry mean that anyone can use it to watch or upload videos.
Now, look at the steps to install YouTube on Kodi.
For Kodi Users!
ISPs, hackers, and other third-party entities worldwide may monitor your online activities. For security, privacy, and smooth streaming, it is recommended to use a reliable VPN for Kodi. Your IP address is visible to sites you visit.
I recommend ExpressVPN, a fast and secure VPN in the industry. It is very easy to install on any device, including Amazon Fire TV Stick, PC, Mac, and Smartphones. Also, it comes with a 30-day money-back guarantee. If you're not satisfied with their service, you can request a refund. ExpressVPN also has a special deal where you can get 4 months free and save 73% on the 2-year plan.
Read: How to Install and Use the Best VPN for Kodi
How to Install YouTube on Kodi
To install YouTube on Kodi, follow these steps.
1. Select addons section on Kodi’s home screen.
2. On the top left of the page, you’ll see three icons. An open box, a turning arrow, and a gear. Click on the open box.

3. Select Install from Repository.

4. Select Kodi Add-on Repository.
5. Click on Video Addons.
6. Select YouTube.

7. Click on Install.

8. Wait until a confirmation message stating “YouTube addon installed” appears on the top right corner of the screen.

9. Go back to the home screen, and choose addons.

10. Select video addons.

11. Choose YouTube.

12. Congratulations! You have successfully installed the YouTube Kodi addon.

Important Note: Due to the way YouTube on Kodi works by default, you use a public API. This shouldn’t be a monumental issue on its own, but occasionally, you receive an error message.
The message states that the quota limit has been reached. This means that too many people are using the public API right now, so you won’t be able to use YouTube in this situation.
Don’t worry; I’ll show you how to set up the API for the YouTube Kodi addon.
How to Setup YouTube Kodi API
Fair warning before we begin. This process is a bit tricky for complete beginners. I’ve tried to keep it as detailed and simple as possible, so make sure you pay close attention. Here are the steps to install the YouTube Kodi API:
1. Visit https://console.cloud.google.com/ and select Create Project. This will be in the upper left-hand corner of the screen, next to the Google logo. (I already have the YouTube Kodi API.)

2. Click on Create New Project.

3. Insert Project Name and press Create. I have named it Kodi YouTube Addon.

4. Visit https://console.cloud.google.com/apis/library YouTube Data API v3.

5. Press Enable

6. Visit https://console.cloud.google.com/apis/credentials and click on Create Credentials.

7. Select API Key.

8. Copy the API Key and store it somewhere for later.

9. Click OAuth Consent which should be visible on the menu bar to your left.

10. Select External and press Create.

11. Choose an appropriate Name for the API, such as YouTube API. Move down and press Save.

12. Select Credentials, the option should be on the left side of the screen. Click on Create Credentials.

13. Press OAuth Client ID

14. Select Other and choose an appropriate name. Once finished, press Create.

15. Copy the Client ID and Client Secret, for later use. You may use Notepad for this.

16. Start up the YouTube addon for Kodi, and go to Settings.

17. Select API. Enter your API Key, API ID, and API Secret in this section.

18. Go to the Main Menu, and Sign In.

19. You will be prompted by a message stating, “You must enable two applications so that YouTube is functioning properly.” Press OK.

20. Note down the Authorization Code that has appeared on the screen.

21. Visit www.google.com/device and enter the Authorization Code you received in the previous step. Then press Next.

22. Click Allow.

23. You will receive another Authorization Code. Note this down somewhere.

24. Go to www.google.com/device again and enter the second Code you just received.

25. You may receive a warning from Google. Click on Advanced Settings and select Go to Kodi Youtube.

26. Select Allow.

27. Congratulations! You are now signed in and have access to all your subscriptions.

Wrapping Up
This was my guide to installing the YouTube Kodi addon. By installing this addon to your Kodi, you can enjoy the variety of services that YouTube has to offer, such as:
- YouTube Red
- YouTube Music
- YouTube Originals
- Millions of free songs, videos, documentaries, podcasts, and more
- Access to a community of more than 2 billion people
I hope you’ve found this guide to be useful. For more useful guides, tips and tricks keep visiting my site!

Suberboost Your FireStick with My Free Guide
Stay Ahead: Weekly Insights on the Latest in Free Streaming!
No spam, ever. Unsubscribe anytime.



Thanks for your post. Got a running Youtube app in my nexus 20.3 now.
A little additional information when I setup this API.
Slightly different from the way you use the “Allow” in “Advanced Settings” method when a Google warning appears.
In my case, I have add a Test User in the “OAuth consent screen” section.
Otherwise we will get the error “Access Blocked: has not completed the Google verification process” when doing /activate.
Hi,
I just wanted to thank you for showing me finally how to make my YouTube API keys. I have struggled for a year to do this and yours was the easiest most concise set of instructions I have seen. Thank you again! 😁🎉
Hi Lvmycorcor, thank you for your kind words. I’m glad to hear that our guide helped!