In this guide, you will learn how to install the Asgard Kodi addon. You can stream with this add-on on any Kodi device, including FireStick, Fire TV, Android TV boxes, mobile phones, computers, and more.
What is Asgard?
Asgard is a comprehensive Kodi addon that provides various entertainment options for watching on-demand movies, TV shows, and live TV.
In addition, it features specialized sections such as kids’ content, documentaries, and more.
This versatile addon offers users a robust way to access their preferred media, presenting a selection of free streaming links.
For those seeking an enhanced viewing experience, integrating Real Debrid with Asgard is highly recommended, as it boosts the quality and reliability of streaming links. So, for a superior quality experience, set it up with Real Debrid.
Asgard Kodi addon also allows Trakt integration, which helps users synchronize their watch history and create personalized lists, ensuring they never lose their favorite content.
With its unique features and performance, Asgard stands out as one of the top Kodi add-ons and has been added to our list of best Addons for Kodi.
Attention Kodi Users!
Governments and ISPs worldwide monitor your online activities. If you use third-party Kodi addons, you should always use a reliable Kodi VPN to hide your identity and prevent issues with your streaming experience. Currently, your IP is visible to everyone.
I use ExpressVPN, the fastest and most secure VPN in the industry. It is very easy to install on any device, including Amazon Fire TV Stick, PC, Mac, and Smartphones. It also includes a 30-day money-back guarantee. If you're not satisfied with their service, you can request a refund. ExpressVPN is offering a special NEW YEAR deal: get 4 months free and save 78% on the 2-year plan.
Install and Use Best Kodi VPN | Why you must use a VPN at all times
Is Asgard Safe and Legal?
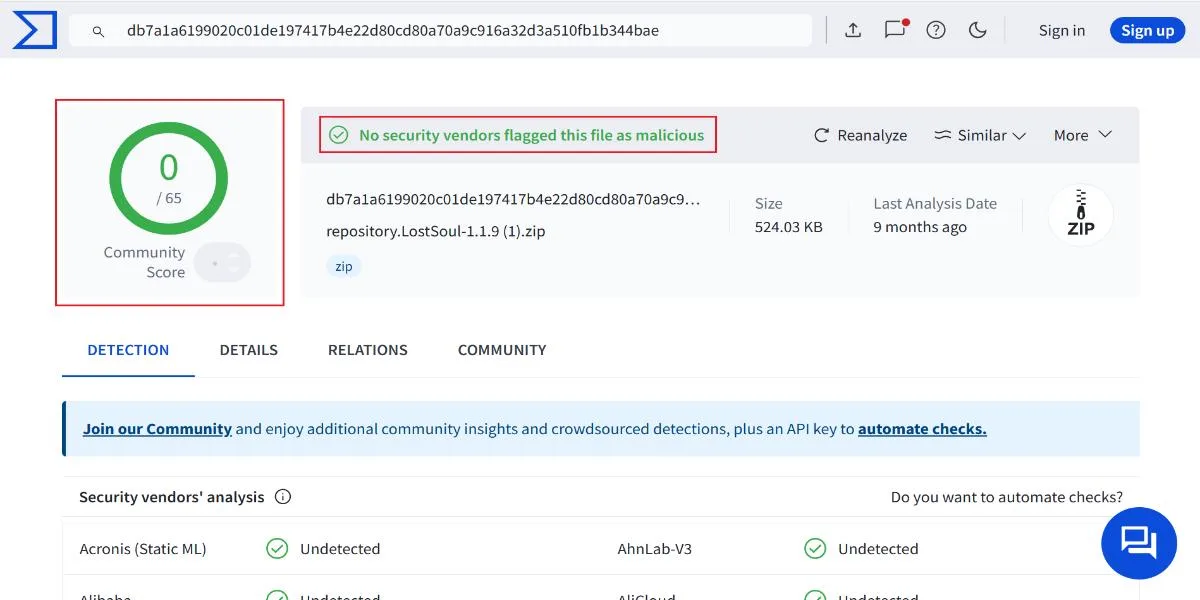
Virus Total, a reputable online antivirus service, has deemed the Lost Soul Repository safe. It is where you download the Asgard add-on. I checked the repo zip file on VirusTotal and none of the vendors tagged it as malicious. Here is the scan result of the repository zip file:
The legality of a third-party addon like Asgard is a different matter. FireStickTricks.com cannot say for sure if this addon is entirely legal. Asgard may also fetch video links from unofficial sources. Unfortunately, there is no way to find out if all the sources have copyright permission from the content creators.
I advise you to stream only videos that are available in the public domain. To maintain your privacy and avoid legal trouble, it would also be a great idea to use ExpressVPN with Asgard.
How to Install Asgard Addon on Kodi
The Asgard addon is not included in Kodi’s official repository. It comes from a third-party source. To install any third-party addon, there is one quick change we need to make to the security settings of the Kodi app, no matter which device you use. Here, follow these steps:
Legal Disclaimer: This guide is for informational purposes only. FireStickTricks.com does not own, host, operate, resell, or distribute any apps, services, or content mentioned. Some services discussed may be unverified, and FireStickTricks.com cannot confirm their legal status in every region. Users are responsible for ensuring that any content they access complies with applicable laws.
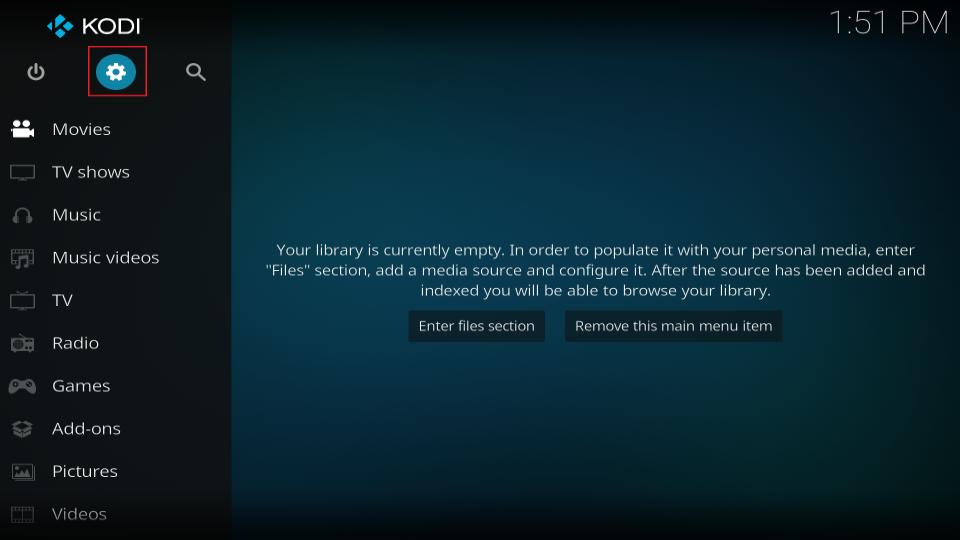
1. Go to Kodi Settings. Click the cog or gear icon at the top left of the Kodi app’s home screen (see the image below).
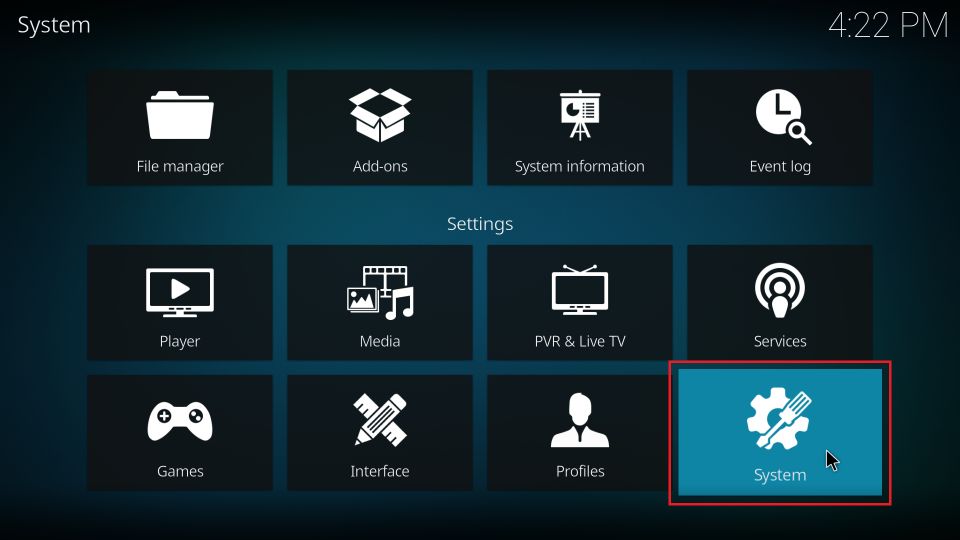
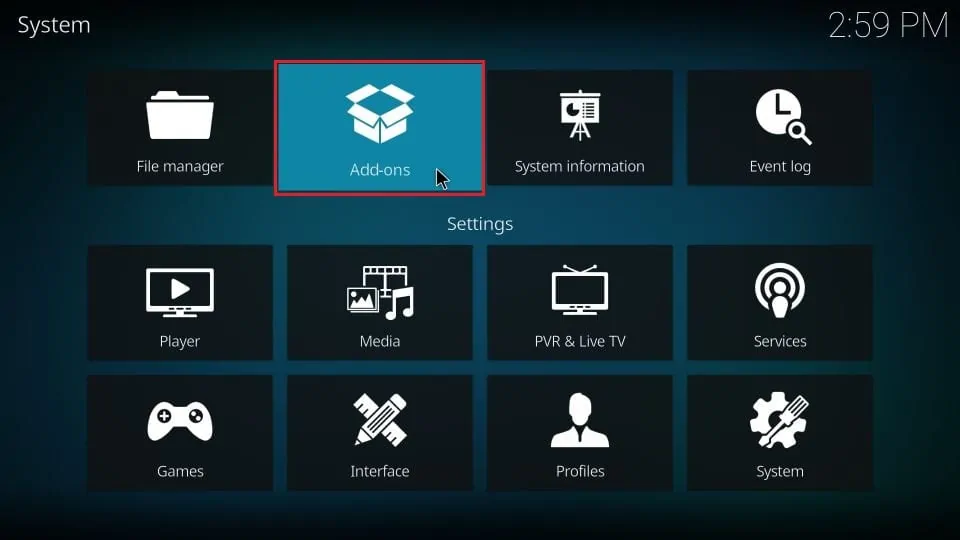
2. Click the tile System in the following window.
3. Go ahead and click Add-ons. Now, go to the right and enable the option named Unknown Sources. If it is already enabled, leave it as it is.
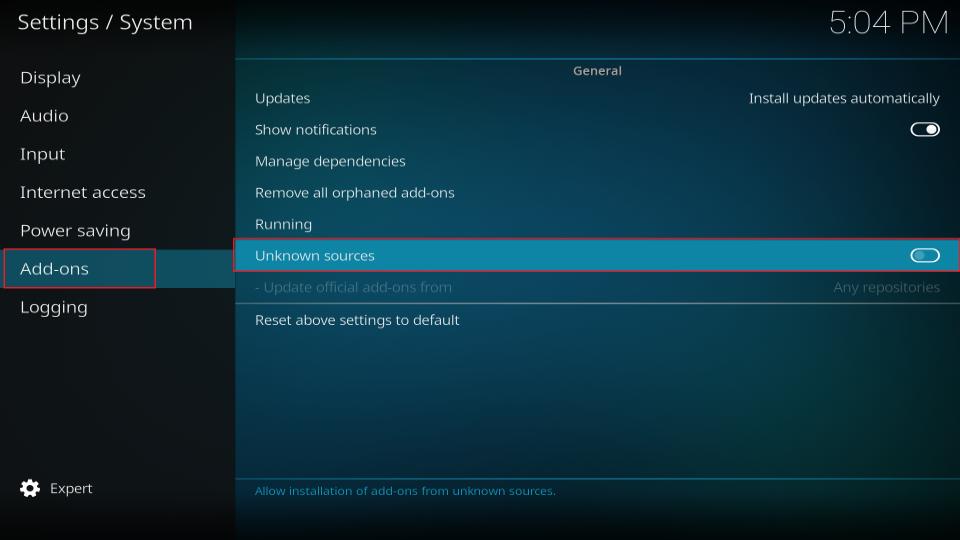
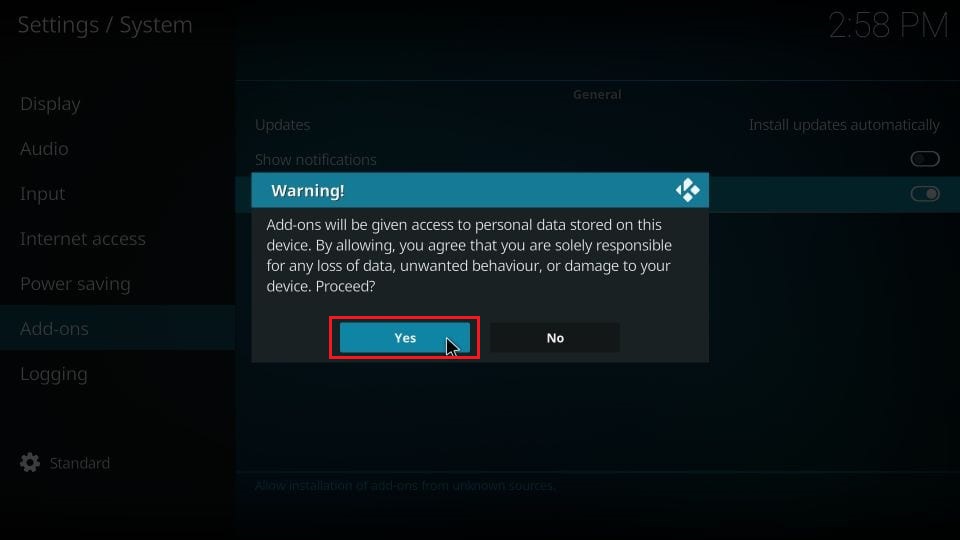
4. Click Yes on the prompt that appears.
This will configure the Kodi app and let you install the Asgard addon.
Asgard Kodi addon installation steps
Following the steps to install the Asgard addon on Kodi on any device:
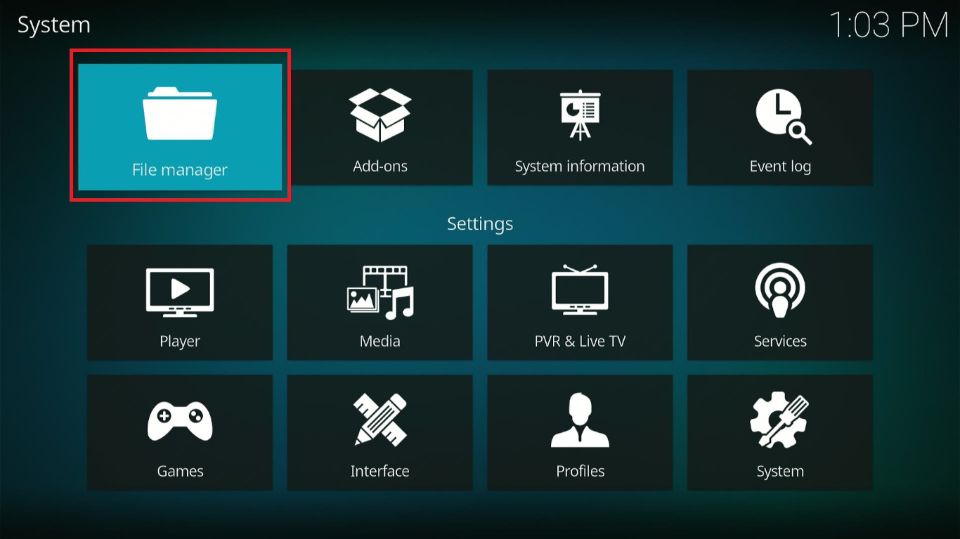
1. Go to the Settings window again by clicking the gear icon at the top-left section of Kodi’s home screen.
2. Now, go ahead and open the File manager.
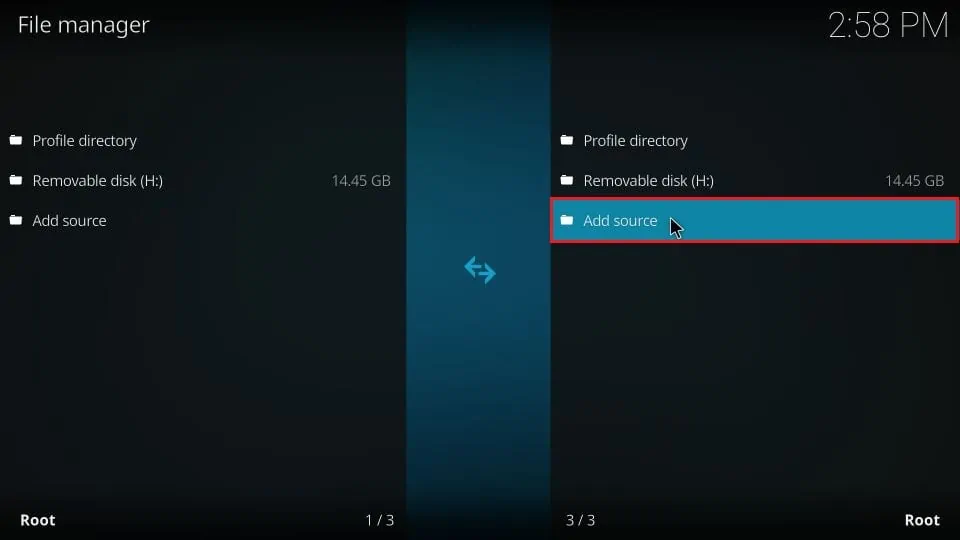
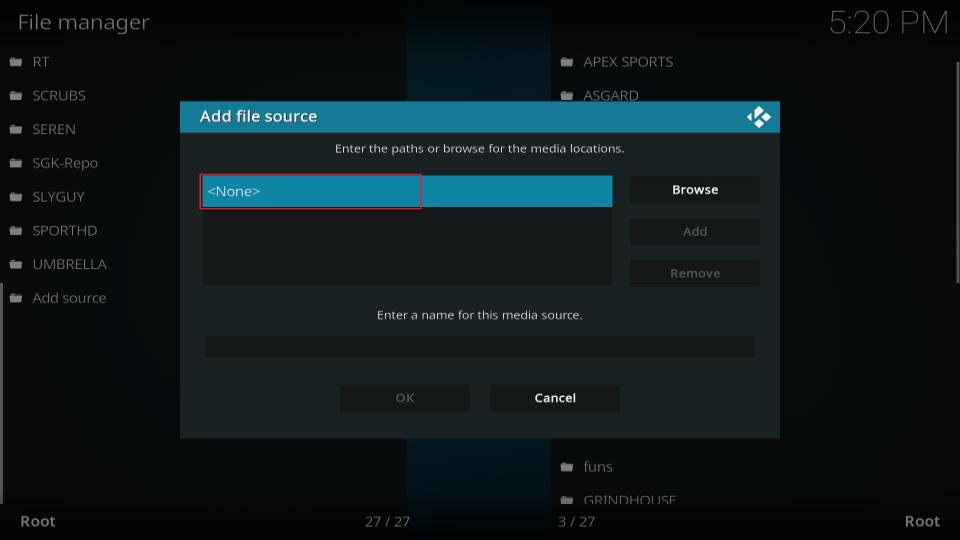
3. You can see the Add source option on both sides of the next window. So you may click on either of them.
Note: On a PC, you need to double-click this option.
4. The following dialog box is now displayed. Click where you see <None>.
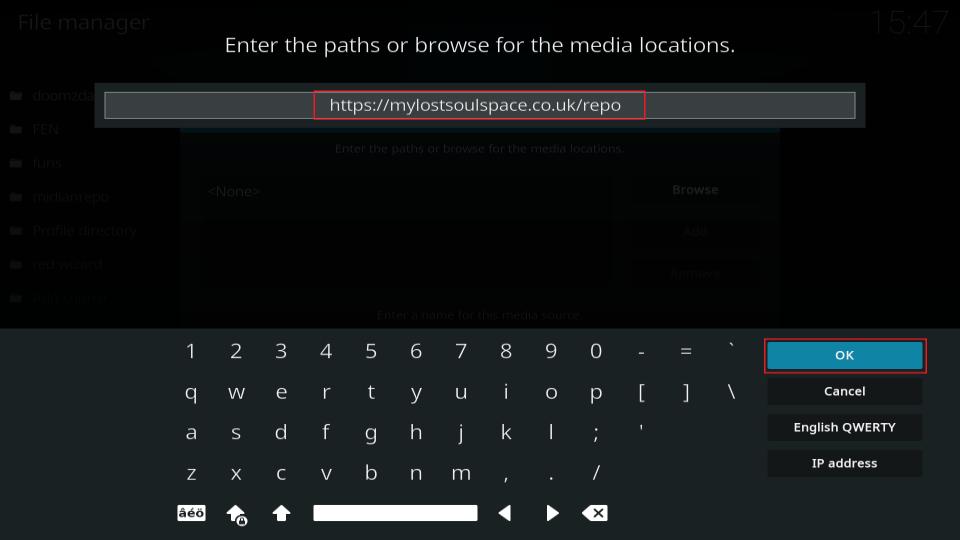
5. Type https://mylostsoulspace.co.uk/repo precisely as you see it here to avoid typos. Click OK.
Note: The URL above downloads the Lost Soul Repository from its source. FireStickTricks.com has no association with the developers of the repository or those who host this URL.
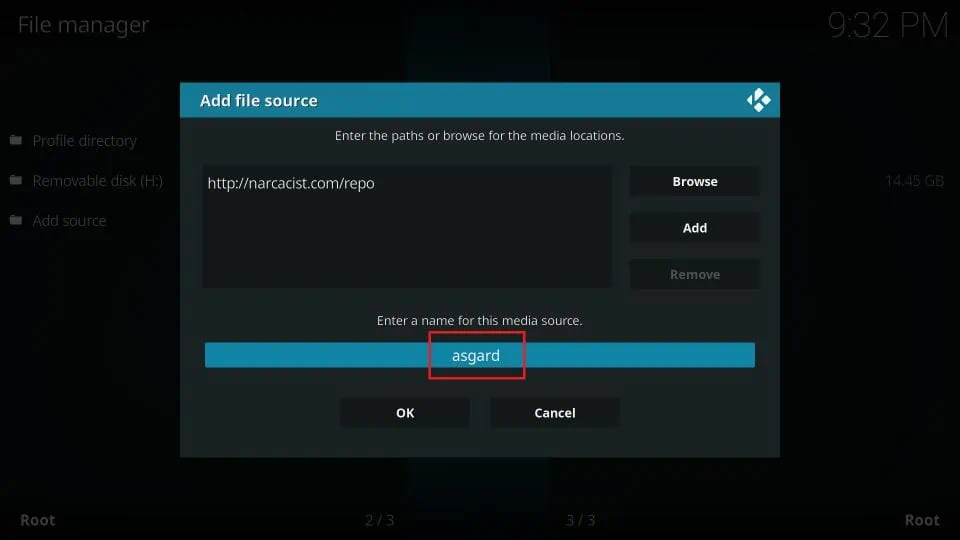
6. You are now taken back to this screen. We must name the source path we provided in the previous step. You may keep the default name ‘repo’ or give it a custom, more identifiable name like I did (asgard). Click OK.
7. Now, click the back button to return to this window or navigate it from Kodi’s home screen. Click Add-ons.
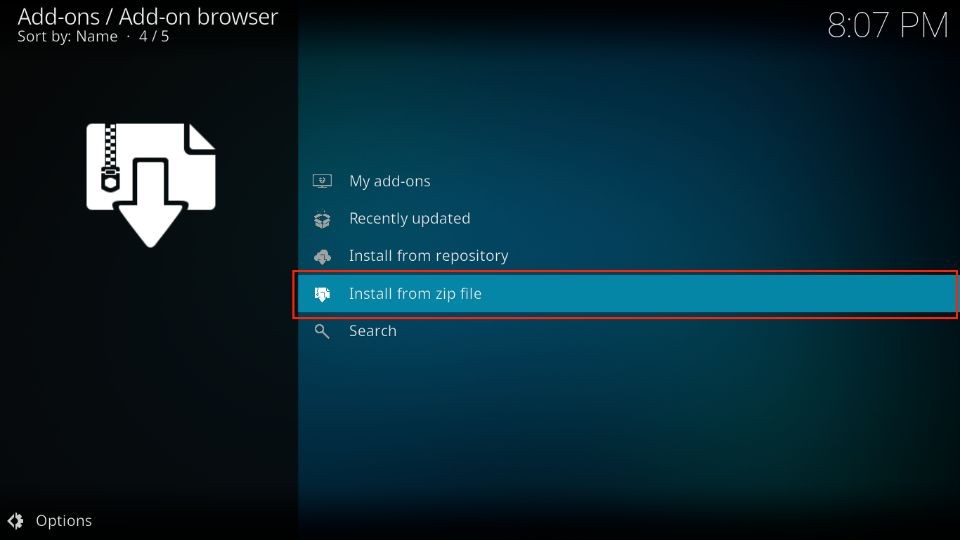
8. Click the item Install from zip file on the following window.
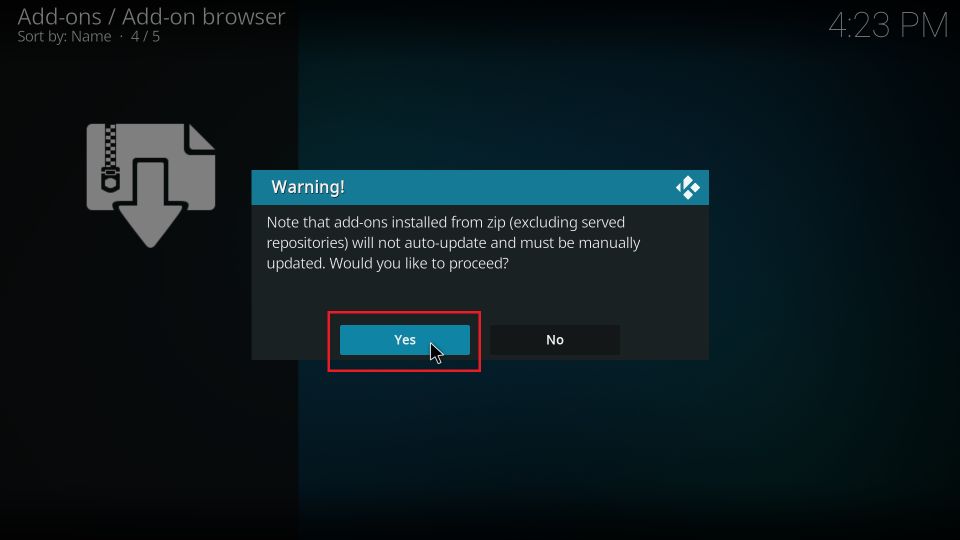
9. Select Yes when you see a popup notifying addons installed from zip file (excluding official Kodi repositories) must be manually updated.
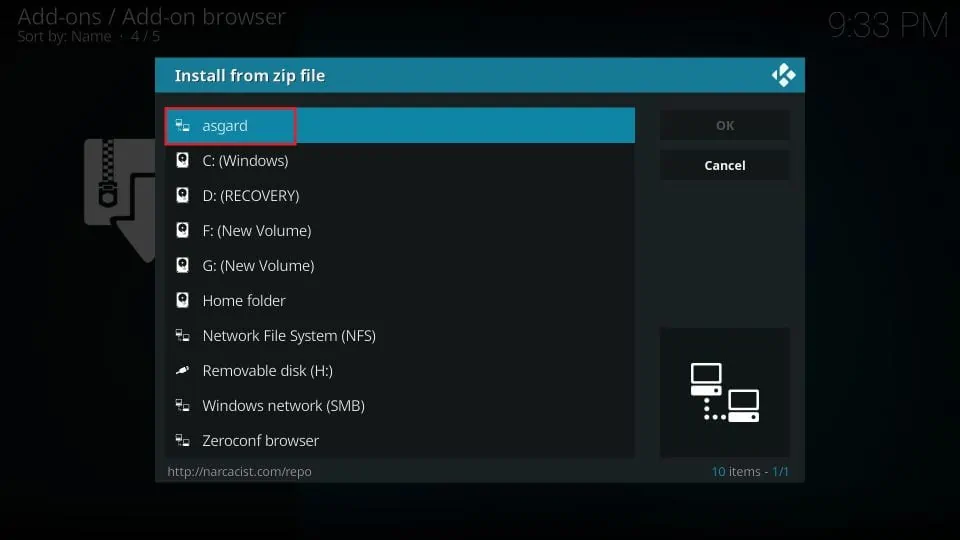
10. Click the media source name you added in the previous steps. For this guide, it is Asgard.
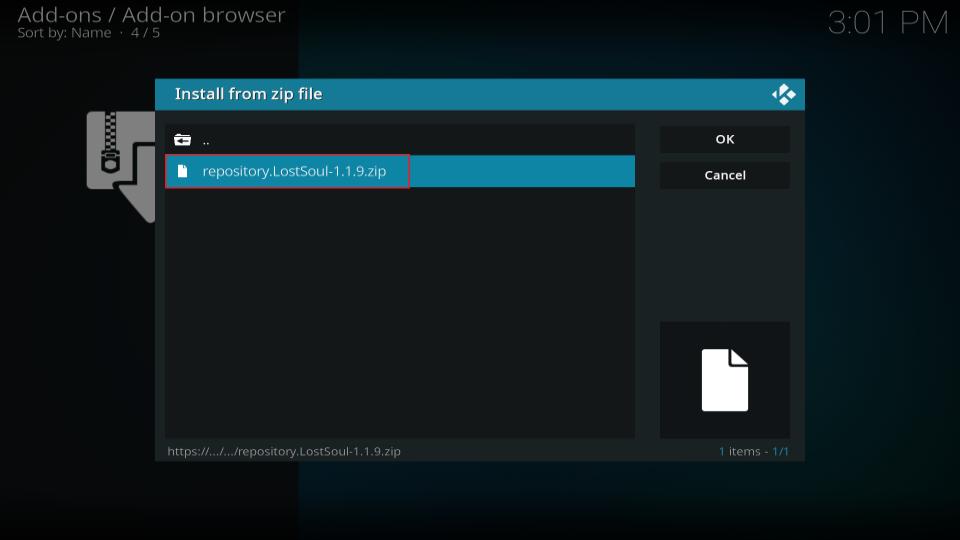
11. The following zip file is displayed in the window: repository.LostSoul.zip. Click the file.
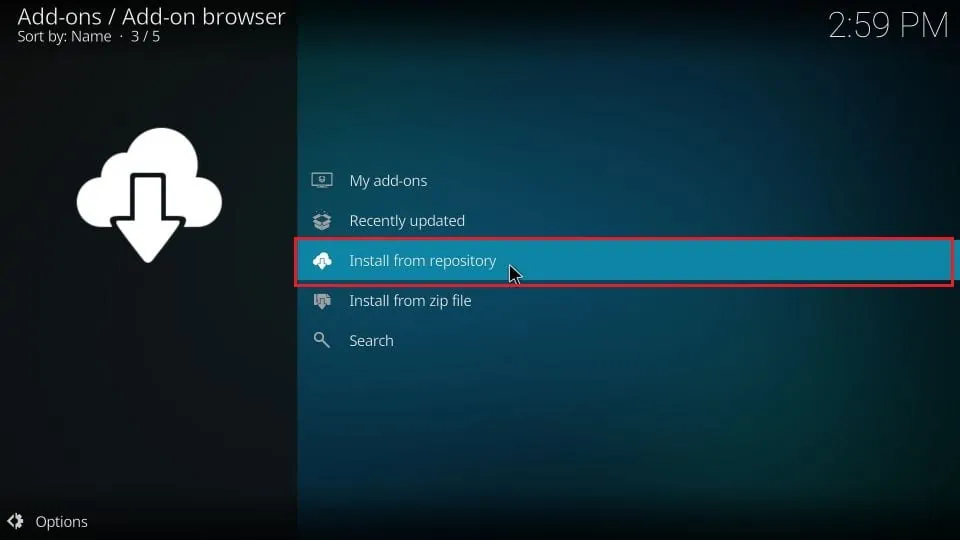
12. Give it a few seconds. The repository installation notification will appear in the top-right corner. Now, click the option “Install from repository.”
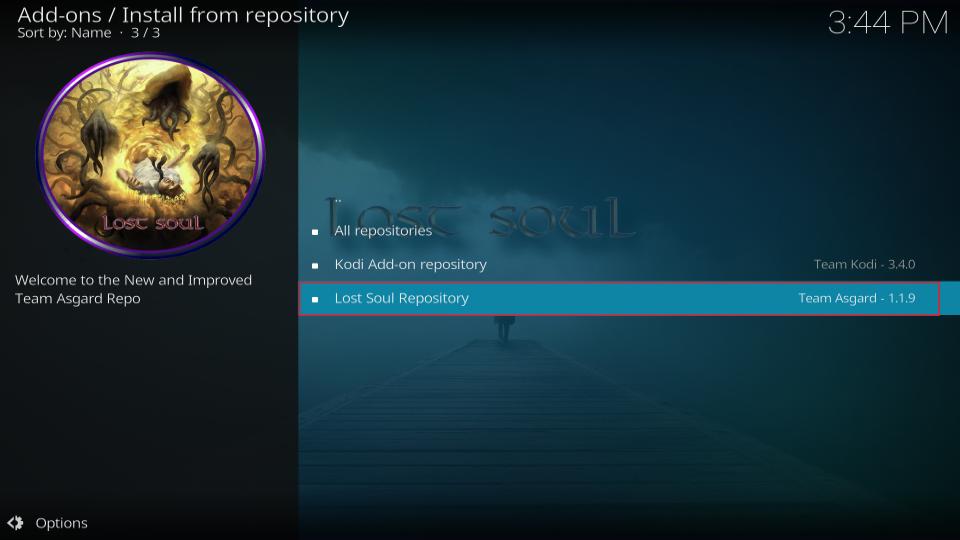
13. Click the repository you just installed: Lost Soul Repository.
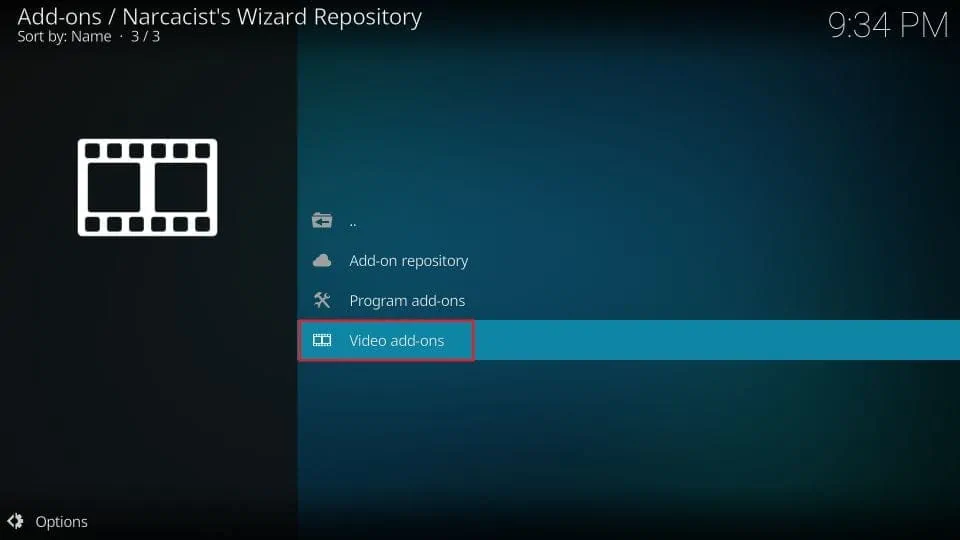
14. Choose Video add-ons next.
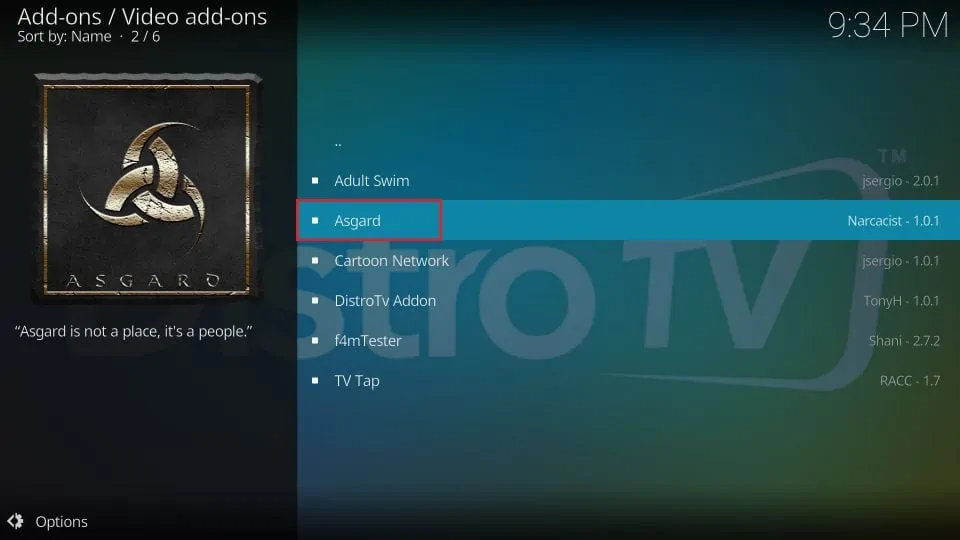
15. Here, you find the Asgard addon, among other addons. Go ahead and click it.
16. Now, choose the Install button located in the bottom-right corner.
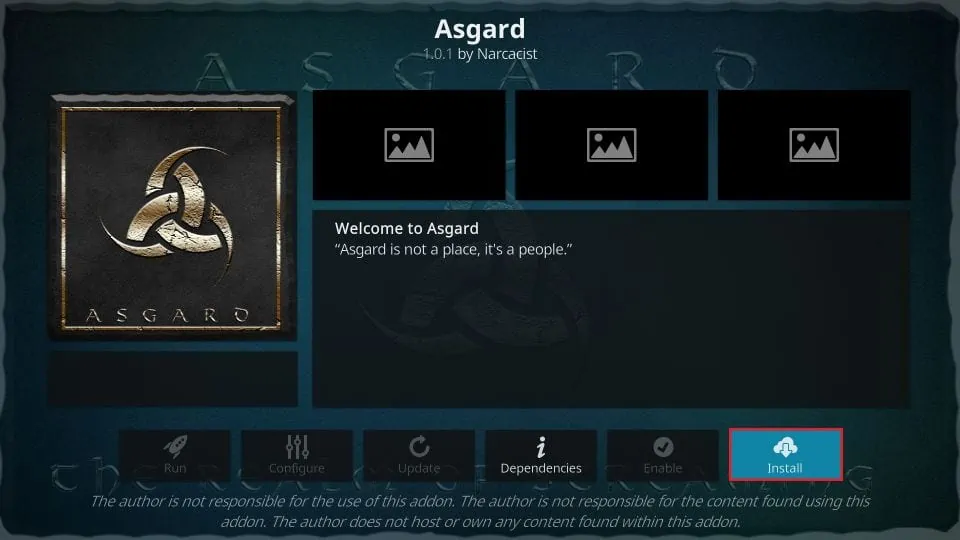
17. Click OK on the following prompt.

18. Wait for a couple of minutes. You see the Asgard Add-ons installed notification in the top-right corner.
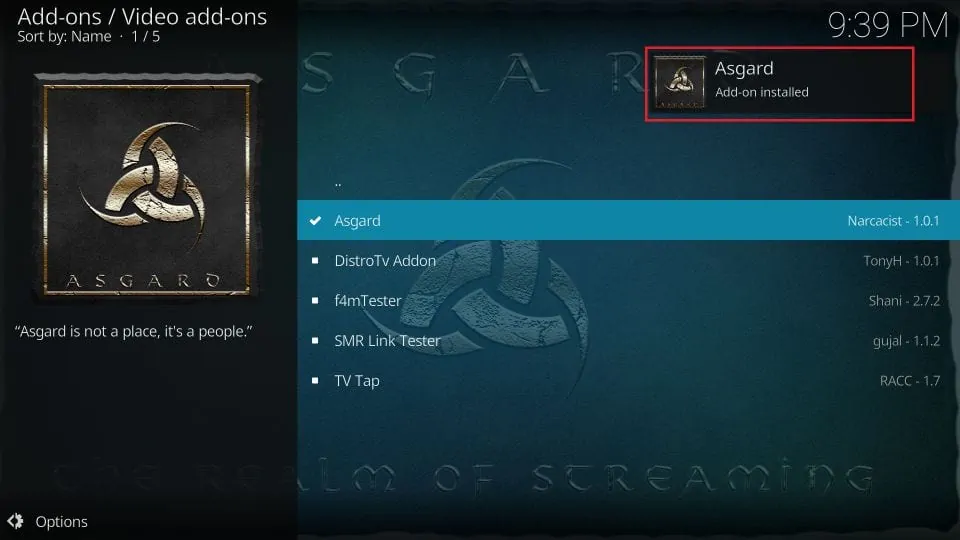
Well, that’s how you install the Asgard addon on Kodi.
Before you start streaming with Kodi Addons or Builds, I would like to warn you that everything you stream on Kodi is visible to your ISP and Government. This means, streaming copyrighted content (free movies, TV shows, live TV, and Sports) might get you into legal trouble.
Thankfully, there is a foolproof way to keep all your streaming activities hidden from your ISP and the Government. All you need is a good VPN for Kodi. A VPN will mask your original IP which is and will help you bypass Online Surveillance, ISP throttling, and content geo-restrictions.
I personally use and recommend ExpressVPN, which is the fastest and most secure VPN. It is compatible with all kinds of streaming apps and devices.
NOTE: We do not encourage the violation of copyright laws. But, what if you end up streaming content from an illegitimate source unintentionally? It is not always easy to tell the difference between a legit and illegal source.
So, before you start streaming on Kodi, here's how to get VPN protection in 3 simple steps.
Step 1: Get the ExpressVPN subscription HERE. It comes with a 30-day money-back guarantee. Meaning, you can use it free for the first 30-days and if you are not satisfied with the performance (which is highly unlikely), you can ask for a full refund.
Step 2: Click HERE to download and install the ExpressVPN app on your streaming device. If you are using a FireStick, I have given the exact steps starting with Step 4 below.
Step 3: Click the Power icon to connect to a VPN server. That's all. Your connection is now secure with the fastest and best VPN for Kodi.

The following are the steps to install Kodi VPN on your Fire TV devices. If you have other streaming devices, follow Step 1-3 above.
Step 4: Subscribe to ExpressVPN HERE (if not subscribed already).
Step 5: Go to Fire TV Stick home screen. Click Find followed by Search option (see image below).

Step 6: Type Expressvpn in the search bar and select when it shows up.

Step 7: Click Download.

Step 8: Open the ExpressVPN app and Sign in using the email ID and password that you created while buying the ExpressVPN subscription.

Step 9: Click the Power icon to connect to a VPN server. That’s all. Your FireStick is now secured with the fastest VPN.

How to Use Asgard Kodi Addon
Asgard is a straightforward Kodi addon that is easy to understand and learn. This section will give you a quick preview of the addon and the steps to integrate Real Debrid.
Go to the home screen to access Asgard. You may now select or highlight (not click) the Add-ons option in the left column. The installed addons will appear on the right.
Or, you may instead click Add-ons in the left column, and on the next screen, highlight/select Video add-ons. You may now click the Asgard addon in the right section.
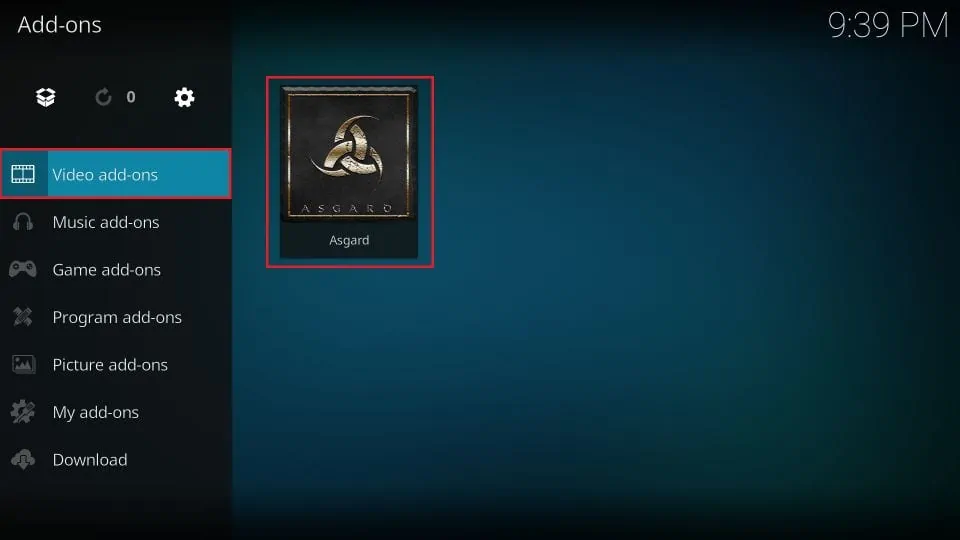
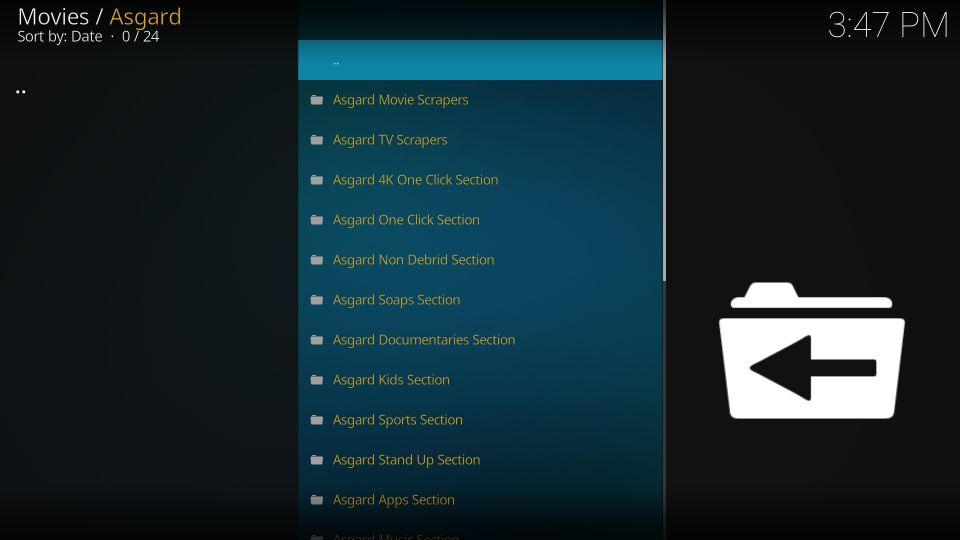
This is the main screen of the Asgard Kodi addon. Here, you will find several categories: One-Click Section, Non-Debrid Section, and sections for Movies, TV Shows, Kids, Sports, Documentaries, Anime, Live TV, and more.
Let me show you how to configure Real Debrid with the Asgard Kodi addon. Even though this addon gets many free links, it is always better to use Real Debrid for a more satisfying streaming experience. So first, scroll to the bottom of the main screen and click Settings.

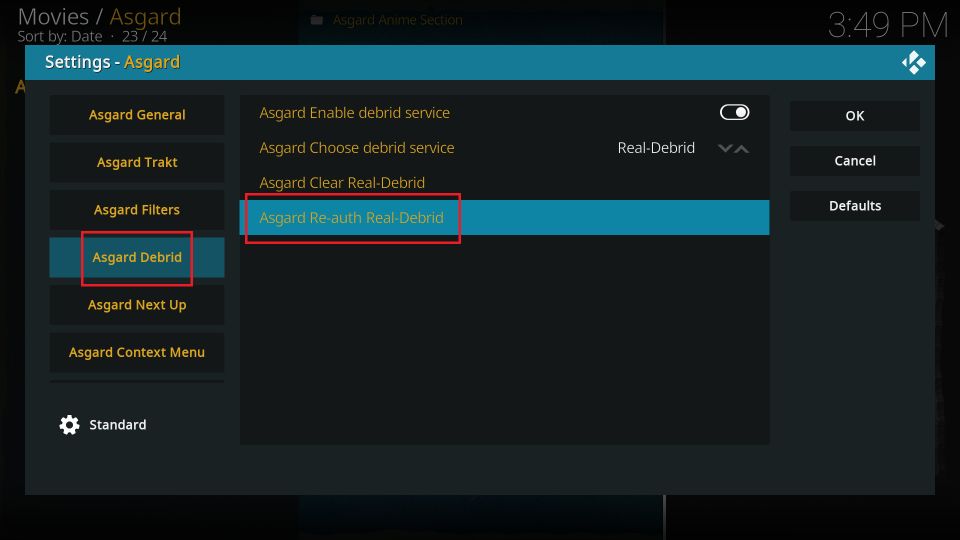
Click Asgard Debrid on the left. Select Real-Debrid in the Asgard. Choose the debrid service menu. Click Asgard Re-auth Real-Debrid.
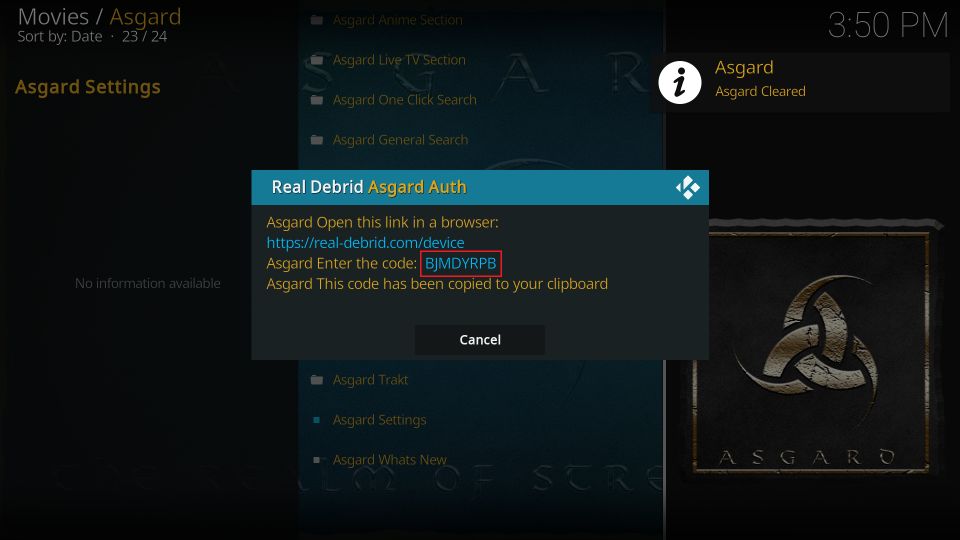
You should now see a popup window with the RD authorization code. The prompt also mentions a URL. Access the URL real-debrid.com/device in any web browser on a mobile or computer. Sign in with your RD account and enter the code on your screen if needed.
Once Real Debrid is successfully authorized, you will see a notification in the top-right corner that says “Real Debrid Resolver Authorized.” It’s done.
Wrapping Up
This post outlined how to install the Asgard Kodi addon. This add-on features many free links, supports Real Debrid, and is a decent option for watching movies, shows, and more. Additionally, you can sign in with Trakt to sync your streaming data across devices and apps. Give it a try.
Related:
- How to Install Scrubs Kodi Addon
- How to Install Magic Dragon Kodi Addon
- How to Install The Crew Kodi Addon
- How to Install Homelander Kodi Addon

Suberboost Your FireStick with My Free Guide
Stay Ahead: Weekly Insights on the Latest in Free Streaming!
No spam, ever. Unsubscribe anytime.

Asgard I’ve tried downloading it and it just not seem to work usually a very good app don’t know what the problem is anybody know
Hey David! If Asgard isn’t working, try using a VPN. It usually helps with connection issues. Also, make sure to link it with Real-Debrid for the best performance and more reliable streams. That combo should get it working smoothly again!
How do I add Put.io to kodi.
Hi Judy,
To set up Kodi with the put.io add-on, follow these simple steps:
1) On Kodi’s home screen, select the search icon and choose “Search add-ons.”
2) Enter “put.io” in the search bar, and you’ll find the add-on listed as a media source.
3) Install the put.io add-on, then link it to your put.io account. When you open the add-on, it will display a unique code.
4) Go to put.io/kodi on your browser and enter the code to connect your account.
Once linked, you can seamlessly access your put.io files through Kodi.
Hi it keeps on loading then saying error in RD I dot. Know why please help it won’t load this or the crew I am able to look at names but not watch
Hi Reggie, Asgard is a debrid-only addon. You will need to set it up with Real Debrid.
Hi,
On step 14, when I click at the repository I get “Could not connect to repository”
I tried with Host505 and got the same error. Any advice?
Hi Walter. I just checked and it is working for me. You may have run into a temporary issue, please try again.