In this guide, I will show you how to install the Gaia addon on Kodi. The method in this article works on all Kodi devices. The list includes Android mobiles, Amazon FireStick, Android TV boxes, Windows, Mac, and more.
What’s Gaia?
Gaia Kodi addon is an extension of Bubbles, one of the most popular plugins. This addon provides access to an extensive library of movies and TV series.
Gaia browse the internet and fetches high-quality media content from numerous sources, offering users an excellent collection of media options.
It also supports services like Trakt.tv and Real Debrid. Notably, Gaia’s latest version works brilliantly with Real Debrid and delivers superior performance.
Gaia’s straightforward design makes it easy to use: Launch the app, select a category, and start streaming your preferred movies or shows. This simplicity has made it popular among users who appreciate the intuitive interface.
Gaia is also featured on our list of best addons for Kodi due to its reliable performance and extensive library. It also comes preinstalled with many Kodi builds. Gaia supports numerous sources and integrations, which increase the content range.
Gaia is an excellent option for users seeking a seamless streaming experience.
Attention Kodi Users!
Governments and ISPs worldwide monitor your online activities. If you use third-party Kodi addons, you should always use a reliable Kodi VPN to hide your identity and prevent issues with your streaming experience. Currently, your IP is visible to everyone.
I use ExpressVPN, the fastest and most secure VPN in the industry. It is very easy to install on any device, including Amazon Fire TV Stick, PC, Mac, and Smartphones. It also includes a 30-day money-back guarantee. If you're not satisfied with their service, you can request a refund. ExpressVPN is offering a special NEW YEAR deal: get 4 months free and save 78% on the 2-year plan.
Install and Use Best Kodi VPN | Why you must use a VPN at all times
Features of Gaia?
Here are some features of the Gaia Kodi addon:
- A simplified setup wizard for easy setup.
- Supports tons of premium link providers.
- It lets you install free external providers.
- Easy to access sections with minimal fuss.
Is Gaia Safe and Legal?
Gaia Kodi addon is a third-party addon. Although it comes from a reputable repository, it’s still unofficial. On record, Kodi provides no support for any third-party addons or repositories. Hence, at FireStickTricks.com, we can’t say whether Gaia is safe for your device.
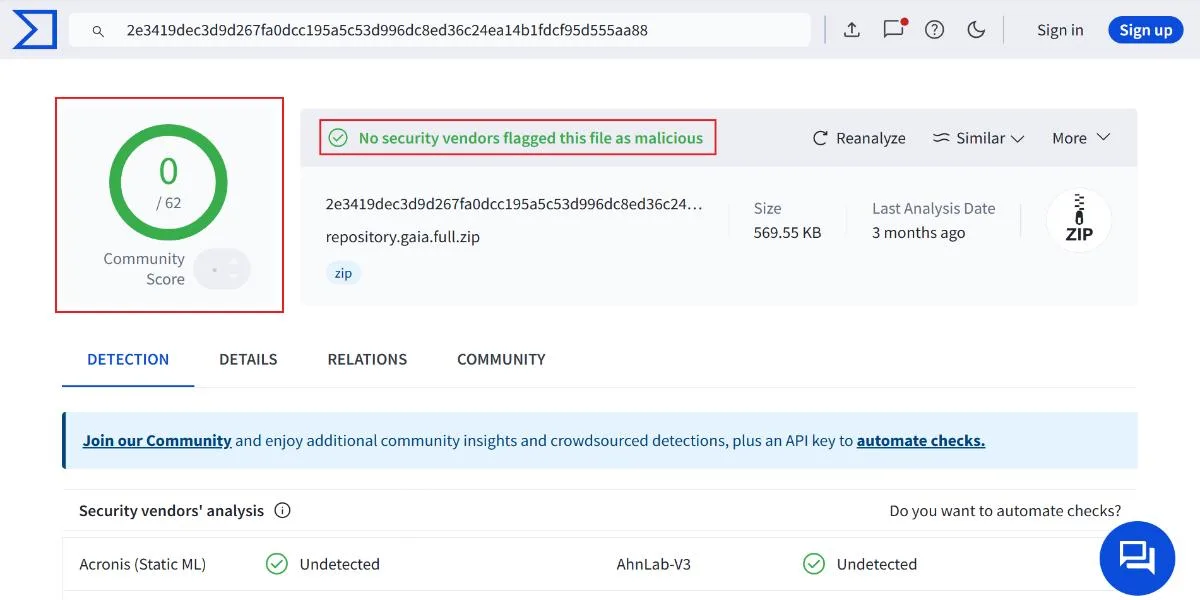
I tested the Gaia Repository zip file on Virus Total. There’s nothing wrong with the file on the surface level. Please check it out:
Regarding legality, the status of the Gaia Kodi addon is unknown. Given that it’s a third-party addon that relies on providers, there’s no way for us at www.firesticktricks.com to see if the addon is legal. So, I’ll advise using a trusted VPN service like ExpressVPN to use Gaia.
How to Install Gaia Kodi Addon
Legal Disclaimer: This guide is for informational purposes only. FireStickTricks.com does not own, host, operate, resell, or distribute any apps, services, or content mentioned.
Like any third-party addon, installing Gaia requires several processes. For your ease, I have split the installation into three separate parts:
- Part 1: Turn On Unknown Sources.
- Part 2: Install Gaia Repository.
- Part 3: Install Gaia Kodi Addon.
Part 1: Turn On Unknown Sources
This part covers the most essential step: enabling unknown sources on Kodi. By default, Kodi doesn’t allow the installation of third-party repos and addons. So, here’s how to turn it on:
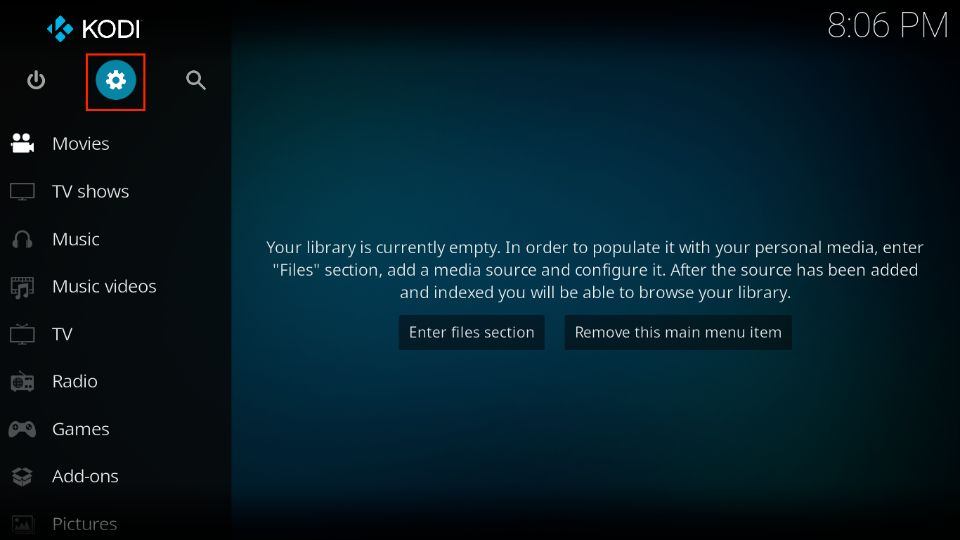
1. Launch Kodi, and from the home screen, click Settings.
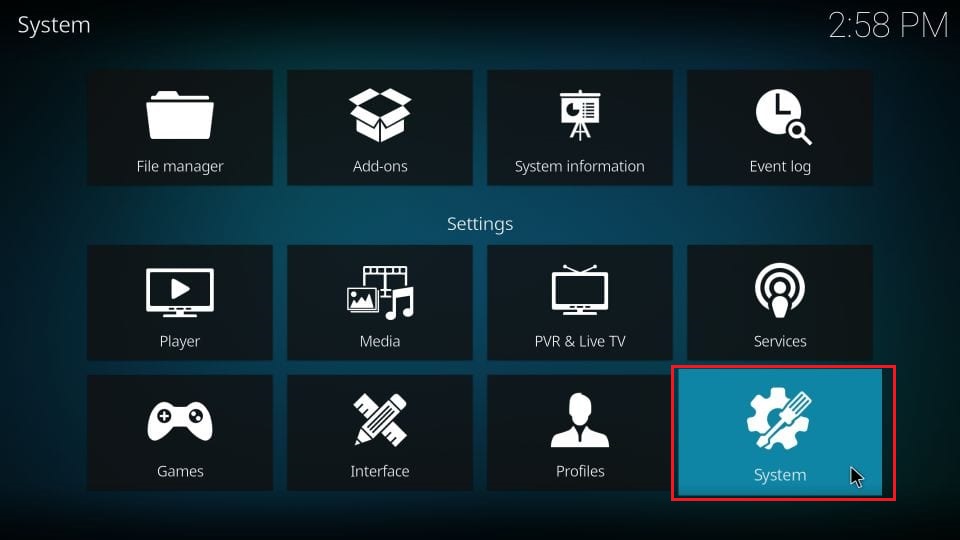
2. Open System.
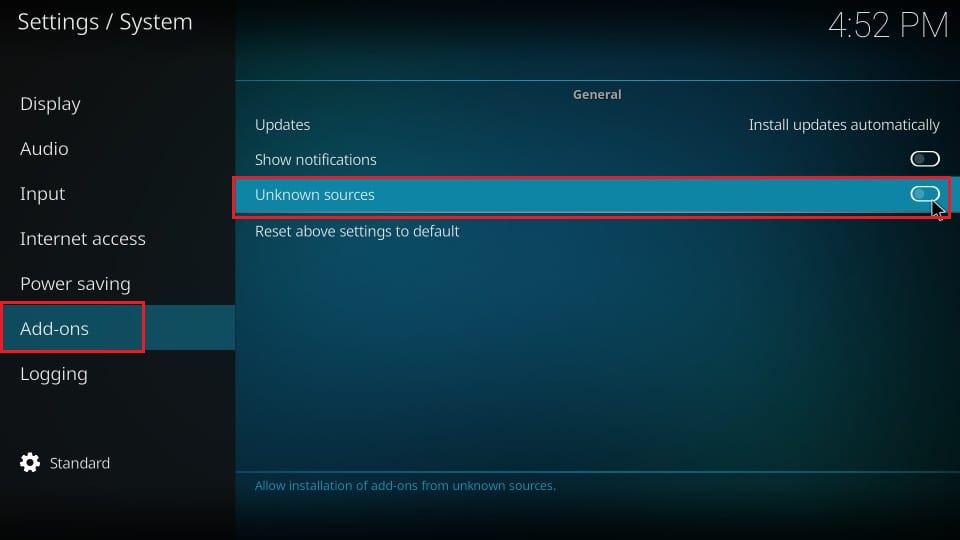
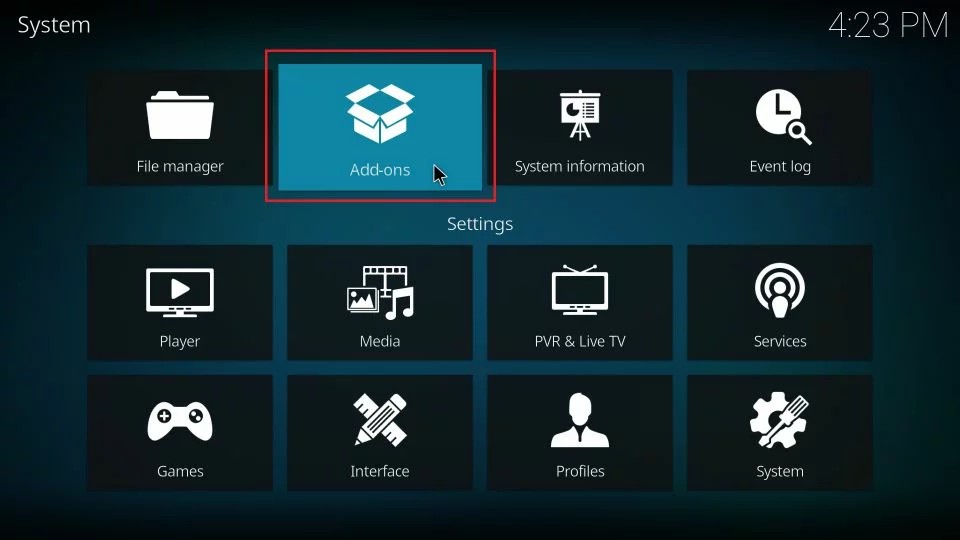
3. Now, click Add-ons. On the right, you will see Unknown Sources. This option is turned off by default. Move the toggle to the ON position.
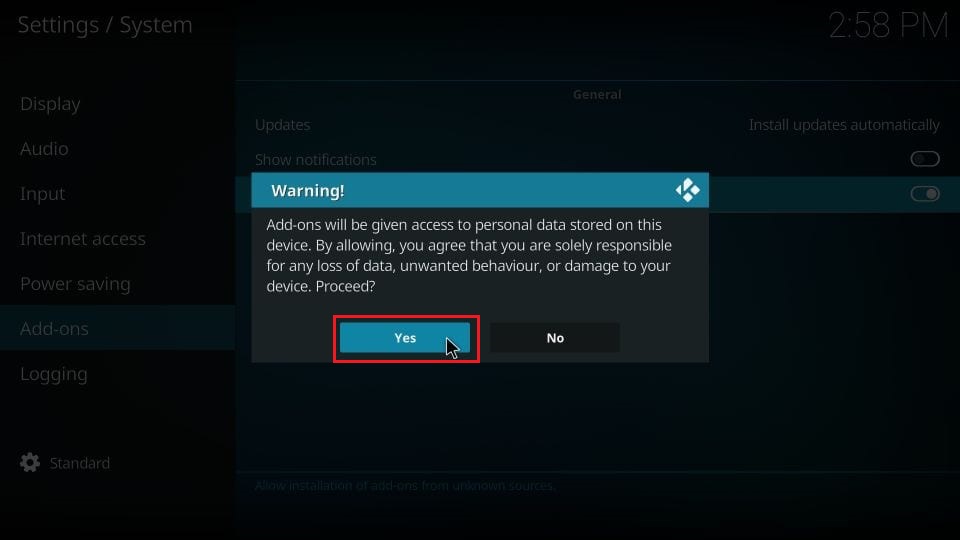
4. When you see the following prompt warning, ignore it and click Yes.
Now you have enabled Unknown Sources. Let’s get started with the installation process. Gaia addon for Kodi can be installed following the steps below:
Part 2: Install Gaia Repository
Addons come from various repositories, and Gaia is part of an eponymous repository. We must install the Gaia repository on Kodi before installing the addon.
In this part, we will add & install the Gaia repository source to Kodi. Here is what you need to do:
1. Click Settings again on the Kodi home screen.
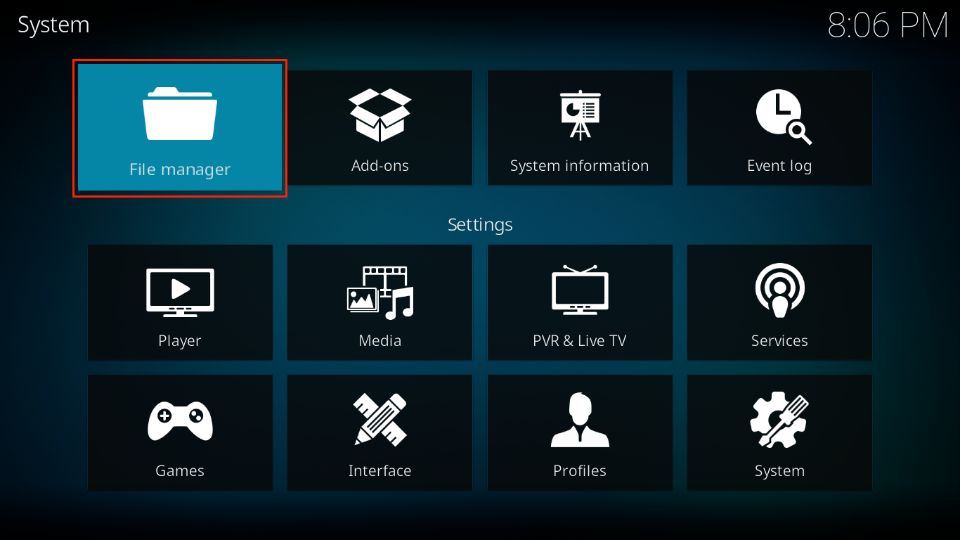
2. On the next screen, select File manager.
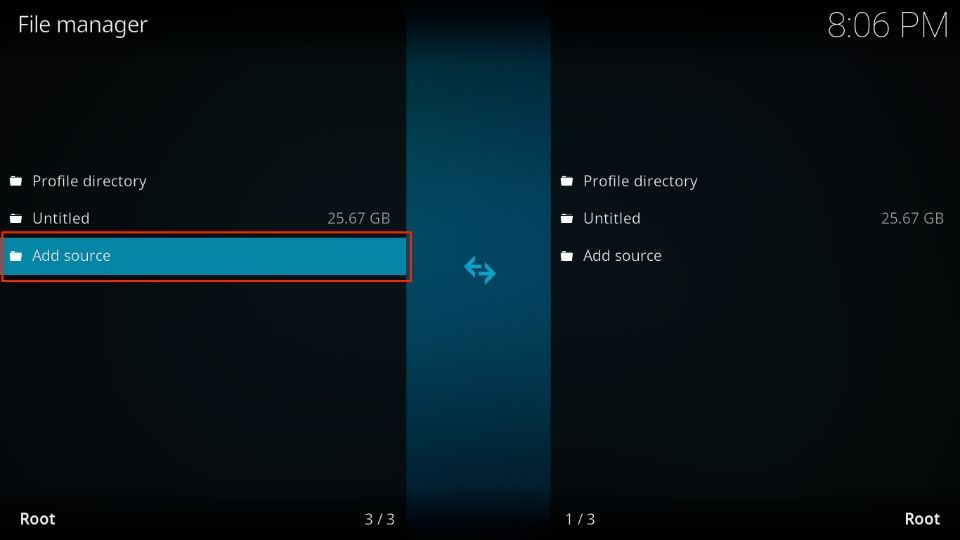
3. Now, go ahead and click Add source.
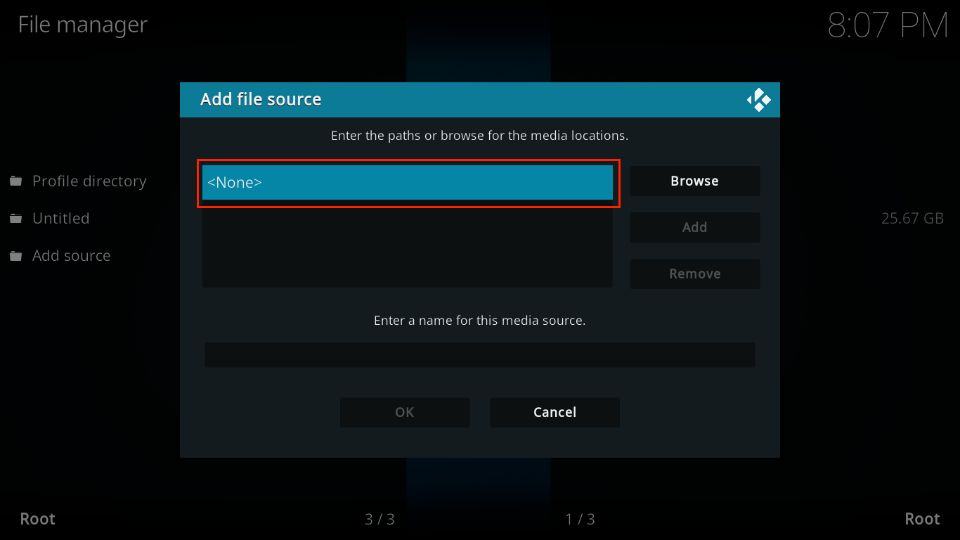
4. Click on the next screen, as you see in the screenshot below.
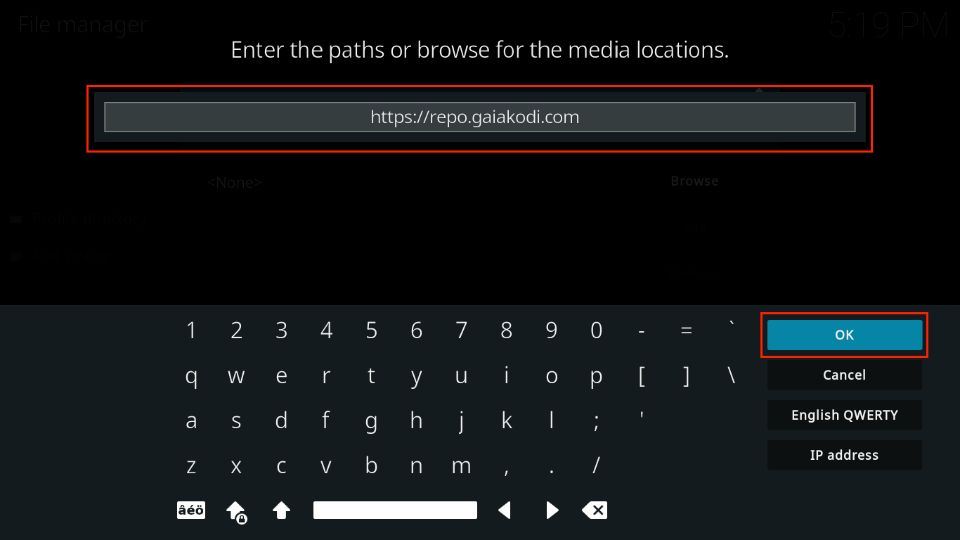
5. A new window will open where you must enter the source URL: https://repo.gaiakodi.com. Click OK to proceed.
Note: The URL mentioned above is purely for educational purposes. FireStickTricks.com is not affiliated with the repository’s developers.
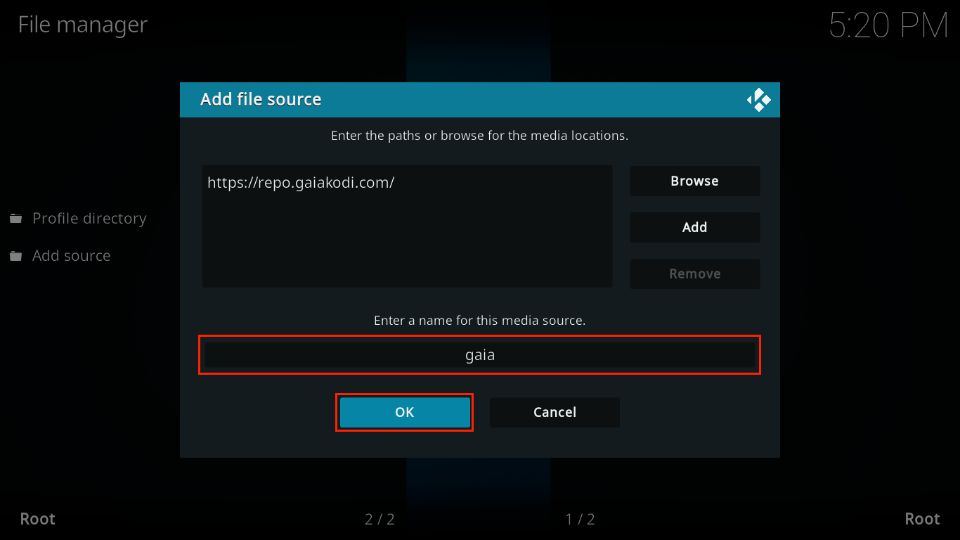
6. Now, you should see a box, Enter a name for this media source. In this field, you must type in a name for the source you just added. You may add any name you can identify later.
Name something memorable. I am naming it Gaia. When you are done, hit the OK button.
7. Go back to one screen and select Add-ons.
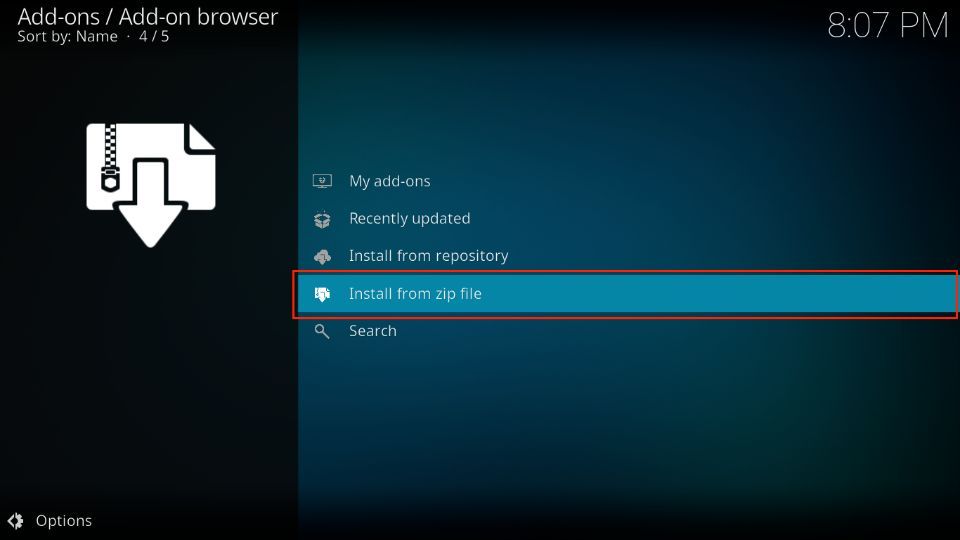
8. Next, click Install from zip file.
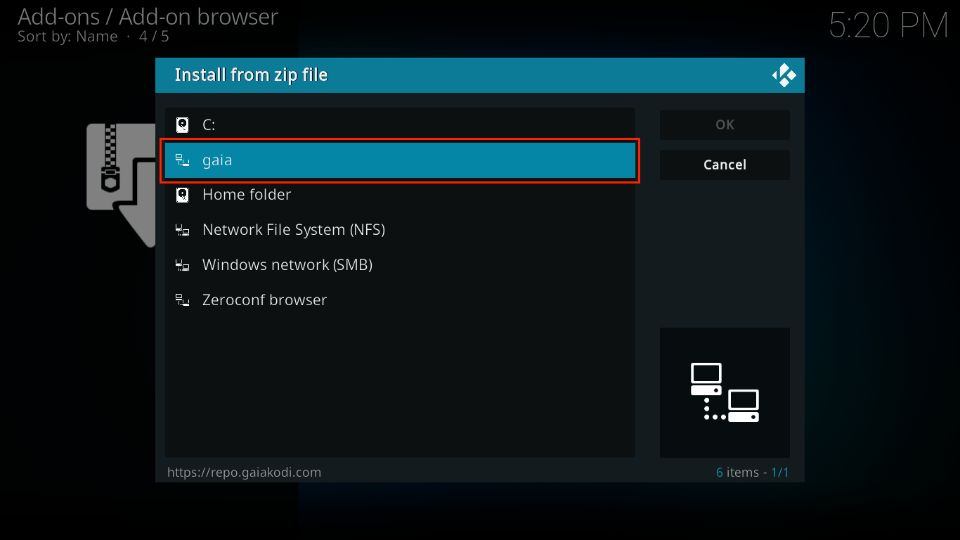
9. Now, click the name you gave to the source earlier. I chose gaia.
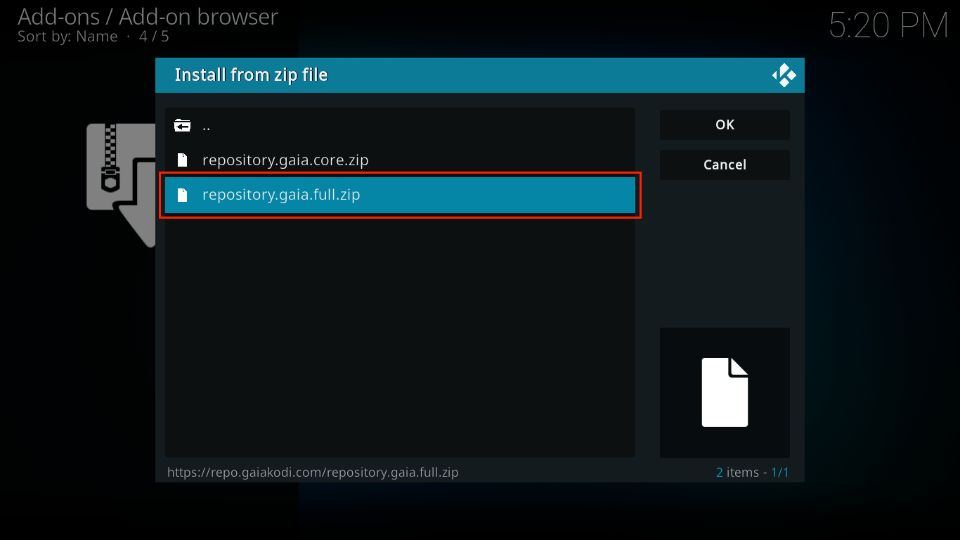
10. You should now see the zip file repository.gaia.full.zip. Click it.
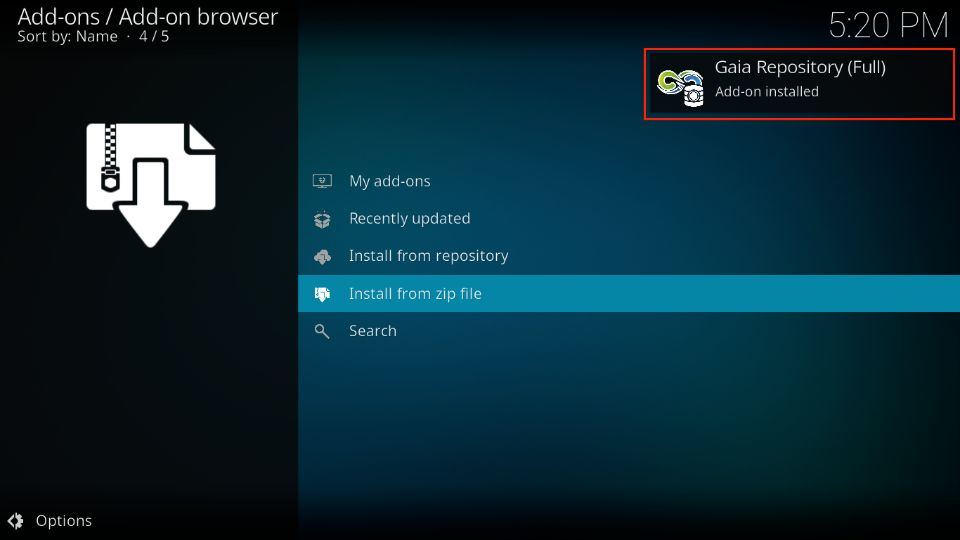
11. Now, wait for the Gaia Repository (Full) Add-on installed notification. You will see this notification on the top right.
This installs the Gaia repository on Kodi.
Part 3: Install Gaia Kodi Addon
In this section, you will find the steps to install the Gaia Kodi addon from the repository you just added. Here, we have the Gaia Repository. Follow the steps below to install it:
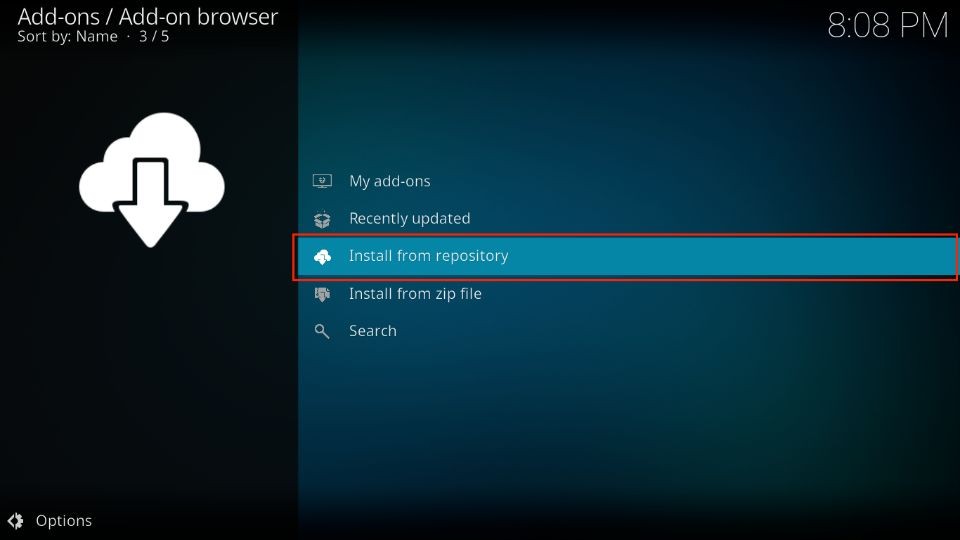
1. Select Install from repository.
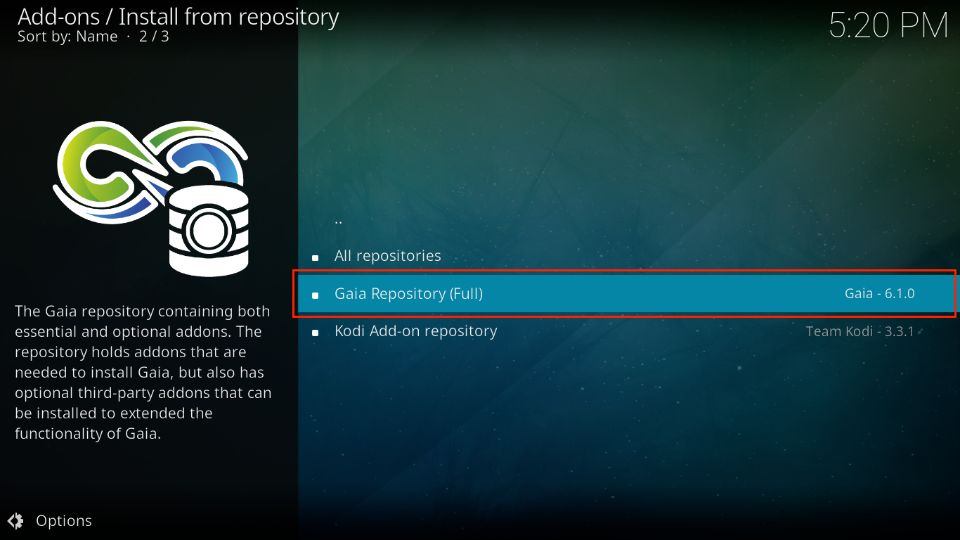
2. Next, click Gaia Repository (Full) from the list of installed repositories.
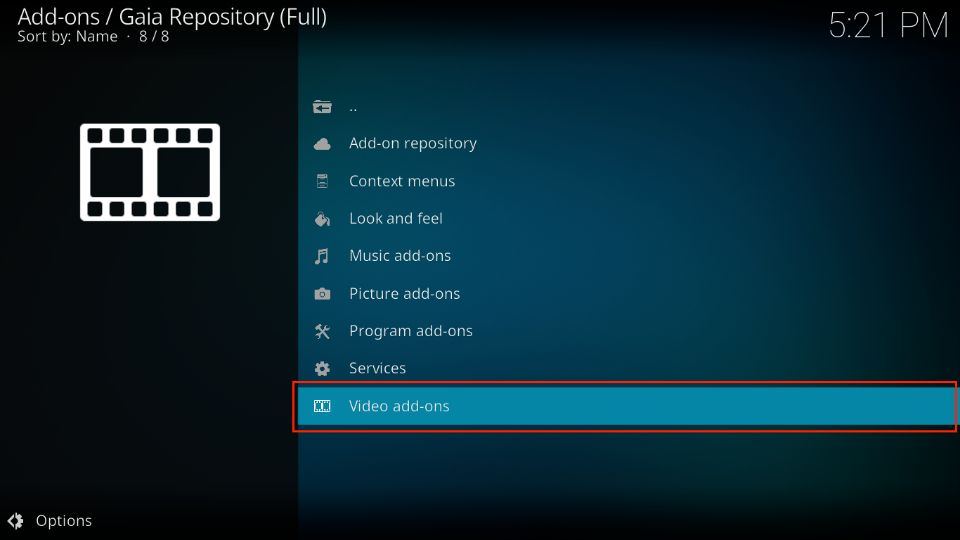
3. Click Video add-ons on the next window.
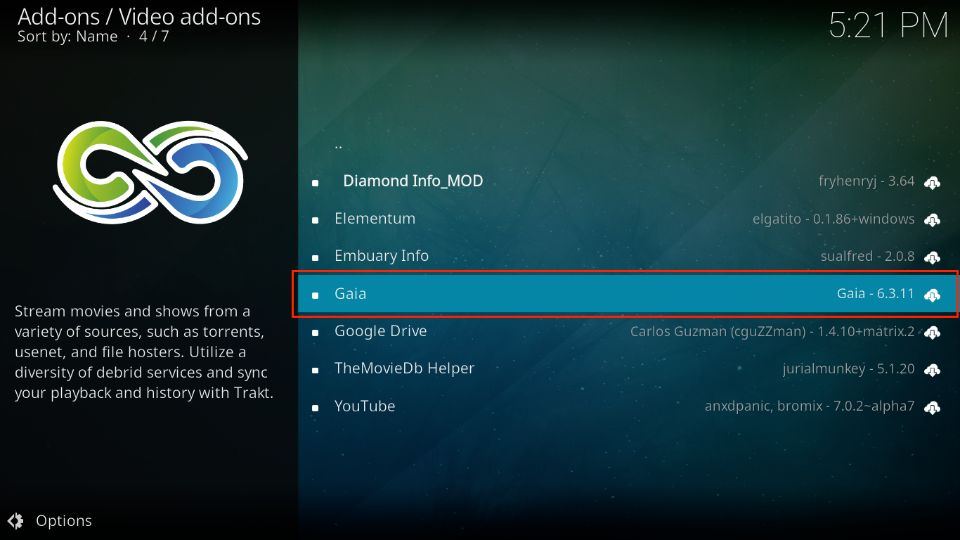
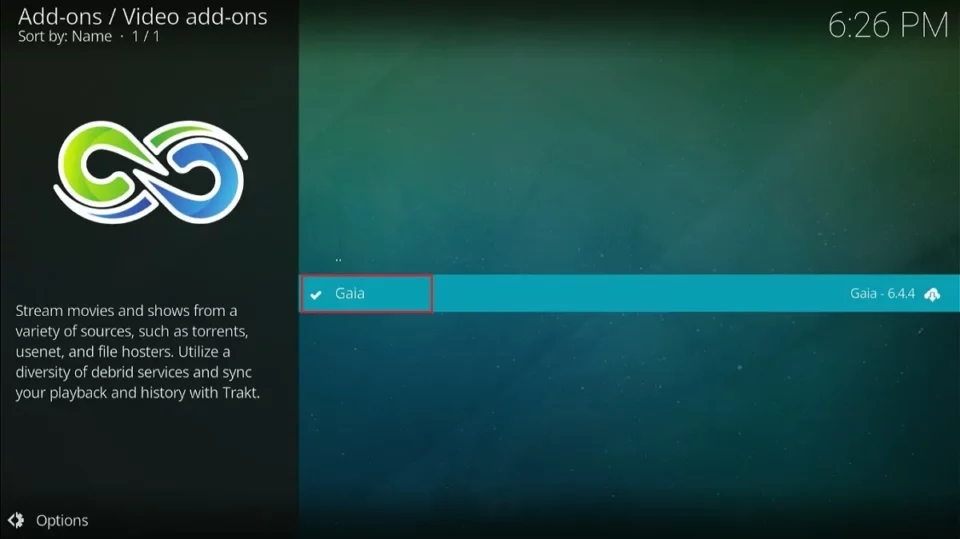
4. On the next screen, click Gaia.
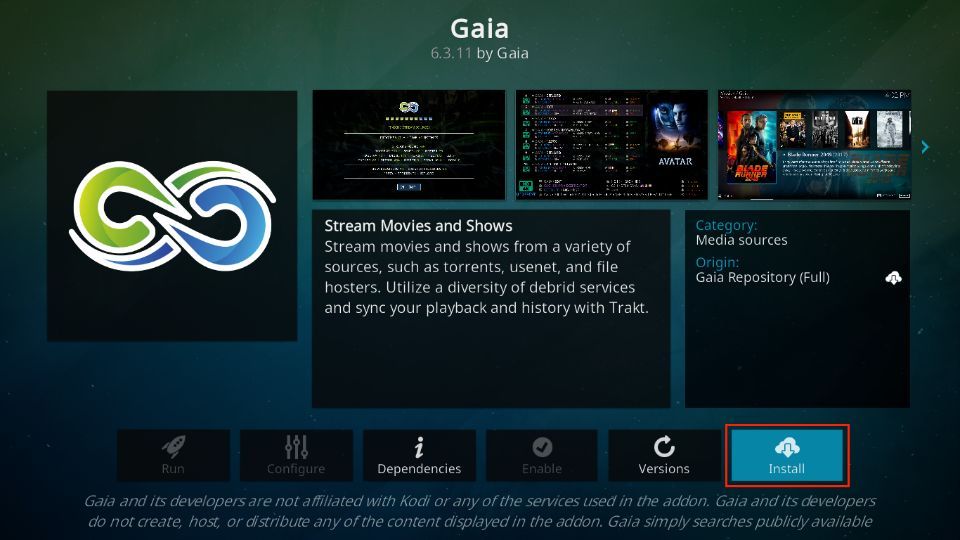
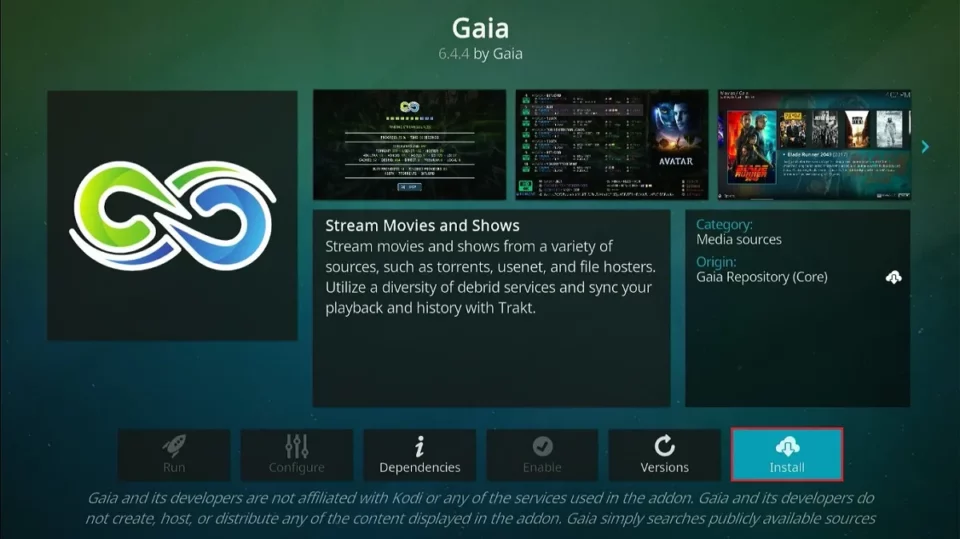
5. Click Install. You will find this button on the bottom right.
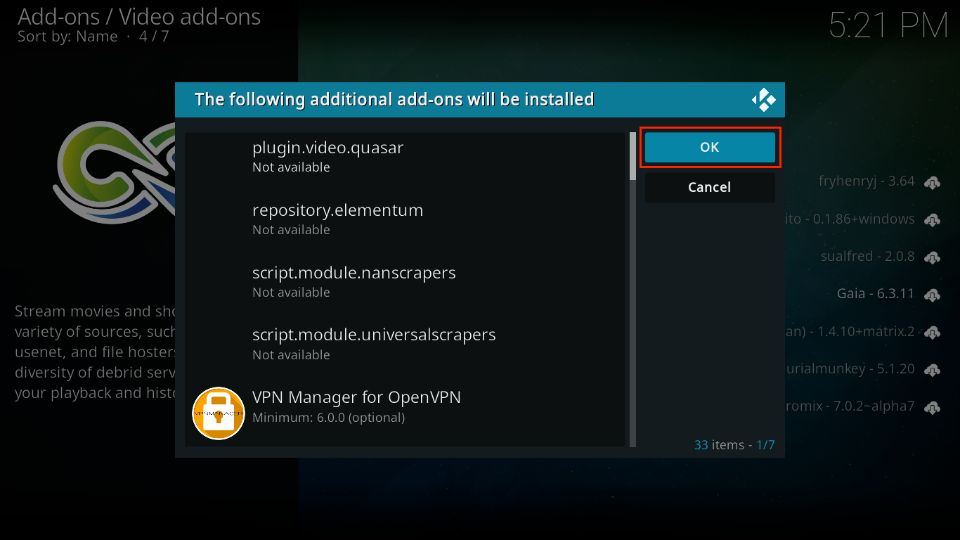
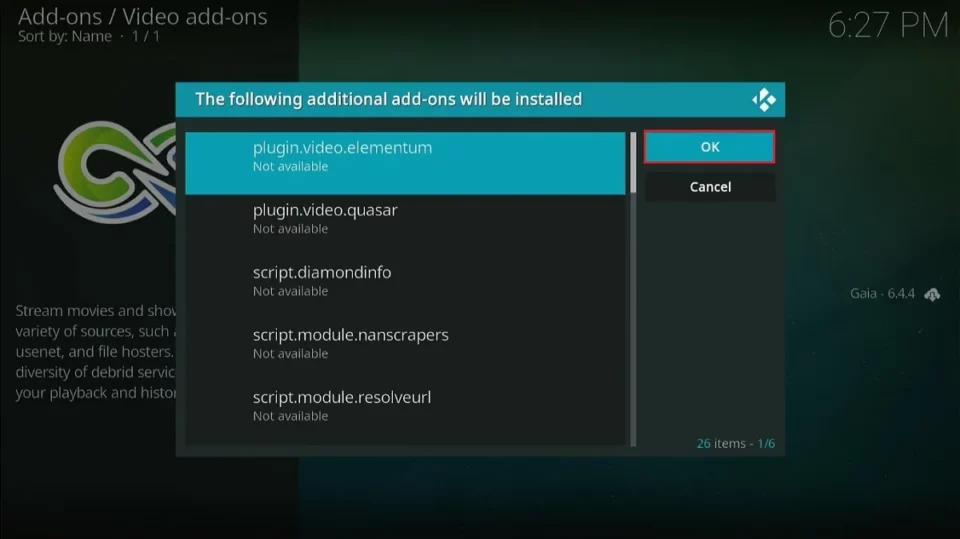
6. An additional prompt will appear with the list of the additional addons installed along with Gaia. Click OK.
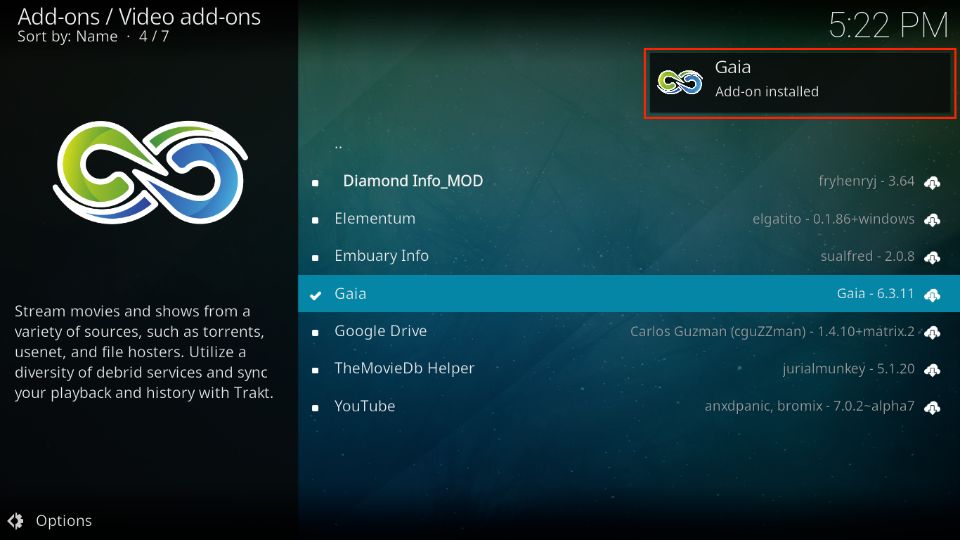
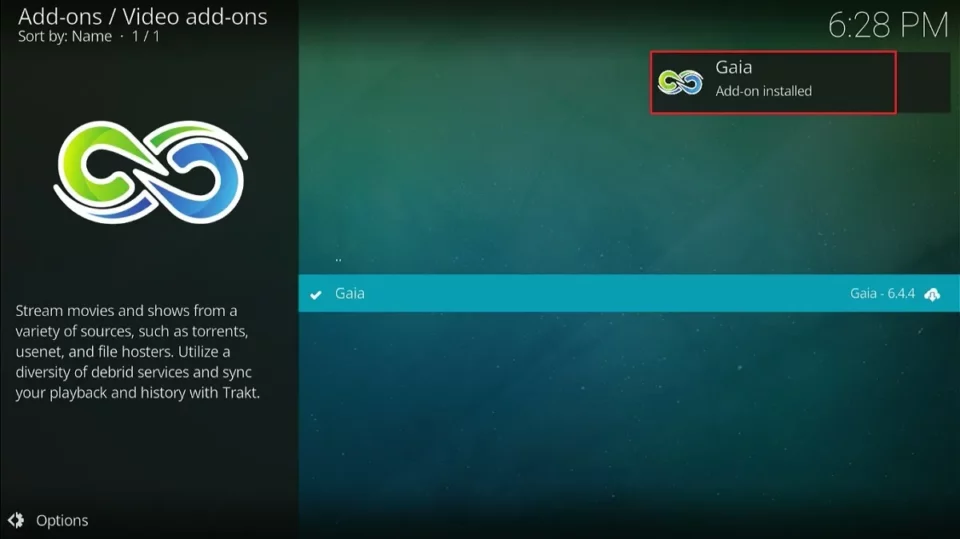
7. To install the Gaia add-on, wait for the notification, as shown in the image below.
You have successfully installed the Gaia addon on Kodi.
Before you start streaming with Kodi Addons or Builds, I would like to warn you that everything you stream on Kodi is visible to your ISP and Government. This means, streaming copyrighted content (free movies, TV shows, live TV, and Sports) might get you into legal trouble.
Thankfully, there is a foolproof way to keep all your streaming activities hidden from your ISP and the Government. All you need is a good VPN for Kodi. A VPN will mask your original IP which is and will help you bypass Online Surveillance, ISP throttling, and content geo-restrictions.
I personally use and recommend ExpressVPN, which is the fastest and most secure VPN. It is compatible with all kinds of streaming apps and devices.
NOTE: We do not encourage the violation of copyright laws. But, what if you end up streaming content from an illegitimate source unintentionally? It is not always easy to tell the difference between a legit and illegal source.
So, before you start streaming on Kodi, here's how to get VPN protection in 3 simple steps.
Step 1: Get the ExpressVPN subscription HERE. It comes with a 30-day money-back guarantee. Meaning, you can use it free for the first 30-days and if you are not satisfied with the performance (which is highly unlikely), you can ask for a full refund.
Step 2: Click HERE to download and install the ExpressVPN app on your streaming device. If you are using a FireStick, I have given the exact steps starting with Step 4 below.
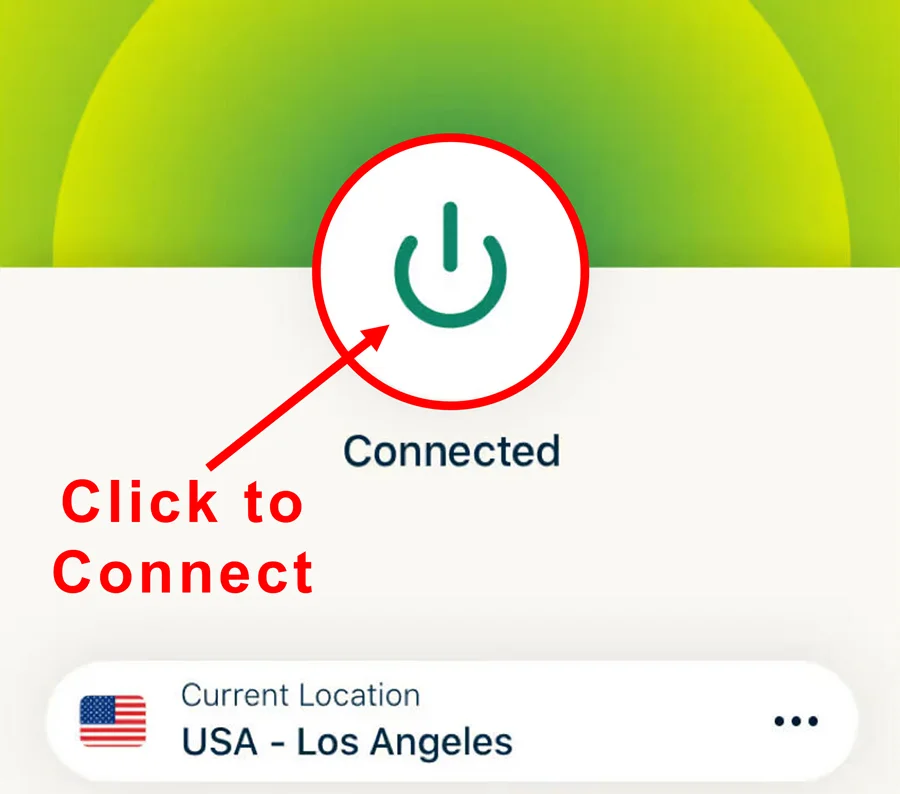
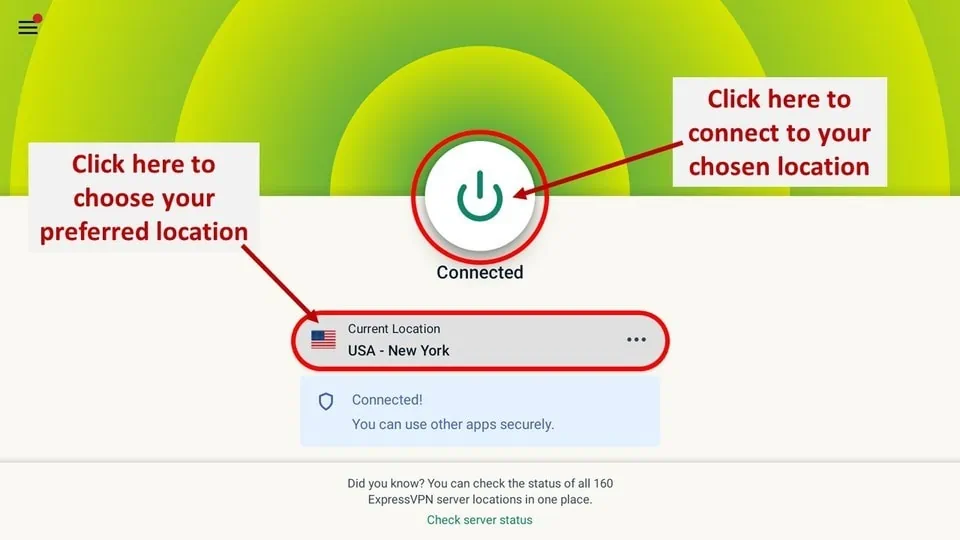
Step 3: Click the Power icon to connect to a VPN server. That's all. Your connection is now secure with the fastest and best VPN for Kodi.
The following are the steps to install Kodi VPN on your Fire TV devices. If you have other streaming devices, follow Step 1-3 above.
Step 4: Subscribe to ExpressVPN HERE (if not subscribed already).
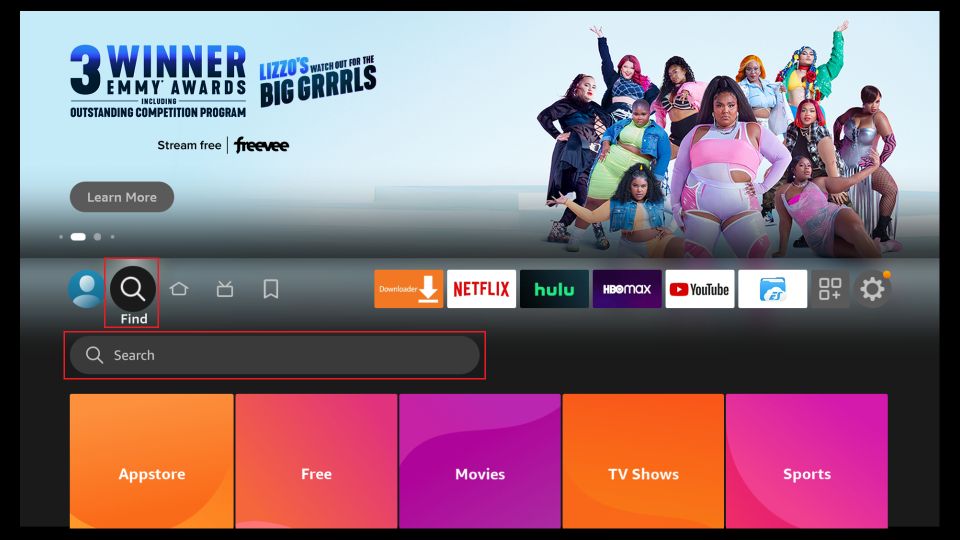
Step 5: Go to Fire TV Stick home screen. Click Find followed by Search option (see image below).
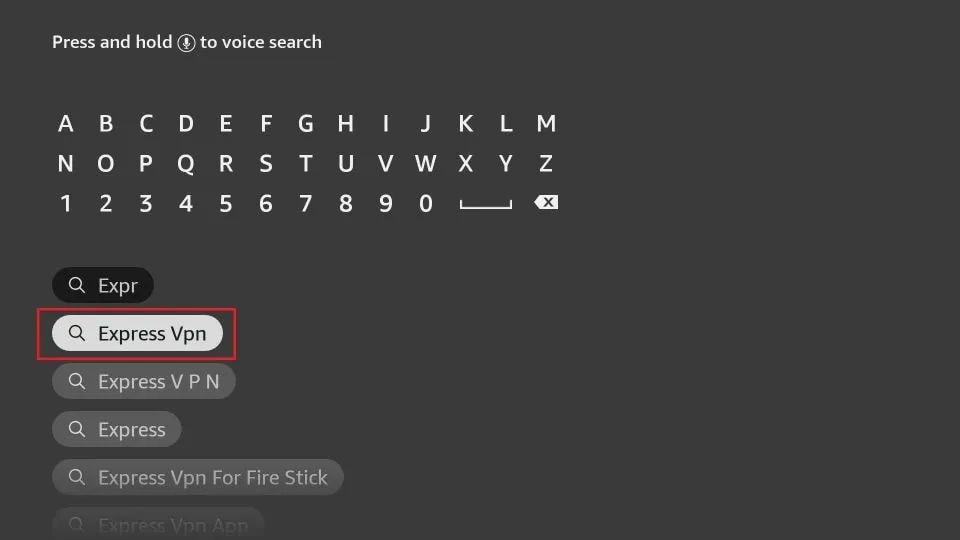
Step 6: Type Expressvpn in the search bar and select when it shows up.
Step 7: Click Download.
Step 8: Open the ExpressVPN app and Sign in using the email ID and password that you created while buying the ExpressVPN subscription.
Step 9: Click the Power icon to connect to a VPN server. That’s all. Your FireStick is now secured with the fastest VPN.
How to Install the Gaia Repository Manually
Note: Follow these steps only if you don’t see the Gaia repository zip file in the previous section. If you have already installed the addon, you may skip this section.
Manual installation of the Gaia repository is required if you don’t find it in the zip file. Some users (including me) can’t see it even after clicking the source name. In that case, follow these quick steps:
- Open https://repo.gaiakodi.com in a browser and download the zip file.
- Go to Kodi Settings > Addons > Install from zip file.
- Navigate to the folder where you downloaded the zip file.
- Install the Gaia repository from the zip file.
You can follow the above steps on any browser-enabled device. I have also provided detailed steps for installing the Gaia repository manually on a FireStick.
Part 1: Downloading the Repository Using the Downloader App
Follow the steps below:
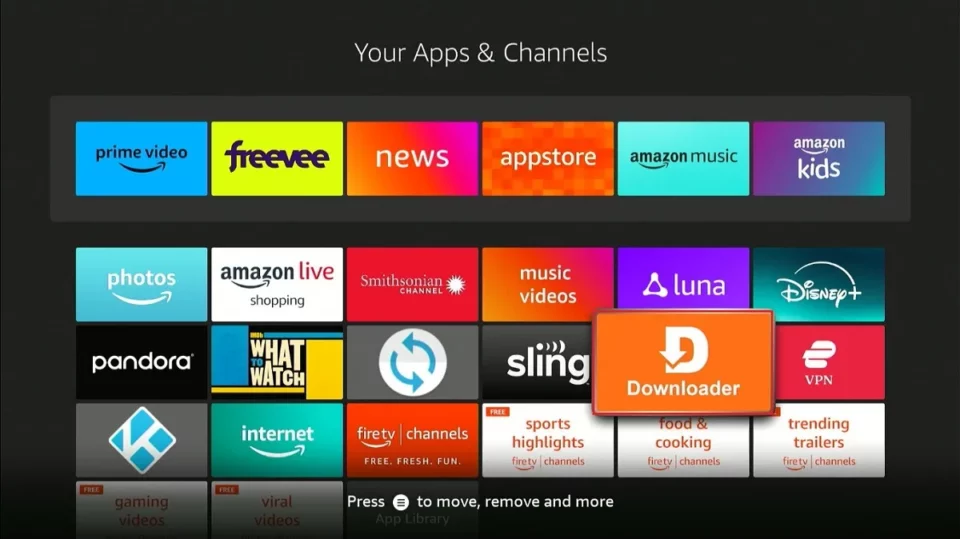
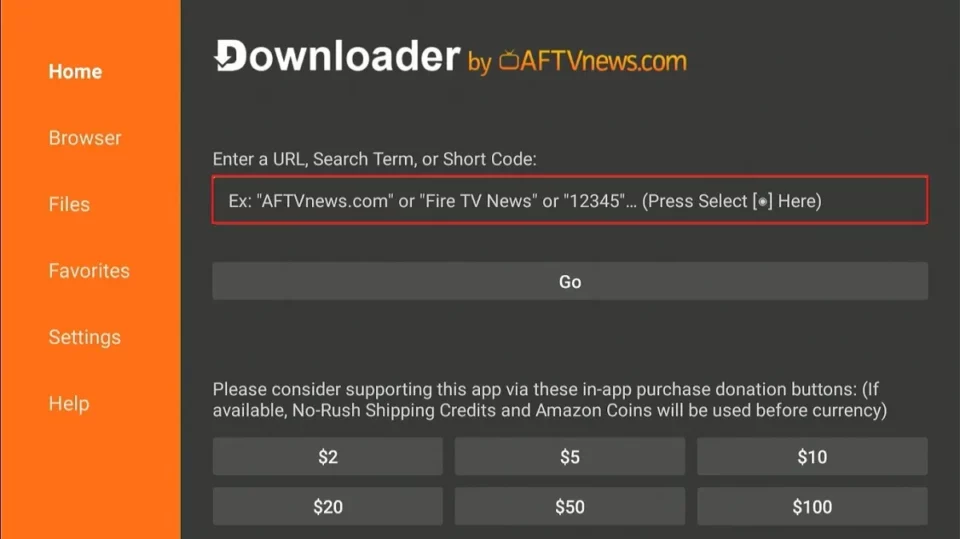
1. Launch the Downloader app on your device. You can install the Downloader app from the Amazon Store.
2. Click on the Search Term/URL/Short Code input field.
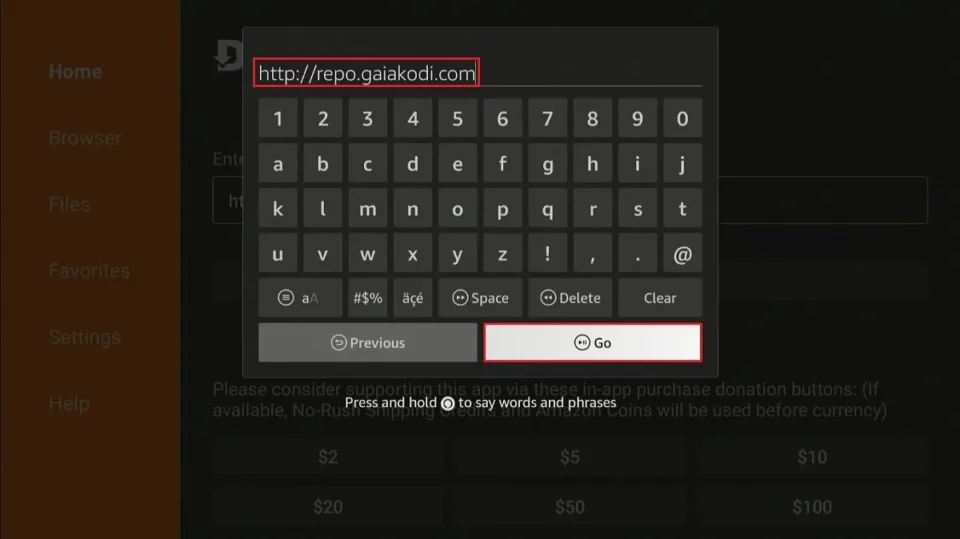
3. Type the following URL link: http://repo.gaiakodi.com and click Go.
Disclaimer: FireStickTricks.com does not own this URL and is not associated with the developers of the Gaia Kodi addon.
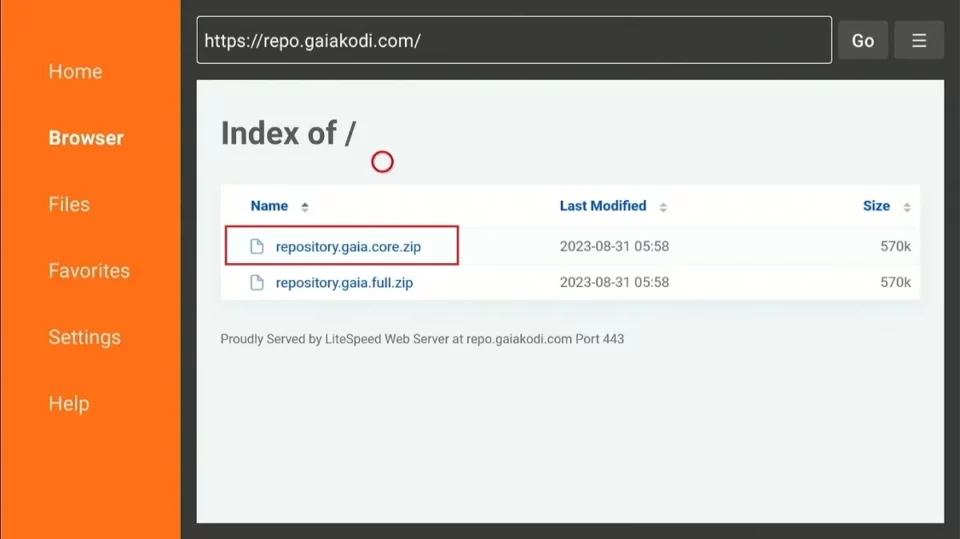
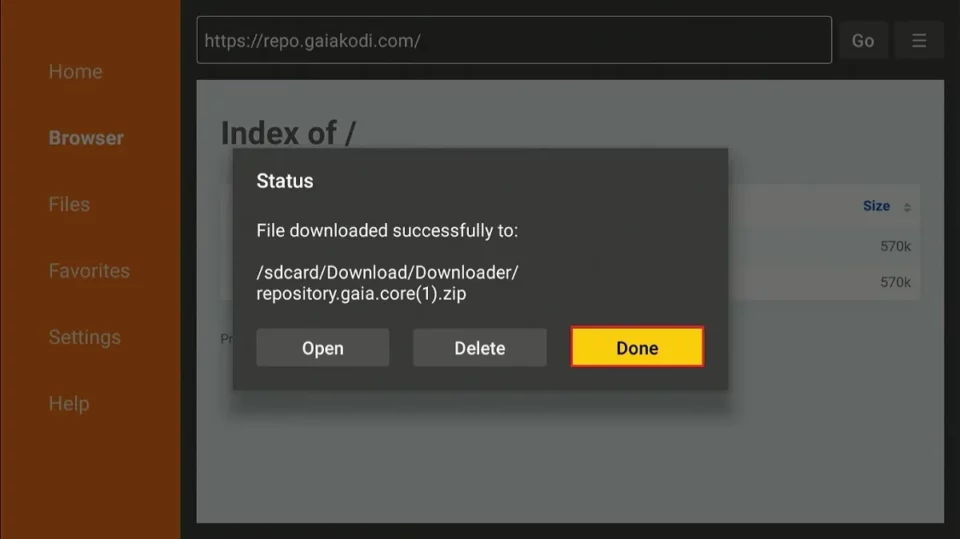
4. On the next screen, you’ll see two download links. Select the repository.gaia.core.zip link and click on it.
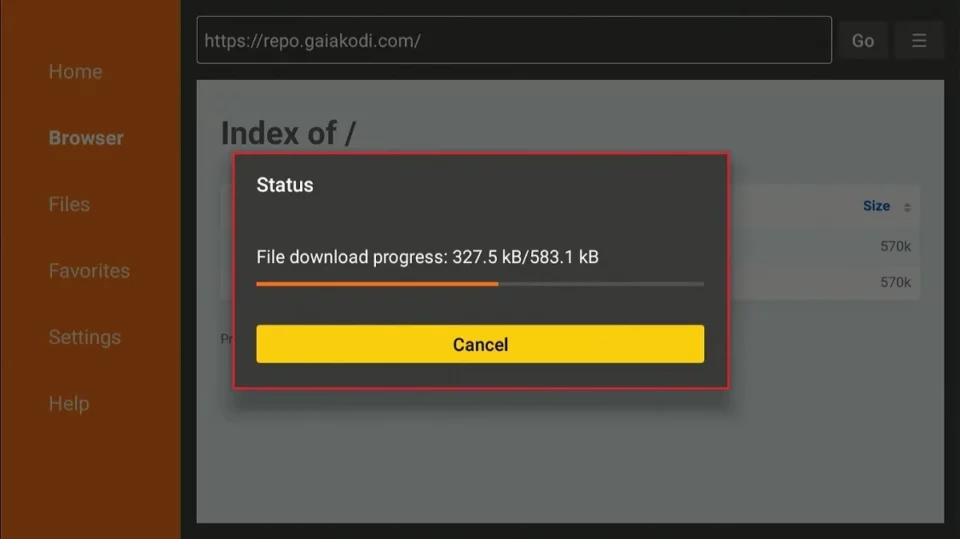
5. The zip file will begin downloading right away. Wait for the download to complete.
6. Once the download is complete, click Done.
Part 2: Installing Gaia Repository from the Downloads Folder
Please follow the steps below:
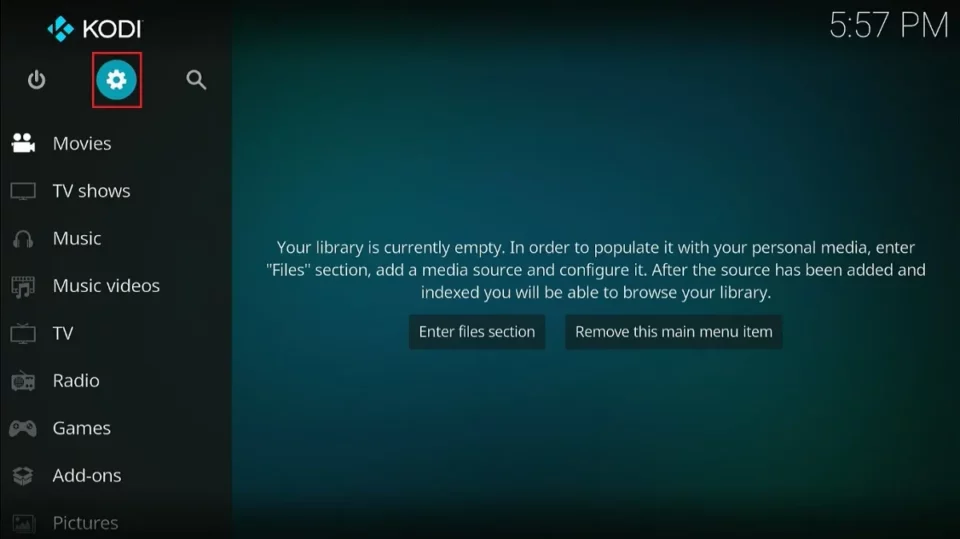
1. Open Kodi and click the Settings (gear) icon.
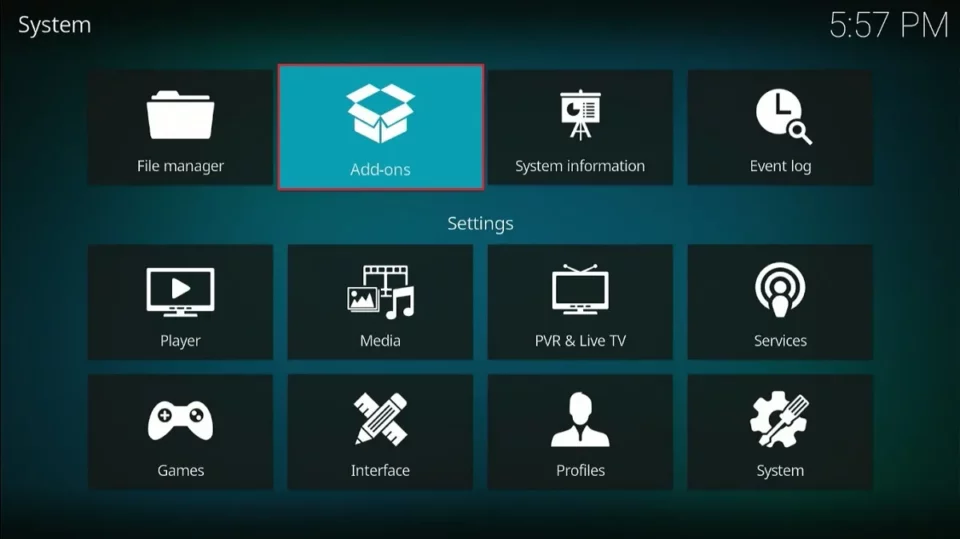
2. Select the Add-ons folder on the next page.
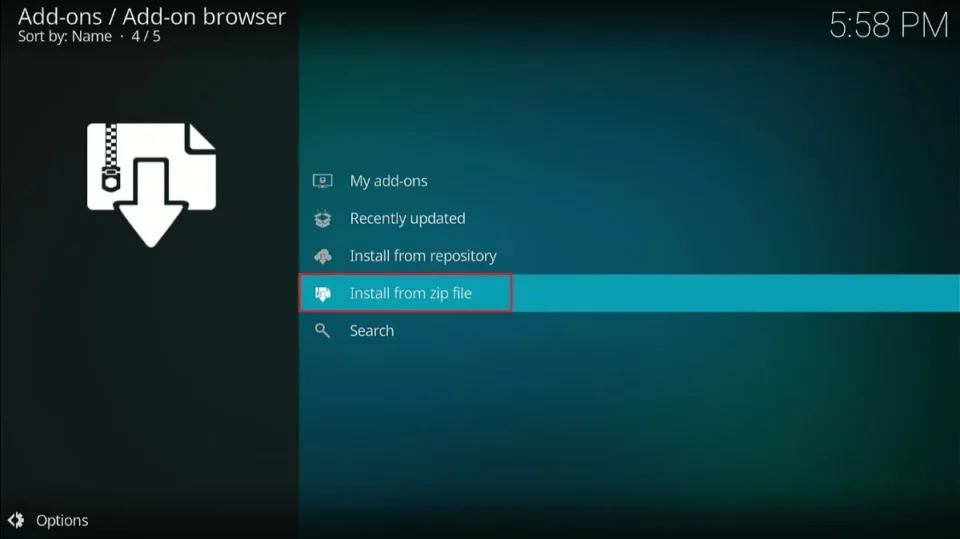
3. Click Install from zip file.
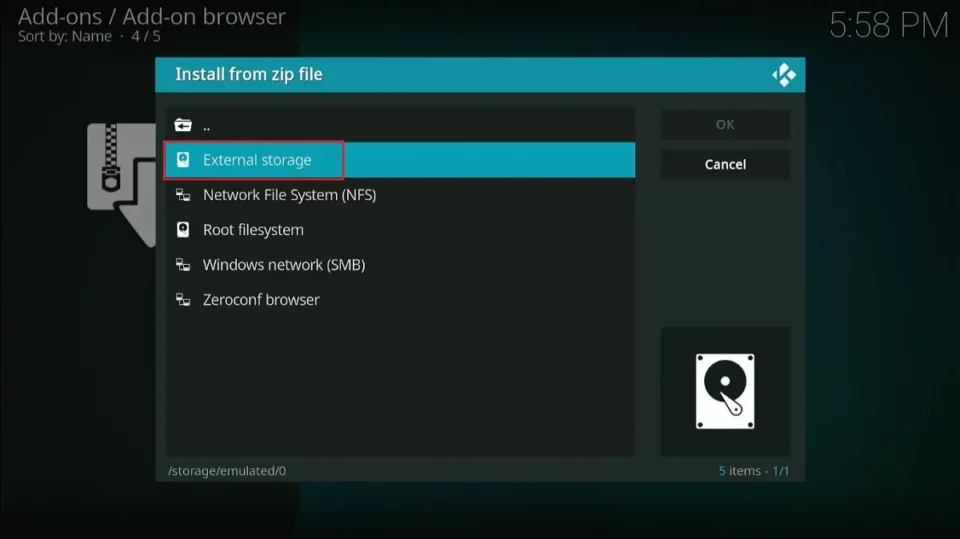
4. Select External Storage.
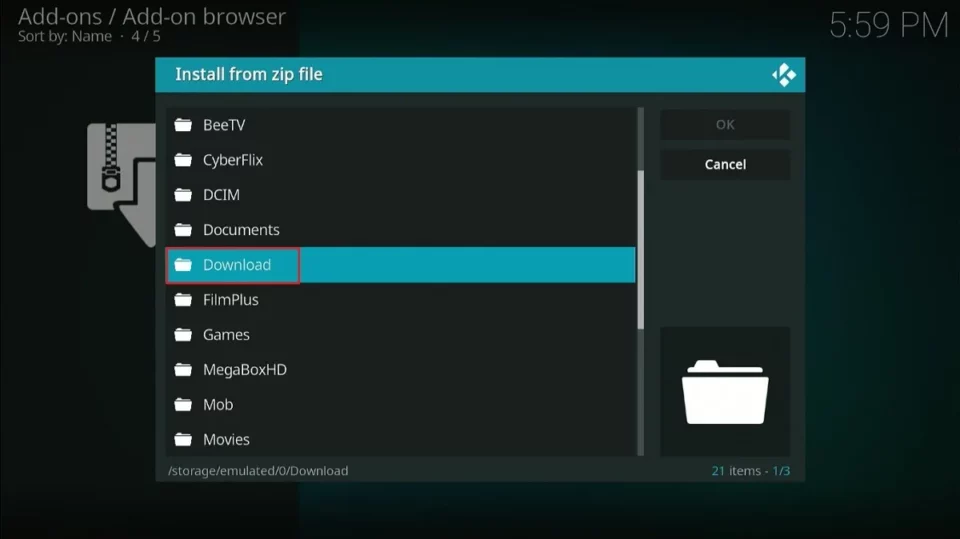
5. Choose the Download folder.
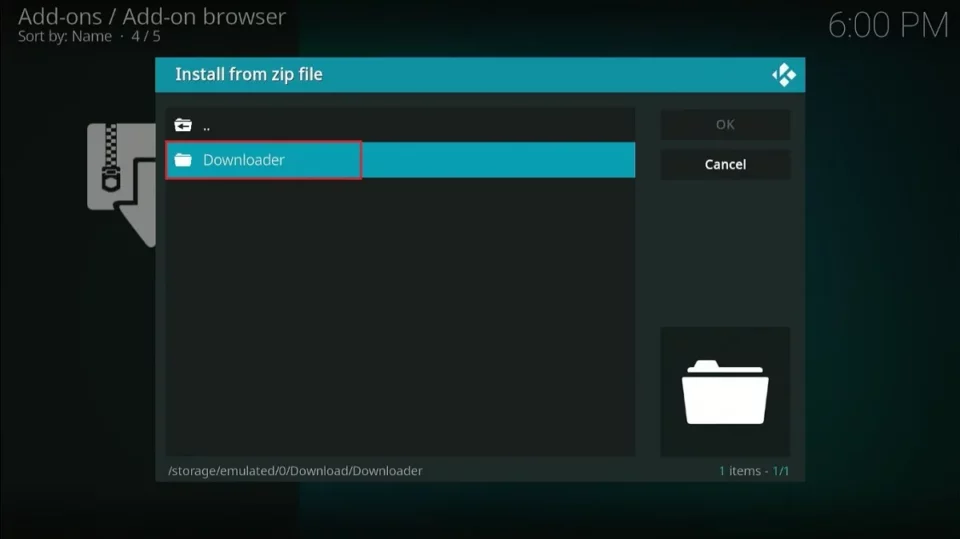
6. Select Downloader.
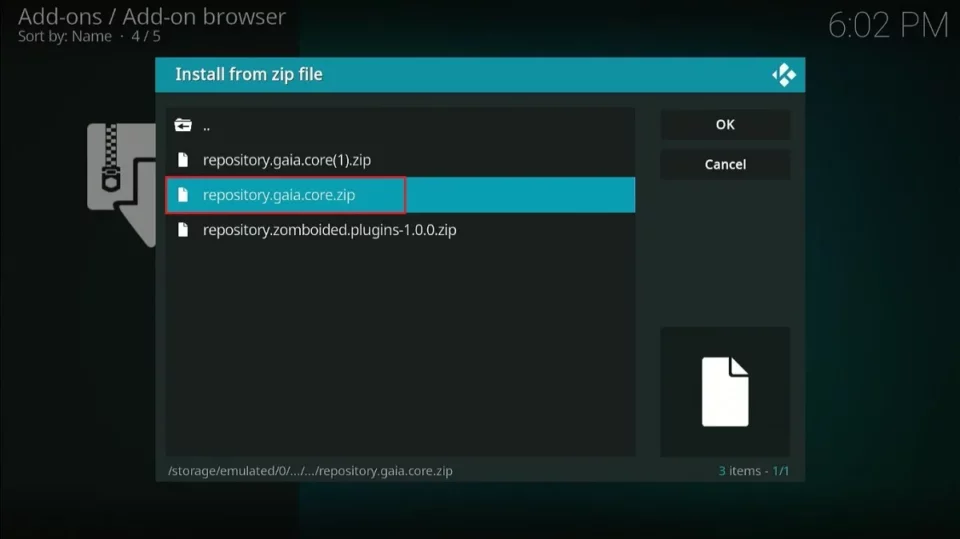
7. Choose the repository.gaia.core.zip file.
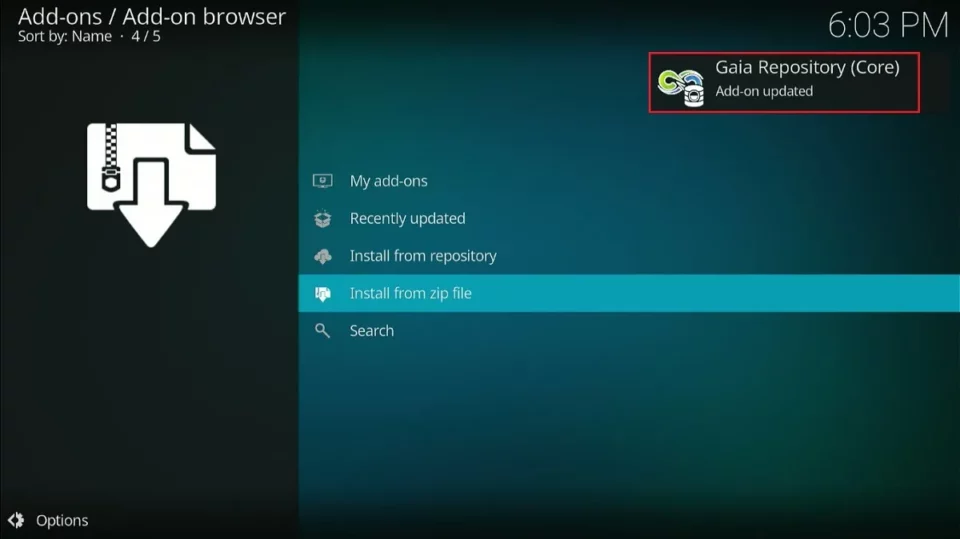
8. The zip file will download, and you’ll see a Gaia Repository (Core) Addon Updated.
You have successfully installed the Gaia repository on Kodi.
Part 3: Install Gaia Addon
Here are the steps to install Gaia addon from the Gaia repository:
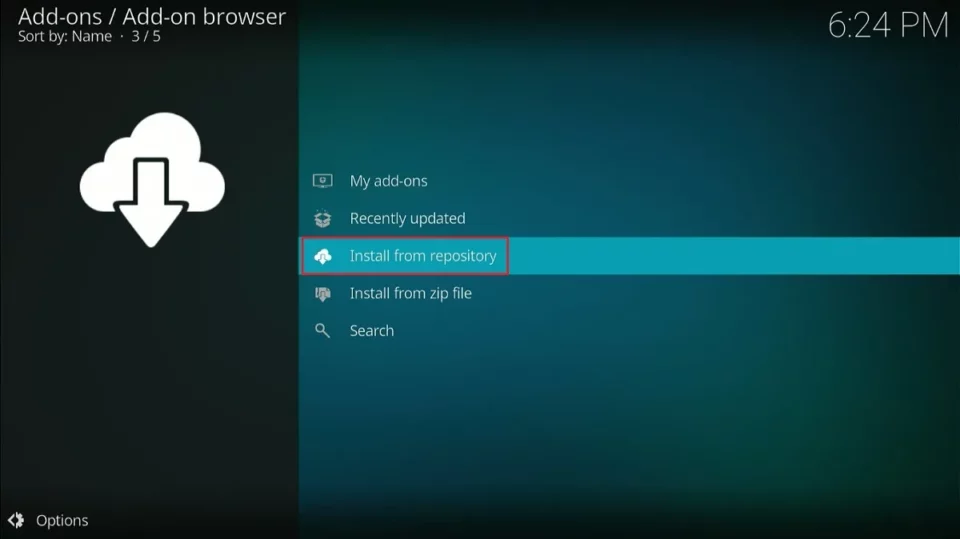
1. While still on the Add-ons/Add-ons Browser page, select Install from repository.
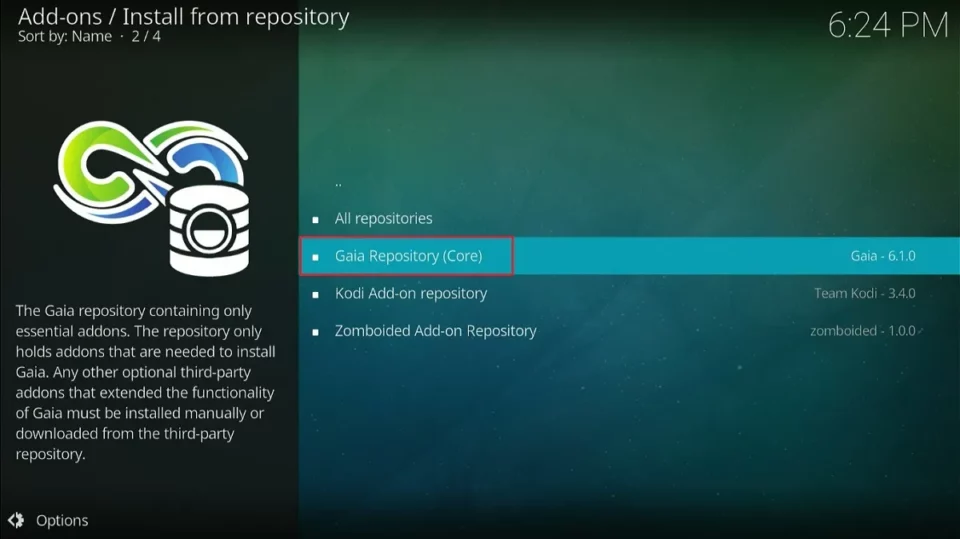
2. Choose Gaia Repository (Core).
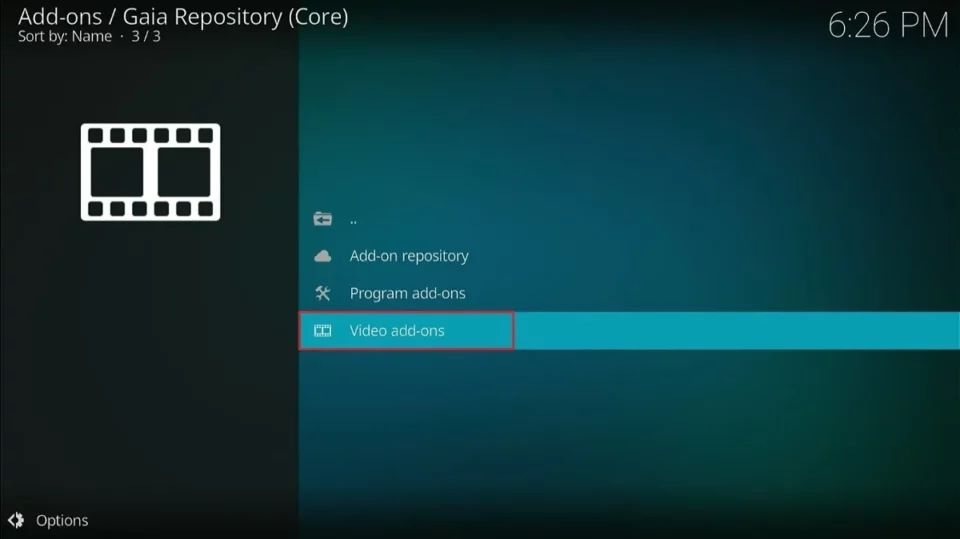
3. Select Video Add-ons.
4. Click Gaia.
5. Select Install.
6. You’ll be prompted to install additional add-ons alongside Gaia. Click OK.
7. Wait for the addon to download and install. You should see a Gaia Add-on Installed notification at the top right corner when the installation is complete.
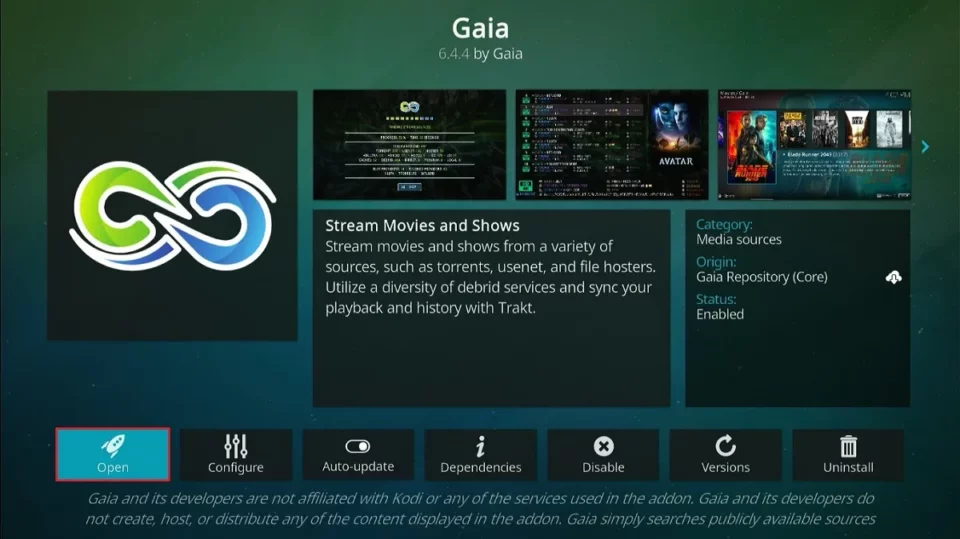
8. You have successfully installed the Gaia addon. Click Open on the following page to explore the addon and its content.
How to Set Up Gaia on Kodi
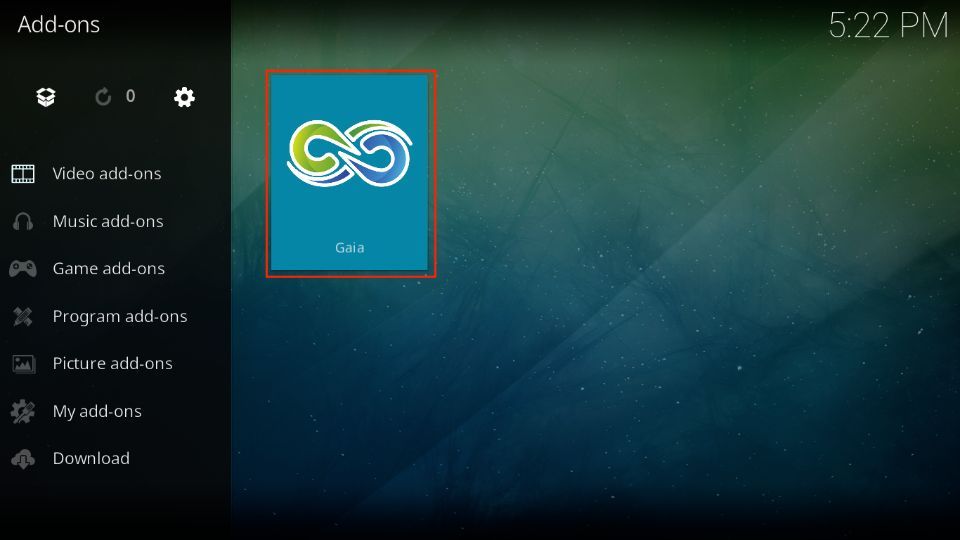
1. Go to the Kodi home screen and select Add-ons from the left tab. Then, open Gaia from the Video add-ons sub-tab.
2. Wait for Gaia to load up on your Kodi app.
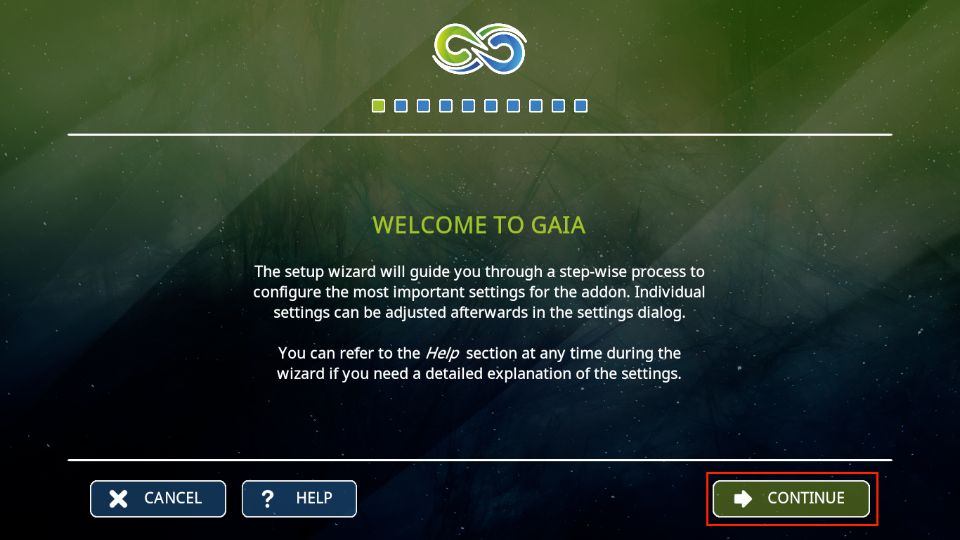
3. The Gaia setup wizard will start. Click CONTINUE to go ahead.
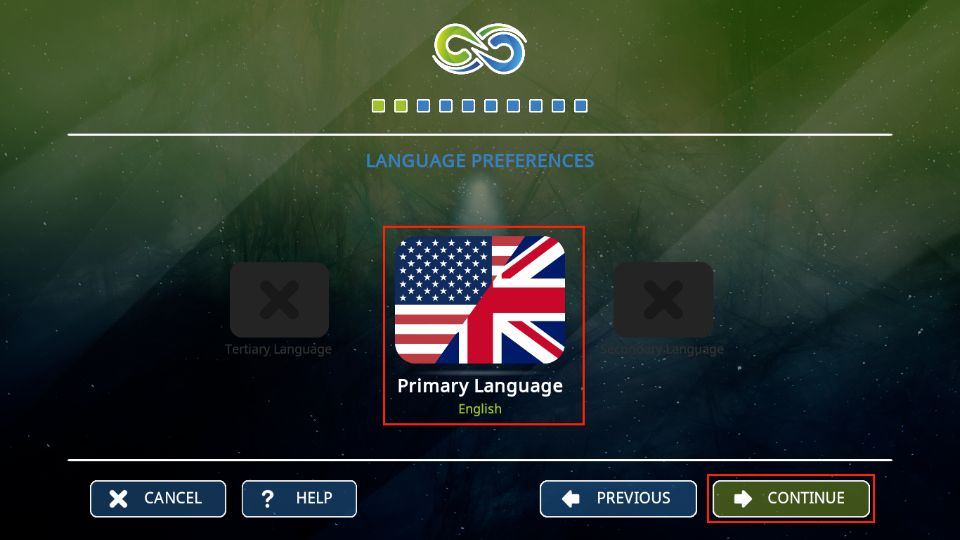
4. The Primary language is English by default. You can choose to change it. Once you have done so, click CONTINUE.
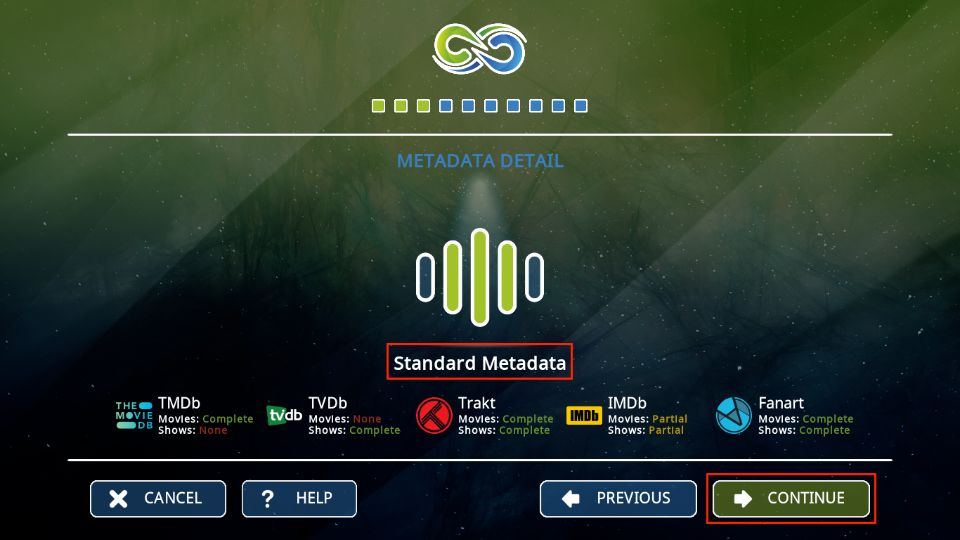
5. Next, click CONTINUE to set up Gaia with Standard Metadata.
Note: You can also pick basic or advanced Metadata.
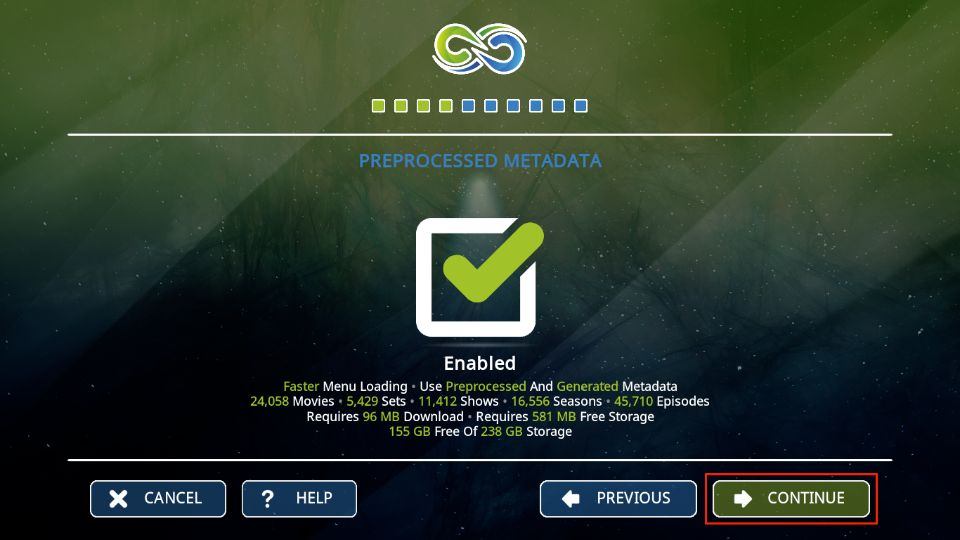
6. Ensure the Preprocessed Metadata is enabled, then click CONTINUE.
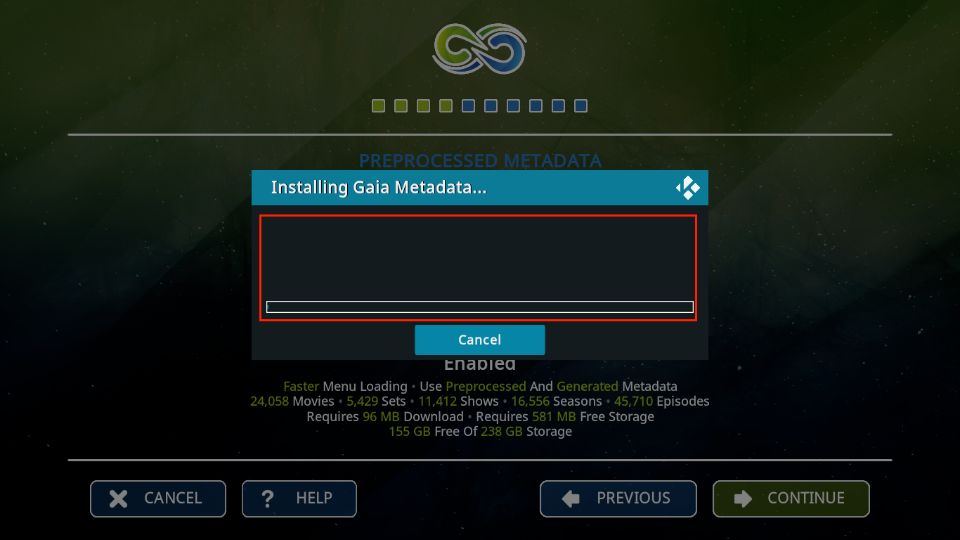
7. Wait for Gaia to install Metadata.
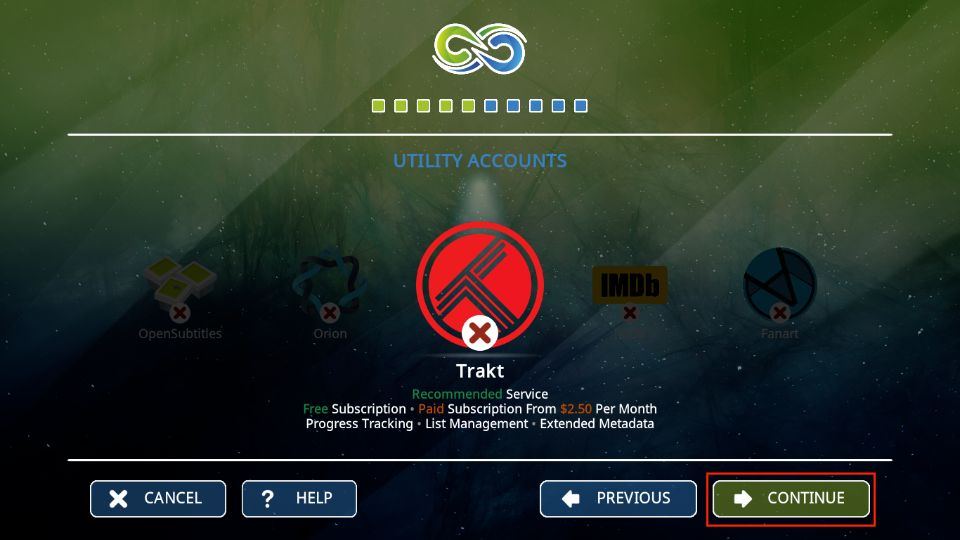
8. Click CONTINUE on the UTILITY ACCOUNTS screen.
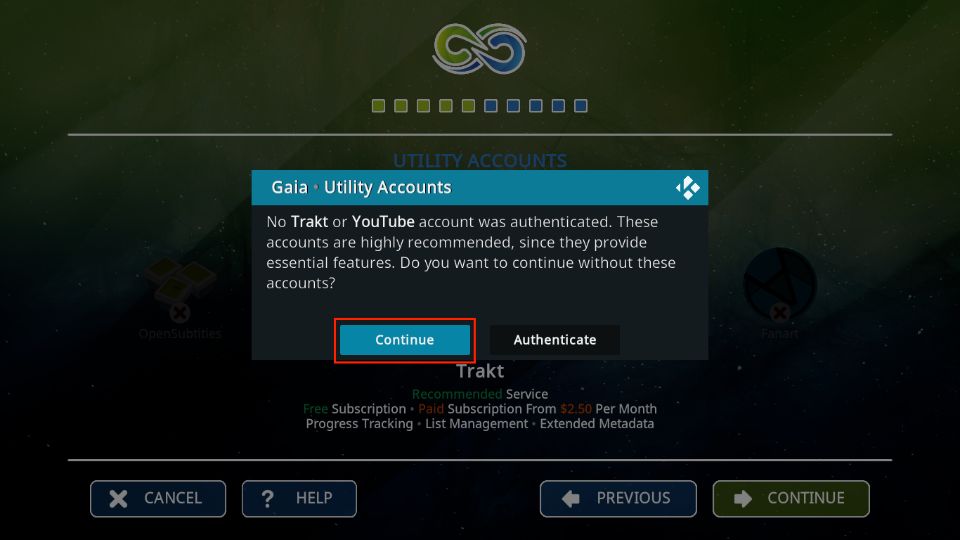
9. Click Continue, as we’ll set up Trakt later.
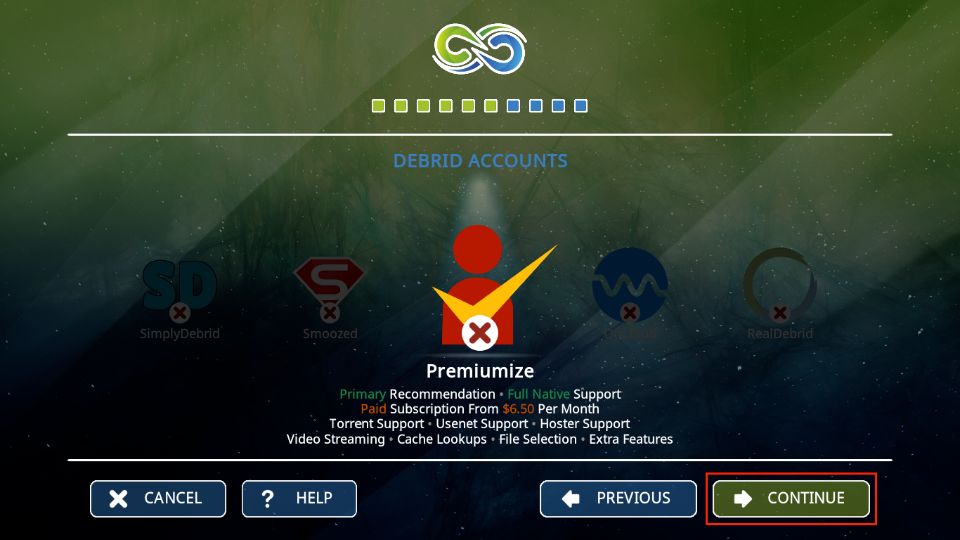
10. Once again, click CONTINUE on the DEBRID ACCOUNTS screen.
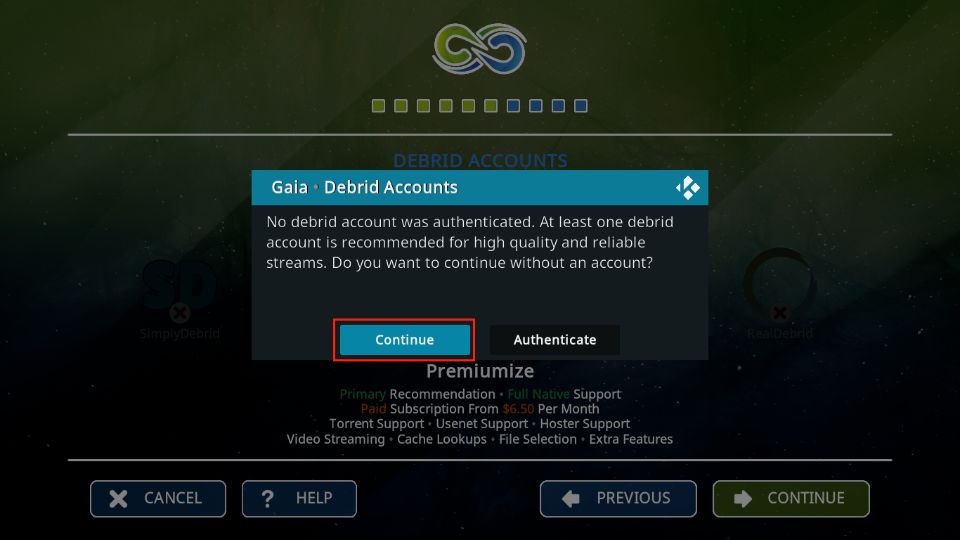
11. Hit Continue, as we’ll set up Real Debrid later.
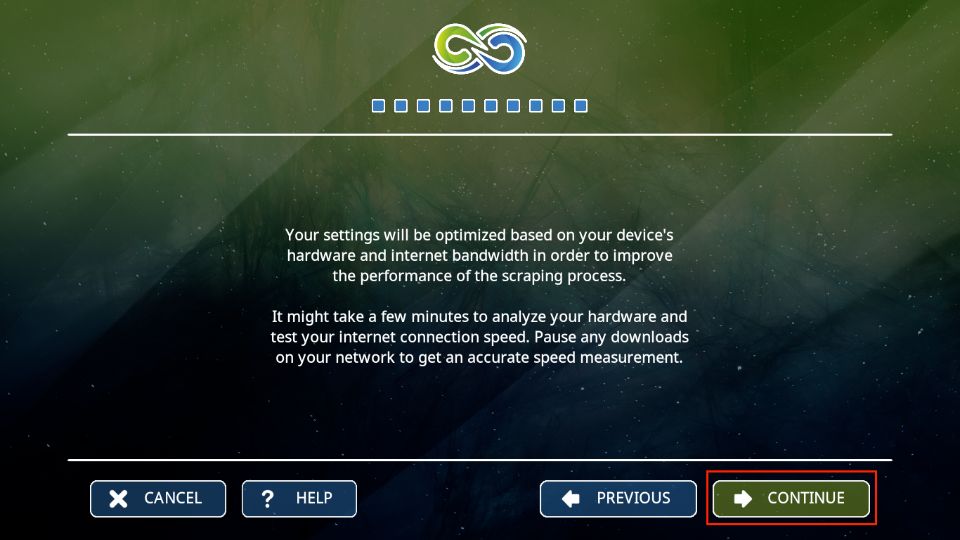
12. Click CONTINUE to let Gaia analyze your hardware.
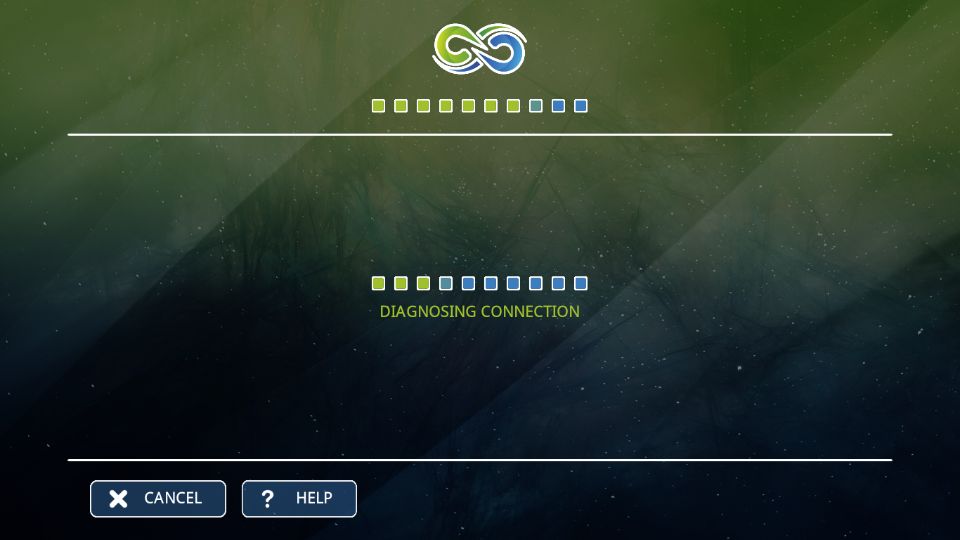
13. Wait for the diagnostic to end.
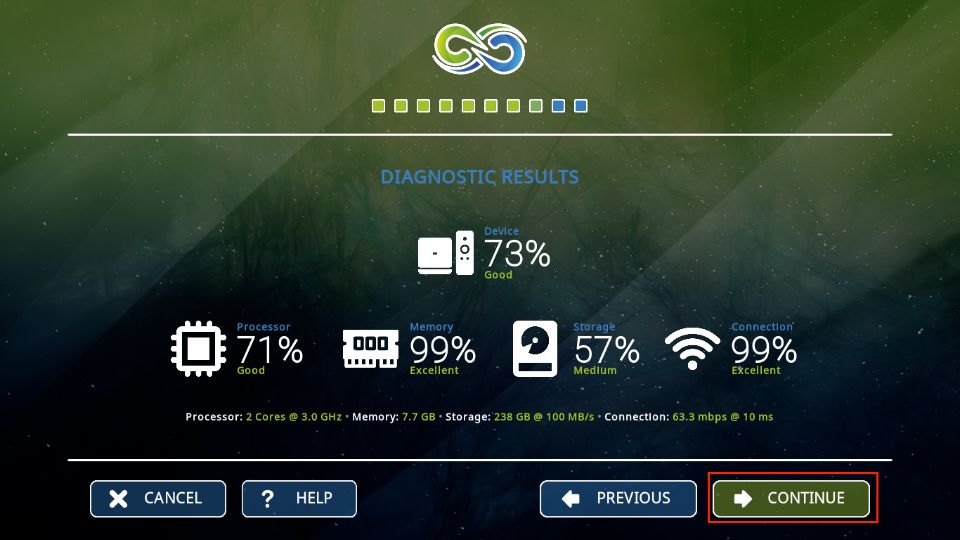
14. Select CONTINUE to complete the DIAGNOSTIC screen.
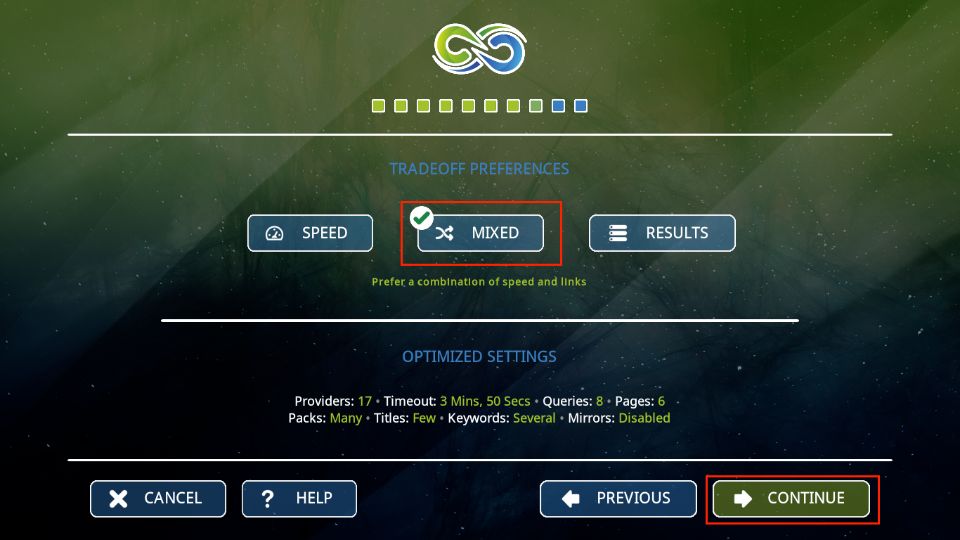
15. On the next screen, you will find the tabs for preferences: Speed, Mixed, or Results. I recommend you choose Mixed, a combination of speed and links. Then, click CONTINUE.
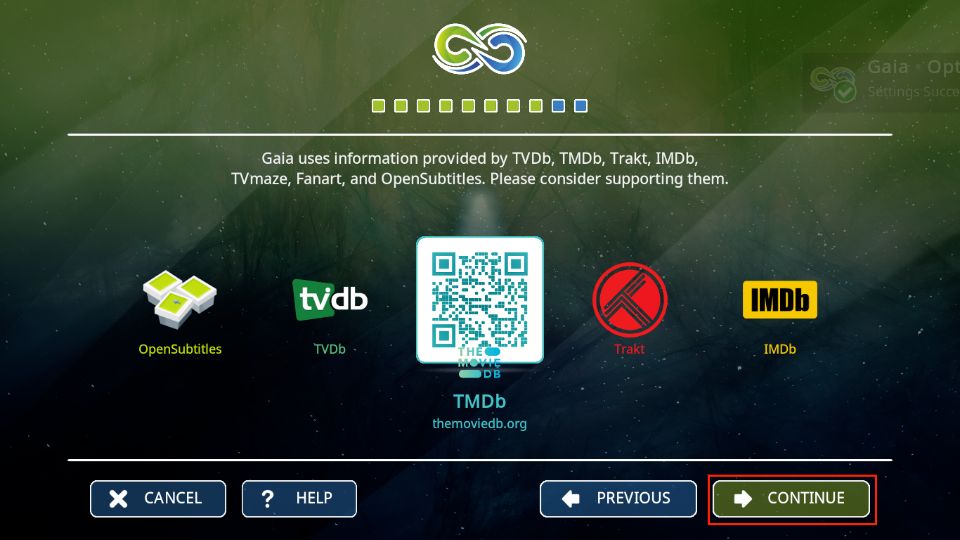
16. Gaia will ask you to support information providers like TVDb, TMDb, etc. Press CONTINUE.
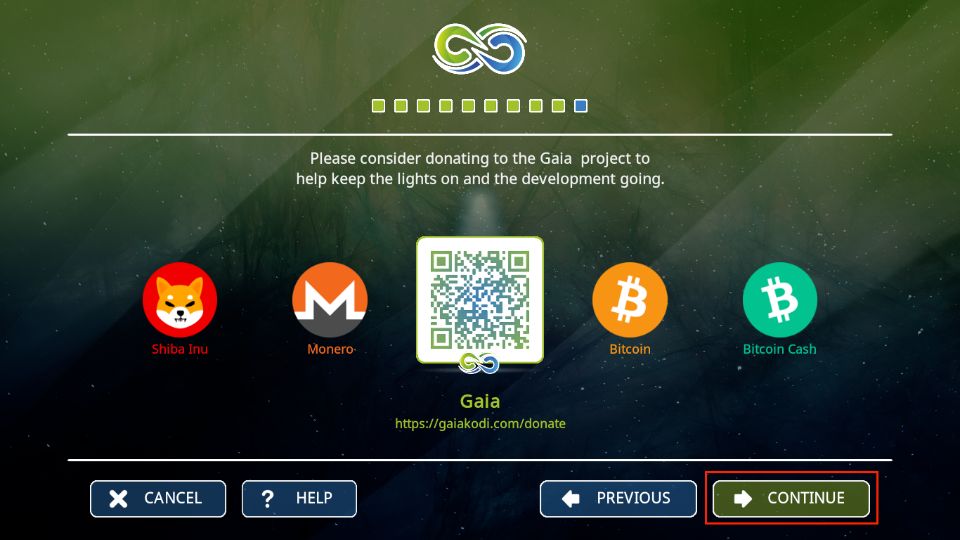
17. Select CONTINUE on the Gaia project support screen.
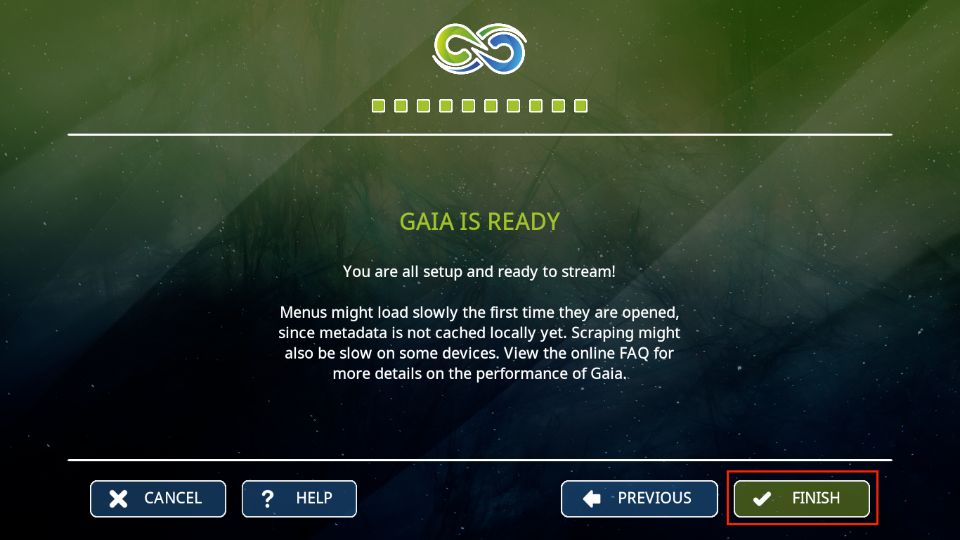
18. Finally, click FINISH to complete the Gaia wizard setup.
How to Use Gaia Kodi Addon
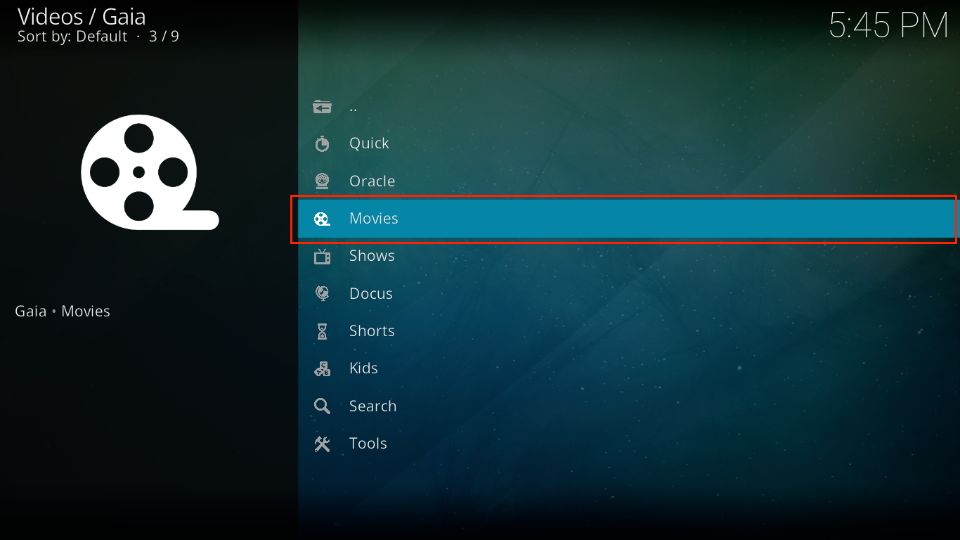
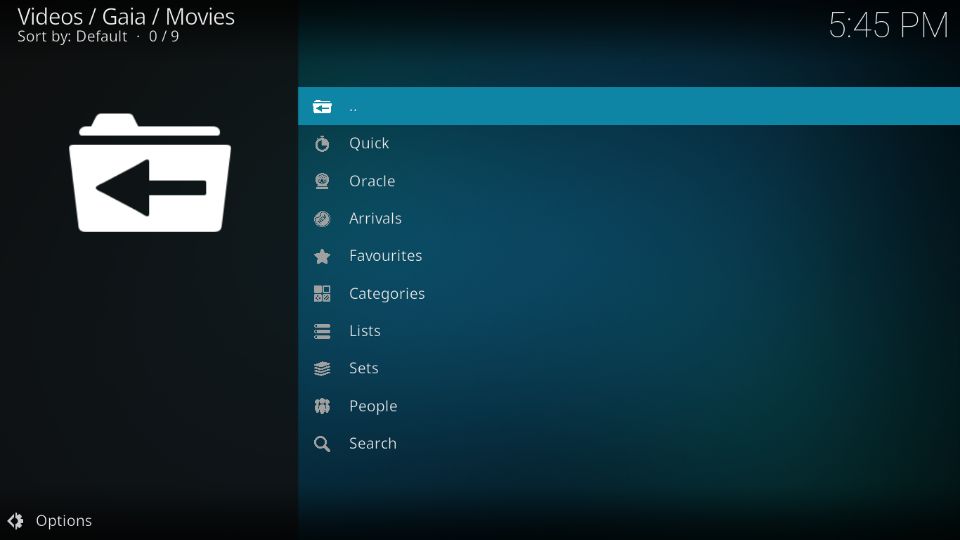
Welcome to Gaia! The home screen is split into nine sections. To watch films, open Movies.
Inside, you have nine sub-folders: Arrivals, Categories, Lists, Sets, etc. Feel free to explore them.
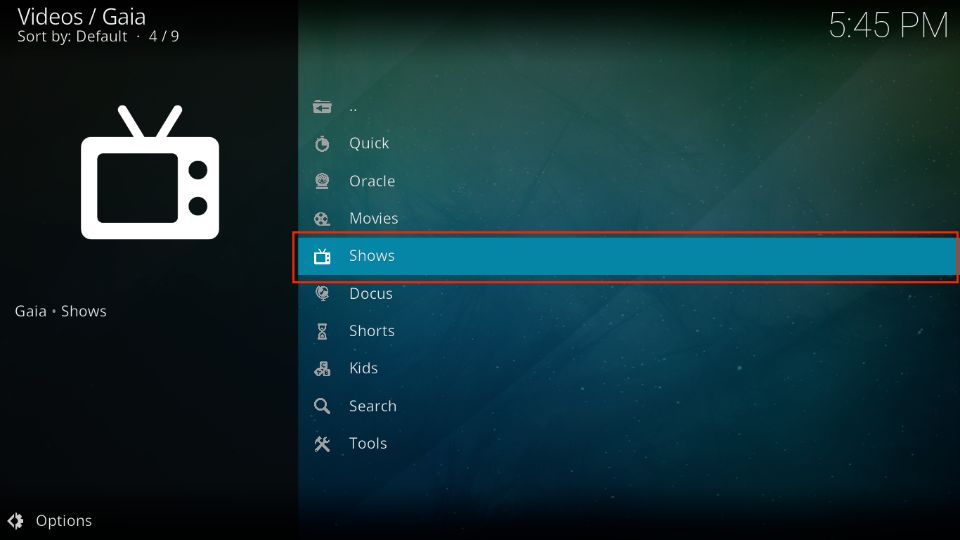
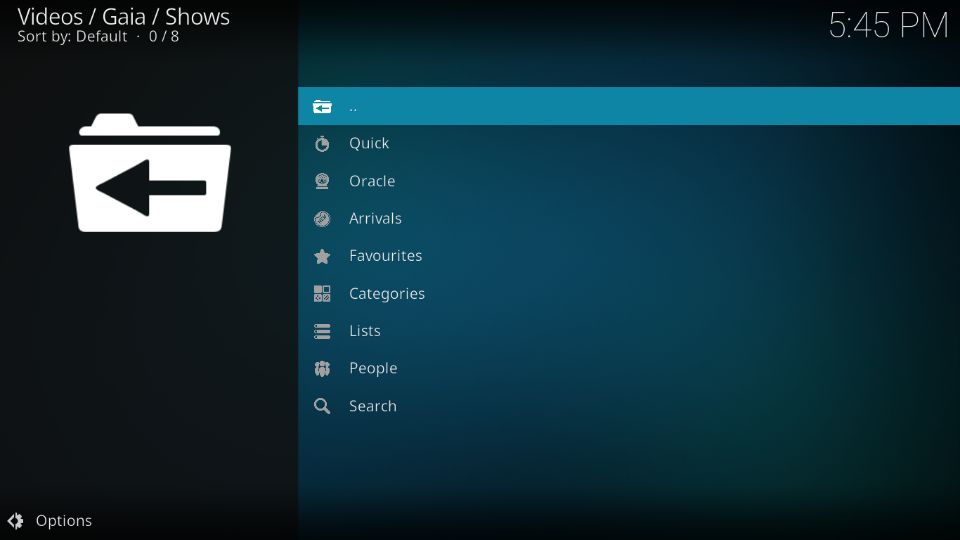
Next, open Shows.
This section shares sub-folders similar to Movies. Take your time and explore them all.
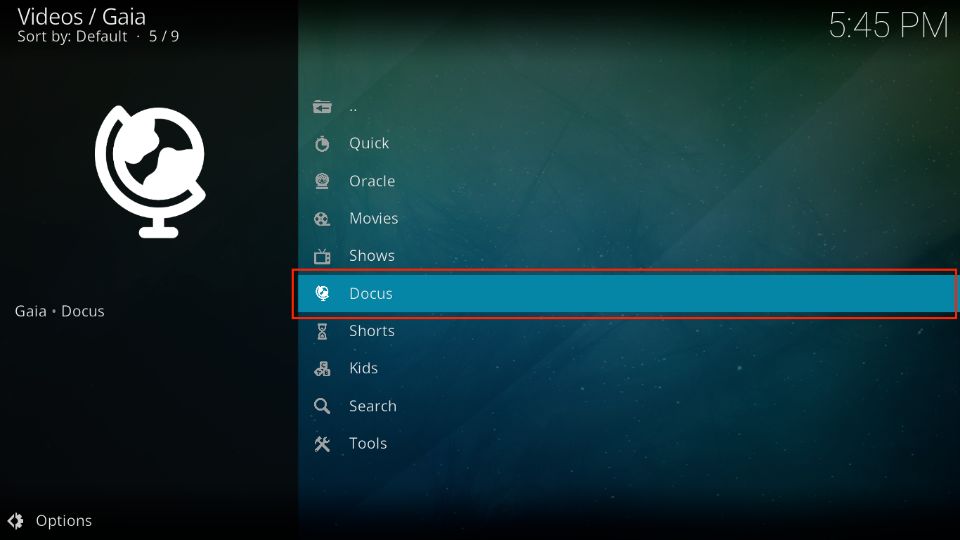
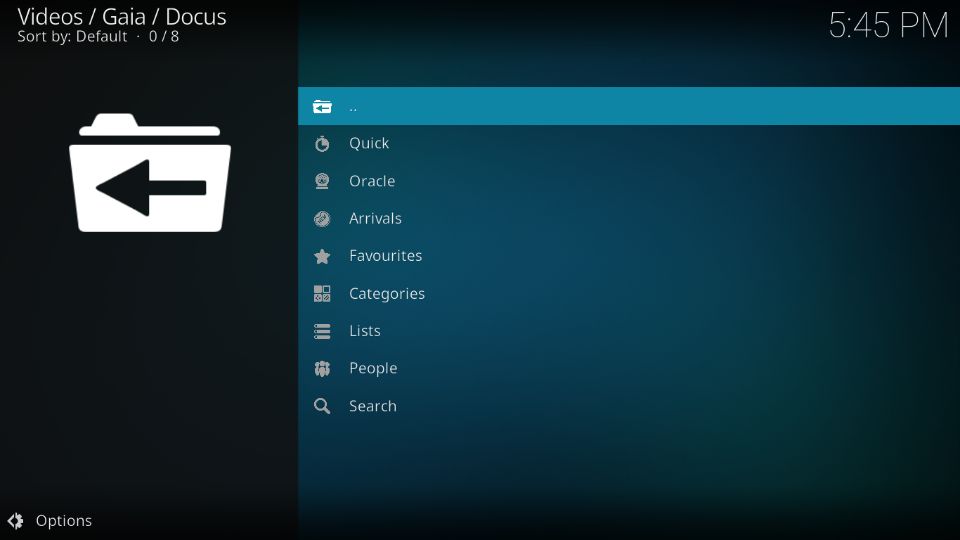
Next, we have Docus.
You can discover documentaries by Search and People, Lists, Categories, and more here.
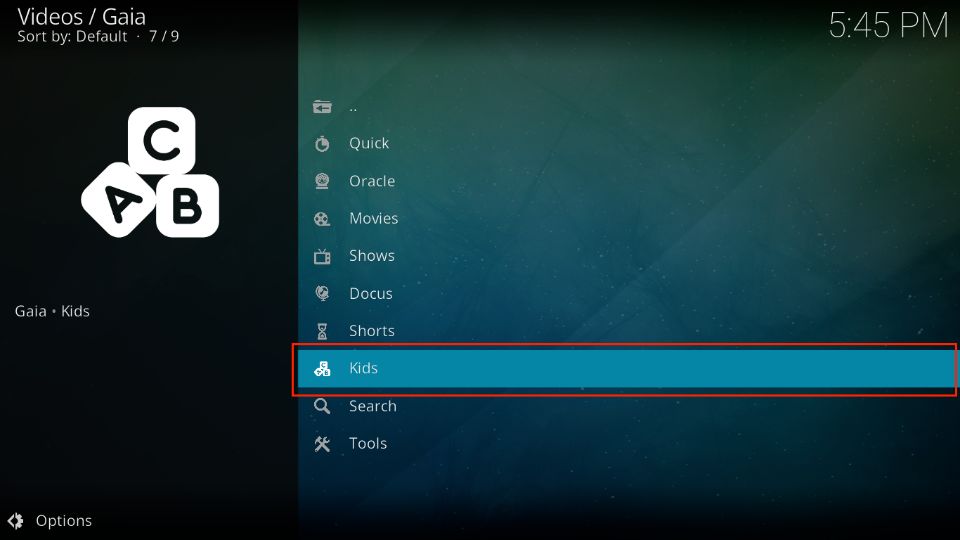
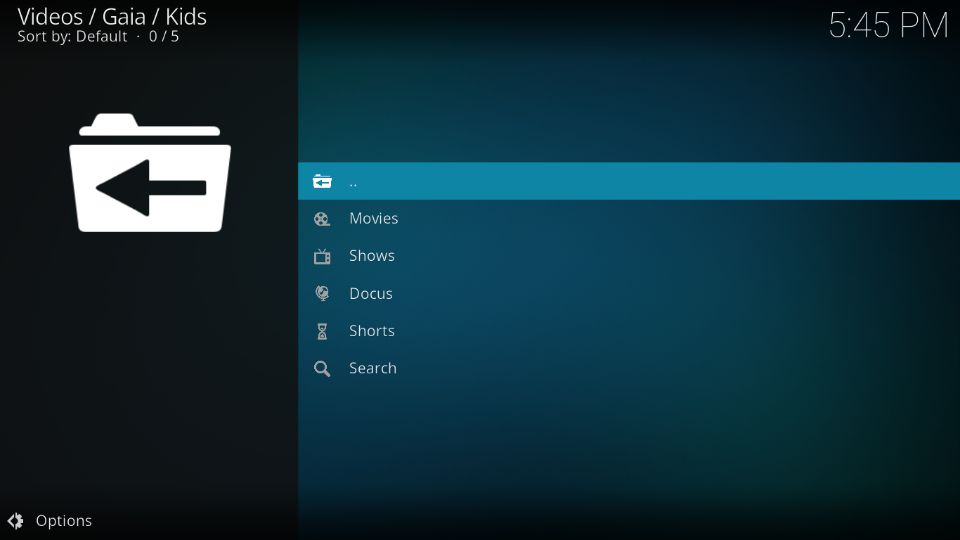
Next up, we have the Kids section.
You’ll find folders like Movies, Shows, Docus, Shorts, and Search.
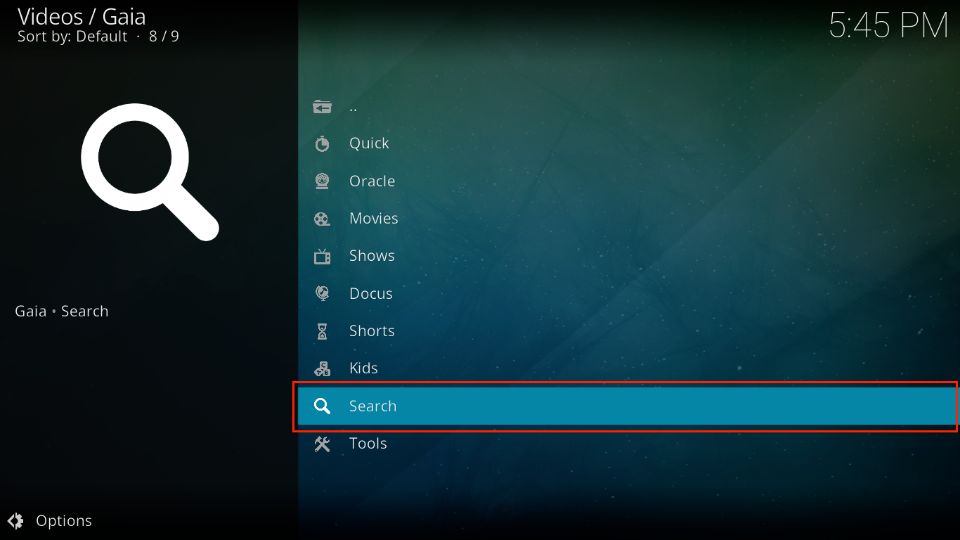
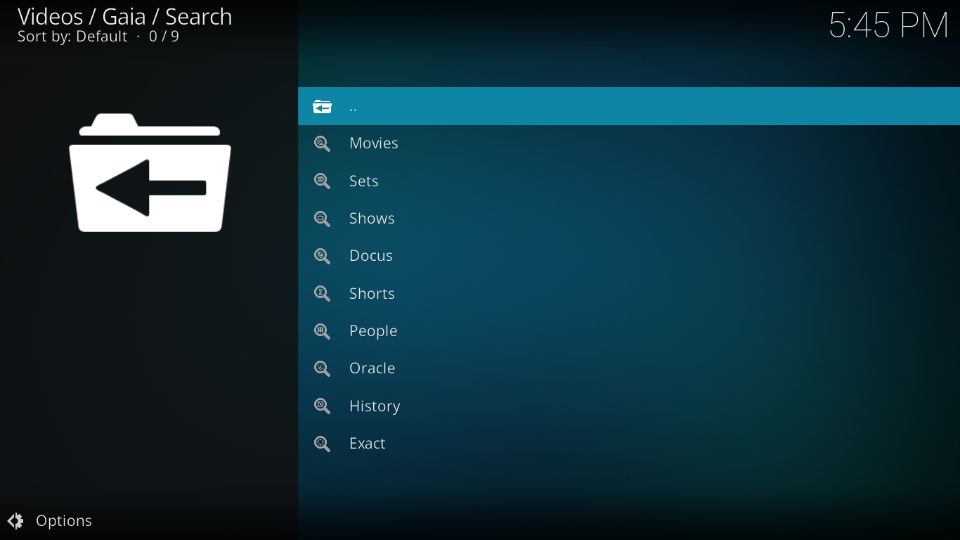
Lastly, we have the Search function.
You can search Movies, Sets, Shows, Docus, Shorts, People, and more.
Setup External Providers with Gaia Kodi Addon
Gaia heavily relies on premium services. However, you can install free external providers to watch your favorite content without paying anything.
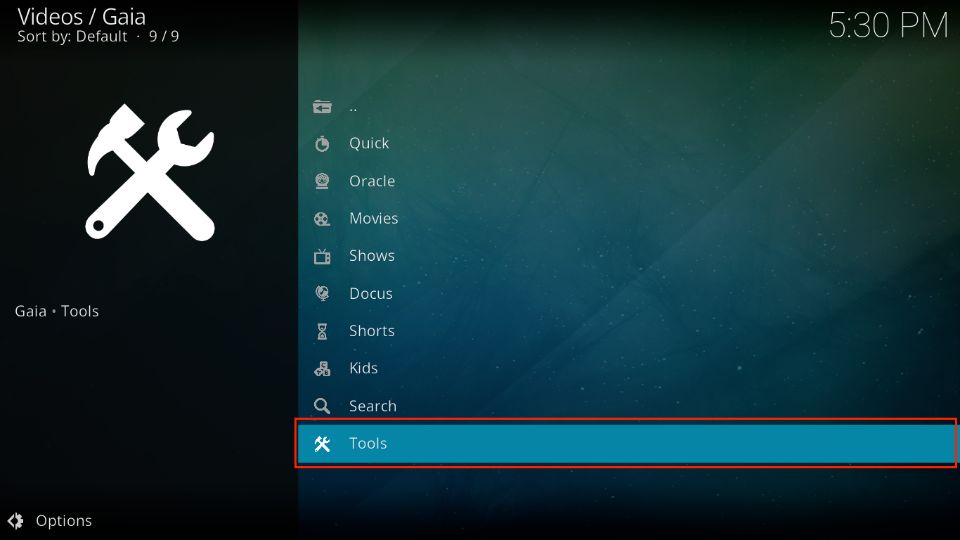
1. On the Gaia addon main screen, click Tools.
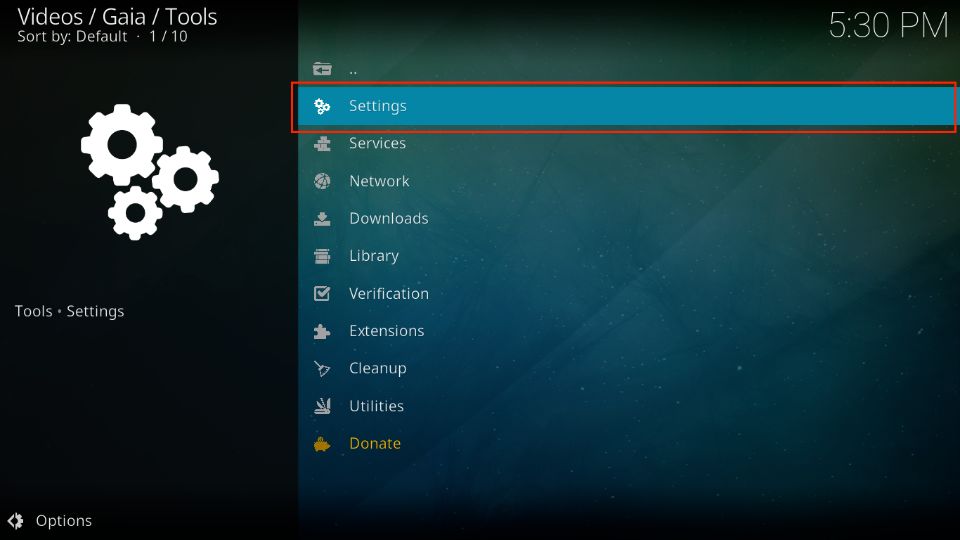
2. Open Settings.
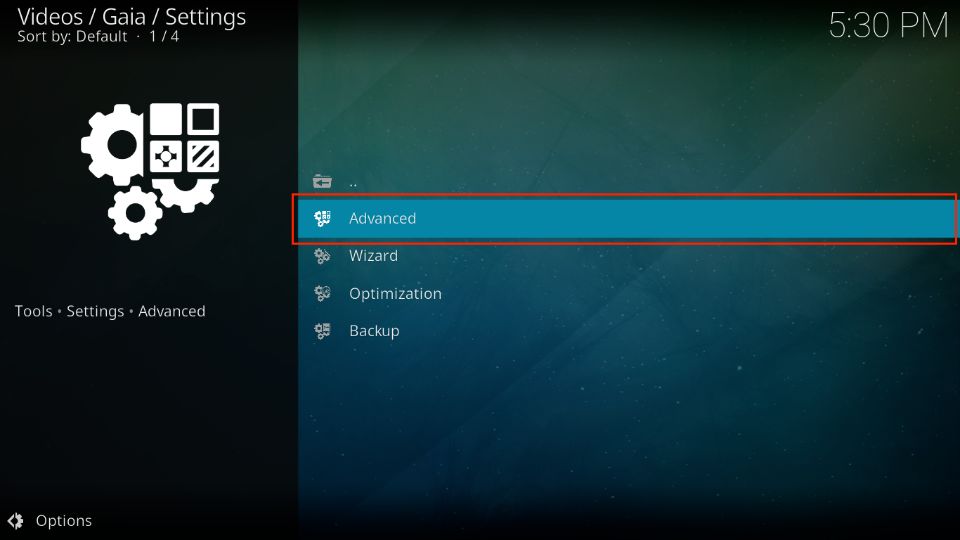
3. Click Advanced next.
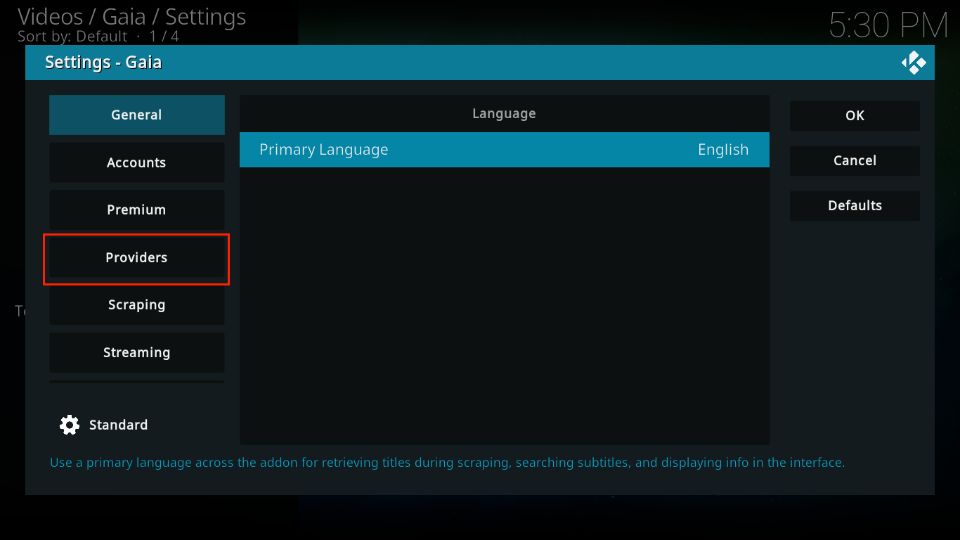
4. Select Providers on the left.
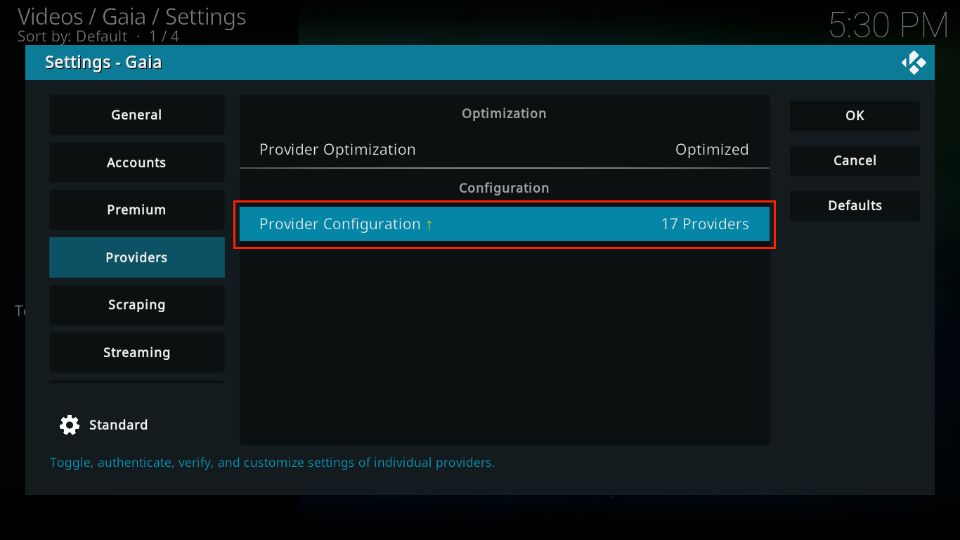
5. Choose Provider Configuration.
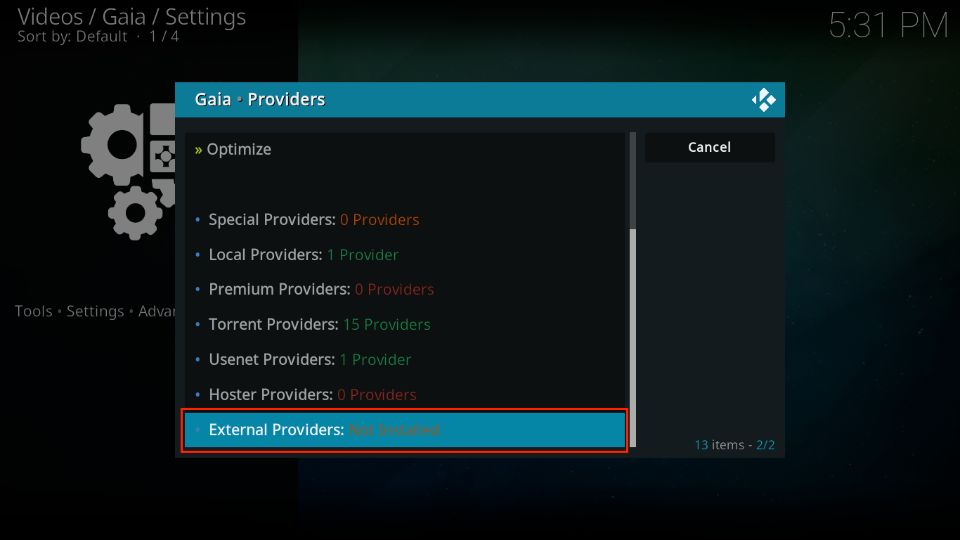
6. On the next window, scroll down and select External Providers.
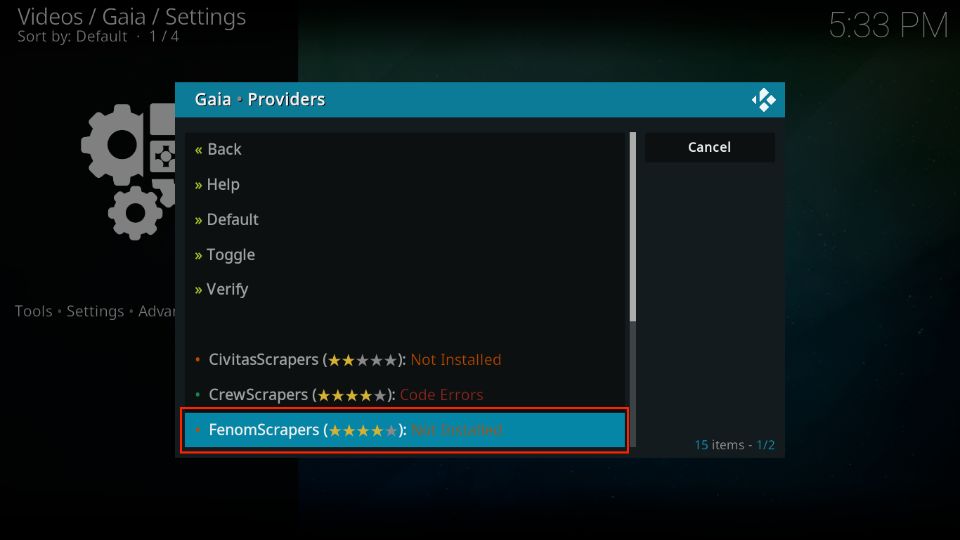
7. Select Fenom Scrapers.
Note: You can choose to install any other scrapers you like.
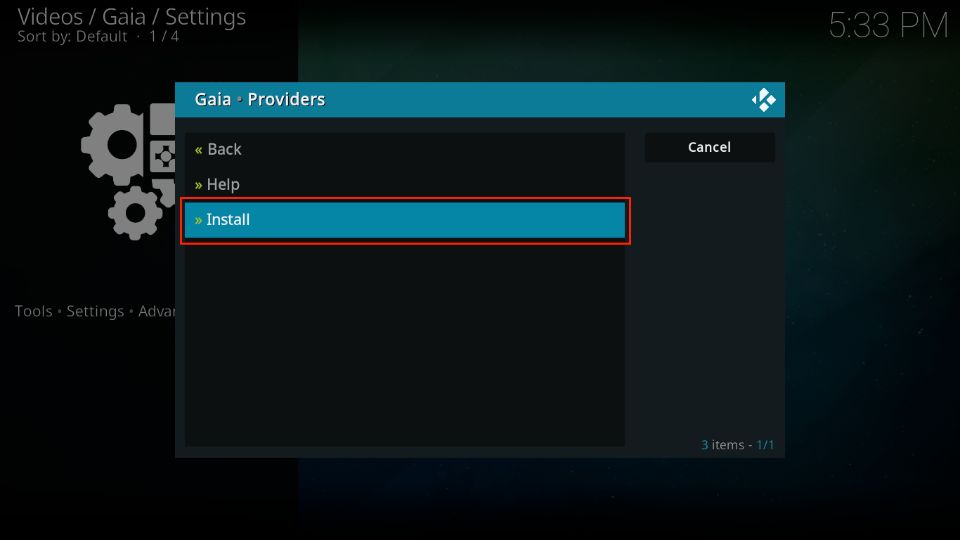
8. Choose Install.
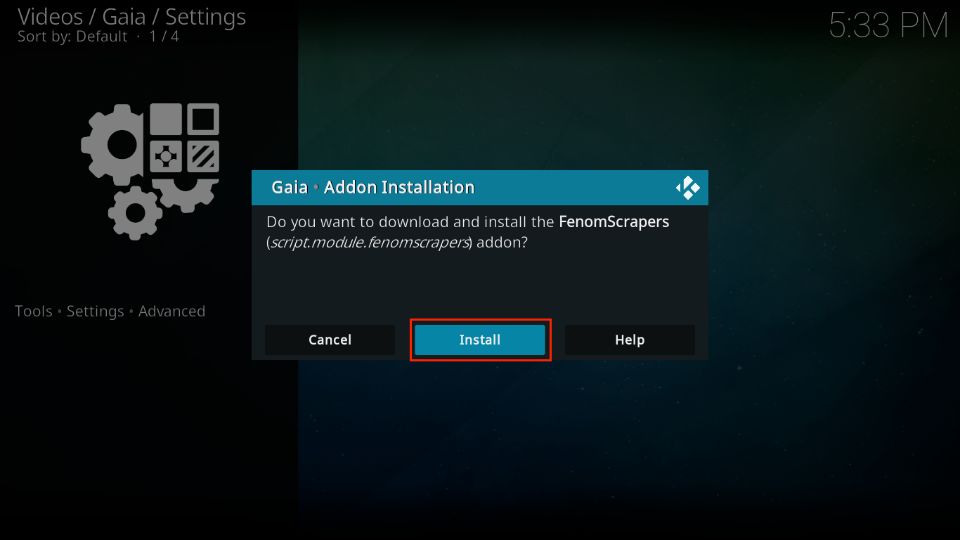
9. Click Install when prompted to install the scrapers.
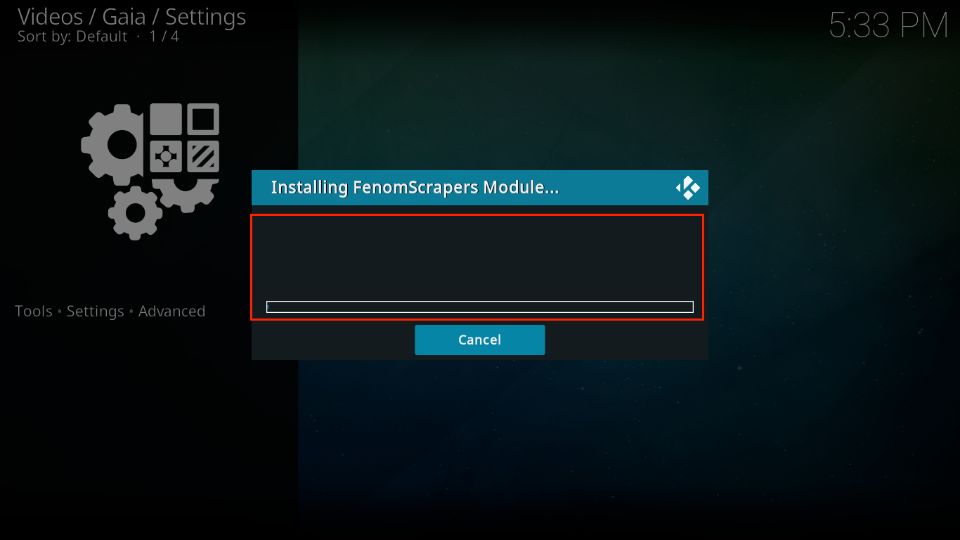
10. Wait for the installation to finish.
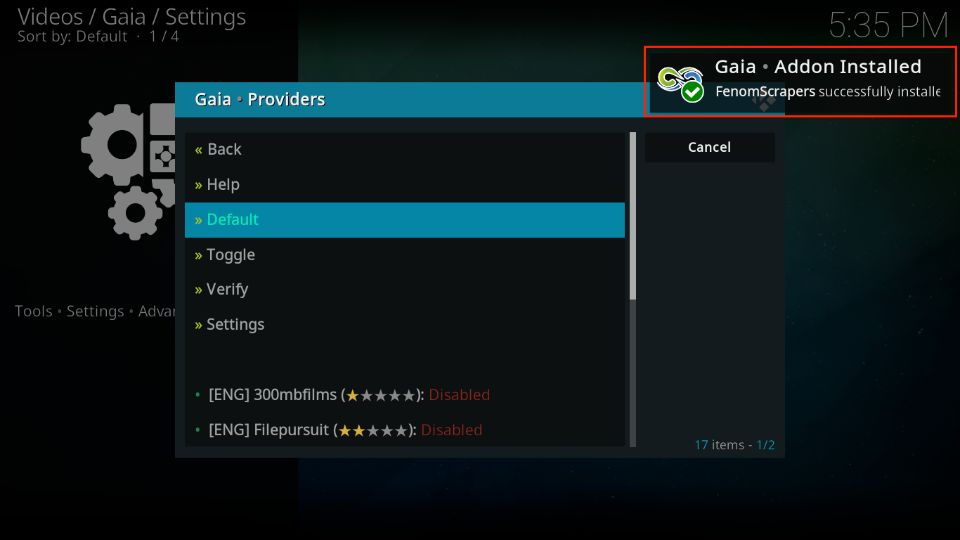
11. A notification will appear on the top right, confirming the scraper has been installed.
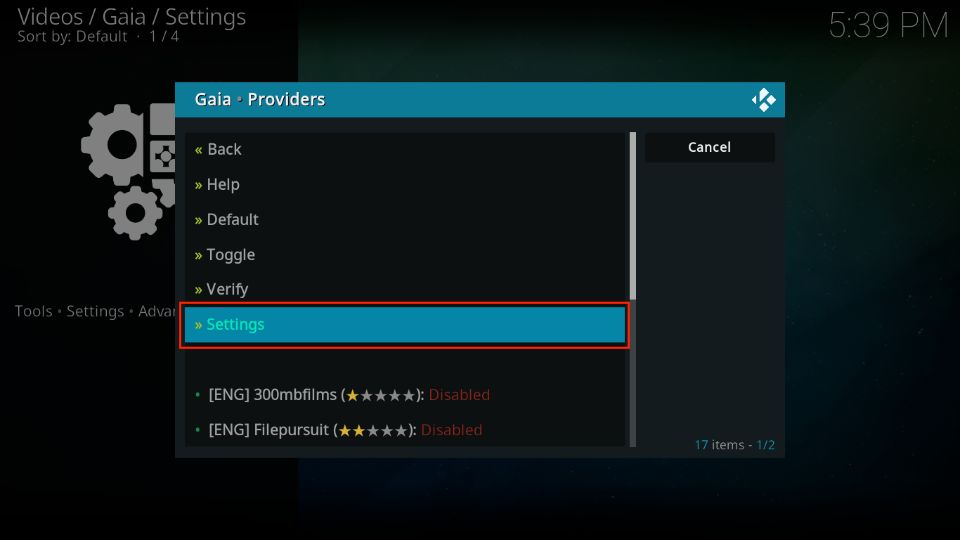
12. Open Settings.
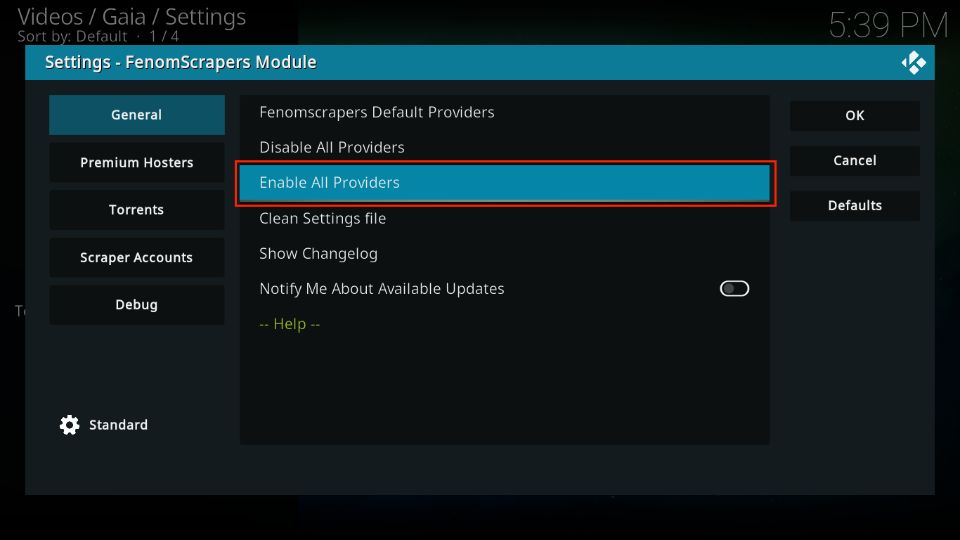
13. Now, click Enable All Providers.
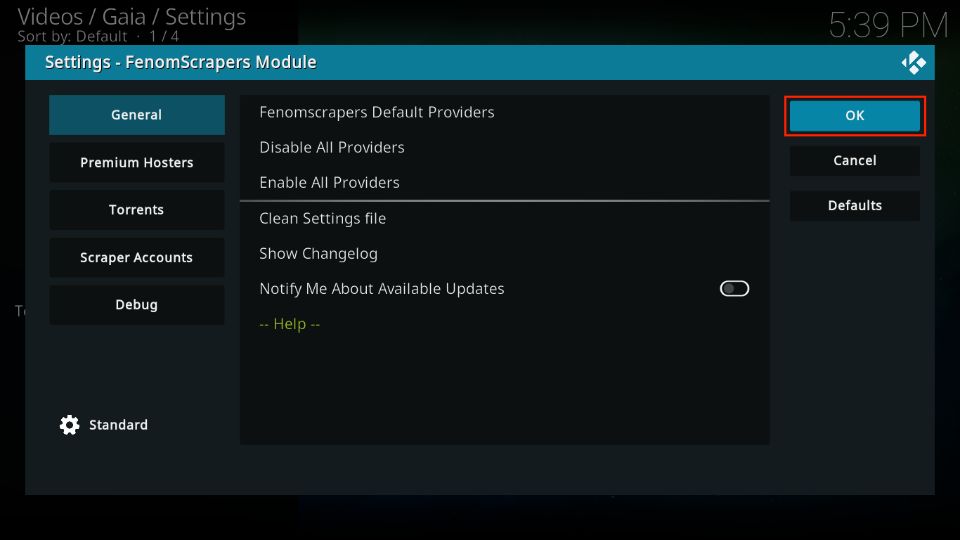
14. Select OK to save the changes.
How to Connect Real Debrid with Gaia
Gaia supports multiple premium hosters, including Real Debrid. As I use Real Debrid due to its reliability, here’s a quick rundown on how you can integrate it with this addon:
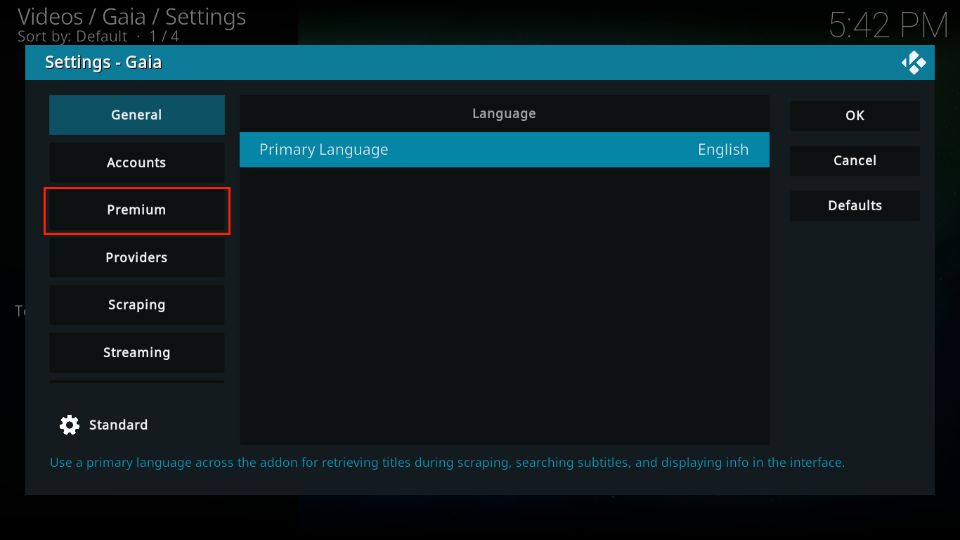
1. Navigate to Tools > Settings > Advanced. Then, select Premium.
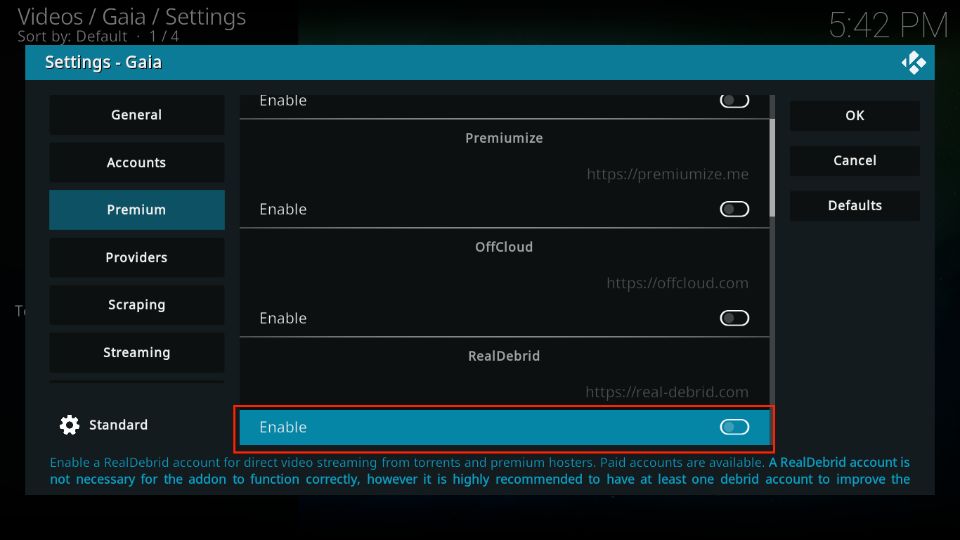
2. Scroll down and enable Real Debrid.
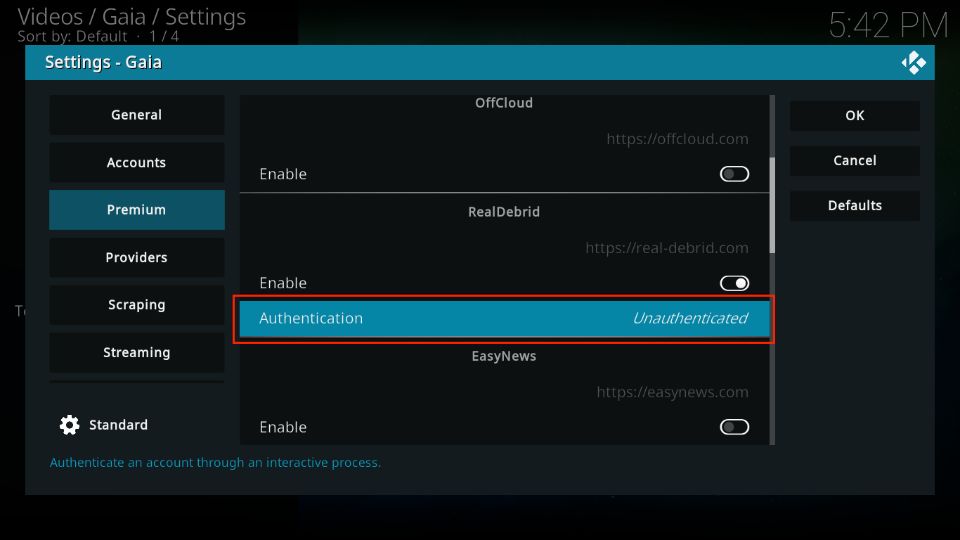
3. Click Authentication.
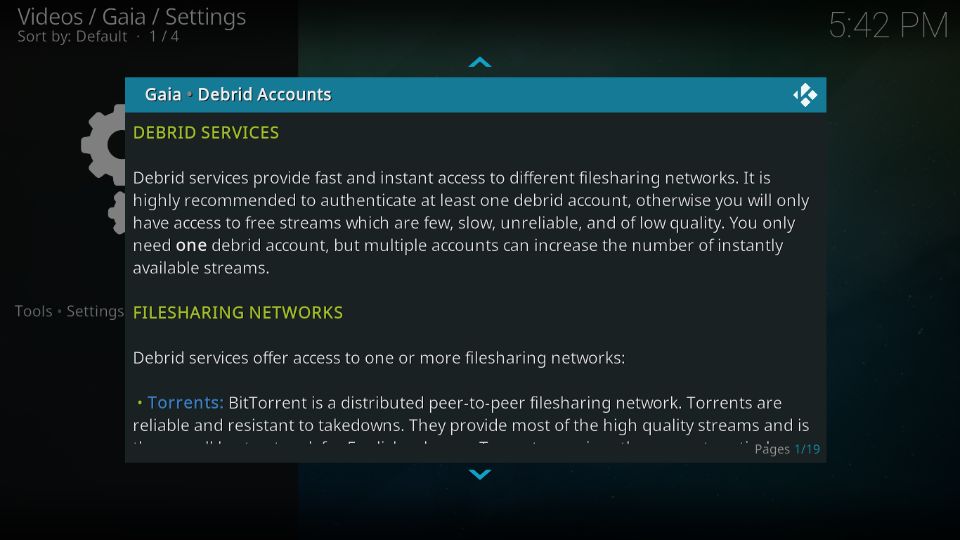
4. A prompt will appear, close it.
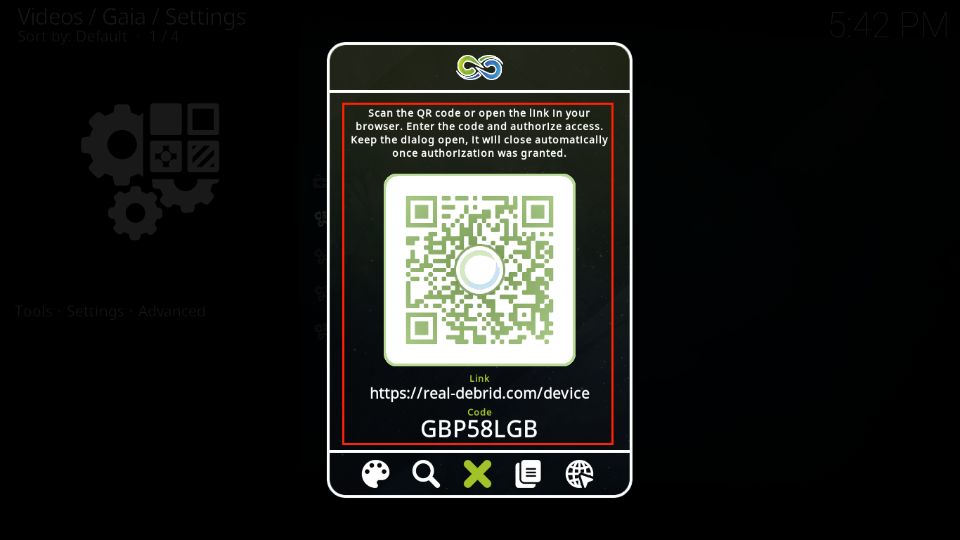
5. A prompt with the URL and code will appear on the screen now. Go ahead and open the following link on a computer or mobile and enter the code to authenticate Real-Debrid: real-debrid.com/device.
Enter the code on the website and use the website’s instructions to complete the setup.
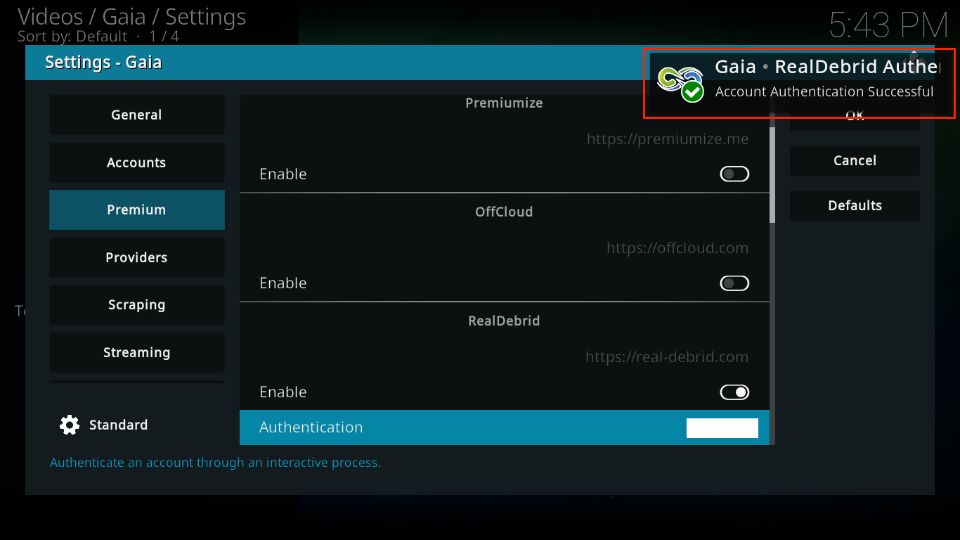
6. A notification will appear on the right side informing about RealDebrid Authentication.
That will be all! Return to the Gaia Kodi addon main screen and start enjoying your favorite content.
How to Connect Trakt with Gaia
Along with premium scrapers, Gaia also supports accounts like Trakt. Trakt is a fantastic service that lets you sync your watch history. Here’s how to connect it with Gaia:
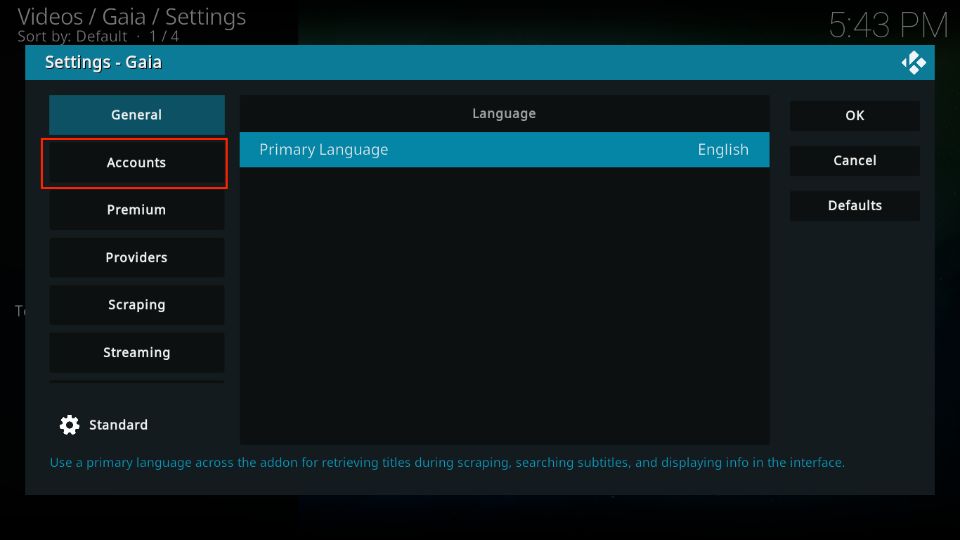
1. Go to Tools > Settings > Advanced. Then, select Accounts.
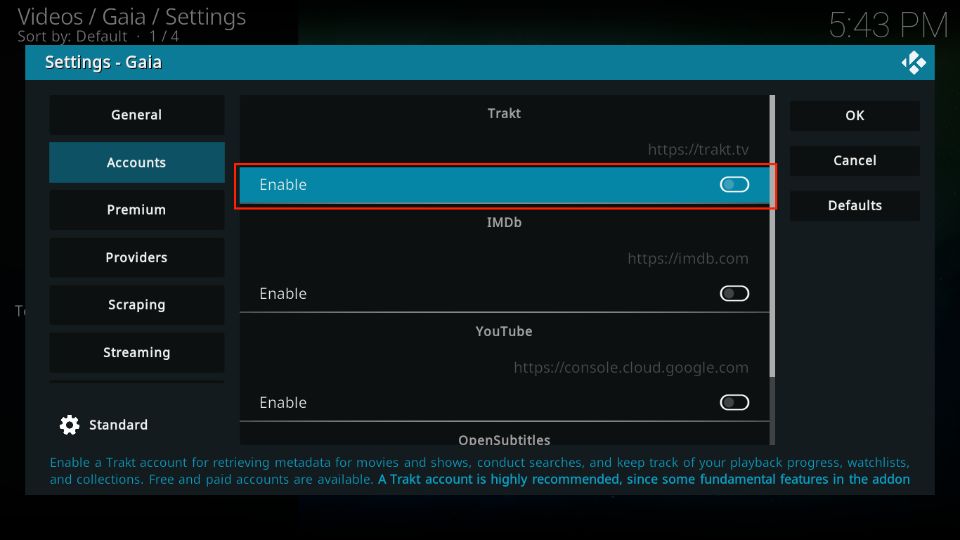
2. Under Trakt, toggle on Enable.
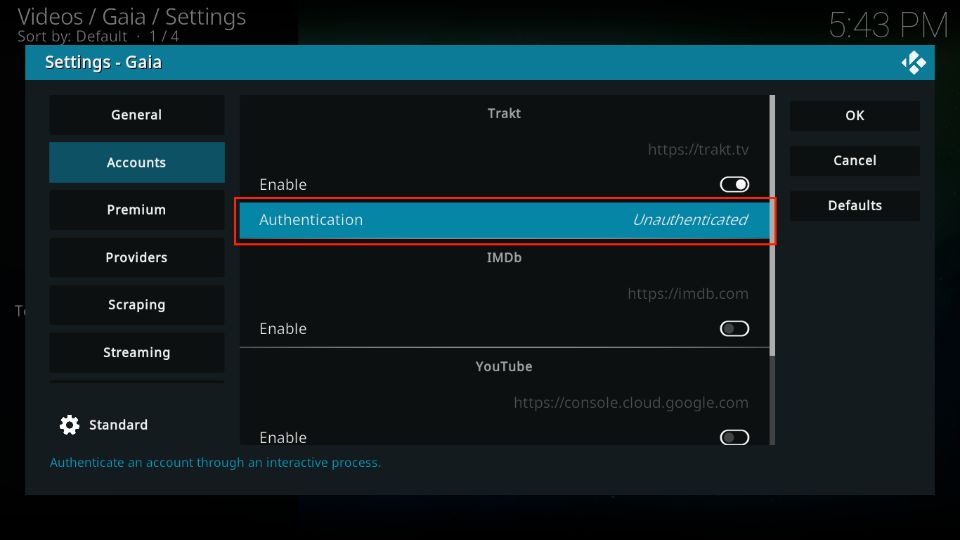
3. Click Authentication.
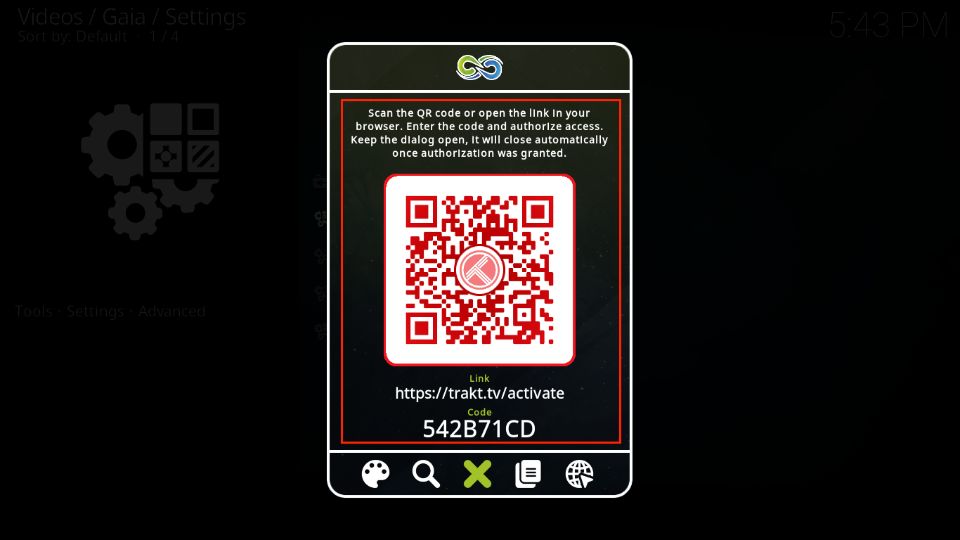
4. A Gaia Trakt prompt will appear. Go to https//trakt.tv/activate and enter the code you see on Kodi. Then, use the site’s instructions to complete the setup.
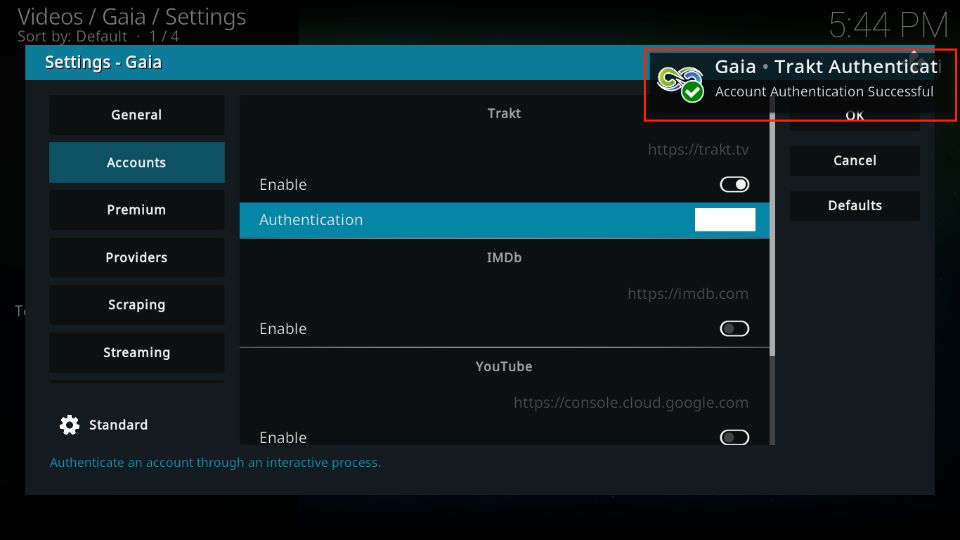
5. On success, a Trakt Authentication notification will appear on the top right side of your screen.
Conclusion
This guide showed how to install the Gaia Kodi addon. In the times when many popular addons are shutting down or losing quality streams, Gaia is a pleasant addition to my list. I have been using this addon for several days. And I am surprised to see the kinds of streams it has been able to fetch. I have never had difficulty playing the title I wanted to watch. Go ahead and give this addon a try.
Related:
- How to Install Homelander Kodi Addon
- Install Asgard Kodi Addon
- The Crew Kodi Addon
- How to Install Scrubs Kodi Addon

Suberboost Your FireStick with My Free Guide
Stay Ahead: Weekly Insights on the Latest in Free Streaming!
No spam, ever. Unsubscribe anytime.




Hi, I just added Gaia today and followed all of the instructions but after it finds sources the loading symbol (spinning cog) comes up like it’s going to give me the list to pick a source to play from but nothing ever happens the cog just spins forever. Help ??
Hi, this could be a temporary issue. In the meantime, you may try some other working addons from this list: https://www.firesticktricks.com/best-kodi-addons.html
I keep getting an error “, failed to add steam to realdebrid” what do I need to do to fix this?
Hi Kim, uninstall and reinstall the addon and reauthorize Real Debrid again. However, if you are not using Real Debrid, you will need a subscription. Here is our guide: https://www.firesticktricks.com/real-debrid-kodi.html
In case you are looking for addons that work without Real Debrid, here is our list: https://www.firesticktricks.com/best-kodi-addons.html
Brad, you get what you paid for! NOTHING
REAL-DEBRID +180 days = $20.
Works great. https://real-debrid.com/premium
Don’t forget to setup Orion, Offcloud and TRAK tv integration with GAIA.
Of course a VPN is essential.
🙂
I added real dedrid but don’t have a paid account, just free. Whenever I try to load a stream it says “Failed to Add stream to Real Dedrid ” what’s going wrong?
Hi Brad, free account pulls streams only during the happy hours: European Time (5 AM to 11 AM GMT)