
In this guide, I will walk you through the step-by-step process for installing and using Zoom on FireStick. The same process applies to all Fire TV devices, including FireStick 4K, Fire TV Cube, and FireStick Lite. But before I jump into the installation process, let’s briefly look at Zoom.
Zoom is a popular cloud-based video conferencing software that allows you to communicate across nearly any device. Employers often use it to conduct online video meetings, training sessions, and webinars with other participants, while others may use it for video communication. It enables anyone to host unlimited video calls with up to 100 participants.
You can also share your screen with others and display documents, images, or any other content on your screen. Additionally, you can record your meetings as videos or audio clips to review later.
Currently, Zoom offers four pricing tiers. You can compare the Zoom plans in detail on the official site or read the summaries below:
- Basic Version: The basic free version allows you to hold unlimited one-on-one meetings of any duration. You can also host up to 100 participants in limited group calls for 40 minutes.
- Pro Version: This version costs $15.99 per month per license and is great for small teams. It allows you to conduct group meetings for up to 30 hours, stream over social media, store meeting recordings, and more.
- Business Version: This plan is ideal for small to medium-sized businesses. It costs $21.99 per month per license and lets you brand Zoom meetings with your company branding. Other features include single sign-on, recording transcripts, and managed domains. On this plan, you can host meetings with up to 300 participants.
- Enterprise Version: This plan is suitable for large enterprises. The price will vary depending on the organization’s size. You can host meetings with up to 500 participants. Plus, it offers unlimited cloud storage for recordings.
For FireStick Users
ISPs, hackers, and other third-party entities worldwide may monitor your online activities. For security, privacy, and smooth streaming, it is recommended to use a reliable VPN for FireStick. Your IP address is visible to sites you visit.
I recommend ExpressVPN, a fast and secure VPN. It is very easy to install on any device, including an Amazon Fire TV Stick. Also, it comes with a 30-day money-back guarantee. If you don't like their service, you can always ask for a refund. ExpressVPN also has a special deal where you can get 4 months free and save 81% on the 2-year plan.
Read: How to Install and Use the Best VPN for FireStick
How to Install Zoom on FireStick
After reviewing the Zoom app’s basic overview, let’s examine the Zoom installation process. Since Zoom is a third-party app, you must sideload it onto your Fire TV device.
Follow these steps to install the Zoom app on your Amazon FireStick.
Part 1: Install the Downloader App on FireStick
This is the standard and simplest method for installing Zoom on your FireStick. Downloader is a free app available in the Amazon App Store that makes installing the Zoom app easy and smooth. It is a must-have app for all FireStick users who want to sideload any app onto their device.
Follow these steps to install Downloader:
1. Go to the FireStick home screen. In the menu bar, scroll to Find.
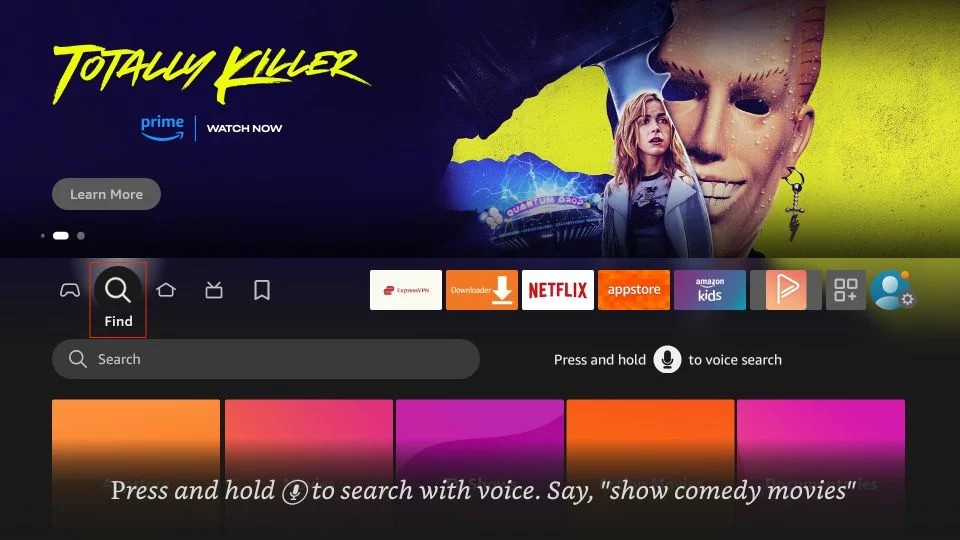
2. Select Search.
3. Type in Downloader. Click it from the suggestions.
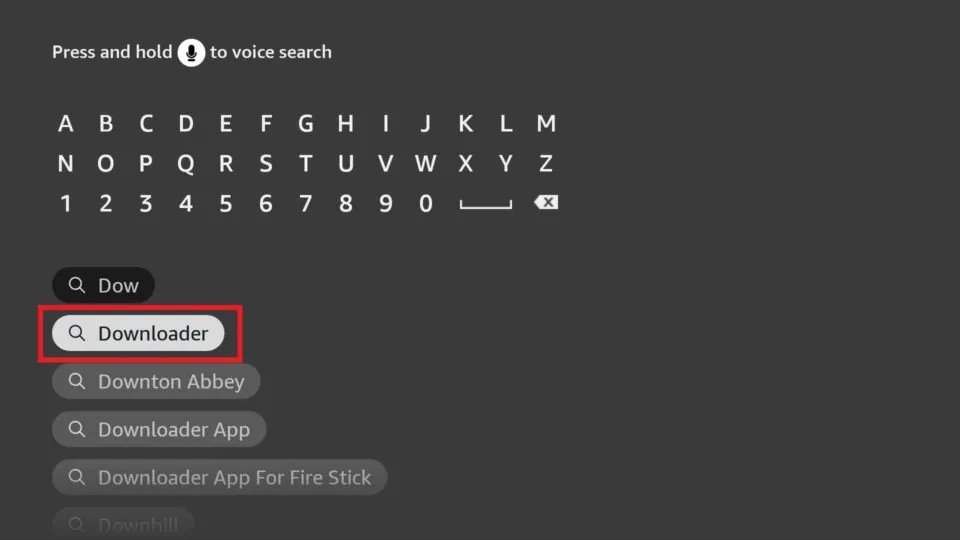
4. Select Downloader in the search results under APPS AND GAMES.
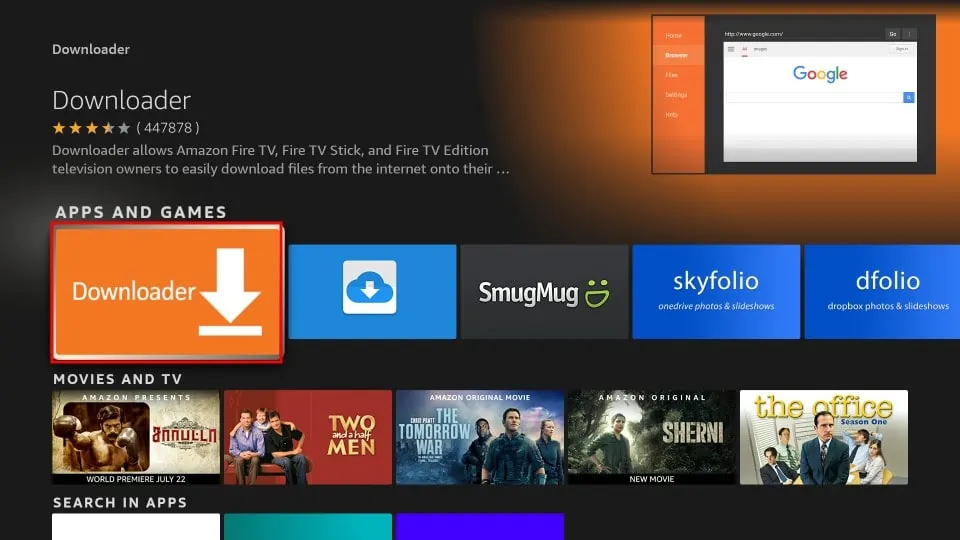
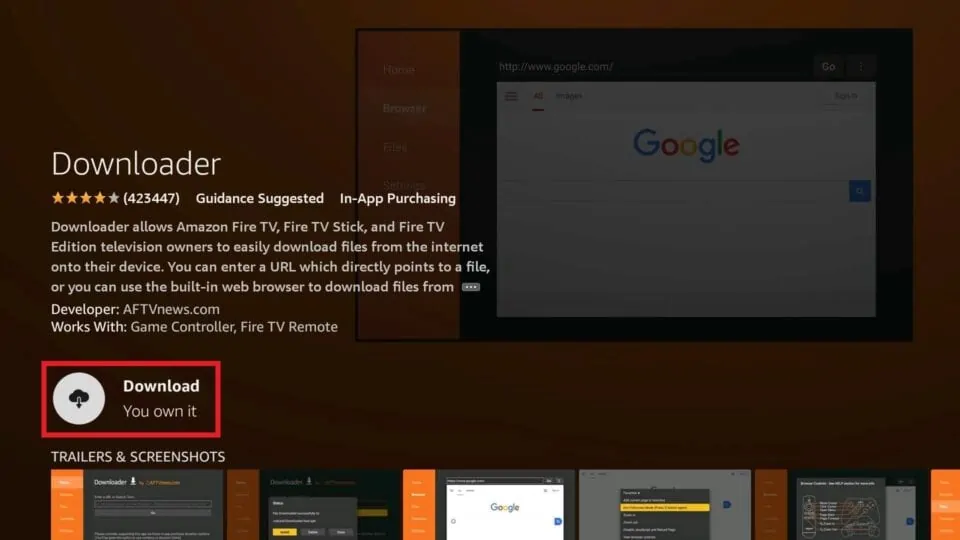
5. Click Download or Get and wait for the installation to complete.
Part 2: Allow Apps From Unknown Sources
Once you have installed the Downloader app, prepare your FireStick for Zoom installation. You can easily do so by following these steps:
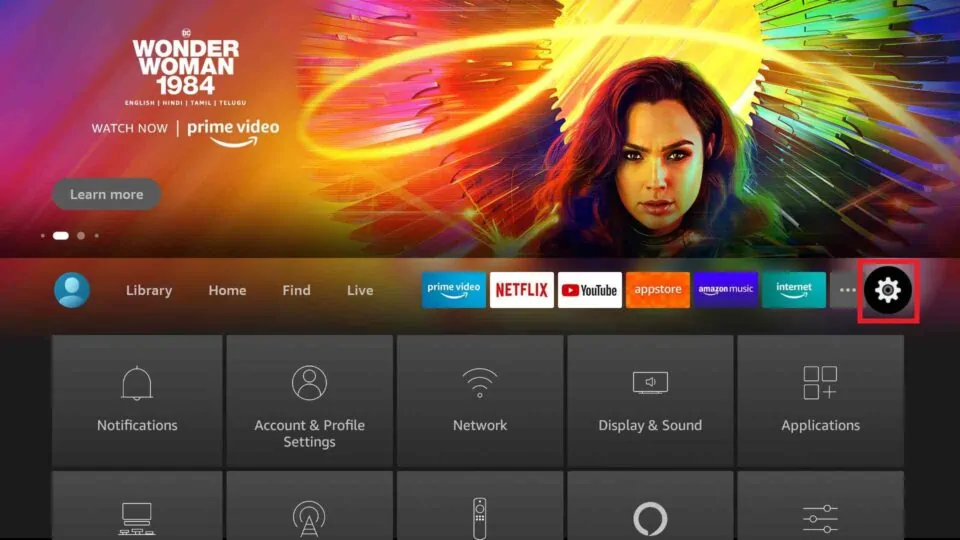
1. Press the home button on your remote to return to the Fire TV home screen. Then select the settings icon on the far right.
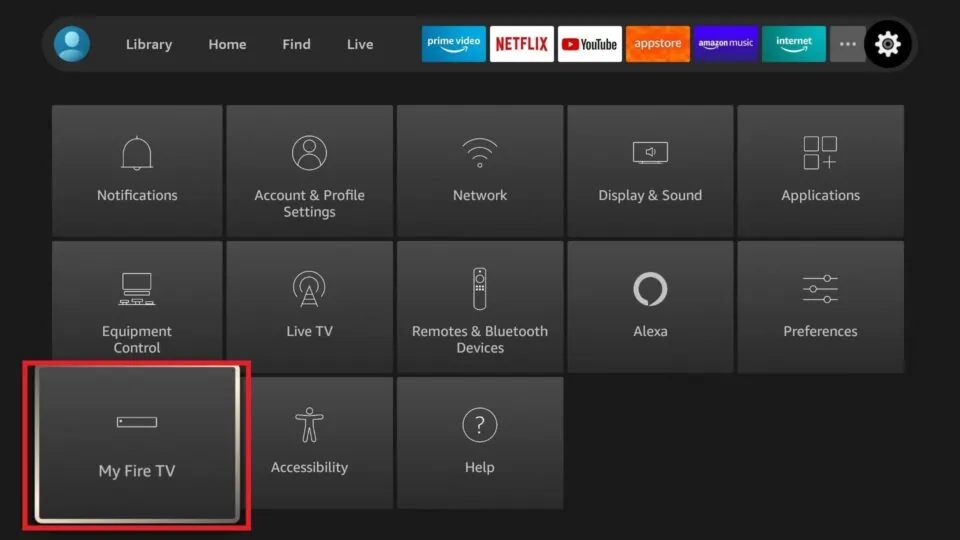
2. Click My Fire TV.
3. On the next window, click Developer Options.

4. Now, click Install unknown apps.
Note: If you see a setting labeled “Apps from Unknown Sources,“ select it to turn it ON. Otherwise, skip the next step and continue with part 3.
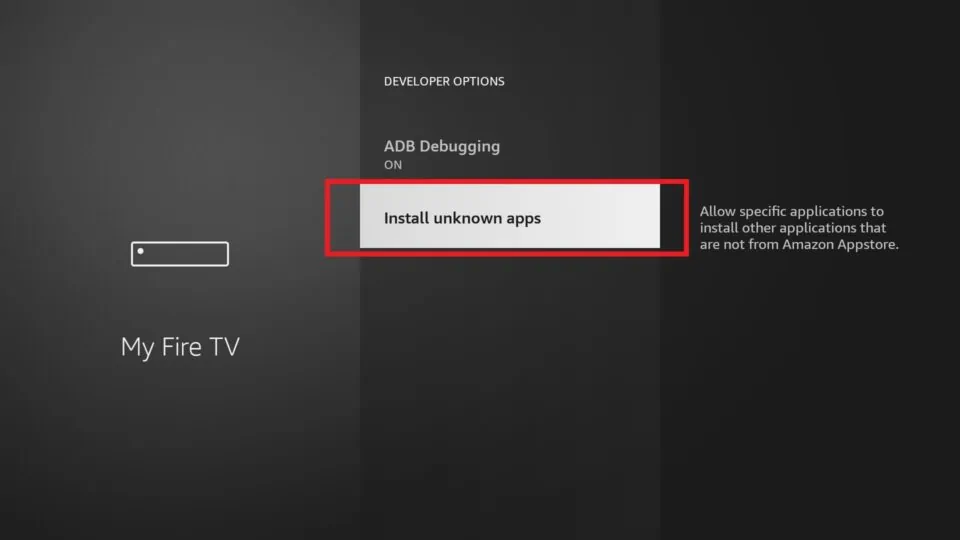
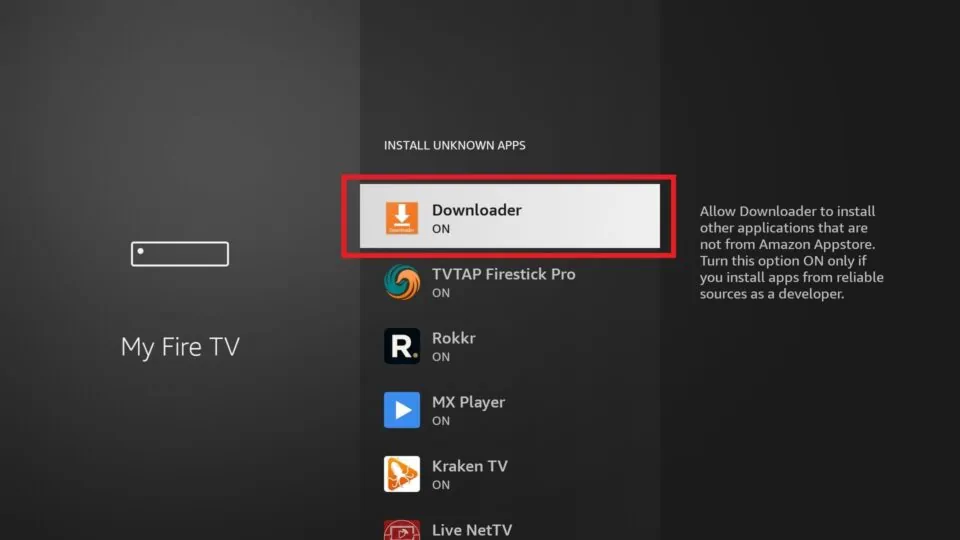
5. Select Downloader and turn it ON.
You have successfully set up your FireStick to install any third-party app, including Zoom. Let’s start the process now.
Part 3: Install Zoom on FireStick
In this step, I’ll show you how to install Zoom on your Amazon Fire TV Stick.
1. Open the Downloader app you just installed. If you’re having trouble finding the app in your interface, press and hold the home button on your remote and go to Apps. From there, you can locate and select Downloader to launch it.
2. Navigate to the Browser option on the left and select it.
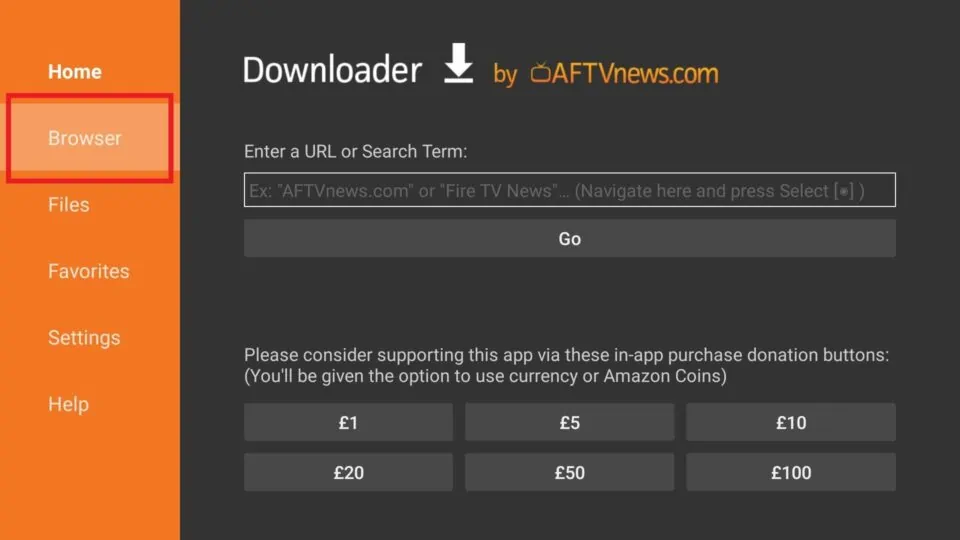
3. Click the URL field.

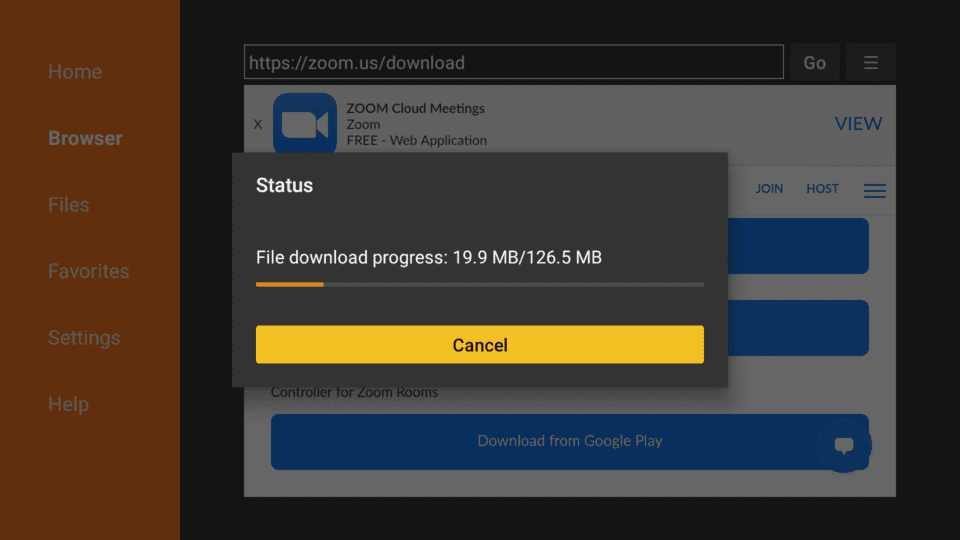
4. Now, you will notice the following pop-up window. Erase the URL mentioned here and type zoom.us/download

5. Now, click Download from Zoom.
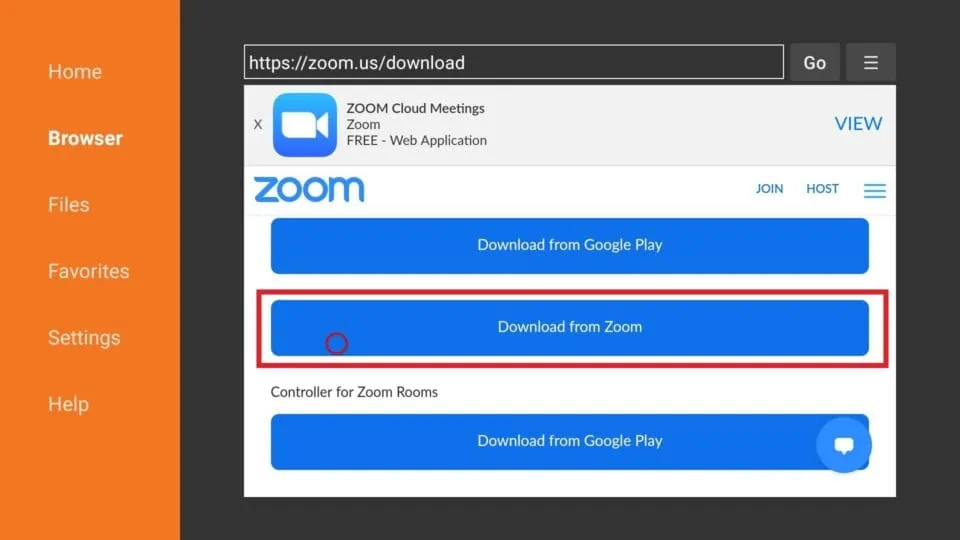
6. The Zoom app should start downloading now.
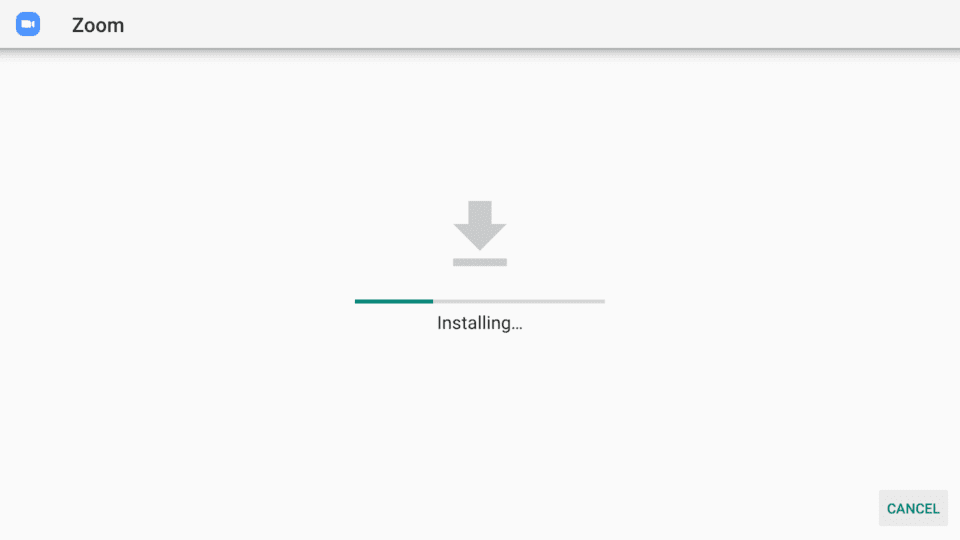
7. Once the download is complete, click Install in the bottom right corner.

8. This is where FireStick will begin installing the Zoom app from the APK file. This will take a few minutes.
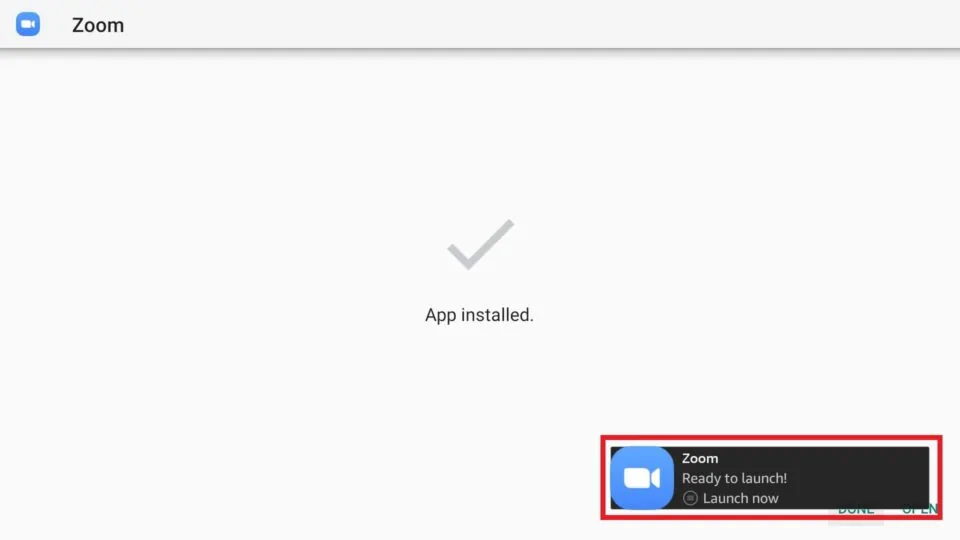
9. When the Zoom app is completely installed, you will be notified with the following window at the bottom right: Zoom – Ready to launch.
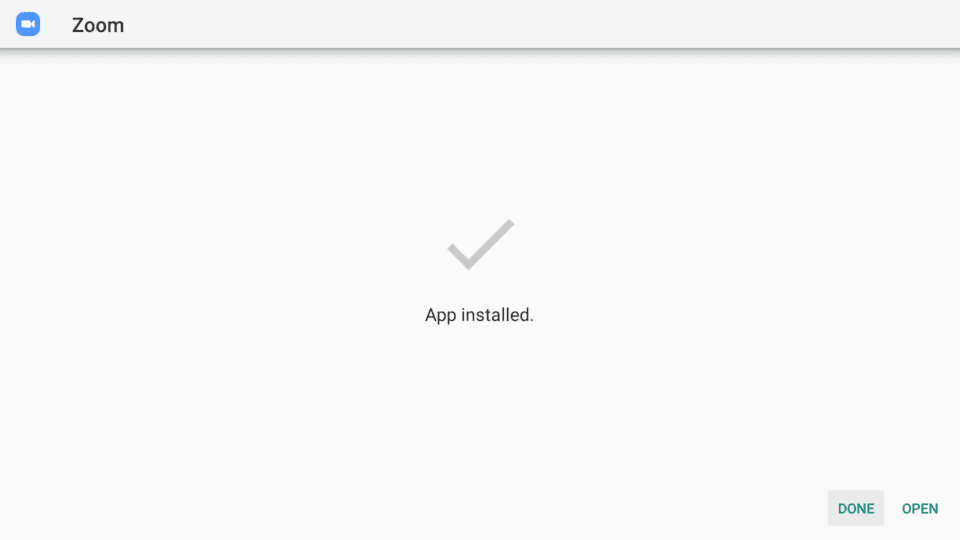
10. Click Done to access the app later, or select Open to use it now.
11. On the next screen, click Delete to remove the Zoom app’s APK file. This file is no longer needed after installation is complete, so it is recommended to remove it to free up space on the device’s storage.
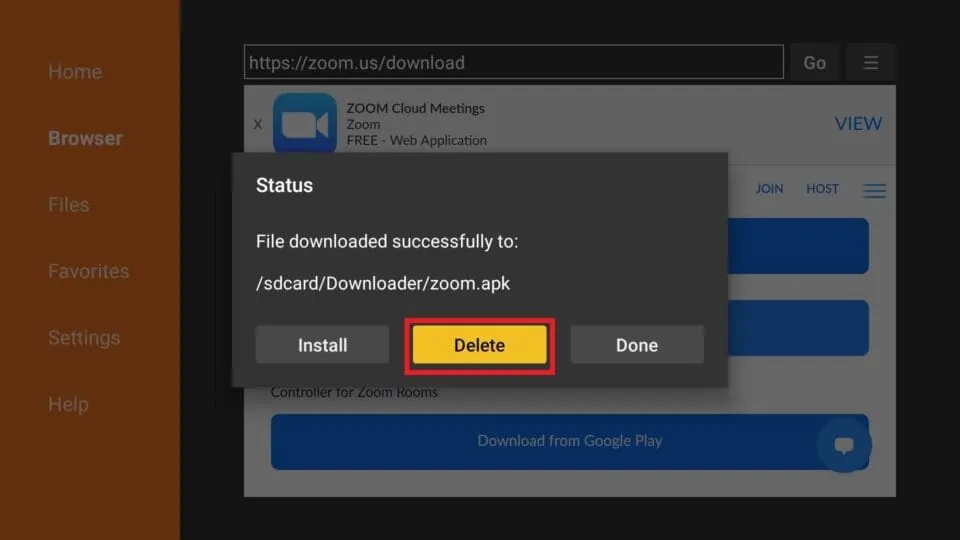
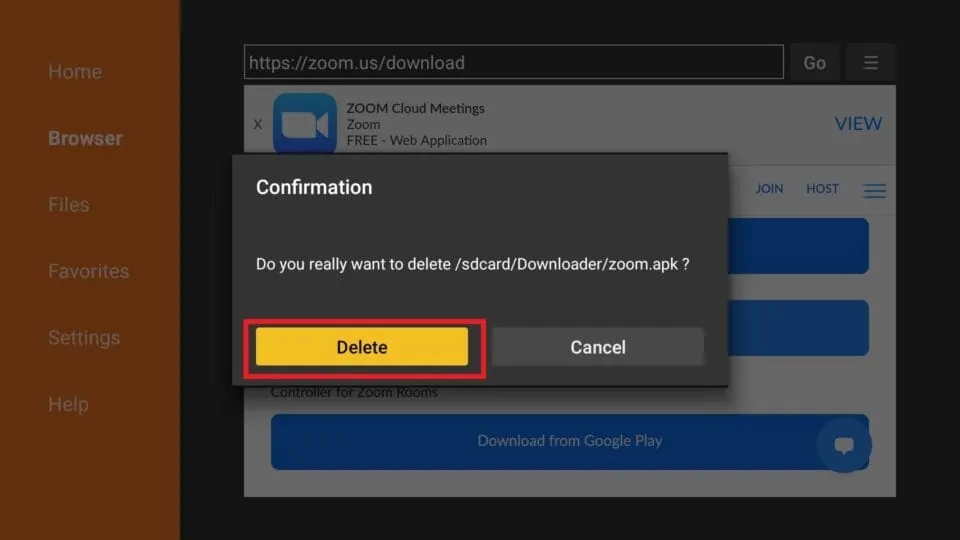
12. Click Delete again to confirm the deletion.
Congratulations! You have finally installed the Zoom app on your Amazon FireStick.
How to Stream on FireStick with a VPN
Your internet provider and many websites/apps can see your IP address and some details about your connection. Using a VPN encrypts your traffic and masks your IP address, which helps protect your online privacy.
I recommend ExpressVPN. It’s a reputable VPN with strong encryption and fast connections, and it’s straightforward to install on Fire TV/FireStick and other devices.
Next, I’ll show you how to set up and use ExpressVPN on your Fire TV/Stick.
Step 1: Subscribe to ExpressVPN HERE. It comes with a 30-day money-back guarantee. Meaning, you can use it for free for the first 30 days, and if you are not satisfied with the performance (which is highly unlikely), you can ask for a full refund.
Step 2: Power ON your Fire TV Stick and go to Find, followed by the Search option.

Step 3: Now type “Expressvpn” (without quotes) in the search bar and select ExpressVPN when it shows up in the search results.

Step 4: Click Download to install the ExpressVPN app on Fire TV / Stick.

Step 5: Open the app and enter the login credentials that you created when you purchased the ExpressVPN subscription. Click Sign in.

Step 6: Click the Power icon to connect to a VPN server. That’s all. Your connection is now secure with the fastest and best VPN for FireStick.

How to Use Zoom on FireStick
This section will guide you on how to use the Zoom app on your FireStick. First, let’s make the app more accessible on your FireStick. Then, we’ll take a quick peek inside.
1. Press and hold the home button on your Fire TV remote until the following screen appears. Then click Apps.

2. Scroll to your Zoom app, but don’t select it.
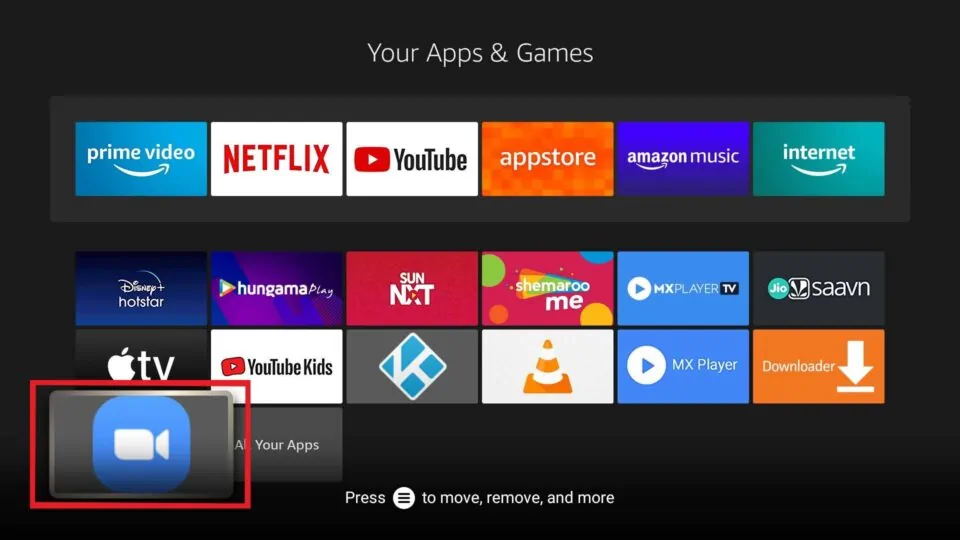
3. Press the options button on your remote, indicated by three horizontal lines. In the menu that appears on the right, select Move.
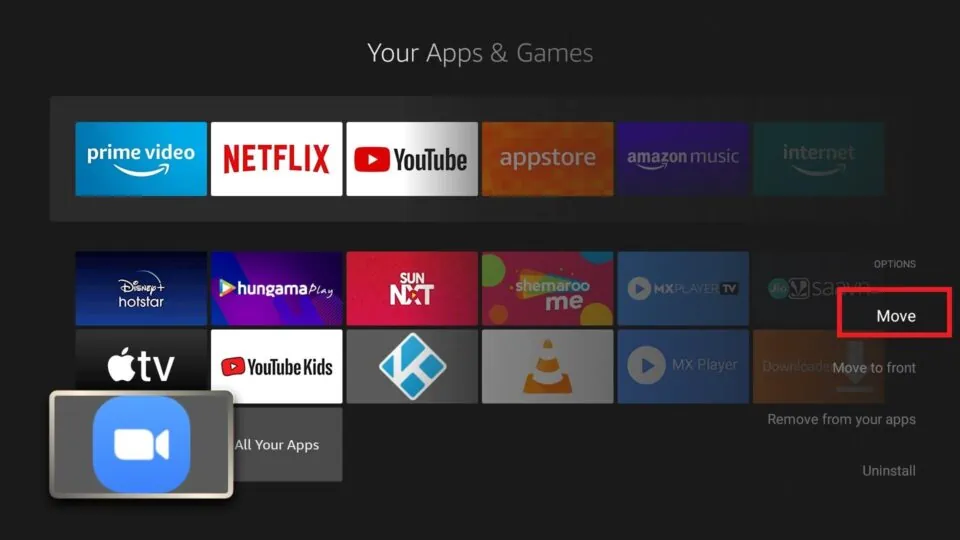
4. Use the directional buttons on your remote to move Zoom to the top row of apps, which are visible on the Fire TV home screen. Press the Select button, located in the center of the directional buttons, to confirm the new location.
5. After relocating the app, select it to launch it.
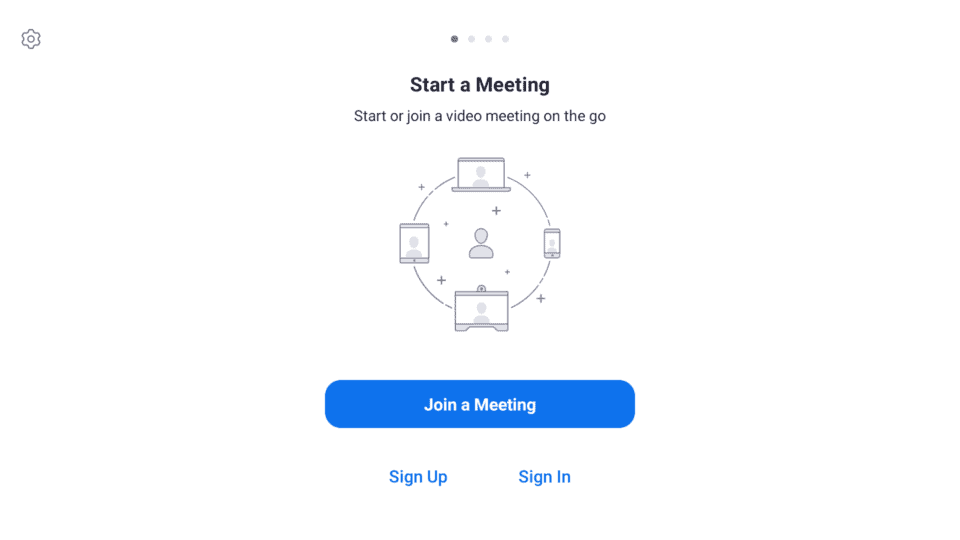
On the main screen, Join a Meeting by providing a meeting ID. You don’t need to create an account to join a meeting someone else is hosting; you only need that meeting ID. However, you’ll need a Zoom account to host a meeting or webinar. You can make an account or sign in to your account from the app’s home screen.
Wrapping Up
There you have it! Zoom offers a reliable and convenient solution for both casual and professional video conferencing. With this guide, you should now be able to easily install Zoom on your Firestick. If you face any issues during the installation process, feel free to share your experience in the comments. We will be happy to assist you.

Suberboost Your FireStick with My Free Guide
Stay Ahead: Weekly Insights on the Latest in Free Streaming!
No spam, ever. Unsubscribe anytime.

If you use the FireTV app on your phone as a remote, you can type in this box.
Hi Steve, thank you so much for pointing this out! This is a very good way to bypass this issue. I really appreciate the comment.
I followed the instructions exactly. Everything seemed to be going well. Both Downloader app and Zoom apps installed. However the Zoom app won’t launch.
Hi Barry, I just checked and it is working for me. Please try uninstalling the app and installing it again.
how do you type in meeting id from the firestick control?
Hi John, this seems to be a common issue with the latest FireStick version. A way to bypass this is by downloading the Amazon Fire TV Remote App and using the app to type. Here is our guide on how to download Amazon Fire TV remote app.
Thanks for your clear explanation. The problem I have when I come to run zoom is that the on screen Firestick keyboard doesn’t appear so I’m unable to enter the URL link in the meeting ID box for my zoom meeting. Am I doing something wrong?
Hi John, this seems to be a common issue with the latest FireStick version. Unfortunately, we have not found a fix for it yet. In the meantime, you can try plugging in your laptop to your TV through an HDMI chord in order to get Zoom on your TV.
Excellent site!! Finally, really clear instructions with pictures!
Hi Christine, thank you for your kind words!
Thanks for your tutorial on installing Zoom on my firestick. With the situation the world is in right now, we haven’t been able to hold our church meetings in person & thanks to you, I’m now able to watch it on my tv. I am having a problem though, I’m not able to get any audio. It comes up with the message “You are using the device audio”, but what does that mean? There’s not a speaker in the firestick, so how is it using the device audio? I have my firestick plugged into my receiver so is it trying to send the audio to speakers that are connected to my receiver or is it sending the audio to the speakers in my tv? Or something else?
Hi Blaine. I’m glad that you are able to hold your church meetings online. The new FireStick devices seem to have an audio problem when it comes to Zoom. Fortunately, there is a way to bypass this. Instead of using the Zoom app, try using the Amazon Silk Browser to manually go to Zoom. You can find how to download the Amazon Silk Browser at the top of this guide, then use silk and log into to zoom.us.