This guide will demonstrate how to set up and use Premiumize on Kodi and FireStick. From setting up an online account to integrating it with Kodi and FireStick, you’ll find everything about Premiumize below. This guide is for eligible Kodi and new Amazon Fire TV devices.
What is Premiumize?
Premiumize is a paid service, also known as a Debrid service.
It uses premium scrapers to find high-quality links to your favorite TV shows and movies, offering you better download and streaming speeds than the free user.
In addition to fast speeds, Premiumize improves playback quality.
In short, the file hosting service guarantees more content sources, top-notch links, and better quality than free links.
It also offers features like transferring and collecting files over the cloud, remote downloading, RSS automation, VPN servers, and more.
Premiumize works with several Kodi add-ons, Stremio add-ons, and FireStick Apps.
Attention Kodi Users!
Governments and ISPs worldwide monitor your online activities. If you use third-party Kodi addons, you should always use a reliable Kodi VPN to hide your identity and prevent issues with your streaming experience. Currently, your IP is visible to everyone.
I use ExpressVPN, the fastest and most secure VPN in the industry. It is very easy to install on any device, including Amazon Fire TV Stick, PC, Mac, and Smartphones. It also includes a 30-day money-back guarantee. If you're not satisfied with their service, you can request a refund. ExpressVPN is offering a special NEW YEAR deal: get 4 months free and save 78% on the 2-year plan.
Install and Use Best Kodi VPN | Why you must use a VPN at all times
How to Set Up Premiumize Account Online
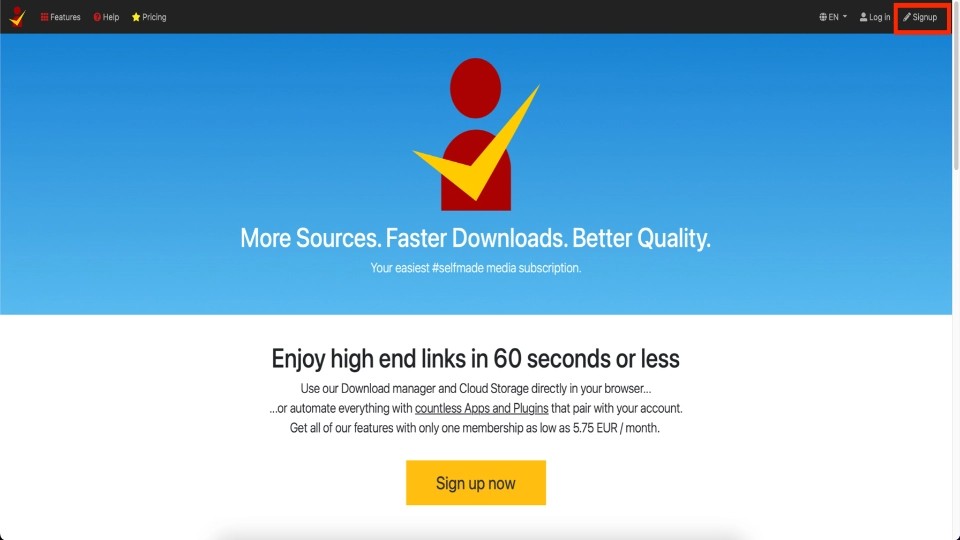
Here’s how to start with Premiumize: Open a web browser on your PC, tablet, or laptop and go to Premiumize’s official site, www.premiumize.me.
Select the button Sign up on your screen’s top right side.
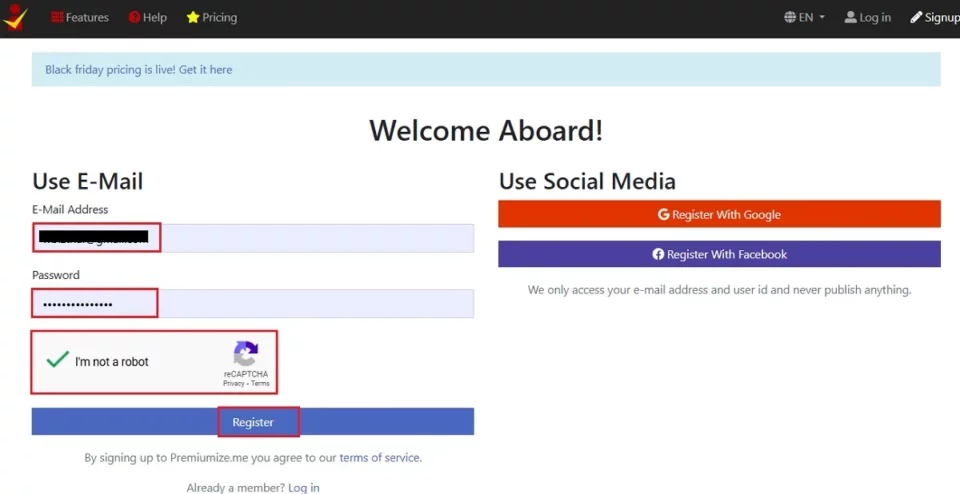
To create your Premiumize account, enter your email address and set a password.
Next, complete the captcha to prove you are not a robot. Then, click on the blue Register button.
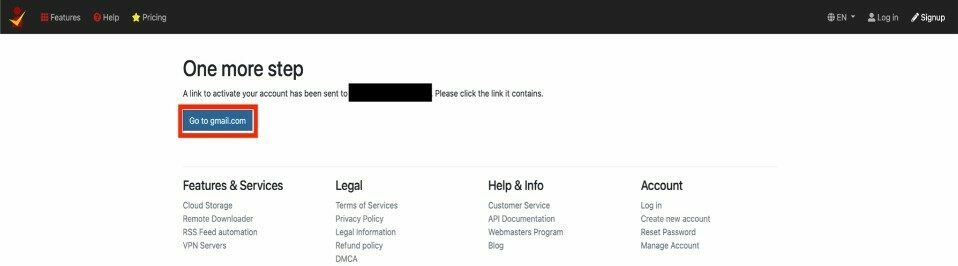
Premiumize will send an activation link to the email address you have entered.
Select the blue Go to [your email host].com button.
As I entered my Gmail account, the button read Go to gmail.com.
Open Premiumize’s email and click on the yellow Activate Account button. You can also copy and open the link inside the email.
Note: Check the spam folder if you can’t find the Premiumize email in your primary inbox.

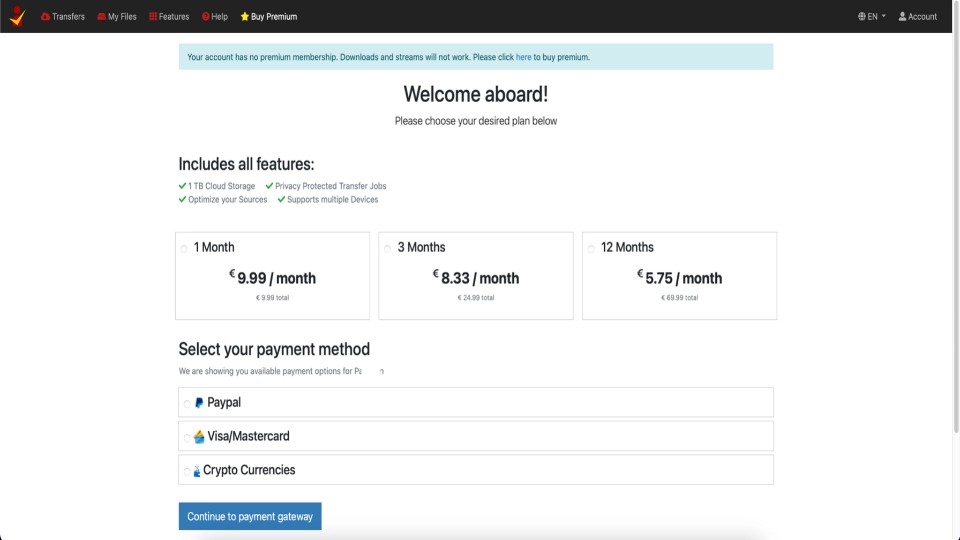
You’ll be redirected to the Premiumize official website. A notification will appear at the top of your screen: Welcome aboard! Please Choose Your Desired Plan Below.

That’s how you set up your Premiumize account online! The next part is purchasing a premium package to access the services.
To get started, choose a package that suits your needs, then select Continue to Payment.
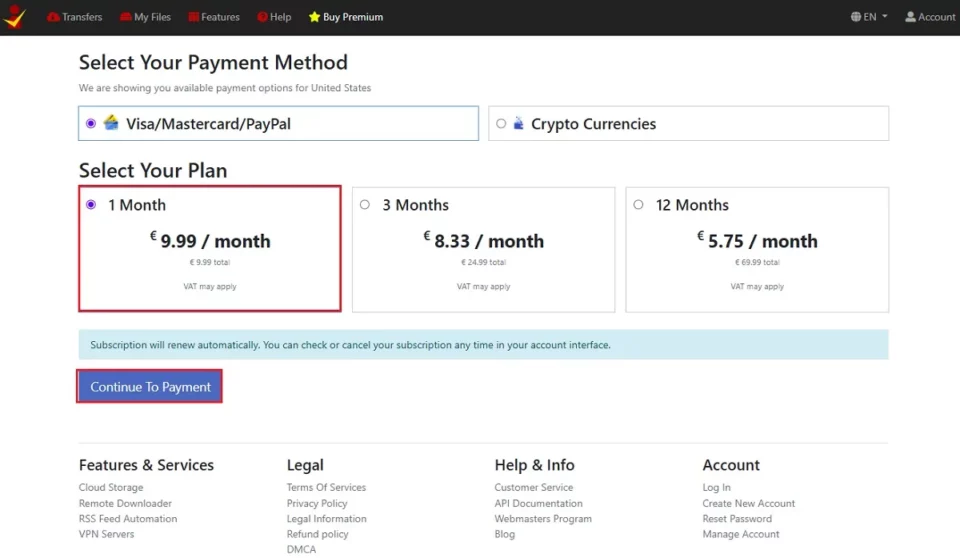
Enter your billing information and follow the on-screen instructions to complete the payment. Premiumize will process your payment and update your premium package benefits. Then, you’re all set to set up your account on Kodi and other apps.
Premiumize Membership Pricing & Features
Here’s a complete overview of Premiumize membership plans and their exclusive features:
Premiumize offers you the following three packages:
- 1 Month – €9.99 per month.
- 3 Months – €8.33 per month – billed €24.99 every three months.
- 12 Months – €5.75 per month – billed €69.99 annually.
All the Premiumize membership plans include the following features:
- Up to 1 TB of cloud storage.
- Multiple device support.
- Optimize and configure local sources.
- Privacy-protected transfer jobs.
You can purchase a Premiumize paid plan using the following payment methods:
- PayPal
- Visa/Mastercard
- Cryptocurrencies
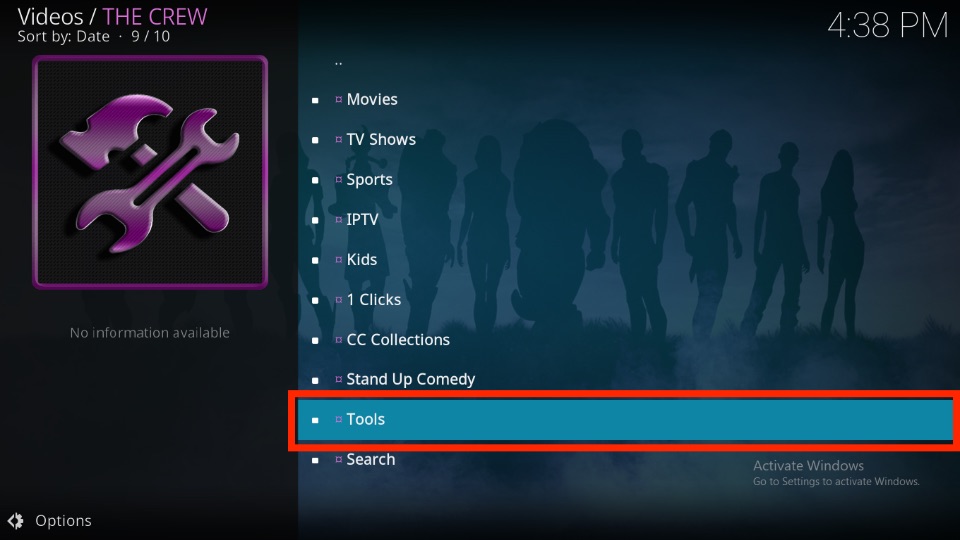
How to Set Up Premiumize on Kodi
Done creating your Premiumize account and purchasing a plan? Here are the steps to set up your Premiumize account on Kodi:
Legal Disclaimer: This guide is for informational purposes only. FireStickTricks.com does not own, host, operate, resell, or distribute any apps, services, or content mentioned.
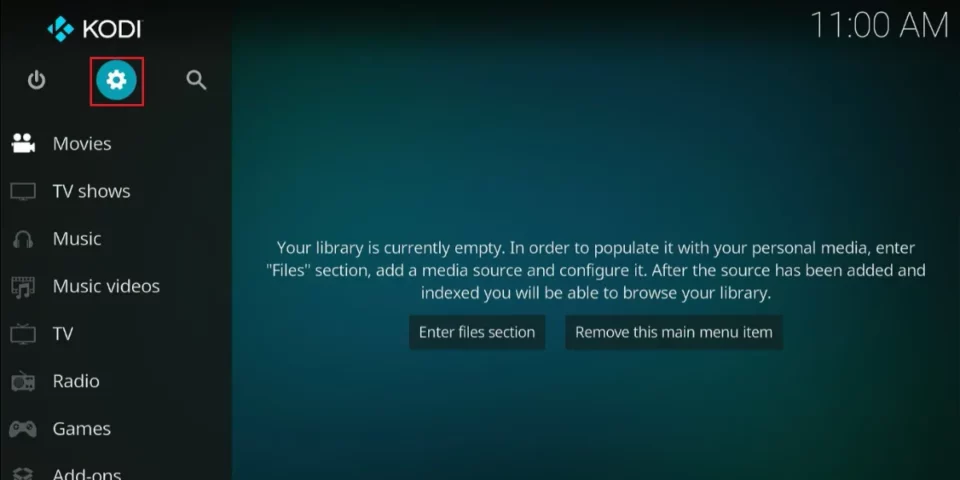
1. Go to Kodi settings by selecting the Gear Cog icon on the app’s home page.
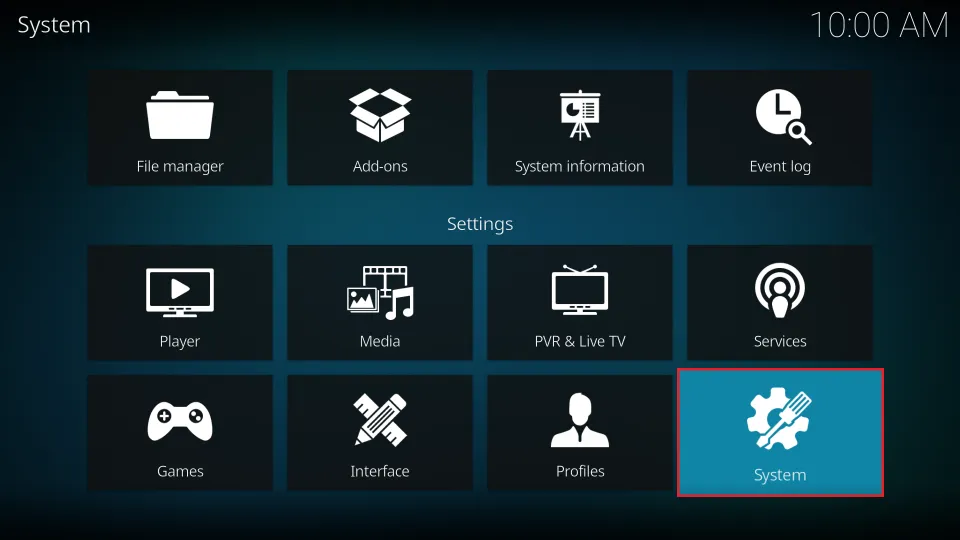
2. Open the System page.
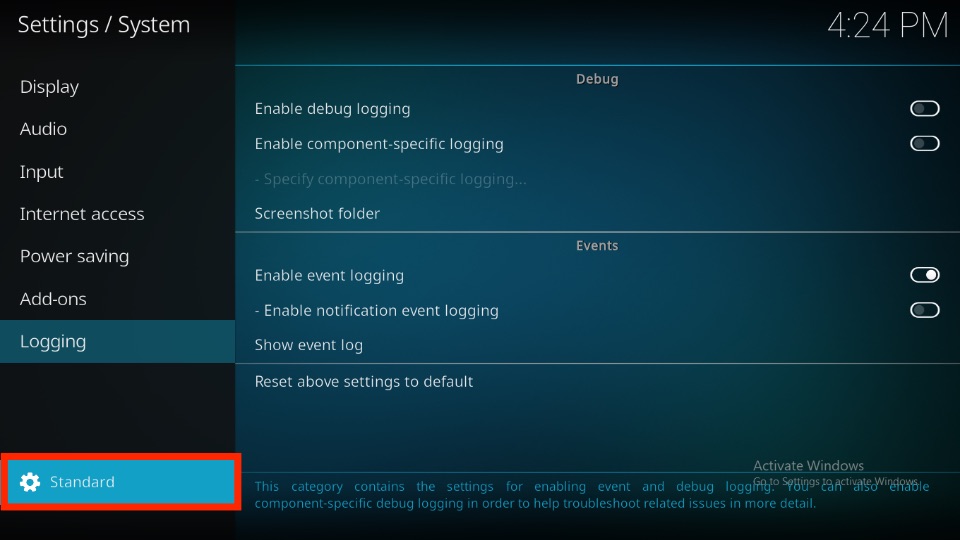
3. On the left pane, scroll to Standard’s last option. Then, select it two times to uncover the Expert menu.
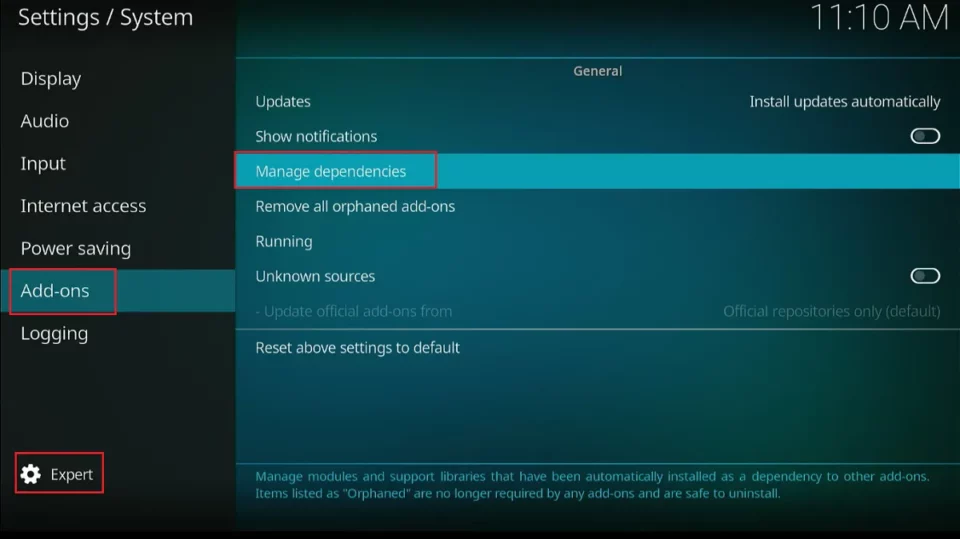
4. Scroll up and go to the Add-ons tab. After that, select Manage dependencies on the right-pane menu.
Note: Ensure you are on the Expert menu; otherwise, you won’t see the manage dependencies option.
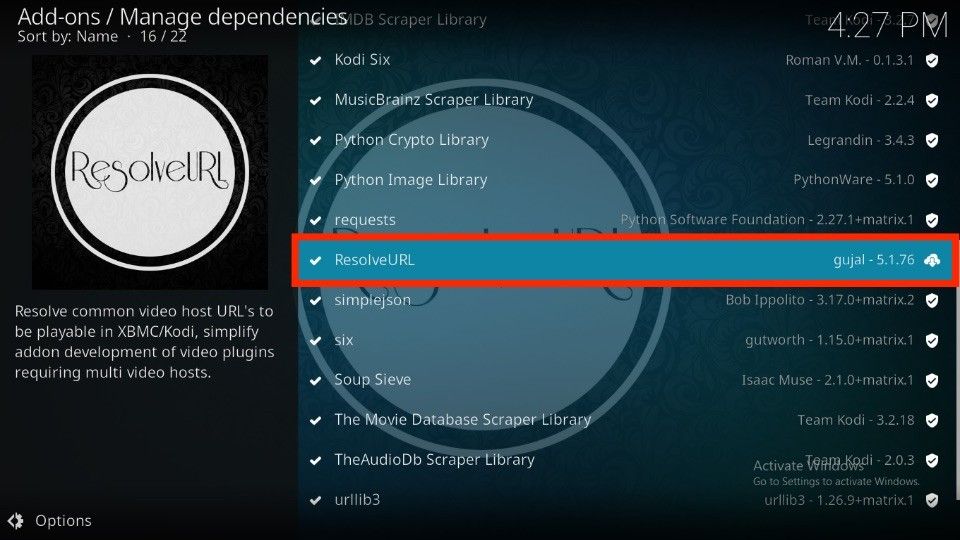
5. On the Manage Dependencies window, select ResolveURL.
Note: Can’t see the ResolveURL addon? This means you haven’t installed a third-party Kodi addon. Install any addon like the CREW to see the ResolveURL addon on the list.
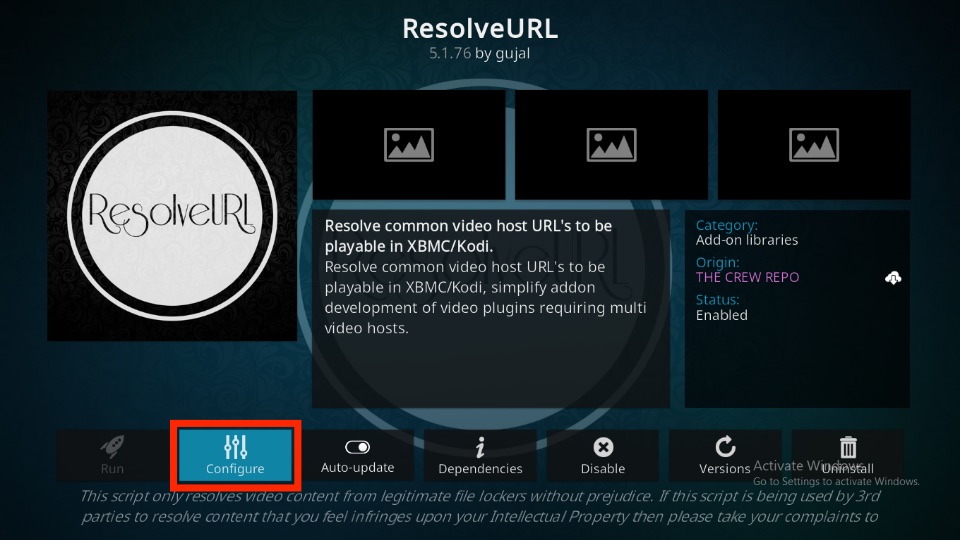
6. Select Configure.
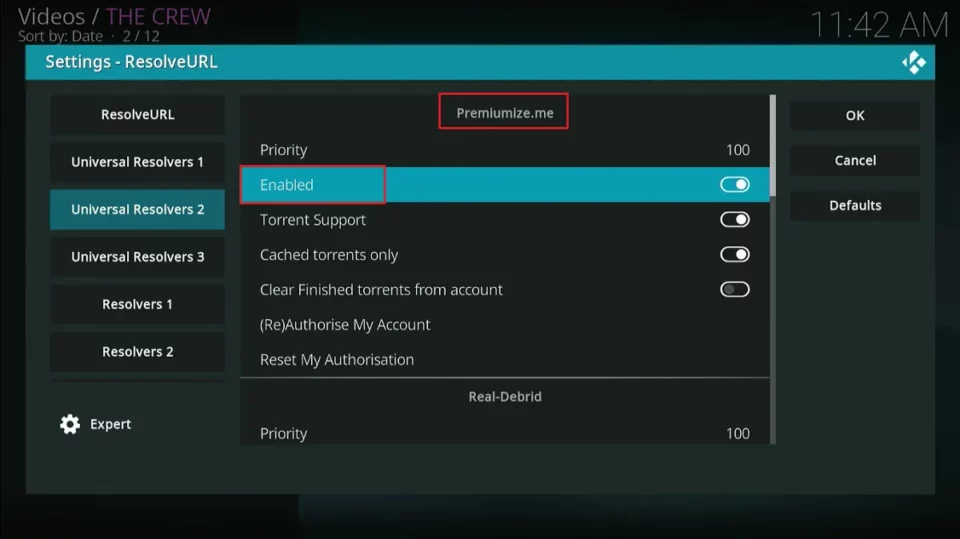
7. ResolveURL settings menu will pop up. Select the Universal Resolvers 2 tab.
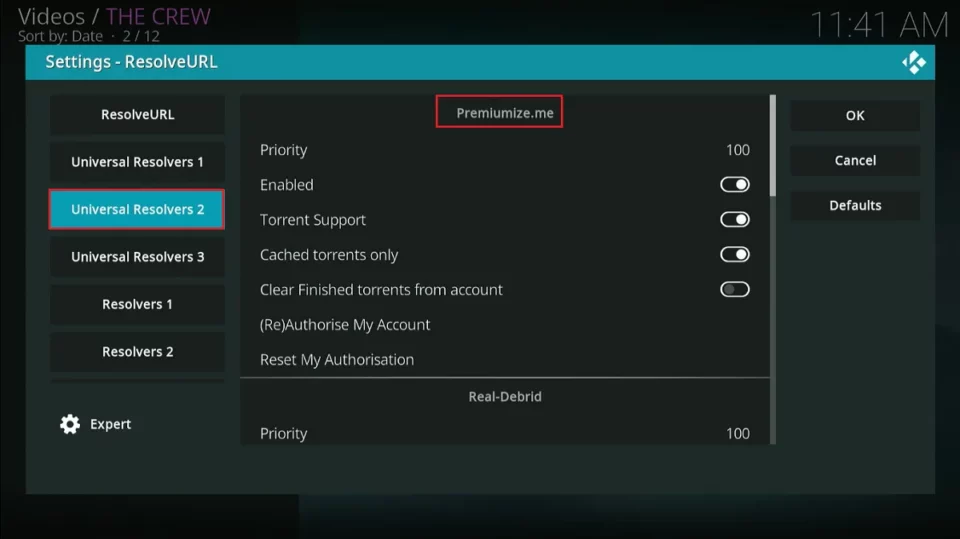
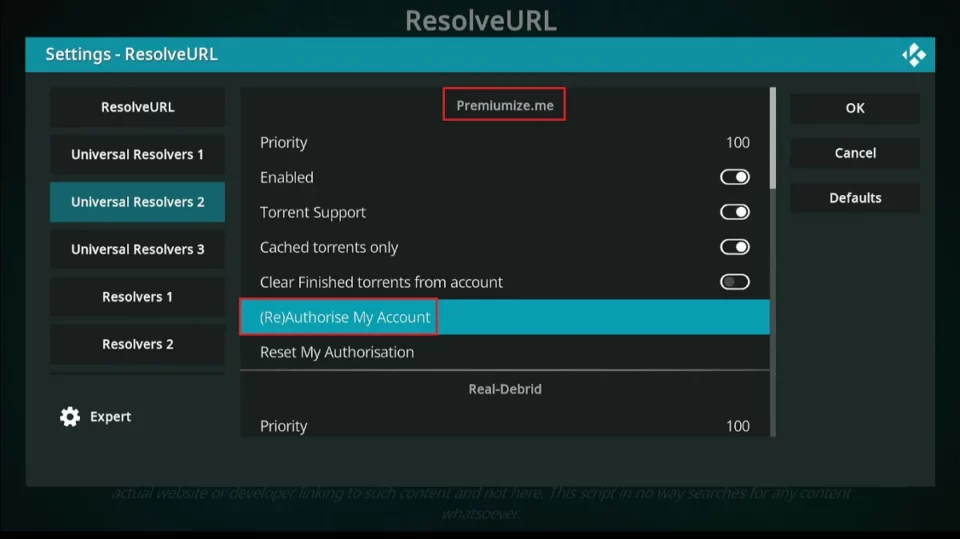
8. On the settings right-side menu, scroll down to the Premiumize.me section. Select (Re)Authorise My Account.
9. Premiumize Authorization screen will appear.
Open a web browser on any smart device and go to https://premiumize.me/device.
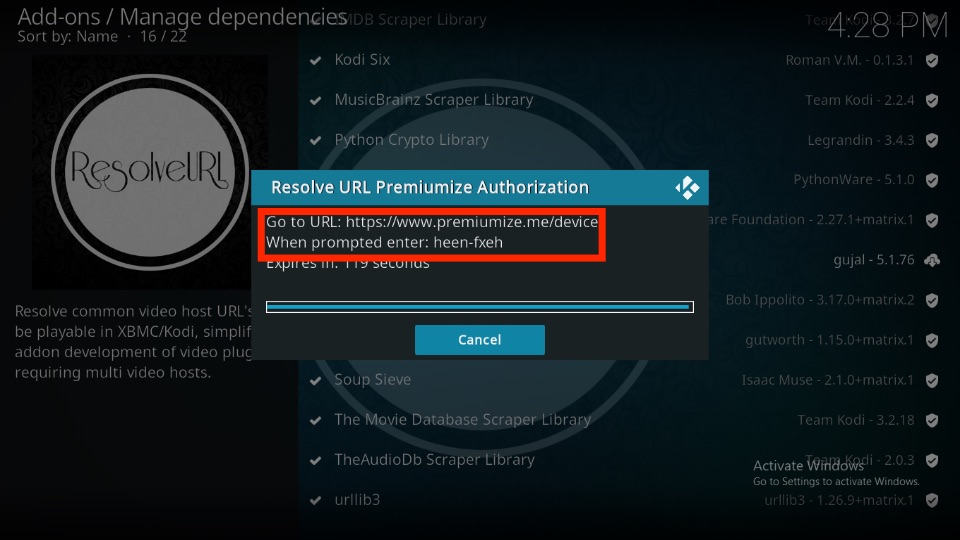
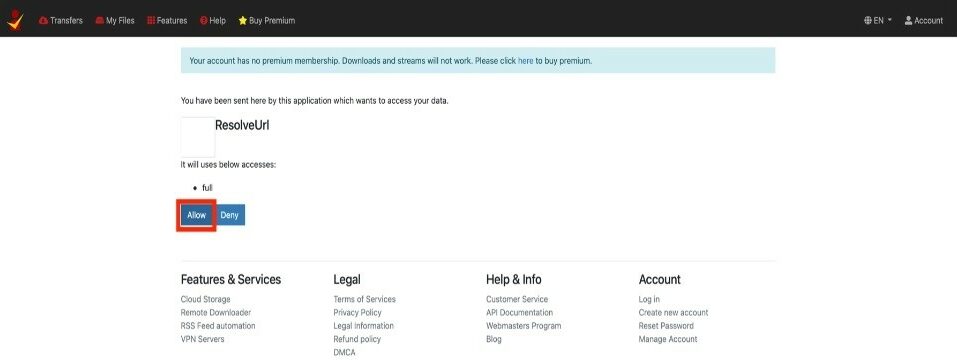
10. Enter the code in the input box and click the blue Submit button.
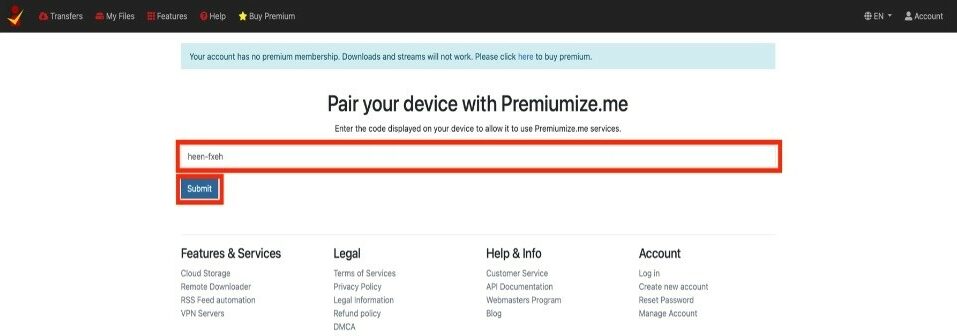
11. Premiumize.me will notify the app to access your data and select Allow.
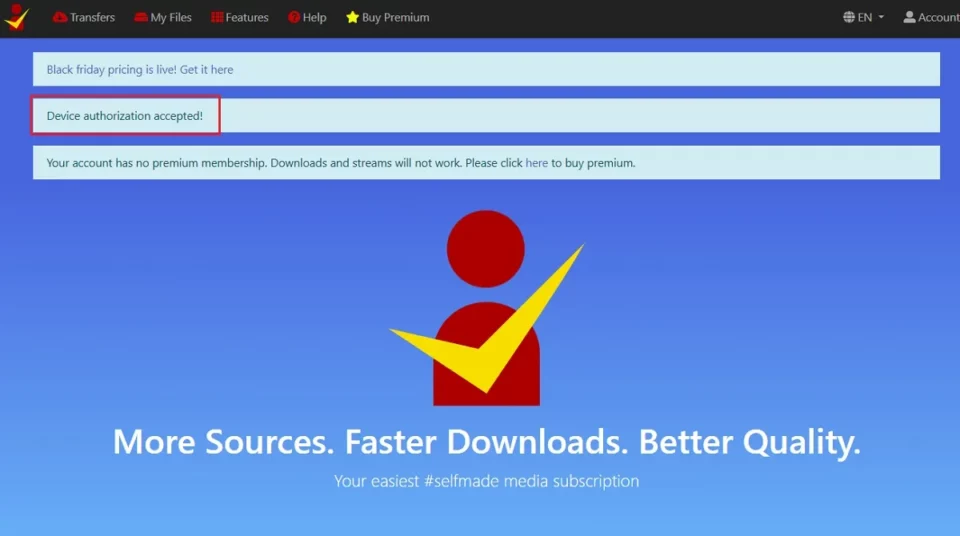
12. You’ll be re-directed and receive a message from Premiumize – Device authorization accepted.
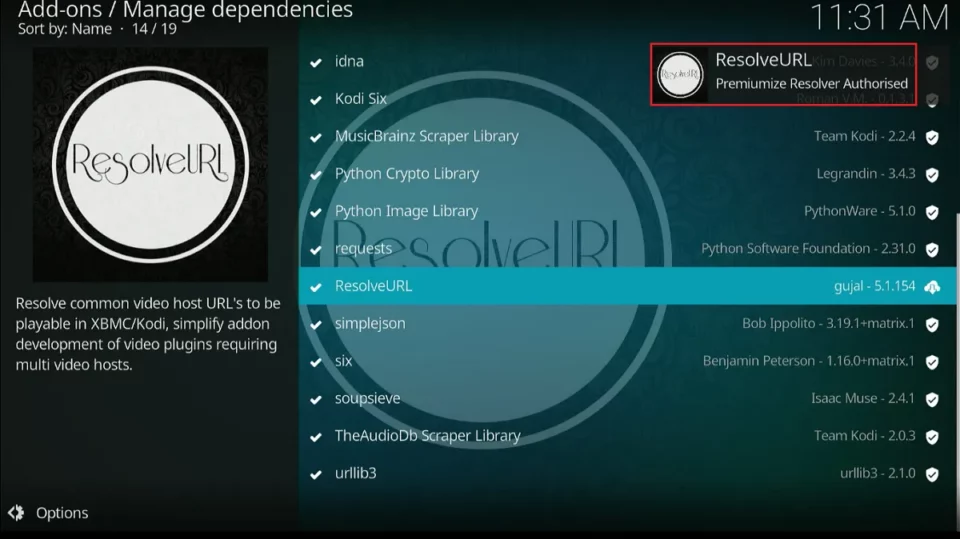
13. On your Kodi app, you’ll get a notification – ResolveURL Premiumize resolver authorized.
Congratulations! You have successfully set up Premiumize on your Kodi app.
Before you start streaming with Kodi Addons or Builds, I would like to warn you that everything you stream on Kodi is visible to your ISP and Government. This means, streaming copyrighted content (free movies, TV shows, live TV, and Sports) might get you into legal trouble.
Thankfully, there is a foolproof way to keep all your streaming activities hidden from your ISP and the Government. All you need is a good VPN for Kodi. A VPN will mask your original IP which is and will help you bypass Online Surveillance, ISP throttling, and content geo-restrictions.
I personally use and recommend ExpressVPN, which is the fastest and most secure VPN. It is compatible with all kinds of streaming apps and devices.
NOTE: We do not encourage the violation of copyright laws. But, what if you end up streaming content from an illegitimate source unintentionally? It is not always easy to tell the difference between a legit and illegal source.
So, before you start streaming on Kodi, here's how to get VPN protection in 3 simple steps.
Step 1: Get the ExpressVPN subscription HERE. It comes with a 30-day money-back guarantee. Meaning, you can use it free for the first 30-days and if you are not satisfied with the performance (which is highly unlikely), you can ask for a full refund.
Step 2: Click HERE to download and install the ExpressVPN app on your streaming device. If you are using a FireStick, I have given the exact steps starting with Step 4 below.
Step 3: Click the Power icon to connect to a VPN server. That's all. Your connection is now secure with the fastest and best VPN for Kodi.

The following are the steps to install Kodi VPN on your Fire TV devices. If you have other streaming devices, follow Step 1-3 above.
Step 4: Subscribe to ExpressVPN HERE (if not subscribed already).
Step 5: Go to Fire TV Stick home screen. Click Find followed by Search option (see image below).

Step 6: Type Expressvpn in the search bar and select when it shows up.

Step 7: Click Download.

Step 8: Open the ExpressVPN app and Sign in using the email ID and password that you created while buying the ExpressVPN subscription.

Step 9: Click the Power icon to connect to a VPN server. That’s all. Your FireStick is now secured with the fastest VPN.

How to Use Premiumize on Kodi
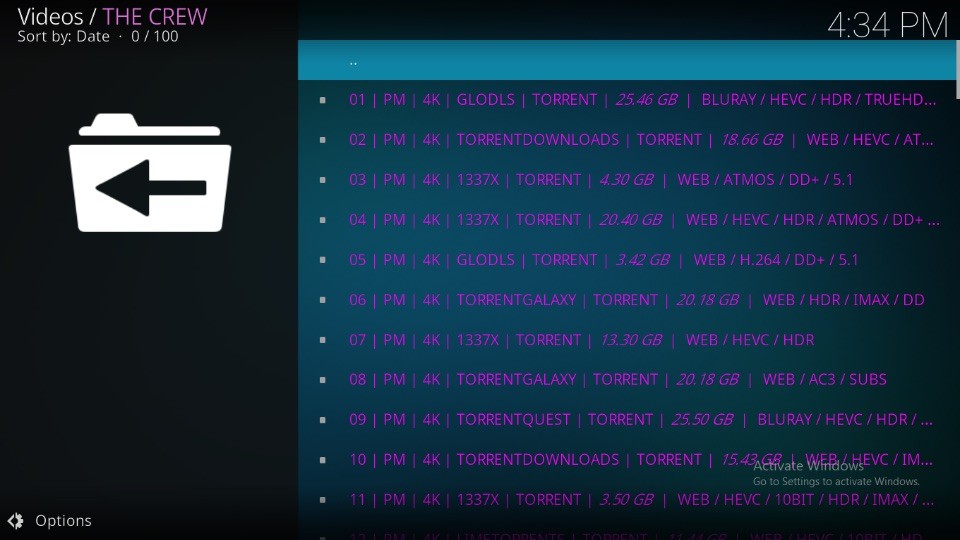
Want to see the before/after concerning Premiumize? I have got your six.
Before Premiumize on Kodi
Before adding Premiumize, I quickly used free scrapers available with THE CREW addon to find links to a movie.
And the results were not so promising; here’s the proof:
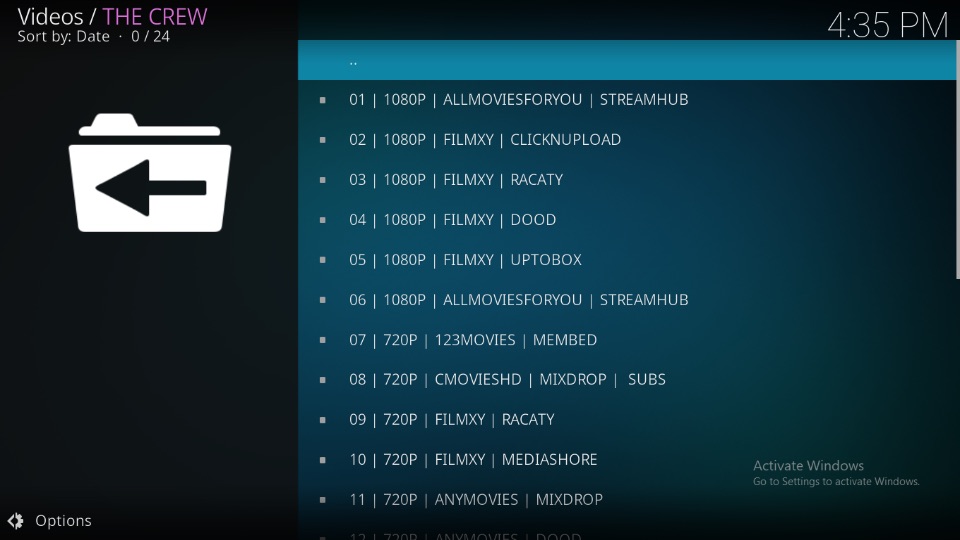
With the free THE CREW addon scrapers, I only got 24 links. Furthermore, I played all of them, and only a few worked.
After Premiumize on Kodi
After adding Premiumize, I used the same addon, THE CREW, to find links for the same movie.
And the results were quite astonishing – see for yourself:
I got a list of 100 paid links after adding Premiumize.
See the purple text and PM text. This means the link belongs to Premiumize.
Also, I played all the links, which worked flawlessly, to my surprise!
So, yes! Integrating Premiumize with any third-party Kodi addon hugely affects the quantity and quality of links you get.
What if Premiumize is Not Auto-Enabled
By default, services like Premiumize are auto-enabled on most third-party addons.
However, if that’s not the case with you, here’s how to turn on Premiumize on any Kodi addon:
Open a third-party addon and go to its settings/tools.
Open the RESOLVEURL: SETTINGS tab.
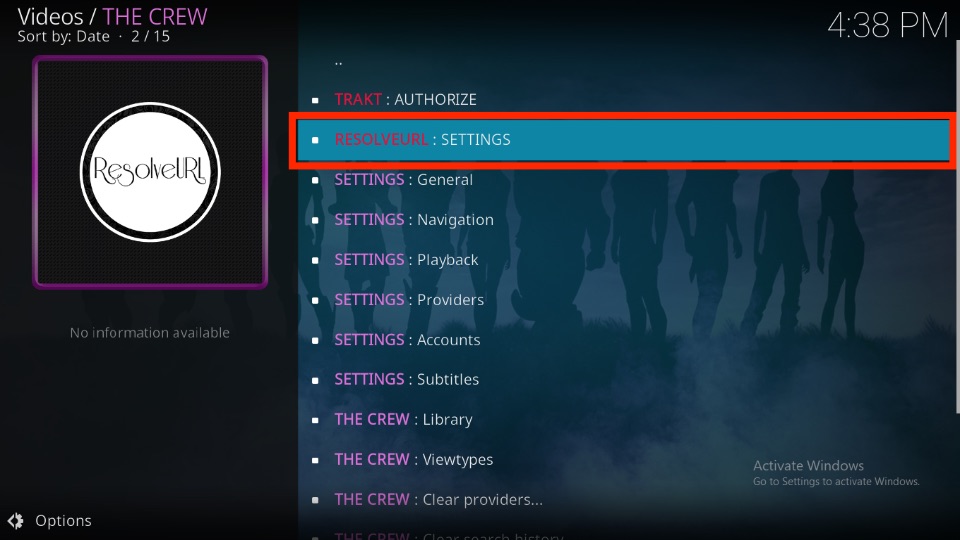
Choose the Universal Resolvers 2 tab when the Settings menu appears.
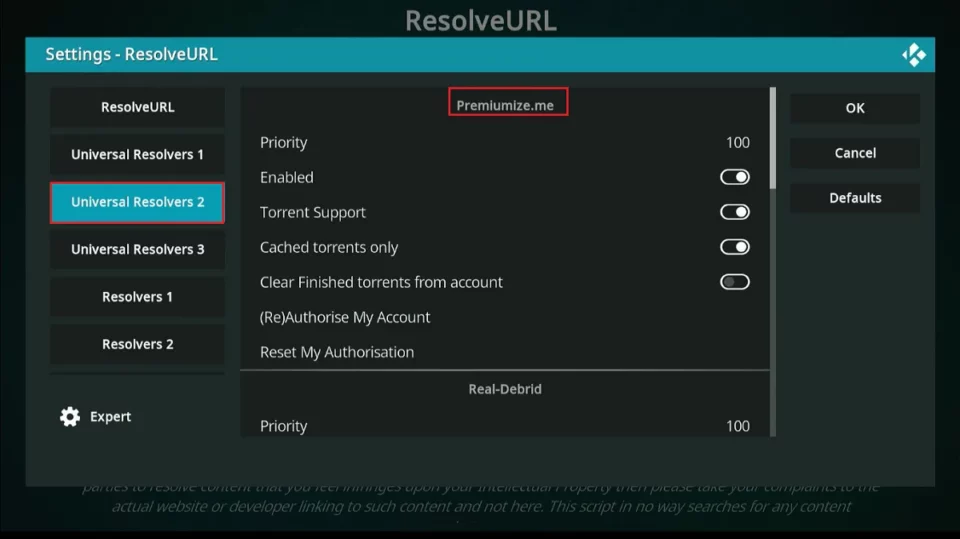
Scroll down to the Premiumize.me section and make sure the Enabled option is turned on.
That’s how you enable Premiumize if it’s not auto-enabled.
How to Use Premiumize with FireStick Apps
Premiumize is also supported on several third-party FireStick apps. Here’s how to use it with them:
Open an app that supports Premiumize integration and go to its Settings page. I’m using the Cinema HD app, a top-rated third-party app for streaming free movies and TV shows.
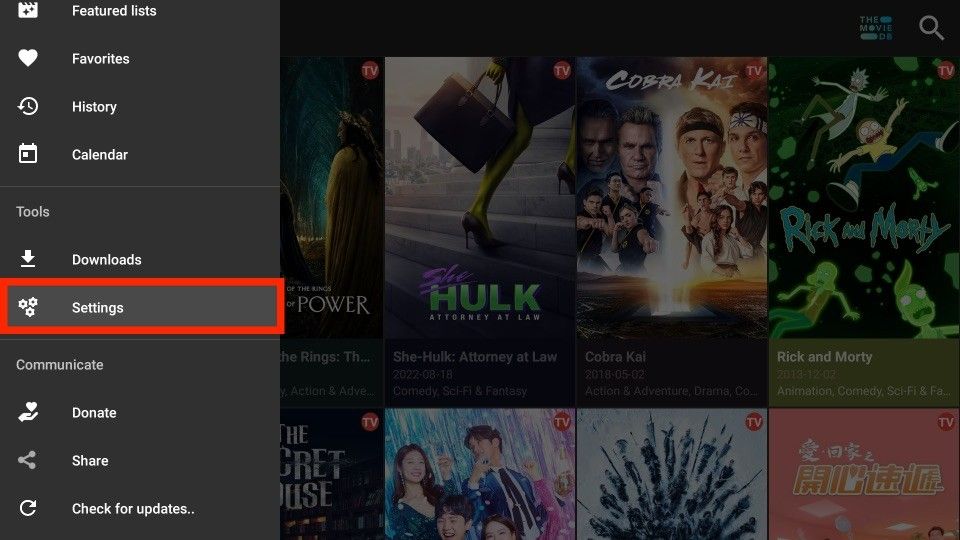
Open the Account section.
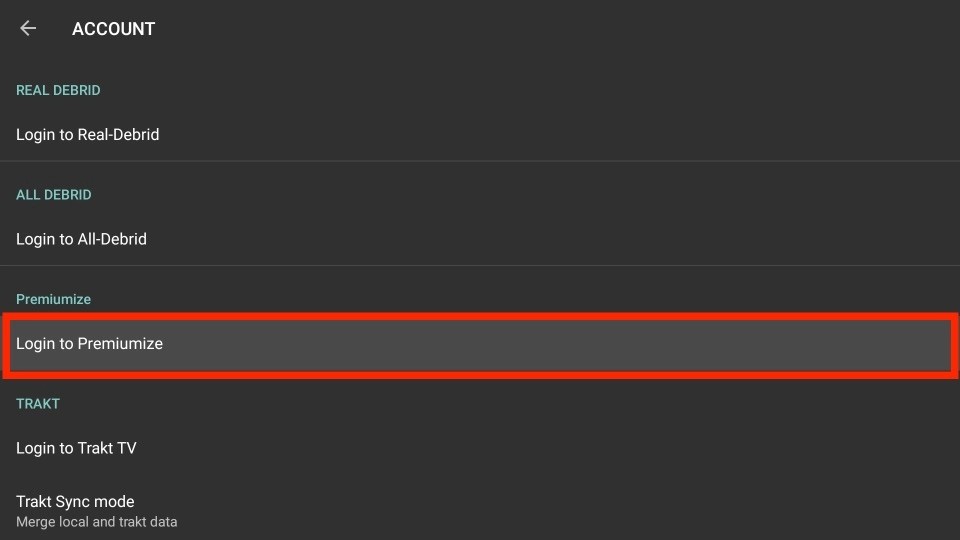
Select Login to Premiumize under the Premiumize sub-tab.

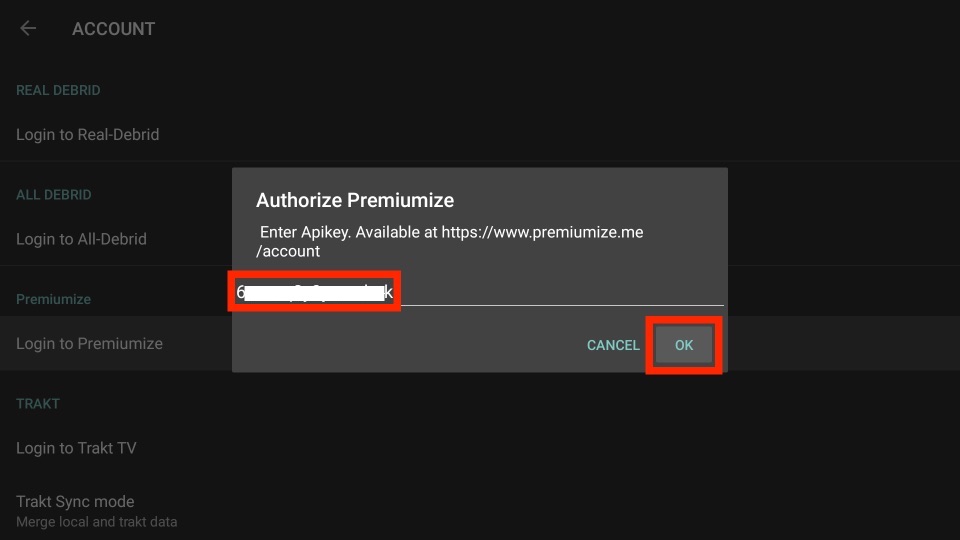
The app will ask you to enter the API key provided by Premiumize.
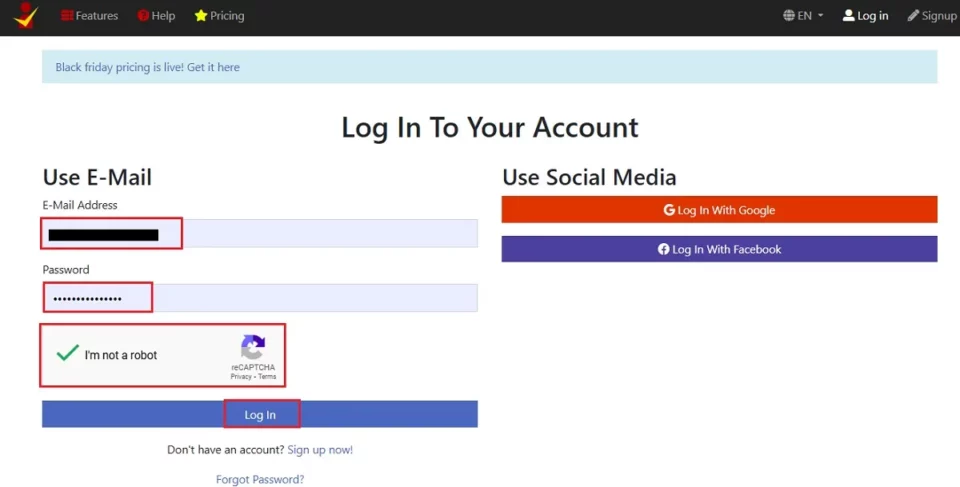
On your smartphone/tablet/PC, visit https://premiumize.me/account on a web browser.
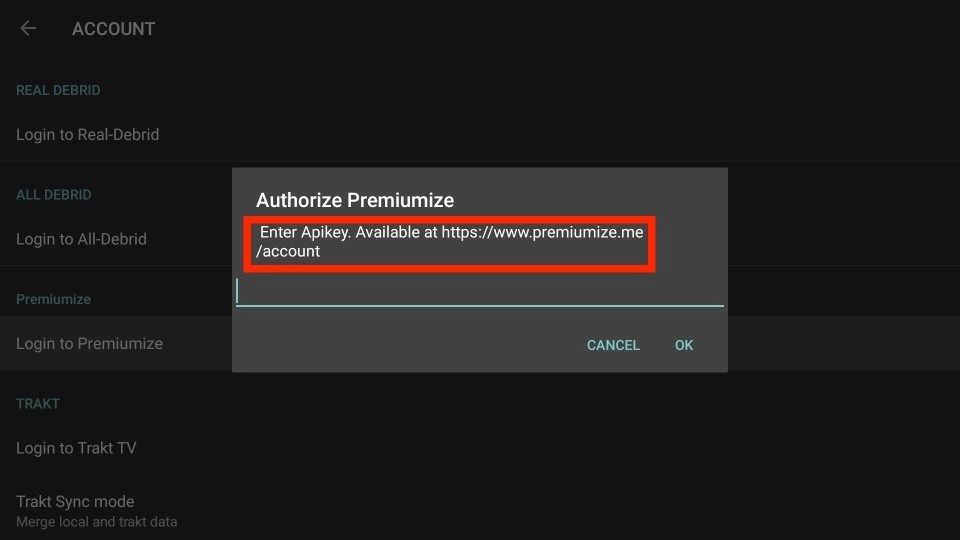
Log in to your account by entering your email and password and completing the CAPTCHA.
Under API KEY, select the blue Show API Key button.
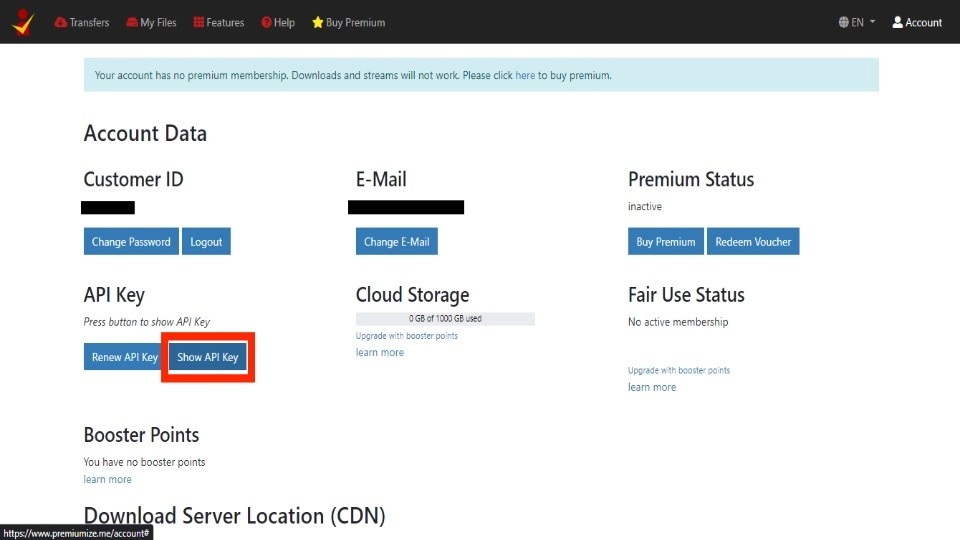
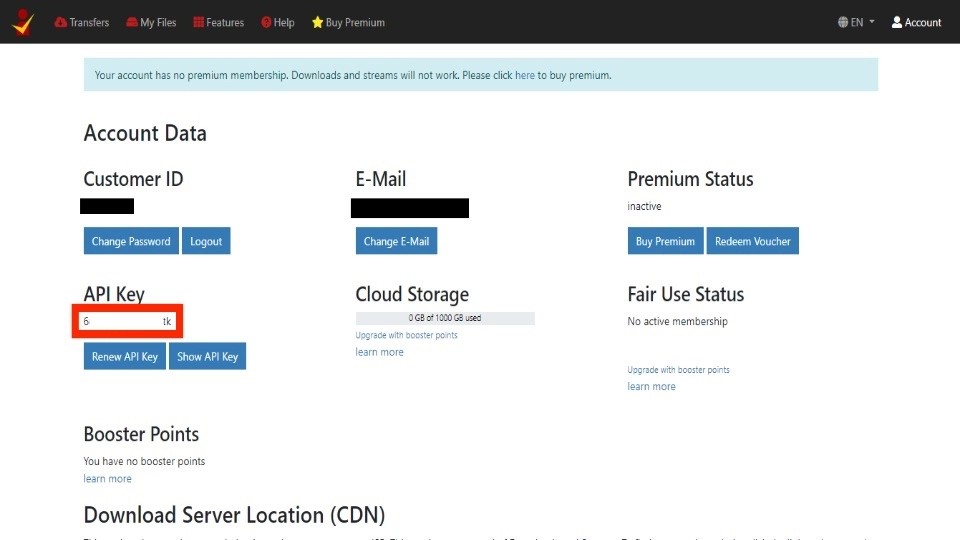
Copy your Premiumize account key, which is located under the API Key heading.
Enter the API Key on the FireStick app’s prompt input field and click OK.
That’s how you use Premiumize with any eligible FireStick app!
Wrapping Up
Premiumize provides better access to movies, TV shows, sports, and other content from online sources. It generates more links than free sources, which are top-notch and buffer-free. The premium file hoster also improves the playback quality.
I hope you understand how to set up and use Premiumize on Kodi and FireStick. Please share your experience with the service, and don’t hesitate to ask questions; our comment section is open.
Related:
- How to Set Up & Use Trakt on FireStick and Kodi
- How to Set Up Best FireStick Ethernet Adapter
- How to Install & Setup Best Antivirus for FireStick
- How to Sync FireSick Remote to TV

Suberboost Your FireStick with My Free Guide
Stay Ahead: Weekly Insights on the Latest in Free Streaming!
No spam, ever. Unsubscribe anytime.

Leave a Reply