
In this article, I’ll demonstrate how to install Samsung TV Plus on Kodi. Samsung TV Plus is compatible with Kodi 21 Omega, Kodi 20 Nexus, and Kodi 19 Matrix.
What Is Samsung TV Plus?
Samsung TV Plus is a streaming platform officially created by Samsung that provides access to a wide selection of TV channels across the USA, the United Kingdom, Canada, and more.
Samsung TV Plus is completely free. There is no subscription fee, no hidden charges, or payment required.
The service includes an extensive lineup of channels across dozens of categories, offering something for many types of viewers.
Samsung TV Plus offers a variety of genres, including comedy, crime, films, documentaries, news, and international content.
Additionally, the service is preinstalled on many Samsung smart TVs and Galaxy devices.
It is a practical choice for anyone seeking diverse, free entertainment.
For Kodi Users!
ISPs, hackers, and other third-party entities worldwide may monitor your online activities. For security, privacy, and smooth streaming, it is recommended to use a reliable VPN for Kodi. Your IP address is visible to sites you visit.
I recommend ExpressVPN, a fast and secure VPN. It is very easy to install on any device, including Amazon Fire TV Stick, PC, Mac, and Smartphones. Also, it comes with a 30-day money-back guarantee. If you're not satisfied with their service, you can request a refund. ExpressVPN also has a special deal where you can get 4 months free and save 81% on the 2-year plan.
Read: How to Install and Use the Best VPN for Kodi
Is Samsung TV Plus Safe & Legal?
Most people get reluctant when an add-on isn’t available on Kodi’s official addon repository. However, the SlyGuy Repository that hosts Samsung TV Plus only creates add-ons for services that are entirely legal, either free or paid.
Unfortunately, even though the service is free, legal, and hosted by a trusted source, you can’t be 100% sure you’re getting the unaltered, authentic service if it’s not coming directly from the official Kodi repository.
Thankfully, the antivirus scan of the repository did not detect any harmful content. Here are the scan results:

How to Install Samsung TV Plus on Kodi
Now, it’s time to jump in and learn how to install the popular Samsung TV Plus addon on Kodi. This section is split into three parts. Make sure to follow each part in order, and don’t miss any steps.
Legal Disclaimer: This tutorial is purely educational. FireStickTricks.com doesn’t own, host, operate, resell, or distribute any streaming apps, addons, websites, IPTV or services. The page contains some unverified services, and we are not certain whether they hold legal licenses to distribute the content. FireStickTricks.com does not verify the legality of each app/service in all regions. Do your due diligence if you use any of the unverified apps/services, and stream only content that is available in the public domain. The end-user shall be solely responsible for the media accessed.
Part 1: Enable Unknown Sources on Kodi
In this part, I’ll show how you can enable Unknown Sources on your Kodi app. Without enabling this option, you won’t be able to add the SlyGuy repository and install the Samsung TV Plus addon.
By default, Unknown Sources is disabled in Kodi to ensure your device’s safety and security. However, since we are adding a reputable, trusted third-party source, it’s safe to enable the option.
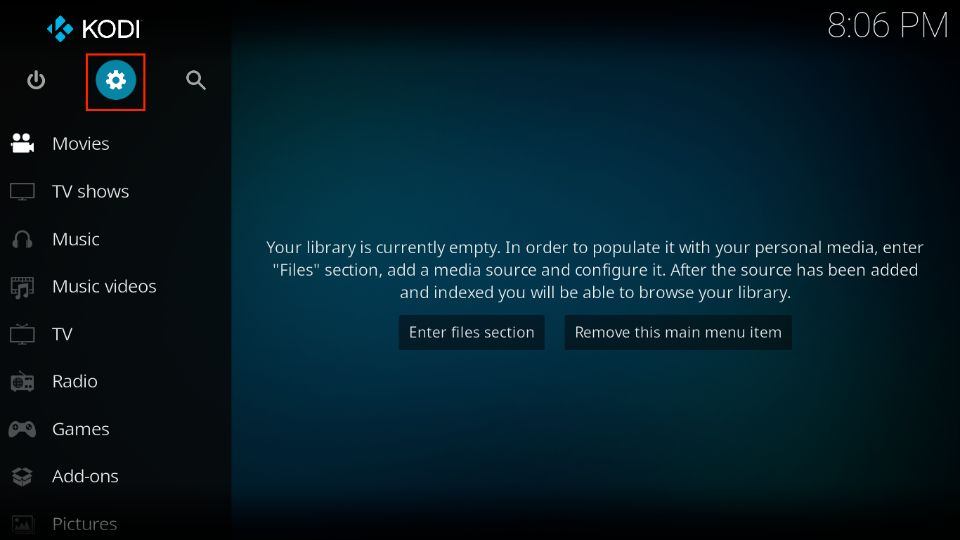
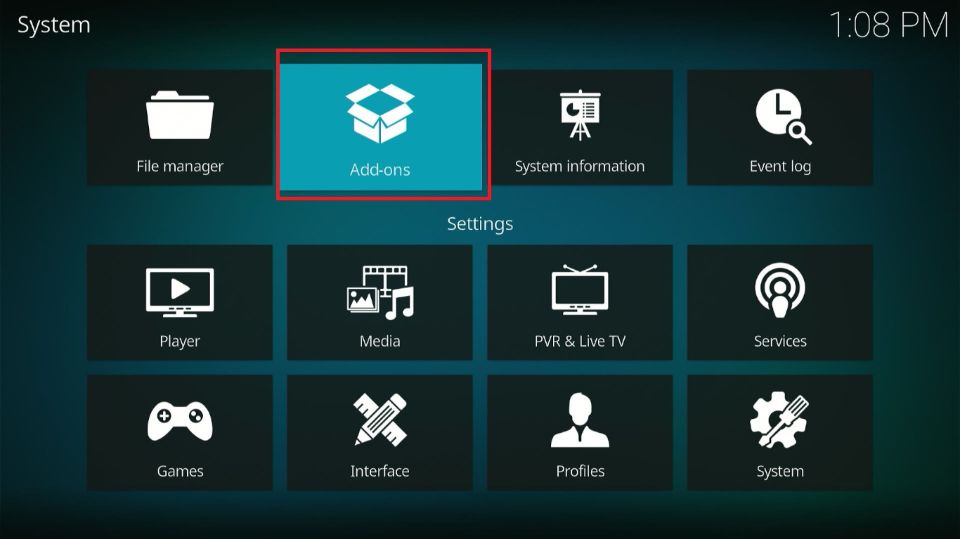
1. On Kodi home, click on the settings gear icon located on the top left side of your screen, just below the Kodi logo.
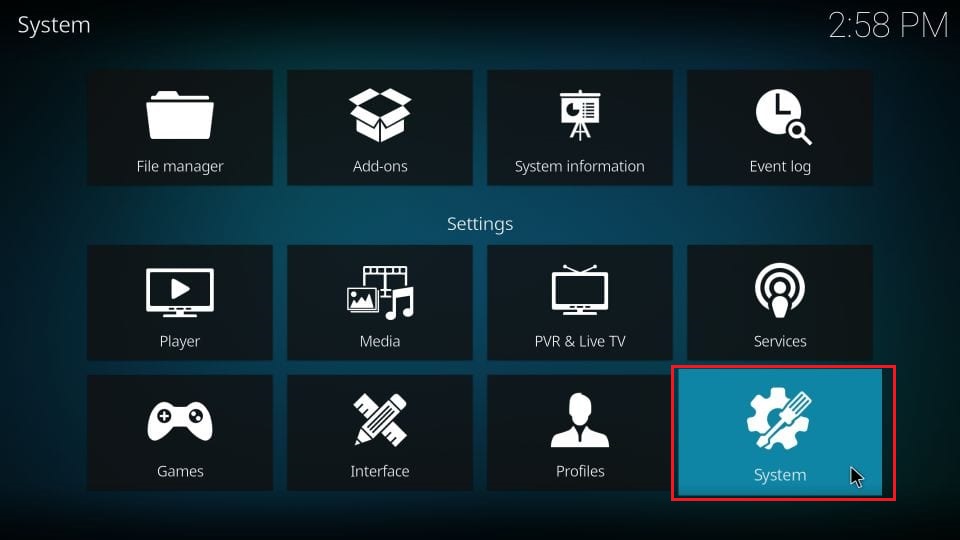
2. On the next screen, click the System option on the bottom-right side of your screen.
3. Next, scroll down on the left panel and select the Add-ons tab. In the right-side panel, scroll down and select Unknown sources to enable it.
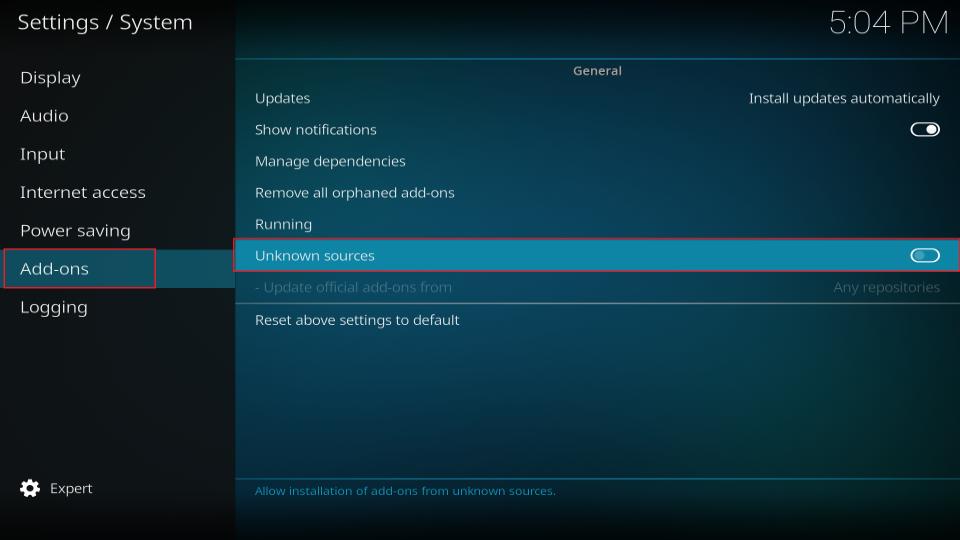
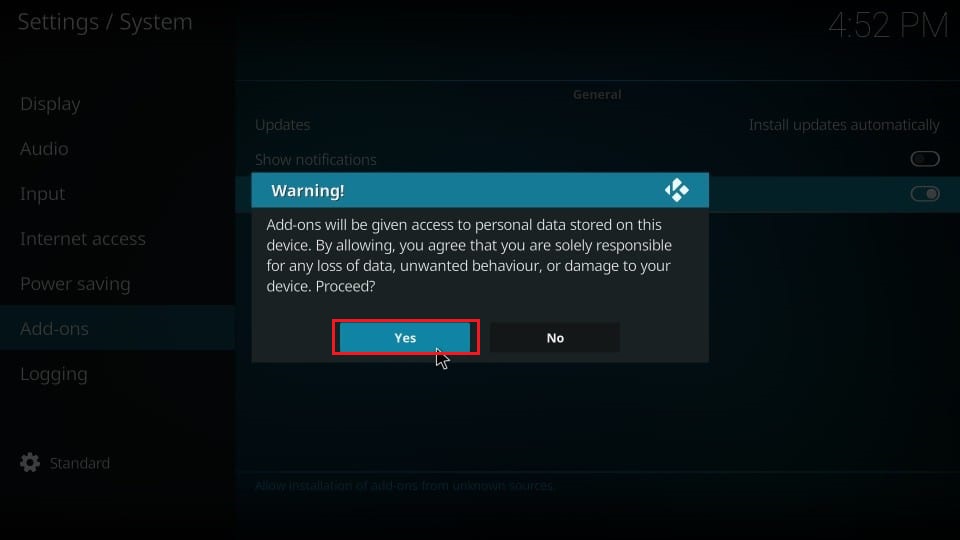
4. A warning message will appear on your screen. Click Yes to proceed.
Part 2: Install the SlyGuy Repository that Contains Samsung TV Plus
In this part, I’ll show how you can load the SlyGuy Repository on your Kodi app. This repo hosts Samsung TV Plus; without it, we won’t be able to access or install the add-on on our device. So, here’s how you can add the SlyGuy Repository on Kodi:
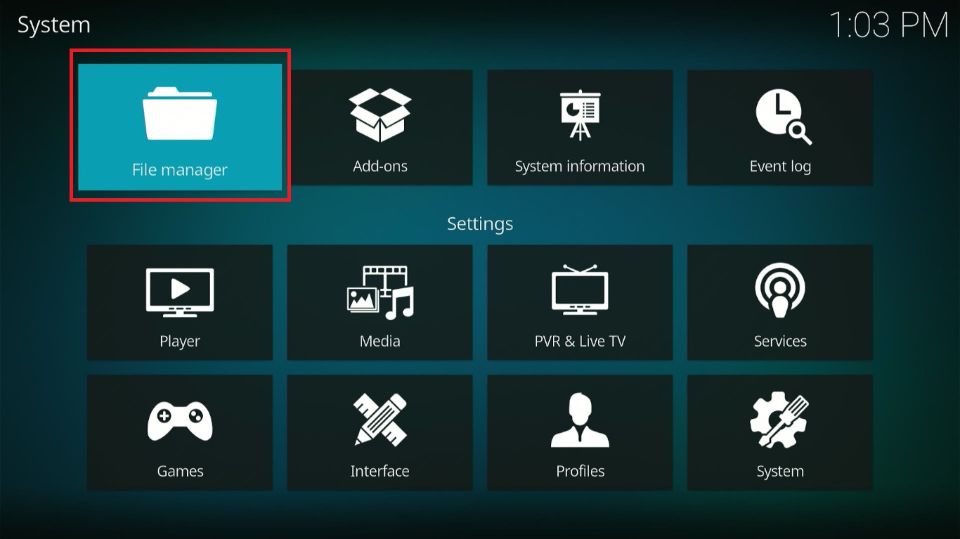
1. On Kodi’s home page, click on the same settings gear icon in the top-left corner.
2. Click File manager.
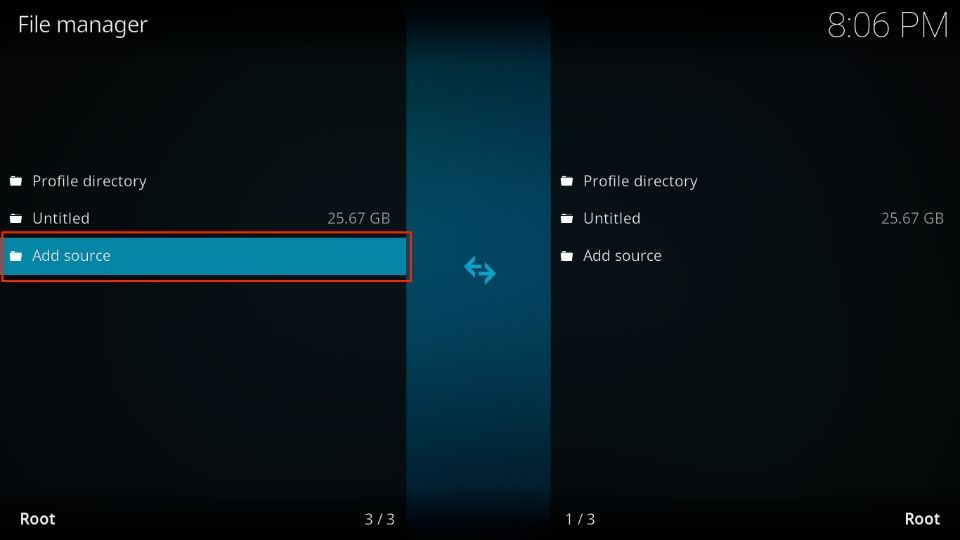
3. Choose Add Source.
4. On the next window, select <None>.
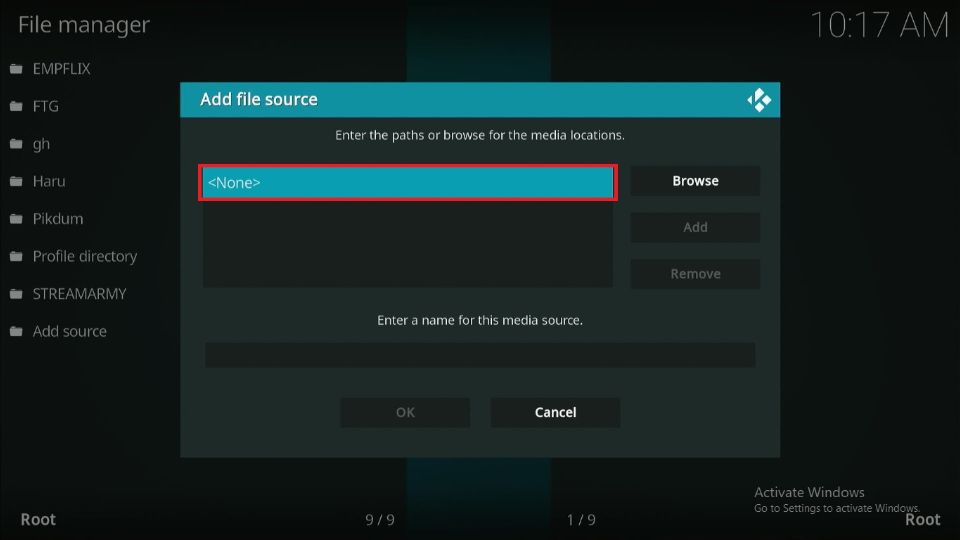
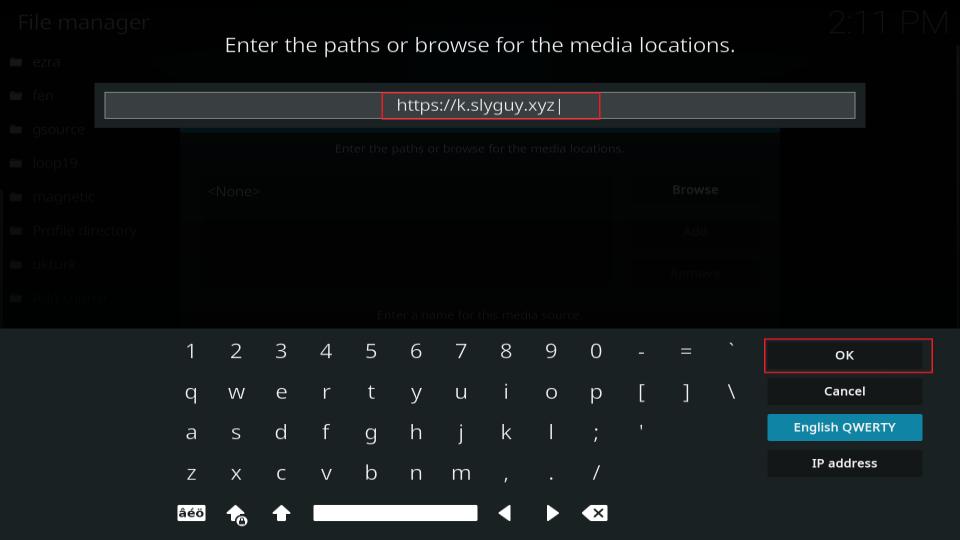
5. A new screen will appear. Enter the URL https://k.slyguy.xyz and click the OK button.
Note: I have provided the official link to the SlyGuy Repository. FireStickTricks.com does not host or own this repository and is not affiliated with it in any way.
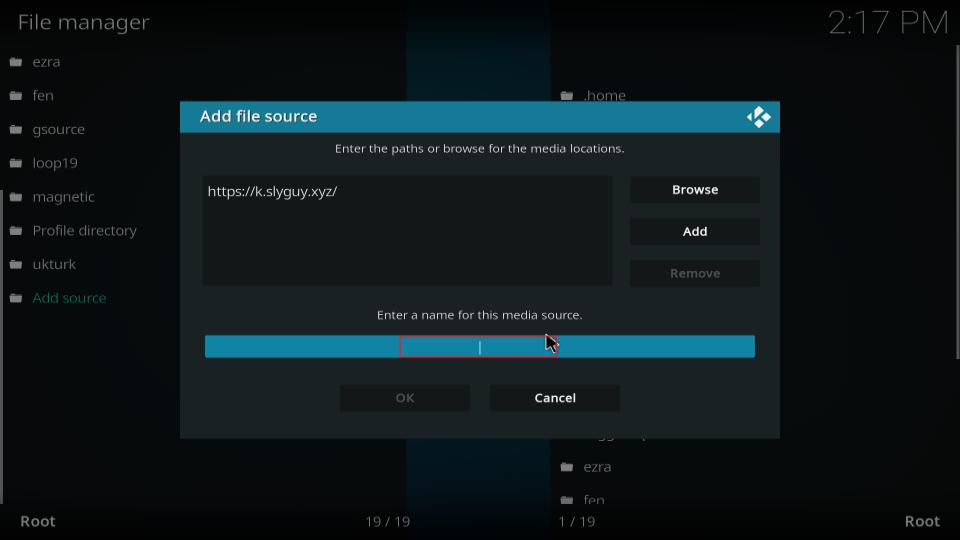
6. Next, you’ll have to add a name for the SlyGuy Repository. Click on the input box under Enter a name for this media source.
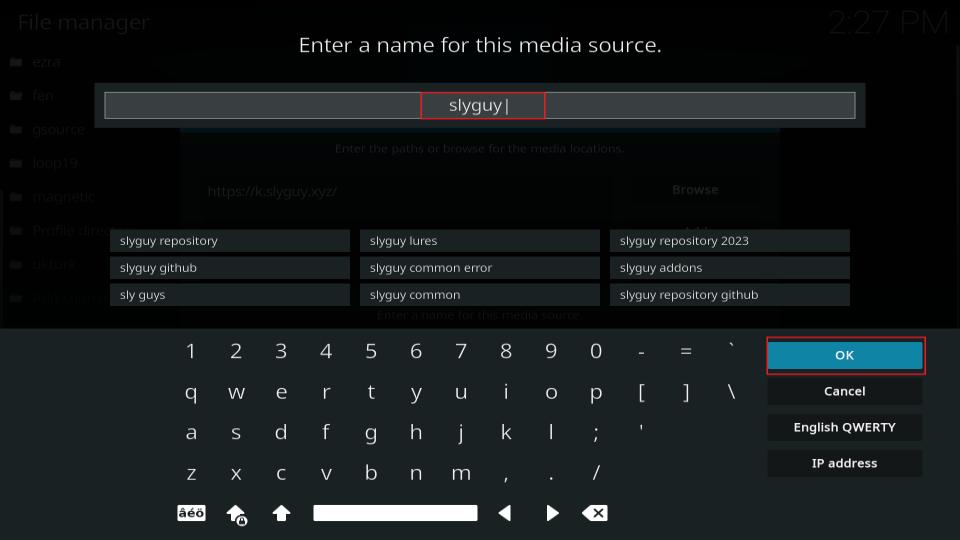
7. Now, enter the name slyguy. Once you are done, click on the OK button to continue.
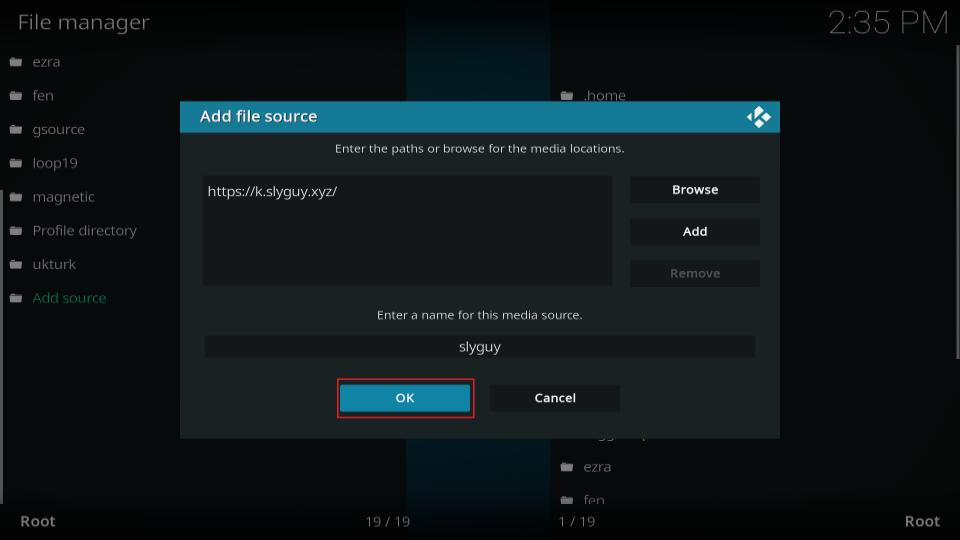
8. To save the changes, click on the OK button and the window will close.
9. You’ll see the slyguy repo you just added.
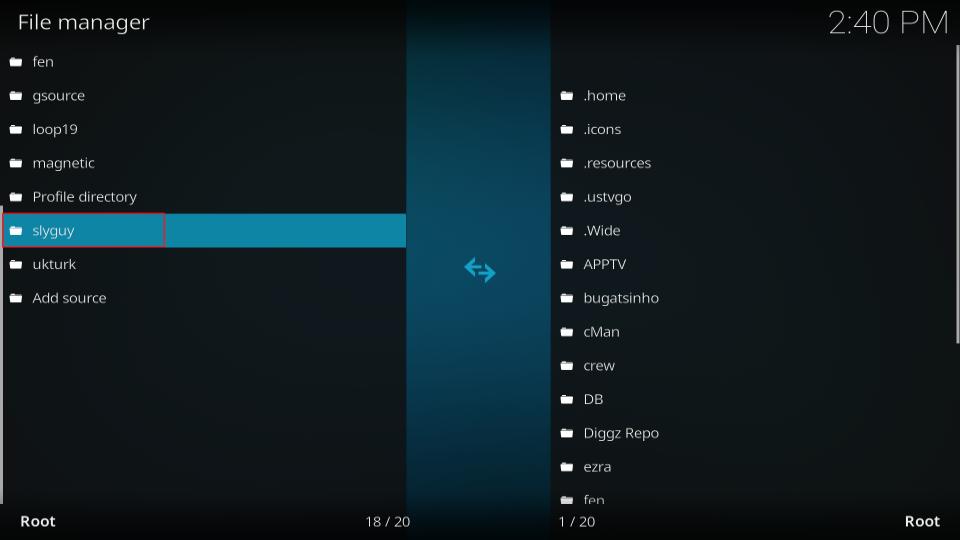
10. Now, press the back button on your device to go to the settings page. Click on Add-ons.
11. On the addons page, scroll down and select Install from zip file.
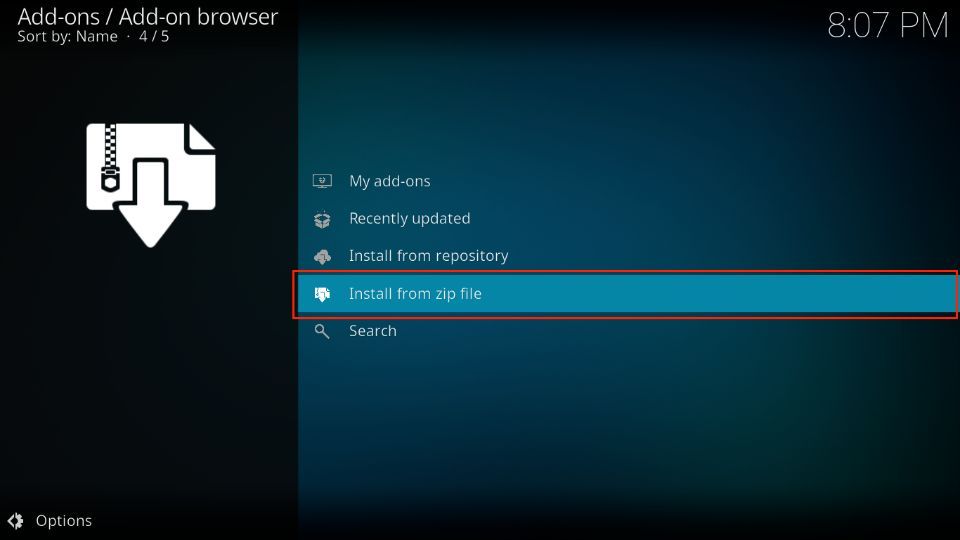
12. On Kodi 19 Matrix, you’ll receive a warning. Read it and click on the Yes button to continue. This warning does not appear on Kodi 20 Nexus.
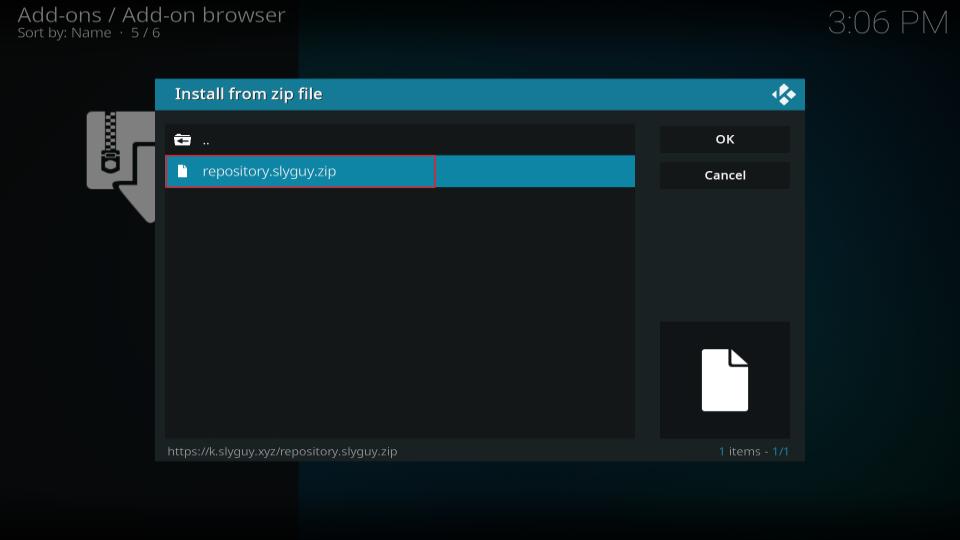
13. This window will appear. From the list, choose slyguy.
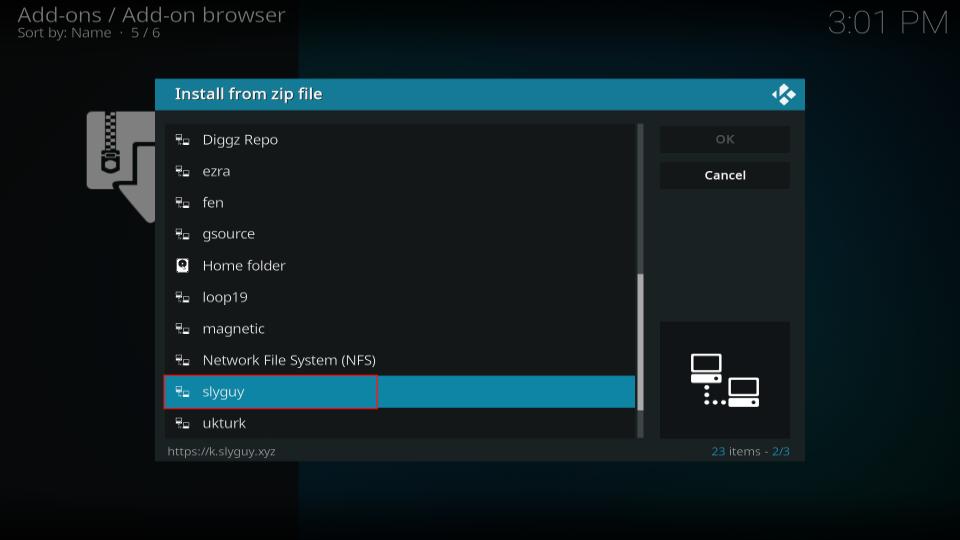
14. Now, select the file repository.slyguy.zip to install and download the SlyGuy Repository.
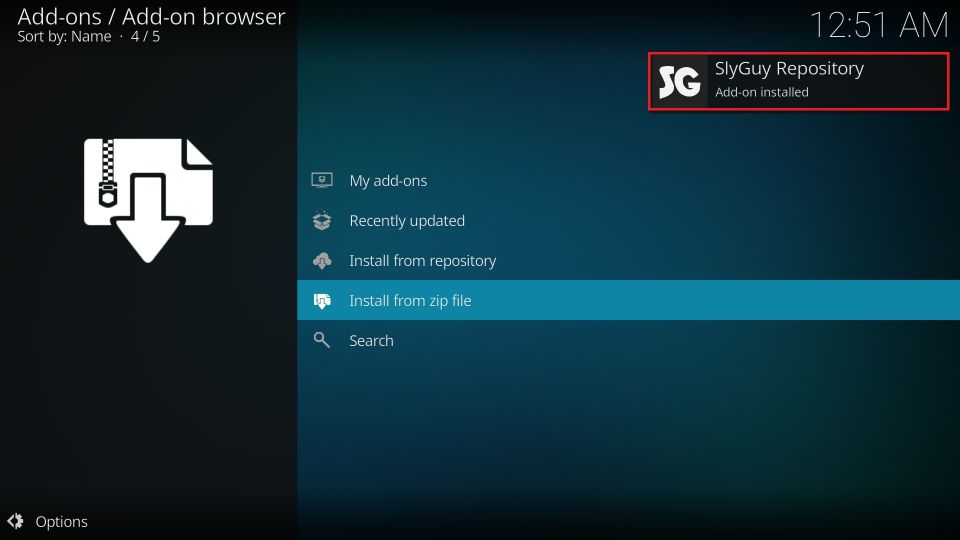
15. Wait for a few seconds. Once the repository has been loaded on your Kodi app, you’ll receive an Add-on installed notification at the top right of your screen.
Part 3: Install Samsung TV Plus Addon
Now that we’ve enabled unknown sources and added the SlyGuy Repository, everything is set up for the installation. Now, let’s go ahead and see how to install the Samsung TV Plus Kodi addon:
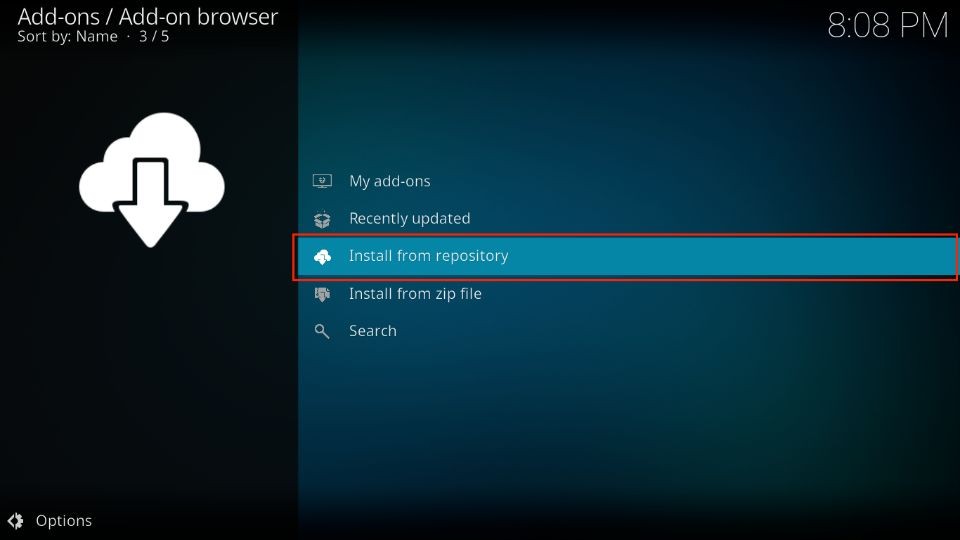
1. On the same screen, scroll up and select the Install from repository option.
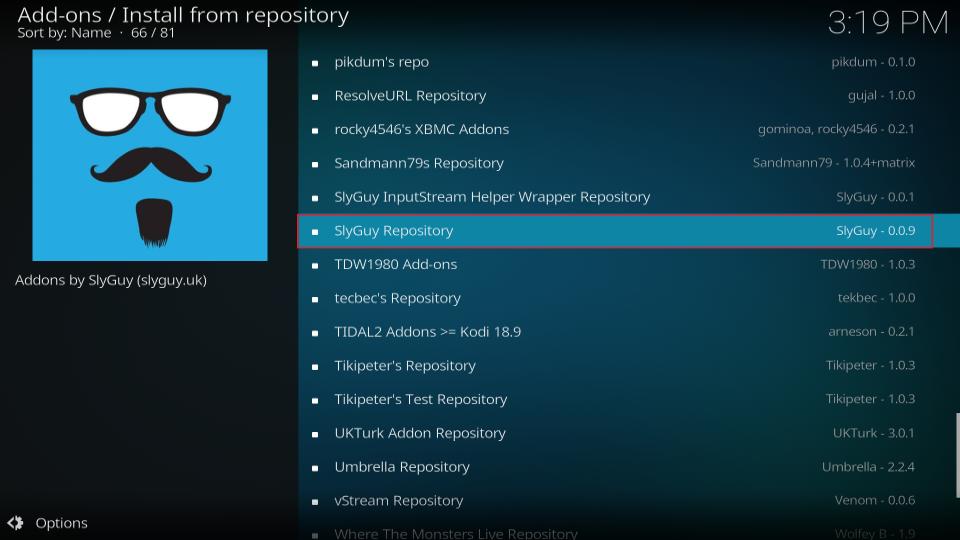
2. On the next screen, scroll down and select SlyGuy Repository.
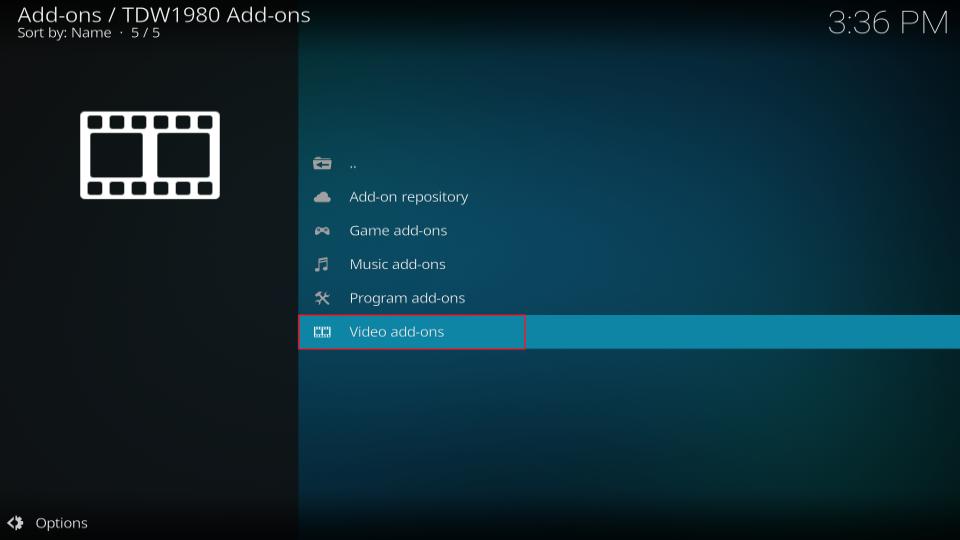
3. Next, select Video add-ons from the list.
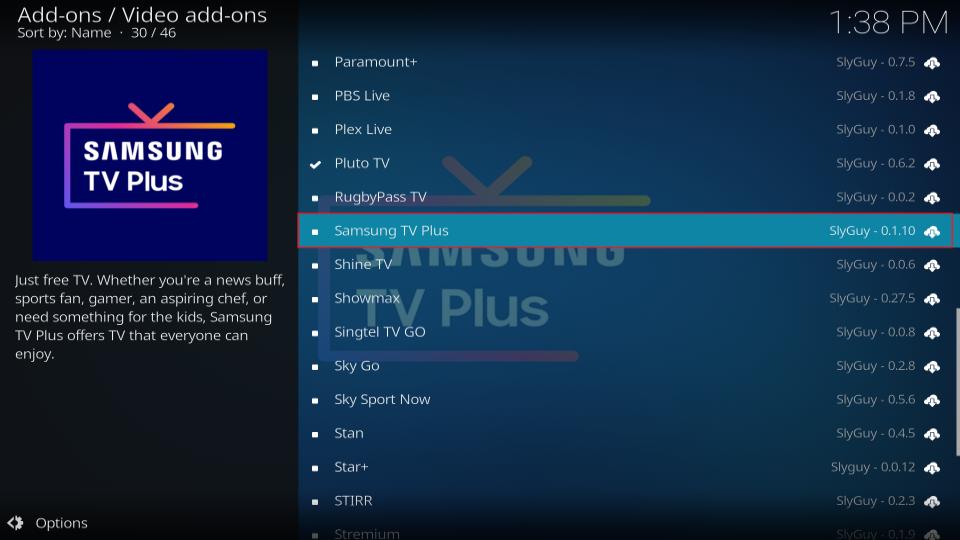
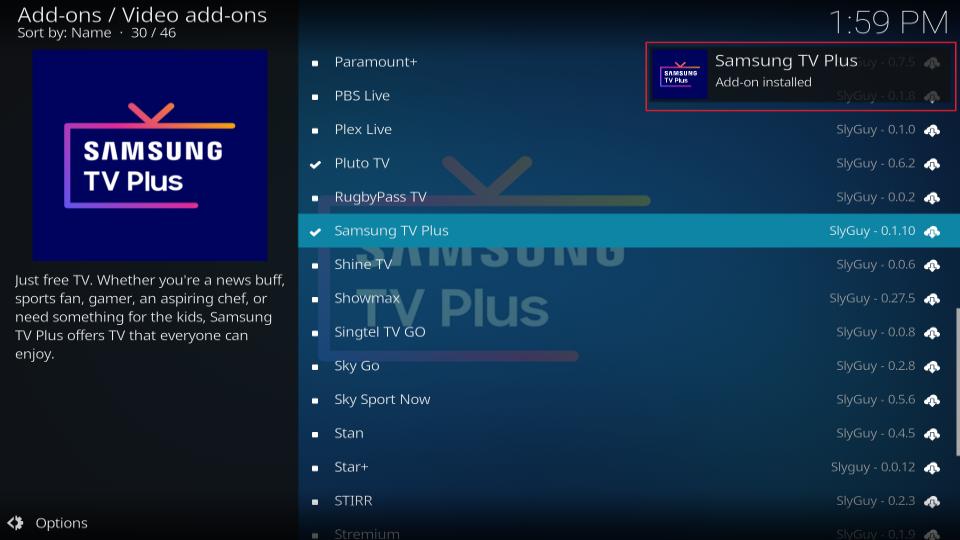
4. You’ll see tons of add-ons in alphabetical order. Scroll down to the S section and select Samsung TV Plus.
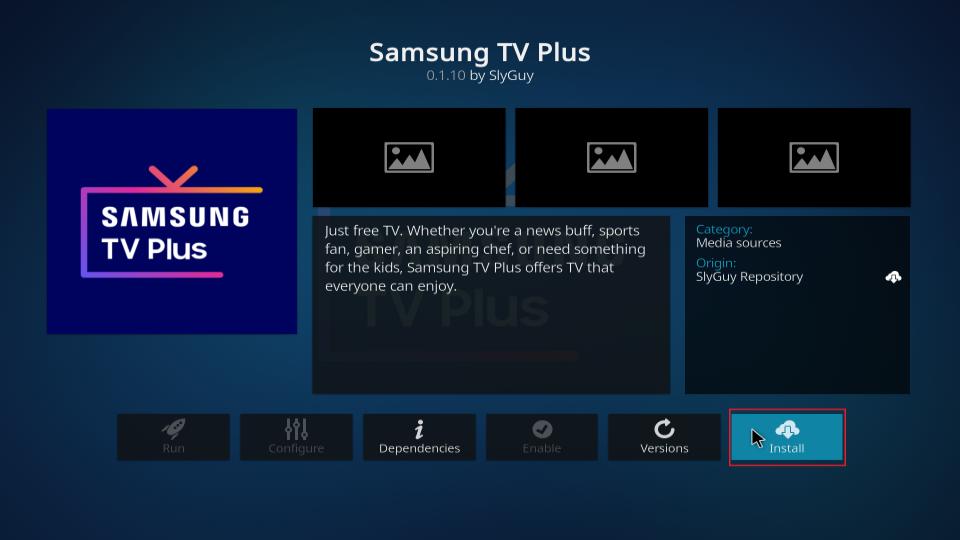
5. The dashboard for Samsung TV Plus will appear. Click on the Install button on your screen’s bottom right side.
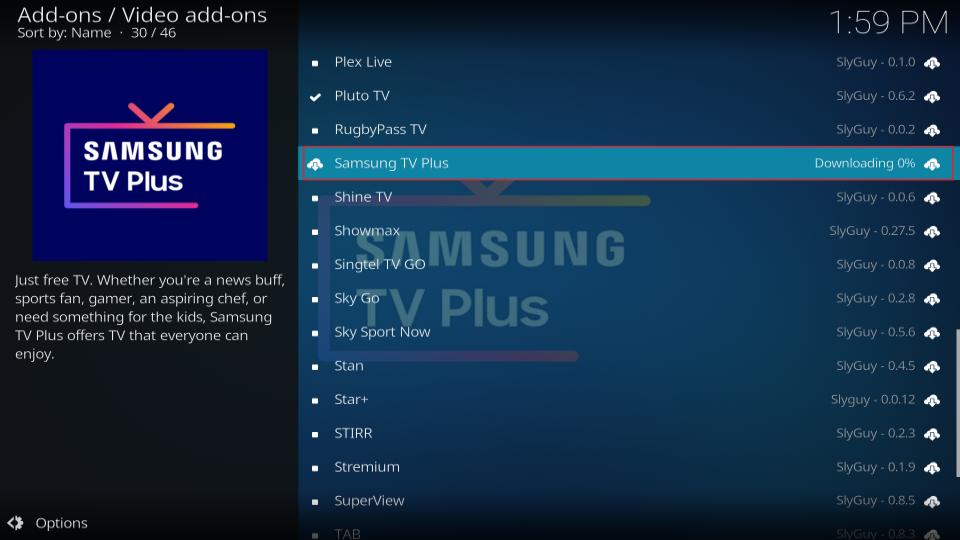
6. Wait for the Kodi to download and install the addon.
7. Once done, you’ll receive an Add-on installed notification in the top-right of your screen.
Congratulations! You have now installed Samsung TV Plus on your Kodi app.
You’re now all set. A quick reminder: your internet provider and many websites/apps can see your IP address and some details about your connection. Using a VPN encrypts your traffic and masks your IP address, which helps protect your online privacy.
I recommend ExpressVPN. It’s a reputable VPN with strong encryption and fast connections, and it’s straightforward to install on Fire TV/FireStick and other devices.
Next, I’ll show you how to set up and use ExpressVPN.
Step 1: Get the ExpressVPN subscription HERE. It comes with a 30-day money-back guarantee. Meaning you can use it for free for the first 30 days, and if you are not satisfied with the performance (which is highly unlikely), you can request a full refund.
Step 2: Click HERE to download and install the ExpressVPN app on your streaming device. If you are using a FireStick, I have given the exact steps starting with Step 4 below.
Step 3: Click the Power icon to connect to a VPN server. That's all. Your connection is now secure with the fastest and best VPN for Kodi.

The following steps will help you install Kodi VPN on your Fire TV devices. If you have other streaming devices, follow Step 1-3 above.
Step 4: Subscribe to ExpressVPN HERE (if you are not already subscribed).
Step 5: Go to the Fire TV Stick home screen. Click Find, then select the Search option (see image below).

Step 6: Type Expressvpn in the search bar and select it when it shows up.

Step 7: Click Download.

Step 8: Open the ExpressVPN app and Sign in using the email ID and password that you created while buying the ExpressVPN subscription.

Step 9: Click the Power icon to connect to a VPN server. That’s all. Your FireStick is now secured with the fastest VPN.

How to Use Samsung TV Plus
Samsung TV Plus is a fantastic free IPTV addon by Samsung. In the previous section, I walked you through its installation process. Now, I’ll show how to use the addon to explore hundreds of free channels.
First, go to Kodi’s home screen and select the Add-ons tab.
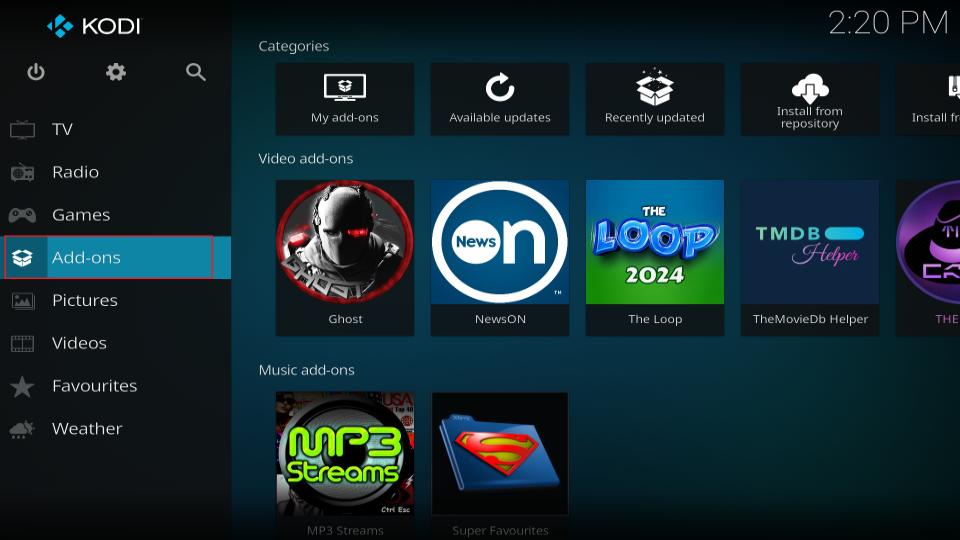
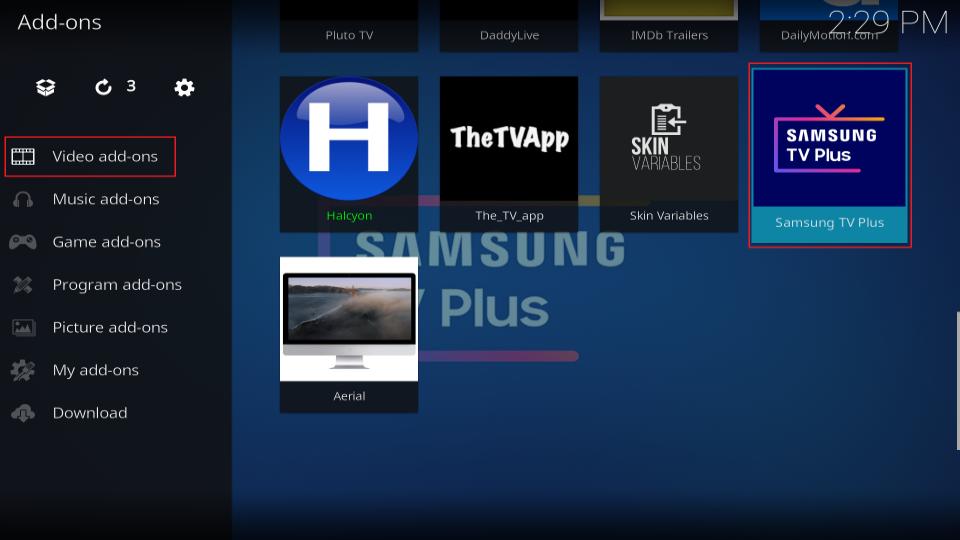
Go to the Video add-ons tab. You will see all the addons installed on the right side of the screen. Select Samsung TV Plus to launch it.
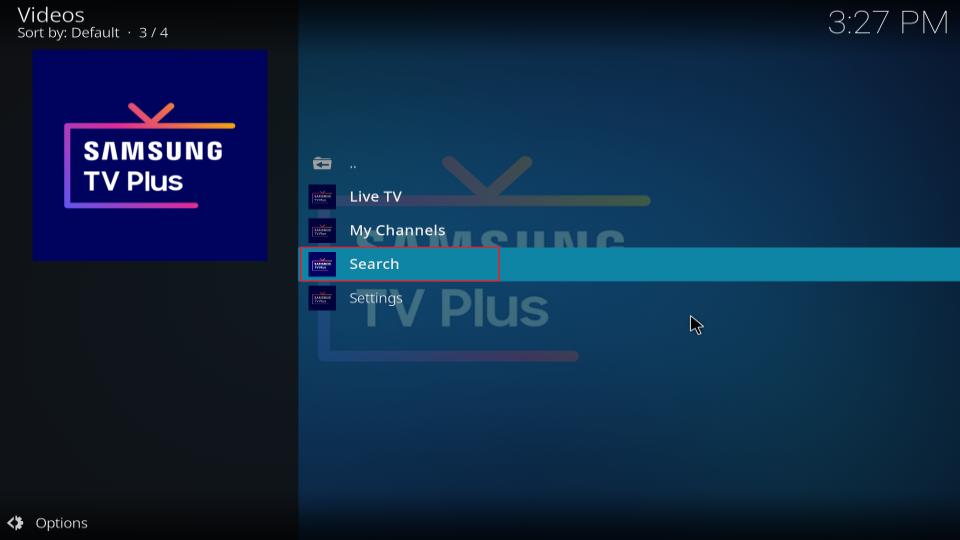
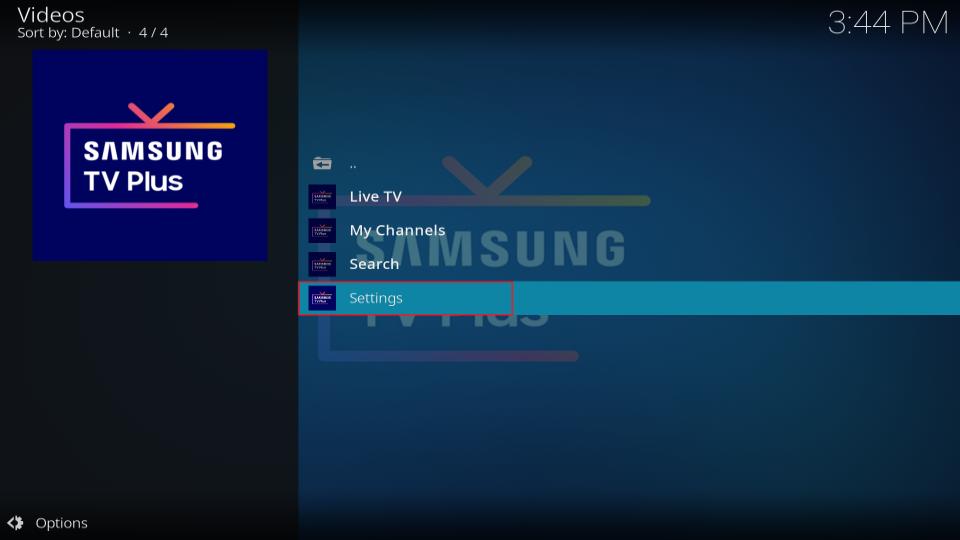
The home screen of the addon has only four options: Live TV, My Channels, Search, and Settings.

Exploring the Live TV > All Folder
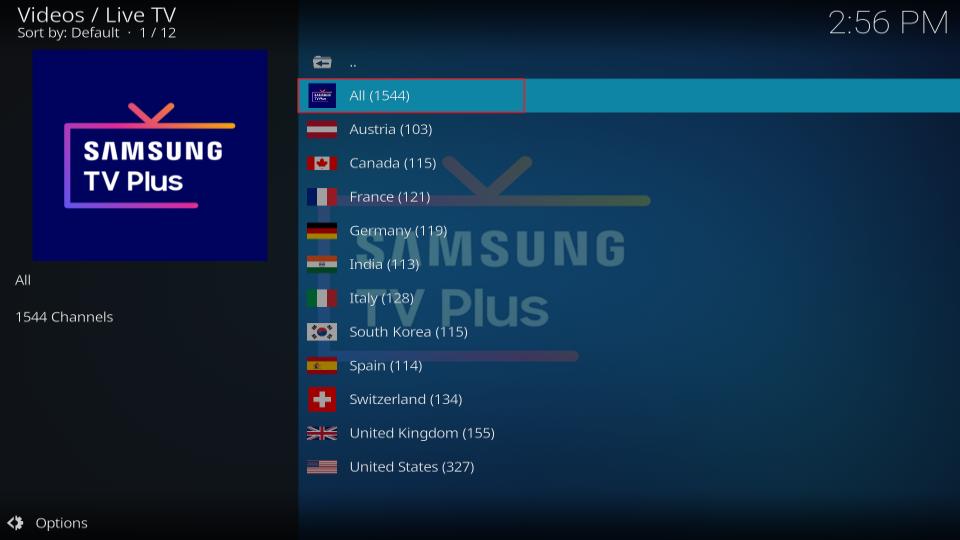
First, let’s check out the Live TV section of Samsung TV Plus, where you’ll find all the available content.

Inside it, you’ll find 12 folders. These are the sections for different regions that are available in the add-on. Here’s the complete list of channel regions available in Samsung TV Plus:
- All
- Austria
- Canada
- France
- Germany
- Great Britain
- India
- Italy
- Korea
- Spain
- Switzerland
- USA
Let’s now explore the All folder. Note that the number next to the folder shows the total number of TV channels available in the folder. For instance, there are 1,016 total channels in the All folder.
Inside the All folder of Live TV are genres divided into 63 folders, including Comedy, Crime, and Entertainment. You can browse any category and check out the related TV channels available for it.

I’m choosing the Comedy folder. Let’s see what we have inside.
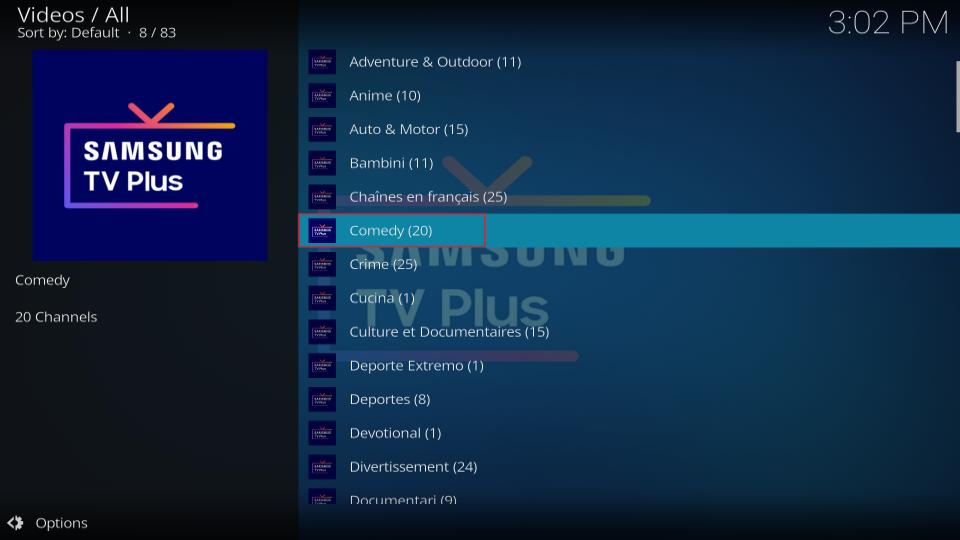
20 live TV channels are available, along with their designated channel number in the Samsung TV Plus service. Check some out below, or explore the folder yourself to see the full list.

Next, go back to the All folder, scroll down, and select Sports.
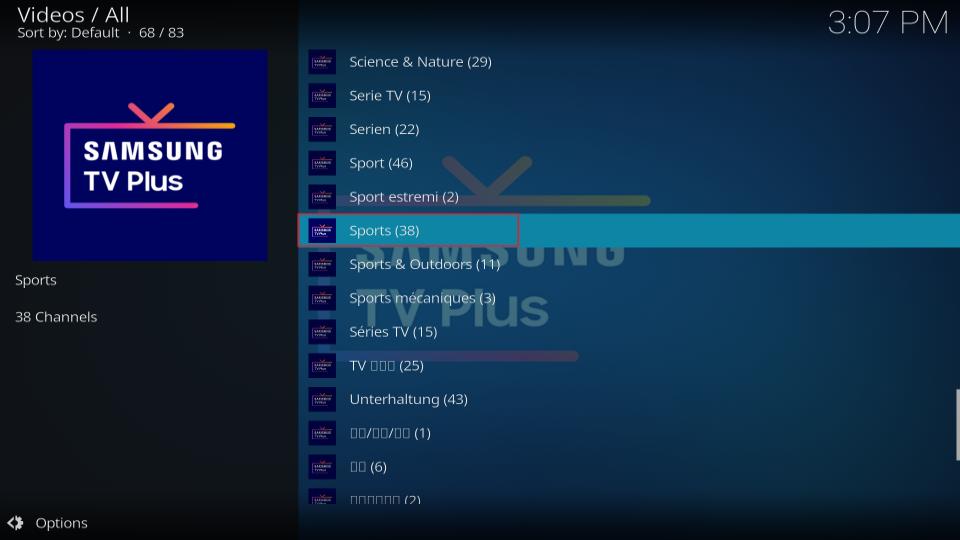
Inside it, you’ll find 65 channels. If sports are your thing, you’ll want to take a look around!

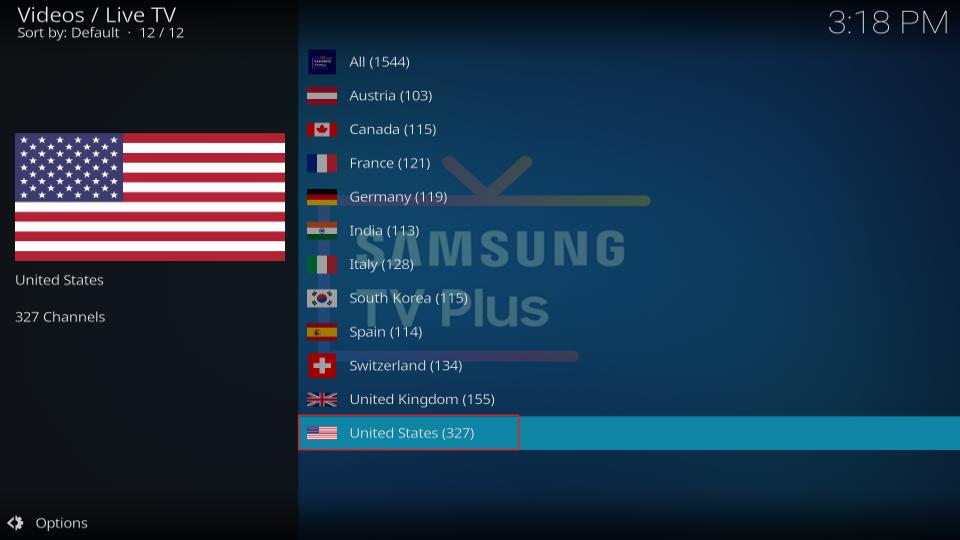
Exploring the Live TV > Region Folders
Let’s return to the Live TV folder and explore a specific channel region in the Samsung TV Plus addon. I’m selecting the last folder, USA. The USA section has around 200 live TV channels.
Inside the USA folder, or the folder for another specific region, you’ll find up to 17 folders for different genres, like Comedy, Crime, Entertainment, Gaming, Kids, International, and Movies.

To play a channel, select it and choose the playback quality.
Search for a Channel on Samsung TV Plus
Are you looking for a specific channel on Samsung TV Plus? There’s a search feature available in the addon. This can help you easily find a channel without having to roam through the different folders.
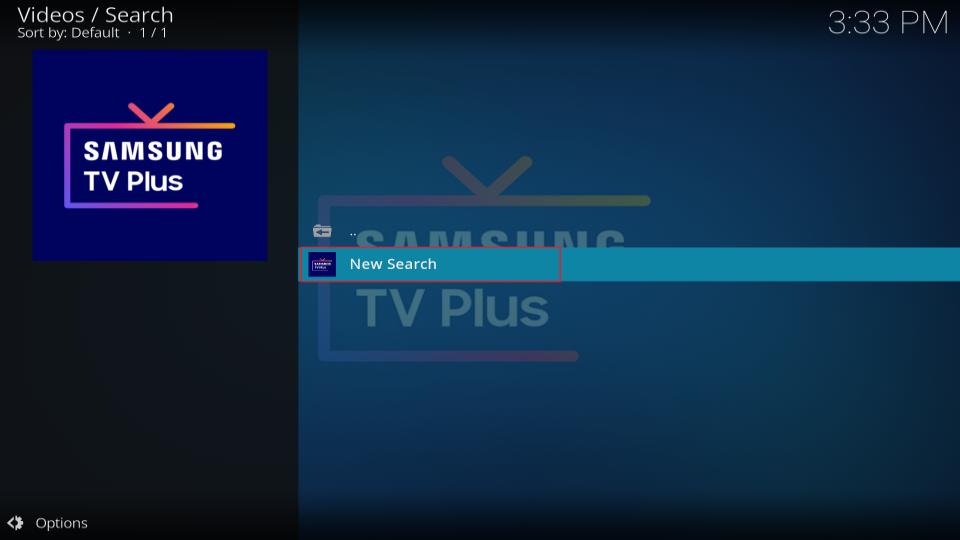
Go to the Samsung TV Plus home screen and select Search.
Then, click on New Search.
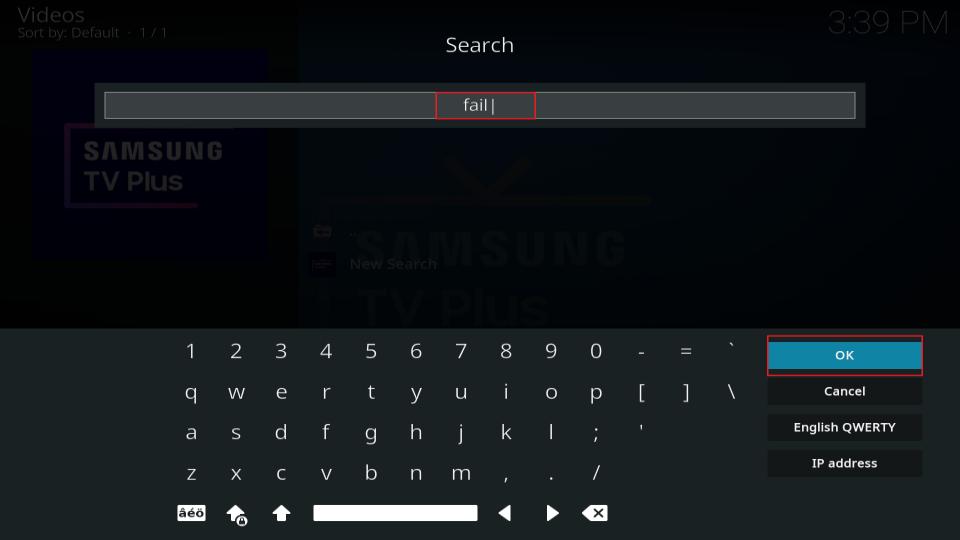
After that, enter your search terms and click the OK button. For example, I have searched for fail.
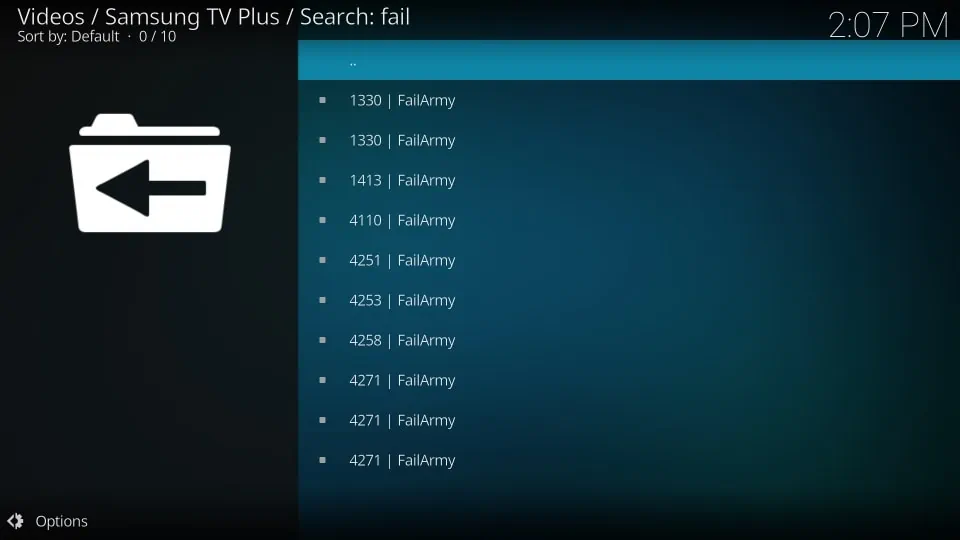
After a few seconds, the addon will present all the channels matching the search term.
Exploring Samsung TV Plus Settings
Lastly, we have the Settings section of Samsung TV Plus. Let’s quickly learn about it.
Open Settings from the home screen.
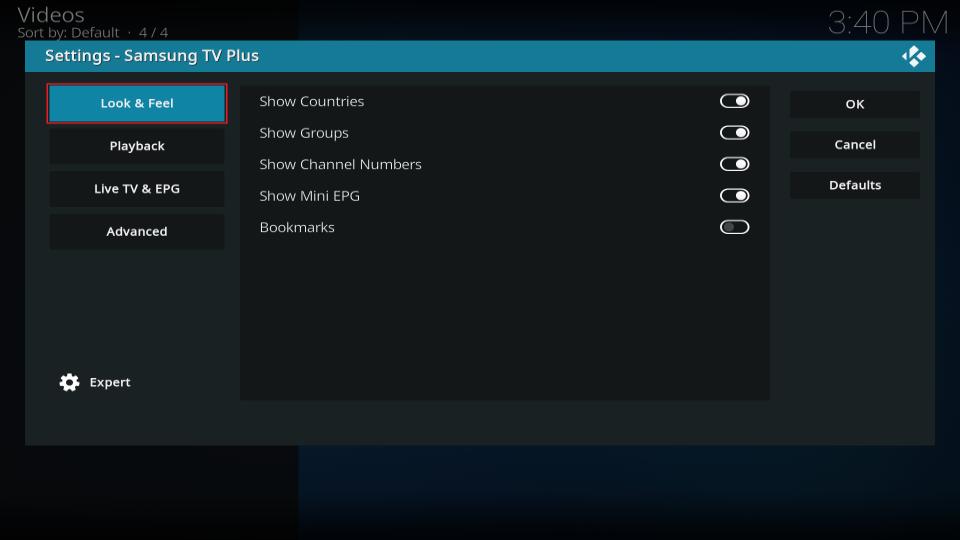
A window will appear, and you’ll be on the Look & Feel tab by default. Here, you can tweak the overall appearance of the addon.
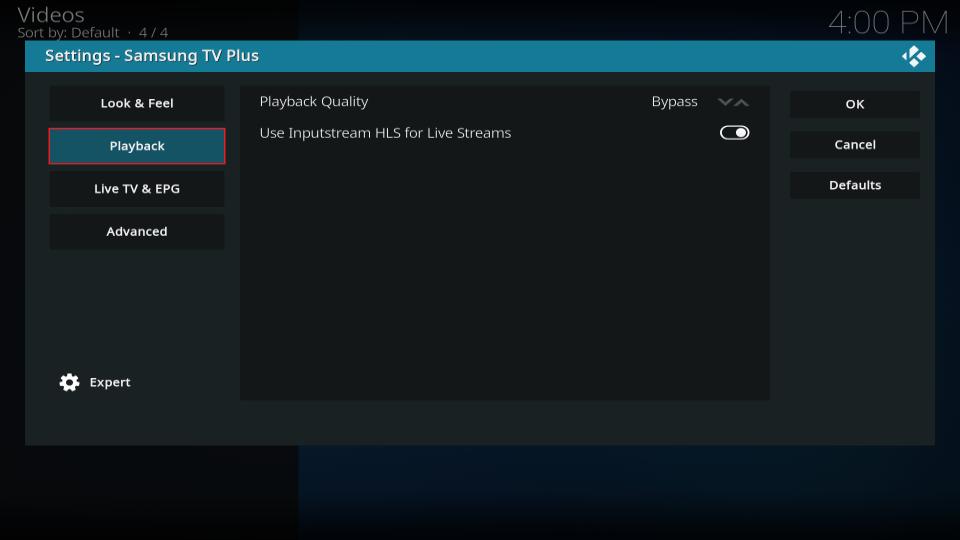
Next, there’s the Playback tab. Here, you can set the default playback quality.
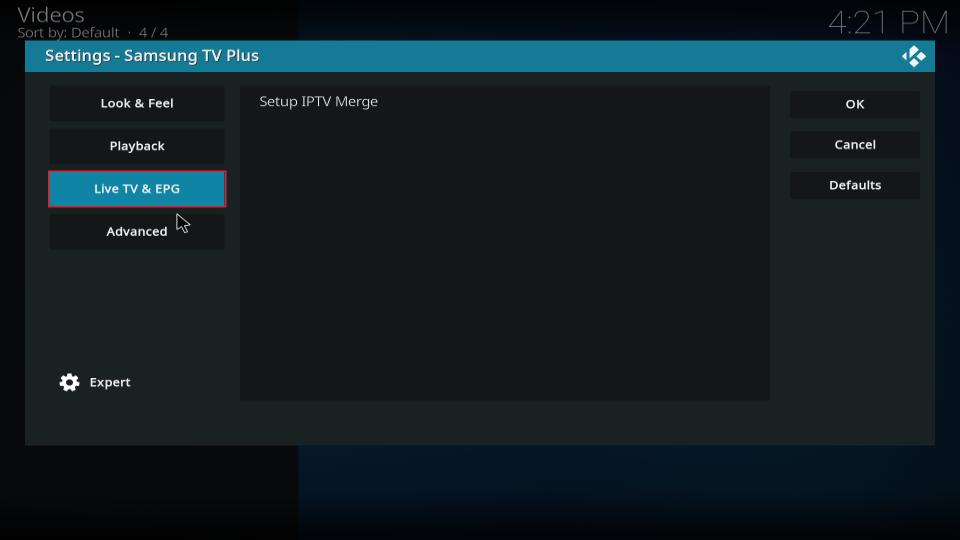
After that, we have Live TV and EPG. Inside it, you can select Setup IPTV Merge to integrate any IPTV services you subscribe to.
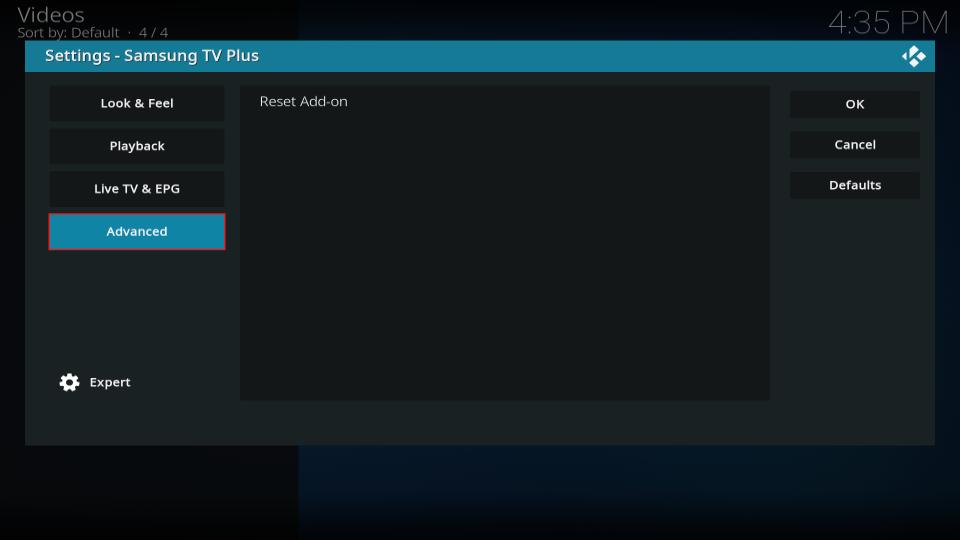
Lastly, if the add-on isn’t working correctly, you can reset it using the Reset Add-on option in the Advanced tab.
Wrapping Up
Samsung TV Plus offers a large selection of free channels across multiple genres worldwide. If you have any comments about this article, please leave them in the comments section below. Also, let me know which TV channels you enjoy most on the Samsung TV Plus Kodi add-on.

Suberboost Your FireStick with My Free Guide
Stay Ahead: Weekly Insights on the Latest in Free Streaming!
No spam, ever. Unsubscribe anytime.

Leave a Reply