In this comprehensive guide, I will explain how to install the Aliunde K19 addon on Kodi. Aliunde K19 is compatible with Kodi 20 Nexus and Kodi 19 Matrix. The instructions in this article will work the same way for all Kodi-compatible devices, such as the Amazon Fire TV Stick (FireStick 4K, FireStick Lite, Fire TV Cube), NVIDIA SHIELD, Android TV boxes, Mac, Windows PC, tablets, and smartphones. Before we install Aliunde Kodi addon, let’s quickly learn a bit about the addon.
Aliunde is a fork of the Shadow addon, and it offers lots of one-click content with impressive collections of movies and TV shows. Aliunde K19 addon is ideal if you don’t like spending on expensive streaming services and yet want quality entertainment.
In addition to movies and TV shows, you can explore content in other categories, such as radio, fitness, and sports. It supports debrid services, including Real-Debrid, Premiumize, and AllDebrid. If you are looking for an addon that offers content in various genres, Aliunde K19 is the one for you.
Aliunde K19 Kodi addon is hosted in the Aliunde Repository. Below is the step-by-step guide on how to install the Aliunde K19 addon on Kodi.
Is Aliunde Kodi Addon Safe and Legal?
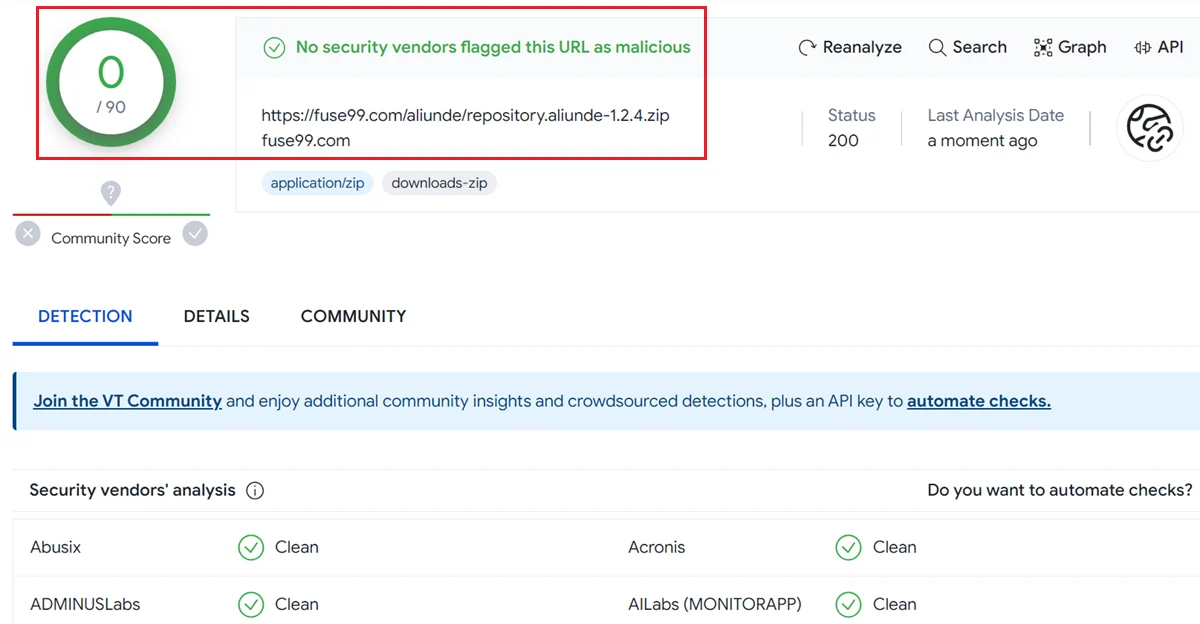
For safety, I scanned the repository zip file of the Aliunde addon. As you can see, no security vendor flagged the file as malicious.
Regarding legality, downloading and installing free third-party Kodi addons is legal, but using them to watch copyrighted content puts you in a legal grey area. Like other third-party addons, Aliunde K19 provides links to content hosted elsewhere.
The sources of the content are sometimes unknown and usually unverified. That means it may or may not be legal to stream content on a third-party Kodi addon like Aliunde.
Unfortunately, FirestickTricks.com can’t address the legal status of the Aliunde K19 addon. It depends on various factors like the source of the content, local and international licensing agreements, and others. User discretion is advised.
That means you could end up in legal trouble if you’re not careful since your government and ISP (internet service provider) are aware of your activities online.
We never promote piracy, so we encourage you to watch only public-domain content. However, you have the right to privacy, so I recommend using a Kodi VPN to hide your streaming activities. ExpressVPN is the best VPN for Kodi.
Attention Kodi Users!
Governments and ISPs worldwide monitor your online activities. If you use third-party Kodi addons, you should always use a reliable Kodi VPN to hide your identity and prevent issues with your streaming experience. Currently, your IP is visible to everyone.
I use ExpressVPN, the fastest and most secure VPN in the industry. It is very easy to install on any device, including Amazon Fire TV Stick, PC, Mac, and Smartphones. It also includes a 30-day money-back guarantee. If you're not satisfied with their service, you can request a refund. ExpressVPN is offering a special NEW YEAR deal: get 4 months free and save 78% on the 2-year plan.
Install and Use Best Kodi VPN | Why you must use a VPN at all times
How to Install Aliunde Kodi Addon
Installing third-party Kodi addons can be a bit tricky, but I’ll walk you through the steps below. I divided the steps into four parts to make the installation easy to understand.
First, we’ll enable unknown sources in Kodi. Then, we’ll add the source of the Aliunde Repository. Next, we’ll install the repository. Finally, we can install the Aliunde K19 addon from the repository. Let’s get started with the first part.
Legal Disclaimer: This guide is for informational purposes only. FireStickTricks.com does not own, host, operate, resell, or distribute any apps, services, or content mentioned.
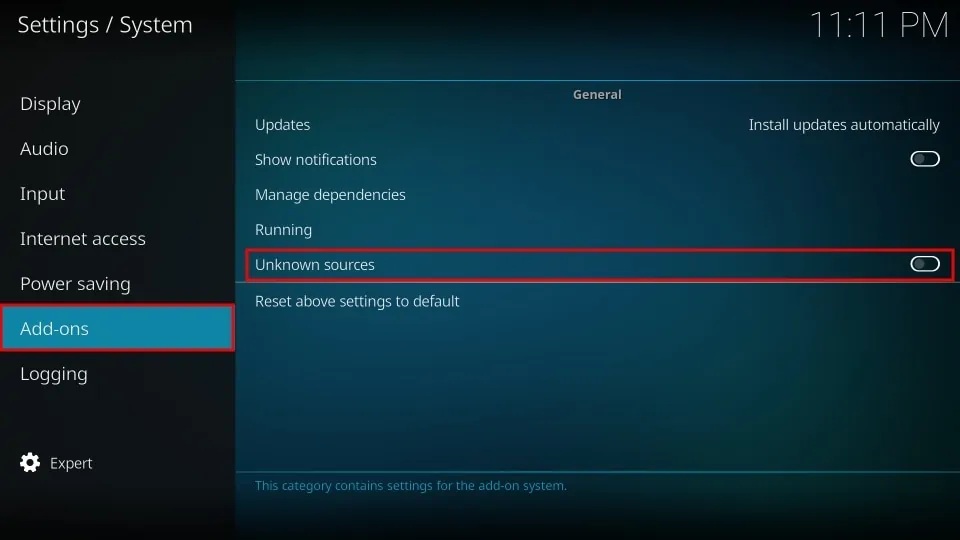
Part 1: Enable Unknown Sources in Kodi
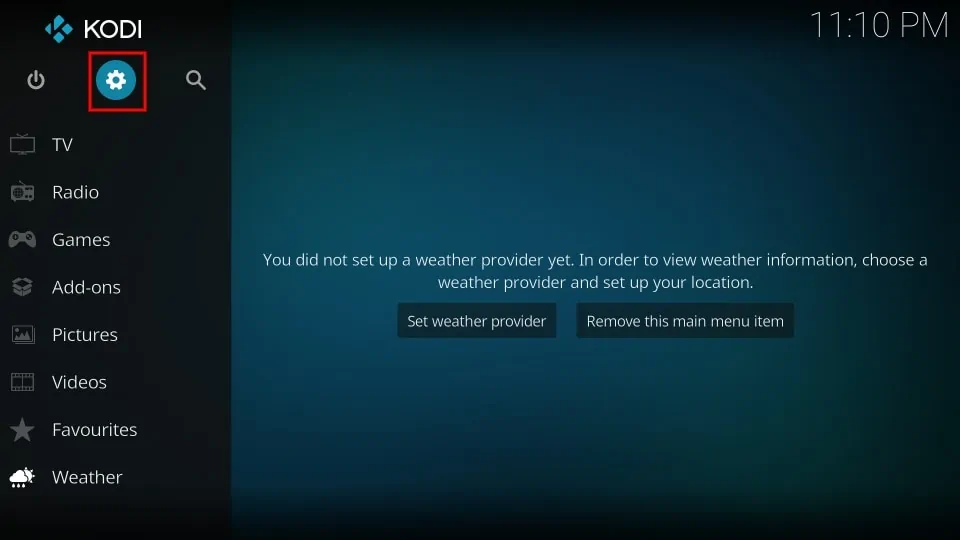
1. Select Settings (the gear icon) in the top-left corner.
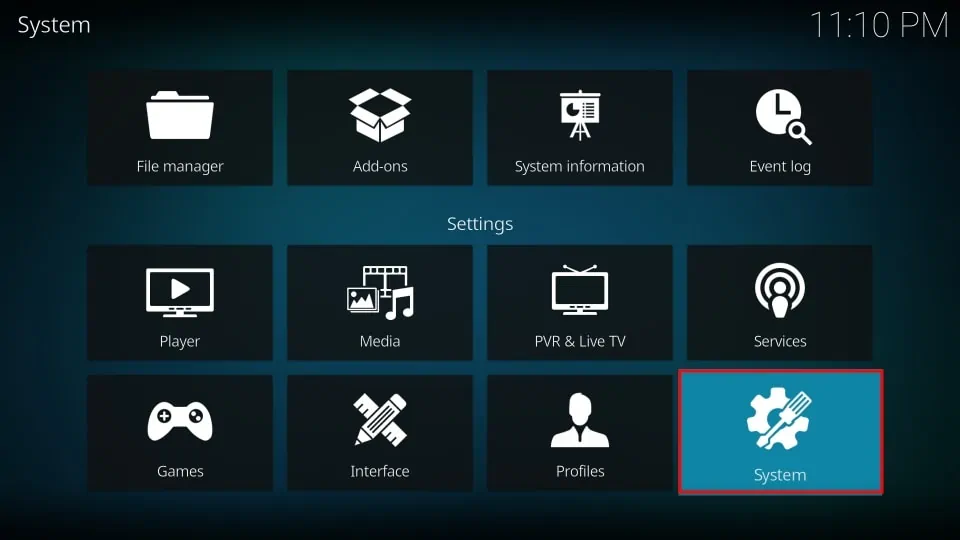
2. Select System on the bottom right.
3. Scroll down to the Add-ons tab. On the right side, select Unknown sources to turn it on.
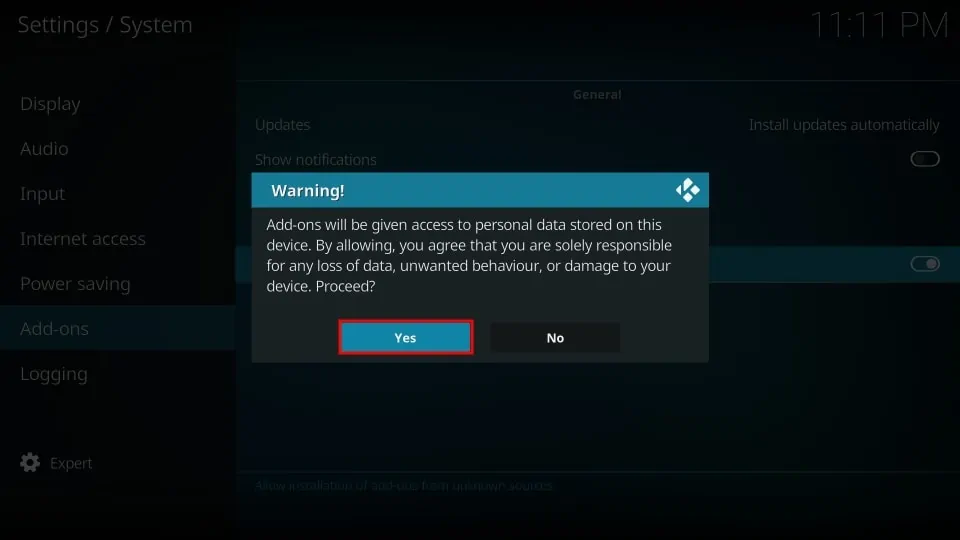
4. Click Yes if a warning about privacy and security pops up.
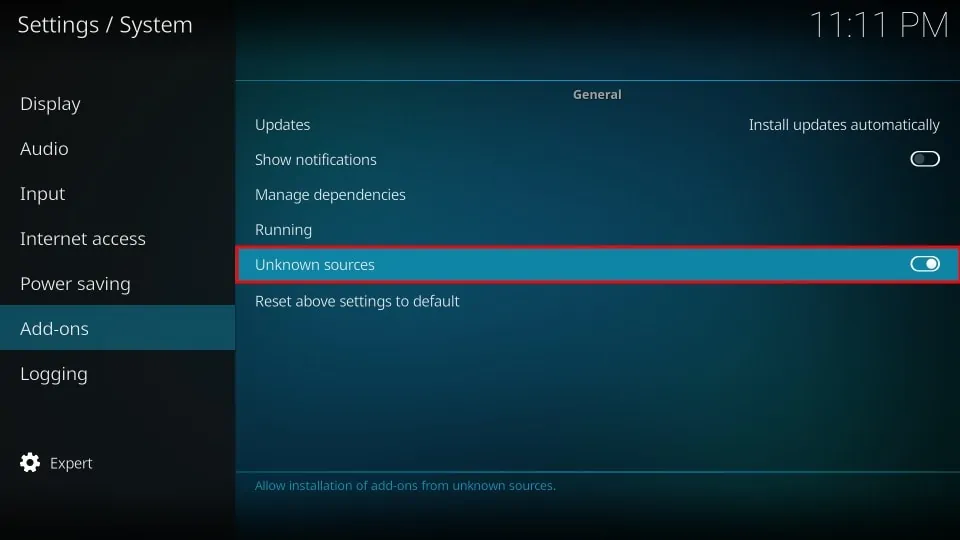
5. The toggle for Unknown sources is now on.
Part 2: Add the Source of Aliunde Repository
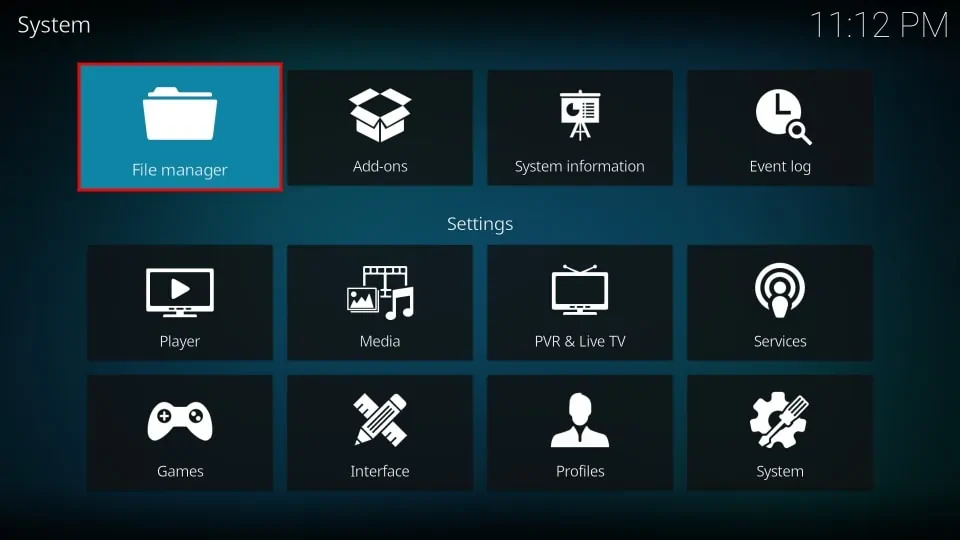
1. Select settings again.
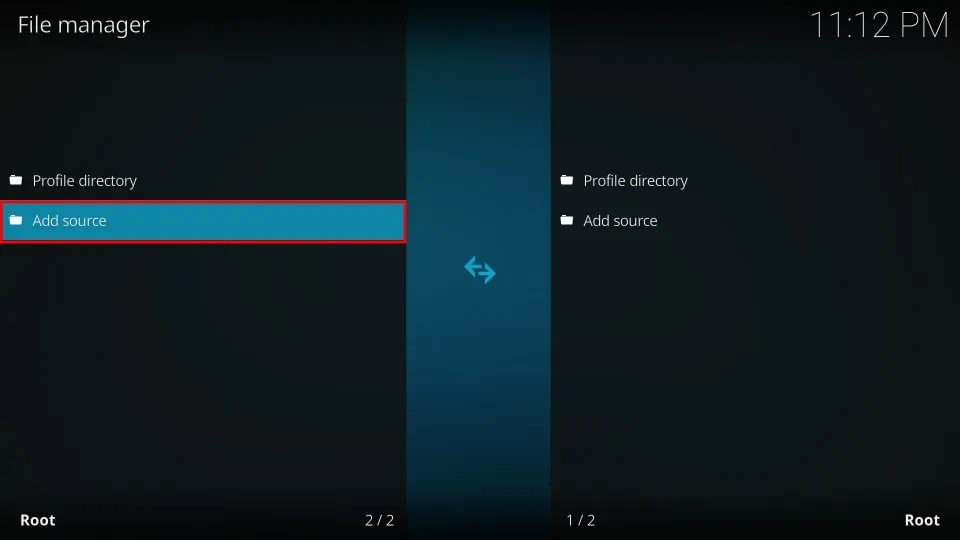
2. Choose File manager.
3. In either column, click on Add source.
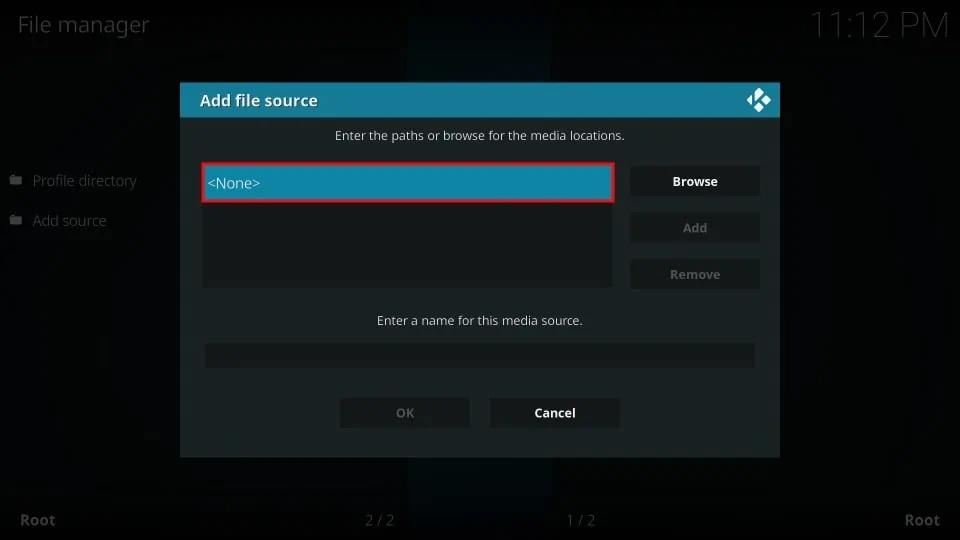
4. Click the area where it says <None>.
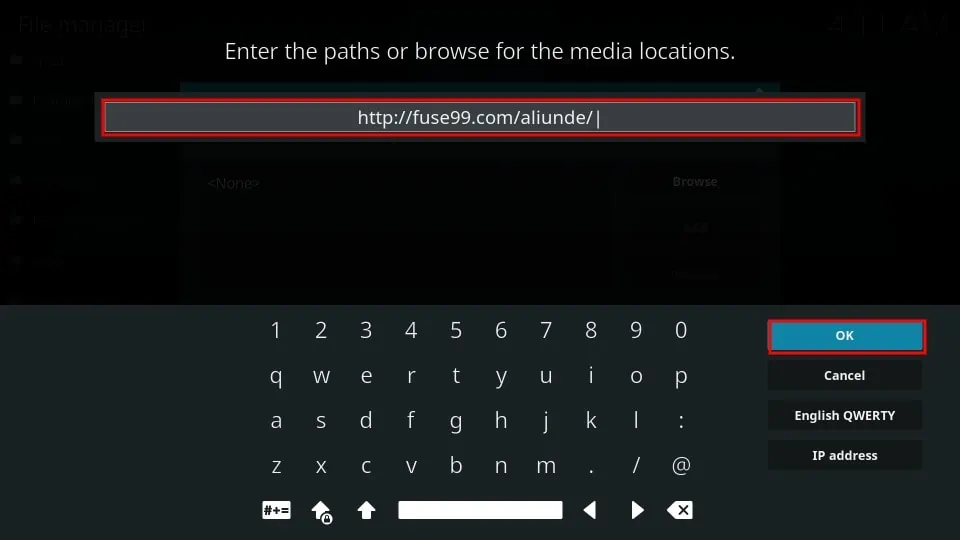
5. In the text box, type in https://fuse99.com/aliunde/ and hit OK. Make sure you type the URL properly.
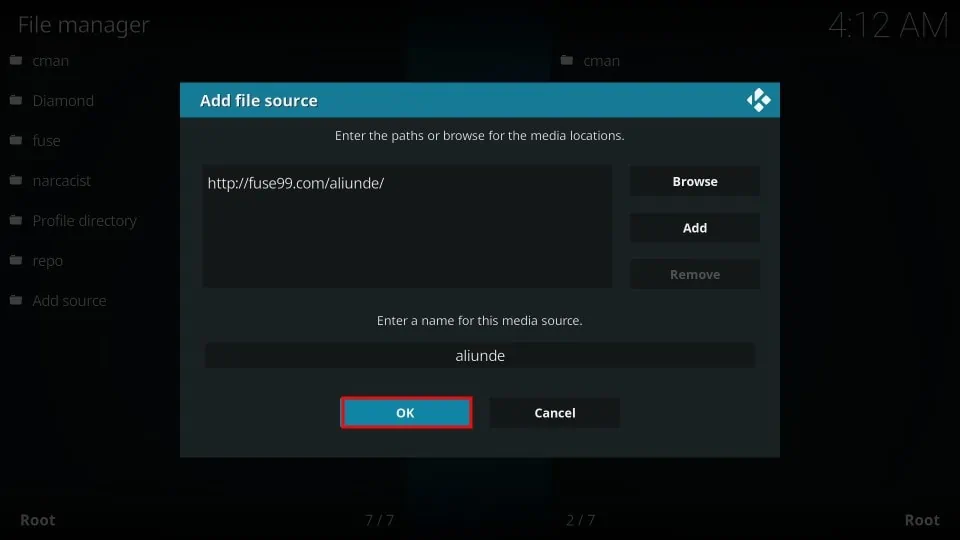
6. Select the Enter a name box. Enter the name aliunde and click OK to return to the screen shown below. Then click OK again at the bottom of this screen to finalize the new source.
Part 3: Install Aliunde Repository
Here are the steps to install the Aliunde Repository:
1. Scroll down to Add-ons.

2. In the right portion of the screen, select Install from zip file.
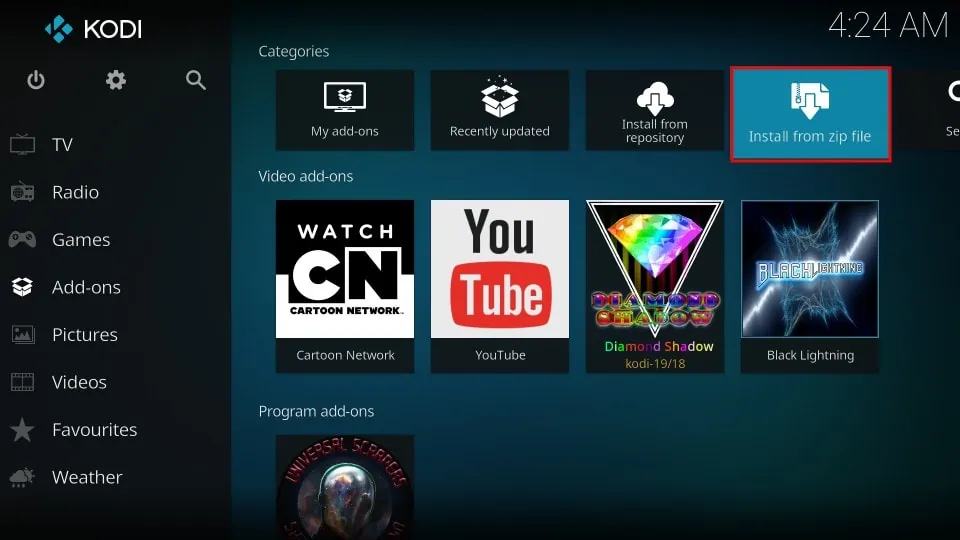
3. Select aliunde in the next window.
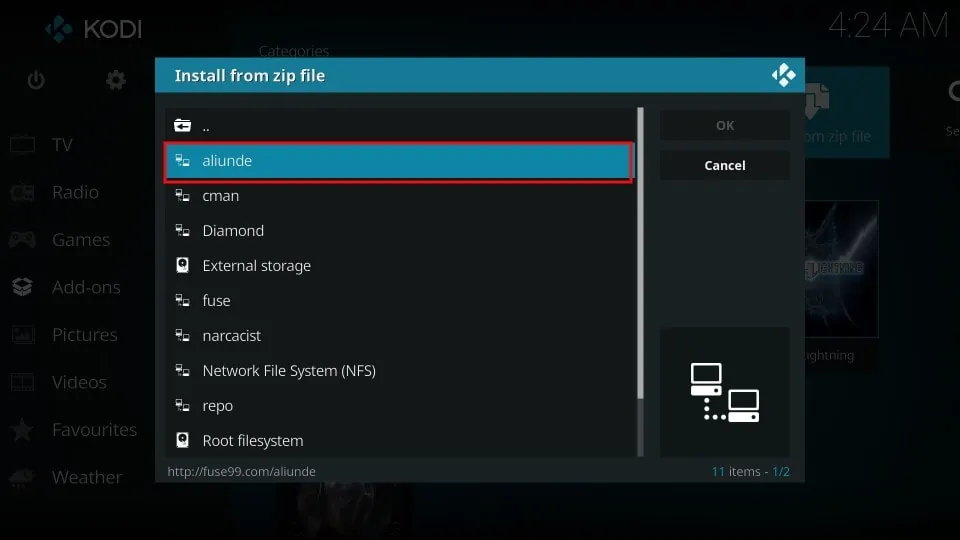
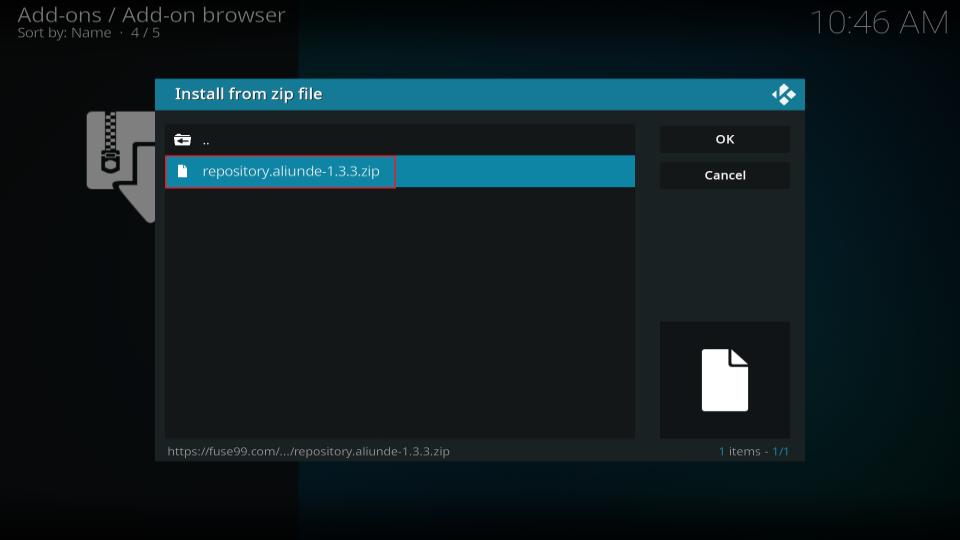
4. Choose repository.aliunde-x.x.x.zip. The numbers in the file will change as Aliunde K19 receives updates, so don’t worry if you see different numbers.’
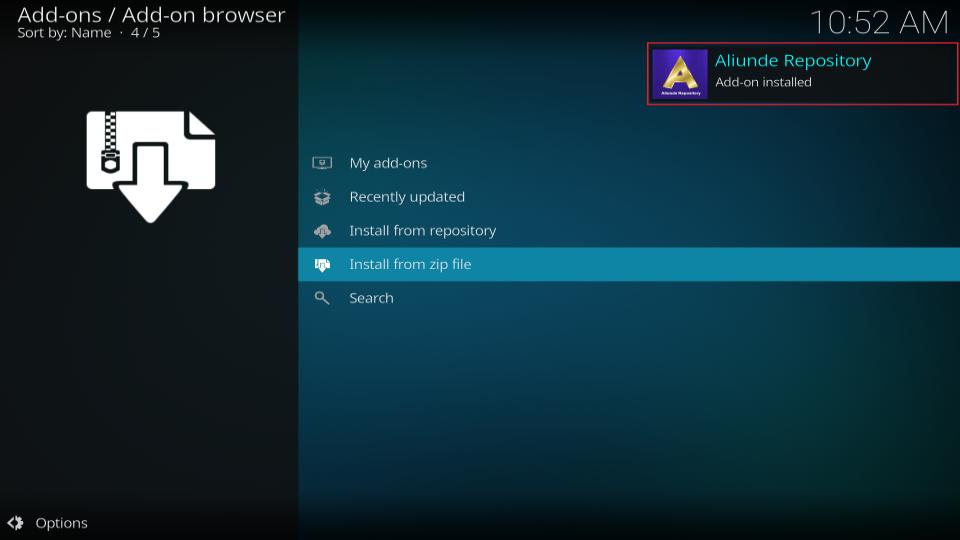
5. When you see a message in the top-right corner that says Aliunde Repository Add-on installed, you’re done. However, stay on the screen for the next step.
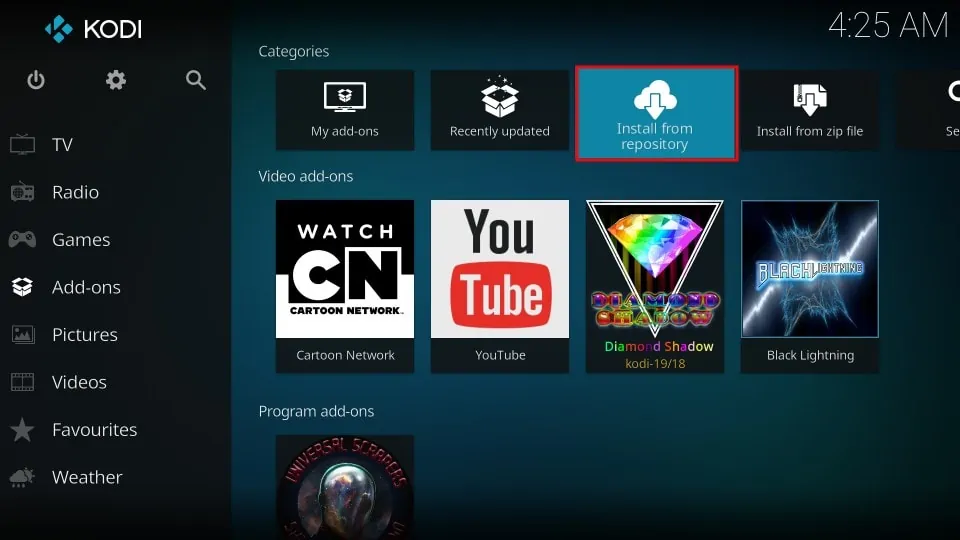
Part 4: Install Aliunde Addon on Kodi
1. On the same screen, select Install from repository.
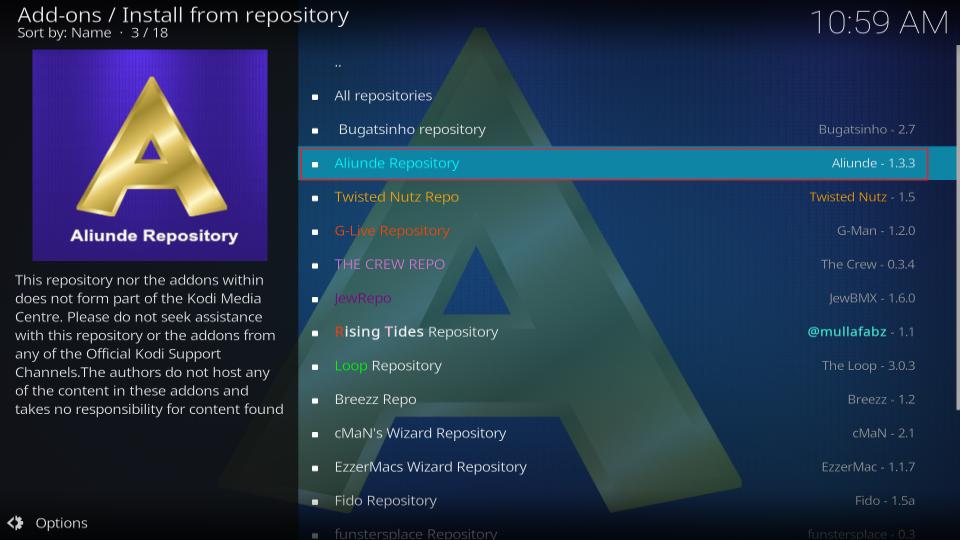
2. Click Aliunde Repository.
3. Scroll down and select Video add-ons.
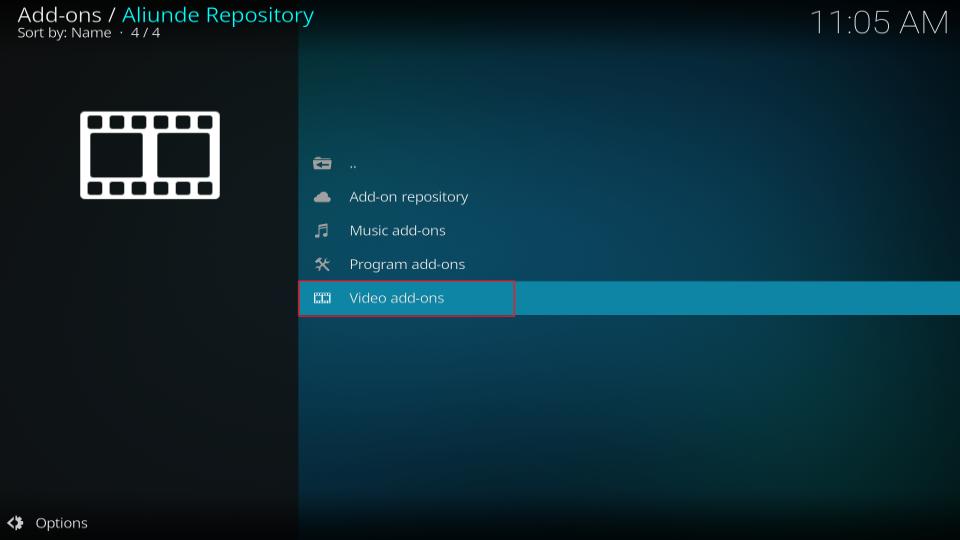
4. Locate and select Aliunde.

5. Click Install in the bottom right.
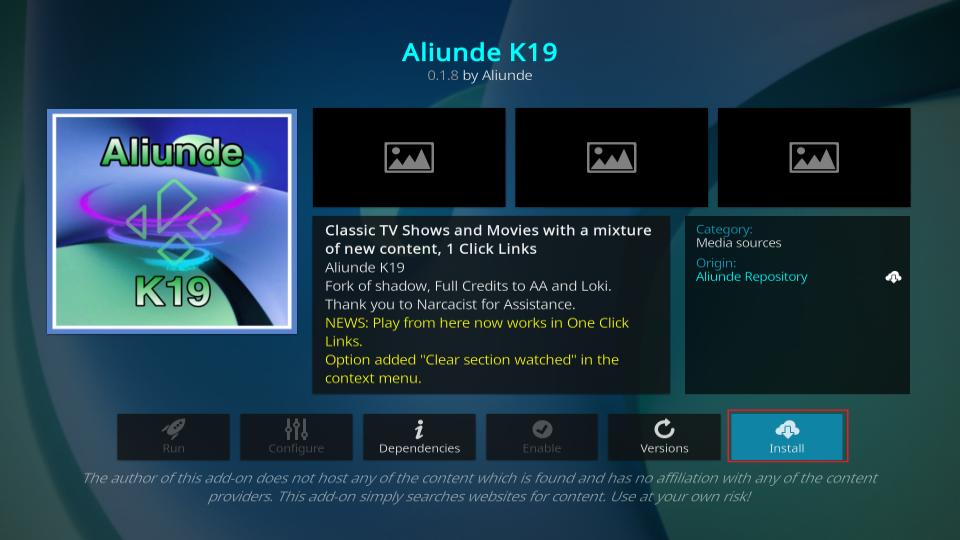
6. Select OK in the window that prompts you to install additional addons.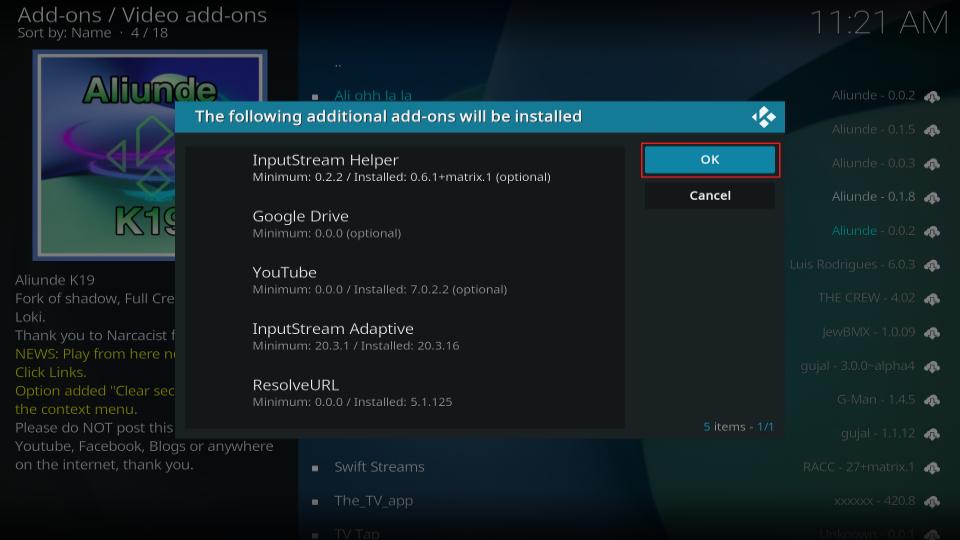
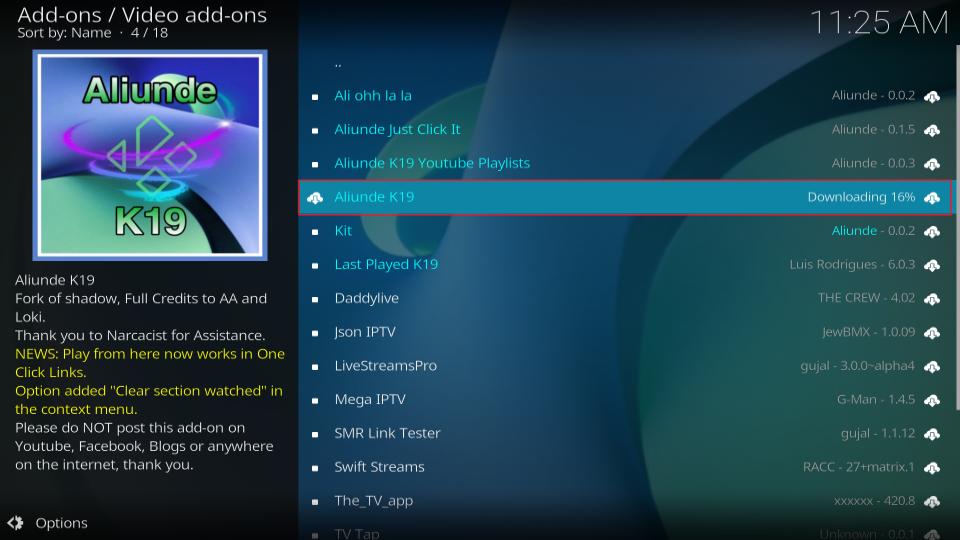
7. Wait for Aliunde K19 to download.
8. Wait until you see the message Aliunde K19 Add-on installed.
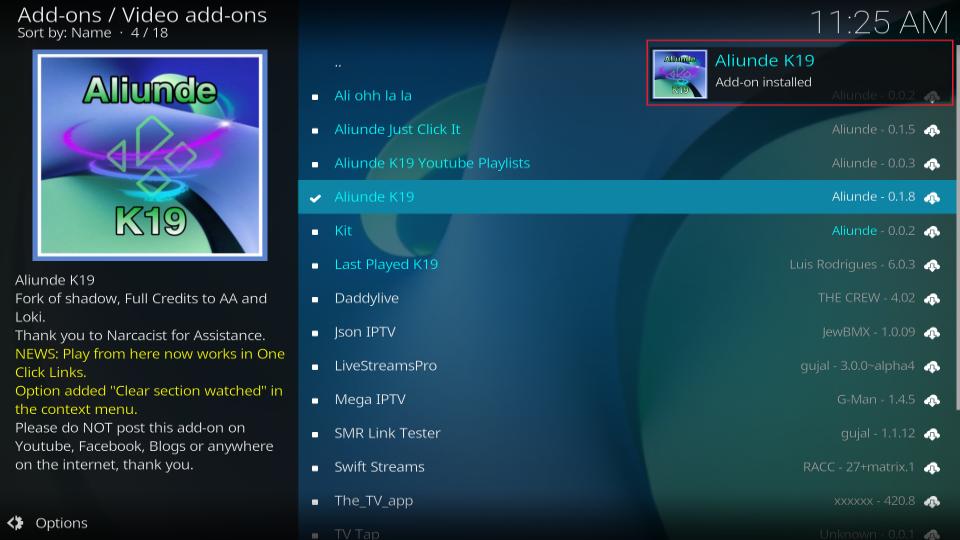
You have successfully installed the Aliunde addon on Kodi.
Before you start streaming with Kodi Addons or Builds, I would like to warn you that everything you stream on Kodi is visible to your ISP and Government. This means, streaming copyrighted content (free movies, TV shows, live TV, and Sports) might get you into legal trouble.
Thankfully, there is a foolproof way to keep all your streaming activities hidden from your ISP and the Government. All you need is a good VPN for Kodi. A VPN will mask your original IP which is and will help you bypass Online Surveillance, ISP throttling, and content geo-restrictions.
I personally use and recommend ExpressVPN, which is the fastest and most secure VPN. It is compatible with all kinds of streaming apps and devices.
NOTE: We do not encourage the violation of copyright laws. But, what if you end up streaming content from an illegitimate source unintentionally? It is not always easy to tell the difference between a legit and illegal source.
So, before you start streaming on Kodi, here's how to get VPN protection in 3 simple steps.
Step 1: Get the ExpressVPN subscription HERE. It comes with a 30-day money-back guarantee. Meaning, you can use it free for the first 30-days and if you are not satisfied with the performance (which is highly unlikely), you can ask for a full refund.
Step 2: Click HERE to download and install the ExpressVPN app on your streaming device. If you are using a FireStick, I have given the exact steps starting with Step 4 below.
Step 3: Click the Power icon to connect to a VPN server. That's all. Your connection is now secure with the fastest and best VPN for Kodi.

The following are the steps to install Kodi VPN on your Fire TV devices. If you have other streaming devices, follow Step 1-3 above.
Step 4: Subscribe to ExpressVPN HERE (if not subscribed already).
Step 5: Go to Fire TV Stick home screen. Click Find followed by Search option (see image below).

Step 6: Type Expressvpn in the search bar and select when it shows up.

Step 7: Click Download.

Step 8: Open the ExpressVPN app and Sign in using the email ID and password that you created while buying the ExpressVPN subscription.

Step 9: Click the Power icon to connect to a VPN server. That’s all. Your FireStick is now secured with the fastest VPN.

How to Integrate Real Debrid
1. Open Aliunde K19 from the Addons tab.
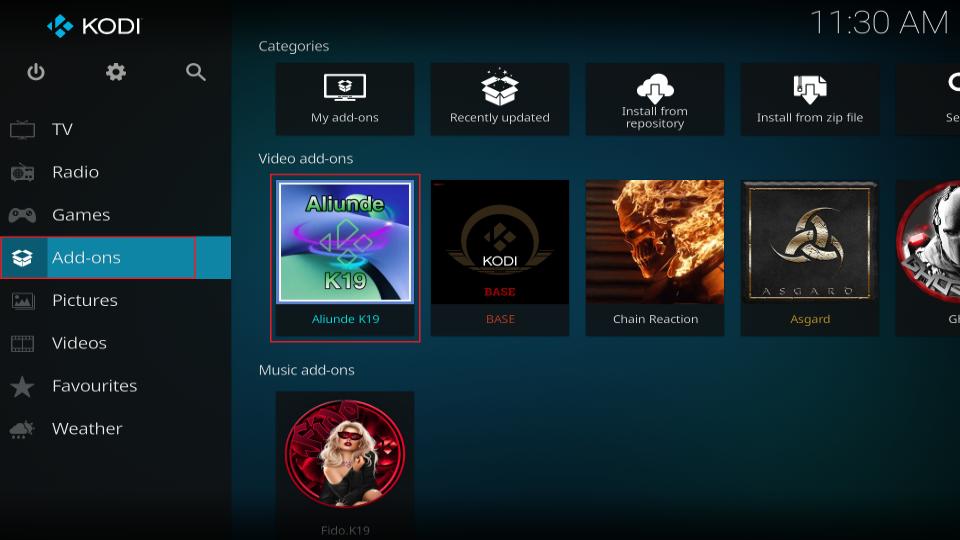
2. You’ll land on the home screen of the Aliunde K19 Kodi addon.
3. Scroll down and select Settings.
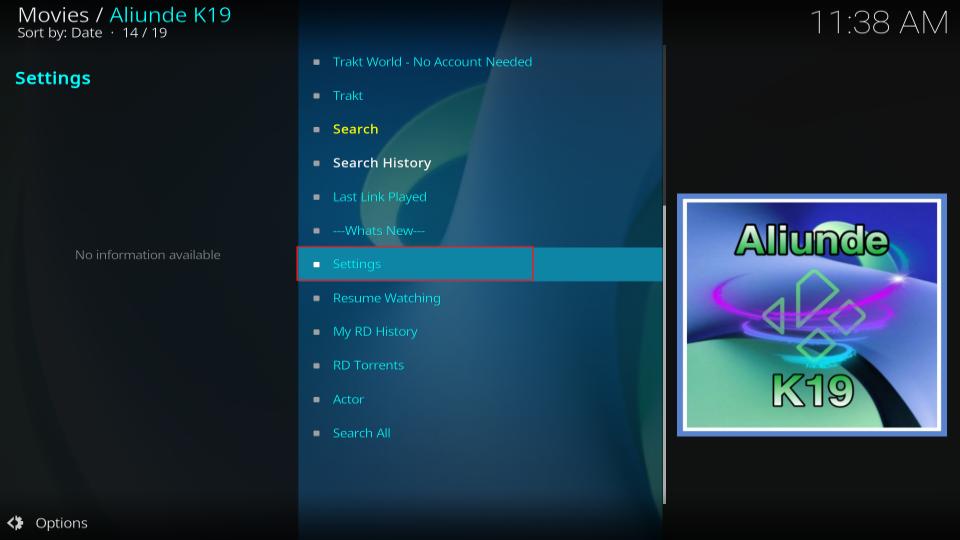
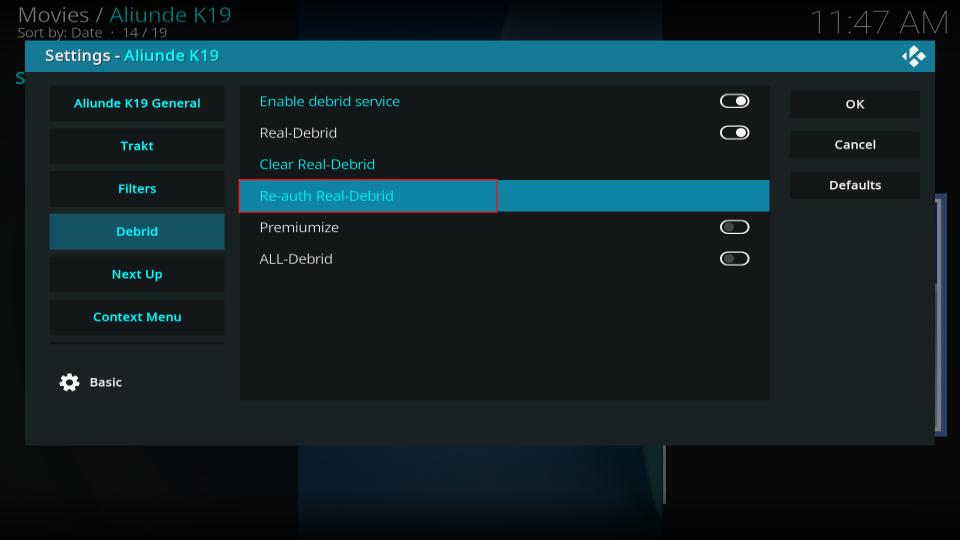
4. Scroll down and go to the Debrid tab.
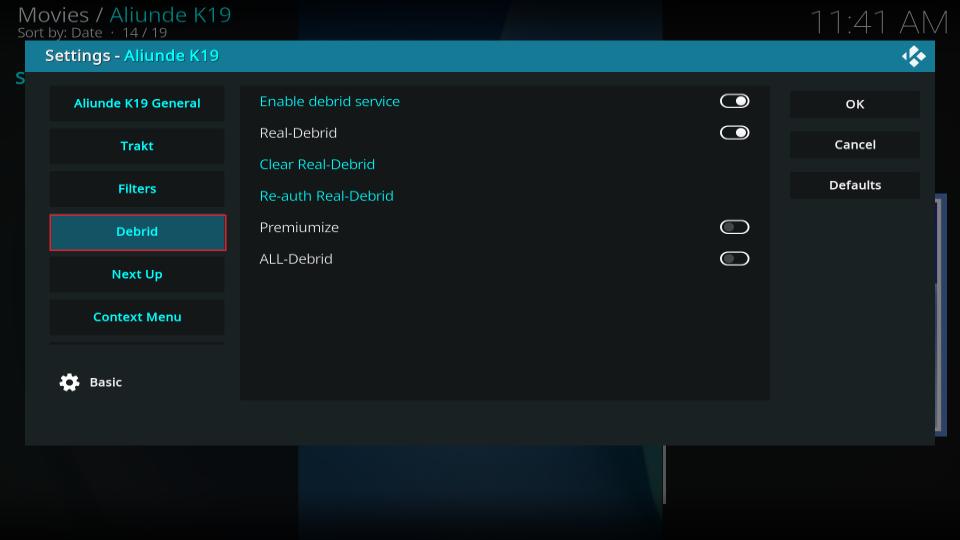
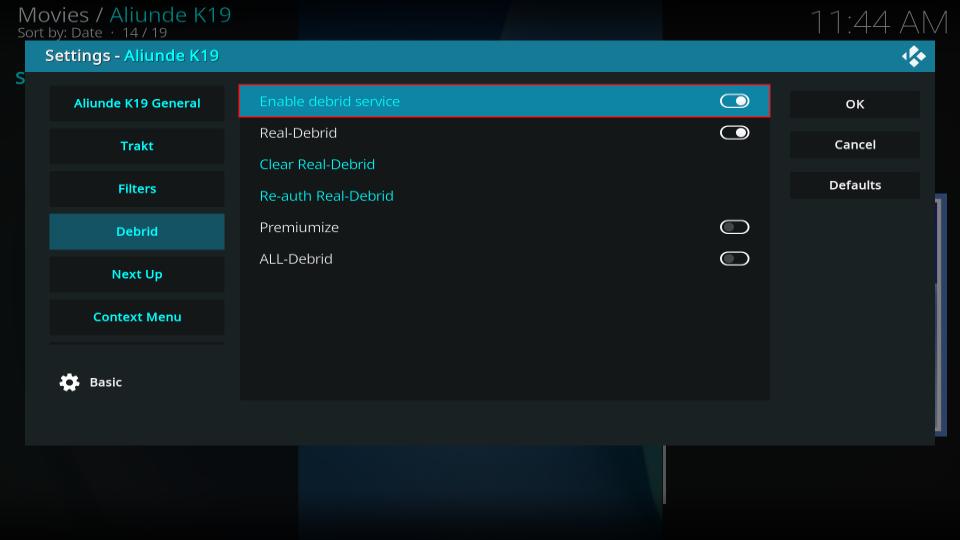
5. Make sure the Enable debrid service is turned on.
Note: You can also select the debrid service by clicking the Choose debrid service option.
6. Select Re-auth Real-Debrid.
7. Aliunde K19 will clear the current debrid settings, and a notification will appear on the top right side of your screen.

8. A Real Debrid Auth pop-up with a link and code will appear.
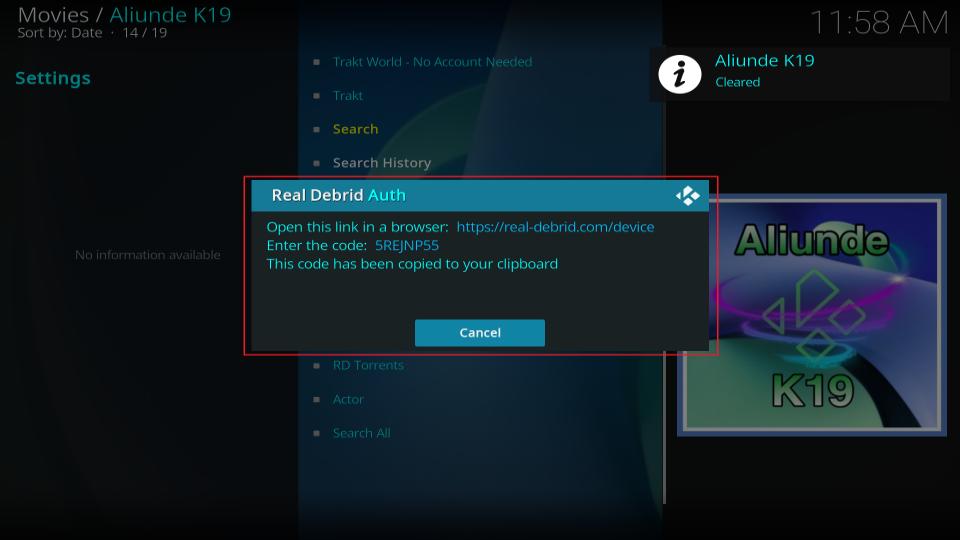
9. Now, open your internet browser on a convenient device, like a computer or smartphone. If you’re integrating Real-Debrid, go to https://real-debrid.com/device. Otherwise, go to the URL provided for your service.
Note: Before going to the URL provided, ensure you’re logged in to your debrid service on that device.
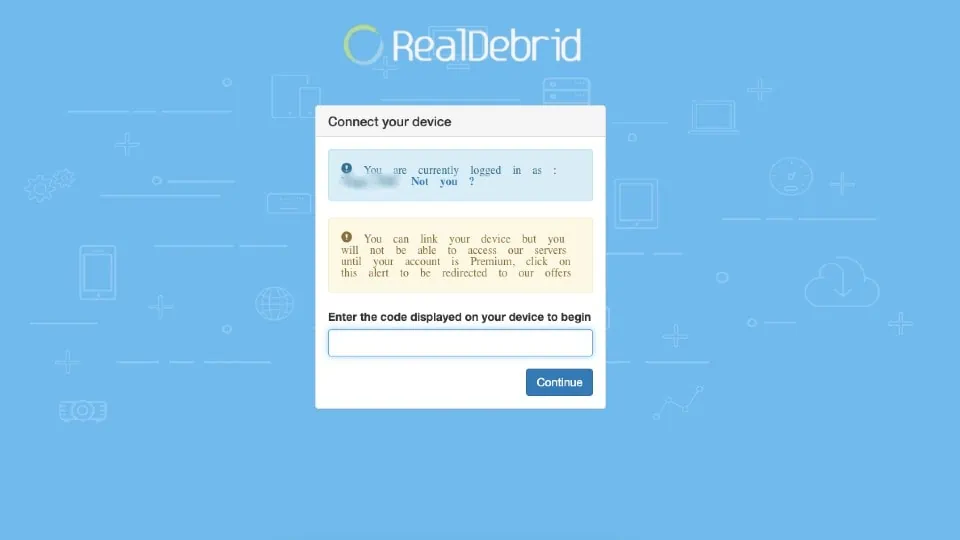
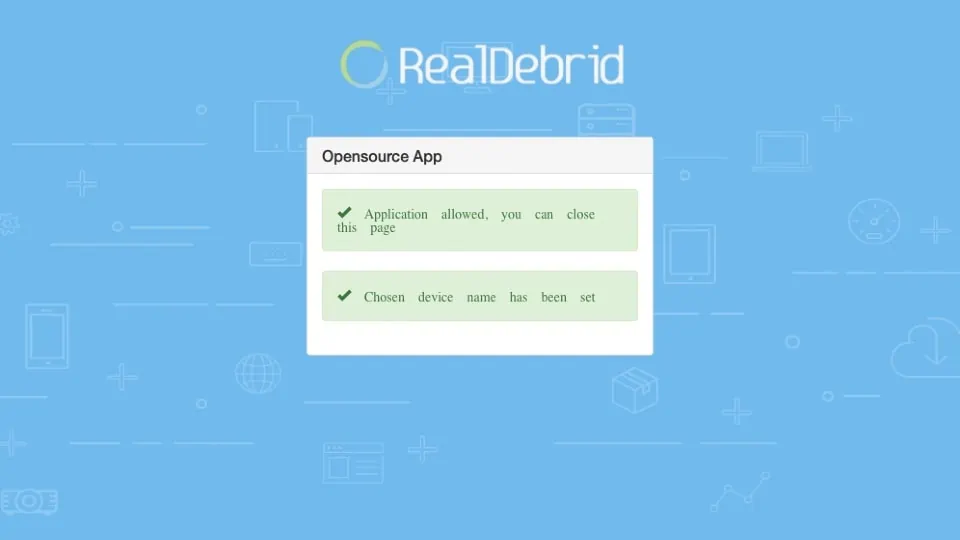
10. Enter your code where indicated and click Continue. You’ve successfully integrated Real-Debrid (or your other debrid service) into Aliunde K19.
How to Use Aliunde K19 Addon
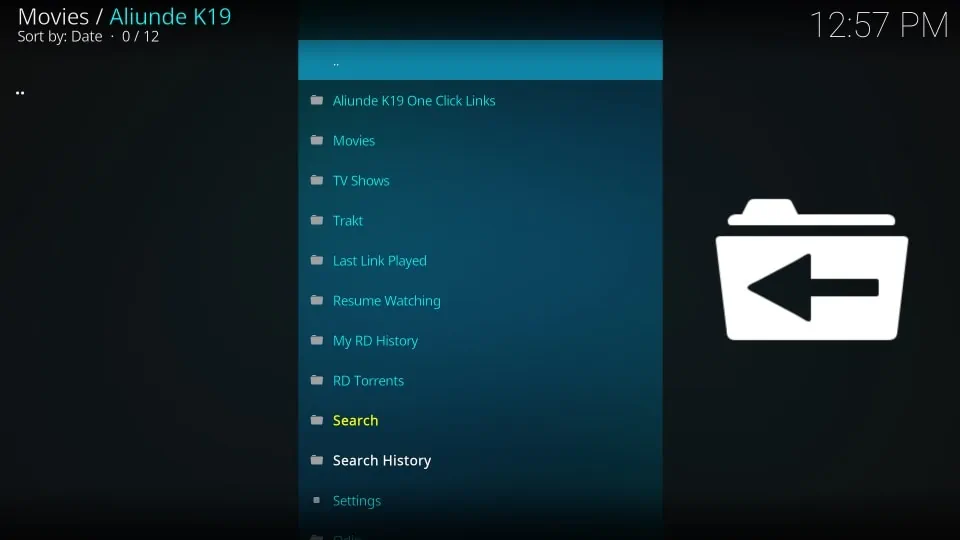
Open Aliunde K19, and you’ll see the following sections on your screen:
- Aliunde K19 One Click Links
- Movies
- TV Shows
- Trakt
- Last Link Played
- Resume Watching
- My RD History
- RD Torrents
- Search
- Search History
- Settings
- Odin
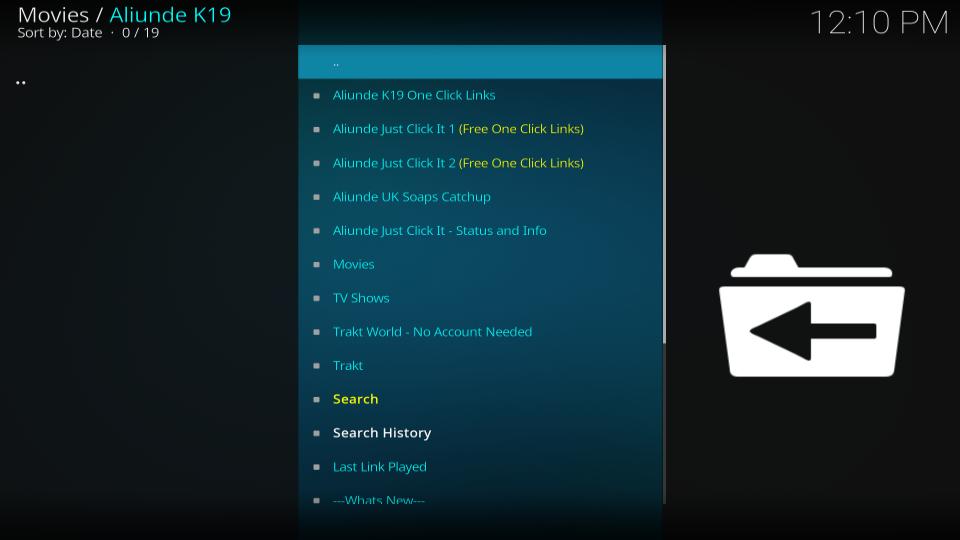
Unlike the previous version of the Aliunde Kodi addon, Aliunde K19 doesn’t have many options on the home screen. Instead, this version concentrates on providing content without clutter.
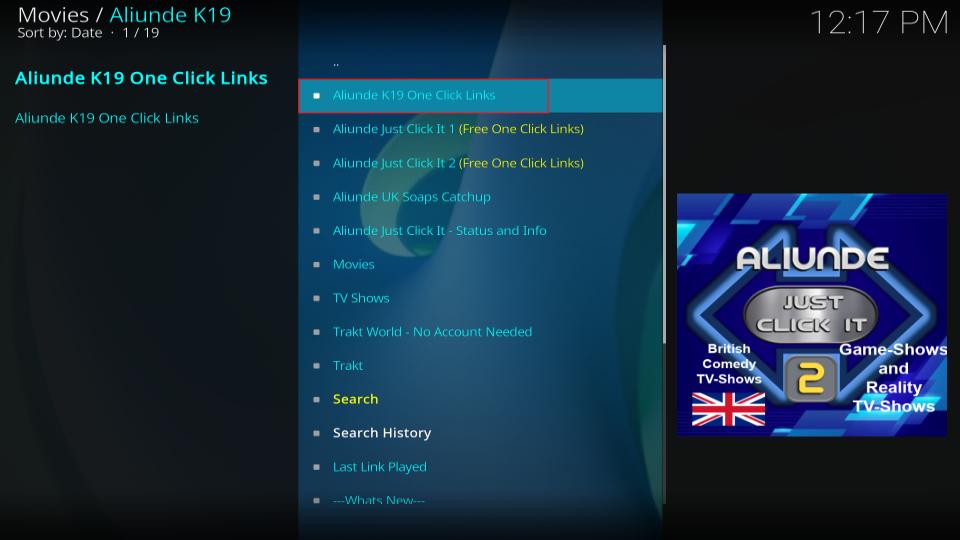
Aliunde K19 One Click Links
The first section of the Aliunde K19 addon is the Aliunde K19 One Click Links. This section lets you watch content with a single click.
Unlike the traditional method, where the addon searches for multiple links, the One Click Links section has the perfect link ready. You need to select the content, and it’ll start playing immediately.
To access the section, select Aliunde K19 One Click Links. But there’s a catch: You’ll be asked to enter a password to access the section. The developers of Aliunde K19 set this limit to ensure that only real humans can access the wonderful section.
Movies
This addon is great if your favorite spare time activity is watching movies.
Aliunde K19 has a separate section for all your movie needs. You’ll find classics, popular hits, trending topics, and content here.
Select the Movies section from Aliunde K19’s home screen. Next, you’ll come across 15 sub-sections, including theaters, popular movies, released movies, 3-D movies, genre, years, studio, advanced content selection, search movies, search history, and more.
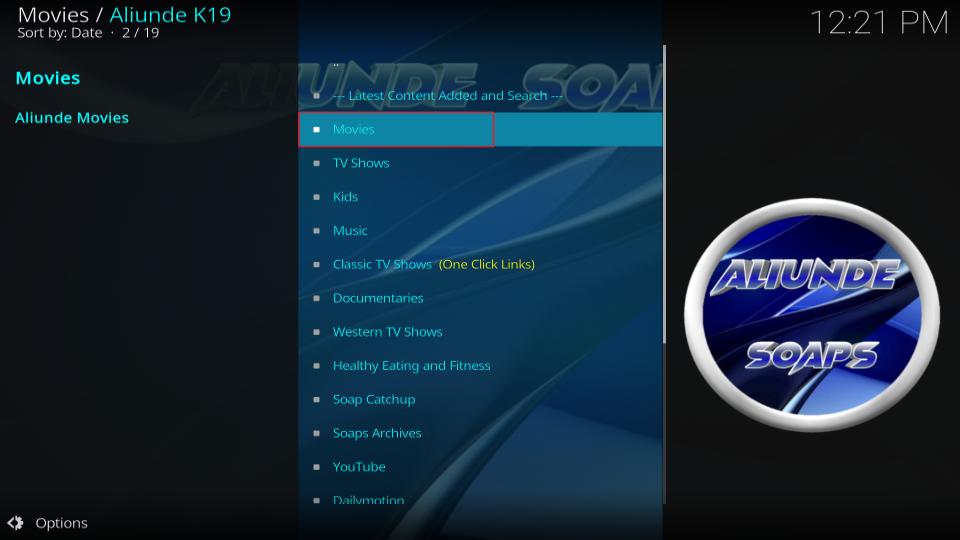
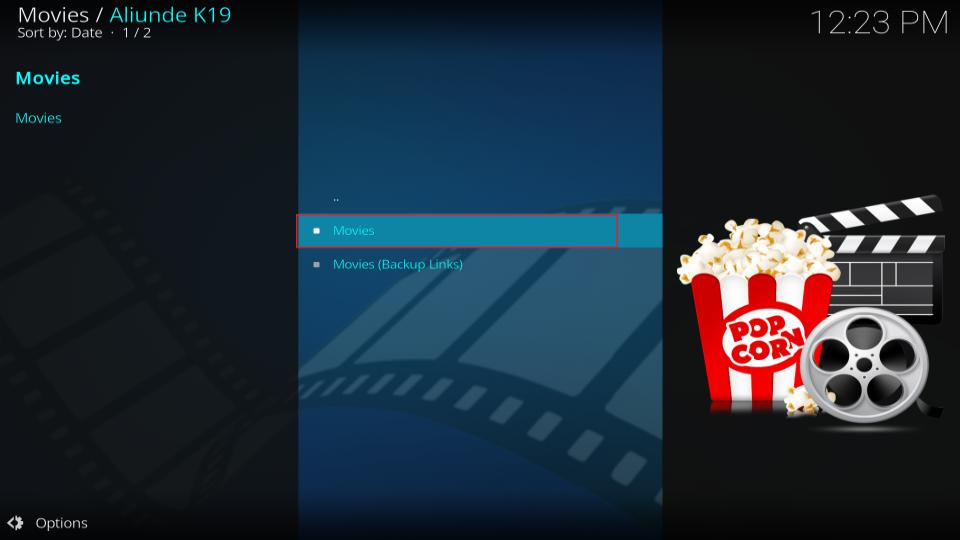
You will see a screen with two options. Select Movies again.
Now, feel free to select any sub-section to reveal the relevant content. For instance, if you choose Bollywood, the following subsection will contain folders labeled with movie names and years with content inside it.
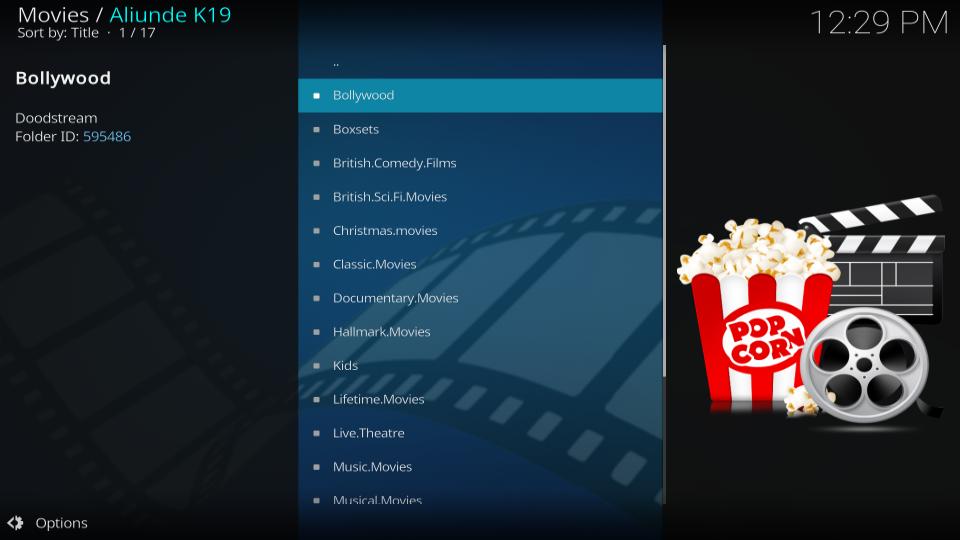
Select any other folder in the movies section to explore different types of movie content.
Searching Movies
Don’t want to find movies manually? Or are you looking for something specific? Use the search option to find movies of your choice.
Inside the movies section, scroll down and select Search.
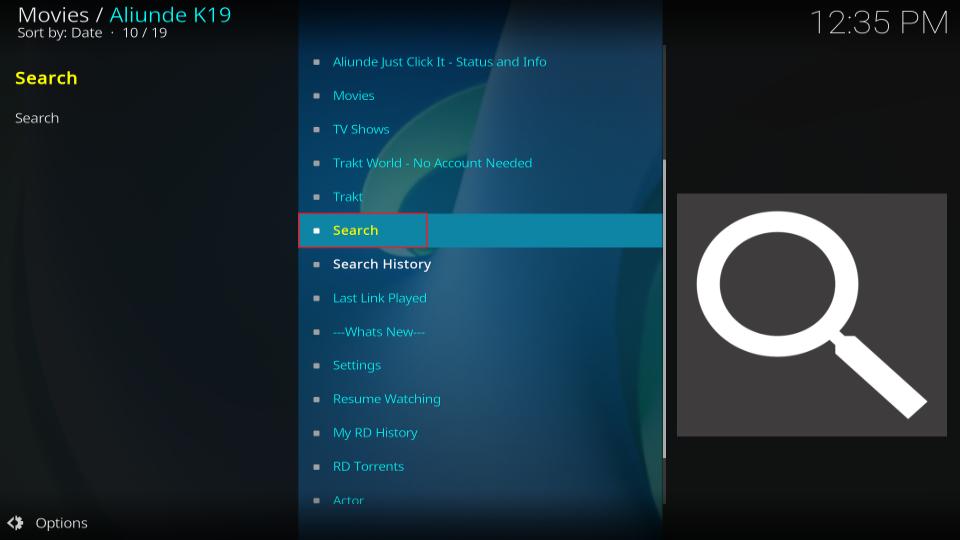
Next, enter your search terms and click on the OK button. After a few seconds, the results will appear as a list on your screen.

If you can’t find your favorite classic movie, you can use the search movie function to find it easily.
TV Shows
The TV shows section of Aliunde K19 lets you access your favorite series. Whether in English, Turkish, or Spanish, all TV shows are available here.
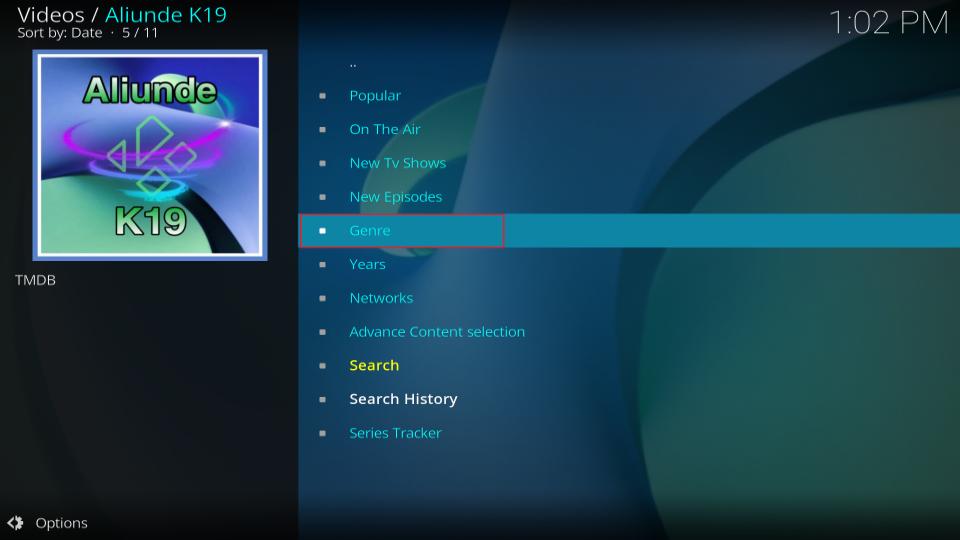
Select TV Shows on Aliunde K19’s home screen to access the section. Inside, you’ll find 11 sub-folders, including Popular, On The Air, New TV Shows, New Episodes, Genre, Years, Networks, and more.
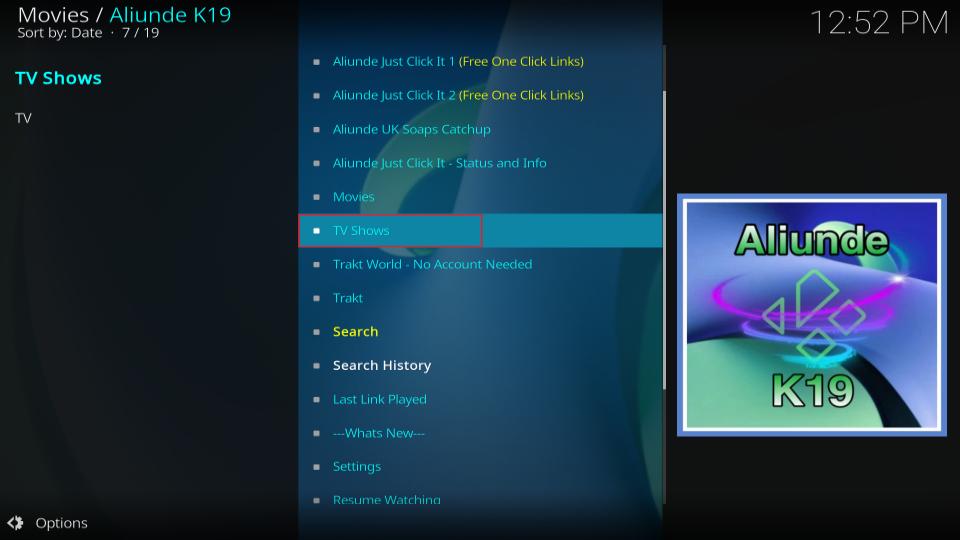
You are free to explore any section in the TV shows section. However, I’ll introduce you to one of them.
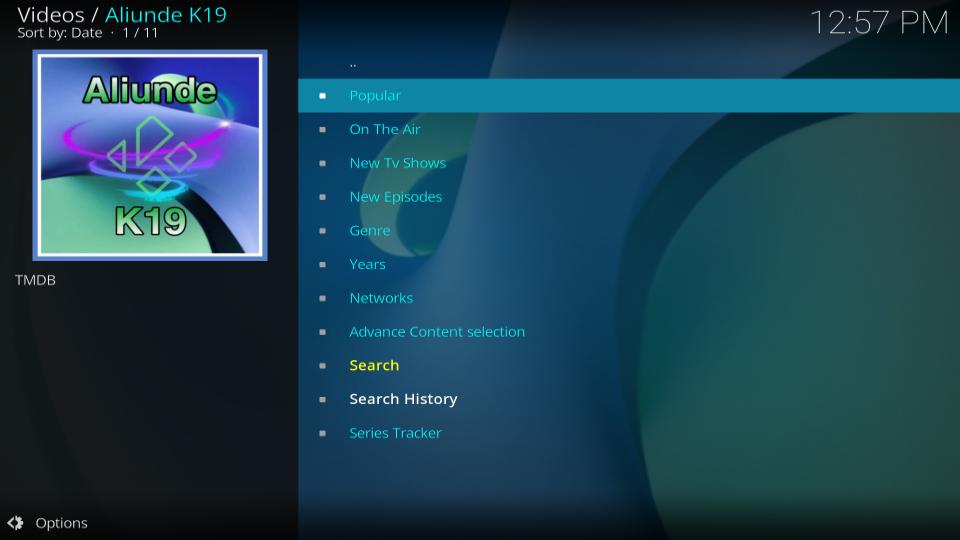
Genre
Select the genre section inside the TV shows section. Next, you’ll find the series split into different genres: action and adventure, animation, comedy, crime, documentary, drama, family, kids, mystery, news, reality, and more.
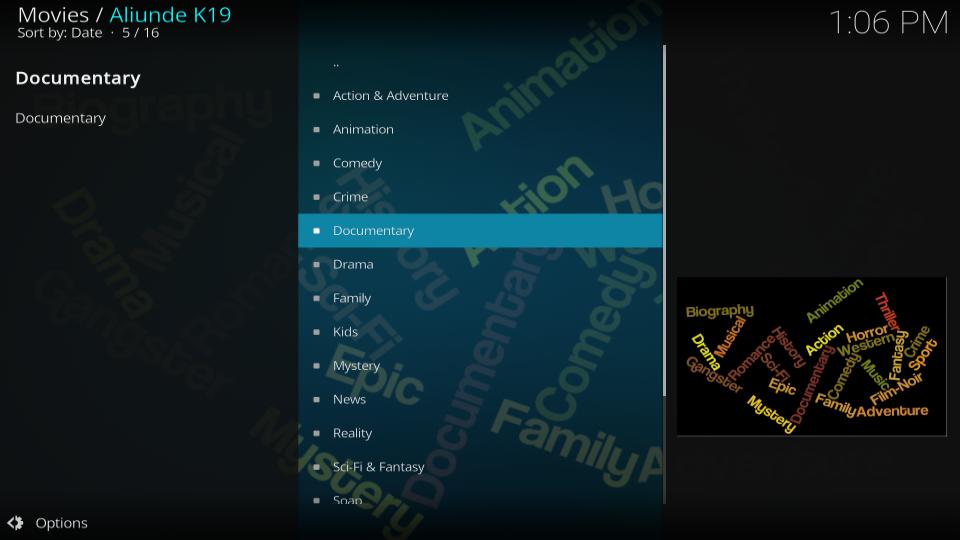
You can select any sub-folder to explore the relevant titles of the genre. For instance, selecting the documentary folder will provide you with the TV series documentaries. Alternatively, choosing the crime folder will show you the list of all crime-related shows.
Searching TV Shows
Want to find a specific TV show? Don’t worry; the Aliunde K19 movie section has you covered. Inside the Aliunde K19 movies section, a search feature lets you find any TV show.
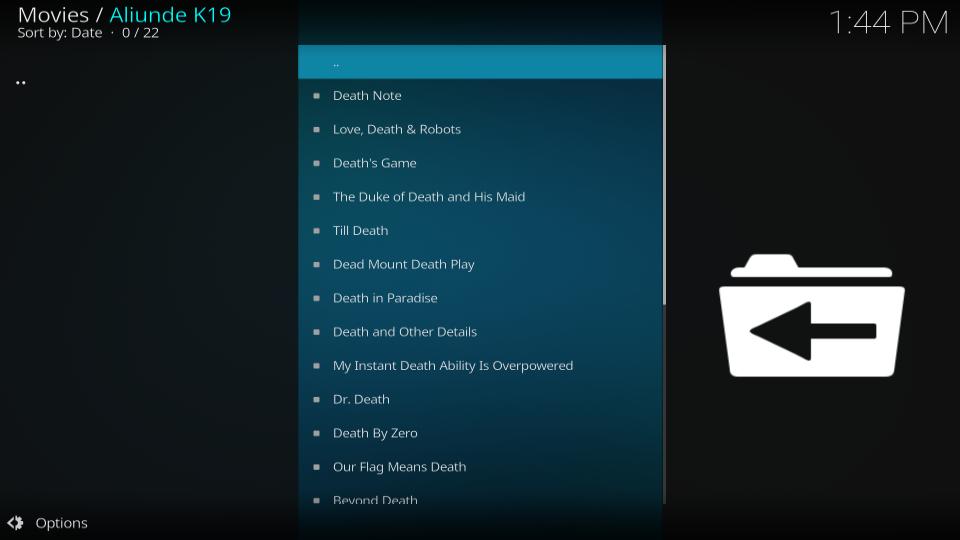
Scroll down and select the Search option inside the Aliunde K19 > Movies section. A search window will then pop up. Enter your search terms and click on the OK button.

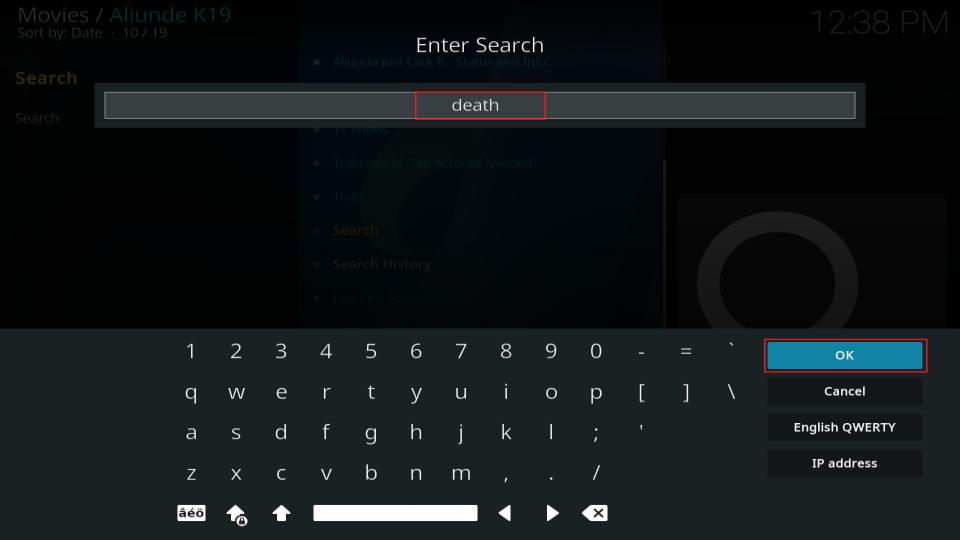
Wait a few seconds to let the addon find the TV shows related to your search term. You’ll see a list of all the series matching your search term.
Wrapping Up
Aliunde K19 is one of the best all-in-one Kodi addons, with many content in various categories. It especially stands out with its dedicated section for fitness and health, in addition to the free movies and TV shows.
This article taught you how to install the Aliunde K19 Kodi addon, as well as how to integrate a debrid service and navigate the addon to find content. Did you run into any trouble while following these instructions? Do you like the Aliunde K19 addon? Feel free to share your thoughts in the comment section below. Happy streaming!
Related:
- How to Install Kaito Kodi Addon
- How to Install Patriot Kodi Addon
- How to Install Chains Reaction Lite Kodi Addon
- How to Install Mad Titan Sports Kodi Addon

Suberboost Your FireStick with My Free Guide
Stay Ahead: Weekly Insights on the Latest in Free Streaming!
No spam, ever. Unsubscribe anytime.

Installed as instructed and when I select whichever show I keep getting error in line 3713 no links found and my VPN is connected to the UK
Please help
Hi Mark, try enabling Real Debrid and reauthorizing it by going to Settings > Debrid > Real Debrid. Once reauthorized, it should work properly. Let me know if you need further assistance!
For Alinude and Cre, there are no,zipped files in the directory. Says couldn’t connect to network server. I was able to install Shadow no issues and I know my internet is not the issue.
Any suggestions?
Thanks
Hi Kim,
I just tried it myself, and it works! As for your issue with Alinude and Crew, if there are no zipped files in the directory and you’re getting the “couldn’t connect to network server” error, it could be a network or server issue. One thing you could try is using a VPN to see if it helps bypass any network restrictions. Since you mentioned that you had no issues with installing Shadow, your internet connection seems fine, so a VPN might just help resolve this. Let me know how it goes!