
In this guide, I’ll show you how to copy (clone) a FireStick to another FireStick. This article is valid for all eligible Fire TV devices, such as the Fire TV Cube, FireStick LITE, FireStick 4K Max, etc.

What’s Copying/Cloning a FireStick to Another FireStick
Copying or cloning a FireStick refers to transferring your apps, music, videos, and more from one device to another. Since there is no official way to clone your FireStick, I’ll show you how to do it unofficially.
Why Copy (Clone) a FireStick to Another FireStick?
But why would you want to clone your FireStick to another?
There are several practical reasons for cloning a Firestick. For instance, you have upgraded to a new version of FireStick but don’t want to go through the manual installation of all your apps, transferring settings, or reconfiguring preferences. In that case, you want to clone your old device to the new one, which is an efficient solution.
Similarly, cloning ensures consistency across both devices if you are buying another FireStick for another TV in your home and want it to be a replica of your existing FireStick.
The process saves time and effort, especially for users with extra customization or sideloaded apps. Cloning also ensures that you retain your preferred settings, including account login, app arrangements, or any specific changes you have made across all your Firestick devices.
For FireStick Users
ISPs, hackers, and other third-party entities worldwide may monitor your online activities. For security, privacy, and smooth streaming, it is recommended to use a reliable VPN for FireStick. Your IP address is visible to sites you visit.
I recommend ExpressVPN, a fast and secure VPN. It is very easy to install on any device, including an Amazon Fire TV Stick. Also, it comes with a 30-day money-back guarantee. If you don't like their service, you can always ask for a refund. ExpressVPN also has a special deal where you can get 4 months free and save 81% on the 2-year plan.
Read: How to Install and Use the Best VPN for FireStick
How to Copy (Clone) a FireStick to Another FireStick
Cloning a FireStick to another FireStick is a somewhat complicated process. I have simplified the guide by dividing it into five parts, each with easy-to-follow step-by-step instructions and accompanying screenshots.
Part 1: Prepare Your FireStick
You’ll need to do two things on your FireStick before you can proceed.
First, install the Downloader app from the Amazon App Store. This software lets you load files from third-party sources, such as MiXplorer APK, onto your FireStick.
And second, you must enable Downloader to install third-party APKs and files.
Here’s our detailed guide on how you can set up the Downloader app on your FireStick.
Part 2: Download & Install MiXplorer Using Downloader
This section will show you how to install MiXplorer on your FireStick.
MiXplorer is a free and advanced file manager app for Android-based devices. This app will help us create, export, and import backups in the upcoming parts.
So, here’s how to install MiXplorer using Downloader on your FireStick.
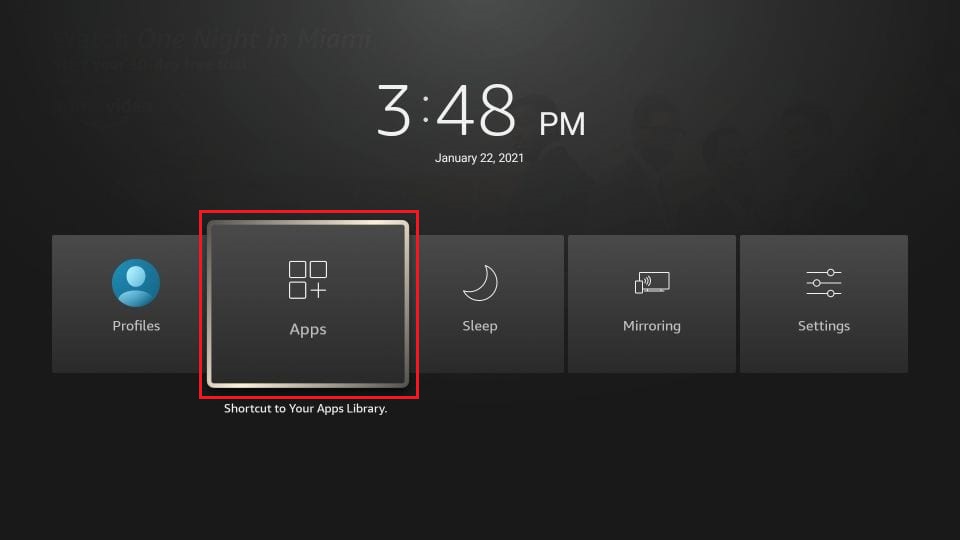
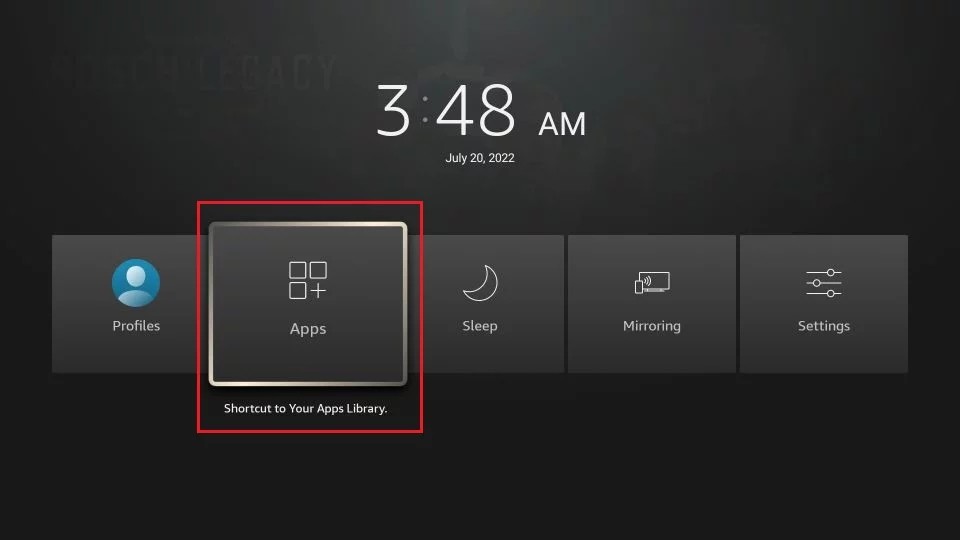
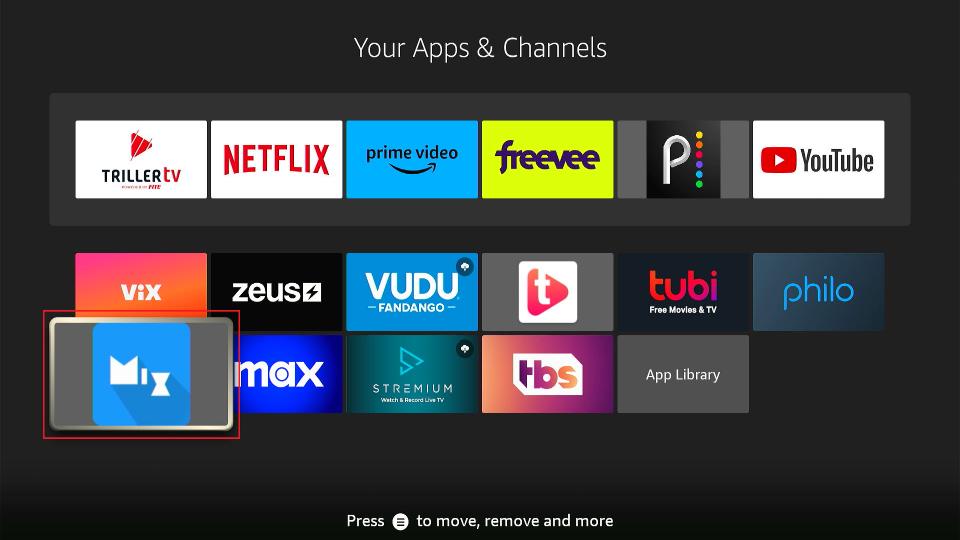
1. Press the Home button on your Fire TV remote until the quick menu appears. Then, select Apps.
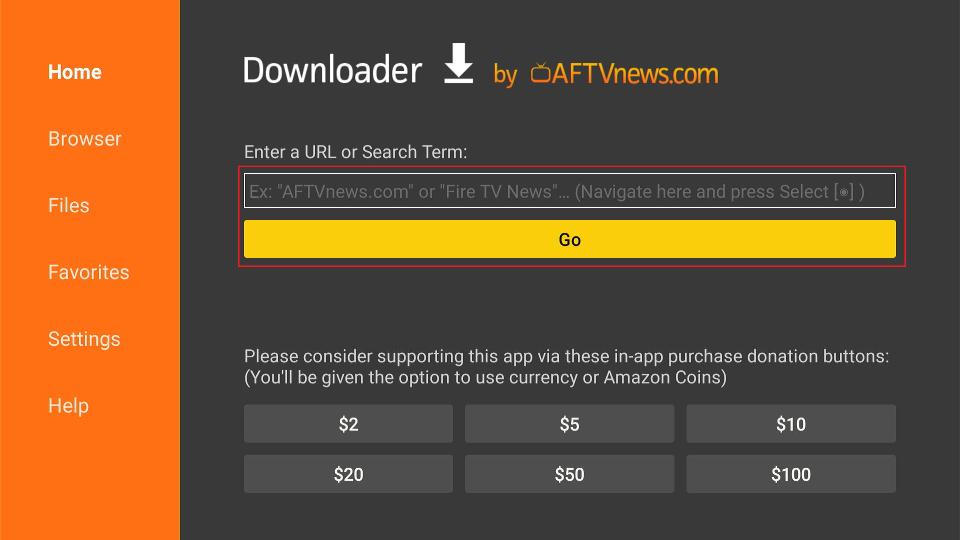
2. Launch Downloader.
Note: Can’t see the Downloader app? Check it inside the App Library tile.
![]()
3. Select the Input Box in the Home tab under Enter a URL or Search Term.
Note: When you launch Downloader, it will ask you to allow access to your data. Click Allow. A quick start guide will appear on your screen. Click OK to continue.
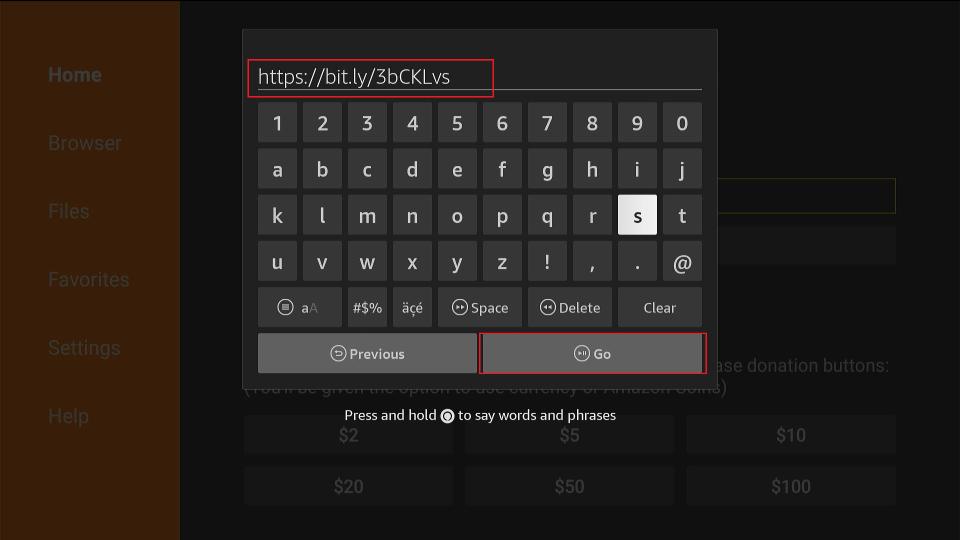
4. Enter the URL https://bit.ly/3bCKLvs and click Go.
Note: I have provided the shortened link to the website hosted by the MiXplorer APK file. Remember that at FST, we don’t own or host any apps.
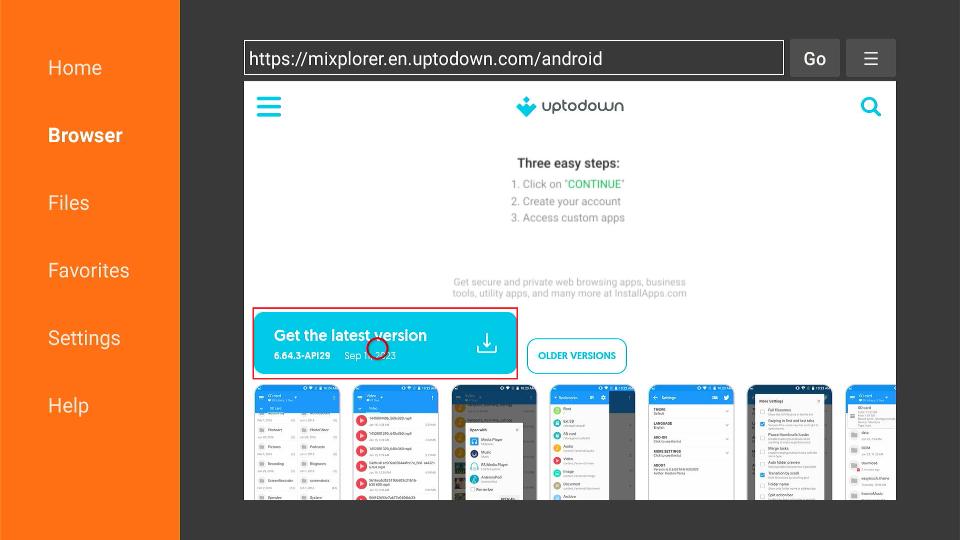
5. Once the page loads, scroll down.
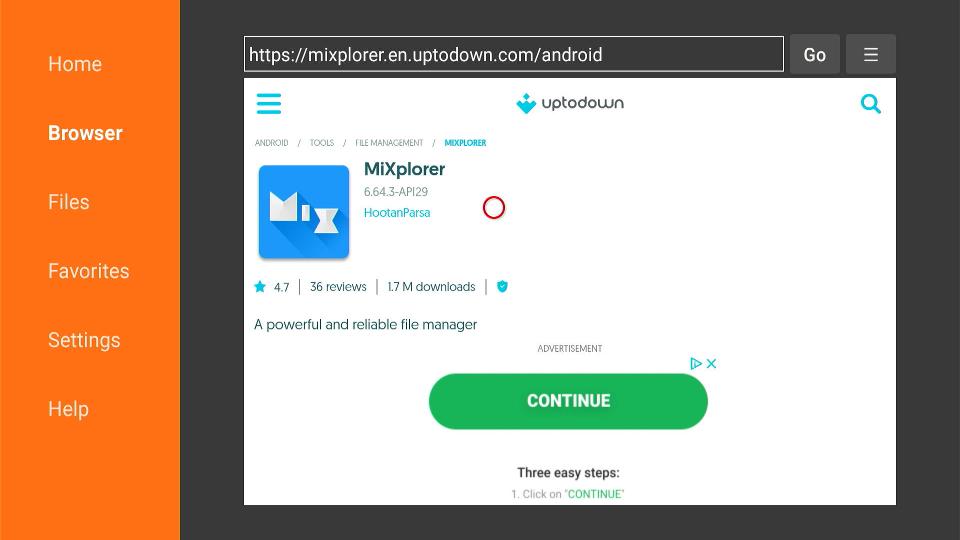
6. Click on the light-blue Latest Version button.
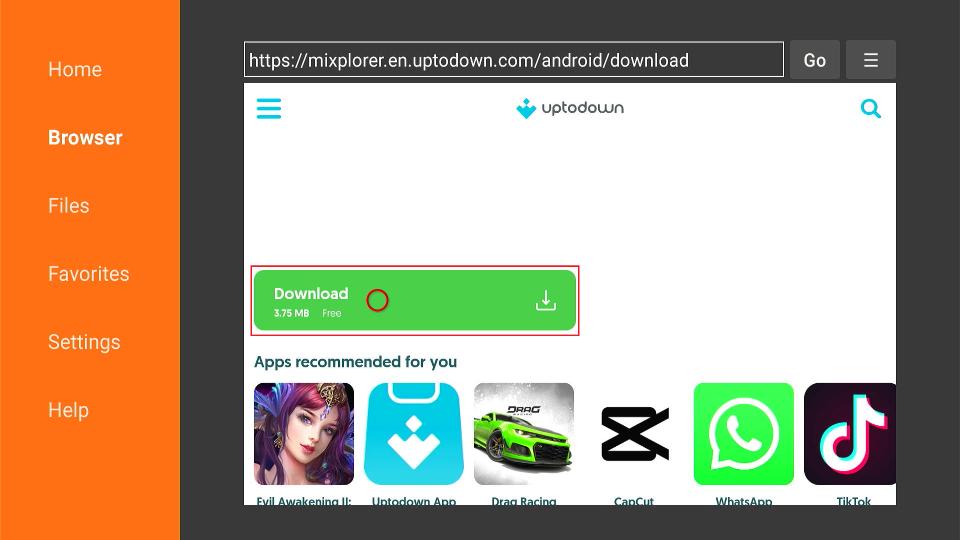
7. Once again, wait for the page to load and then scroll down. Click the green Download button.
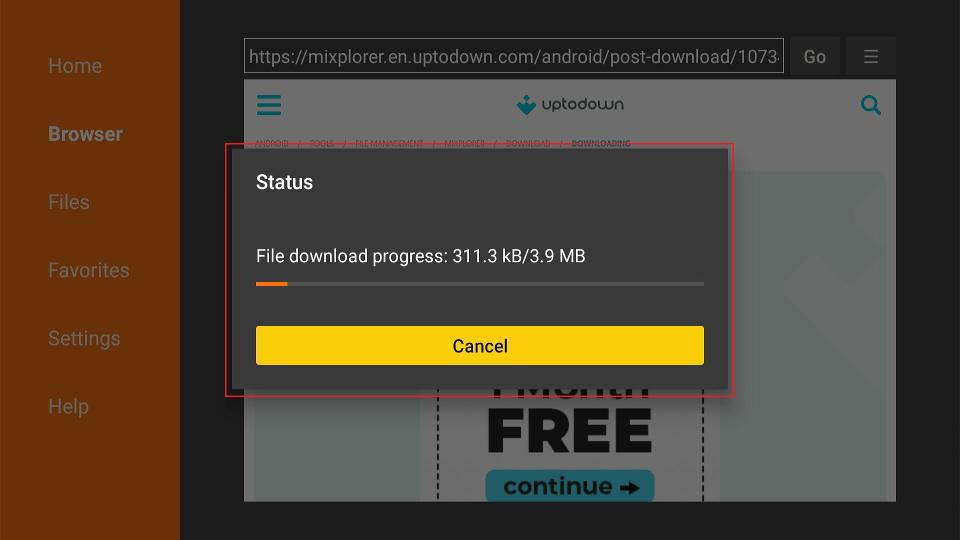
8. Wait for the file to download on your FireStick.
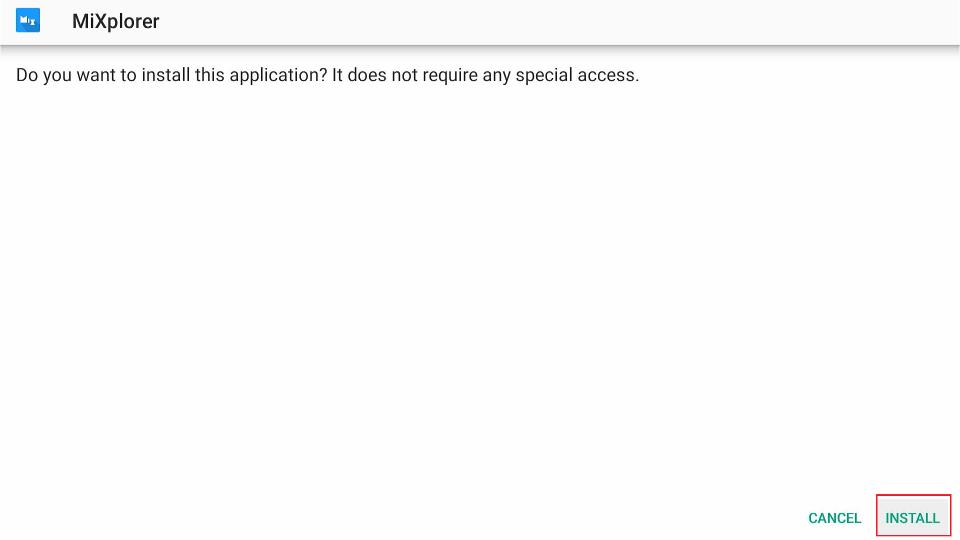
9. Once done, Downloader will automatically stage it for installation – click INSTALL.
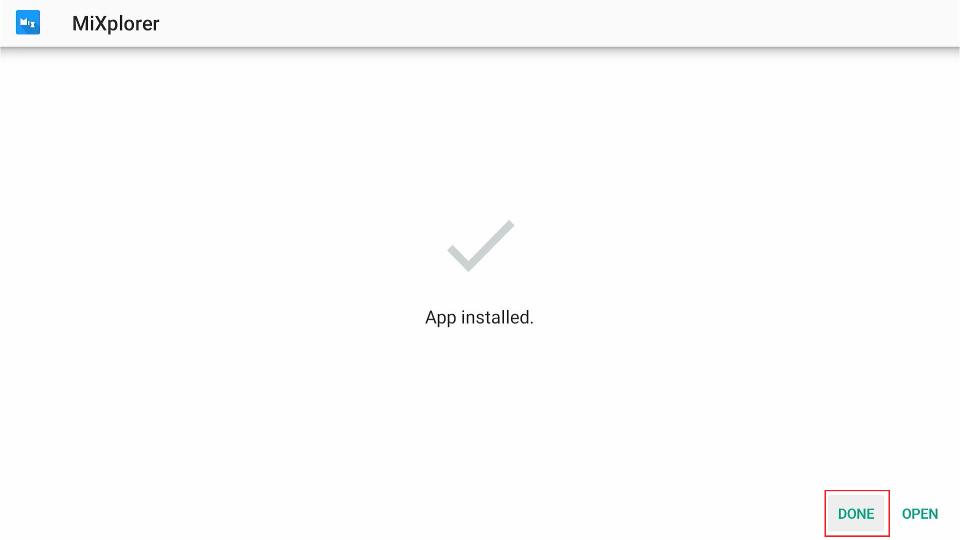
10. Click DONE to continue.
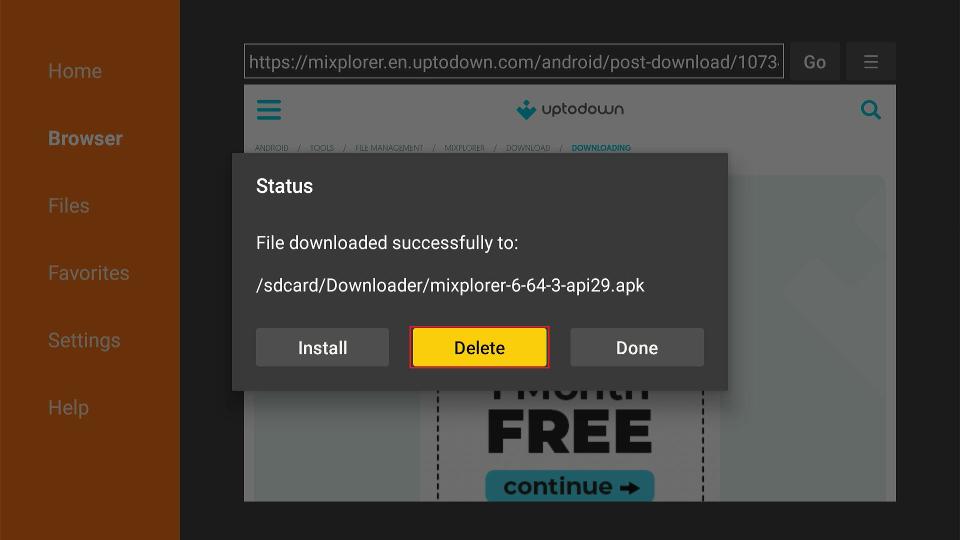
11. Now, let’s remove MiXplorer’s APK file to free up some space. Click Delete.
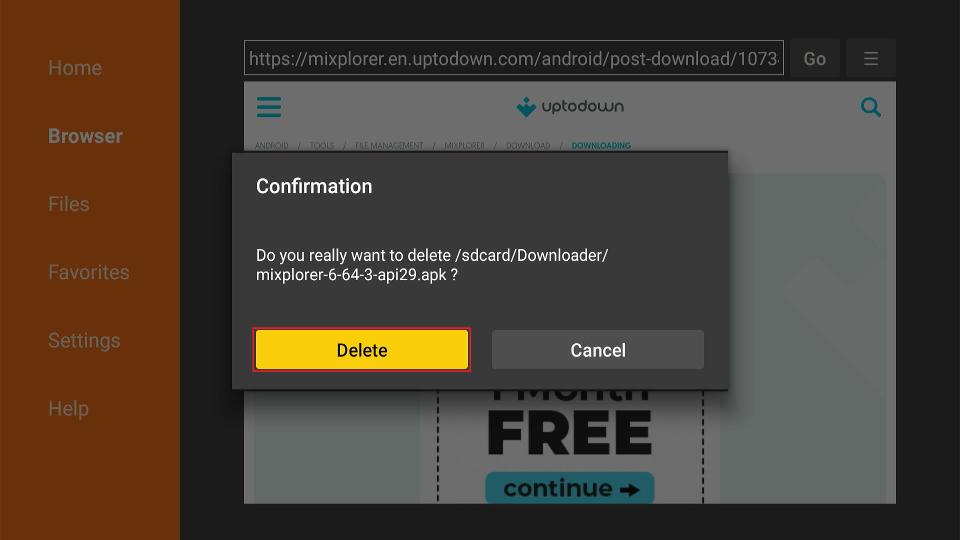
12. Press Delete once again to confirm your decision.
Part 3: Use MiXplorer to Create FireStick Backup
In this part, I’ll show you how to create a backup of your apps and other files using MiXplorer.
1. Long-press the Home button on your Fire TV and wait for the Quick Menu to appear. Then, select Apps.
2. Open MiXplorer.
Note: You might not see the icon preview of MiXplorer on your FireStick. Just open the app located at the end of the tile list.
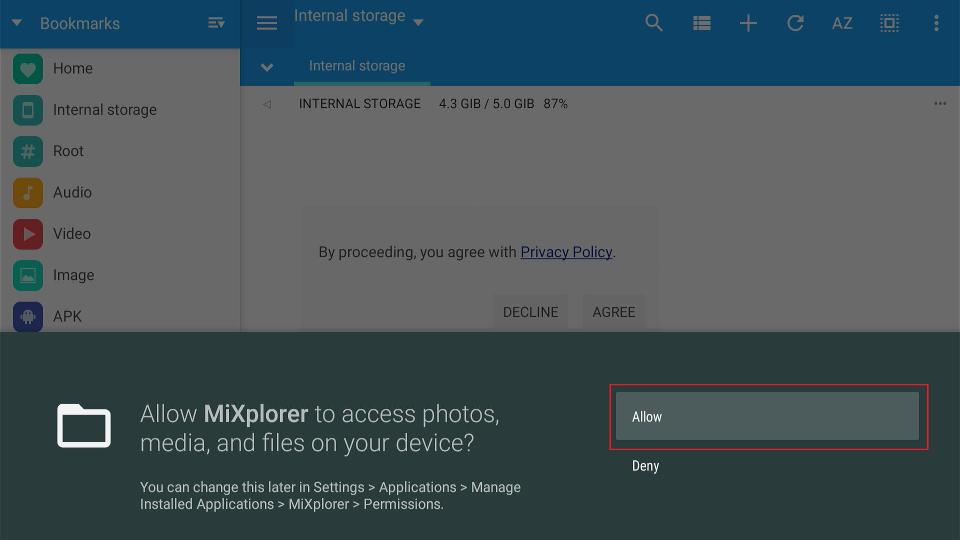
3. MiXplorer will ask you to allow access to your files and folders. Click Allow to continue.
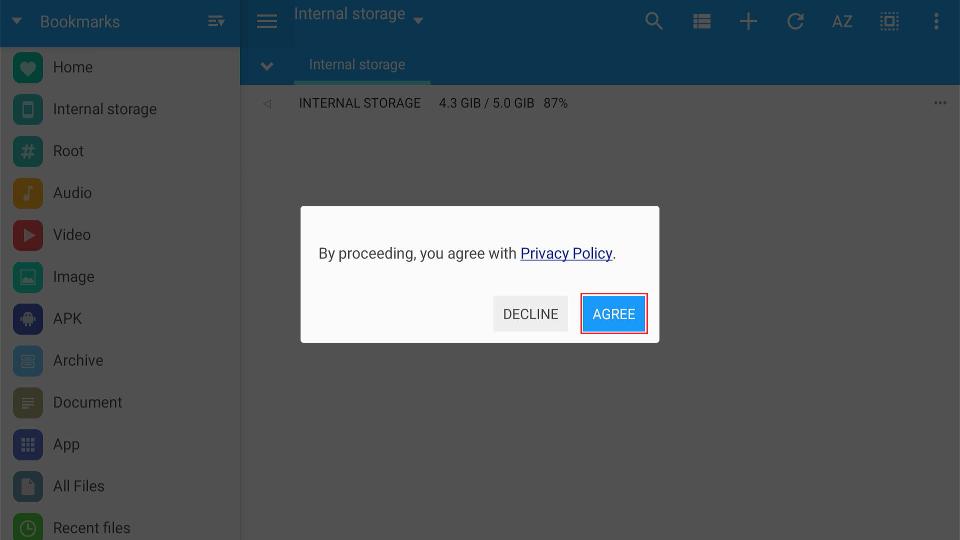
4. Click OK to accept the privacy policy of MiXplorer.
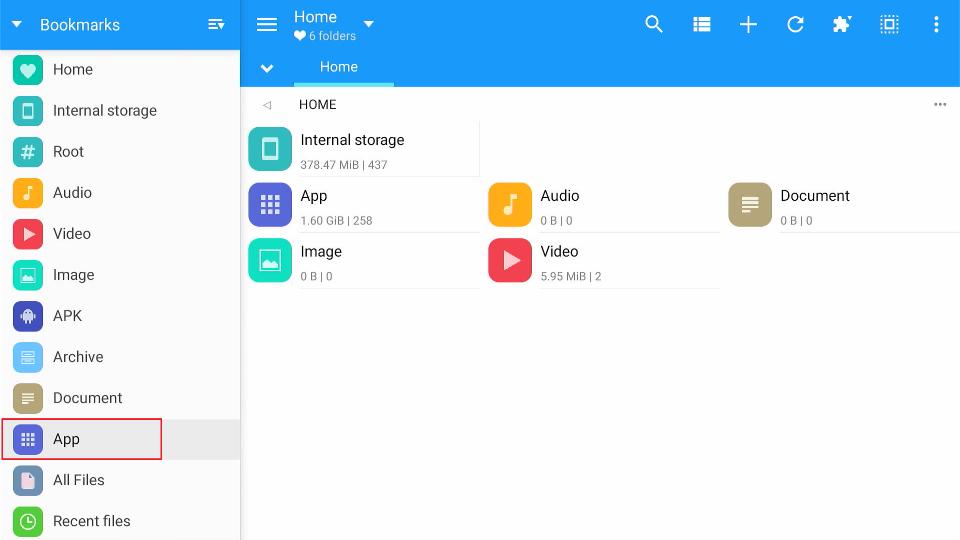
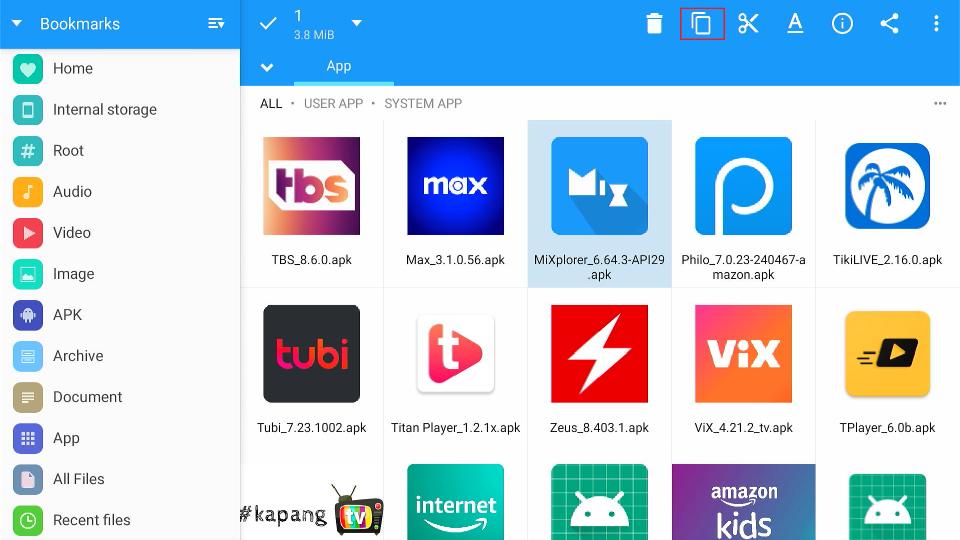
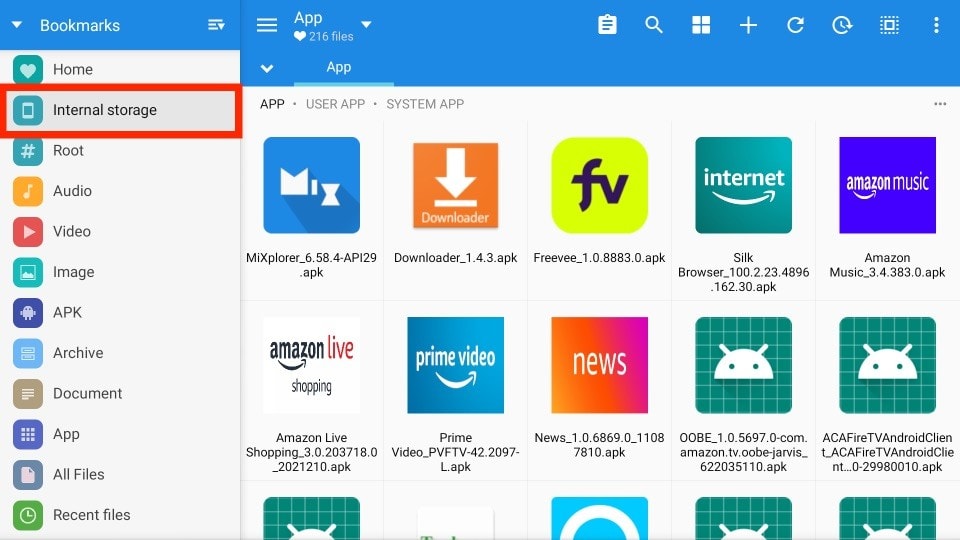
5. Now, you’ll see your files organized into folders by type, such as Audio, Video, Image, Apps, etc. Select a folder—I’m selecting ‘App’.
6. Hover over the app or file you want to back up and long-press the Centre button to select it.

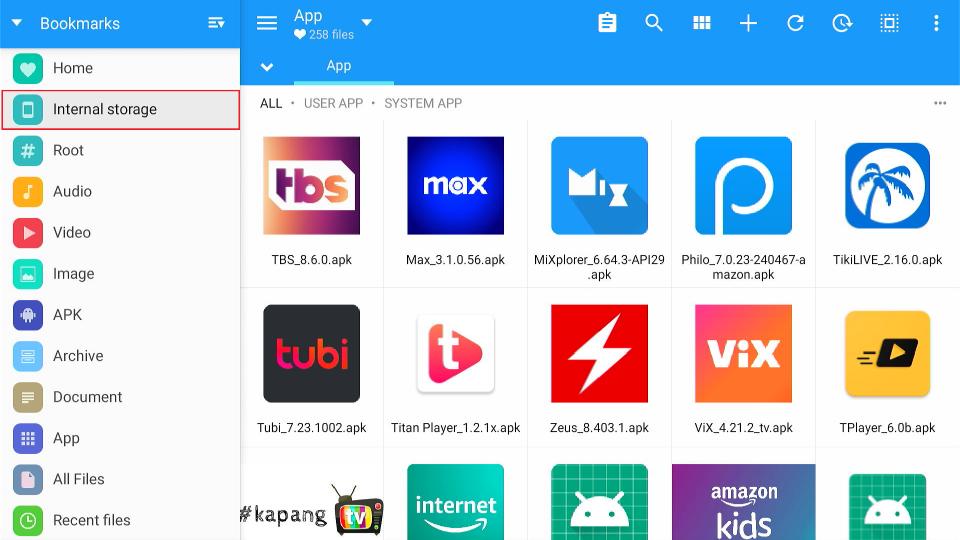
7. Select the other apps or files you want to back up individually, then press and hold the Copy icon.
8. Go to the Internal storage tab.
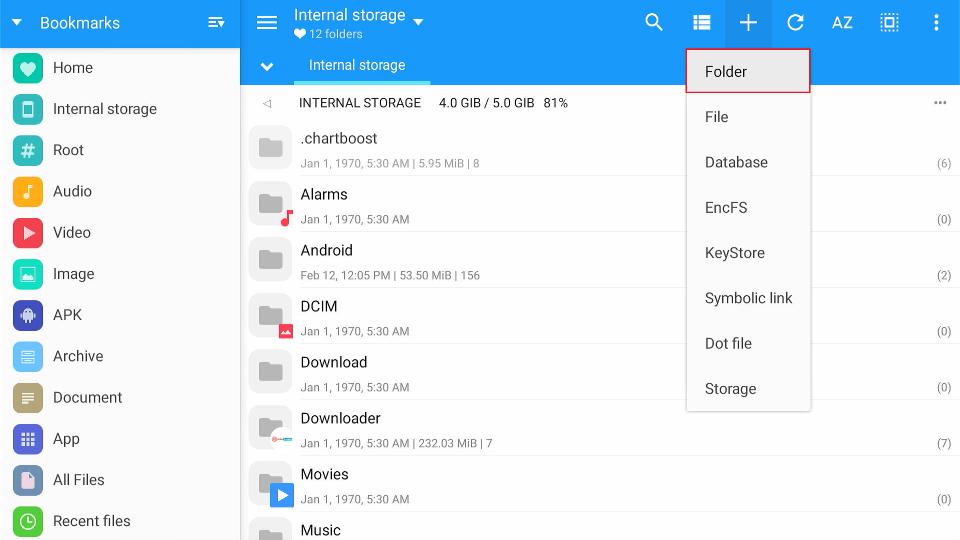
9. Click the Add icon.
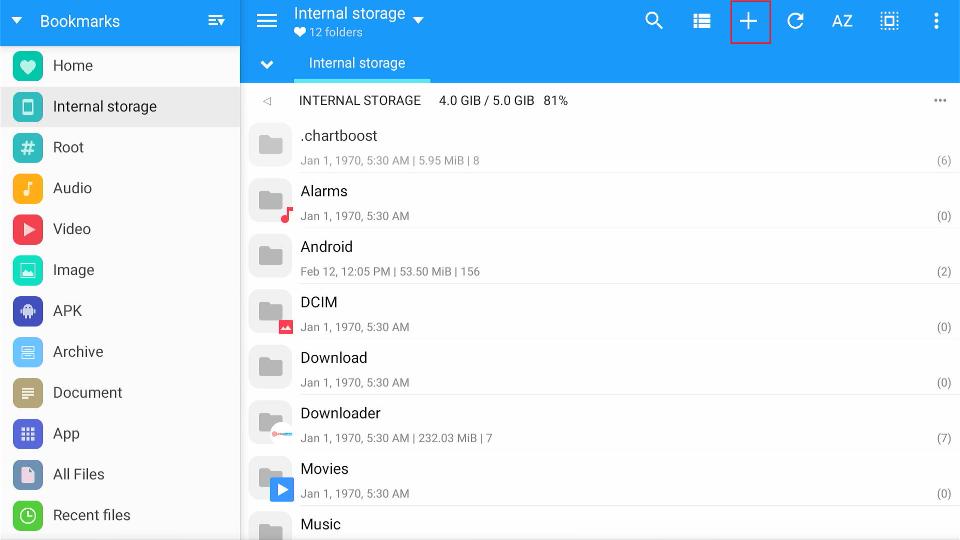
10. Select Folder.
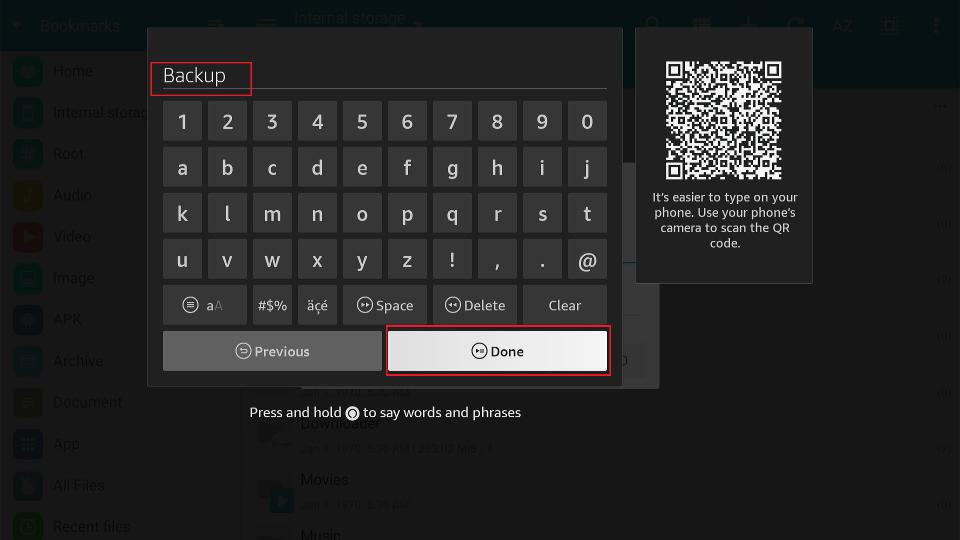
12. Click on the Input Box to edit the folder name.
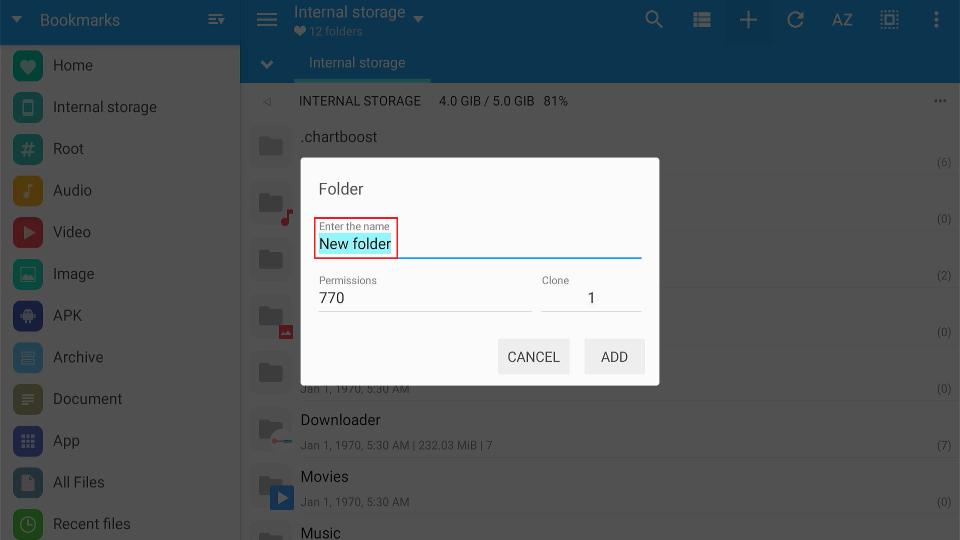
13. Enter Backup as the folder name and click the Done button.
Note: You can enter any custom name, but I recommend picking something easy to understand.
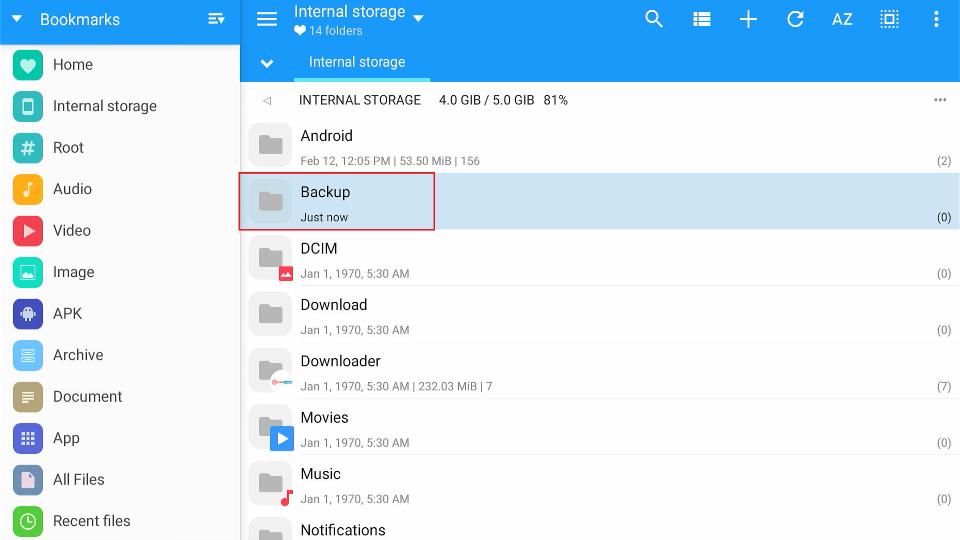
14. Select Backup.
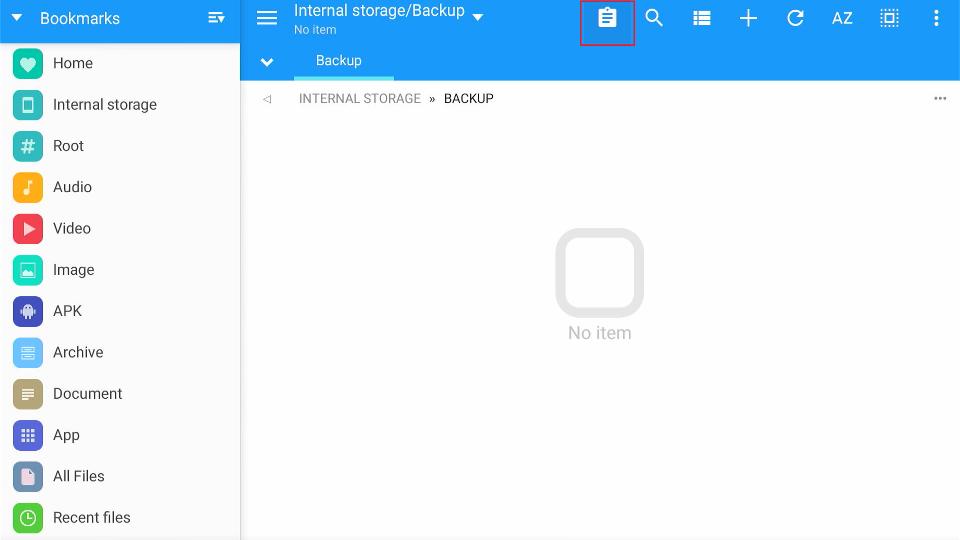
15. Click the Clipboard icon.
16. You’ll see the files you have copied to the clipboard. Select them.
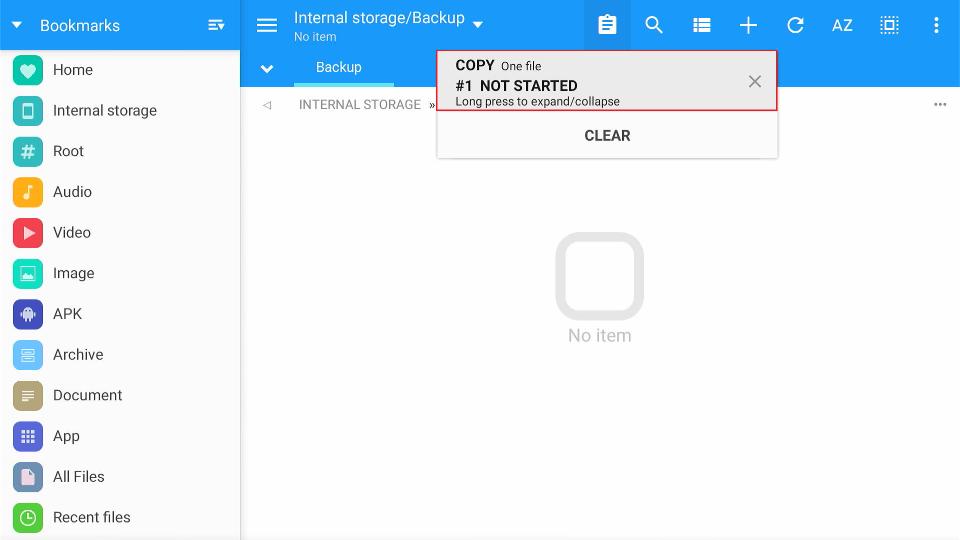
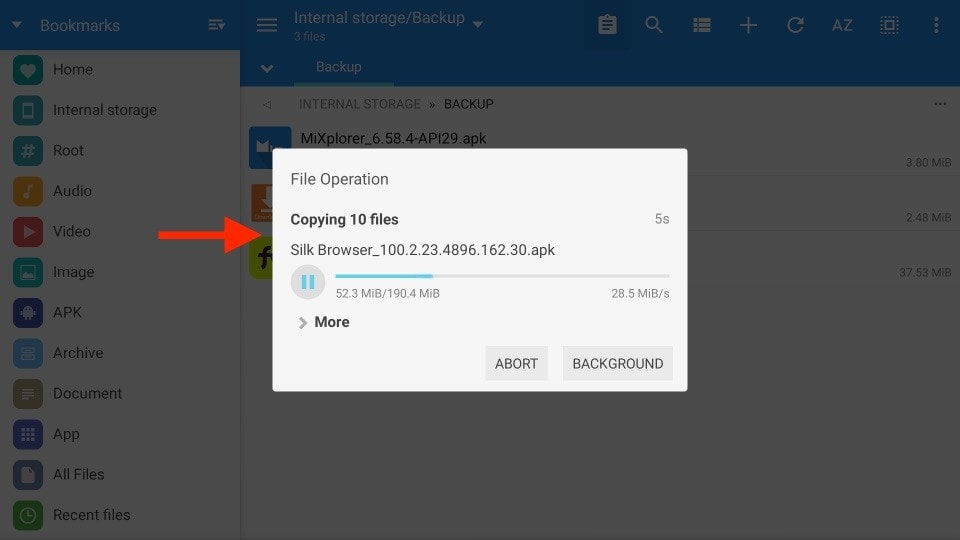
17. The files will start copying to the Backup folder.
Do you want to create a backup of other files? Redo steps 5 – 17 for different files.
Part 4: Exporting FireStick Backup to PC
Are you done creating the backup of your FireStick? Next, let’s export it to your computer.
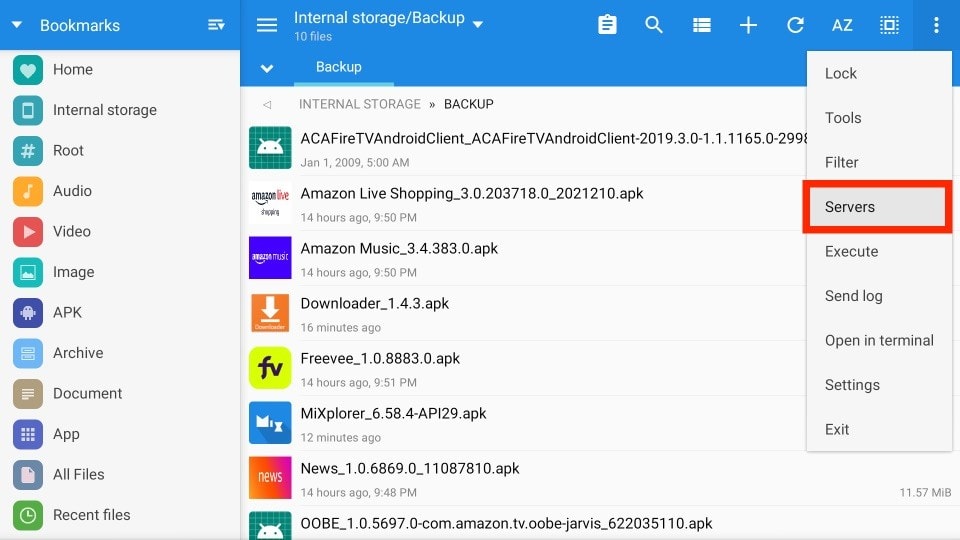
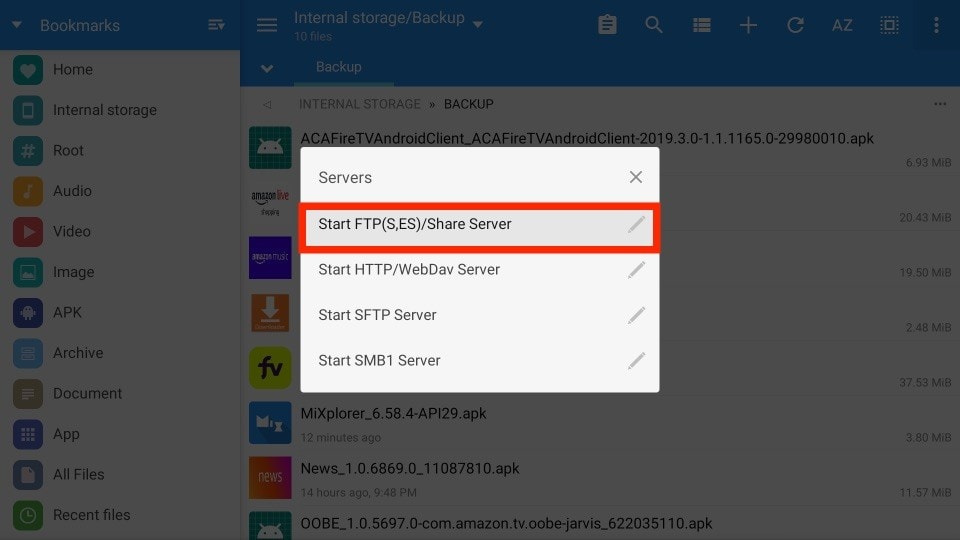
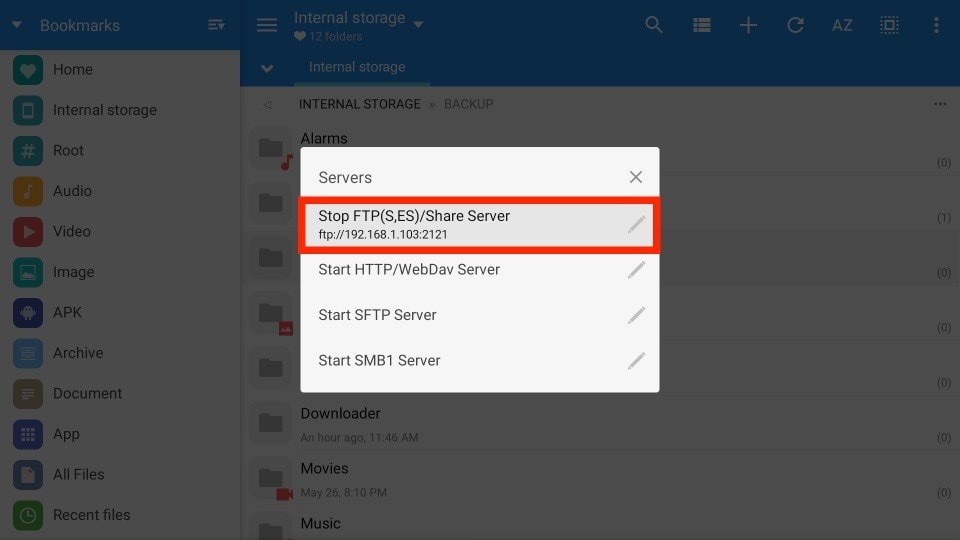
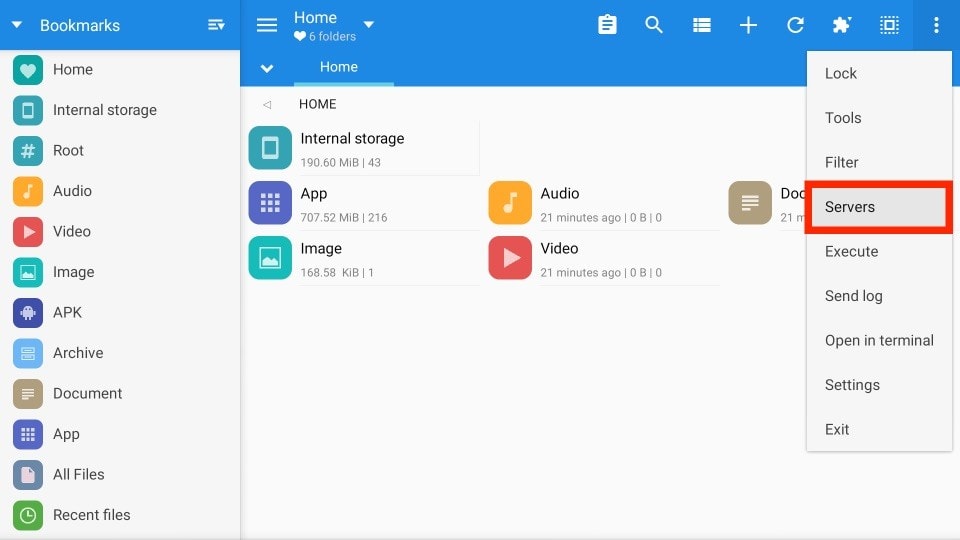
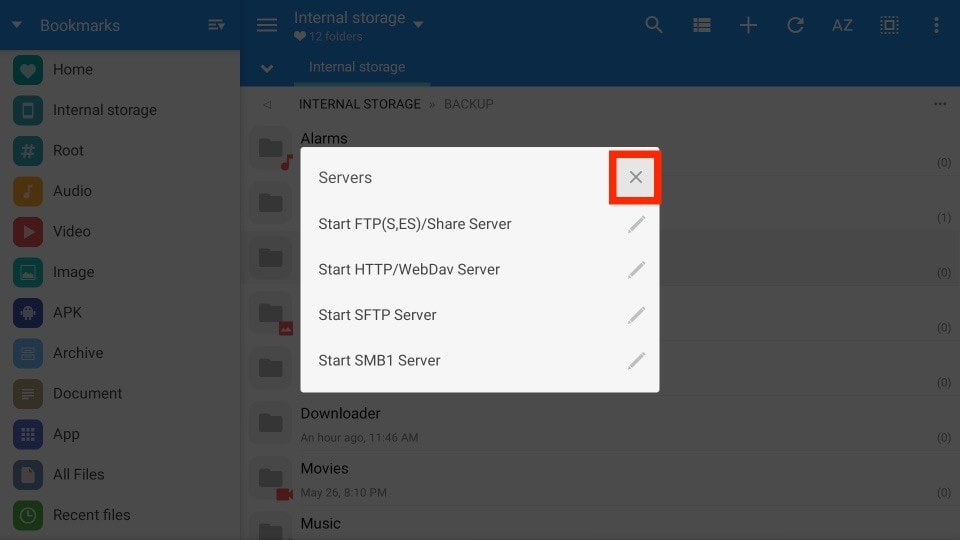
1. Select the Three-Dot menu on MiXplorer.
2. Click Servers.
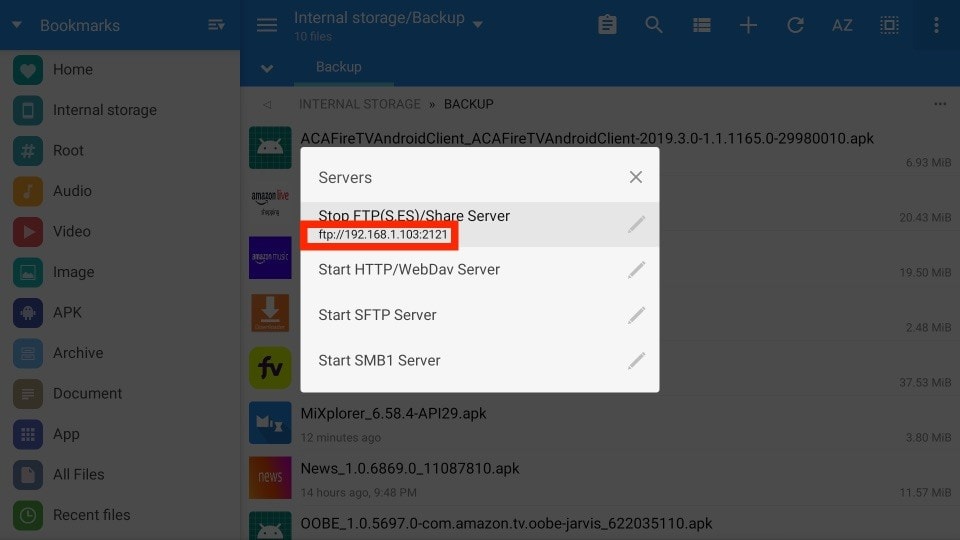
3. Select Start FTP(S,ES)/Share Server.
4. Copy the URL.

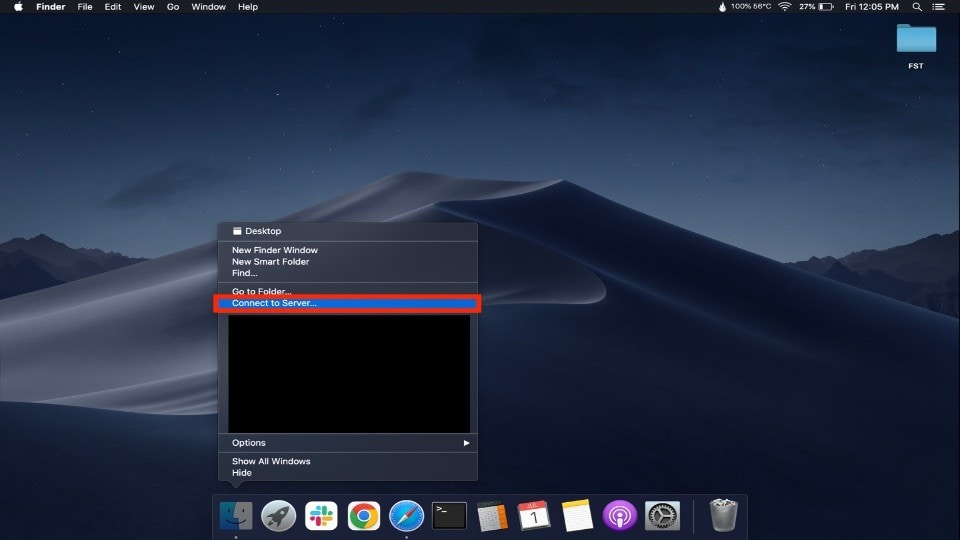
5. Right-click the Finder icon on Mac and select Connect to Server…
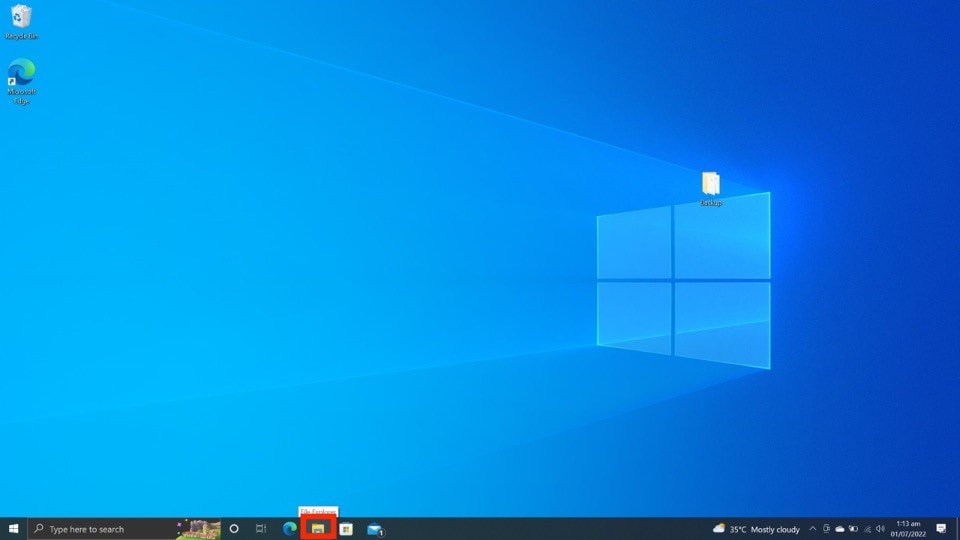
Windows: Open your File Explorer.
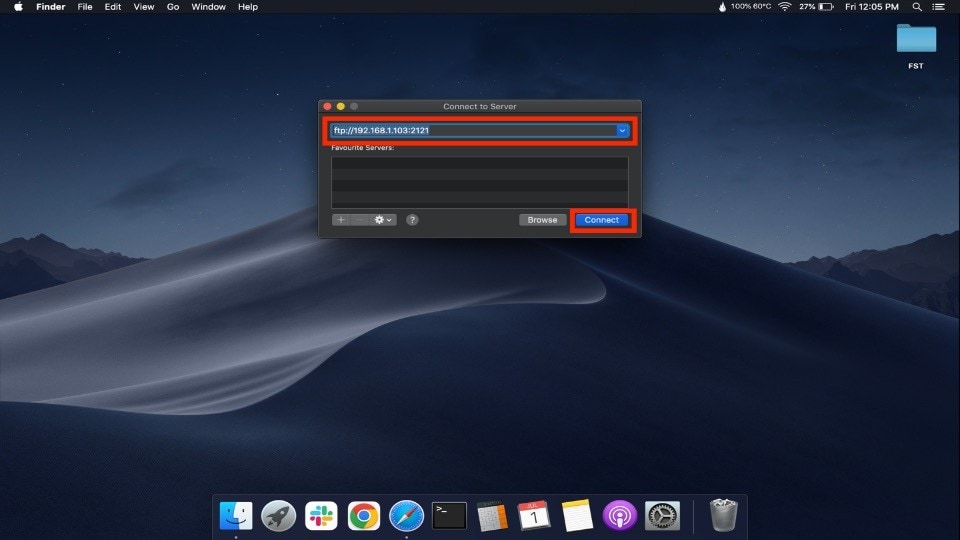
6. Enter the FTP URL in the Input Box and click the Connect button.
Windows: Enter the FTP URL in the Address Bar of your File Explorer and hit Enter.
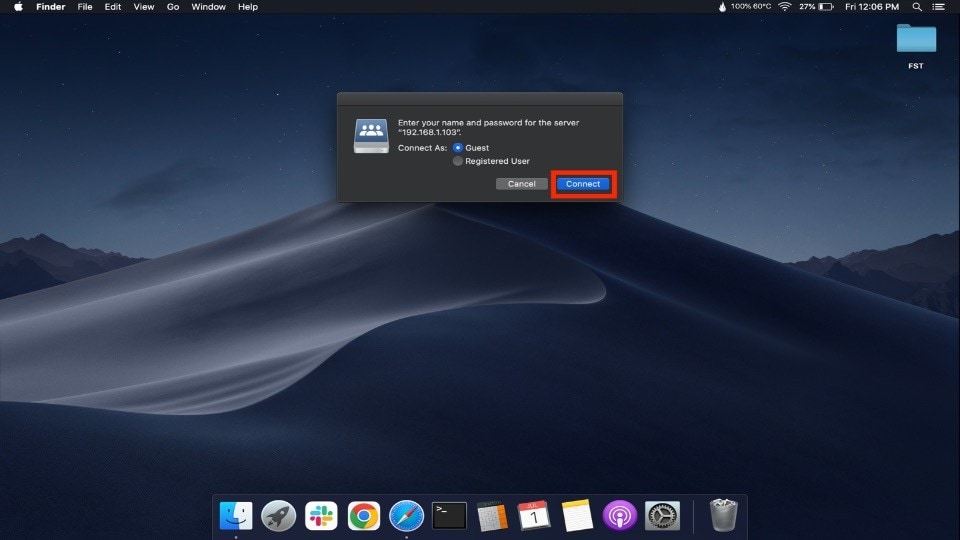
7. Select Guest.
Note: Would you like to connect as a registered user? Enter Admin as the Name and click Connect.

8. Click Connect.
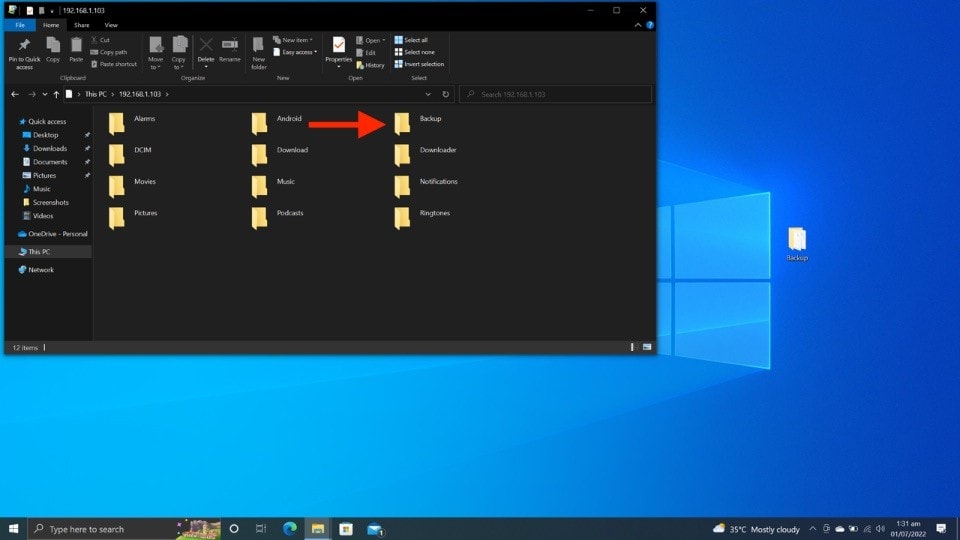
9. Copy the Backup folder to your PC.
Windows: You won’t have to follow steps 7 and 8; copy the folder to your PC.
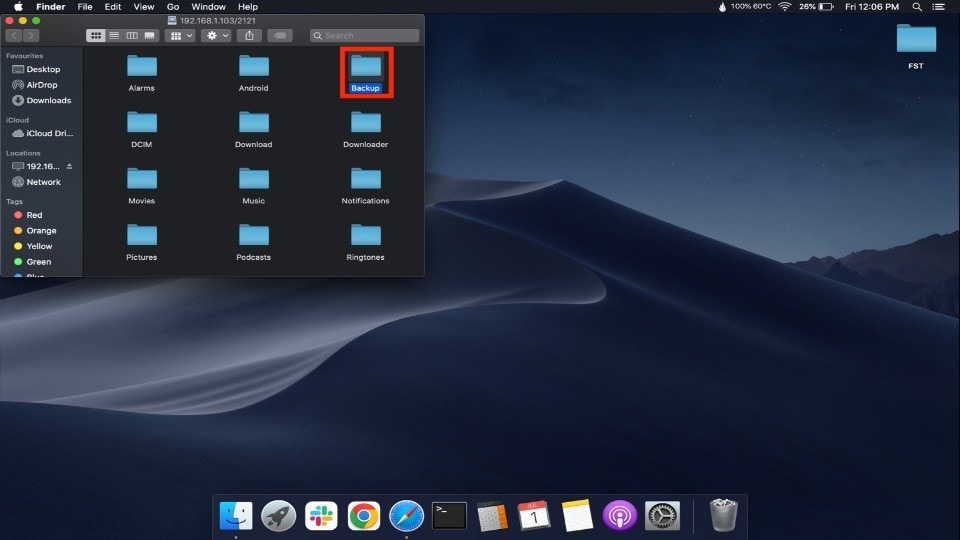
10. Let your system copy the files.
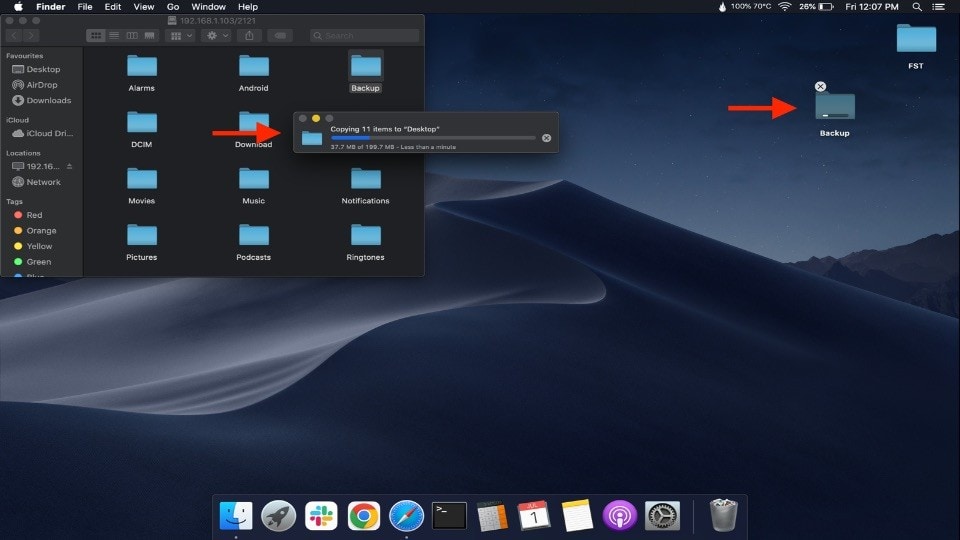
11. Once done, on your FireStick, click Stop FTP(S, ES)/Share Server.
Part 5: Importing Backup to Another FireStick
Now, it’s time to import the backup of your old FireStick to another one.
But before that, make sure to follow parts 1 and 2 to install MiXplorer on your other FireStick:
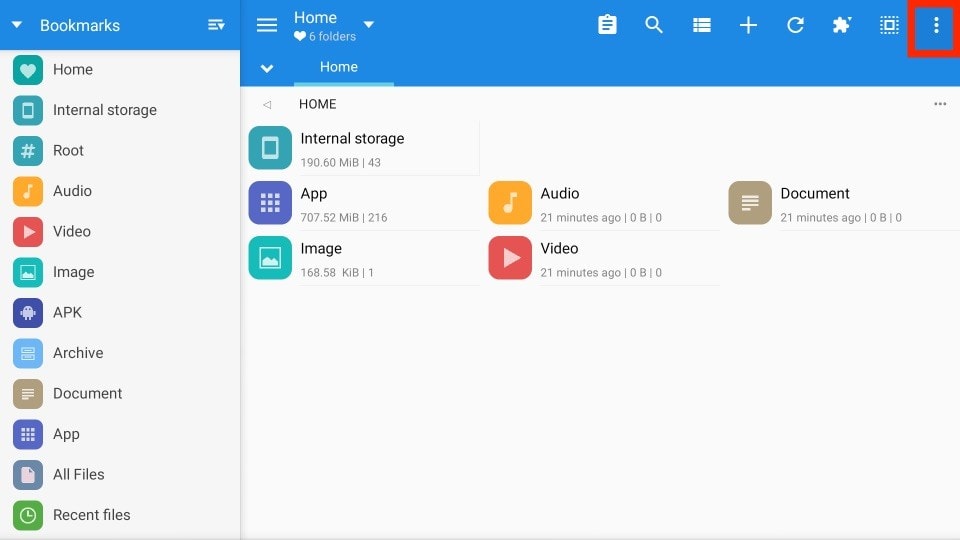
1. On the MiXplorer Home tab, select the Three-Dot menu.
2. Click Servers.
3. Select Start FTP(S,ES)/Share Server.

4. Copy the URL of the FTP server.
5. On a Windows PC, right-click File Explorer.
Note: To copy your backup from Mac to FireStick, you must connect to the FTP server as an admin. To connect to the FTP server on Mac as an Admin, you must re-follow steps 5 – 8 in Part 4. But on Windows, things are different. That’s why I’m showing step-by-step instructions for Windows in this part.
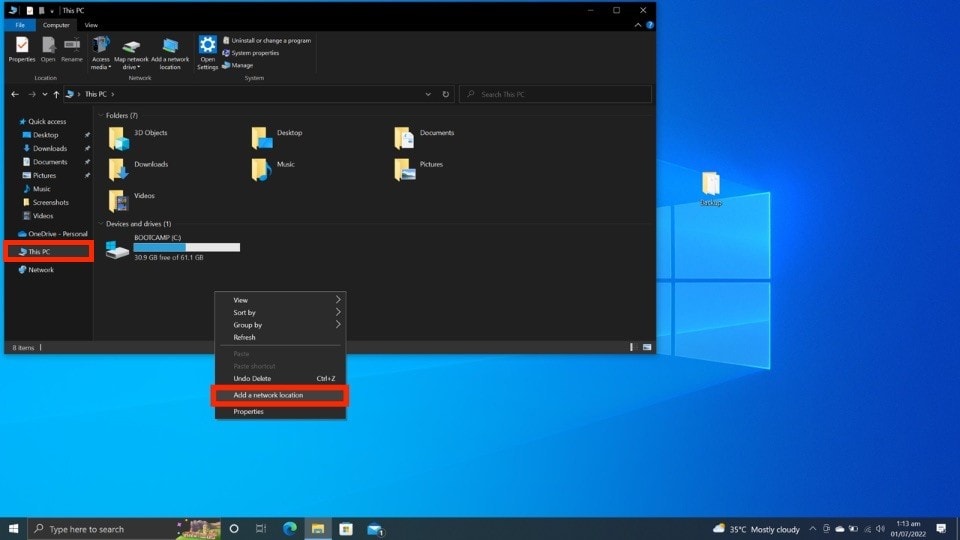
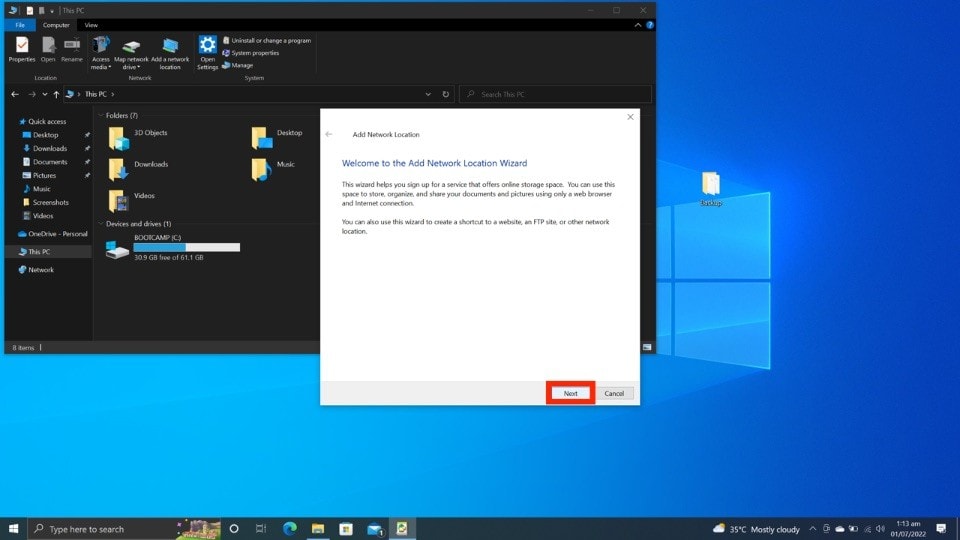
6. Go to This PC, Right-Click in the space, and select Add a network location.
7. Click Next.
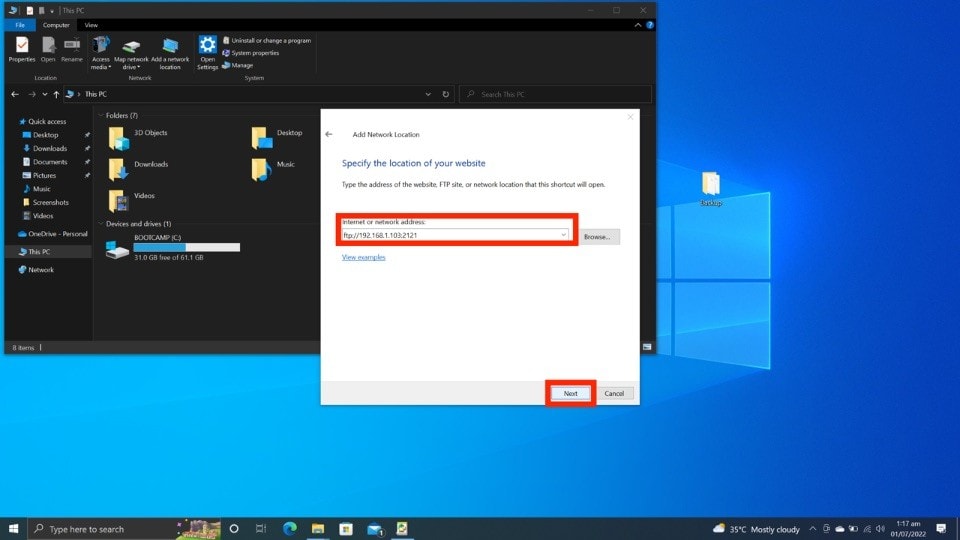
8. Select Choose a custom network location and click Next.

9. Enter the FTP URL in the Input Box and click Next.
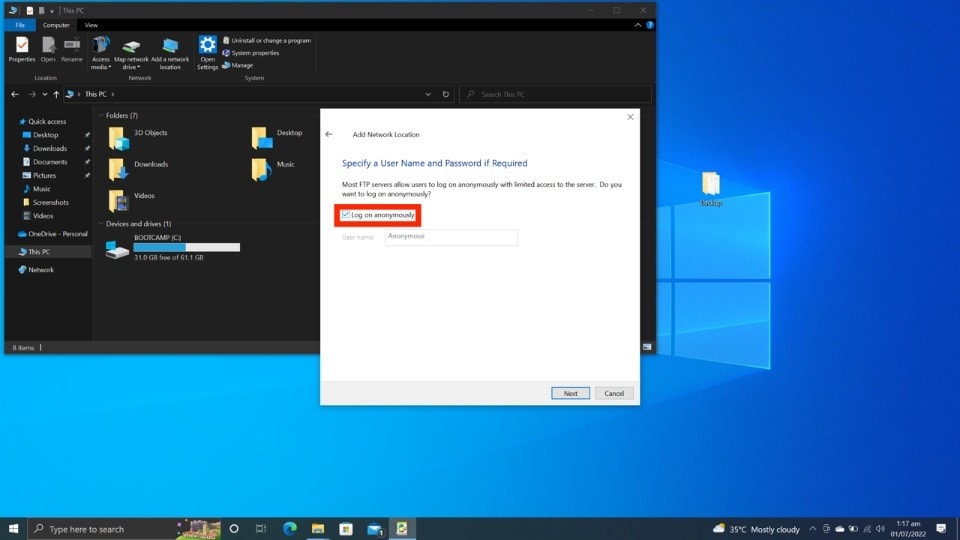
10. Uncheck Log on anonymously.
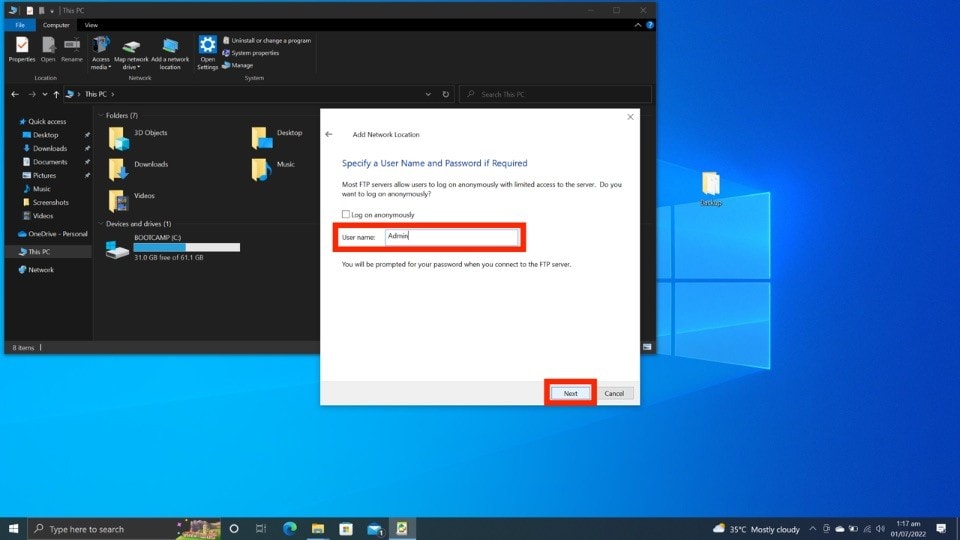
11. Enter Admin as the Username and click Next.
12. Leave the default name of the network location and click Next.
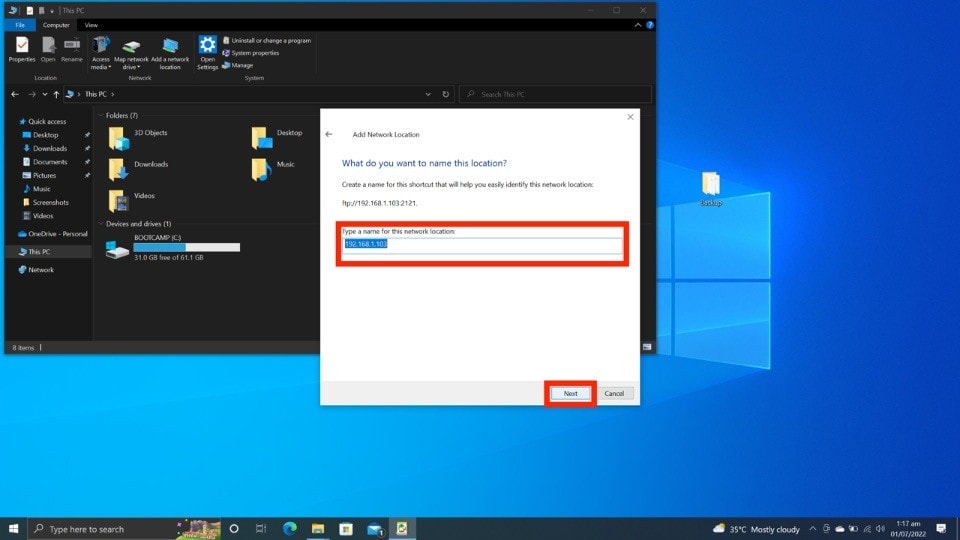
13. Select Finish.
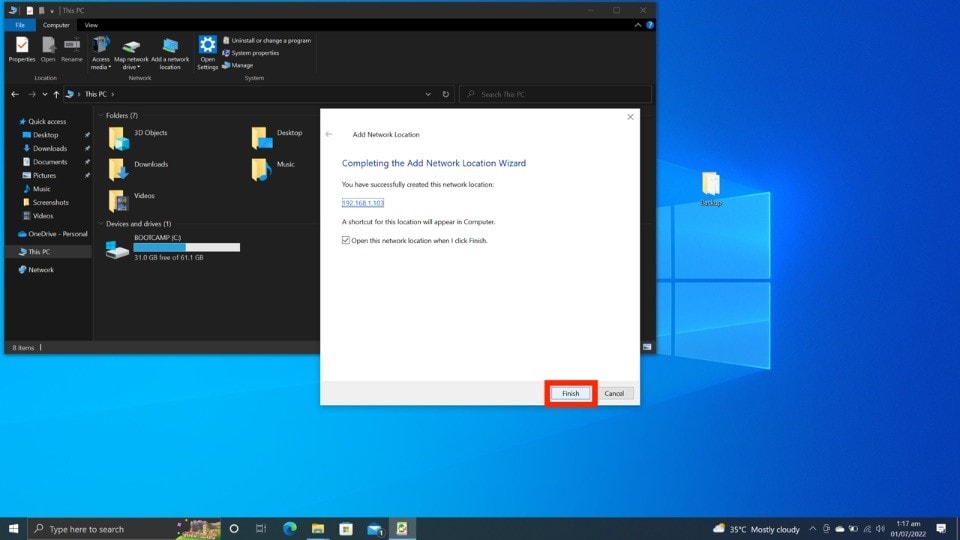
14. Copy the Backup folder to your new FireStick.
Mac: Drag and drop the Backup folder to your FireStick.
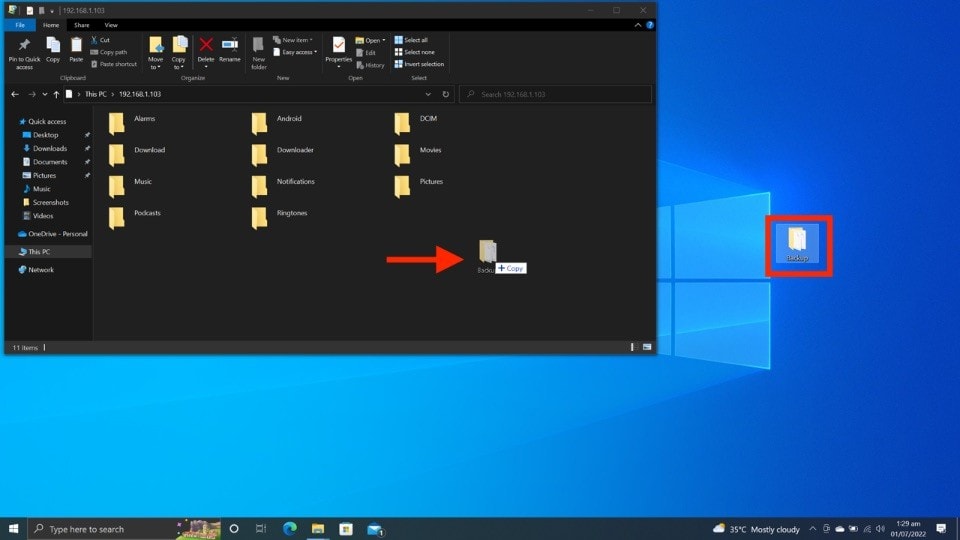
15. Wait for your system to transfer the files to FireStick.
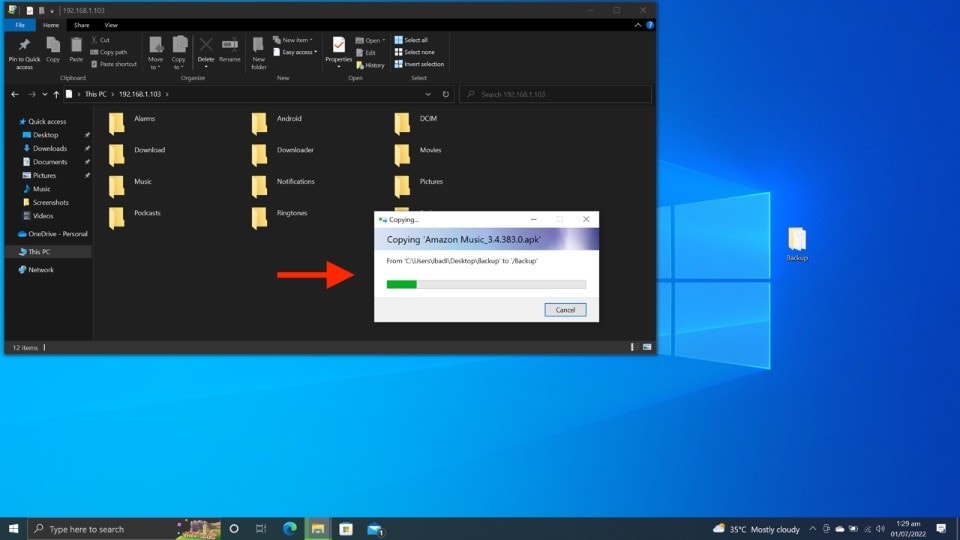
16. The Backup folder is copied successfully!
17. On your FireStick, click Stop FTP(S, ES)/Share Server.

18. Click X to close the window.
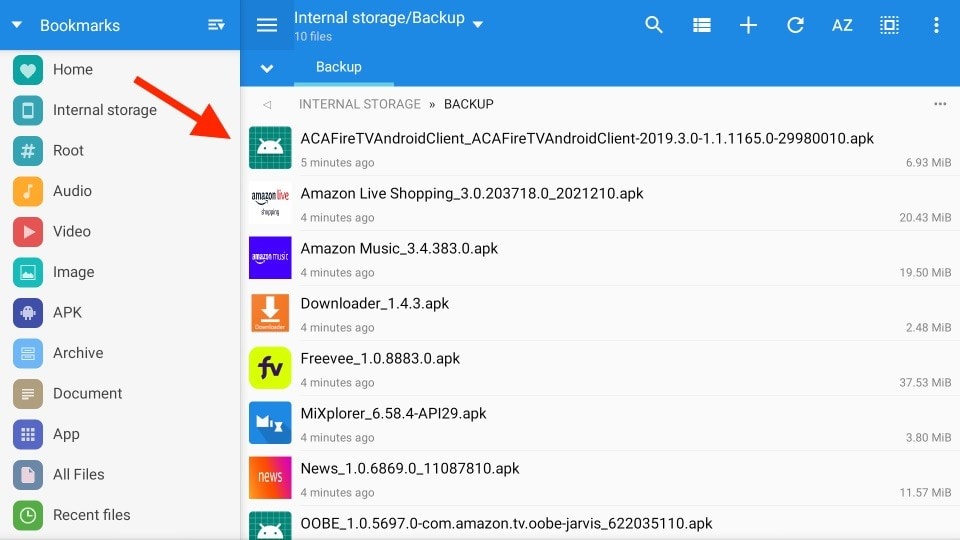
19. Go to the Internal storage tab, where you’ll see the Backup folder. Open it.
20. Inside it, you can access all the files you backed up. Feel free to install the apps and move the other files to their favored locations.
Final Words
Copying (cloning) a FireStick to another FireStick is a long process. There is no way to do it until Amazon decides to facilitate its customers with something easy and intelligent. Cloning seems useful if you upgrade to a newer model or want a seamless setup for multiple devices. Follow this guide on how to clone a FireStick to another FireStick. If you have any questions, feel free to ask in the comments section.

Suberboost Your FireStick with My Free Guide
Stay Ahead: Weekly Insights on the Latest in Free Streaming!
No spam, ever. Unsubscribe anytime.

Leave a Reply