
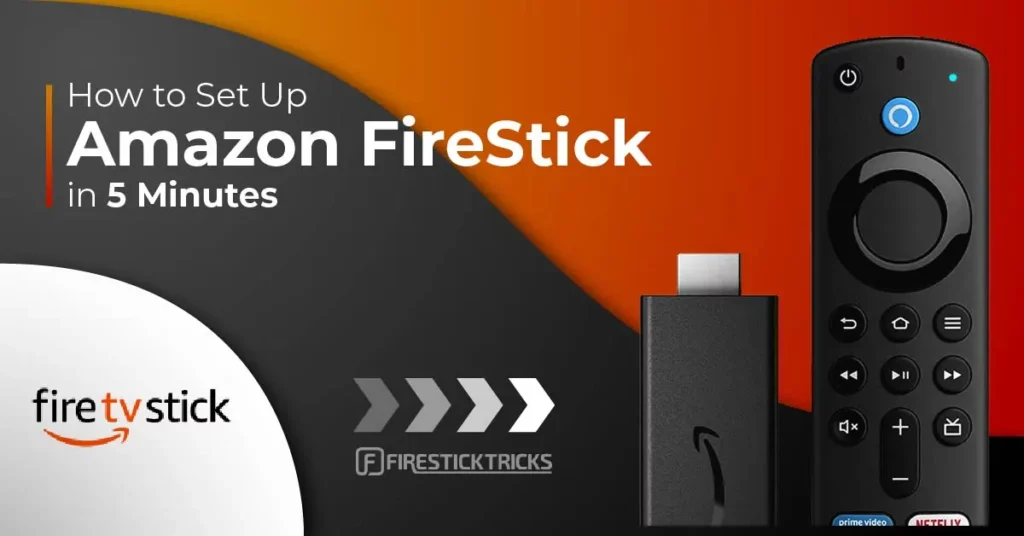
This guide will show you how to set up Amazon FireStick for the first time. The steps work on all Fire TV devices, including FireStick 2nd/3rd Gen, Fire TV Stick Lite, FireStick HD, FireStick 4K, FireStick 4K Max, and Fire TV Cube.
What’s FireStick?
The Amazon FireStick is a streaming device that transforms your non-smart TV into a smart streaming hub. It gives you access to movies, TV shows, sports, live TV, kids’ content, and more.
Other content types accessible through a FireStick include:
- Music
- Podcasts
- Documentaries
- Games
The Amazon FireStick features a dedicated remote with voice commands and customizable buttons, making navigation easy.
The design is compact and lightweight, another feature that makes it a favorite among cord-cutters. It is convenient to carry and watch content wherever they are, provided they have access to an Internet connection and a compatible TV.
In this guide, we have explained how to set up your FireStick if you have recently bought or reset your FireStick.
For FireStick Users
ISPs, hackers, and other third-party entities worldwide may monitor your online activities. For security, privacy, and smooth streaming, it is recommended to use a reliable VPN for FireStick. Your IP address is visible to sites you visit.
I recommend ExpressVPN, a fast and secure VPN. It is very easy to install on any device, including an Amazon Fire TV Stick. Also, it comes with a 30-day money-back guarantee. If you don't like their service, you can always ask for a refund. ExpressVPN also has a special deal where you can get 4 months free and save 81% on the 2-year plan.
Read: How to Install and Use the Best VPN for FireStick
Why Choose FireStick?
There are numerous streaming devices available on the market. Some are feature-rich, while others offer mediocre performance.
Below are some features of FireStick that make it a great choice for your streaming needs:
- The portable size is great for traveling.
- You can add external storage to expand the memory.
- The voice command feature makes it easy to control the device.
- It’s Bluetooth-enabled, so you can easily connect game controllers and other devices.
- It offers HD and UHD streaming facilities.
Pre-requisites to Set Up Amazon FireStick
Before setting up your Amazon FireStick, here are some prerequisites that need to be fulfilled:
- Stable Wi-Fi: The Amazon FireStick doesn’t offer a built-in Wi-Fi feature. Therefore, you must connect it to a fast and active internet connection.
- Compatible Television: FireSticks are only compatible with HD and UHD televisions with an HDMI port.
- Amazon Account: You must have an active Amazon account to enjoy using the Amazon FireStick. If you have ordered the device using your Amazon account, the seller will link it to it. Alternatively, you can register for an Amazon account in a few easy steps (we’ll cover that later).
How to Set Up Amazon FireStick With Remote Controls
Now that you’re all set, let’s begin. This setup guide applies to all Fire TV devices, except the FireStick Lite, which features a simplified remote that lacks essential buttons, such as volume controls.
To make the process easier, I have divided the setup into several key steps. Follow along to set up your Amazon Fire TV Stick for the first time.
Part 1: Getting Started
⚡ DON'T MISS THIS LIMITED-TIME 🕒 DEAL
![]()
Protect your privacy with ExpressVPN
DEAL OF THE DAY
73% DISCOUNT ON ExpressVPN + 4 EXTRA MONTHS
Risk-free with a 30-day money-back guarantee
🔒 GET ExpressVPN↗️
Follow the steps below:
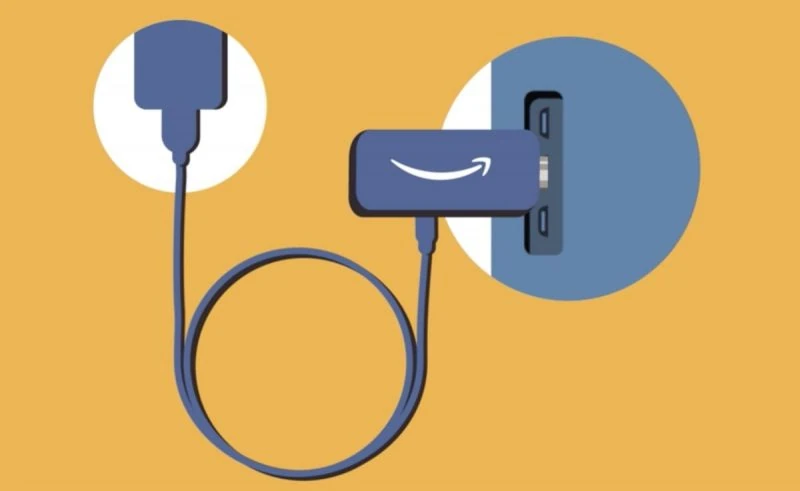
1. Locate the micro-USB port and HDMI connector on your FireStick. Plug one end of the USB power cord into the micro-USB port of your FireStick and the other end into a power adapter brick.
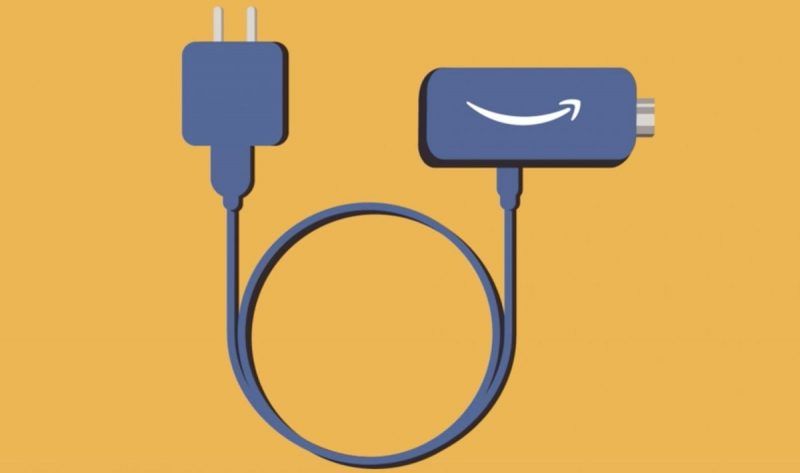
2. Connect the power adapter to a power outlet. Then, plug the FireStick into any HDMI port on your TV.
Power on your TV and change the input to the corresponding HDMI channel. You’ll see a loading screen with the Fire TV Stick logo. It might take some time to load the first time, so don’t worry.
(Note: Using the power adapter in a wall outlet is recommended, not the powered USB ports offered by some TVs.)
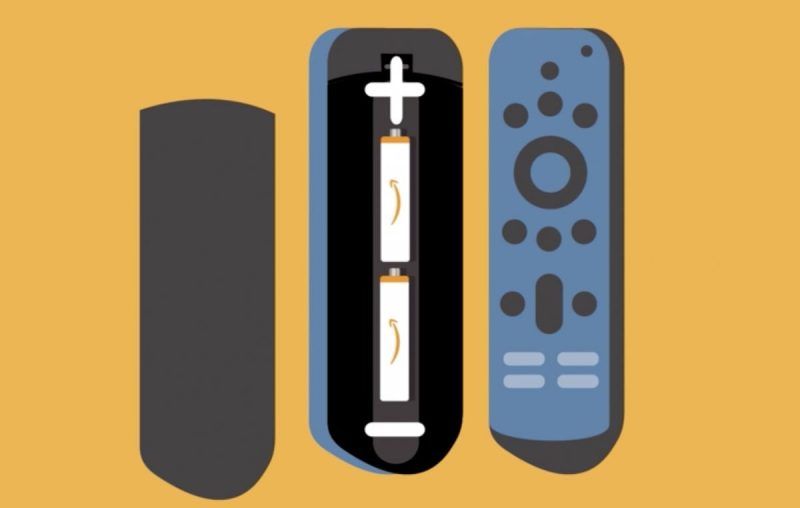
3. It’s time to set up your FireStick remote. First, insert the two AAA batteries included in the box.
4. Once you have fixed the remote and connected the FireStick, the Fire TV logo will appear on your screen.
![]()
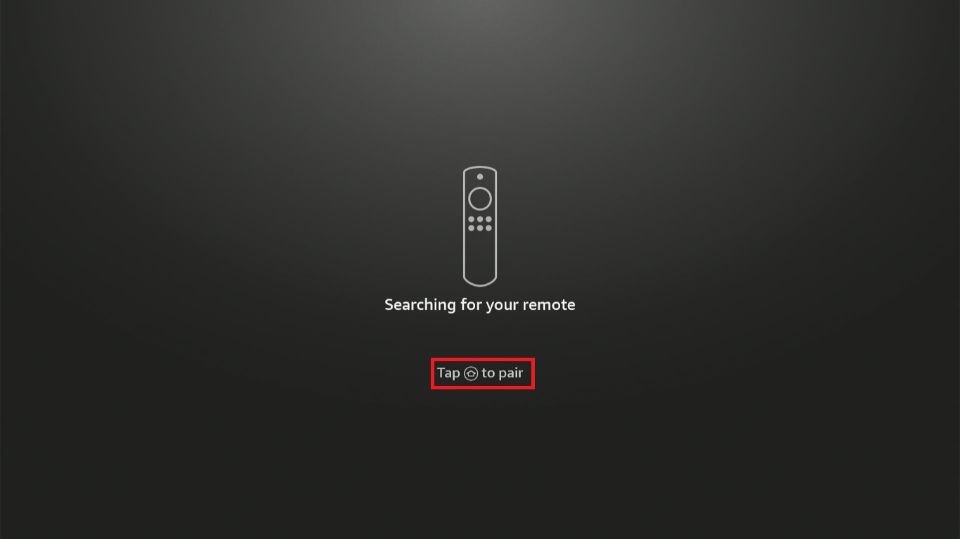
5. Next, a prompt to search for the remote will appear. If the remote is off, switch it on, and then click the Home button to pair.
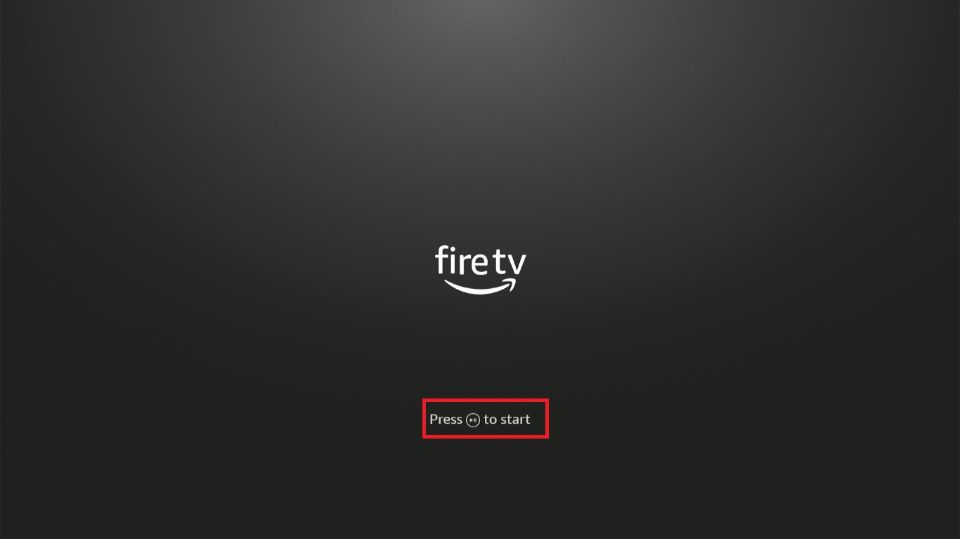
6. Click the pause/play button to begin the setup.
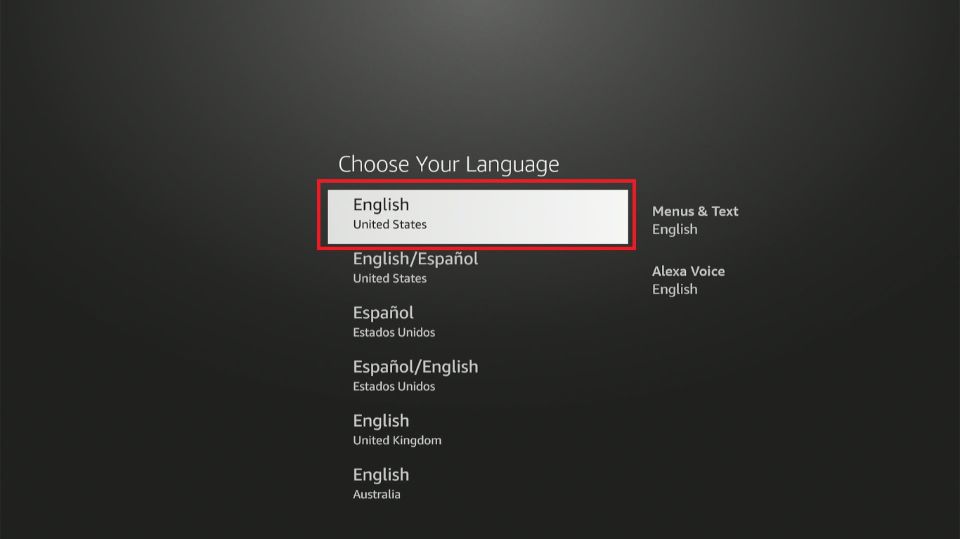
7. Choose your language from the displayed list and click OK on the remote (the circular button is at the center of the navigation ring).
8. After that, a list of available Wi-Fi networks will appear. Click on the network to which you wish to connect your FireStick.
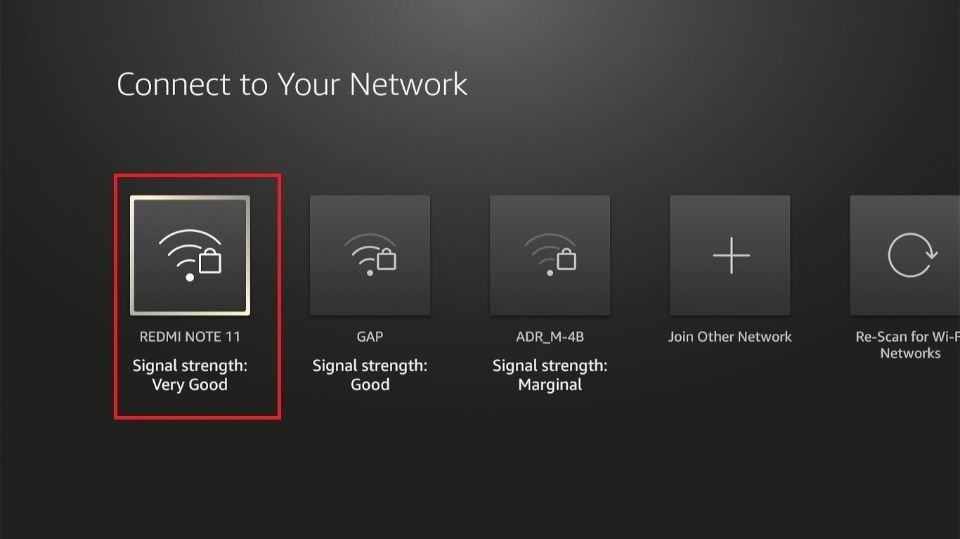
9. Enter the Wi-Fi password and click Connect.

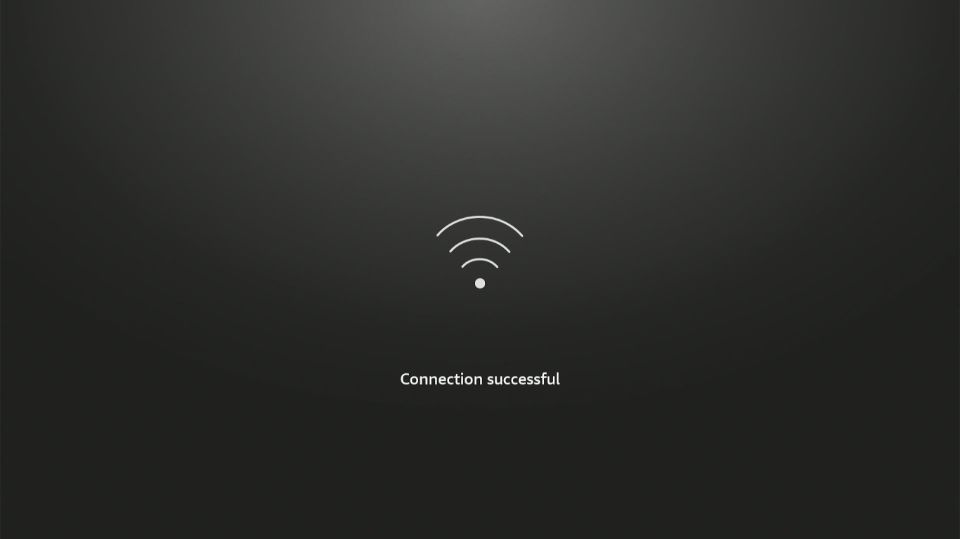
10. Wait for the Connection successful message.
11. The FireStick will check for updates to ensure you use the latest version.
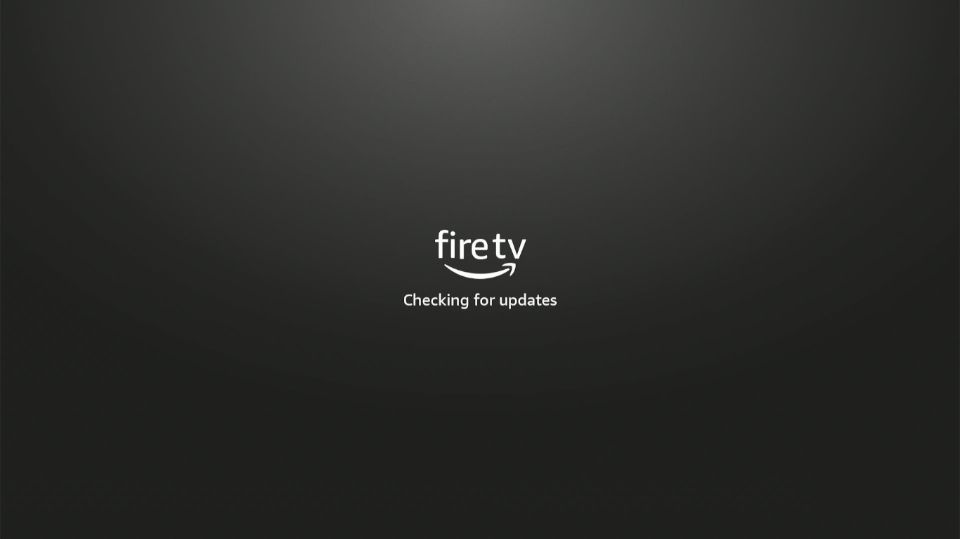
12. FireStick will begin downloading the latest software version.
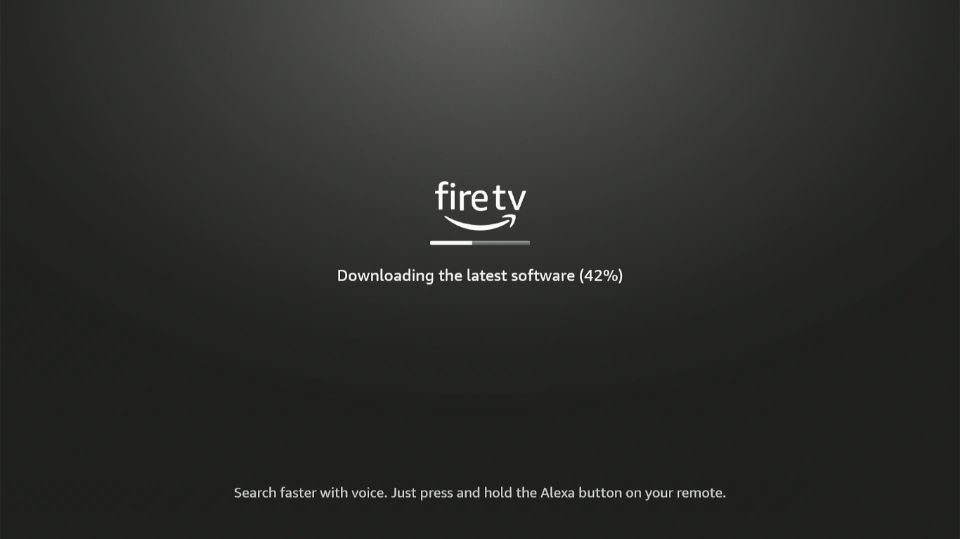
13. Next, your FireStick will begin updating.
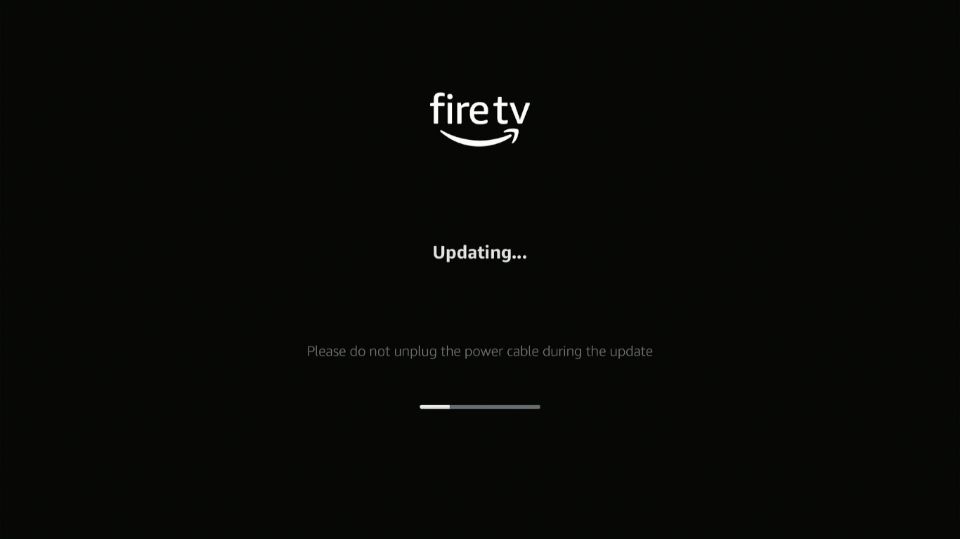
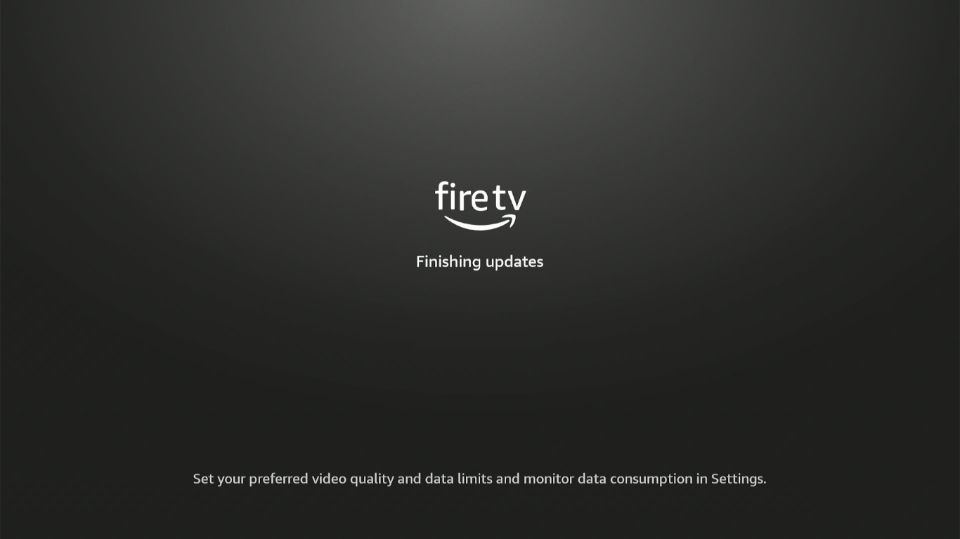
14. The Fire TV logo will reappear on your screen.
![]()
15. You will see a Finishing Updates notification.
Part 2: Setting Up the Fire TV Remote
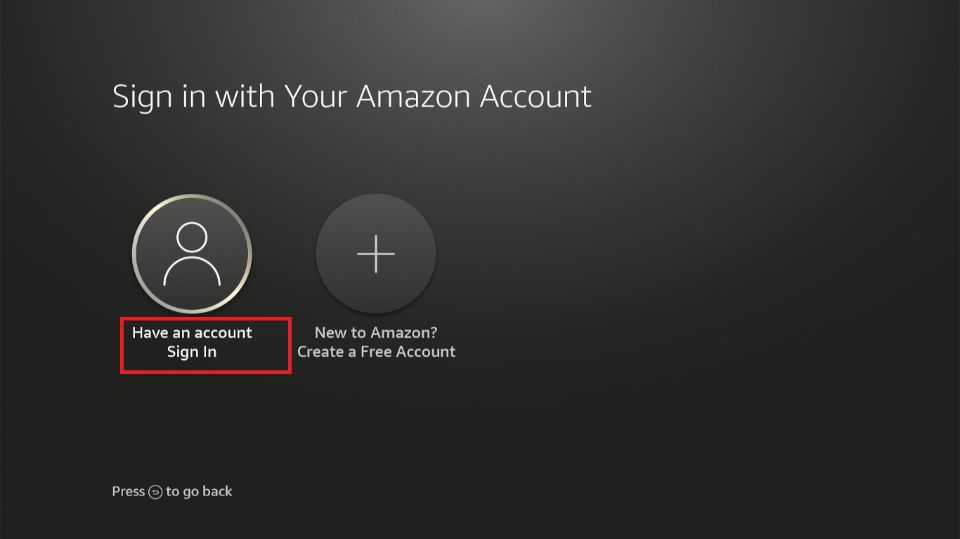
If you purchased your FireStick directly from Amazon, it may already be pre-registered with your Amazon account. However, if it is not pre-registered or you prefer to use a different Amazon account, you can deregister the existing account and register a new one.
Please follow the steps below to register your FireStick with an Amazon account:
1. FireStick will ask you to sign in to your Amazon account. If you don’t have an account, click the second option to create one.
2. Use a computer or phone to go to amazon.com/code and enter the code displayed on your screen.

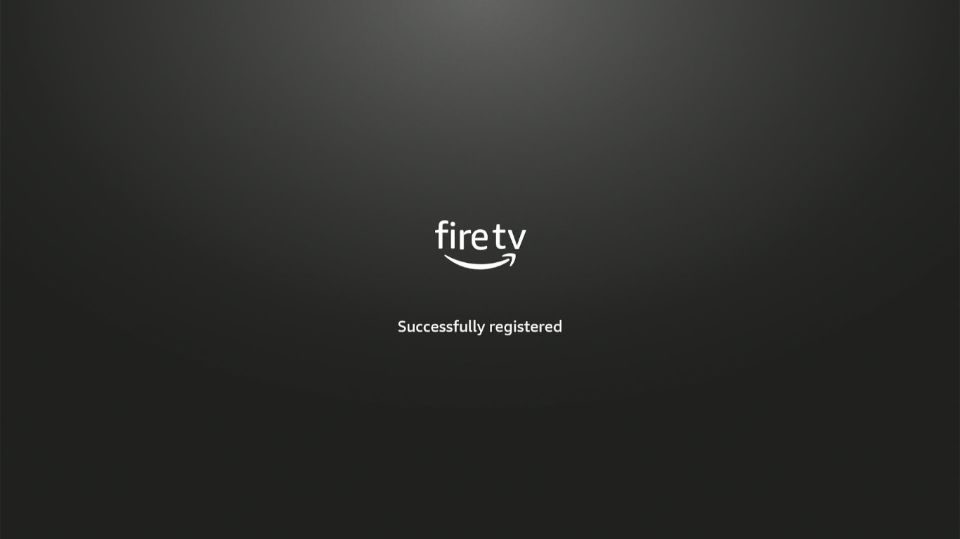
3. You will see a notification that the Fire TV is successfully registered in the next window.
4. Fire TV will inform you that your Fire TV will be registered to your Amazon account. Click Continue to proceed.

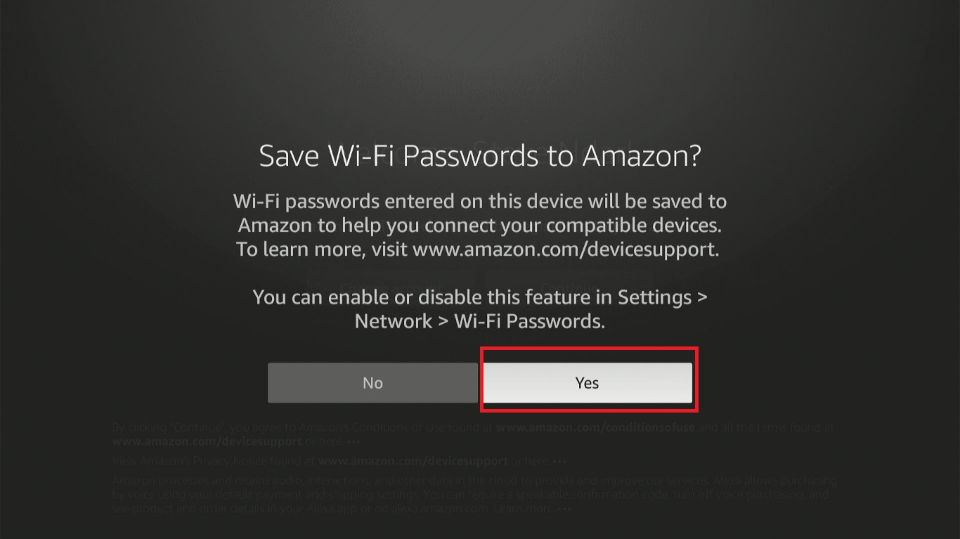
5. Select Yes on the prompt to save your Wi-Fi passwords on your Amazon account.
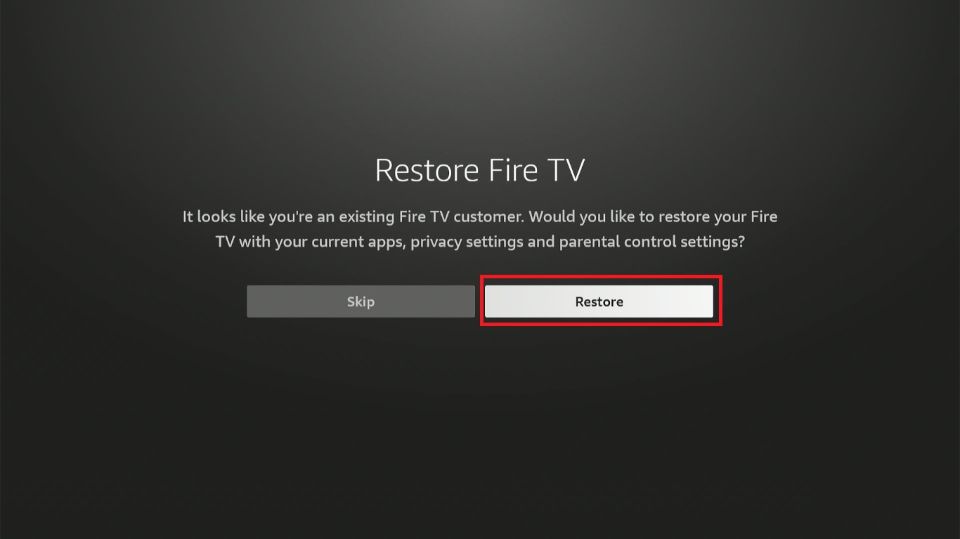
6. If you reset your FireStick or previously had a Fire TV, you will see a prompt asking you to Restore previous account data. You will not see this prompt if you set up Fire TV for the first time.
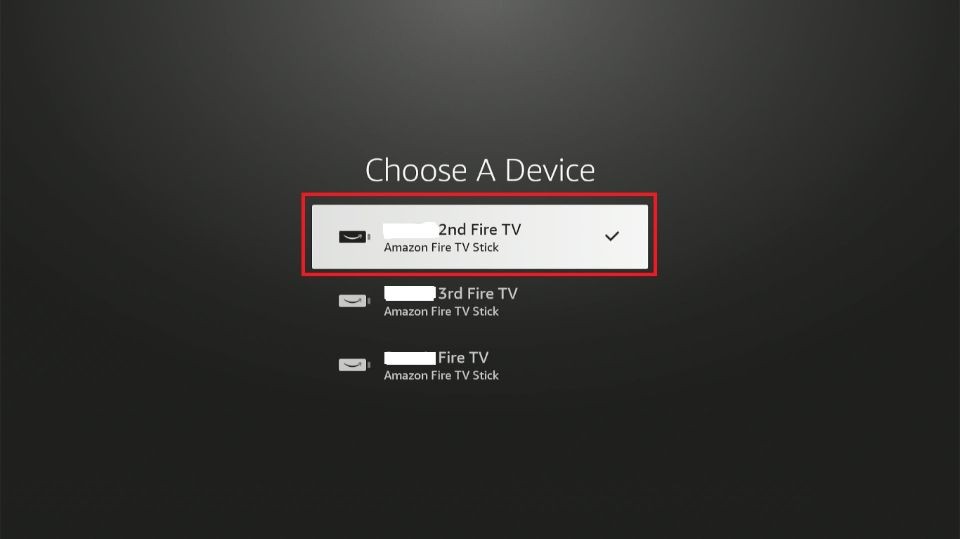
7. Choose a device to restore.
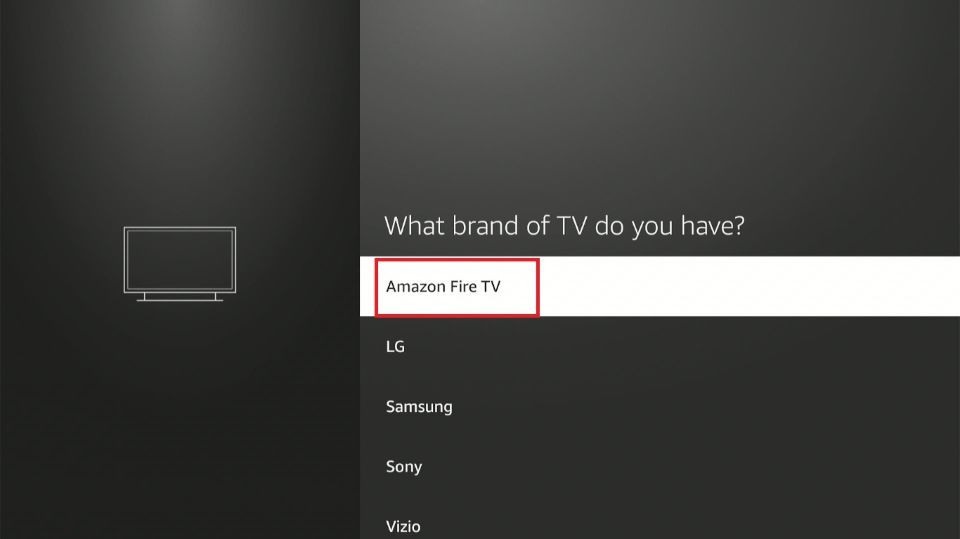
8. Choose your TV brand from the list.
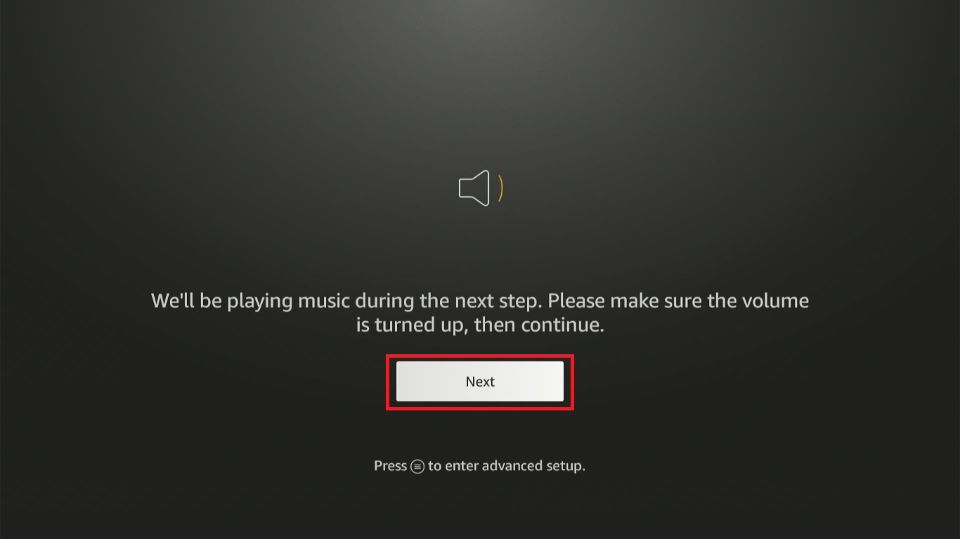
9. You will see a prompt asking you to turn up your volume and listen to music. Click Next.
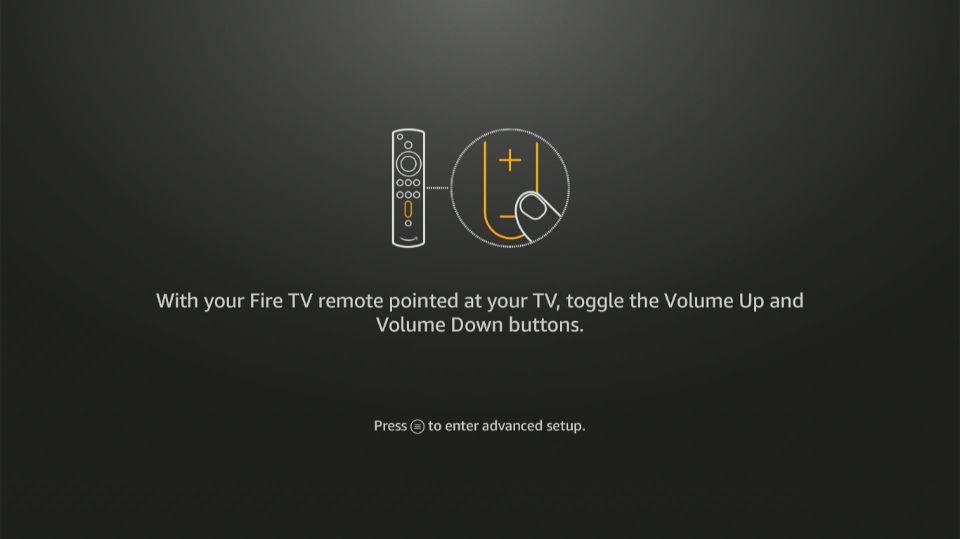
10. Use the volume up and down buttons on your remote as instructed on your screen.
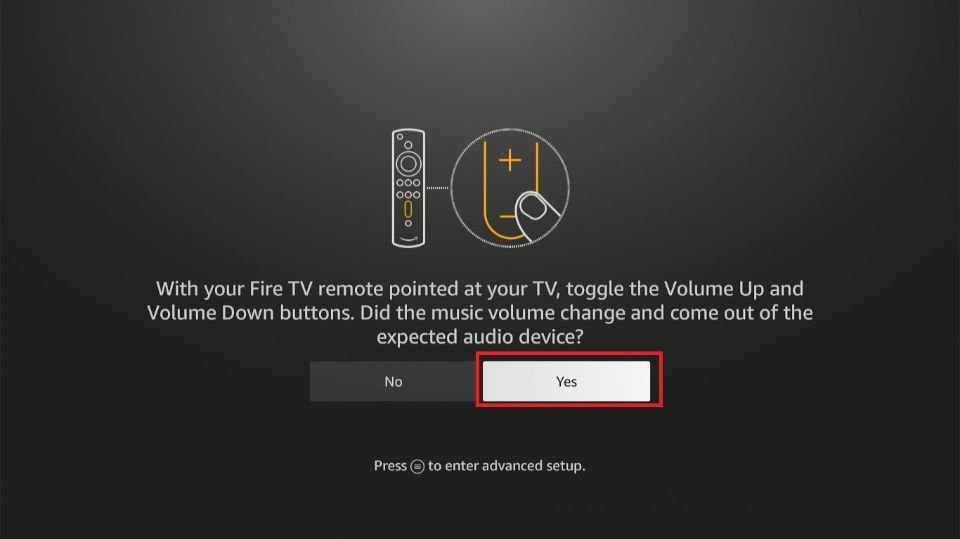
11. Click Yes if you are sure that you can hear the music and that your volume controls are functioning correctly.
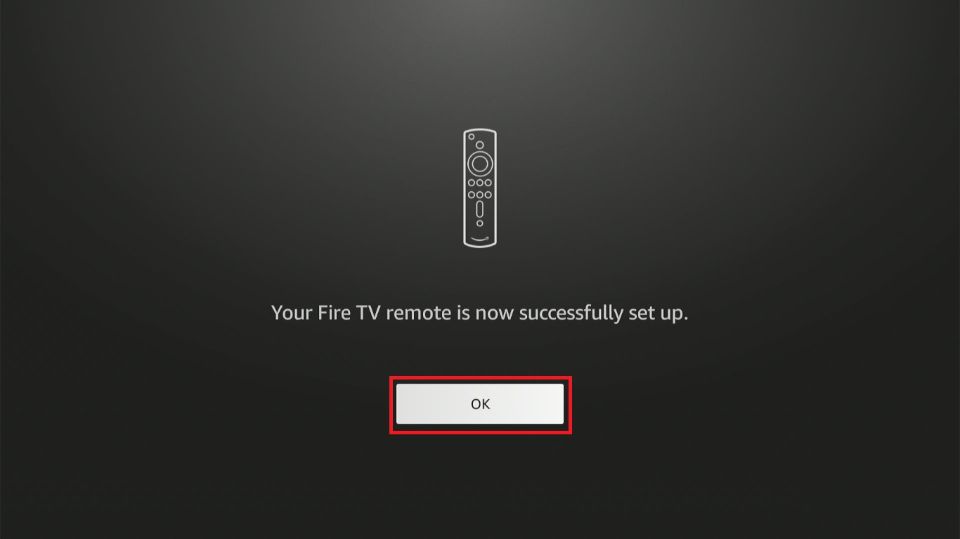
12. Fire TV will notify you that you have successfully set up your remote. Click OK.
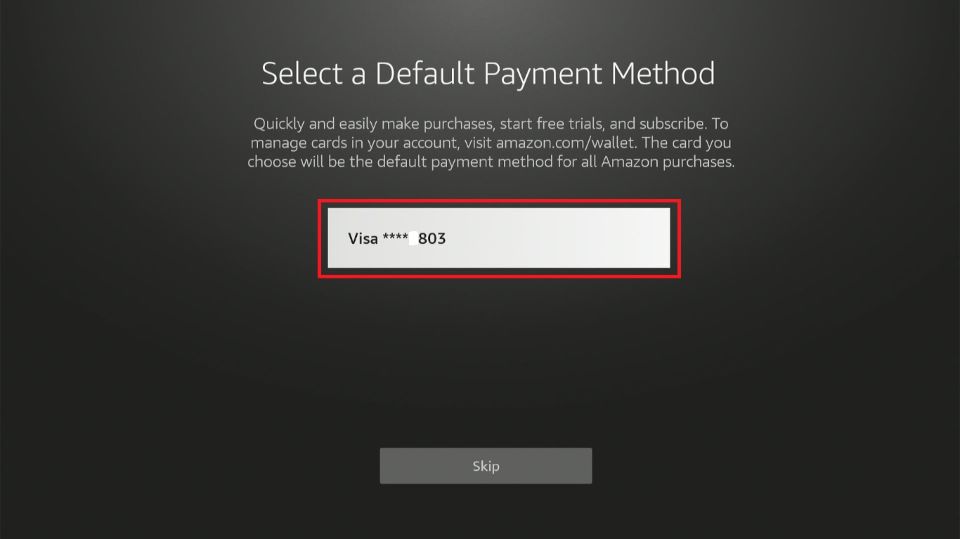
13. Select your default payment method.
Note: This is an optional step that may be missing for some FireStick models.
Part 3: Set up the Fire TV
You need to set up your FireStick to stream content. This includes installing FireStick apps that offer relevant content, such as movies, TV shows, live TV, and sports.
It also entails personalizing the display and device settings. Follow the steps below:
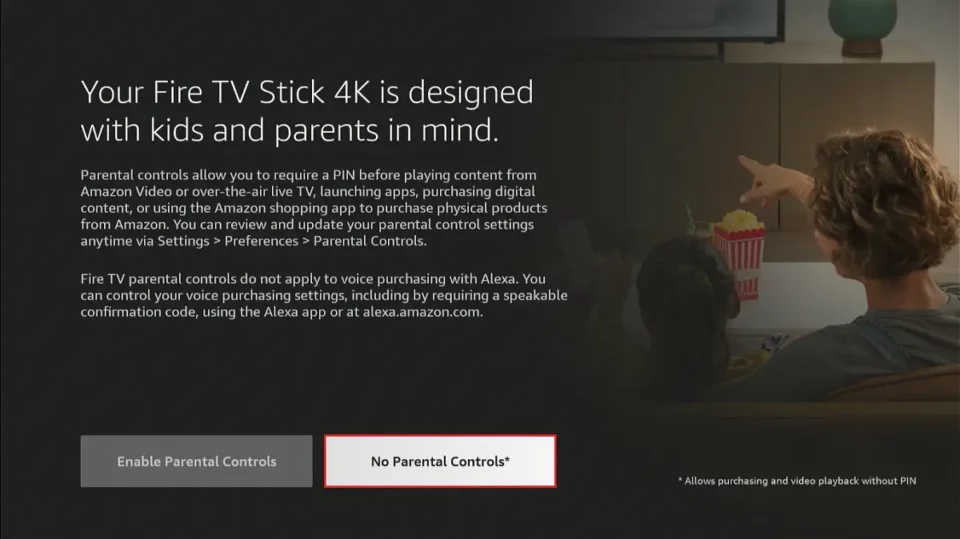
1. Choose your Parental Control preference, whether you want it on or off.
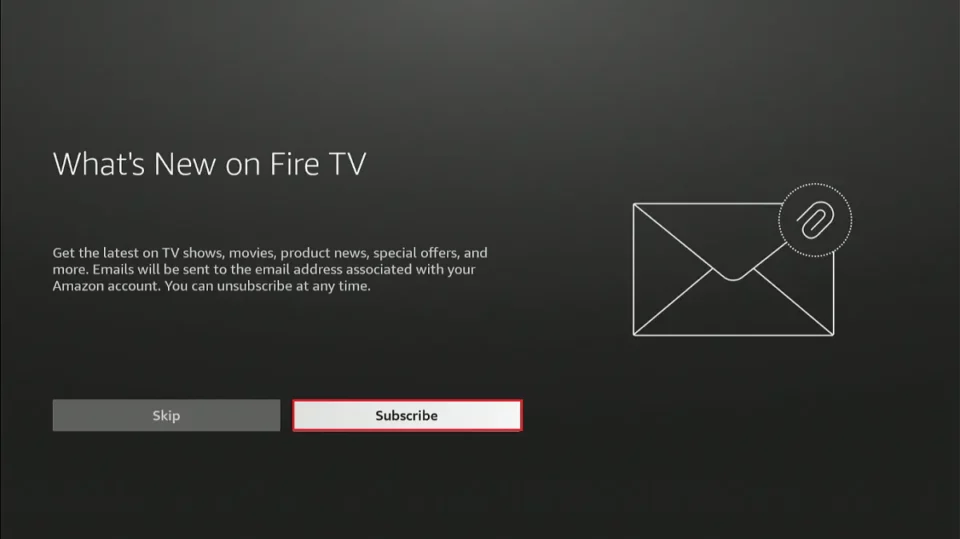
2. Amazon will prompt you to subscribe to get the latest on shows, products, news, special offers, and more. Click Subscribe or Skip.
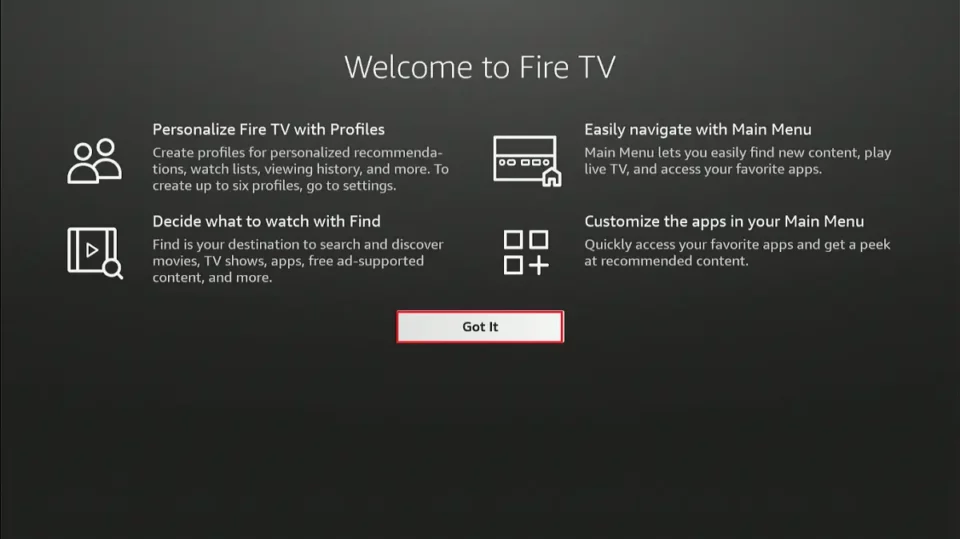
3. Click Got It on the next page.
4. On the next window, set up your FireStick Profile.
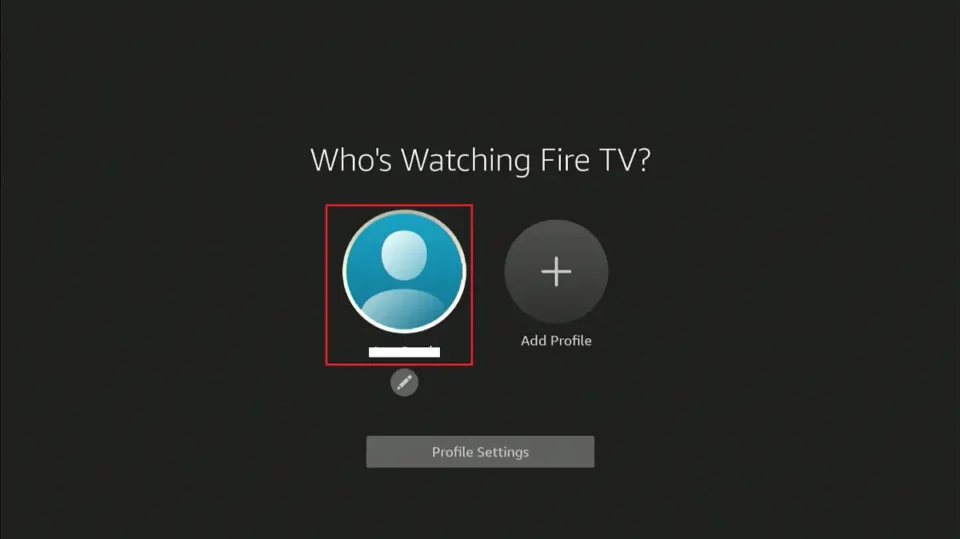
5. This is how the FireStick home screen looks.
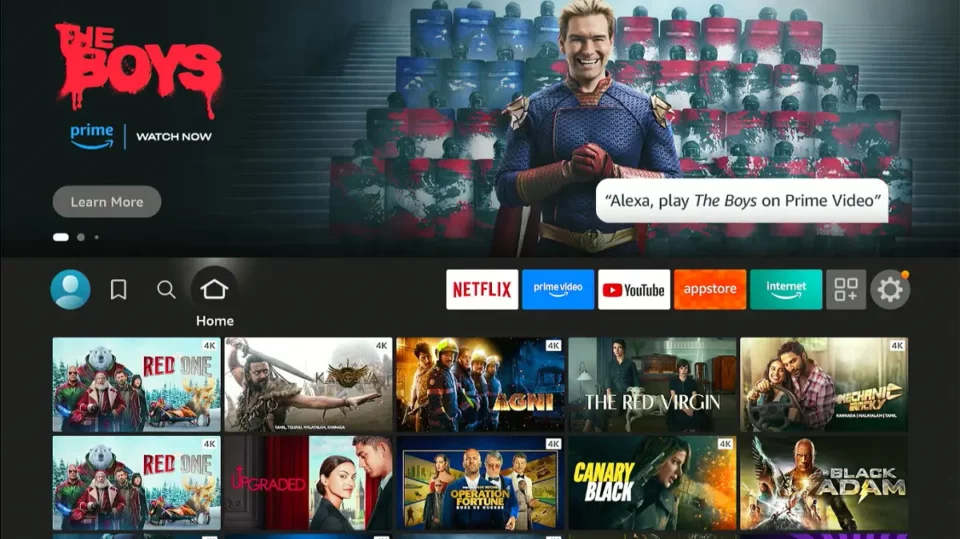
Your FireStick is now set. Install relevant FireStick apps to watch movies, TV shows, sports, live TV, kids’ content, and more.
Exploring FireStick
The Amazon FireStick comes pre-installed with Amazon apps like Prime Video and Amazon Music. However, to use the device to its full potential, you can install more apps from the Amazon App Store.
Let’s explore how you can maximize your FireSticks’ capabilities.
Jailbreak Your FireStick
You can jailbreak your FireStick to install Kodi, which provides access to a vast amount of content through official add-ons.
Furthermore, jailbreaking also allows you to install some maintenance and utility tools that are not available on the Amazon Store, such as the Task Killer app.
Hide Your Internet Activity by Using a VPN
The internet is not always a safe place. Besides ongoing surveillance, your online activities can be traced by:
- Hackers
- Snoopers
- Trackers
- Third parties
- Your Internet service provider (ISP)
For this reason, I recommend using a VPN for FireStick.
There are dozens of VPN services on the market. Some work on subscription-based models, while others may offer limited free data.
After thorough research, I recommend ExpressVPN. It’s a completely secure, reliable, and fast Virtual Private Network. Moreover, your connection will never be compromised.
Follow these steps to get started:
Step 1: Subscribe to ExpressVPN HERE. It comes with a 30-day money-back guarantee. You can use it free for the first 30 days, and if you are not satisfied with the performance (which is highly unlikely), you can ask for a full refund.
Step 2: Power ON your Fire TV Stick and go to Find, followed by the Search option.

Step 3: Now type “Expressvpn” (without quotes) in the search bar and select ExpressVPN when it appears in the search results.

Step 4: Click Download to install the ExpressVPN app on Fire TV / Stick.

Step 5: Open the app and enter the login credentials you created while buying the ExpressVPN subscription. Click Sign in.

Step 6: Click the Power icon to connect to a VPN server. That’s all. Your connection is now secure with the fastest and best VPN for FireStick.

Frequently Asked Questions
A: Yes, an Amazon account is required to activate and use the FireStick. You can create one during setup if you don’t already have one.
A: You need the Fire Stick, remote, power adapter, USB cable, HDMI port on your TV, and Wi-Fi connection. Batteries are included for the remote.
A: No, as long as your TV has an HDMI port, you can use a Fire Stick. It turns any TV into a smart TV.
A: During setup, the Fire Stick will scan for nearby networks. Select your Wi-Fi and enter the password to connect.
A: Use the search function on the home screen to find the app. Select it, then choose “Download” or “Get.”
A: Hold Back + Right on the remote for 10 seconds to open the reset menu, or go to Settings > My Fire TV > Reset to Factory Defaults.
A: Go to Settings > Preferences > Parental Controls, enable it, and set a PIN. You can restrict app usage, purchases, and content ratings.
Winding Up
That’s all you need to do to set up your Amazon FireStick for the first time! This device transforms any non-smart TV into a streaming hub, allowing you to watch movies, TV shows, live TV, sports, kids’ content, and more online. With its compact size and lightweight design, FireStick is an excellent choice for travelers and those with limited TV space.
If you encounter any issues during setup, feel free to ask your question in the comment section below. We will be happy to help.

Suberboost Your FireStick with My Free Guide
Stay Ahead: Weekly Insights on the Latest in Free Streaming!
No spam, ever. Unsubscribe anytime.

Can I ‘Hotspot’ my Firestick to my mobile phone so I can use the phones internet connection?
Hi Gerry,
Yes, you can use your mobile phone’s hotspot to connect your Firestick to the internet. Just enable the hotspot on your phone, go to your Firestick’s settings, select Network, and connect it to your phone’s hotspot like you would with any Wi-Fi network. Keep in mind that streaming can use a lot of data, so make sure your mobile plan can handle it!
Need HELP with setting up fire stick with tv
Hi Patti, this guide helps you set up your FireStick on your TV. If you need any additional assistance, please leave a comment with specific questions and I would be happy to help you.
I’m wanting to know how to use my remote to get on the channels that I want
Hi Donna, have you already set up your FireStick?
I cannot get youtube or Netflix to work, they say app not installed. In fact there are numerous apps that are doing this on a relatively new fire stick device. Help!
Hi Allison, try unplugging the Firestick from its power source and waiting about 20 seconds, then plug it back in. Let me know if this helps!
My screen says, “optimising system storage and applications”… Says this will take appx 10 min. Once it finally completes, it cycles through, and then starts the whole process over again.
Hi Reggie, that’s strange. Are you setting up a new FireStick or an old FireStick after the factory reset?
Hi there Patrick, I have my Firestick connected to my LG HU80KSW and it works just fine except…. it’s that old AV SYNC issue.
The projector on screen setting for av sync doesn’t seem to do anything and the LG iPhone App for the soundbar settings only allows adjustment from 0ms up to 300ms and my problem is I need it to go down below 0 to slow sound down so that the video content catches up.
Any ideas how to do it?
Jeff Erton
Hi Jeff, honestly, I am not quite sure how to fix that. You may need to contact LG customer support.
Hi Max I can’t download YouTube
Hi Elvir, are you getting any specific error message?
What does 83 mean and how do I correct it. I ca not get into disney pluse because there is an error. Will not take my email address or password
Hi Shirl, Error 83 usually appears due to the server issue at Disney+’s end. It will go away if you wait it out for a little while. Let me know if the problem persists.
Hey Max,
My power button doesn’t work? 🤦🏽🤦🏽🤦🏽
Hi LaTresa, does the volume button work?
My tv is LG led tv im not getting to HDMI port
Hi Vinay, I am not sure I understand your concern. Are you saying you are not able to locate the HDMI port in your TV?