
In this tutorial, I will show you how to install any addon on Kodi. The method outlined can be used on FireStick, Android Boxes, Android Mobiles, and all other Kodi-supported devices.
We have separate guides for most of the addons featured on our list of the best addons for Kodi. However, some new addons may not have an installation guide.
This post is a general installation guide for Kodi addons. You may use it as a reference if you encounter any addon on the list without a guide.
The description of each addon on our list contains the URL for its repository. You can use the URL and follow the instructions in this guide to install the addon.
The instructions in this post apply to most Kodi addons. Usually, only the names of the repositories vary. Everything else is much the same.
Please use these steps only to install legal and official addons from third-party (but legitimate) repositories, such as SlyGuy.
For Kodi Users!
ISPs, hackers, and other third-party entities worldwide may monitor your online activities. For security, privacy, and smooth streaming, it is recommended to use a reliable VPN for Kodi. Your IP address is visible to sites you visit.
I recommend ExpressVPN, a fast and secure VPN. It is very easy to install on any device, including Amazon Fire TV Stick, PC, Mac, and Smartphones. Also, it comes with a 30-day money-back guarantee. If you're not satisfied with their service, you can request a refund. ExpressVPN also has a special deal where you can get 4 months free and save 81% on the 2-year plan.
Read: How to Install and Use the Best VPN for Kodi
Installation Prerequisite
To simplify the process, we have divided it into three distinct parts. These are:
- Part 1: Enable Unknown Sources
- Part 2: Install the Repository
- Part 3: Install the Kodi addon
Part 1: Enable Unknown Sources
Follow these steps to enable Unknown Sources on Kodi:
1. Open Kodi and then open Settings from the home screen.
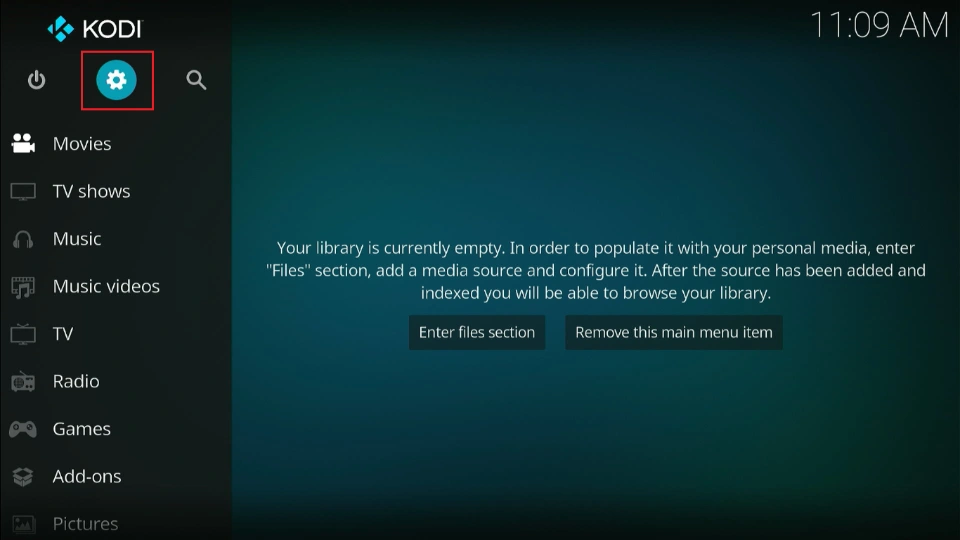
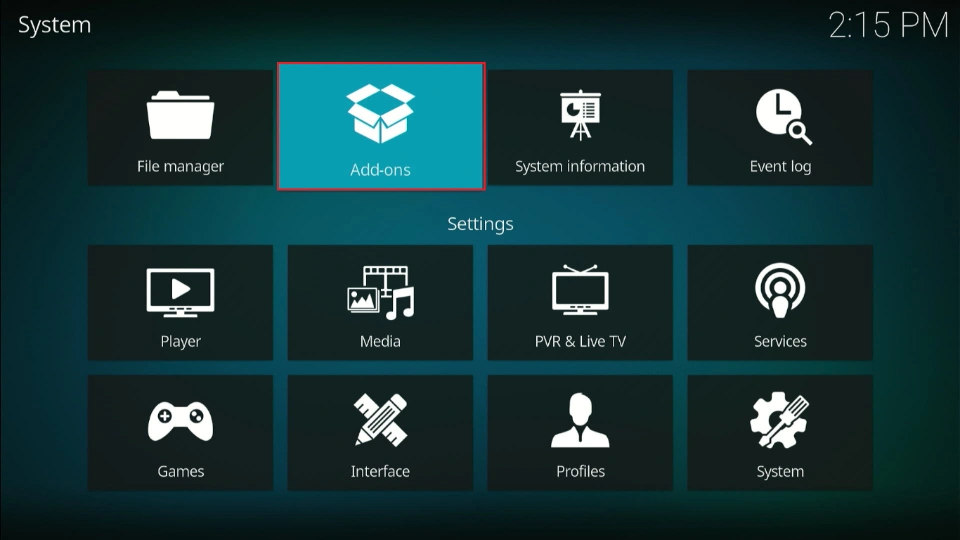
2. Click System.
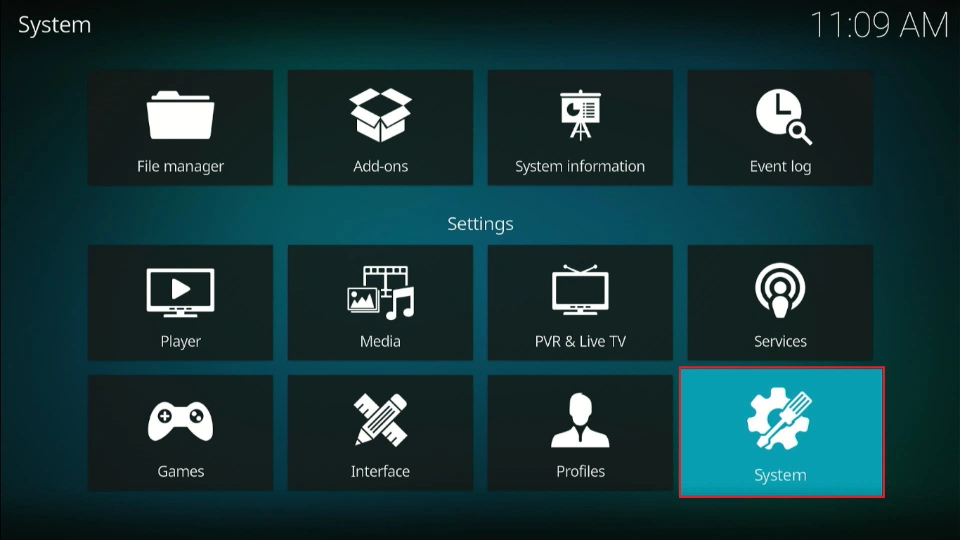
3. Next, select Addons on the left of the screen.
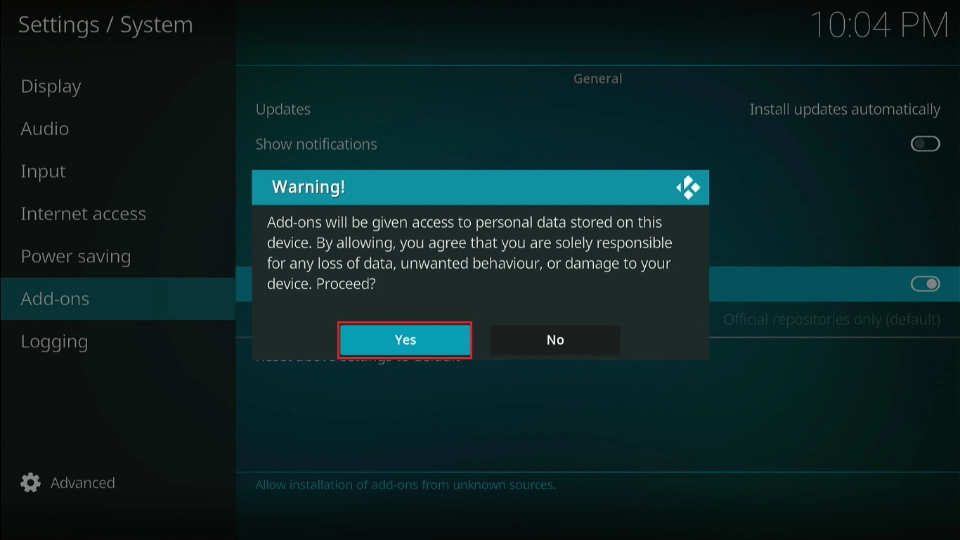
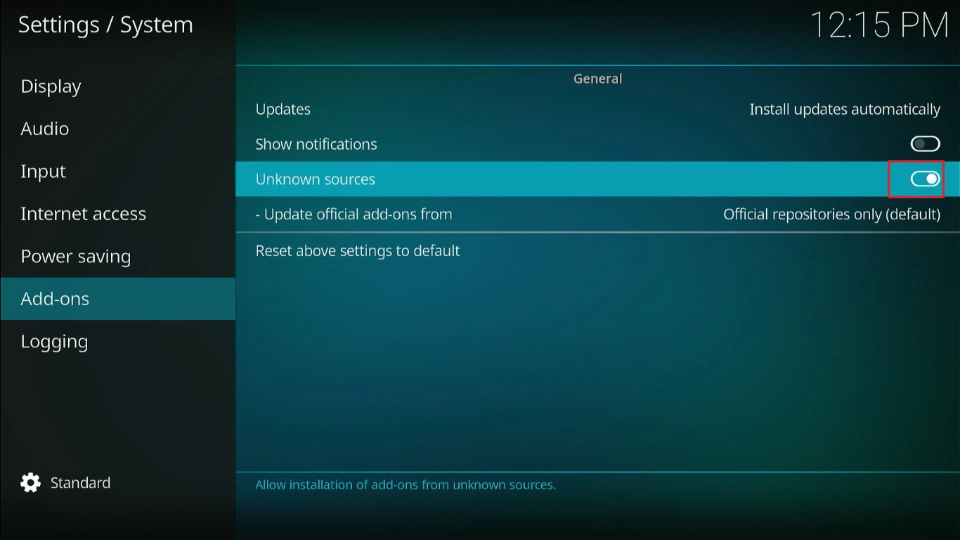
4. Now, find the option Unknown Sources on the right. If it’s disabled, select it to enable it.
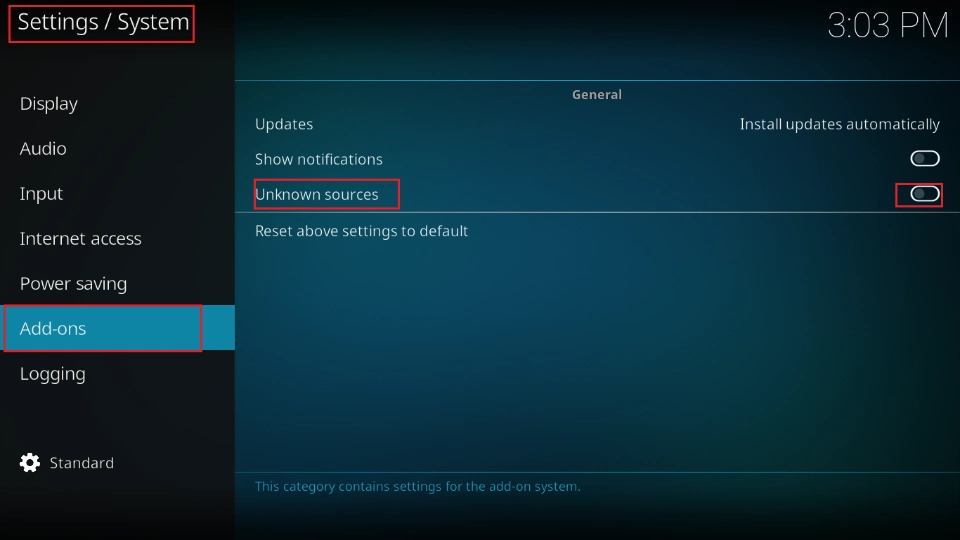
5. When prompted, click Yes.
6. You have successfully enabled unknown sources on Kodi in readiness for installing a third-party addon.
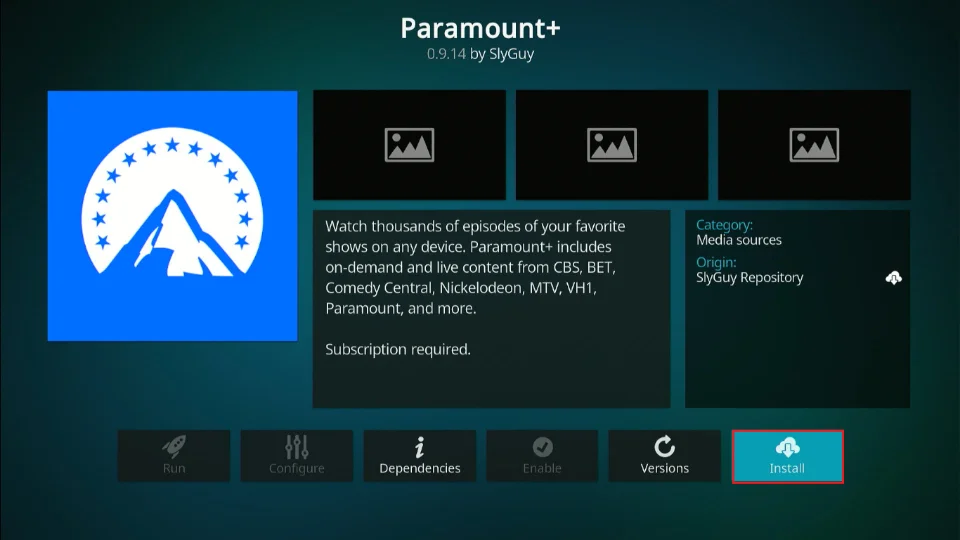
I will use the Paramount Plus addon for demonstration in this guide. This addon is hosted in the SlyGuy repository and is compatible with Kodi 20 Nexus and Kodi 21 Omega.
Let’s discuss the second part below.
Legal Disclaimer: This tutorial is purely educational. FireStickTricks.com doesn’t own, host, operate, resell, or distribute any streaming apps, addons, websites, IPTV or services. The page contains some unverified services, and we are not certain whether they hold legal licenses to distribute the content. FireStickTricks.com does not verify the legality of each app/service in all regions. Do your due diligence if you use any of the unverified apps/services, and stream only content that is available in the public domain. The end-user shall be solely responsible for the media accessed.
Part 2: Install the Repository
Follow these steps to install the repository hosting the Kodi addon:
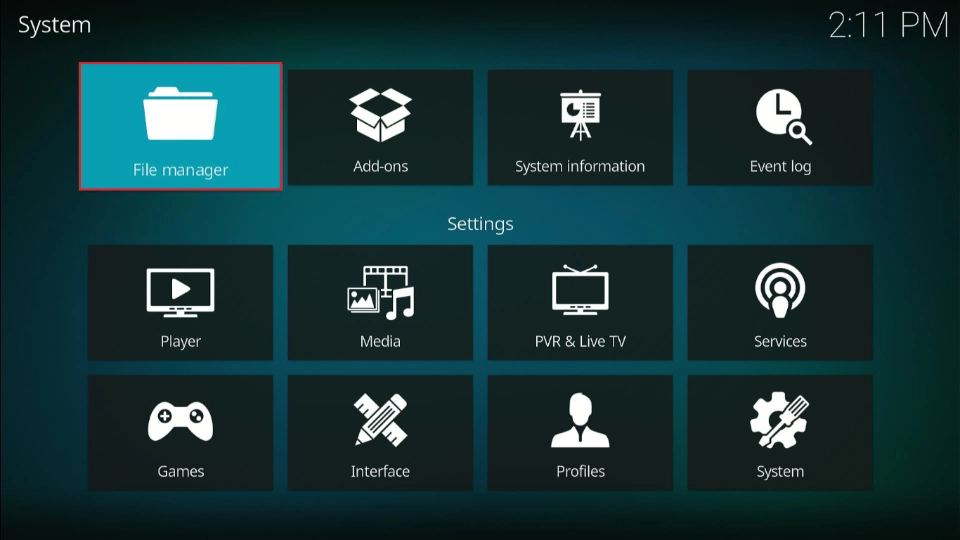
1. Launch Kodi and click the settings symbol right below the Kodi icon at the upper-left corner of the home page.

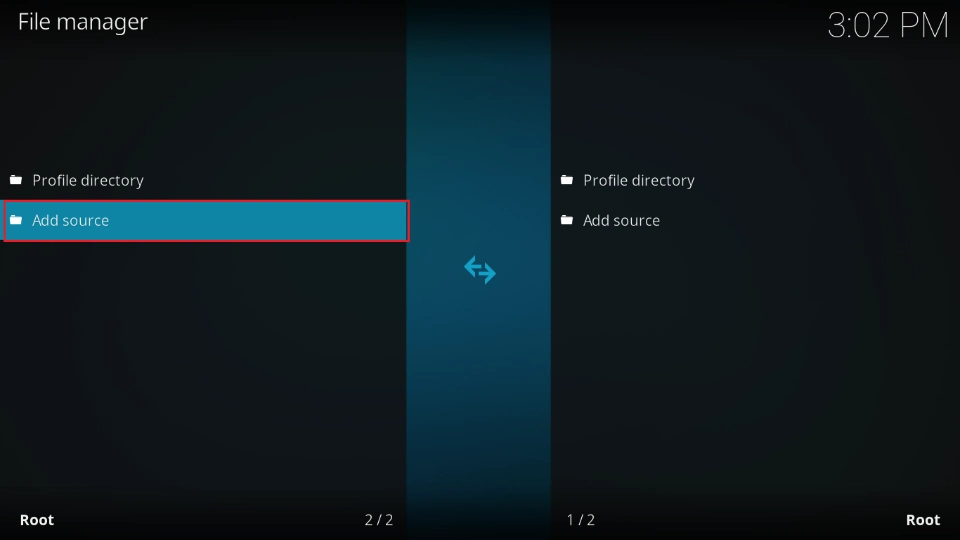
2. Click the File Manager box.
3. Go to the Add Source tab on the left side menu and click on it to open.
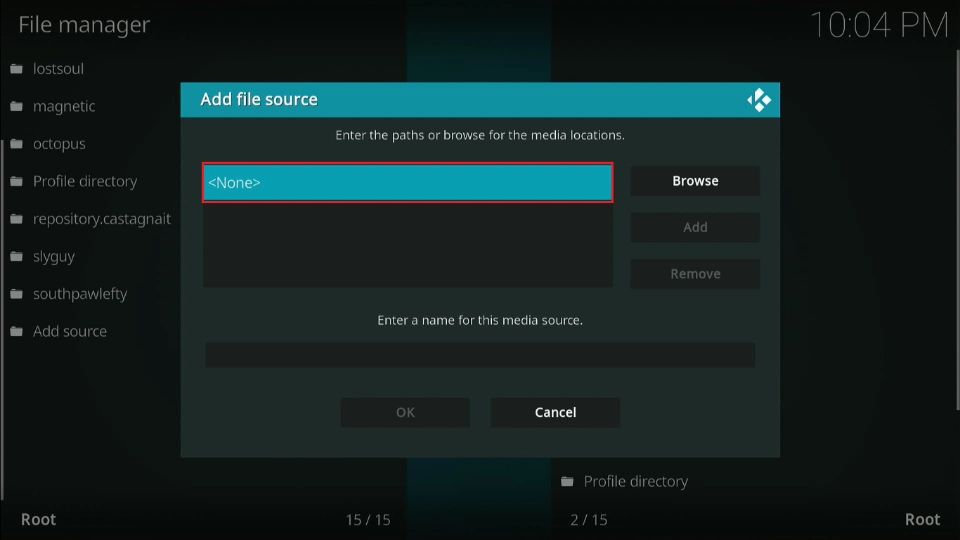
4. A pop-up window will appear. Click the <None> tab inside.
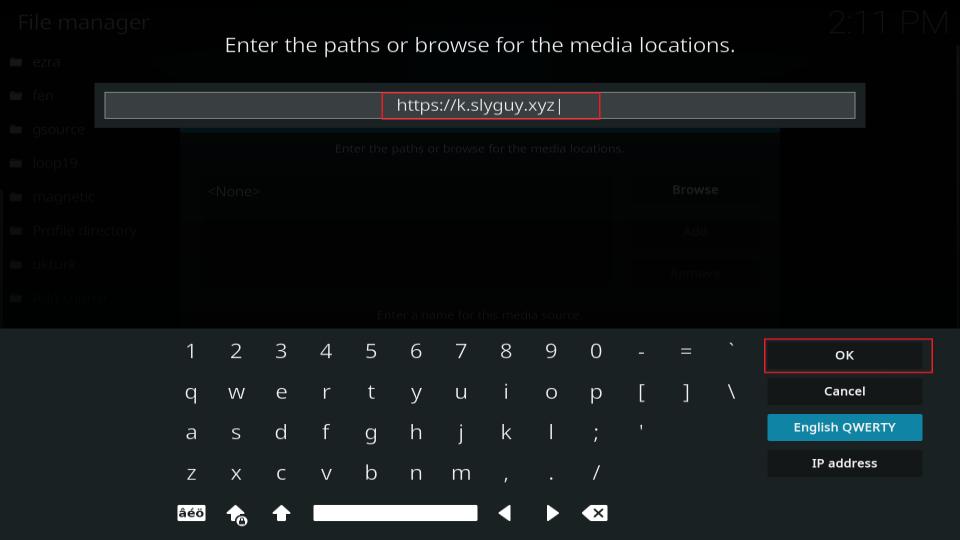
5. Enter the source URL in the designated field at the top and click OK. For example, the source URL for the Paramount+ Kodi addon is https://k.slyguy.xyz.
Disclaimer: This URL belongs to the developer of the addon. FireStickTricks does not host any URLs. We are also not affiliated with the developers.
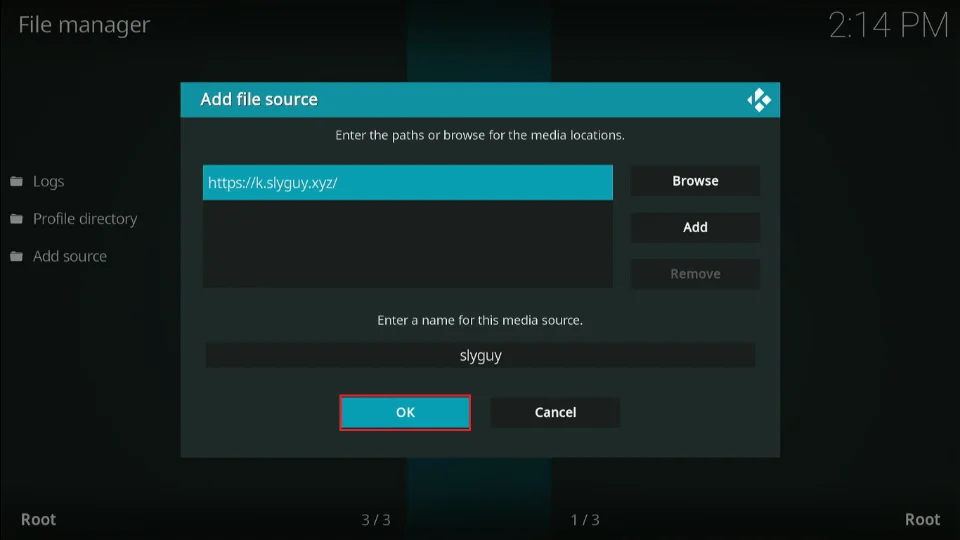
6. Next, type the source’s name in the field Enter a name for this media source and click OK.
Note: You may choose any name you like. The idea is to make the name identifiable with the source. For example, I decided to use Slyguy to mirror the name of the source I’m using in this example.

7. Click OK to confirm all the details and close that window.
8. Your new source will be added to the file manager window.
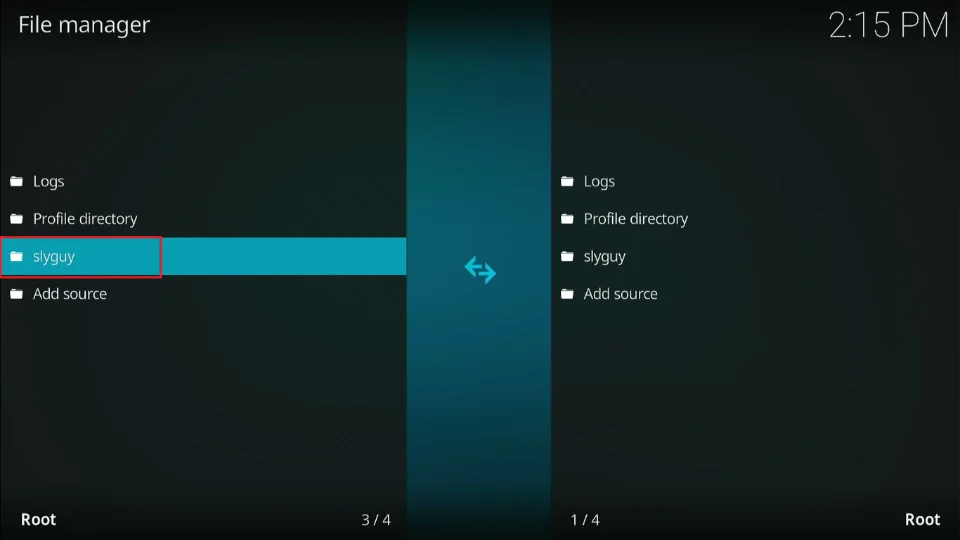
9. Return to the System window and select the Addons folder.
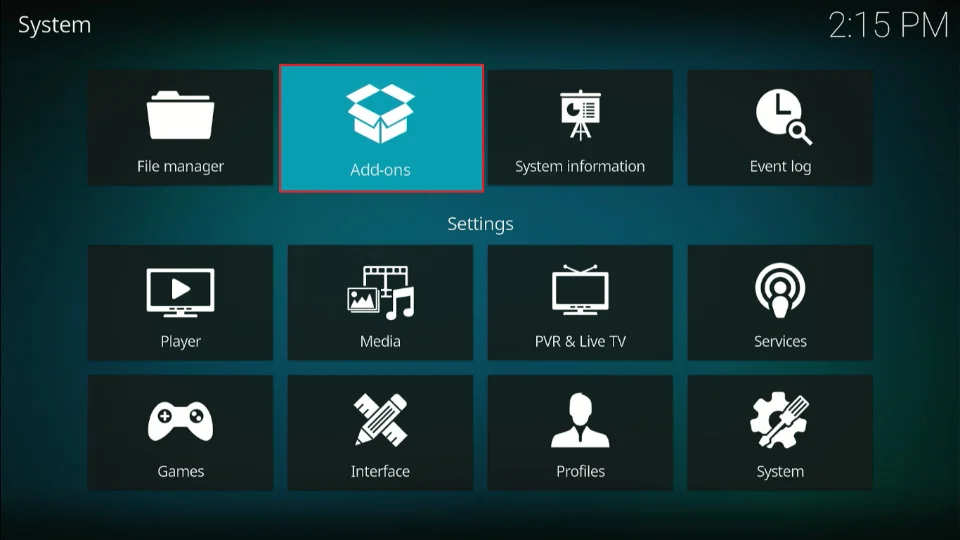
10. Click Install from zip file.
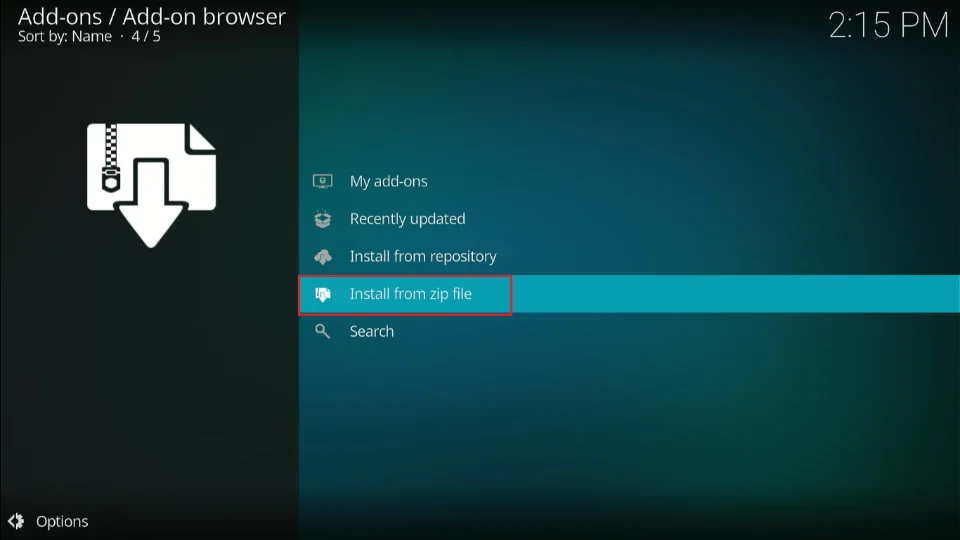
11. Choose the name you gave your new source earlier.
Note: Remember that for this example, I chose the name SlyGuy.
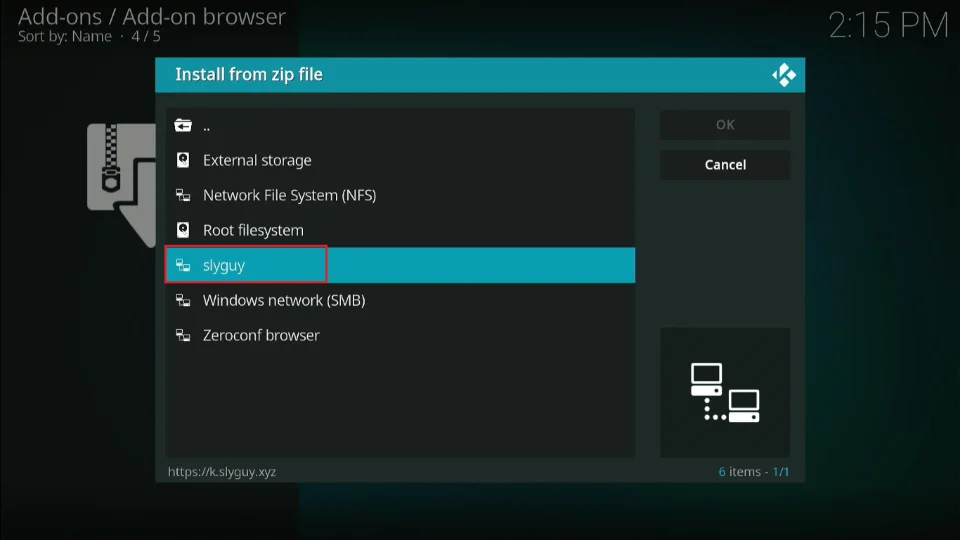
12. On the following screen, you should see the zip file for the repository. Select it.
Note: Sometimes, you may not find the repository zip file when you click the source name. Some repositories are hosted inside the folders within the source. If you see a folder after clicking the source name, open the folder to find the zip file. The zip files usually use the following naming convention: repository.repositoryname-x.x.x.zip
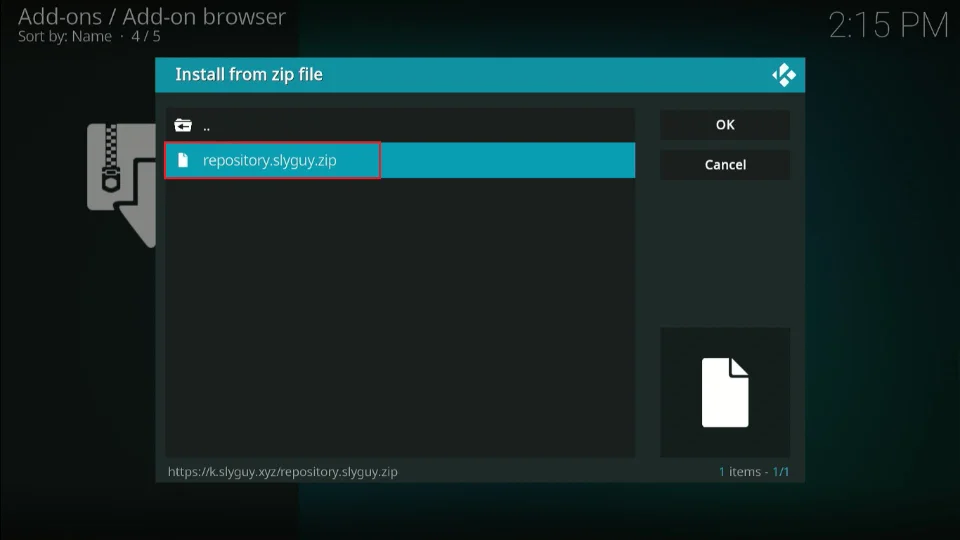
13. Once you click on the zip file, the repository will start downloading. Wait for a few moments. You should see a notification on the screen confirming the repository has been installed.
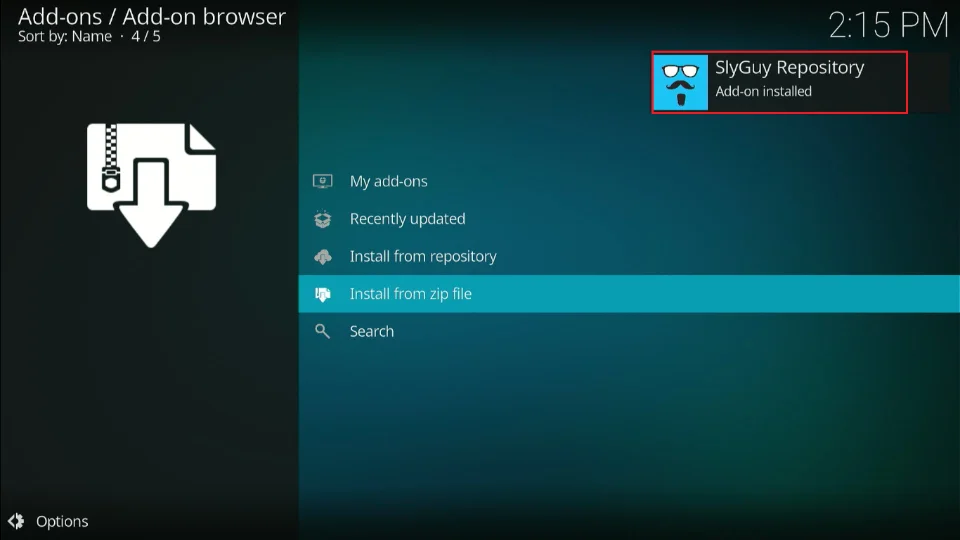
You have successfully installed the repository. Let’s move to the next part of installing the Kodi addon.
Part 3: Install the Addon
Now that you’ve installed the repository, follow the steps below to install the addon from the repository.
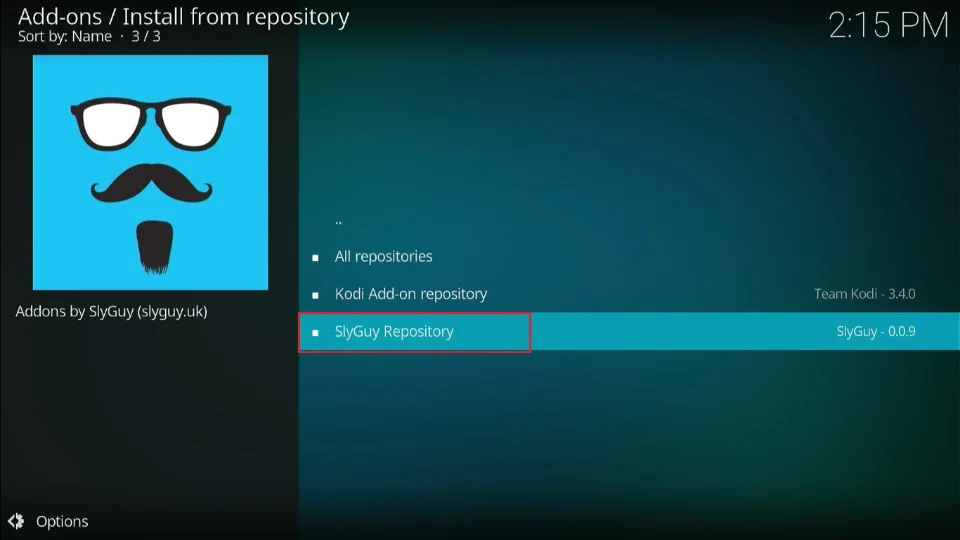
1. While still on the Add-ons window, click Install from repository.

2. Select the repository you installed in part 2 above. In my case, I installed the SlyGuy Repository.
3. Select Video addons.
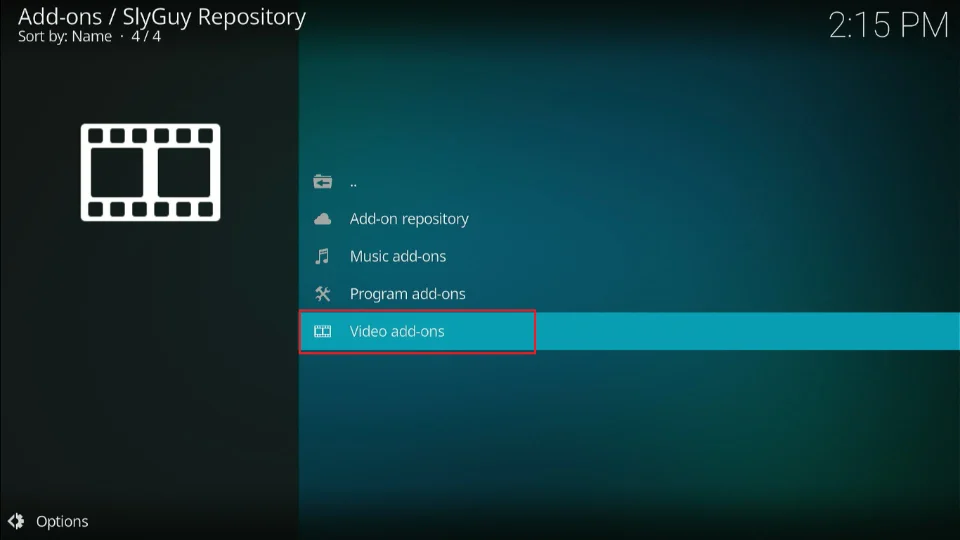
4. Choose the Kodi addon you wish to install. In my case, I’m choosing the Paramount+ addon.

5. Select Install.
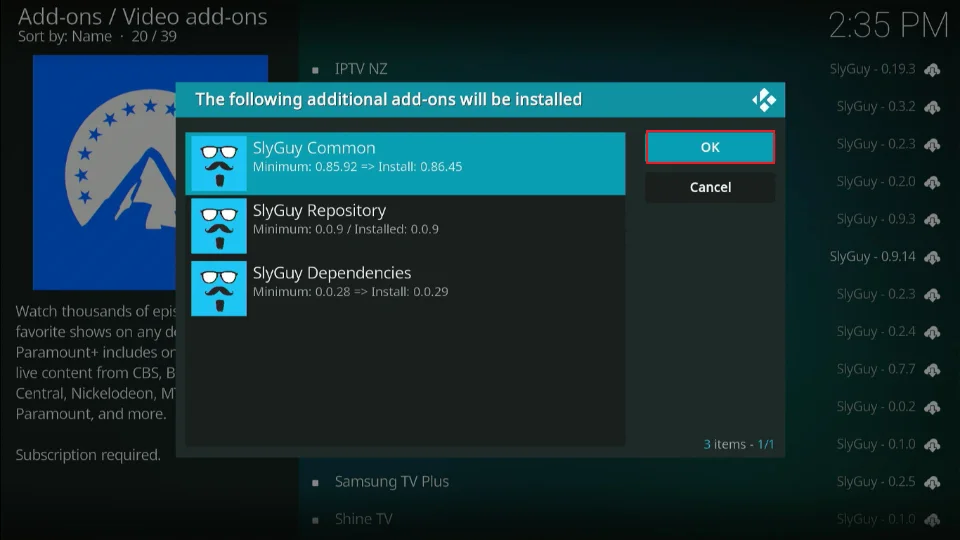
6. A window showing additional addons to be added along with Paramount+ will appear. Click OK.
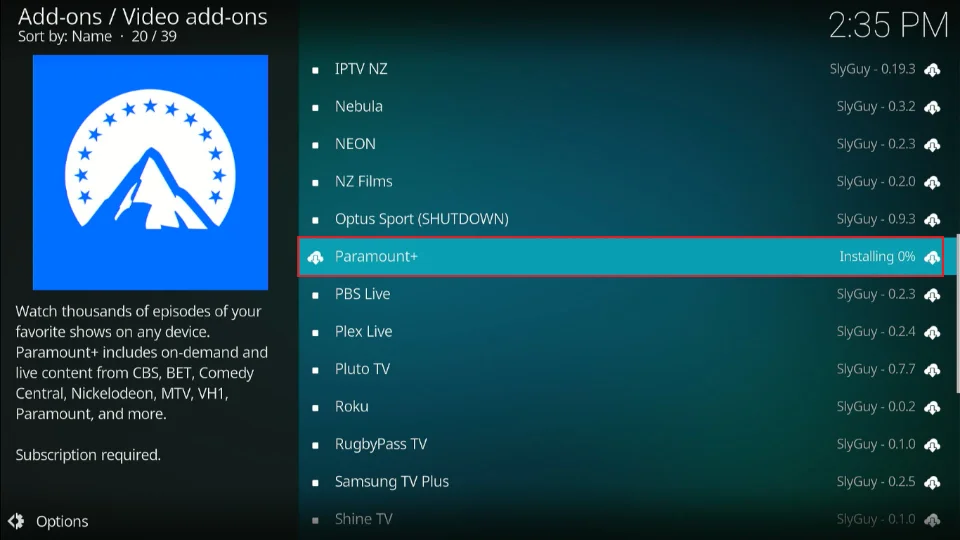
7. The addon will start downloading. You can see the progress on the screen.
8. Once the addon has been installed, a notification appears on the screen.
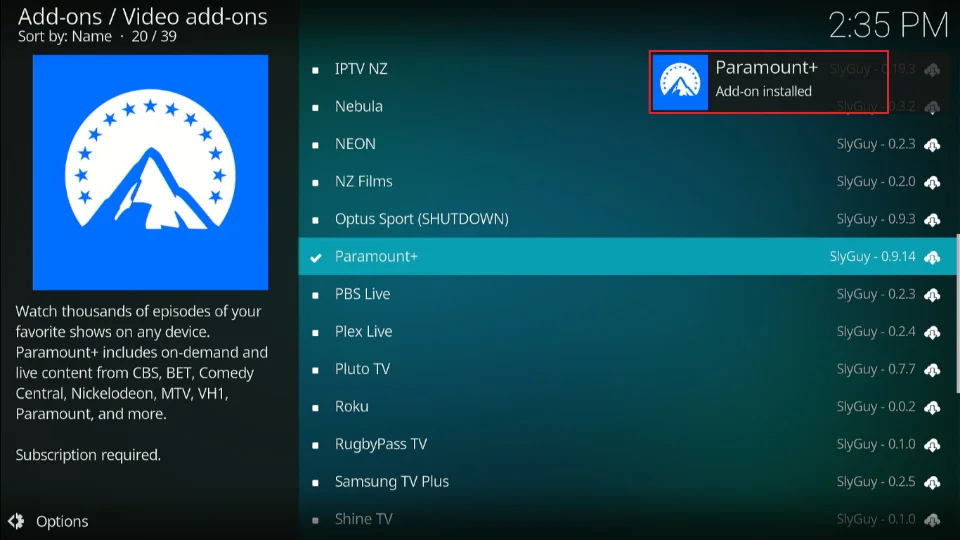
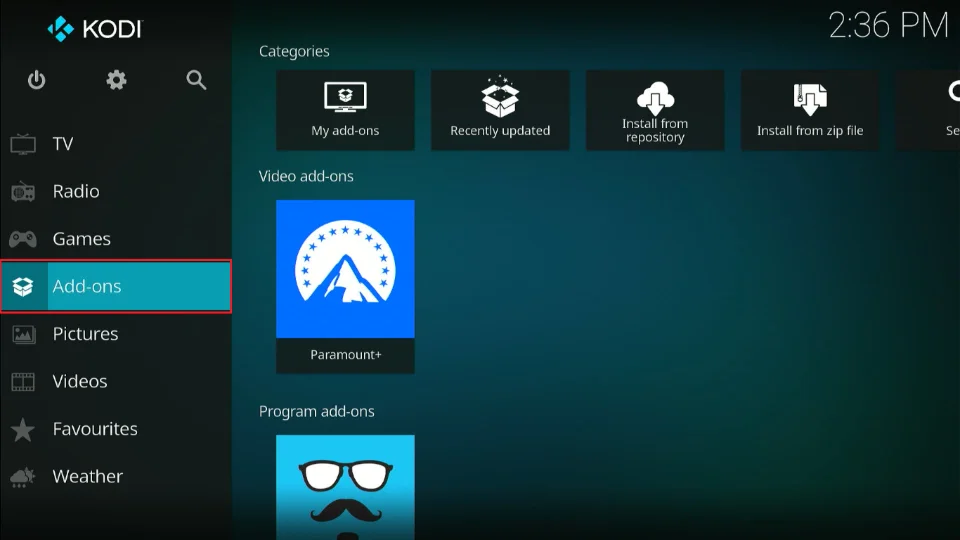
9. Congratulations! You have successfully installed a Kodi addon. To access it, return to the Kodi home screen and navigate to Addons on the left panel menu.
You’re now all set. A quick reminder: your internet provider and many websites/apps can see your IP address and some details about your connection. Using a VPN encrypts your traffic and masks your IP address, which helps protect your online privacy.
I recommend ExpressVPN. It’s a reputable VPN with strong encryption and fast connections, and it’s straightforward to install on Fire TV/FireStick and other devices.
Next, I’ll show you how to set up and use ExpressVPN.
Step 1: Get the ExpressVPN subscription HERE. It comes with a 30-day money-back guarantee. Meaning you can use it for free for the first 30 days, and if you are not satisfied with the performance (which is highly unlikely), you can request a full refund.
Step 2: Click HERE to download and install the ExpressVPN app on your streaming device. If you are using a FireStick, I have given the exact steps starting with Step 4 below.
Step 3: Click the Power icon to connect to a VPN server. That's all. Your connection is now secure with the fastest and best VPN for Kodi.

The following steps will help you install Kodi VPN on your Fire TV devices. If you have other streaming devices, follow Step 1-3 above.
Step 4: Subscribe to ExpressVPN HERE (if you are not already subscribed).
Step 5: Go to the Fire TV Stick home screen. Click Find, then select the Search option (see image below).

Step 6: Type Expressvpn in the search bar and select it when it shows up.

Step 7: Click Download.

Step 8: Open the ExpressVPN app and Sign in using the email ID and password that you created while buying the ExpressVPN subscription.

Step 9: Click the Power icon to connect to a VPN server. That’s all. Your FireStick is now secured with the fastest VPN.

Wrapping Up
I showed you exactly how to install any addon on Kodi. The installation procedure is essentially the same for all addons, with the main difference being the source URL for the repository containing the addon you want. If you encounter any difficulties, let me know via the comments section below, and I will guide you through the exact steps.
Alternatively, you can use this site’s search function to find an individual tutorial for any of the best Kodi addons. If you can’t find the tutorial for an addon you want to install, let me know, and I’ll write it for you!
Frequently Asked Questions
A: You don’t need a VPN to use Kodi, but it can protect your privacy and secure your internet connection. It also helps bypass geo-restrictions for legal streaming services like Paramount+, Tubi, or Pluto TV.
A: Official addons are those available in the Kodi repository. They are verified, safe, and fully legal to install and use. Examples include addons for Paramount+, Tubi, and YouTube.
A: Most addons in the official Kodi repository are free, but some may require a subscription to access premium content on legal platforms like Peacock or ESPN+.
A: This setting allows Kodi to install addons from repositories outside the official Kodi repository. You should only enable it when installing legal, trusted repositories to avoid security risks.
A: Yes, Kodi is compatible with FireStick, Fire TV Cube, Android TV boxes, smartphones, tablets, and computers. Make sure you download the official Kodi app from the Kodi website or a trusted app store.
A: Yes, Kodi supports multiple addons from official repositories and trusted third-party repositories. Always ensure they are legal and safe before installing.

Suberboost Your FireStick with My Free Guide
Stay Ahead: Weekly Insights on the Latest in Free Streaming!
No spam, ever. Unsubscribe anytime.

get to the step where you go to the video add ons and I can’t find it
Hi Dave, which version of Kodi are you using?
I just installed exodus redux but how do I watch. Not understanding
Hi Bill, just go to Kodi home-screen > Addons > Video add-ons. Open Exodus Redux and browse the categories.
I have been trying to add the Tombstone Kodi addon but when I click on install from zip file that is as far as I get, it does not show the install from repository. Can you please help me to get this addon.
Hi Wonda, I don’t think Tombstone addon works anymore. Why don’t you try other quality addons from our list of Best Kodi Addons.
So I downloaded addons but I can’t get nothing to stream.
Hi Lauri, which addons did you install? Have you tried some from this list: https://www.firesticktricks.com/best-kodi-addons.html
Why does it say do you still want to add addon on kodi even though ur not connected to a network
Hi Heather, which addon are you trying to install?
Added exodus but when I click it it’s just a black screen
Hi, I just checked and both Exodus Redux and Exodus V8 are loading fine. You might have run into a temporary issue. Please try again.
Also having trouble with the zip files
Hi Stephanie, which addon are you trying to install?
didn’t work for me..
Hi Linda, these are just the generic steps. Which addon were you trying to install? Let me know and I will give you the specific steps
I having trouble installing from the zip file
Hi Savier, I just noticed that the Maverick Repo link provided in this guide is no longer functional. I will update this guide today. In the meantime, please try one of the other addons from our list: https://www.firesticktricks.com/best-kodi-addons.html
You will find the link to the installation guide for most addons