I am often asked if there is a way to install multiple builds on Kodi, and after trying different techniques, I found a way. In this guide, I will share how to install more than one Kodi build on Kodi supported devices including Amazon Fire Stick / Fire TV Cube.
Update: Please note that Titanium build is currently unavailable. However, the steps below work just the same for any other build. See our list of the best Kodi builds.
 Kodi is one fantastic media player that plays the media on your local device. But, the true potential of Kodi is explored when you use it with plugins (called add-ons) and stream the content over the internet. There are dozens of free Kodi addons to fetch the media you wish to watch. You may think of addons as the bridge between Kodi on your device and the vast world of free content on the web.
The mention of addons leads us to build. A Kodi build is also a plugin but differs from an addon in the way it functions. Addon management seems to be the primary role of any build. The builds come with preinstalled addons, so you don’t have to install them individually. Builds also visually and functionally give Kodi a complete makeover. Install a build, and you will get preconfigured addons and a whole new interface to interact with Kodi. Some Kodi builds are extremely popular among Kodi users than the others.
Many users have asked me if they can install and use more than one build of Kodi. I am glad I finally found the answer. Let us discuss this further.
Is It Possible to Install Multiple Kodi Builds?
Yes, it is possible to install and use multiple builds. However, the traditional method wouldn’t work. What I mean is that you cannot install more than one build on the same instance of Kodi. You will need to install a Kodi fork on your FireStick. A fork is a ‘clone’ of Kodi, you can say, or a replica. I will tell you more about Kodi forks later. Let me first tell you why you need multiple instances of Kodi for this.
When I was trying to figure out how to install multiple builds, I first installed Supreme Kids build and then the Titanium Build on Kodi. At first, I was surprised and pleased to see that the Supreme Kids build would let me deploy Titanium Build. However, when I relaunched Kodi after installing Titanium, I noticed that the previous build had been completely overwritten by it. I went to Interface settings and found that Supreme Kids’ skin had also been removed. I also checked the size of the Kodi data and discovered that the data from the previous build had not been deleted. That’s my fault, though, as I didn’t choose Fresh Install before the installation.
The conclusion is that Kodi technically lets you install multiple builds. But the last installed build will overwrite all the previous builds without truly deleting their data (until you specifically instruct it to).
So, this brings us back to Kodi Fork.
Kodi fork is a copy of Kodi, sometimes with specific customizations. For instance, some Kodi forks come preinstalled with popular builds, like Titanium, while others have preinstalled addons.
To install multiple builds, you need multiple instances of Kodi installed on FireStick. However, Fire Stick doesn’t let you install multiple instances of the same app, so you need a fork. Even though a fork is practically Kodi, your device treats it as a completely different application.
Further, in this guide, we will learn
- How to install the Kodi fork on FireStick
- How to install a build on the fork
This guide demonstrates the installation of the Titanium 18.1 fork from the Supreme Repository source.
How to Install Kodi Fork on Fire Stick
Please follow the steps below to install the Kodi Fork, Titanium 18.1 on FireStick:
Attention Kodi Users!
Governments and ISPs worldwide monitor your online activities. If you use third-party Kodi addons, you should always use a reliable Kodi VPN to hide your identity and prevent issues with your streaming experience. Currently, your IP is visible to everyone.
I use ExpressVPN, the fastest and most secure VPN in the industry. It is very easy to install on any device, including Amazon Fire TV Stick, PC, Mac, and Smartphones. It also includes a 30-day money-back guarantee. If you're not satisfied with their service, you can request a refund. ExpressVPN is offering a special NEW YEAR deal: get 4 months free and save 78% on the 2-year plan.
Install and Use Best Kodi VPN | Why you must use a VPN at all times
1. You need an additional app to sideload the APKs on FireStick . While you could download the files from a link through a browser, I recommend the Downloader app. This app lets you quickly download the APKs and sideload them onto your FireStick.
To get Downloader, select the Search option on the home screen of FireStick. Search for this app and install it.
2. After installing the Downloader app, launch it from YOUR APPS & CHANNELS. Open Settings on the left and enable JavaScript first. Some links will not work correctly without this option.
3. Click the Browser option on the right side of the Downloader home screen.
The web browser will appear on the right. By default, the browser opens the developer’s website after news.com every time you click it. Unfortunately, it cannot be changed.
You should see a red, circular cursor over the browser window. Navigate to the address bar on the top and click inside it.

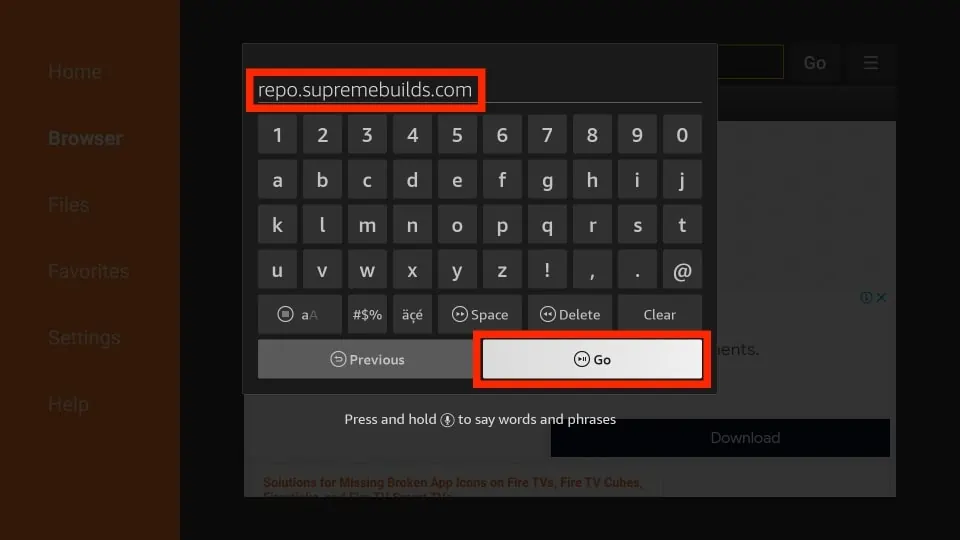
4. The onscreen keypad appears with the developer’s website URL pre-populated. Click the Clear button on the bottom right (above Go and next to Delete) to empty the field. Now, type in the URL: repo.supremebuilds.com and click GO.
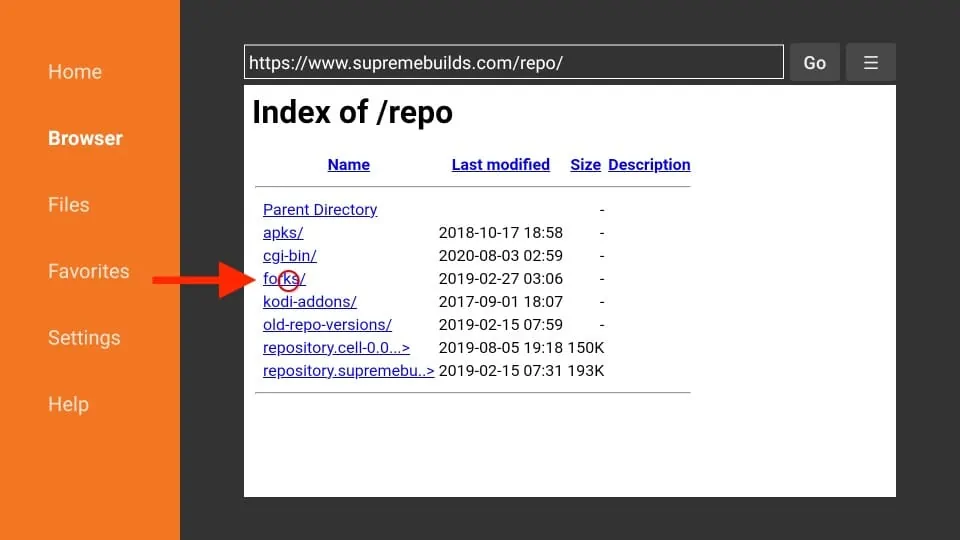
5. You will be redirected to the browser window. Allow the webpage to load. Now, click Forks link on the page.
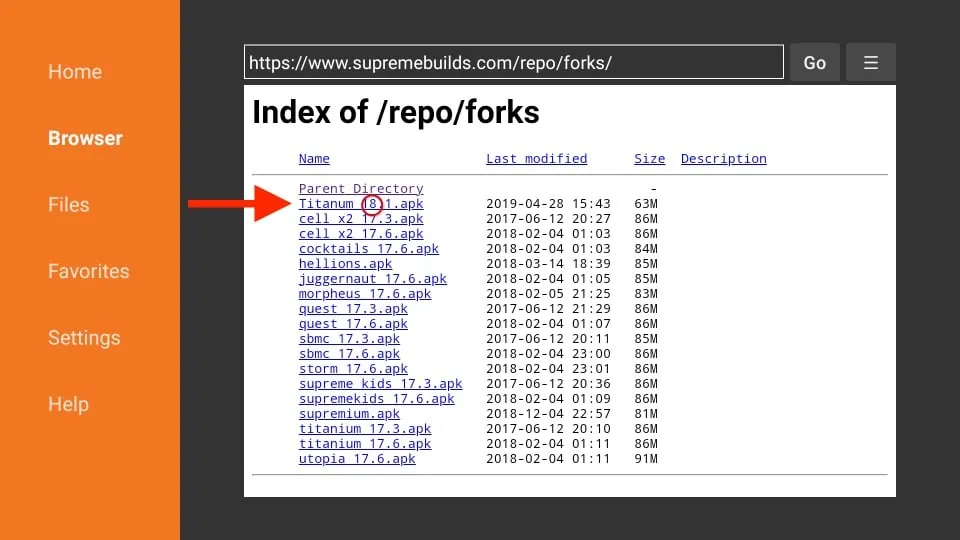
6. The next page displays the list of the Kodi forks available in this repository. As I already said, some forks come preinstalled with specific builds. For instance, if you wish to install Kodi Leia 18.1 with Titanium Build, click the Titanium 18.1.apk link (second from the bottom)
However, if you want to start with a fresh Kodi and install the build of your choice later, you will want the Kodi fork that does not come preinstalled with any build.
Therefore, we will install the Titanium 18.1 fork. This fork gives you a clean Kodi slate with just one preinstalled addon, Supreme Builds Wizard. Click Titanium 18.1 apk.
7. The downloader will begin to download the Titanium 18.1 fork APK file onto your FireStick storage. It might take a few minutes. Allow the download to finish.
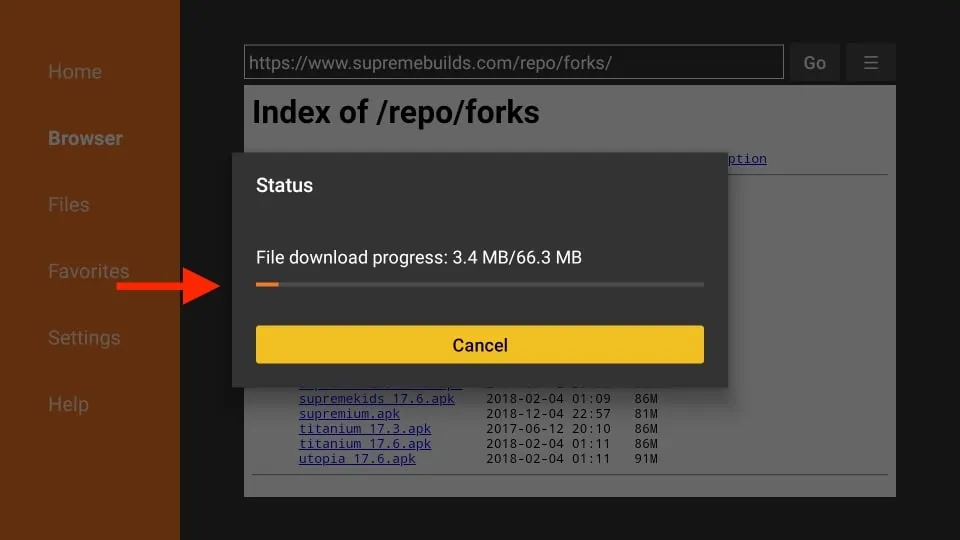
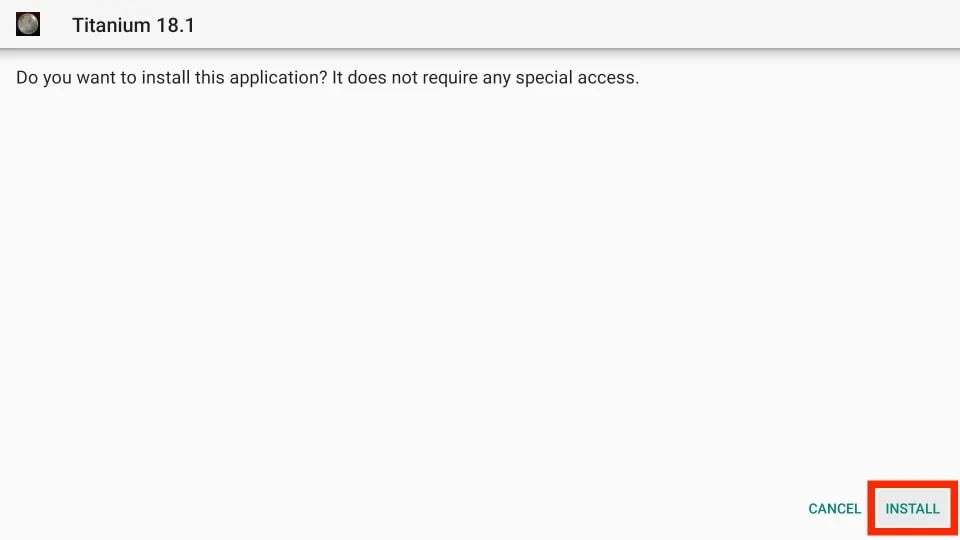
8. When the APK has been downloaded, the Downloader app will instantly initiate the installation procedure. Click the Install option at the bottom right to give your consent to install the Titanium 18.1 Fork.
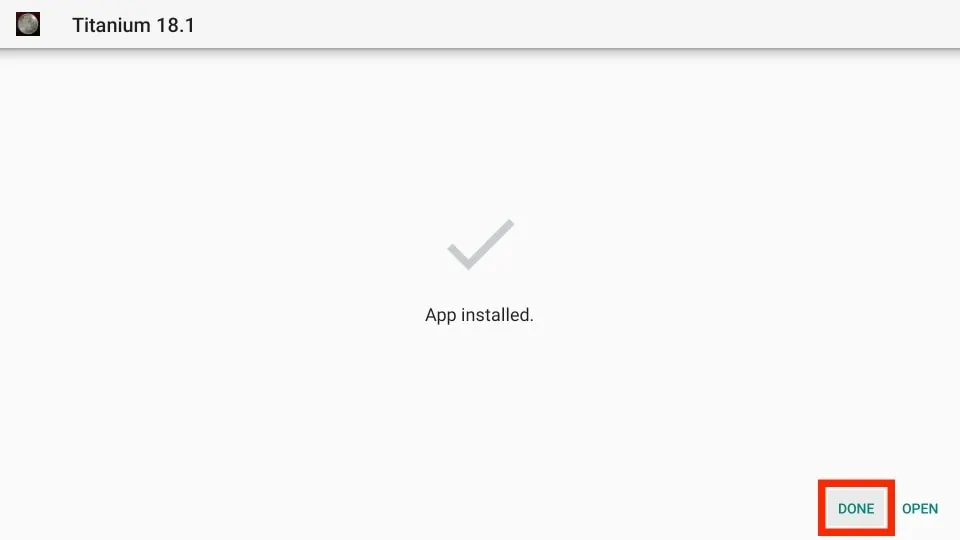
9. Again, wait for a little while. The notification saying App installed means what it says. Titanium 18.1 is installed on FireStick, and you now have a Kodi clone. Don’t click Open yet. We will go back to the Downloader window and delete the APK file. Click Done.
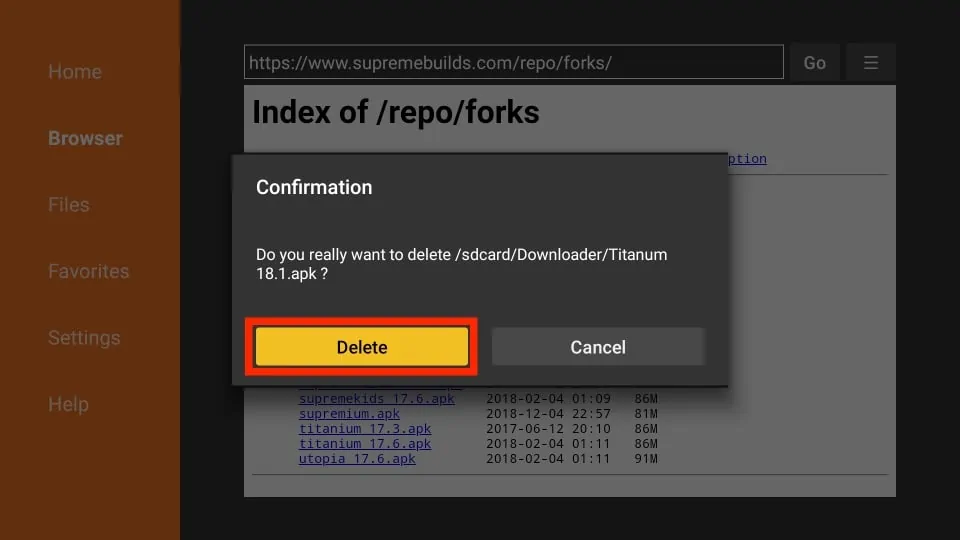
10. Click the Delete button to delete the Titanium 18.1 APK file. The app is installed; you don’t need this file anymore. It is a good idea to clear up space whenever you get the opportunity.
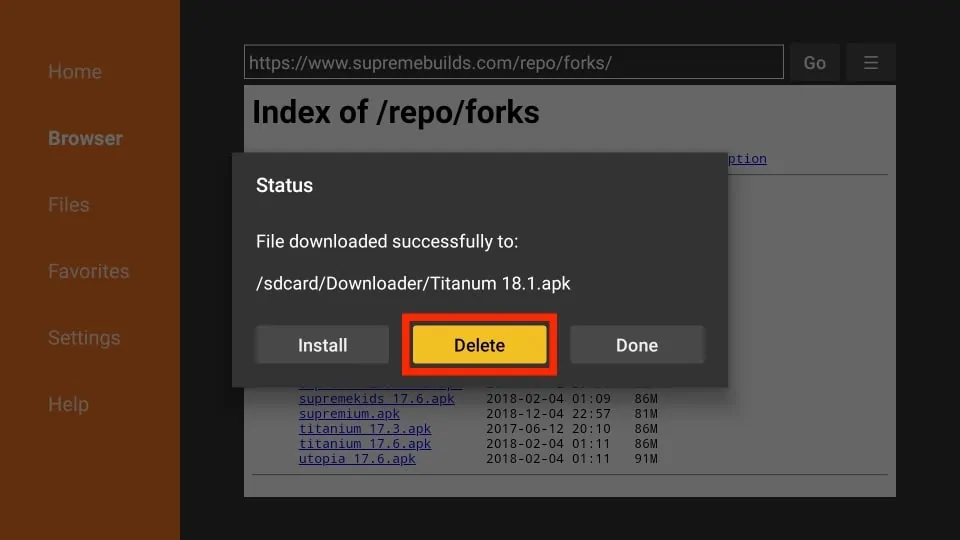
11. Click Delete one more time to confirm your action.
Go back to the FireStick home screen. Press and hold the home button on the remote for a few seconds until the menu pops up. Click ‘Apps’ on the menu. Now, scroll down to the bottom, where you will find the Titanium 18.1 fork icon. As you can see, Kodi and Titanium 18.1 can coexist on the same system.
![]()
How to Install a Build on Titanium 18.1 Kodi Fork
Titanium 18.1 is a replica of the original Kodi 18 Leia. It even gets the same updates as Kodi. So, you can install the builds on Titanium 18.1 Kodi fork as you would install it on the original Kodi.
Go to our list of the Best Kodi builds to explore the top builds we have hand-picked for you. Each build on this list includes a link to the installation guide.
Titanium 18.1 Kodi fork also comes preinstalled with the Supreme Builds Wizard addon. This addon has a decent collection of popular builds. This makes things a bit easier for us. Let me show you how to install Kodi builds on Titanium 18.1 using the Supreme Builds Wizard. Follow the steps below:
Note: The method detailed ahead does not require ‘Unknown Sources’ to be enabled in Titanium 18.1
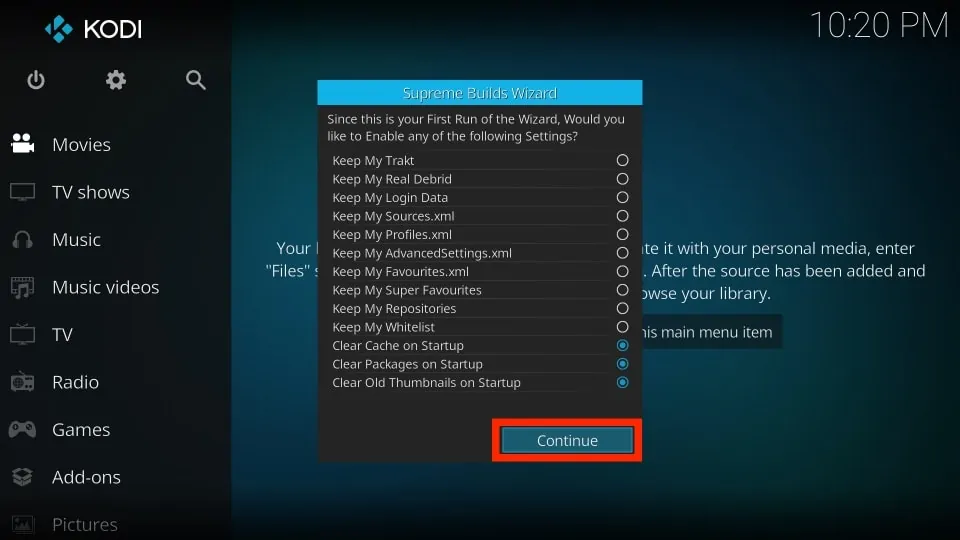
1. Run Titanium 18.1 on FireStick. You will notice that the interface is the same as the original Kodi. You may see certain pop-ups when you run the fork for the first time. The first one looks like what you see in the image below. Click Dismiss.

2. Click Continue on the next pop-up (if you want to enable any settings, choose accordingly).
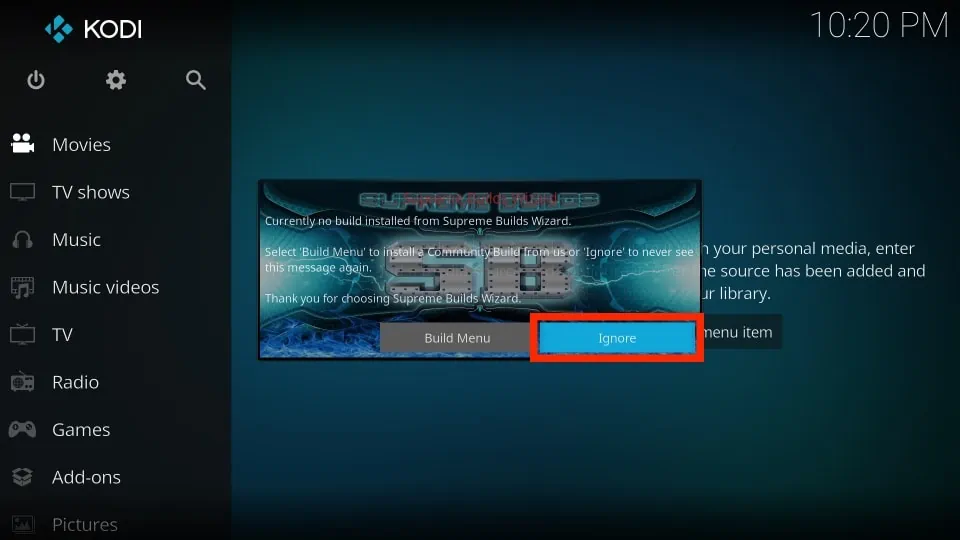
3. The next pop-up asks you to select Build Menu. This will lead you directly to the list of the builds you can install from Supreme Builds Wizard. Click Ignore as I’ll show you how to access the wizard from Kodi’s home screen.
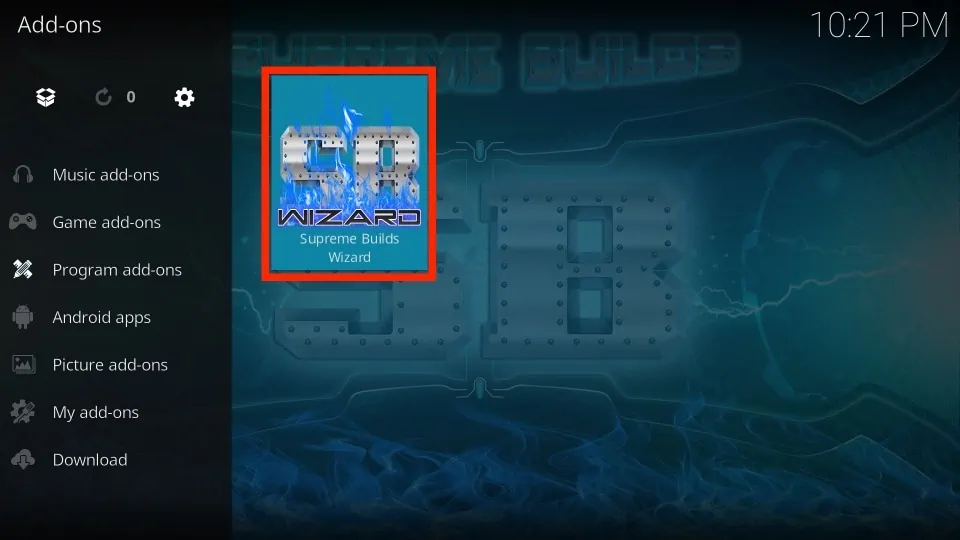
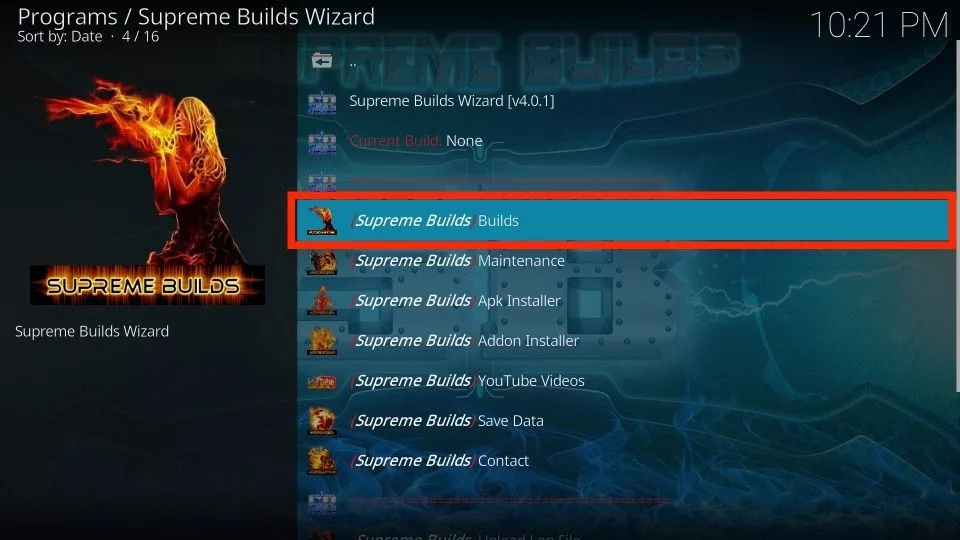
4. From the Titanium 18.1 home-screen, click Add-ons on the left side, followed by Program add-ons on the next screen. Click the Supreme Builds Wizard icon.
5. Select and click (Supreme Builds) Builds.
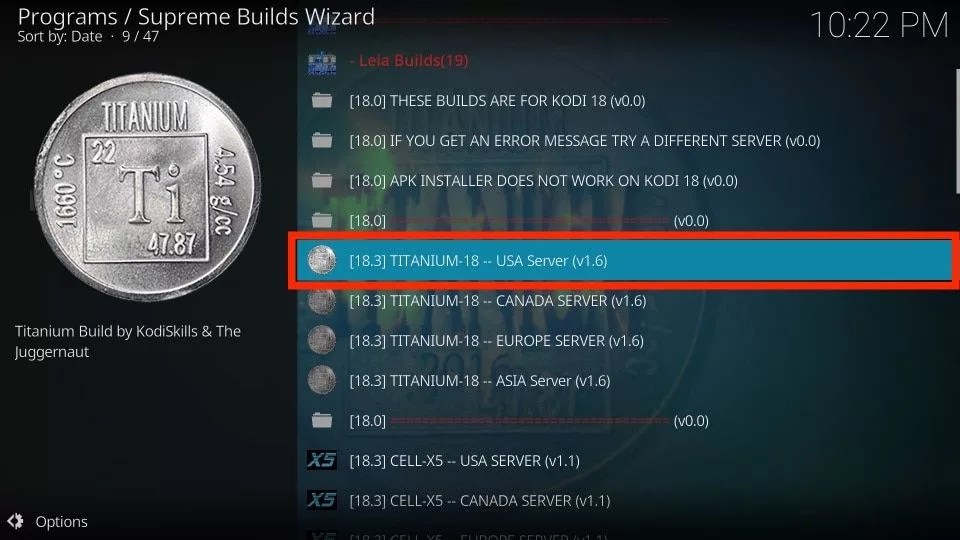
6. You will now be on the Build Menu screen (the same screen you would have seen upon clicking the Build Menu button in Step 3).
Now, all you need to do is choose the build you wish to install and the server from which you will get it. You may pick any server, as it usually makes no difference. But it is best to pick the one closest to your physical location.
Conclusion
Well, that’s pretty much it! You have learned to install multiple builds using multiple instances of Kodi. While I have chosen Titanium 18.1 fork, you may pick any other from several available. If you have any questions or suggestions, fill us in through the comments section below.
Related:
- How to install Kodi on Fire Stick
- How to jailbreak Amazon Fire Stick
- How to Uninstall a Kodi Build
- Best VPN for Fire Stick
- How to install Kodi Addons over Builds

Suberboost Your FireStick with My Free Guide
Stay Ahead: Weekly Insights on the Latest in Free Streaming!
No spam, ever. Unsubscribe anytime.

How do I uninstall a build (or access the main Kodi menu from the build)?
Hi Rich, to access the default or main Kodi menu, find the Interface settings in your current build. Go to the Skin settings and change the default skin to Estuary. However, this will not remove the build data from your device.
If you are using FireStick, here is our guide on how to reset Kodi and restore it to default: https://www.firesticktricks.com/reset-kodi-firestick.html
If you are using it on any other device, you may uninstall and reinstall the Kodi app.
And sorry is there also a way to get live TV to play better that keeps stopping
Is there a way to fix buffering shows keeps freezing
Hi Bonnie, here is our guide on how to fix Kodi buffering issues: https://www.firesticktricks.com/fix-kodi-buffering.html
Is there any way to save your Favorites when adding a build to kodi 17.6 ?
Hi Steven, by choosing Standard Install (and not Fresh Install) during the installation process, you may retain your favorites. However, we can’t say that with a hundred percent certainty.