
This guide provides solutions to prevent buffering on Kodi.
Kodi is a widely used media player among cord-cutters worldwide. Developed by XBMC Foundation, this app turns your device into a powerful media center. It lets you play and stream locally stored media through a wide range of add-ons and builds.
Kodi is supported on various platforms, including Fire TV Stick, FireStick 4K, FireStick 4K Max, Android, iOS, Windows PC, macOS, and Linux.
Kodi is a capable media player, but it has some drawbacks. Some users find it harder to set up than alternatives such as Plex. However, once you understand Kodi, you may not need another media player.
Another issue that affects Kodi users is buffering. Frequent interruptions can disrupt the viewing experience while watching movies or TV shows.
Fortunately, there are several ways to reduce Kodi buffering issues. This guide explains how to fix buffering on Kodi Omega 21 and Kodi Nexus 20. Keep reading.
For Kodi Users!
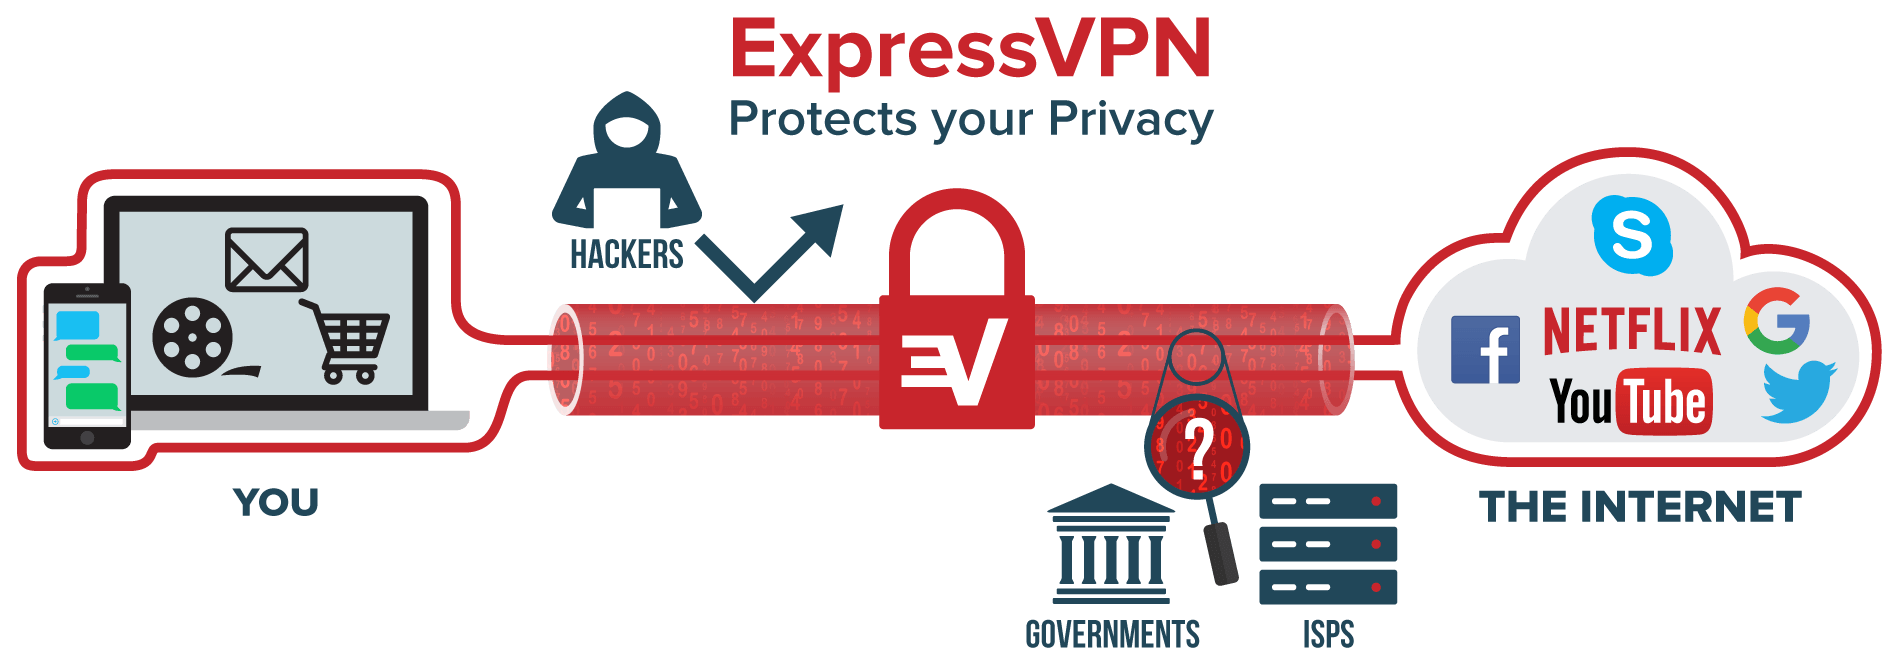
ISPs, hackers, and other third-party entities worldwide may monitor your online activities. For security, privacy, and smooth streaming, it is recommended to use a reliable VPN for Kodi. Your IP address is visible to sites you visit.
I recommend ExpressVPN, a fast and secure VPN. It is very easy to install on any device, including Amazon Fire TV Stick, PC, Mac, and Smartphones. Also, it comes with a 30-day money-back guarantee. If you're not satisfied with their service, you can request a refund. ExpressVPN also has a special deal where you can get 4 months free and save 81% on the 2-year plan.
Read: How to Install and Use the Best VPN for Kodi
How to Fix Kodi Buffering Issues
Enable Unknown Sources on Kodi
Before we proceed, one little thing must be taken care of.
Kodi is designed to provide a safe entertainment experience. To this end, it uses many security features and protocols.
To prevent unsafe builds and add-ons from sneaking in, Kodi does not permit installation from unknown third-party sources by default. But not all third-party add-ons are unsafe, especially not the ones we will learn about in this guide.
To install these add-ons, we will need to temporarily enable Unknown Sources. Here is how you can do it:
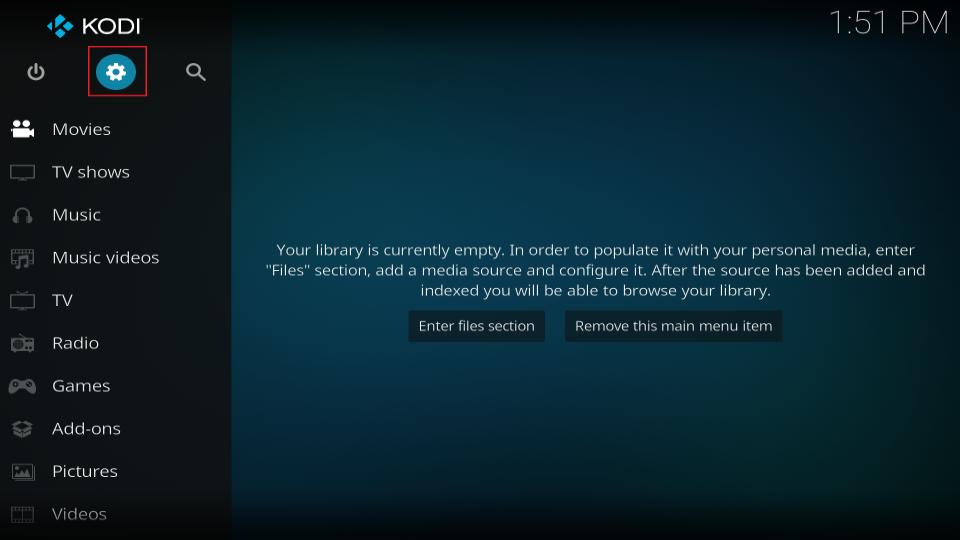
Step 1: Click the Settings (cog icon) on the top right of the Kodi home screen.
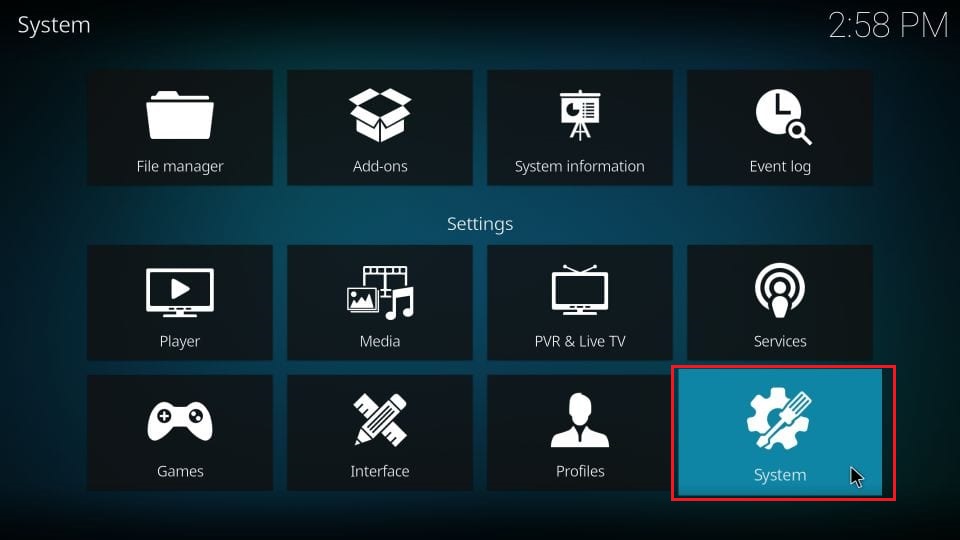
Step 2: Click System.
Step 3: Click ‘Add-ons’ on the left and then move the ‘Unknown Sources’ toggle/switch to the right to enable it.
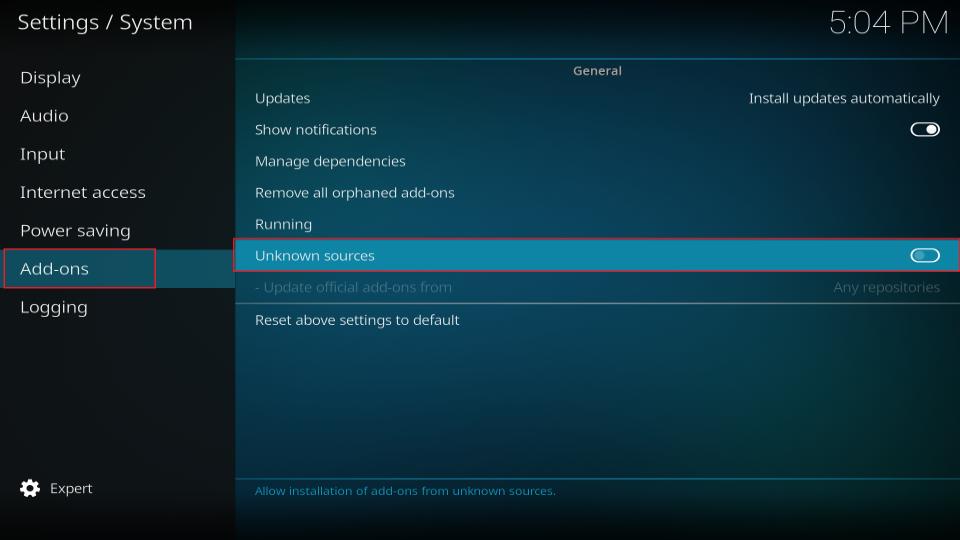
That will be it! Ensure you disable Unknown Sources after installing all the desired add-ons.
Which Platforms Do These Methods Work On?
Kodi uses the same interface across all platforms and devices (except for a few platform-specific additions). Whether you want to fix Windows, Android, iOS, or Amazon FireStick Kodi buffering issues, the methods below will work the same.
Kodi Buffering Fix: Optimize Cache Size
Cache is auxiliary memory that helps with high-speed retrieval. While it is widely used on computers, video cache is especially important for video streaming and playback.
When you stream a video over the internet, the entire file is not downloaded in your browser or app at once. Instead, a small portion of the video is cached and stored temporarily, usually in your device’s RAM. You may notice that if your internet connection drops while streaming, the video continues to play briefly before stopping. The portion that keeps playing after the connection is lost is the part already cached on your local device.
To reduce Kodi buffering issues, two key steps are required. First, allocate sufficient cache memory to Kodi within your device’s RAM. Second, clear Kodi’s cache regularly, as previously played videos can consume the allocated space.
In the following sections, we will explain how to adjust Kodi buffer settings to optimize cache usage and how to clear the cache effectively. There are five methods to fix Kodi buffering issues. Methods 1 to 4 work on all devices, including Amazon Fire TV and FireStick, while Method 5 does not apply to FireStick.
Method 1: How to Stop Kodi Buffering Using Ares Wizard
Ares Wizard is one of the most widely used Kodi maintenance and diagnostic tools. With this tool, you can tweak cache settings and resolve Kodi buffering problems. But before proceeding, install Ares Wizard on Kodi.
Now that you have installed Ares Wizard, let’s see how we can fix the Kodi buffering problem by optimizing the cache.
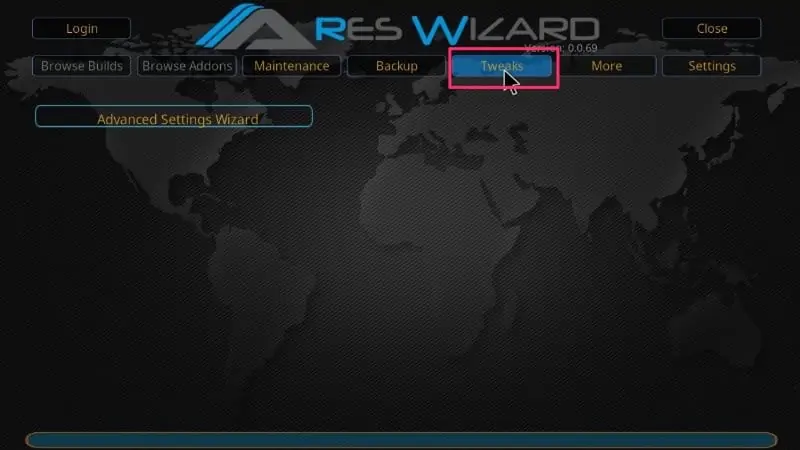
Step 1: Launch Ares Wizard and click the ‘Tweaks’ button at the top
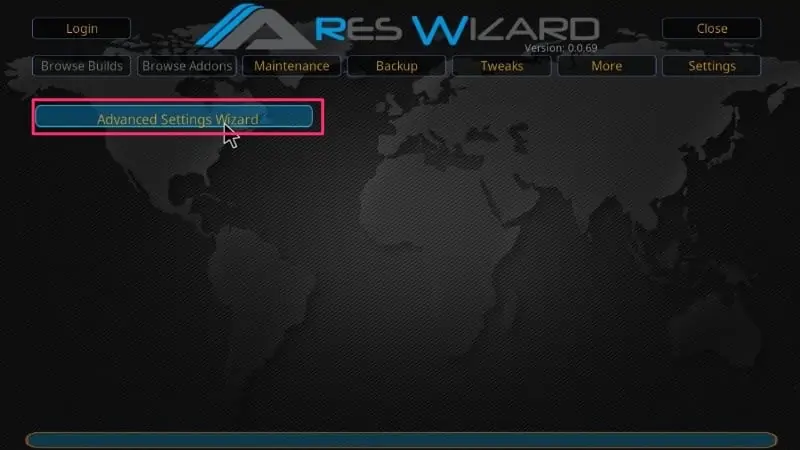
Step 2: Now click the ‘Advanced Settings Wizard’ button
You need to click the ‘Next’ button on the bottom right. But, before you do, do not forget to read the word ‘Caution’ from the developers of this add-on.
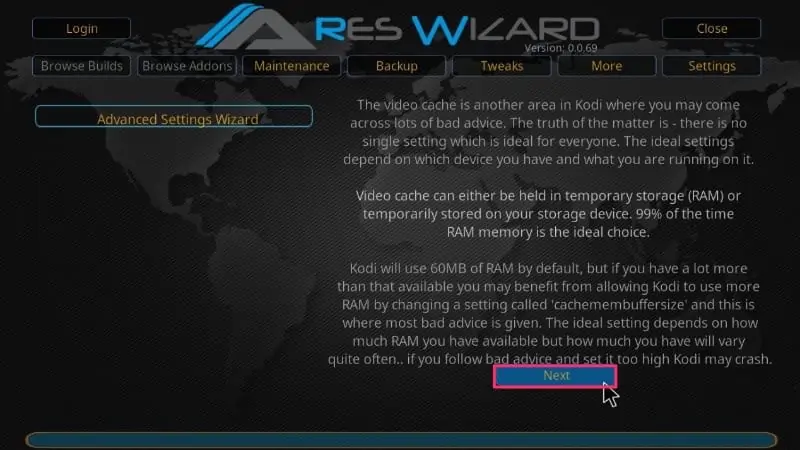
In a nutshell, what you need to know is that:
- There is no single Cache size allocation that is perfect for everyone. It largely depends on the device on which you are using Kodi and the system specs (especially RAM size)
- You can place the cache in the device storage (such as a hard drive) or RAM (which is highly recommended)
- Kodi uses 60MB of RAM for caching purposes. But if you have a lot of spare RAM, you can bump up the size
Step 3: Now that you understand the above points, click ‘Next’
Now, Kodi will display the available RAM and suggest the ideal allocation size for video cache memory (1/3 of the available RAM). But it is also recommended to keep a 10% margin in case other programs further consume memory.
For instance, if you have 900 MB of memory, 1/3 of it would be 300 MB, and the 10% margin would be 30 MB. So, the ideal allocation for video cache memory is 270 MB.
NOTE: Too much memory allocation to the Kodi cache may affect performance.
Step 4: Click the ‘Generate Settings’ button on the bottom left
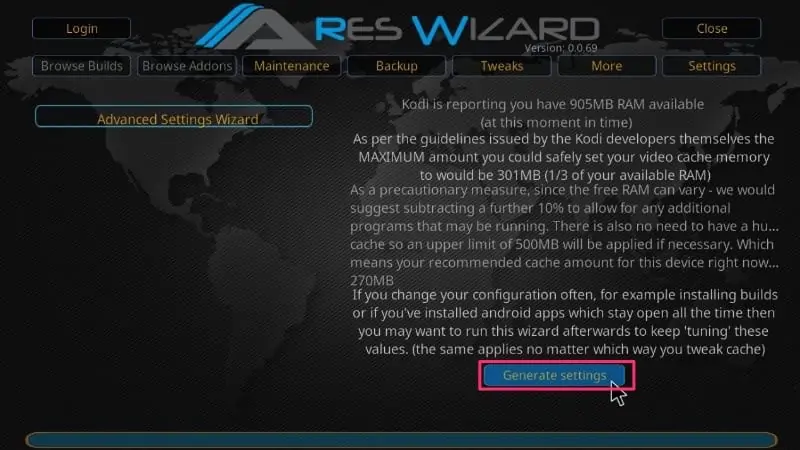
Step 5: On the next screen, Video Cache Size is what you need to change by dragging the slider left or right (check the image below)
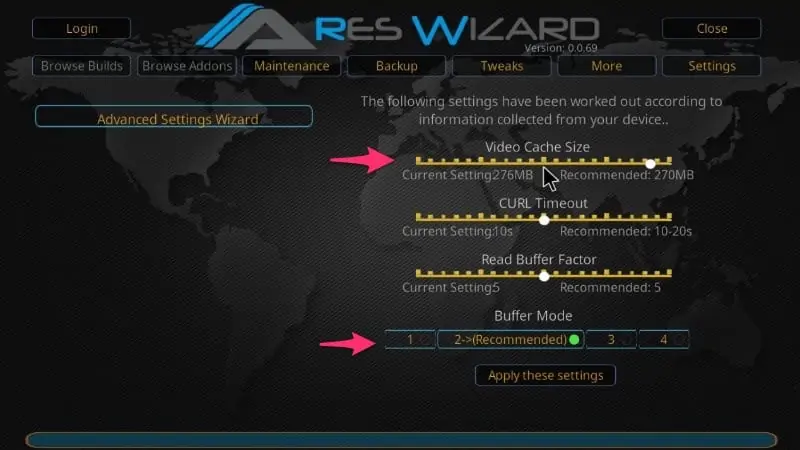
As you can see, I had 900 MB of spare RAM. Hence, Ares Wizard recommended 270 MB to me.
Ares Wizard also offers 4 Buffer Modes, as you can see on the bottom just above the ‘Apply these settings’ button. Here is what these modes do:
- Mode 1: In this mode, Kodi will buffer every streaming service that is available on the internet, including those from cloud sources and FTP
- Mode 2 (recommended): the default mode. In this mode, Kodi will attempt to buffer almost everything, including files played from local storage.
- Mode 3: In this mode, the buffering is restricted to website streams only
- Mode 4: Buffering is completely disabled
If you are experiencing Kodi buffering issues despite having sufficient RAM, ensure that Mode 2 is selected. This mode offers the smoothest playback as it caches much of the video beforehand.
Delete Kodi Temporary Files using Ares Wizard Maintenance
If Kodi keeps freezing or crashing regularly, you may have run out of storage space. This usually happens with low-storage devices. For instance, if you have a handheld Android device with 16 GB of storage and use Kodi regularly with various add-ons, you may soon run out of storage memory. Besides finding a Kodi buffering fix, it will be worth your while to resolve this issue for a smoother, more enjoyable entertainment experience.
Step 1: First, click the Maintenance button at the top to clear the temp files. You should see a screen like this:
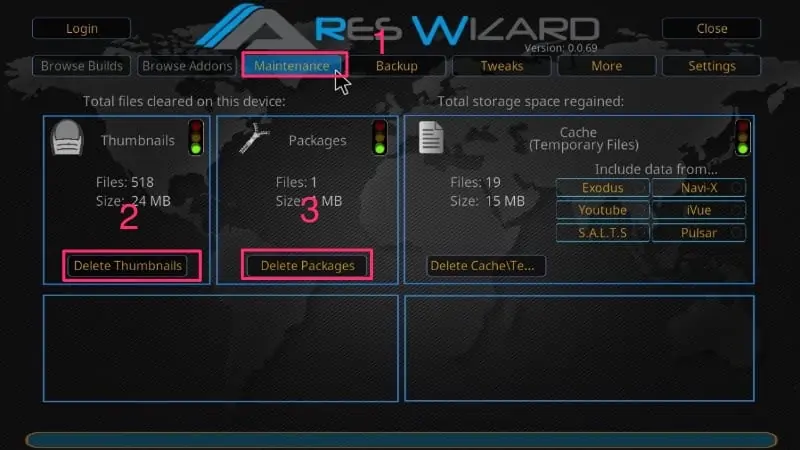
Step 2: Now, click the following buttons one by one:
- Delete Thumbnails
- Delete Packages
Since I recently deleted Thumbnails and Packages, their storage space has decreased. However, together, they took up nearly 1 GB of space.
If you have any stored/saved Caches, they also take up a lot of space. You can clear the cache on Kodi to free up substantial storage space. Do not worry, though! Deleting the cache will not affect the settings discussed in the above section.
Method #2: Fix Kodi Buffering with A VPN
Most Internet Service Providers (ISPs) make lofty claims about providing their customers with high-speed, unlimited Internet services. While their promises are kept for most average users, bandwidth throttling often affects heavy streamers. That may or may not be illegal, depending on your country. Also, sometimes they include clauses in the fine print of the Terms & Conditions that we accept without even reading them; that’s what most of us do.
ISP throttling curtails internet speed when a user exceeds a data usage limit. This, as I mentioned earlier, typically occurs with heavy users. If you love to watch movies and shows online using services like Kodi, you might just as well fall into their bracket of heavy users. The legal aspects of throttling have become increasingly obscure since it was announced a few months ago that Net Neutrality would be repealed in the United States shortly.
Using a reliable VPN is the best way to prevent internet throttling and substantially reduce Kodi buffering issues. A good VPN service does more than conceal your identity online. It also masks your data usage details from your ISP. Put, if you are using a VPN, your ISP will no longer be able to see what kind of data you use. They would only be able to determine the amount of data being used.
Several users worldwide have reported that throttling affects those who stream videos, download from torrents, and share heavy files on the web.
You will have no reason to worry about ISP throttling with a VPN. I use ExpressVPN, which is currently the fastest VPN available.
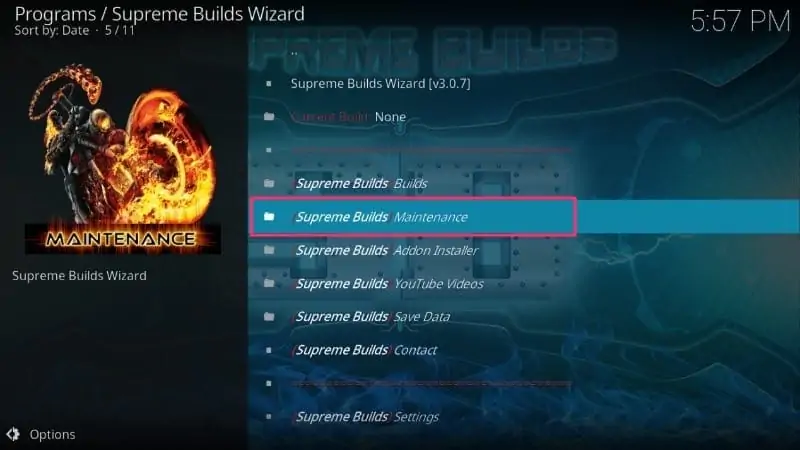
Method 3: How to Stop Kodi Buffering using Supreme Builds Wizard
Supreme Builds Wizard is another popular maintenance tool for Kodi. Let’s learn more about it.
First, run the Supreme Builds Wizard from the home screen or Add-ons > Program Add-ons.
Step 1: Click on Supreme Builds Maintenance
Step 2: On the next screen, you need to click ‘(Supreme Builds) System Tweaks/Fixes’
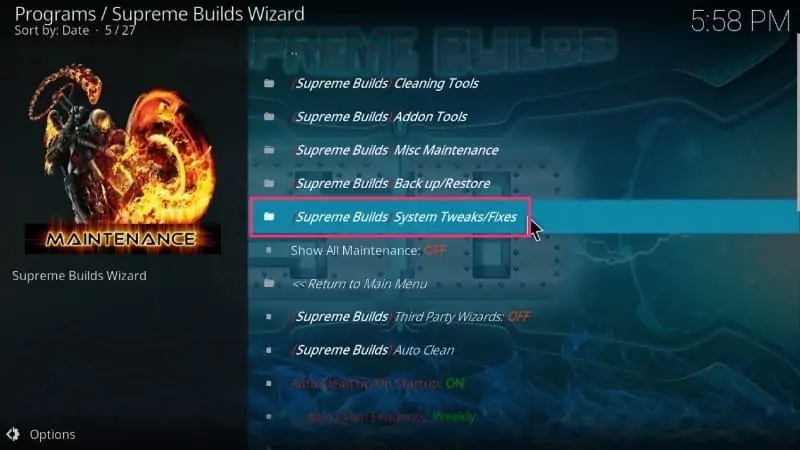
Step 3: Click ‘Advanced Settings’ on the next screen
Step 4: Now, click on Quick Configure AdvancedSettings.xml
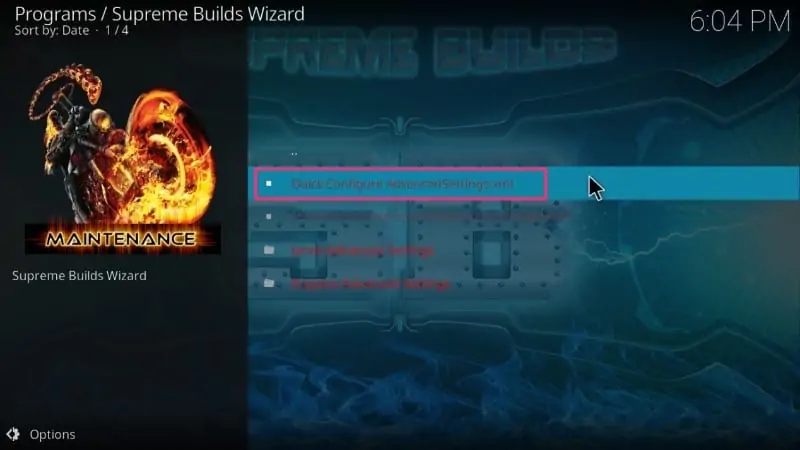
Step 5: We advise against changing the recommended settings. Just take a quick look and then click the ‘Write File’ button on the bottom left.
Step 6: If you see any error message asking whether you wish to remove an active AdvancedSettings.xml file, click ‘Remove Settings.’ If you are using the Supreme Builds Wizard for the first time to update these settings, you will not see this warning message.
Method #5: How to Fix Kodi Buffering Issues Using a Code
In this method, we will plant a file with a specific filename and specific codes in the user data folder inside Kodi’s installation folder on your system.
If Kodi keeps buffering even after following the methods above, you may see a significant improvement after completing this troubleshooting process. While this method may seem technical, I will try to make it as simple as possible. Just follow each step carefully. You will not even have to launch Kodi.
Steps for Windows PC/Laptop
If you are a Windows user, here is what you need to do:
Step 1: Open the Notepad app (press Windows + R together, type in Notepad, and hit Enter key | alternatively, look for Notepad using Windows search/Cortana)
Step 2: Copy and paste the codes below into Notepad:
<advancedsettings>
<network>
<buffermode> 1 </buffermode>
<readbufferfactor> 1.5 </readbufferfactor>
<cachemembuffersize> 104857600 </cachemembuffersize>
</network>
</advancedsettings>
Step 3: Now save this file anywhere on your hard drive with the name advancedsettings.xml (DO NOT change the file name)
Step 4: Again, press Windows + R key to bring up the Run dialogue box and copy the following into it: %APPDATA%\kodi\userdata and now press Enter.
OR
Use Cortana or the Windows search function to copy the code %APPDATA%\kodi\userdata
Step 5: This step opens a folder. Copy the advancedsettings.xml file you created a little while back into this folder.
Step 6: Go ahead and play a video with Kodi. You will notice that it has considerably resolved Kodi’s buffering issues.
Steps for Other Platforms
Like Windows, the idea is to copy the advancedsettings.xml file into the device’s user data folder. However, the folder location varies across devices.
Create a file named advancedsettings.xml with the code above, regardless of the device or platform used.
Once that’s done, use a file explorer/manager app to navigate to the user data folder as follows:
- Android –
Android/data/org.xbmc.kodi/files/.kodi/userdata/ - iOS –
/private/var/mobile/Library/Preferences/Kodi/userdata/ - Linux –
~/.kodi/userdata/ - Mac –
/Users/<your_user_name>/Library/Application Support/Kodi/userdata/
How to Fix Kodi Buffering on an Addon
I have a special section for addons because these are used by thousands worldwide. These have a massive collection of content and offer high-quality streaming.
The methods I outlined above to resolve buffering issues on Kodi are common steps that all users should follow. The steps below can be performed for any Addon. You can use these steps on any device, including an Amazon Fire TV Stick.
Fix Kodi Buffering on Addons by Clearing Cache
- Step 1: Open the addon by navigating to Kodi Home Screen > Add-ons > Video Add-ons.
- Step 2: Scroll down and click ‘Tools’.
- Step 3: Click the Clear Cache option
- Step 4: Click ‘Yes’ to confirm your action and to clear the Kodi cache.
This should work for most addons. If you don’t find the option to clear cache within the addon, you can always use the Ares Wizard method as provided above.
Final Words on Kodi Buffering Issues
Kodi buffering issues have marred the user experience and continue to do so. Thankfully, we have some practical solutions that considerably reduce or eliminate buffering problems.
You should notice a significant improvement in buffering speed. Allocating a larger video cache and clearing it also play an essential role in resolving the issue. I hope the methods I provided above helped you resolve your Kodi buffering issues. If none of the solutions work for you, reset Kodi for a fresh start.

Suberboost Your FireStick with My Free Guide
Stay Ahead: Weekly Insights on the Latest in Free Streaming!
No spam, ever. Unsubscribe anytime.

Hi,
I am about to buy some box for Kodi. I don´t know if I should buy Vero 4k+ or Odroid N2+.
Can you please reccomend me?
I know that Vero 4k+ has integrated 16GB eMMC and better OSMC system for Kodi. Odroid N2+ has 4GB RAM.
My usage should be just for the Kodi and streaming UHD films from internet. Internet connectivity is 20mbps so for some UHD films I need to set more cache size for buffering – it is better to have 4GB RAM Odroid box, or 2GB RAM Vero box is ok?
Thank you.
Hi Maro, we have tested a bunch of Android boxes and believe that Mi Box, Nvidia Shield, and Tivo Stream 4K are the best. However, we prefer a FireStick over any Android Box. You can easily install Kodi on a Fire TV Stick.
I followed the Ares Wizard tutorial and my Fire Tv 4K started to reboot randomly. So I tried to reverse it, but it didn’t solve it. So I did a factory reset, and the problem was still there. After some tests with the original and some other power supplies and cables, I found it only stabilizes when I connect it to my projector’s USB port, that is only 1.5V. It seems it has to be underpowered to work, but this causes other issues, the UI get’s sluggish, Kodi buffers even more, etc. Do you guys have now any other suggestion on how to fix this?
Hi Joe, it could be an issue with the FireStick power adapter. You may want to buy a new one.