In this tutorial, you will learn to install The Diamond Build (formerly Diamond Dust Build) on Kodi 19 Matrix and lower versions. The instructions provided here will work on Amazon FireStick, Fire TV Cube, Fire TV Stick 4K, Android Mobiles, Windows PC, Mac, and all the Kodi compatible platforms.
Diamond Dust Kodi build has been rebranded as The Diamond Build. It is now lighter and better. This build is preloaded with plenty of top-grade video-addons. It lets you stream live TV, on-demand content like movies and shows, sports-related content, and a lot more. It is a moderately-sized build that offers top-notch performance on all devices. After using the Diamond Dust Kodi build, I realized that it must be the part of our top Kodi Builds too.
In this guide, I will give you the detailed instructions to install Diamond Dust build on Kodi. Builds are easy to install, but make sure you follow each step carefully and in the order it has been arranged in this tutorial.
Attention Kodi Users!
Governments and ISPs worldwide monitor your online activities. If you use third-party Kodi addons, you should always use a reliable Kodi VPN to hide your identity and prevent issues with your streaming experience. Currently, your IP is visible to everyone.
I use ExpressVPN, the fastest and most secure VPN in the industry. It is very easy to install on any device, including Amazon Fire TV Stick, PC, Mac, and Smartphones. It also includes a 30-day money-back guarantee. If you're not satisfied with their service, you can request a refund. ExpressVPN is offering a special NEW YEAR deal: get 4 months free and save 78% on the 2-year plan.
Install and Use Best Kodi VPN | Why you must use a VPN at all times
Install Diamond Dust Kodi Build
If you want to install a build from a third-party source, the Unknown Sources in the Kodi security settings must be turned on. So, before getting started with the installation steps, follow the steps below:
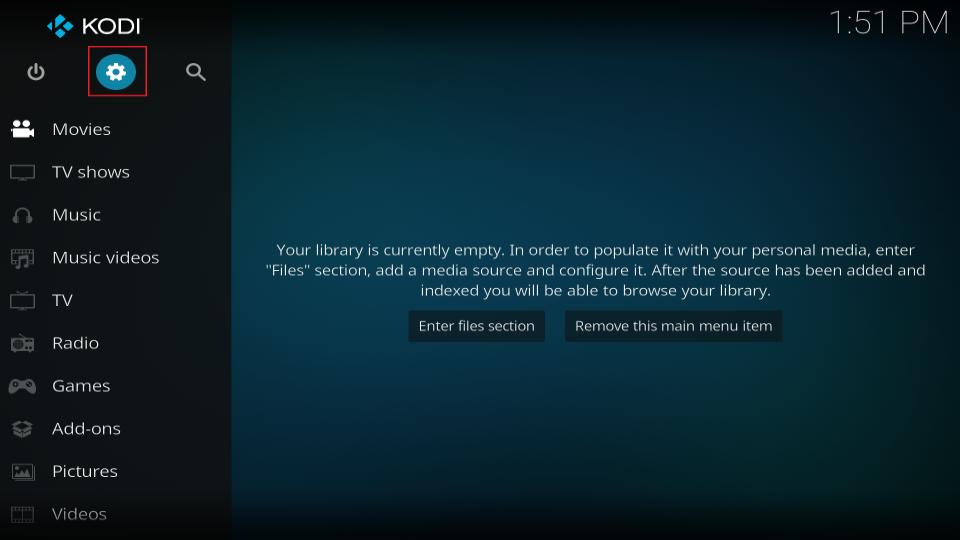
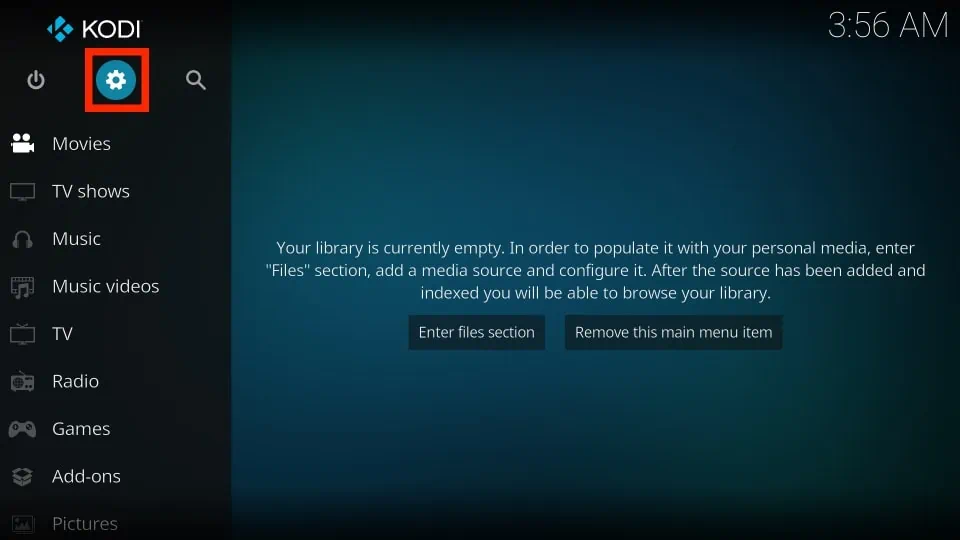
1. Go to the Kodi Settings from the home screen. You can do that by clicking the cog/gear icon on the top-left.
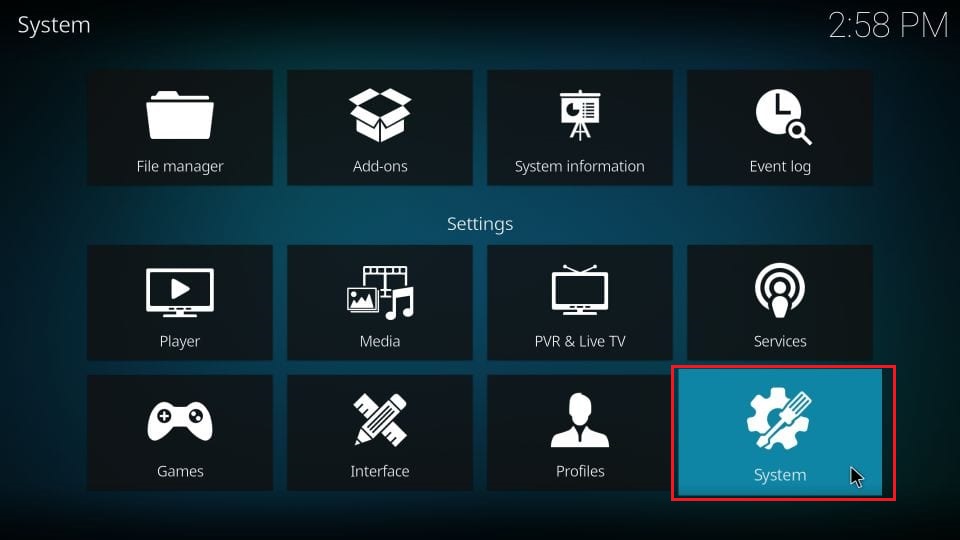
2. Now, navigate to and open System (or System settings if you are using Kodi 17 Krypton).
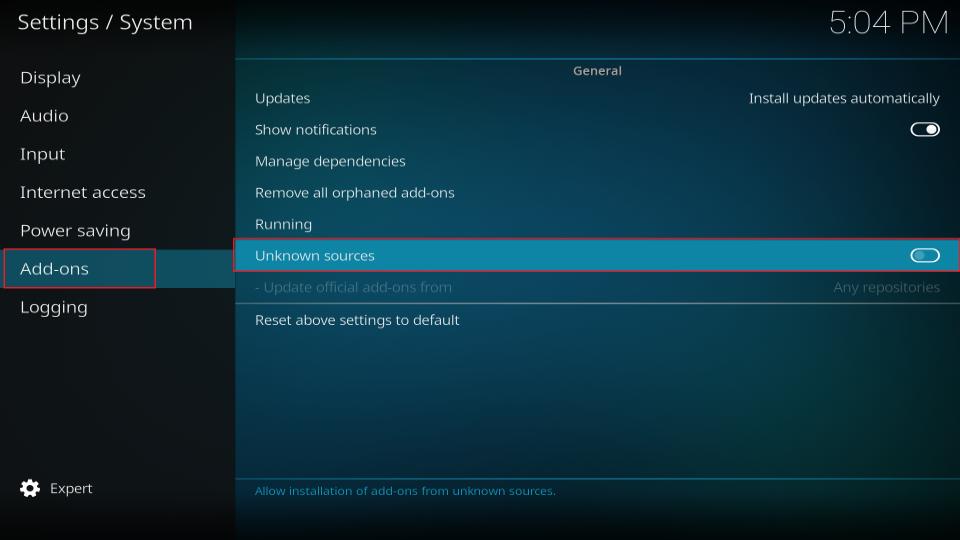
3. Next, click Add-ons on the left of the following window. On the right of the same window, you will see Unknown Sources. If it is switched off, go ahead and turn it on by moving its toggle to the right.
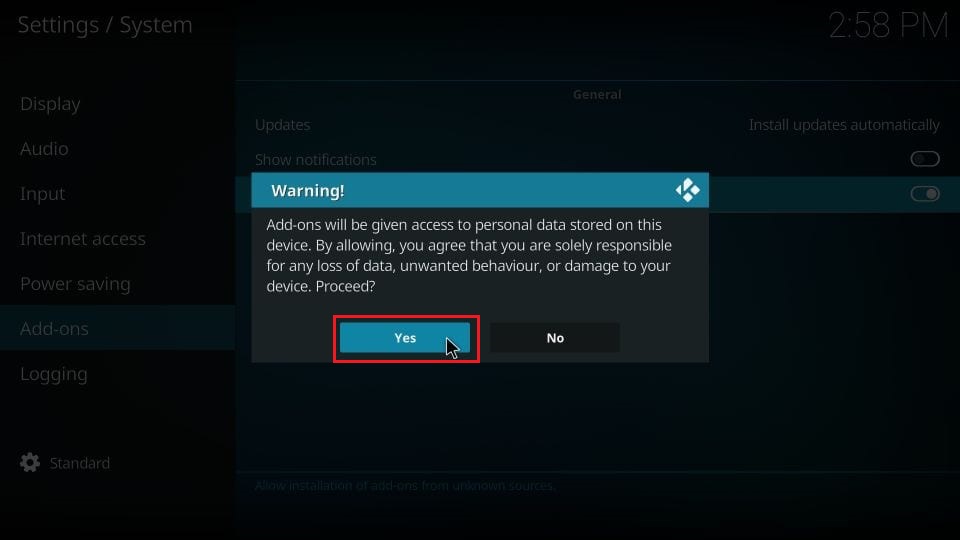
4. Upon turning this option on, Kodi will warn you of the potential threats to your device. Diamond Dust Kodi build is safe. I have used it personally. So, click Yes.
When this is taken care of, you can get started with the installation procedure. There are lots of steps involved in this process. You just need to follow them in the same order as they have been laid out in this guide. You will have Diamond Dust Kodi Build in just a few minutes. To make things even easier, I am breaking down the process in the following parts:
- Part 1: Add the repository source to Kodi
- Part 2: Install Diamond Repo and Diamond Build Wizard
- Part 3: Install Diamond Dust Kodi Build
We will now go through each part separately.
Legal Disclaimer: This guide is for informational purposes only. FireStickTricks.com does not own, host, operate, resell, or distribute any apps, services, or content mentioned. Some services discussed may be unverified, and FireStickTricks.com cannot confirm their legal status in every region. Users are responsible for ensuring that any content they access complies with applicable laws.
Part 1: Add the Repository Source to Kodi
To install any repository or add-on on Kodi, you must either download the zip file on your hard drive or add the source URL to Kodi that points at the zip file. The latter is usually quicker. So, here is how you can add the source URL:
1. Open the Kodi Settings from the Kodi home-screen.
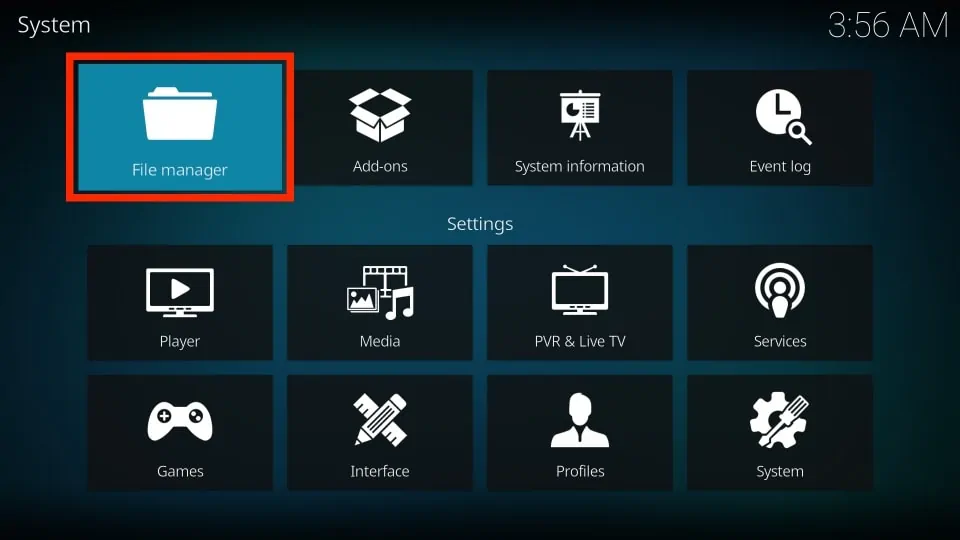
2. On the next window, select and open the option File manager (in Kodi 17, you will find this option on the bottom right).
3. Now, click and open the Add source item on the following window (as you see, this option is on the left as well as right. You may click any you like).
Note: If you have already added too many sources, you may not see Add source on the screen. You will need to scroll down to the bottom of the list first.
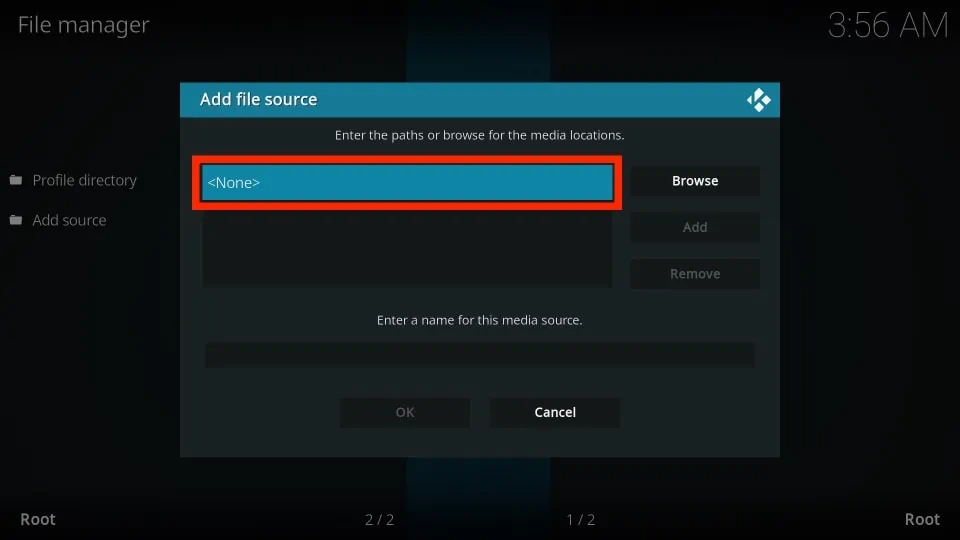
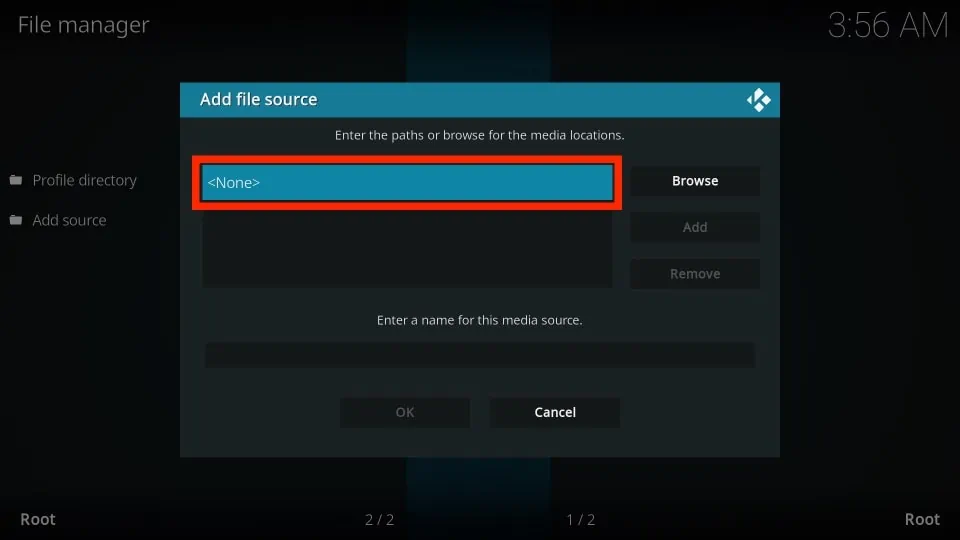
4. When you see the following screen, click <None>.
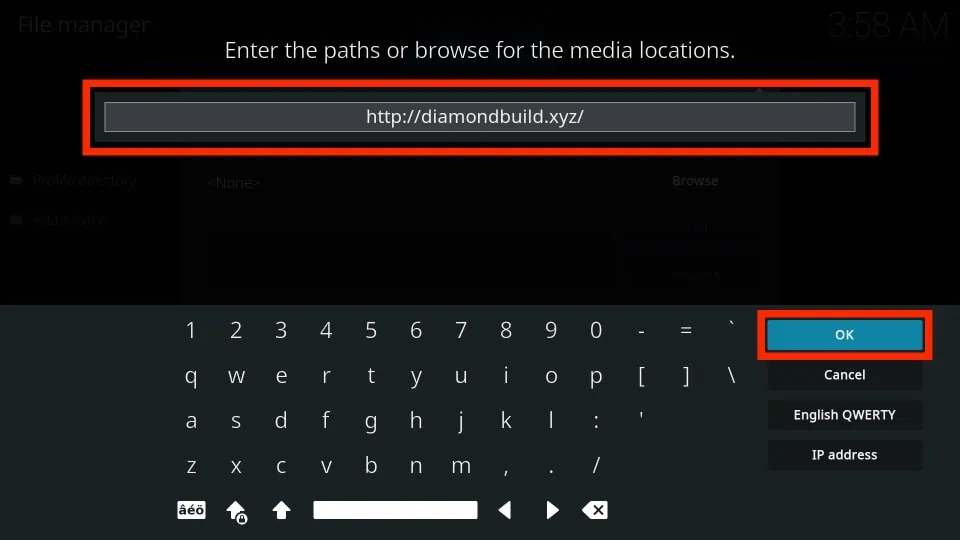
5. This is the window where you will enter the following URL: http://diamondbuild.xyz/
Update: Diamond Dust Build is no longer available. Please try another Kodi build from our collection of Top-rated Builds for Kodi.
Take care while typing in the URL. Even a single mistake will prevent you from installing the Diamond Dust Kodi Build. When done, click OK.
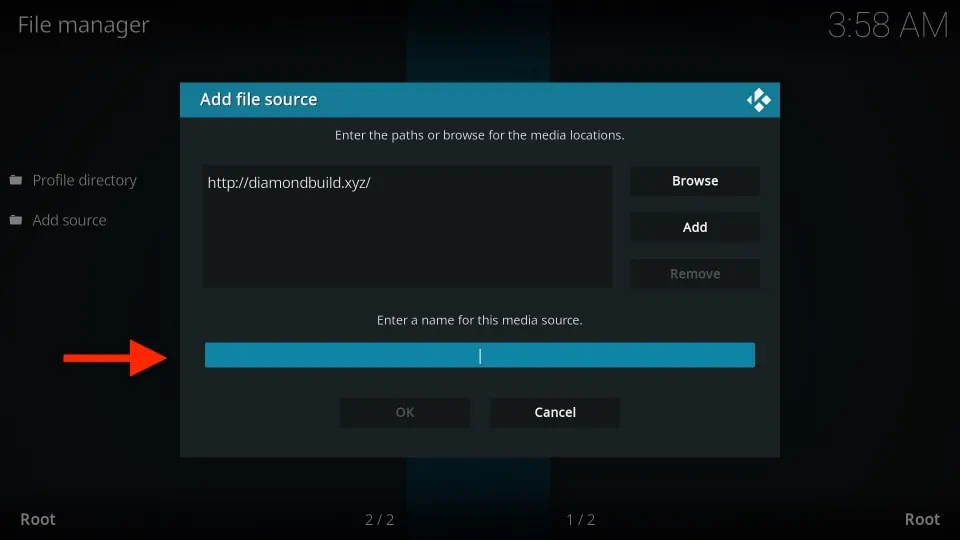
6. You also need to enter the name for this source. Select the box where you can enter the name.
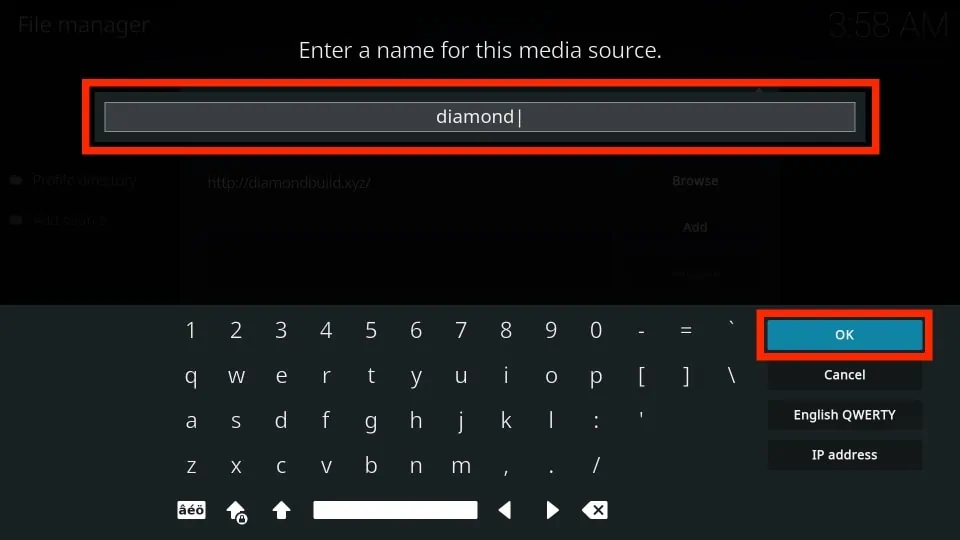
7. Let’s go with diamond and click OK.
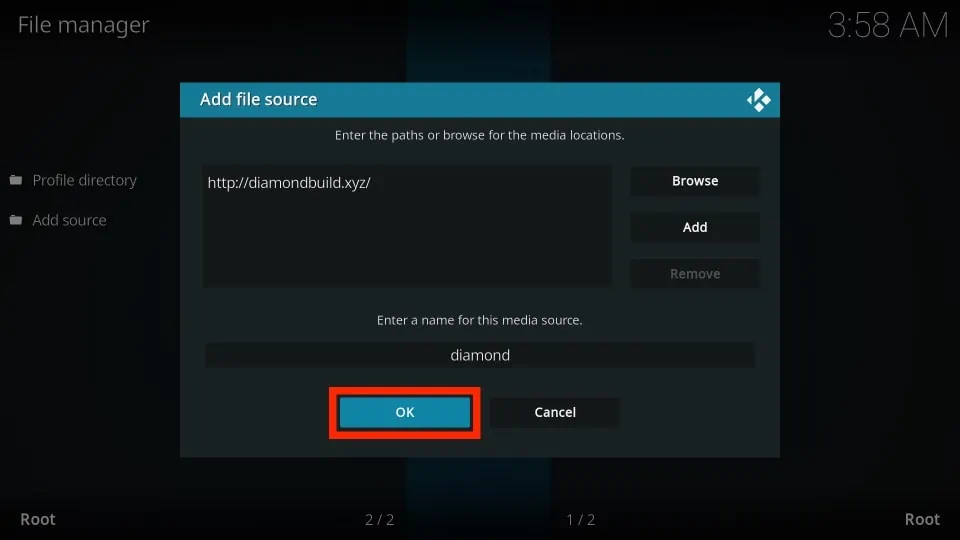
8. Click OK to save the changes.
This is how you add the source to Kodi for the Diamond Dust build.
Part 2: Install the Diamond Repo and Diamond Build Wizard
Diamond Repo is the repository that you will fetch from the source you added a little bit ago. From this repository you will install the Diamond Build Wizard. This is the Wizard from which you will eventually extract the Diamond Dust build on Kodi.
Here is how it goes:
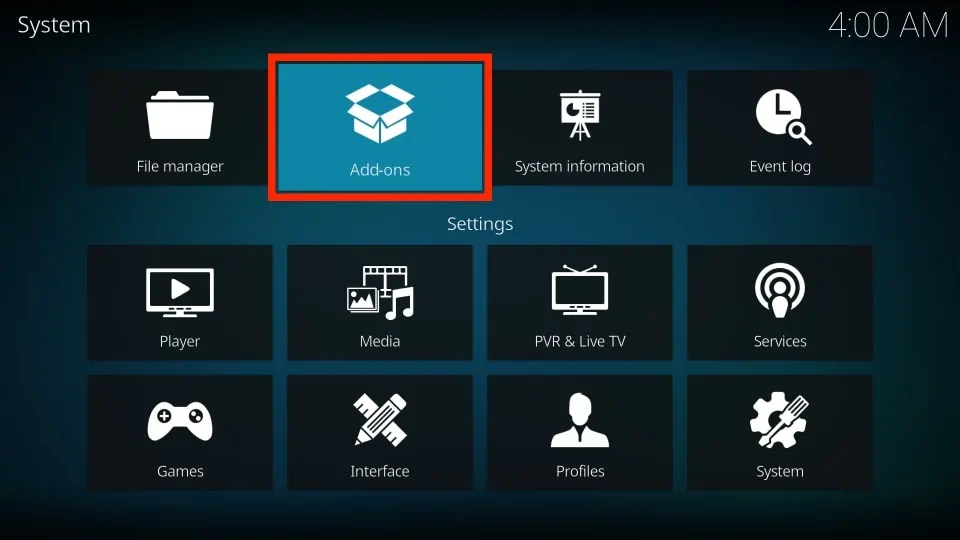
1. Go to the Settings page by clicking back on your device once. Then, select Add-ons.
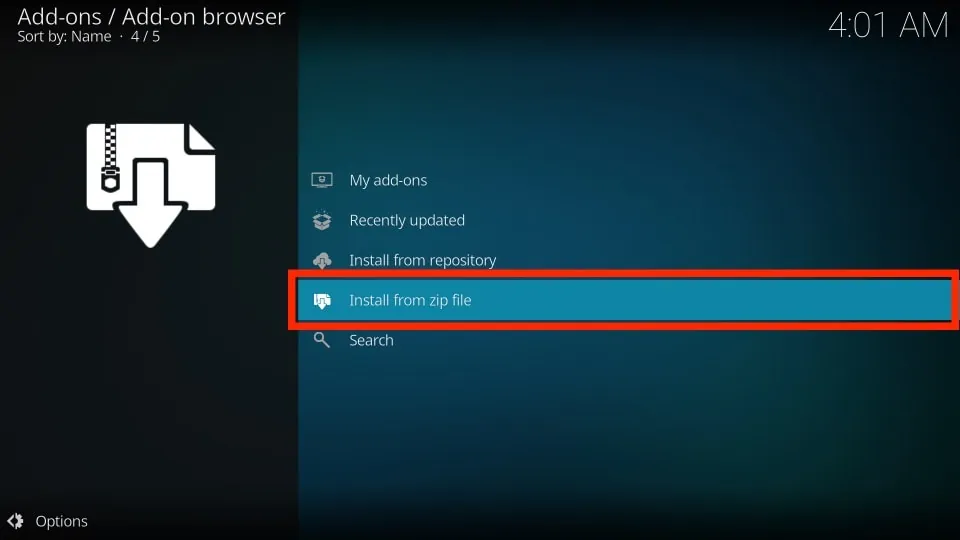
2. Select the item Install from zip file.
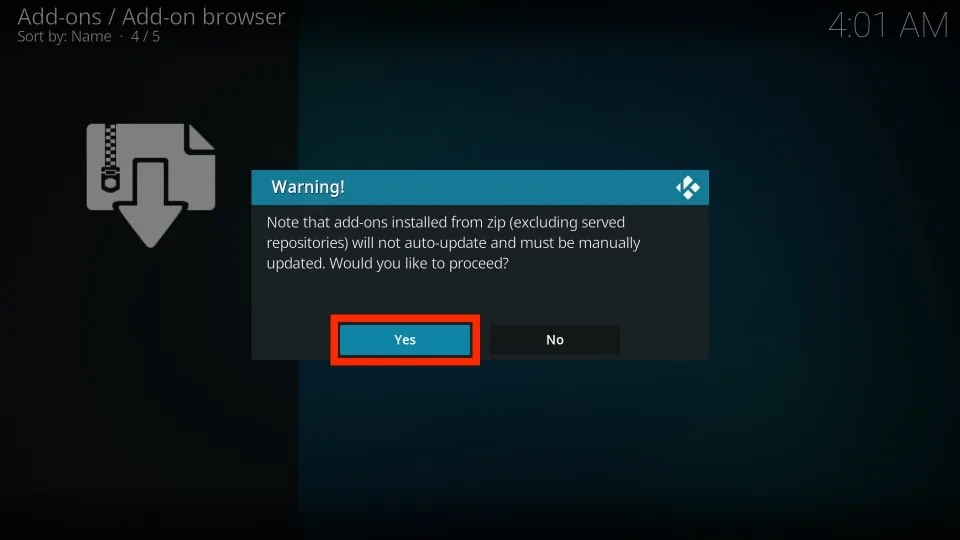
3. Click Yes on the warning pop-up screen.
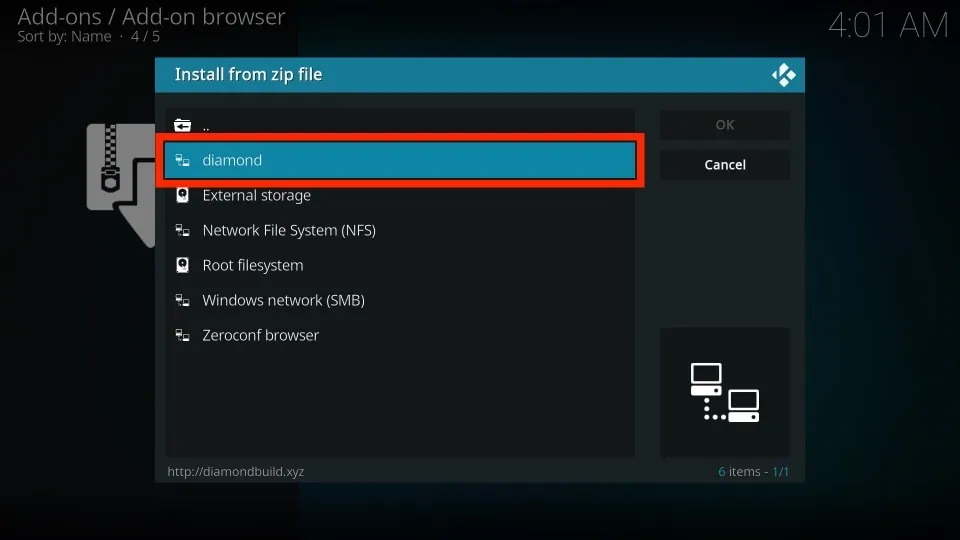
4. Find and click diamond (or any other name you might have added earlier for the source).
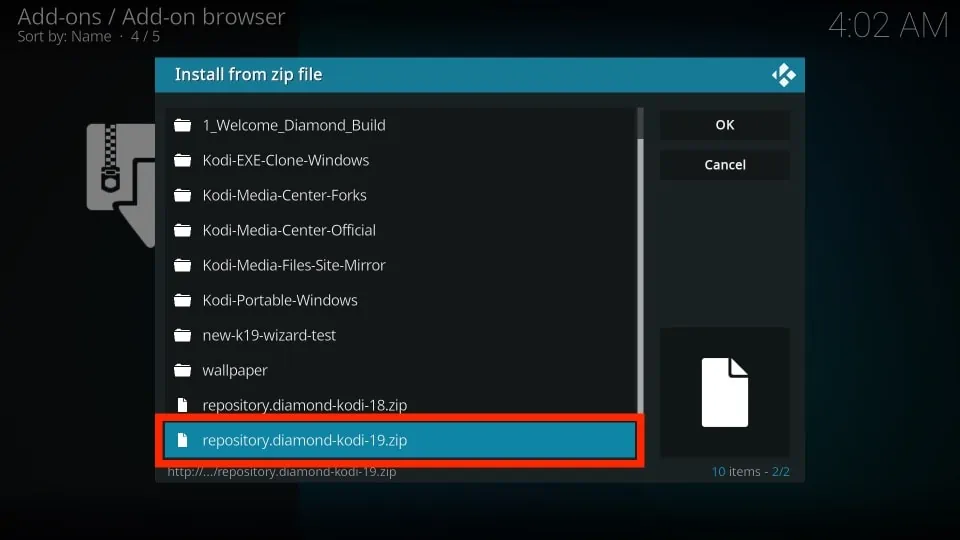
5. On the next screen, click repository.diamond-kodi-19.zip on Kodi 19. On Kodi 18, click repository.diamond-kodi-18.zip.
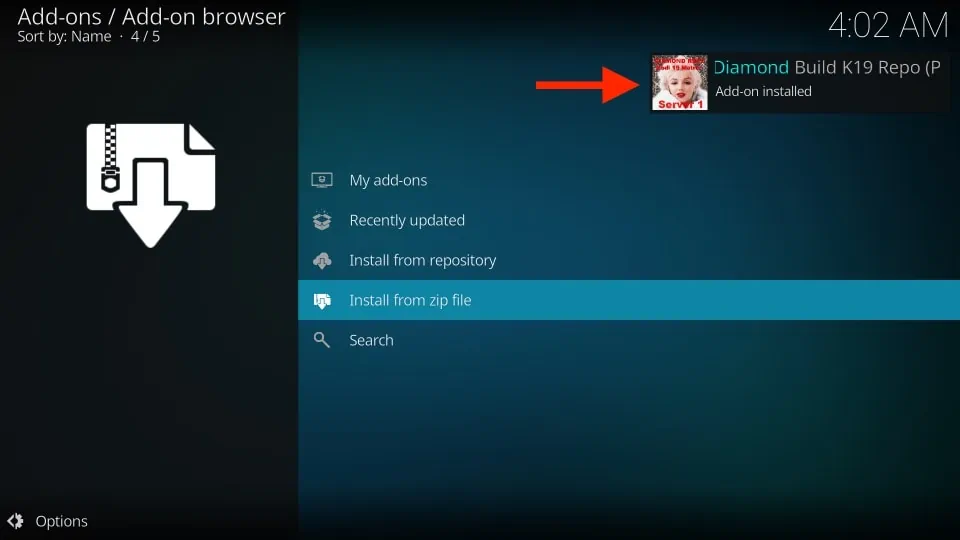
6. In about a minute you will see the message on the top right saying Diamond Build K19 Repo or Diamond Wizard Repo Add-on installed.
You have installed the Diamond Wizard Repo. Let’s install the Diamond Build Wizard now.
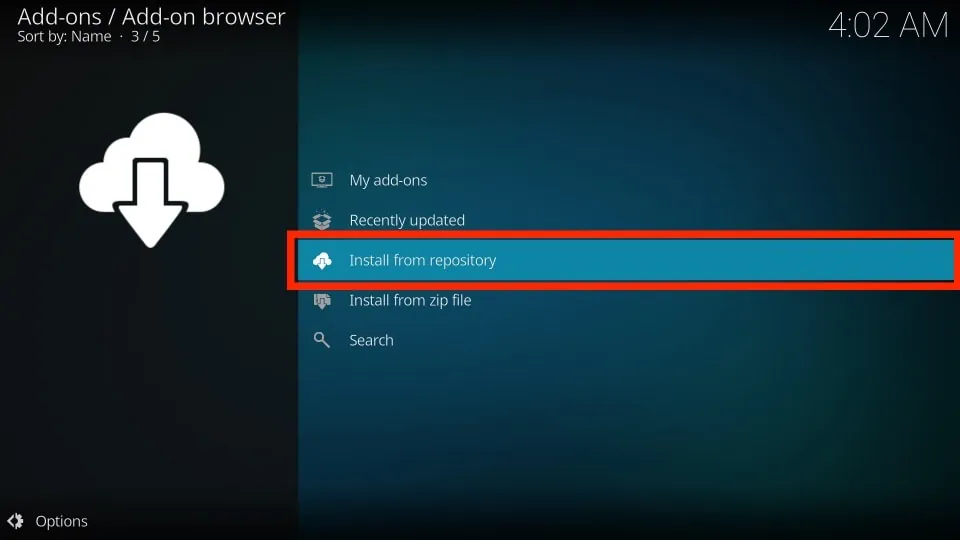
7. Now open Install from repository on the same window.
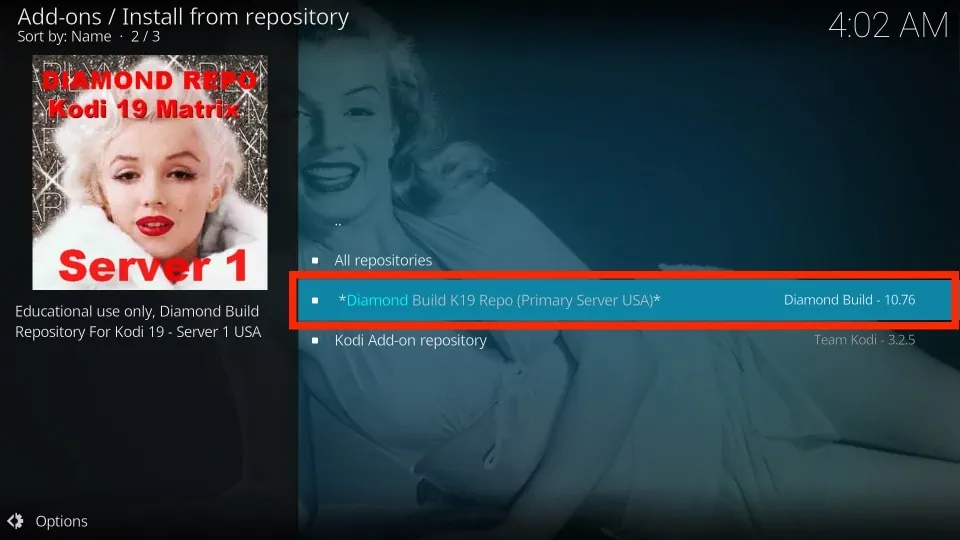
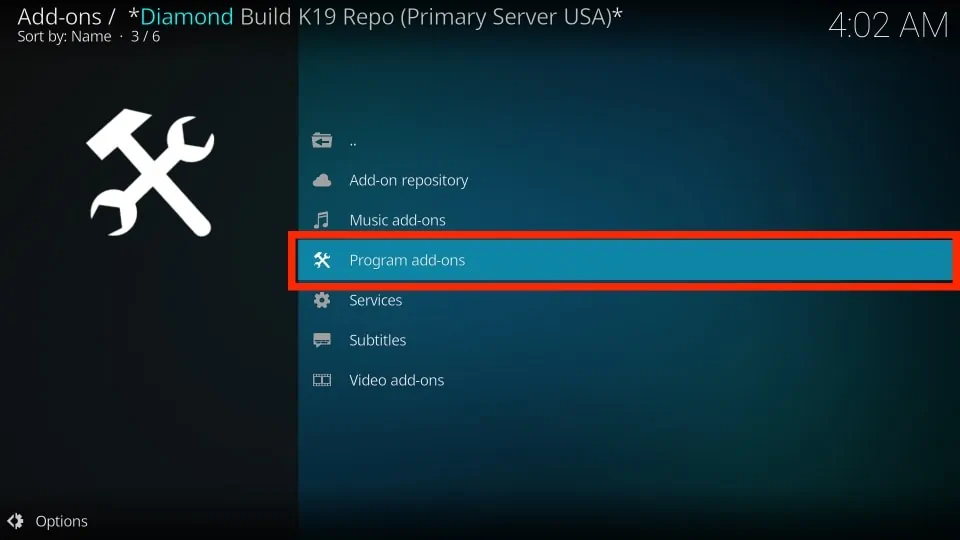
8. Open Diamond Build K19 Repo (Primary Server USA). On Kodi 18, open Diamond Wizard Repo.
9. Click Program add-ons.
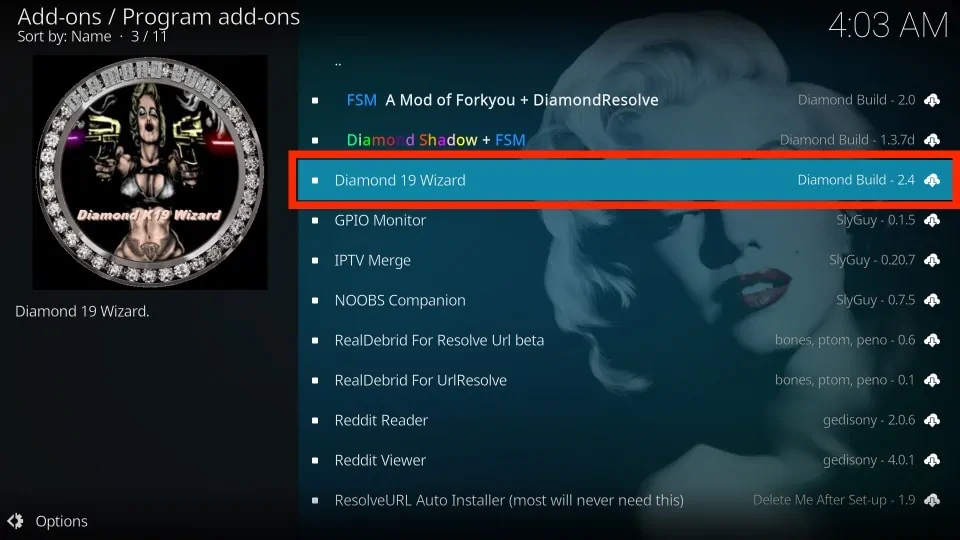
10. Click Diamond Build 19 or Diamond Build Wizard.
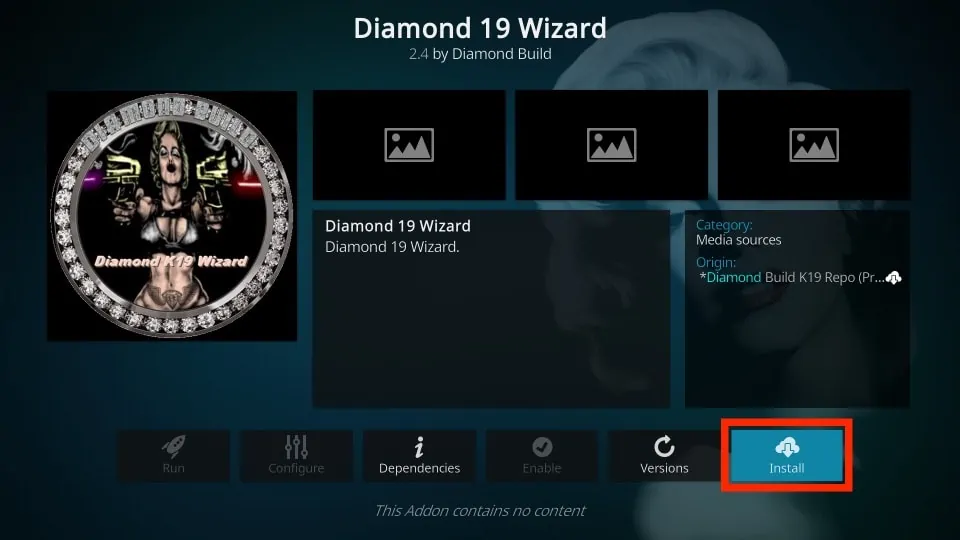
11. On the bottom right click Install.
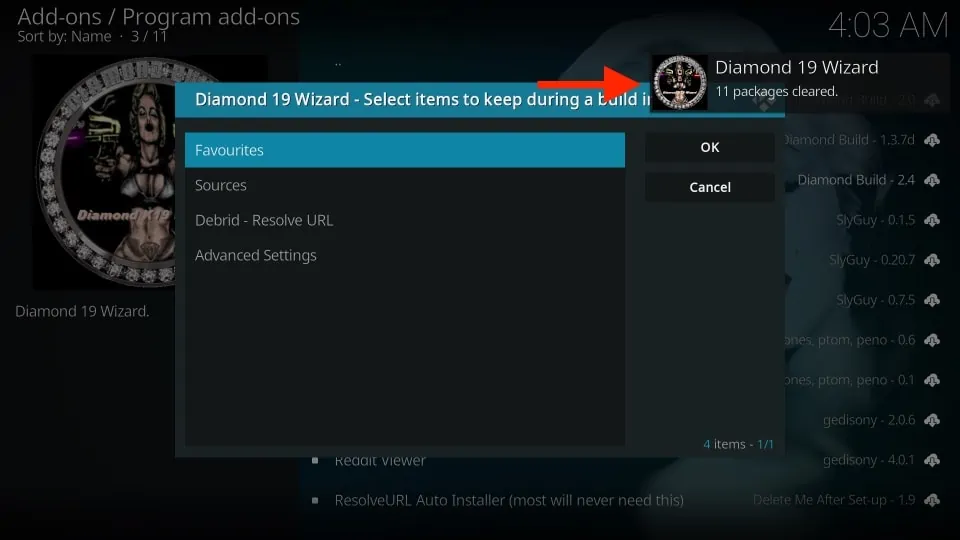
12. Wait for the Diamond Build Wizard Add-on installed or similar notification message on the top-right corner of the screen. The wizard takes 2-3 minutes to install.
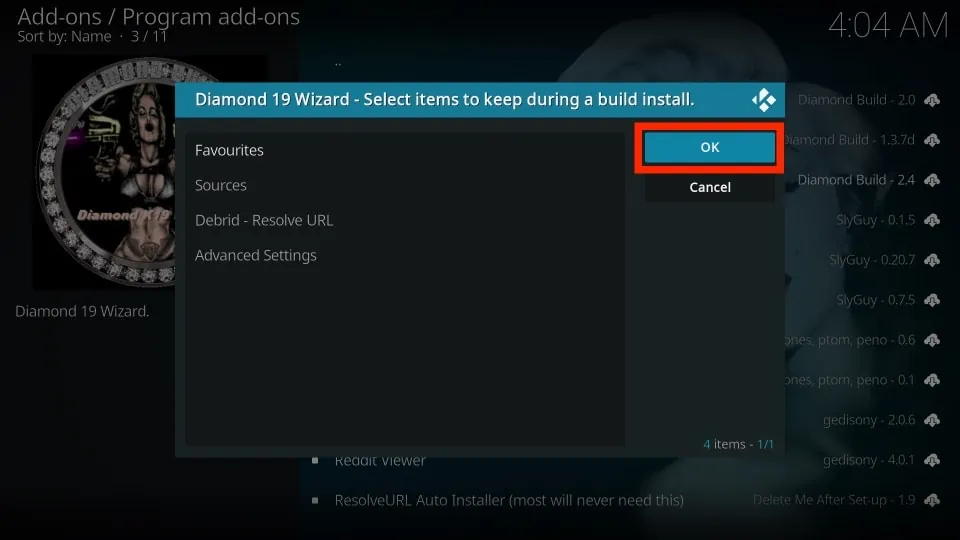
13. As soon as the wizard is installed and the above notification appears, a bunch of popups are displayed on your Kodi screen. Click OK when you see the following pop-up.
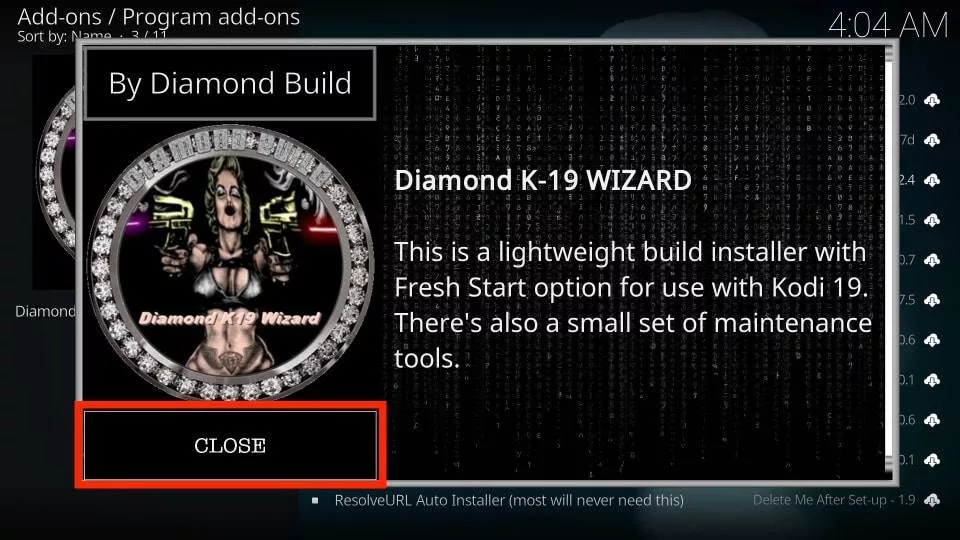
14. Another pop-up will appear, click CLOSE.
This is how you install the Diamond Build Wizard.
Part 3: Install Diamond Dust Kodi Build
We will now use the Diamond Wizard to install the Diamond Dust Kodi build. Follow the steps below:
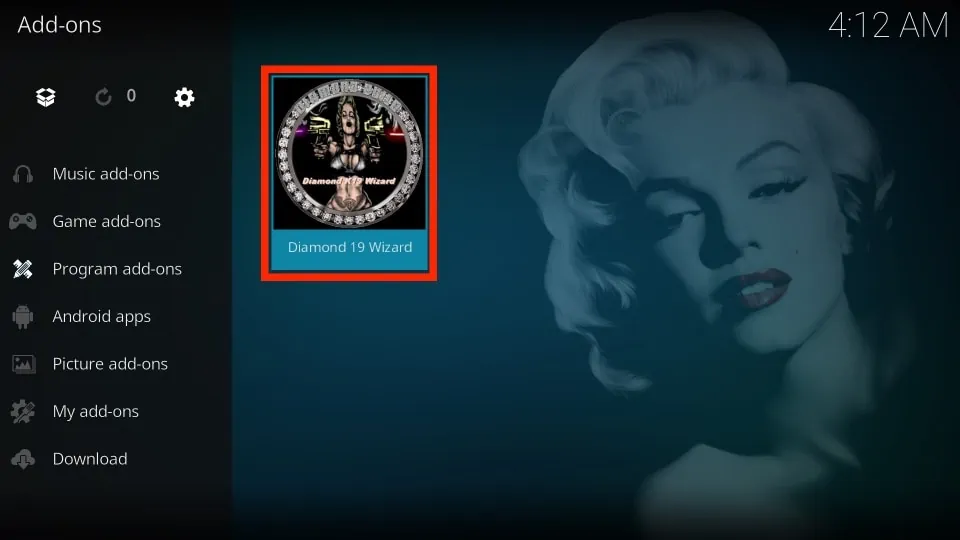
1. Go to Program add-ons from Kodi home-screen > Add-ons.
Now click and open the Diamond 19 Wizard or Diamond Build Wizard.
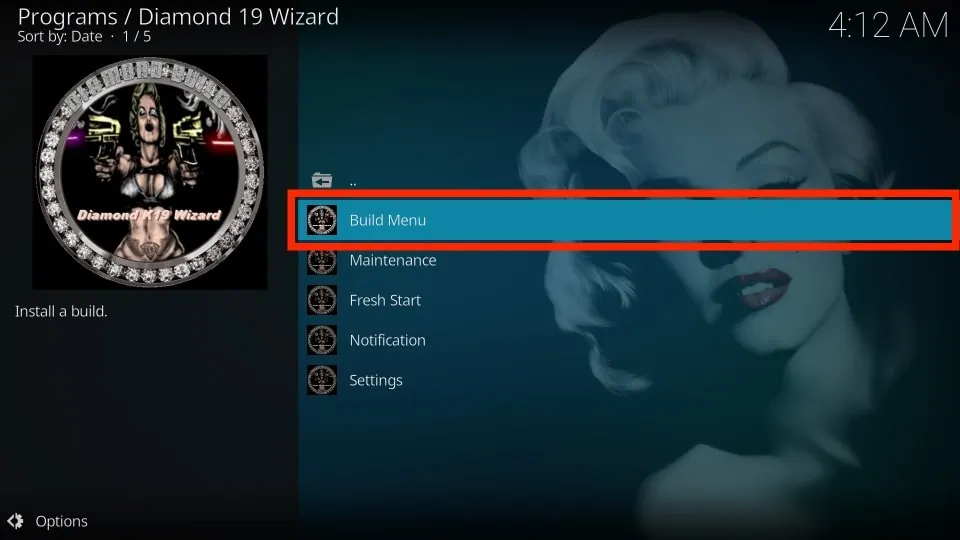
2. Select Build Menu. Note that you might encounter a different interface on Kodi 18 and 17.
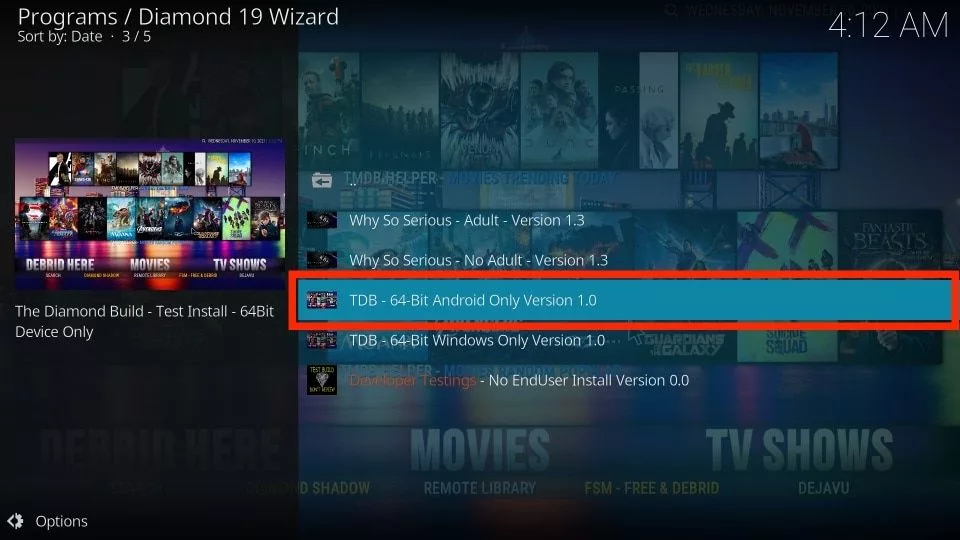
3. Select The Diamond Build / TDB (formerly Diamond Dust Build).
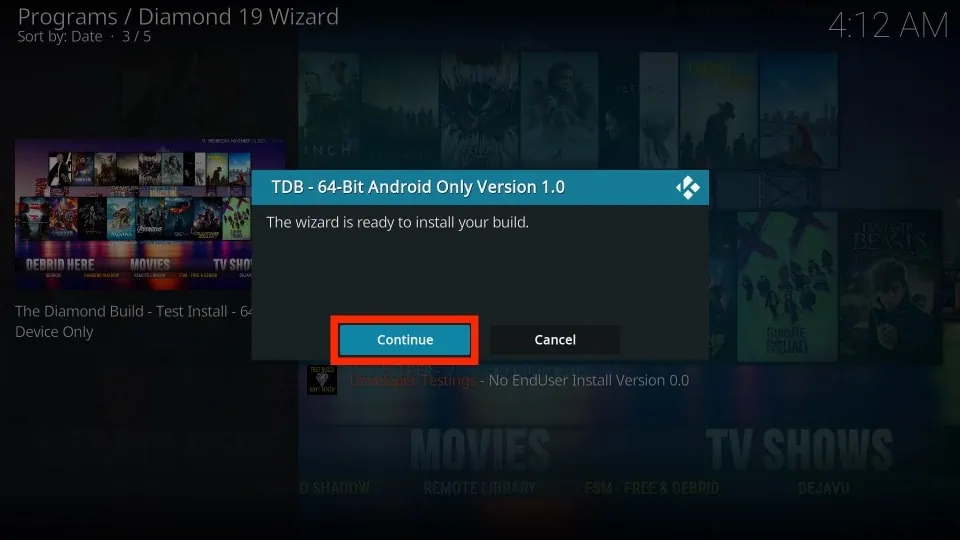
4. The wizard will alert you that it’s ready to install the build, click Continue.
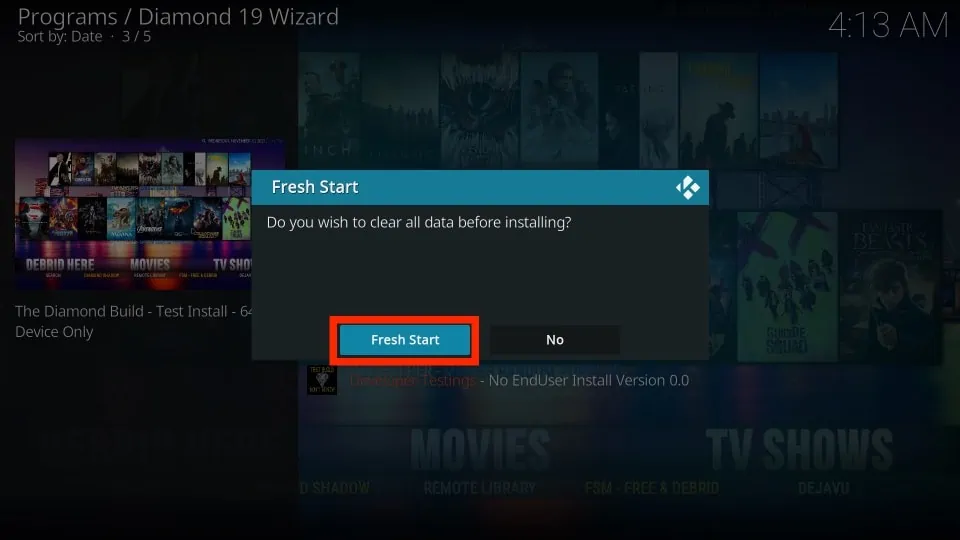
5. You now need to make a choice whether to go for Fresh Install or choose No. My recommendation is Fresh Install. This option will wipe your Kodi clean and install the Diamond Dust Kodi build on the default Kodi. That’s how you get the builds to perform optimally. When you choose No, you may be able to salvage some existing data (not all), but the build may not perform well.
Click Fresh Install.
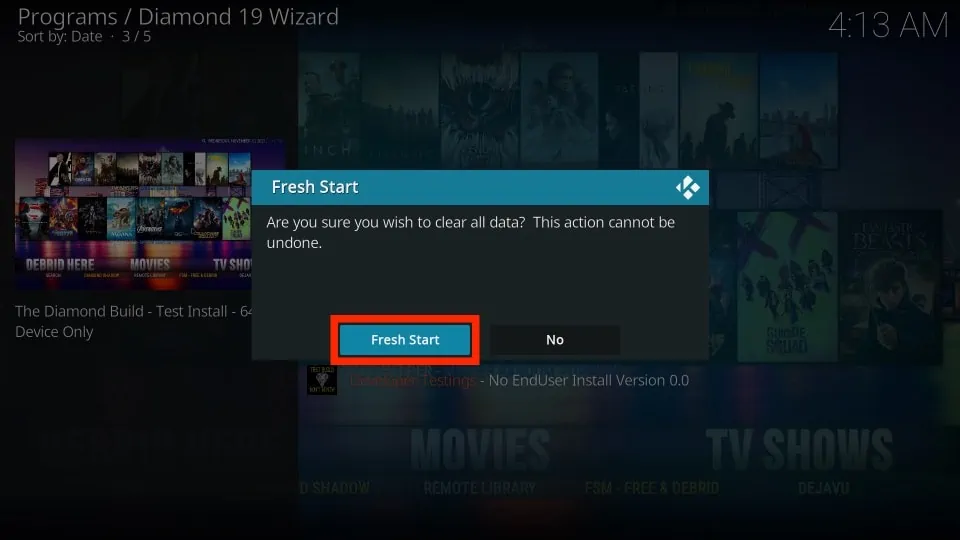
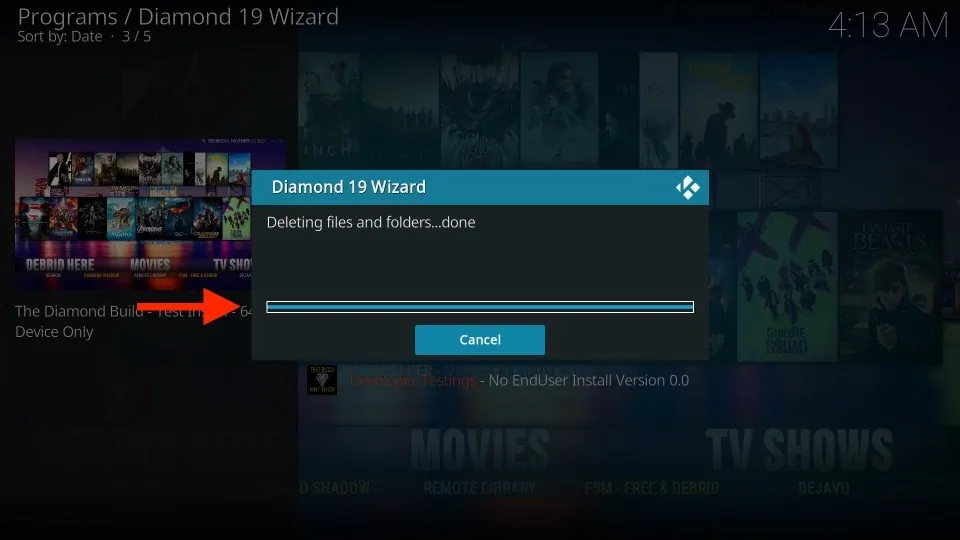
6. Click Fresh Start to re-confirm your choice. After that, the Wizard will start deleting files and folders from your Kodi app.
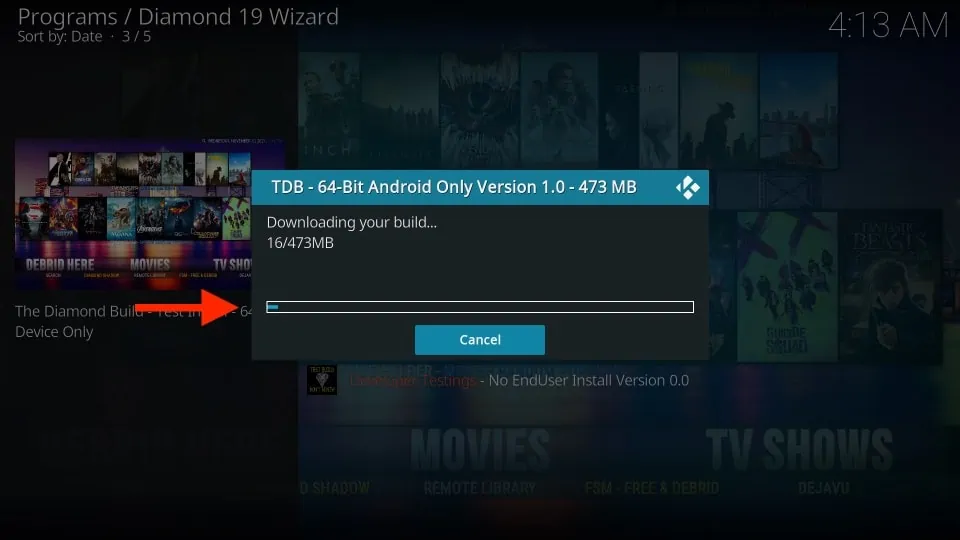
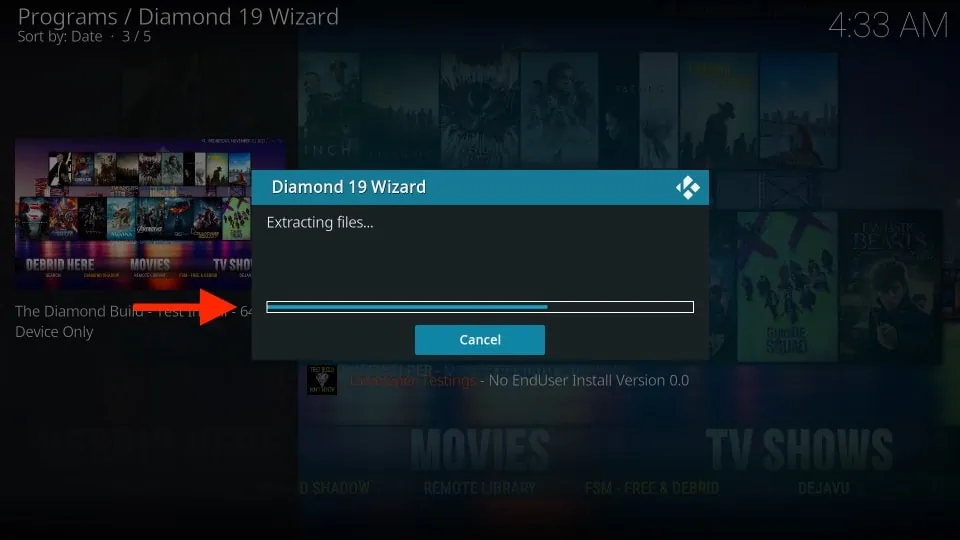
7. Wait for the Wizard to download and install the build. The process will take several minutes.
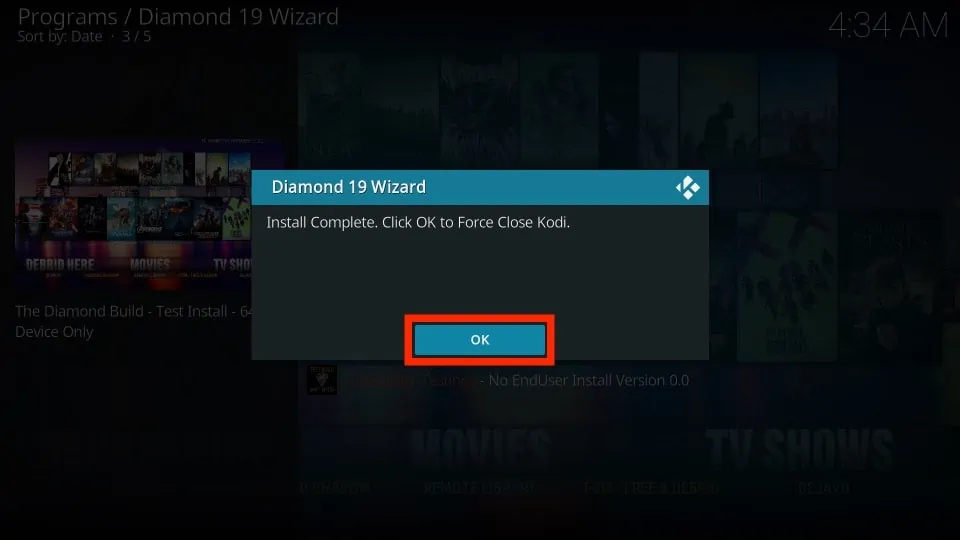
8. When the The Diamond Build has been installed, click OK to force-close the app.
This is how you install The Diamond Build or Diamond Dust Kodi Build.
Before you start streaming with Kodi Addons or Builds, I would like to warn you that everything you stream on Kodi is visible to your ISP and Government. This means, streaming copyrighted content (free movies, TV shows, live TV, and Sports) might get you into legal trouble.
Thankfully, there is a foolproof way to keep all your streaming activities hidden from your ISP and the Government. All you need is a good VPN for Kodi. A VPN will mask your original IP which is and will help you bypass Online Surveillance, ISP throttling, and content geo-restrictions.
I personally use and recommend ExpressVPN, which is the fastest and most secure VPN. It is compatible with all kinds of streaming apps and devices.
NOTE: We do not encourage the violation of copyright laws. But, what if you end up streaming content from an illegitimate source unintentionally? It is not always easy to tell the difference between a legit and illegal source.
So, before you start streaming on Kodi, here's how to get VPN protection in 3 simple steps.
Step 1: Get the ExpressVPN subscription HERE. It comes with a 30-day money-back guarantee. Meaning, you can use it free for the first 30-days and if you are not satisfied with the performance (which is highly unlikely), you can ask for a full refund.
Step 2: Click HERE to download and install the ExpressVPN app on your streaming device. If you are using a FireStick, I have given the exact steps starting with Step 4 below.
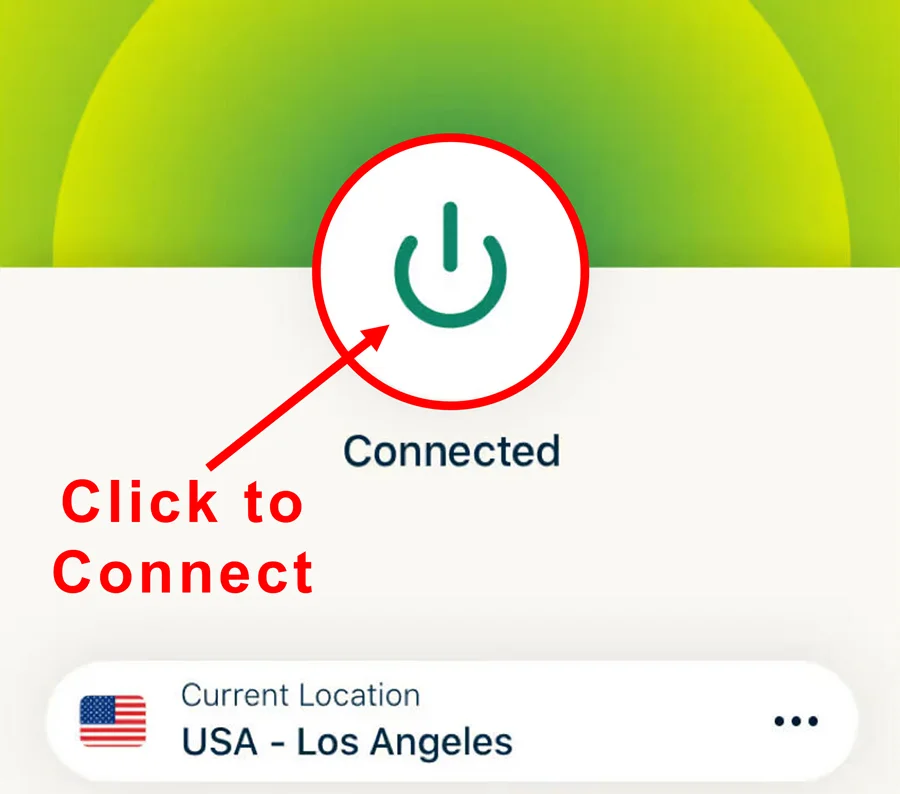
Step 3: Click the Power icon to connect to a VPN server. That's all. Your connection is now secure with the fastest and best VPN for Kodi.
The following are the steps to install Kodi VPN on your Fire TV devices. If you have other streaming devices, follow Step 1-3 above.
Step 4: Subscribe to ExpressVPN HERE (if not subscribed already).
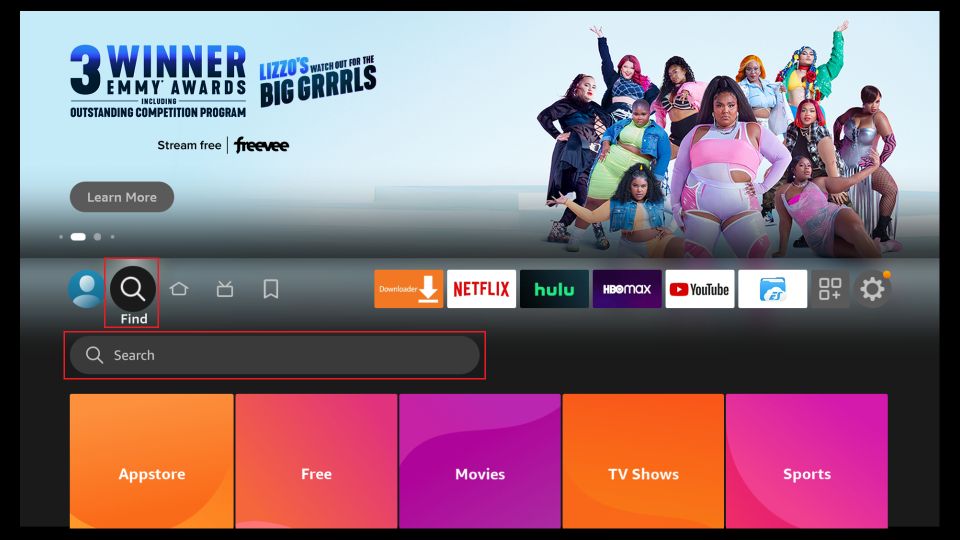
Step 5: Go to Fire TV Stick home screen. Click Find followed by Search option (see image below).
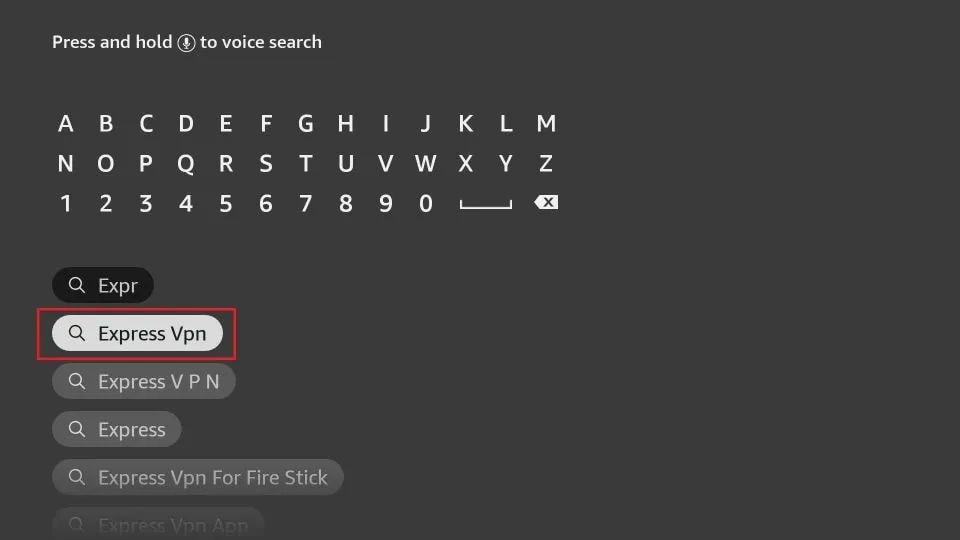
Step 6: Type Expressvpn in the search bar and select when it shows up.
Step 7: Click Download.
Step 8: Open the ExpressVPN app and Sign in using the email ID and password that you created while buying the ExpressVPN subscription.
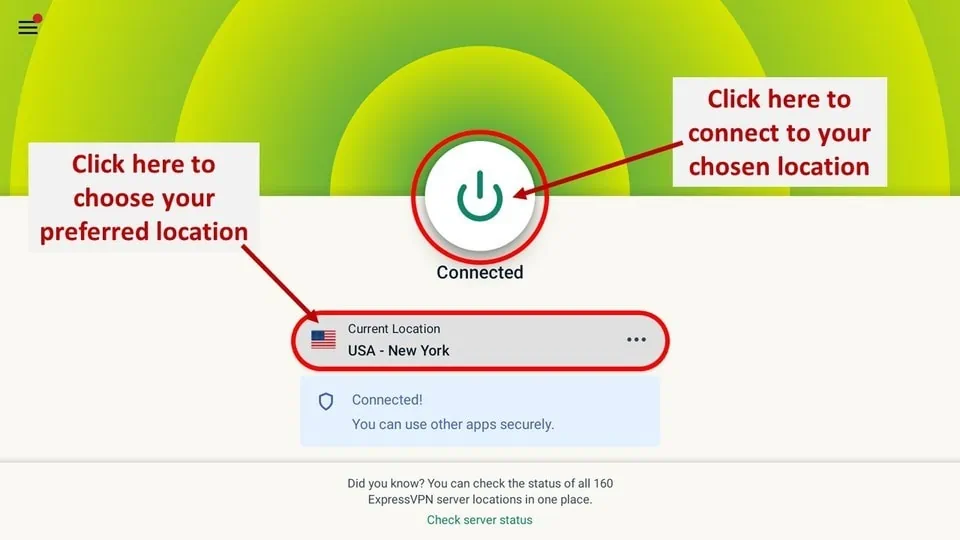
Step 9: Click the Power icon to connect to a VPN server. That’s all. Your FireStick is now secured with the fastest VPN.
Quick Tour of Diamond Dust Kodi Build
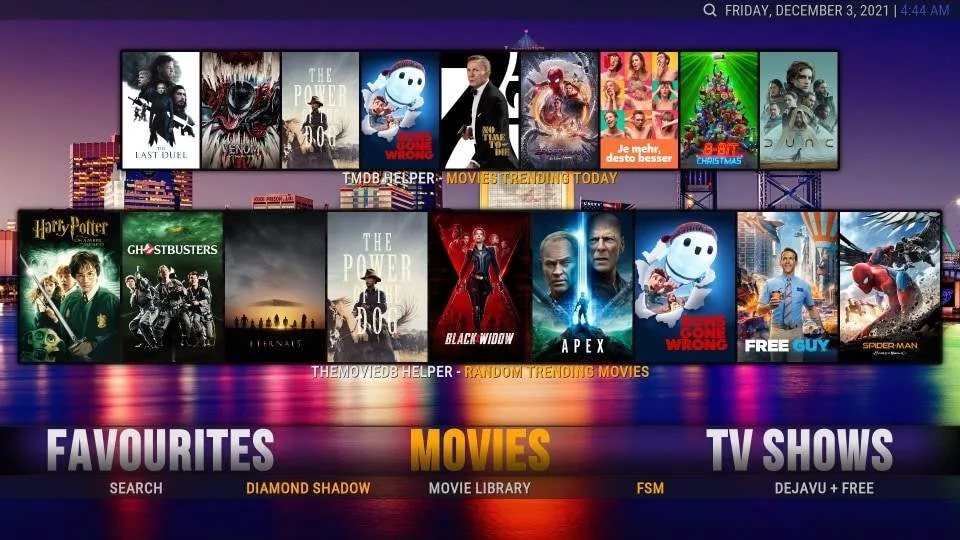
Open Kodi again on your device after installing the build. You will notice that the Kodi home-screen has changed dramatically. This is the new home-screen now:
Most Kodi builds stick to some standards in the layout. They have the main menu-bar strip running across from left to right and is usually positioned closer to the bottom than the top.
The menu-bar also has the submenu-bar underneath it. The whole setup makes navigation a lot easier.
Cycle through the menu-bar and you will find Movies, TV Shows, Live TV, Sports, and other options. These home-screen items help you get started quickly. Choose a menu item, such as Movies, and pick the desired submenu item to explore further.
The Diamond Dust Kodi build also shows other onscreen items related to the chosen item in the Menu and submenu bars.
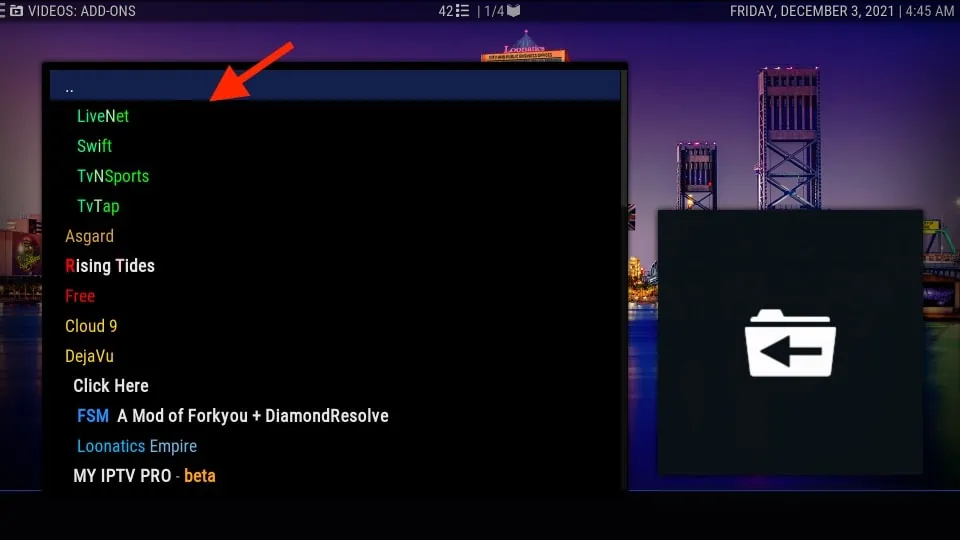
In the image below, I chose the Add-ons option in the menu-bar and click on Video Add-ons in the submenu bar. What I see now is the list of the addons preloaded on Kodi Diamond Dust build.
Explore this build and find everything else it has to offer.
Winding Up
I ran into the Diamond Dust Kodi build by serendipity. With so many builds and addons falling apart, Diamond Dust build is certainly a delightful discovery. It looks good, performs even better and comes with loads of pre-installed video add-ons. Go ahead and give it a go.
Related:
- How to install Multiple Kodi builds
- How to install Addons on Builds
- How to install Misfit Mods Lite Kodi Build
- How to install No Limits Magic Build

Suberboost Your FireStick with My Free Guide
Stay Ahead: Weekly Insights on the Latest in Free Streaming!
No spam, ever. Unsubscribe anytime.




I use a PC, and don’t used Builds anymore. I use one or two Addons but require a Maintenance cleaner. I used to use the old Diamond Wizard, (kept it after uninstalling the build I suppose). It’s a great cleaner and would like to use it again.
Is it possible to not have the build and only the Wizard for the Maintenance? I couldn’t do a Fresh Start. like we used to, so I uninstalled and reinstalled Leia 18.6, got my Addon, without the github, but it has NO good cleaner besides the one in the ADDON itself. So, now that I’ve added all my TV shows, and tweaked everything how i like it etc, I don’t want to lose what I’ve done by dropping a Build on top of it. I don’t like Builds, they are too much for my old PC, so one good addon works great.
So, is it possible to just install the Wizard to get access to the Maintenance? If so, what instructions can you provide?
Vicky
Hi Vicky,
Yes, you can install a Wizard without having to install any build. Just install the Diamond Build Wizard by following the instructions in the guide up until the point – Part 3: Step 1. Instead of clicking the ‘Builds’ section, click the Maintenance or the Tools section.
If you are looking for another Wizard, you can get the EzzerMacs Wizard as well from the following guide: https://www.firesticktricks.com/ezzermacs-kodi-builds.html
Just install the Wizard and use the Maintenance section. You don’t need to install any build.
Nothing works on this build!
Hi Nicole, I just checked. It seems fine. However, sometimes the videos do not work when you try to play them from the home screen. You may go to the Vide add-ons section from the main menu and stream using the individual addons.
You may also try one of the other builds from our list: https://www.firesticktricks.com/best-kodi-builds.html
So I am using Kodi 19 and everything worked until it said my version was incompatable with diamond … any suggestions??
Hi Laurie, Kodi 19 hasn’t been released yet. Diamond Dust Build is currently compatible only with Kodi Leia (18.1 to 18.3). Go to Settings > System Information to check the version of your build (bottom right)
Follow this guide to update to Kodi 18 latest version: https://www.firesticktricks.com/kodi-update.html
The Program works well! We are watching everything we ever wanted.
I have a grand Child so its perfect for teaching and kids movie.
@Dianne Conner; I can confirm that the Diamond Build is available and running smoothly. May I suggest that you d/l an alternate link: http://lazykodi.com/
This contains the Diamond Build within the “Repo” section. Additionally you will find a “Wizard” section where you can find many of the most popular builds and a “zips” section which has downloadable zip files for 7 other popular repos. For longtime kodi/Android users; this link is the “new” version of the now mostly defunct “superkodi” which was great if time is a luxury you don’t have. Goodluck! #shootthatstar
Hi David, I checked it today myself and Diamond Build works smoothly on both Kodi 18 and Kodi 17.6. And yes, thanks for pointing out that LazyKodi has the Diamond repo in its ‘Repo’ section. It would be a useful information for our readers.
that lazykodi site doesn’t seem to be working. all the links say forbidden.
Hi Bryan, you don’t need LazyKodi to install Diamond Dust build. It is available through the source I have provided in the guide.
I also checked the Lazykodi link and it is working. I even installed a couple of repositories from it. You may have run into a temporary problem. Please try again
There is no diamond build wizard. Looks like it’s broken
Hi Diane, I just checked and Diamond Build Wizard is there in the Diamond Wizard Repo in Program addons as shown in the guide.
The build interface has changed. I will update the guide shortly. In the meantime, you can click the Builds tab on the top-left of the Diamond Build Wizard interface to install the desired build.
Also, please note that Diamond Dust Build has been renamed to ‘Diamond Build’.