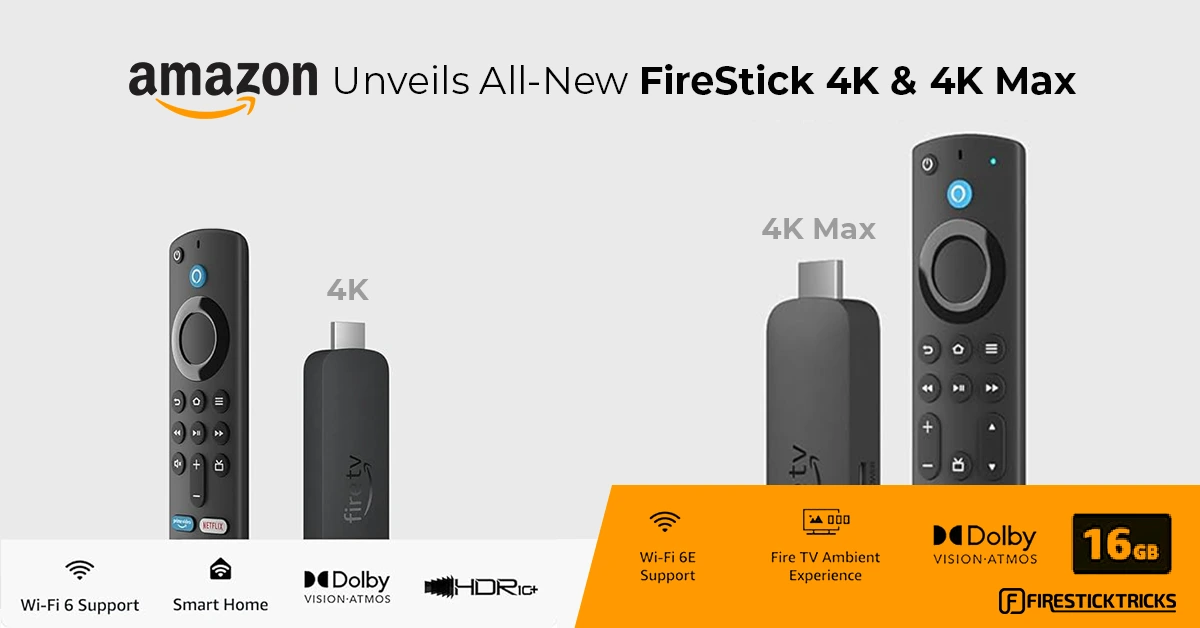
Amazon’s FireStick is like a magic wand for watching movies and shows. This Superboost guide is your ticket to making it even more amazing by using some special apps.
With these special apps, you can watch your favorite content without restrictions. They give you access to unlimited movies, TV shows, sports, live TV, videos for kids, family entertainment, and a lot more.
I’ll show you how to reinforce your streaming arsenal with some amazing apps.
So, here is your step-by-step guide to superboost your FireStick. Make sure you follow all the steps to maximize the potential of FireStick without spending too much money.
Attention FireStick Users
Governments and ISPs across the world monitor their users' online activities. If you use third-party streaming apps on your Fire TV Stick, you should always use a good FireStick VPN and hide your identity so your movie-viewing experience doesn’t take a bad turn. Currently, your IP is visible to everyone.
I use ExpressVPN, the fastest and most secure VPN in the industry. It is very easy to install on any device, including Amazon Fire TV Stick. Also, it comes with a 30-day money-back guarantee. If you don't like their service, you can always ask for a refund. ExpressVPN also has a special deal where you can get 4 months free and save 61% on the 2-year plan.
Read: How to Install and Use Best VPN for FireStick
Step 1: Install Downloader on FireStick
In this section, I will show you how to install Downloader on your FireStick. Downloader is a handy official utility from the Amazon Store. It simplifies the process of downloading and installing the superboost apps.
Let’s get started with the quick and straightforward process of installing Downloader on your FireStick device.
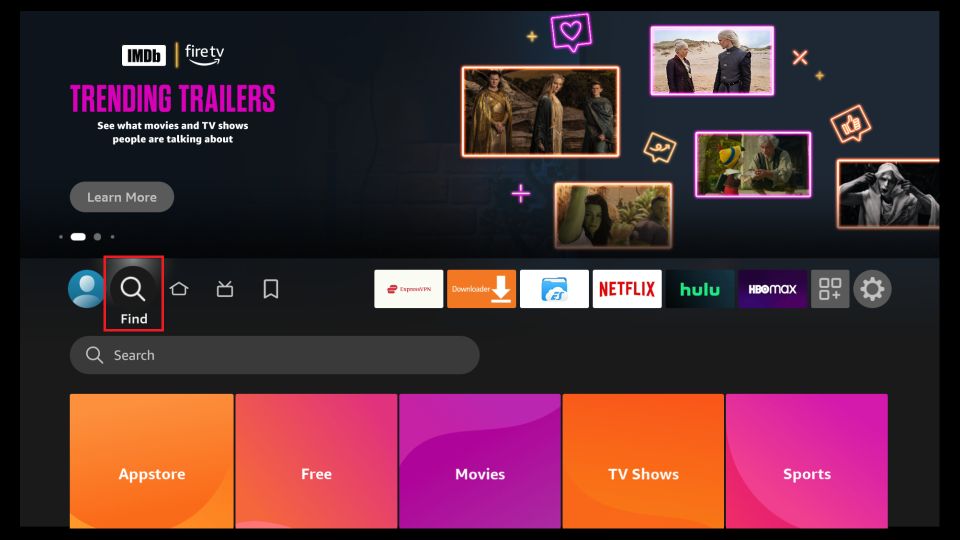
1. Select the search icon (magnifying glass) on the home screen of FireStick.
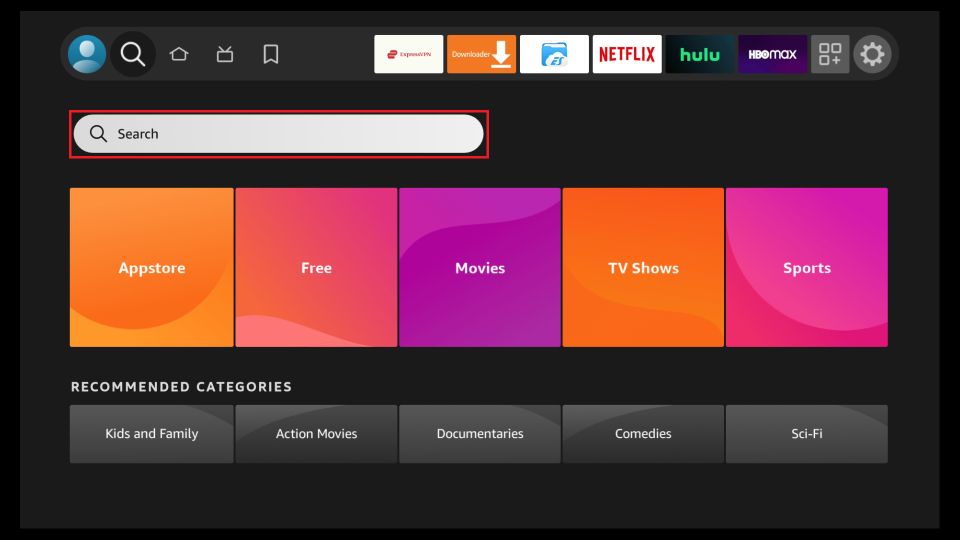
2. Next, click Search.
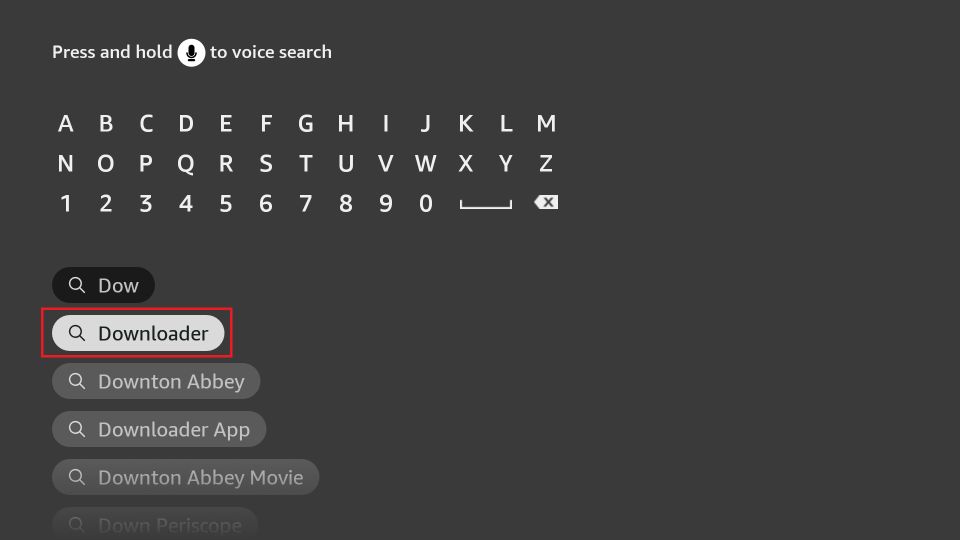
3. Type Downloader Using the on-screen keyboard. Select and click Downloader in the search results.
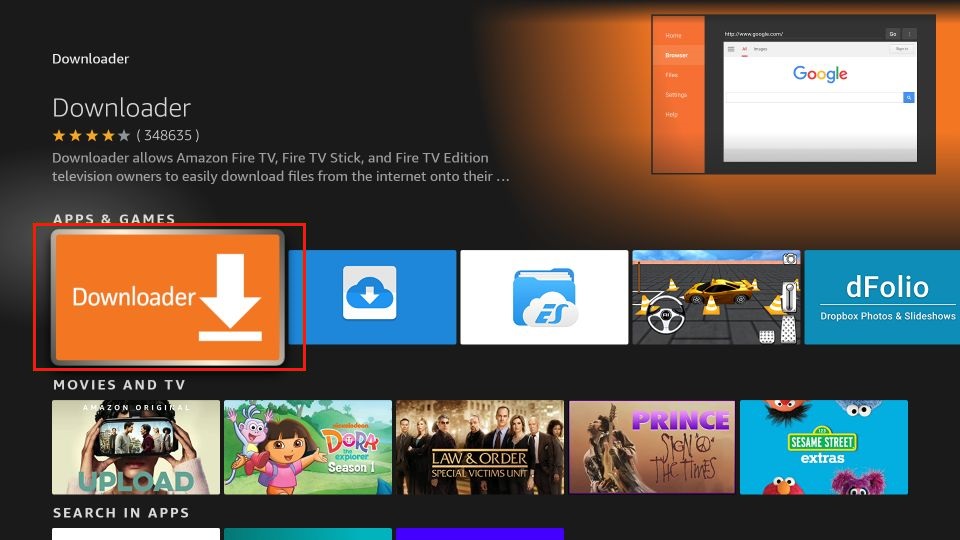
4. Click the Downloader tile on the next window.
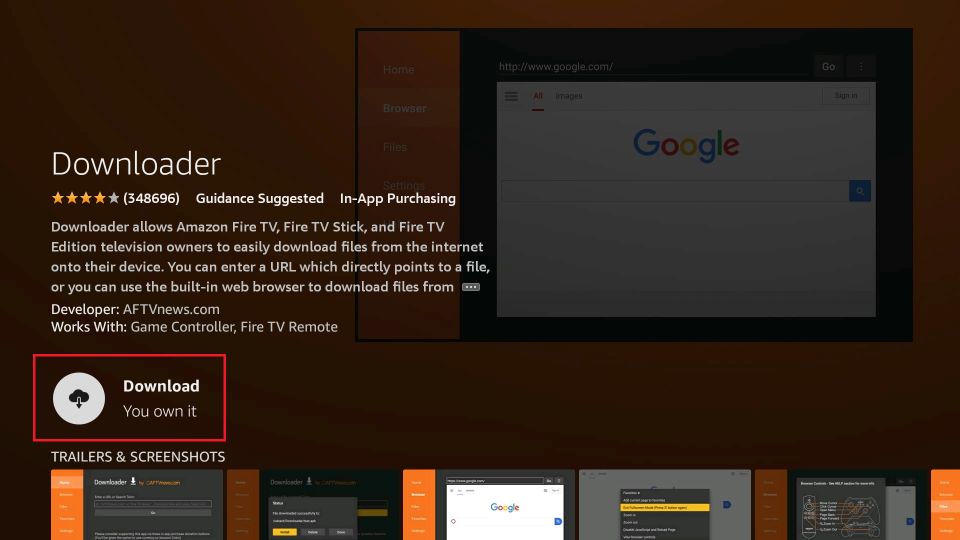
5. On the app dashboard window, select the Download or Get button.
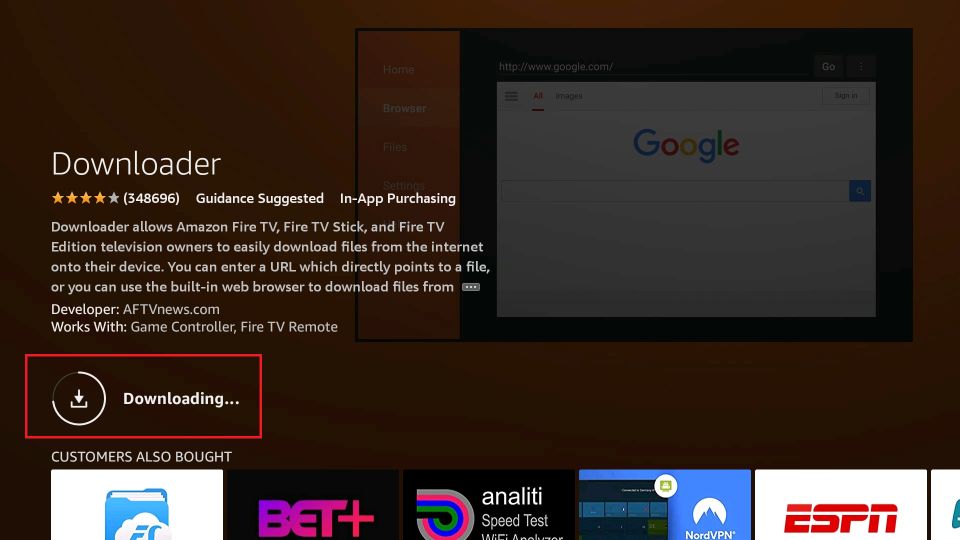
6. Wait for the Downloader app to download and install.
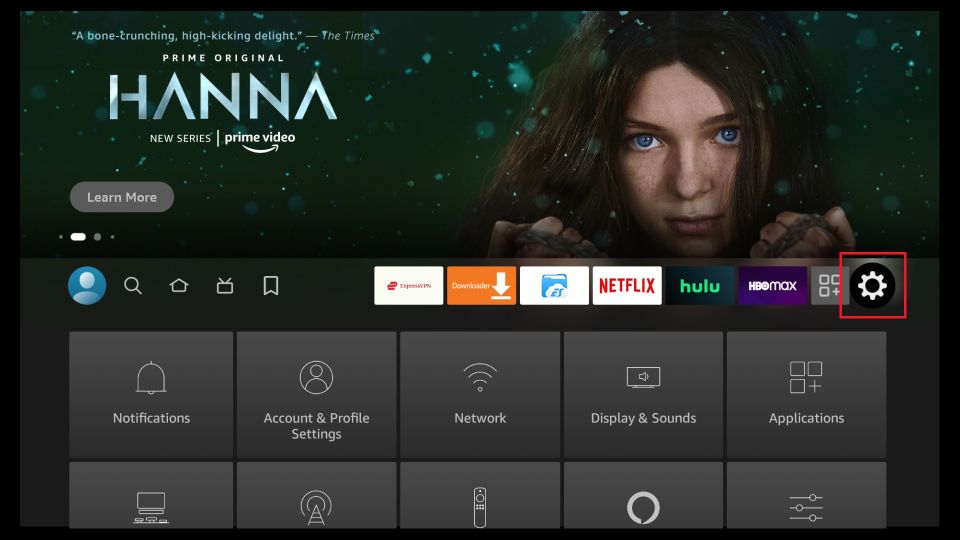
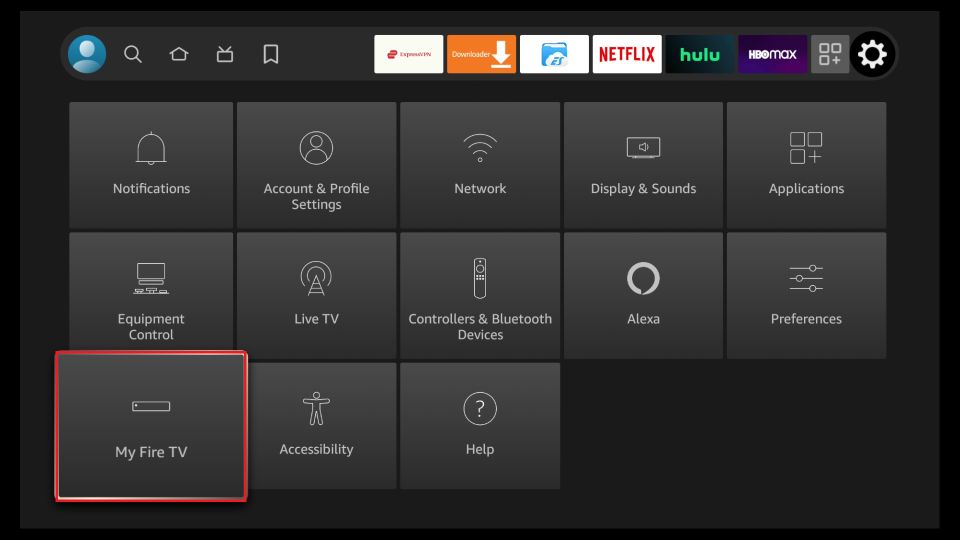
7. DON’T click Open. To superboost your FireStick, you need to grant permission to Downloader first. Go back to the home screen of FireStick by pressing the home button on your remote. Select the gear icon on the right.
8. Click My Fire TV.
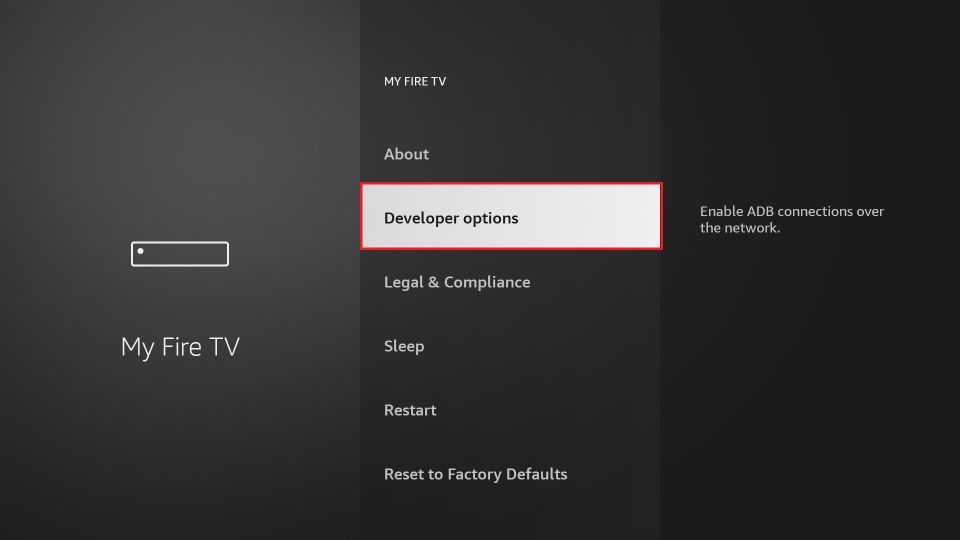
9. Click Developer Options.
Now, select Fire TV Stick and click it 7 times to enable Developer Options. If you’re still not sure how to do it, here’s a step-by-step guide to enable developer options.
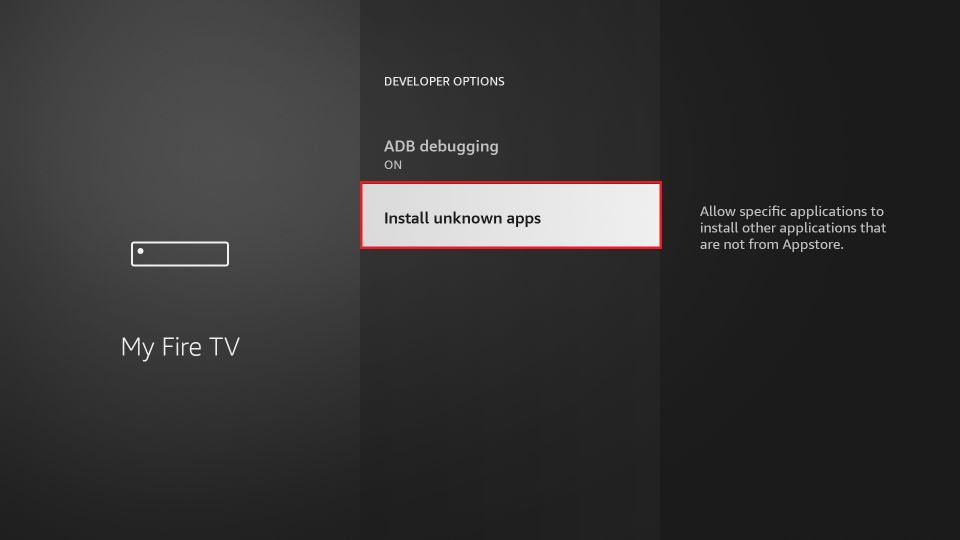
10. Depending upon your FireStick device, you will see one of the two options:
- Install Unknown Apps
- Apps from Unknown Sources
Click the option on your screen (my device has Install Unknown Apps).
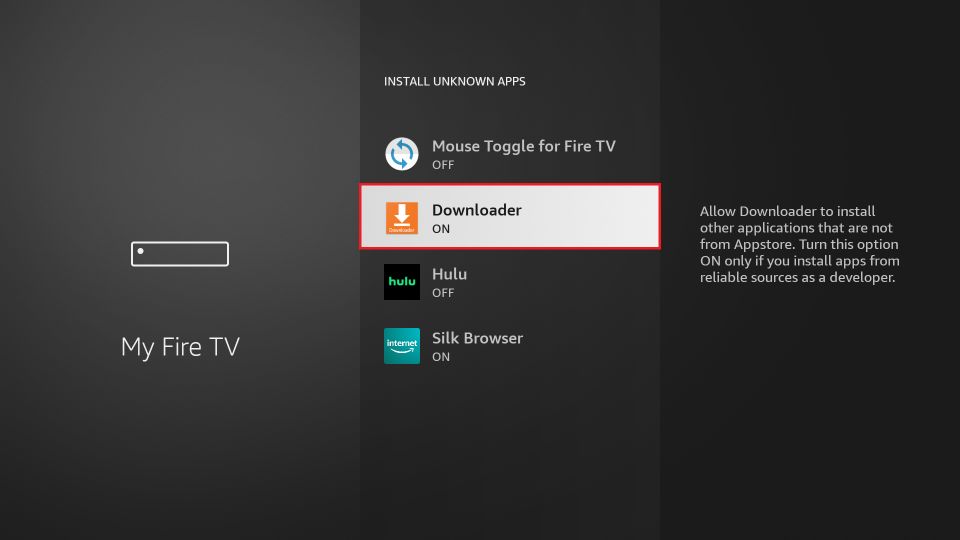
11. Depending upon your action in the previous step, you will need to do one of the following two:
- If your device displayed Install Unknown Apps, select and click Downloader to turn it ON (shown in the image below).
- If it was Apps from Unknown sources, acknowledge the warning and click Yes (not shown in the image below).
You have successfully installed Downloader on FireStick.
Step 2: SuperBoost FireStick with ExpressVPN
Now that you are all set to superboost your Fire TV Stick, I want to warn you that everything you stream on Kodi or other streaming apps in this guide is visible to your ISP and Government. Therefore, streaming copyrighted content (free movies, TV shows, Sports) might get you into legal trouble.
Thankfully, there is a foolproof way to keep all your streaming activities hidden from your ISP and the Government. All you need is a trustworthy VPN for Fire Stick.
A VPN helps bypass online surveillance, ISP throttling, and content geo-restrictions.
I use and recommend ExpressVPN, which is the fastest and most secure VPN. It is streaming-friendly and straightforward to install on a Fire TV / Stick.
We do not encourage the violation of copyright laws. But what if you end up streaming content from an illegitimate source unintentionally? It is not always easy to distinguish between a legitimate and illegal source.
So, before you start installing superboost apps on your FireStick, let’s see how to use ExpressVPN to keep your streaming activities hidden from prying eyes.
1. Visit the ExpressVPN website and select a suitable subscription plan. Enjoy the special deal with a 49% discount on the yearly plan and 3 extra months. It comes with a 30-day money-back guarantee.
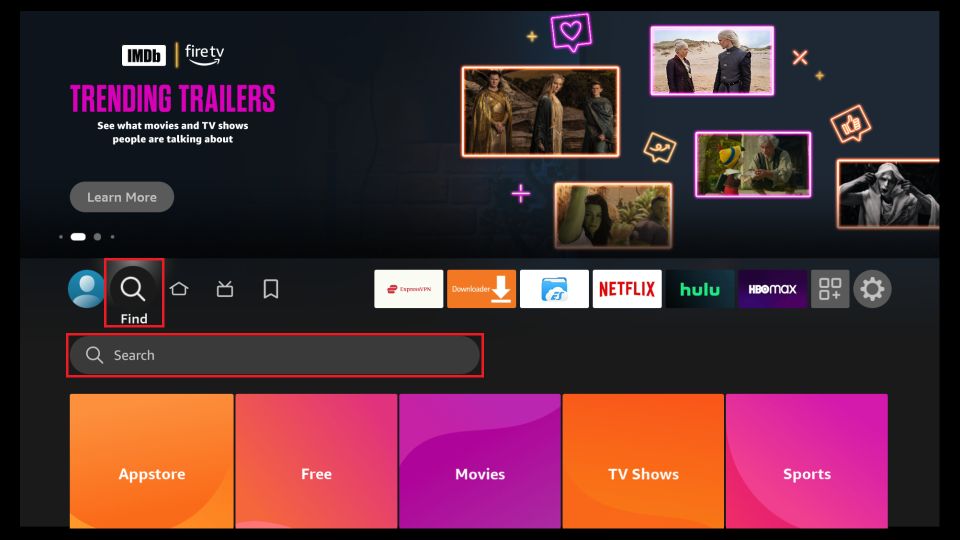
2. After subscribing to ExpressVPN, open your FireStick. Select Find > Search on the home screen.
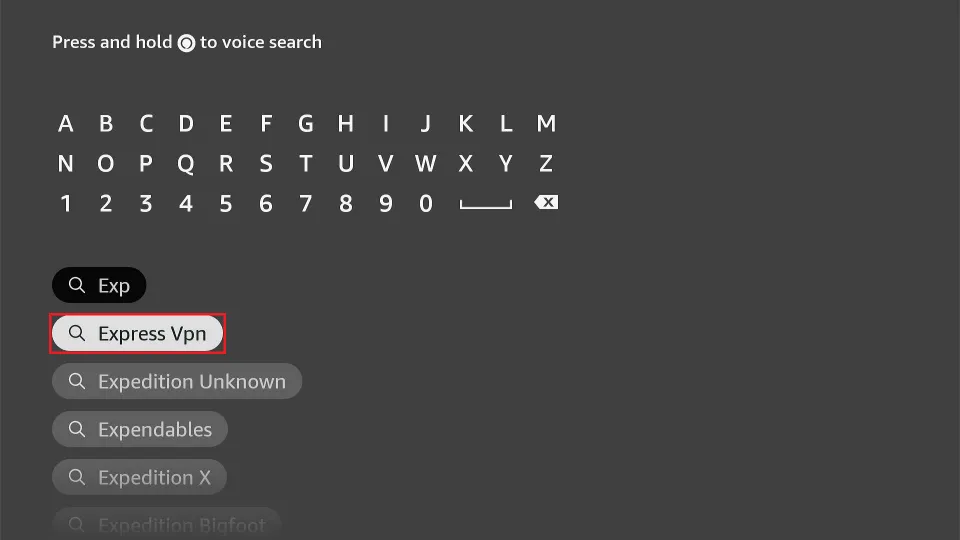
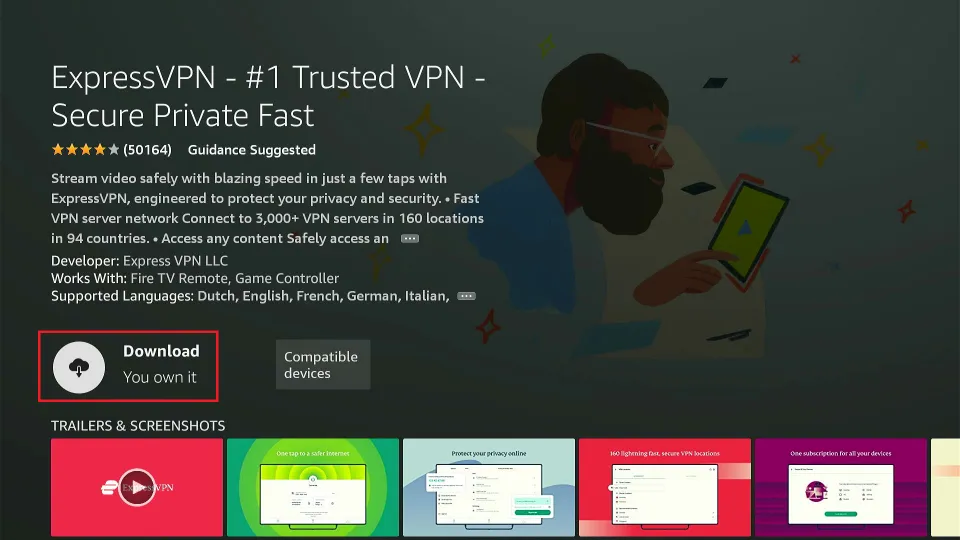
3. Search for the ExpressVPN App. In the search bar, type ExpressVPN and press the search icon. Click the ExpressVPN in the search results.
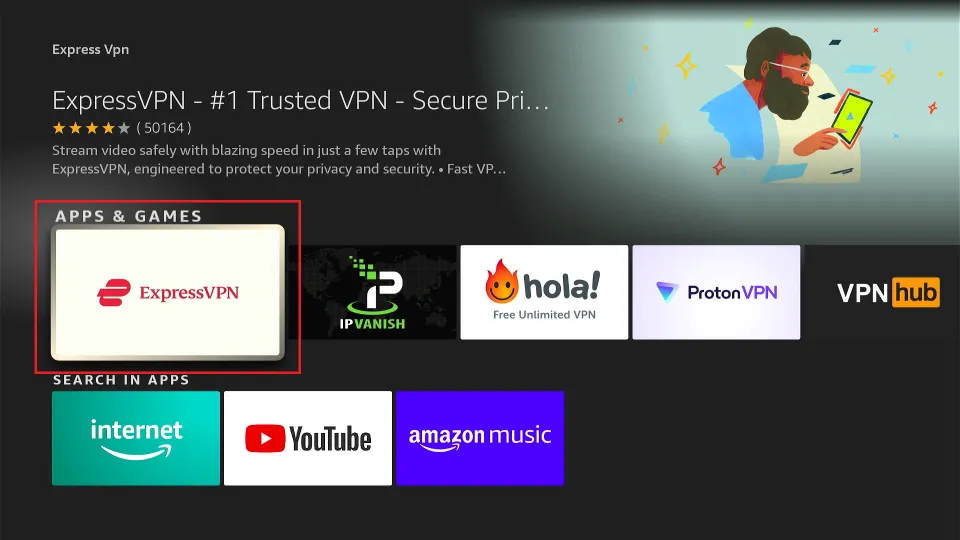
4. Click the ExpressVPN tile on the next screen.
5. Then, click the Download or Get button to initiate the installation process.
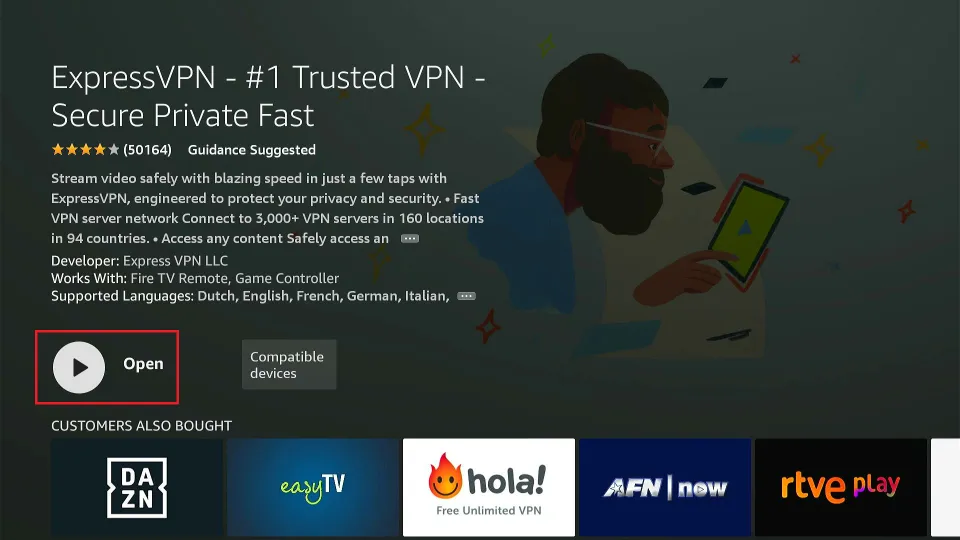
6. Once the installation is complete, click Open to launch the app.
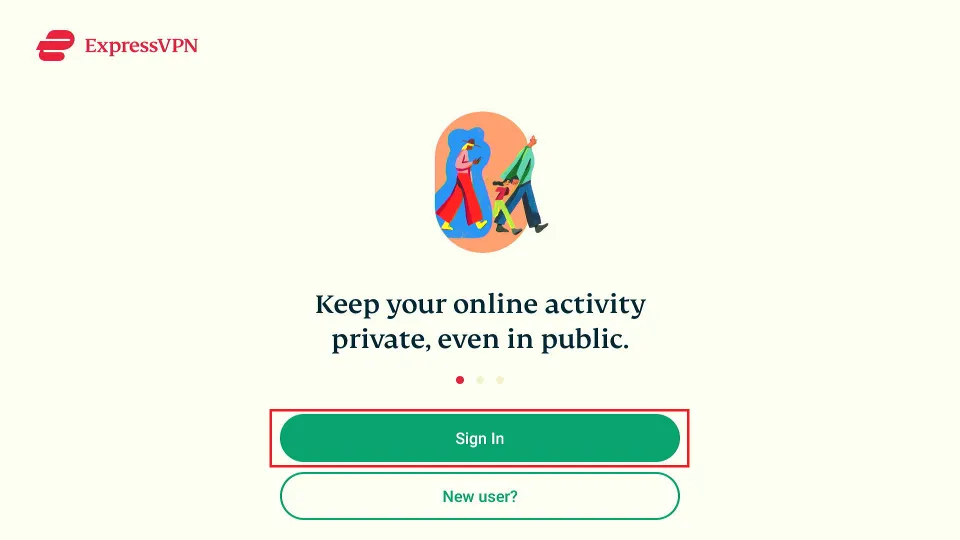
7. When you open the app the first time, you’ll be prompted to log in. Click Sign In.
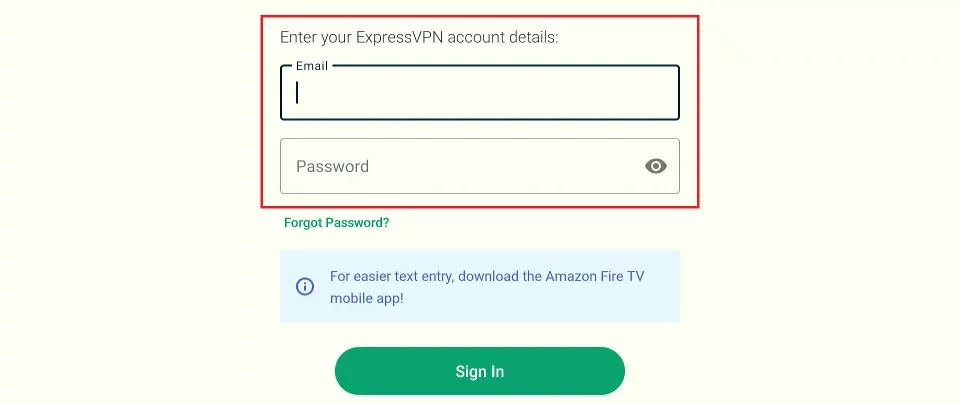
8. Enter your email and password that you created during the subscription process.
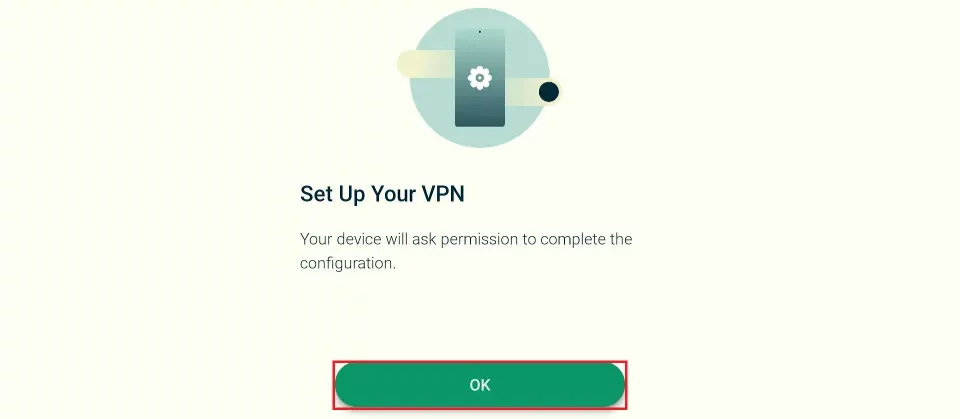
9. Click OK.
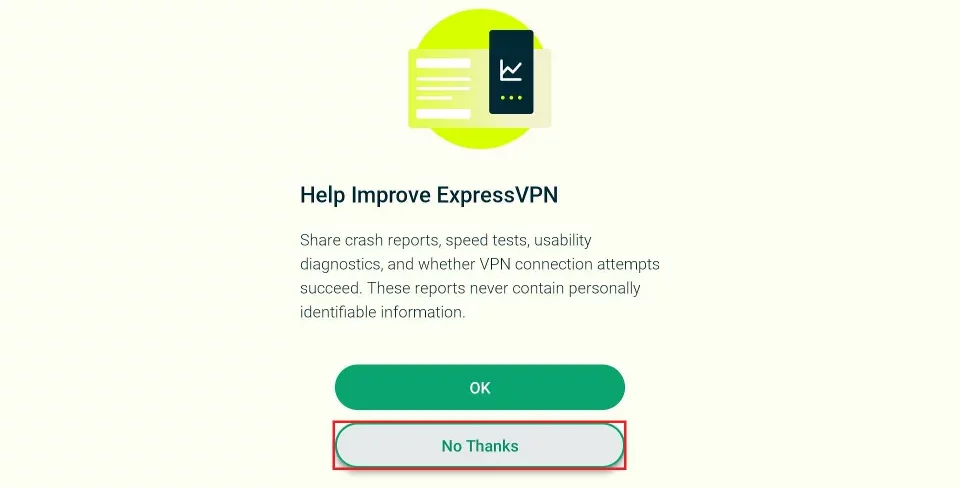
10. Click OK again.
11. Choose an option and click it. I am clicking No Thanks.
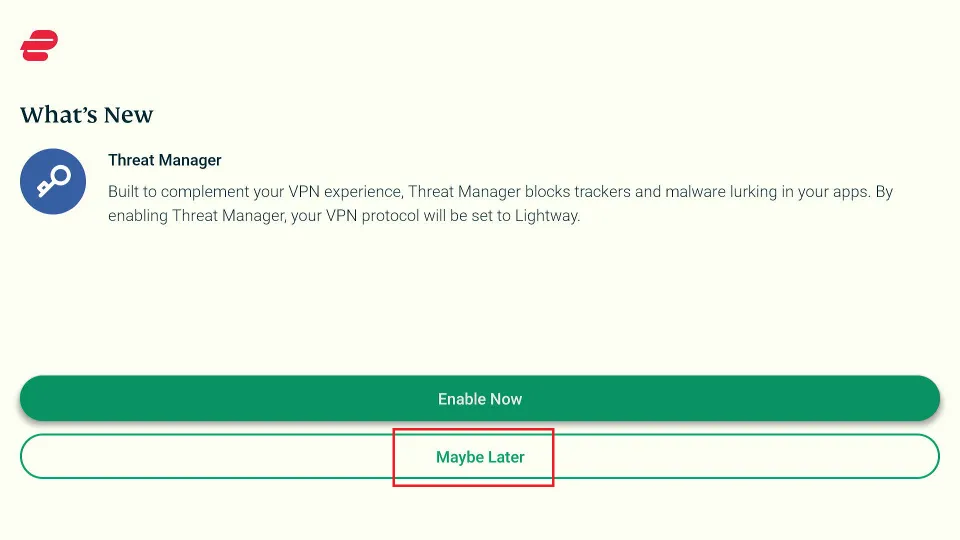
12. You may activate Threat Manager now or do it later from the app settings.
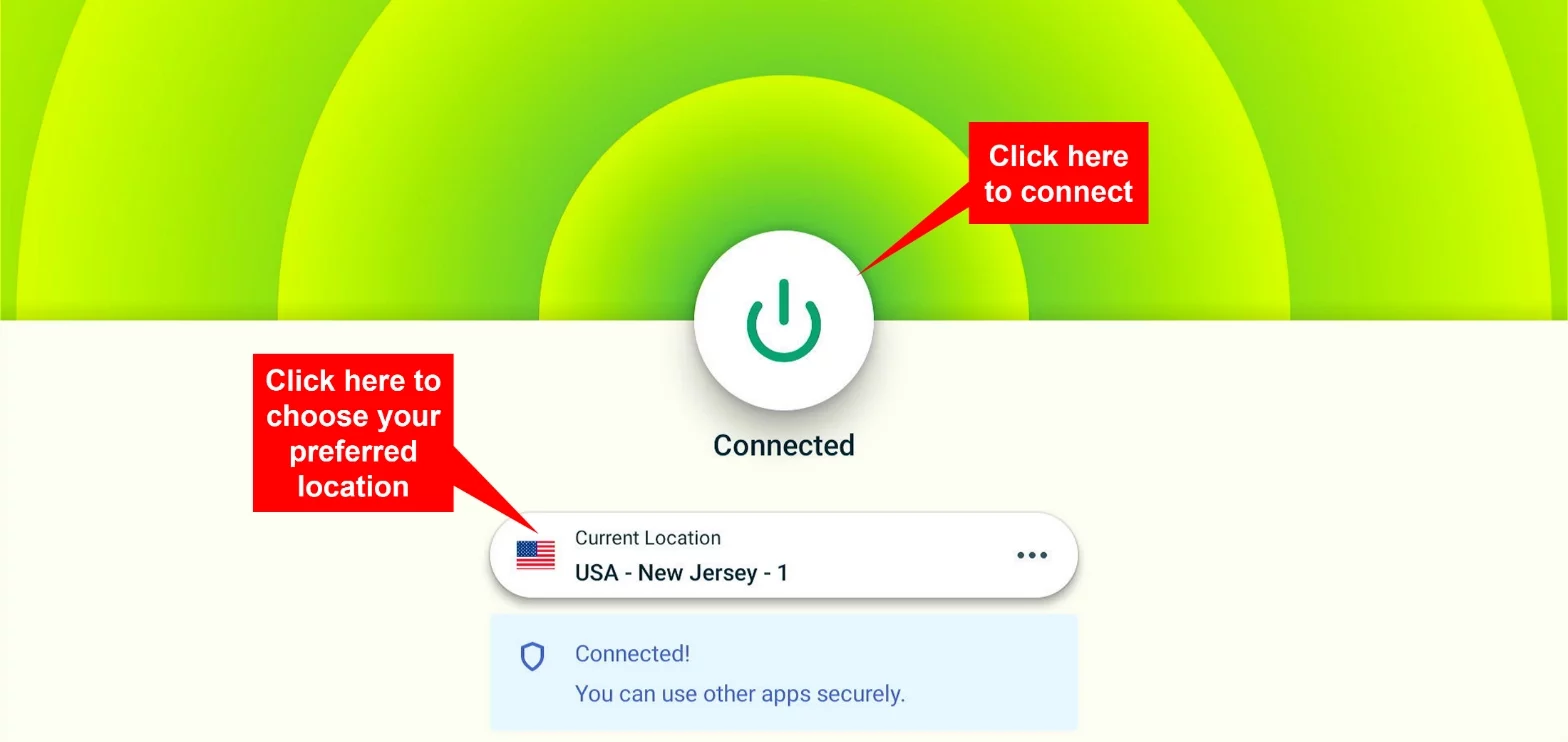
13. This is the ExpressVPN main screen. Here, you can select a server location from the list of available servers.
Choose a server location and click the Connect or Power button. ExpressVPN will securely connect to the selected server.
Congratulations! You are now ready to Superboost your FireStick safely.
Step 3: Install and Set Up Kodi on FireStick
In this section, I’ll guide you through the process of installing Kodi, a versatile media player, and entertainment hub, on your FireStick.
Unlocking the full potential of your FireStick for an enhanced streaming experience is easier than you might think.
Kodi not only offers a user-friendly interface but also opens up a world of unrestricted streaming. It gives you access to a wide range of movies, TV shows, and live channels.
Kodi transforms your FireStick into a powerful streaming device. It brings tons of free options to your fingertips.
Here are the steps to install Kodi on FireStick:
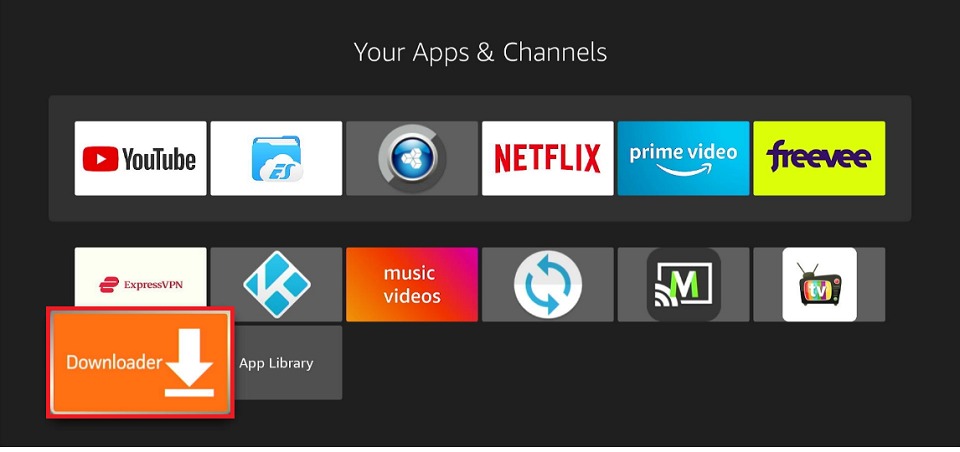
1. Start by pressing the Home button on your remote control. Then, navigate to the right and click on the Apps icon (three squares and a plus sign). You may also press the Apps button on your remote.
2. In the Apps section, locate and select the Downloader app.
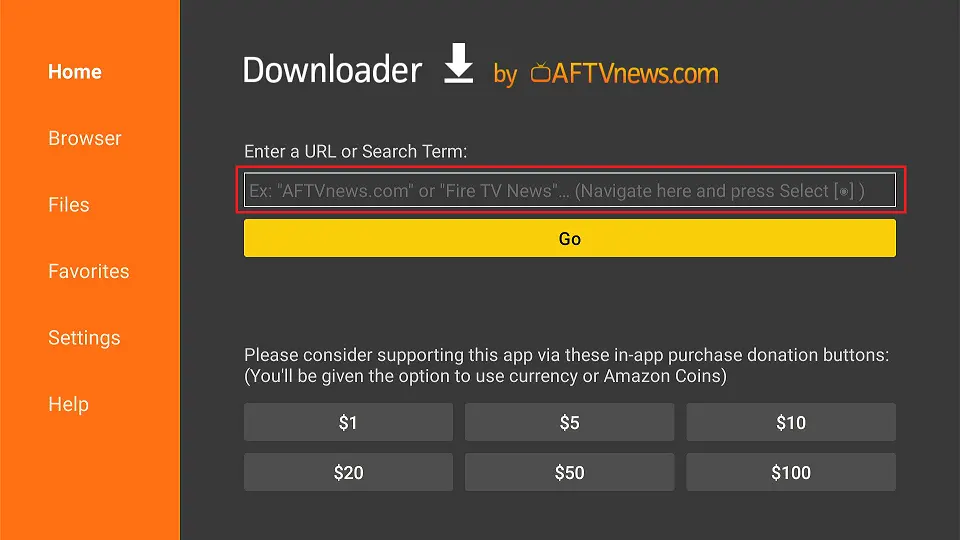
3. Inside the Downloader app, click on the URL box situated at the center of the screen.
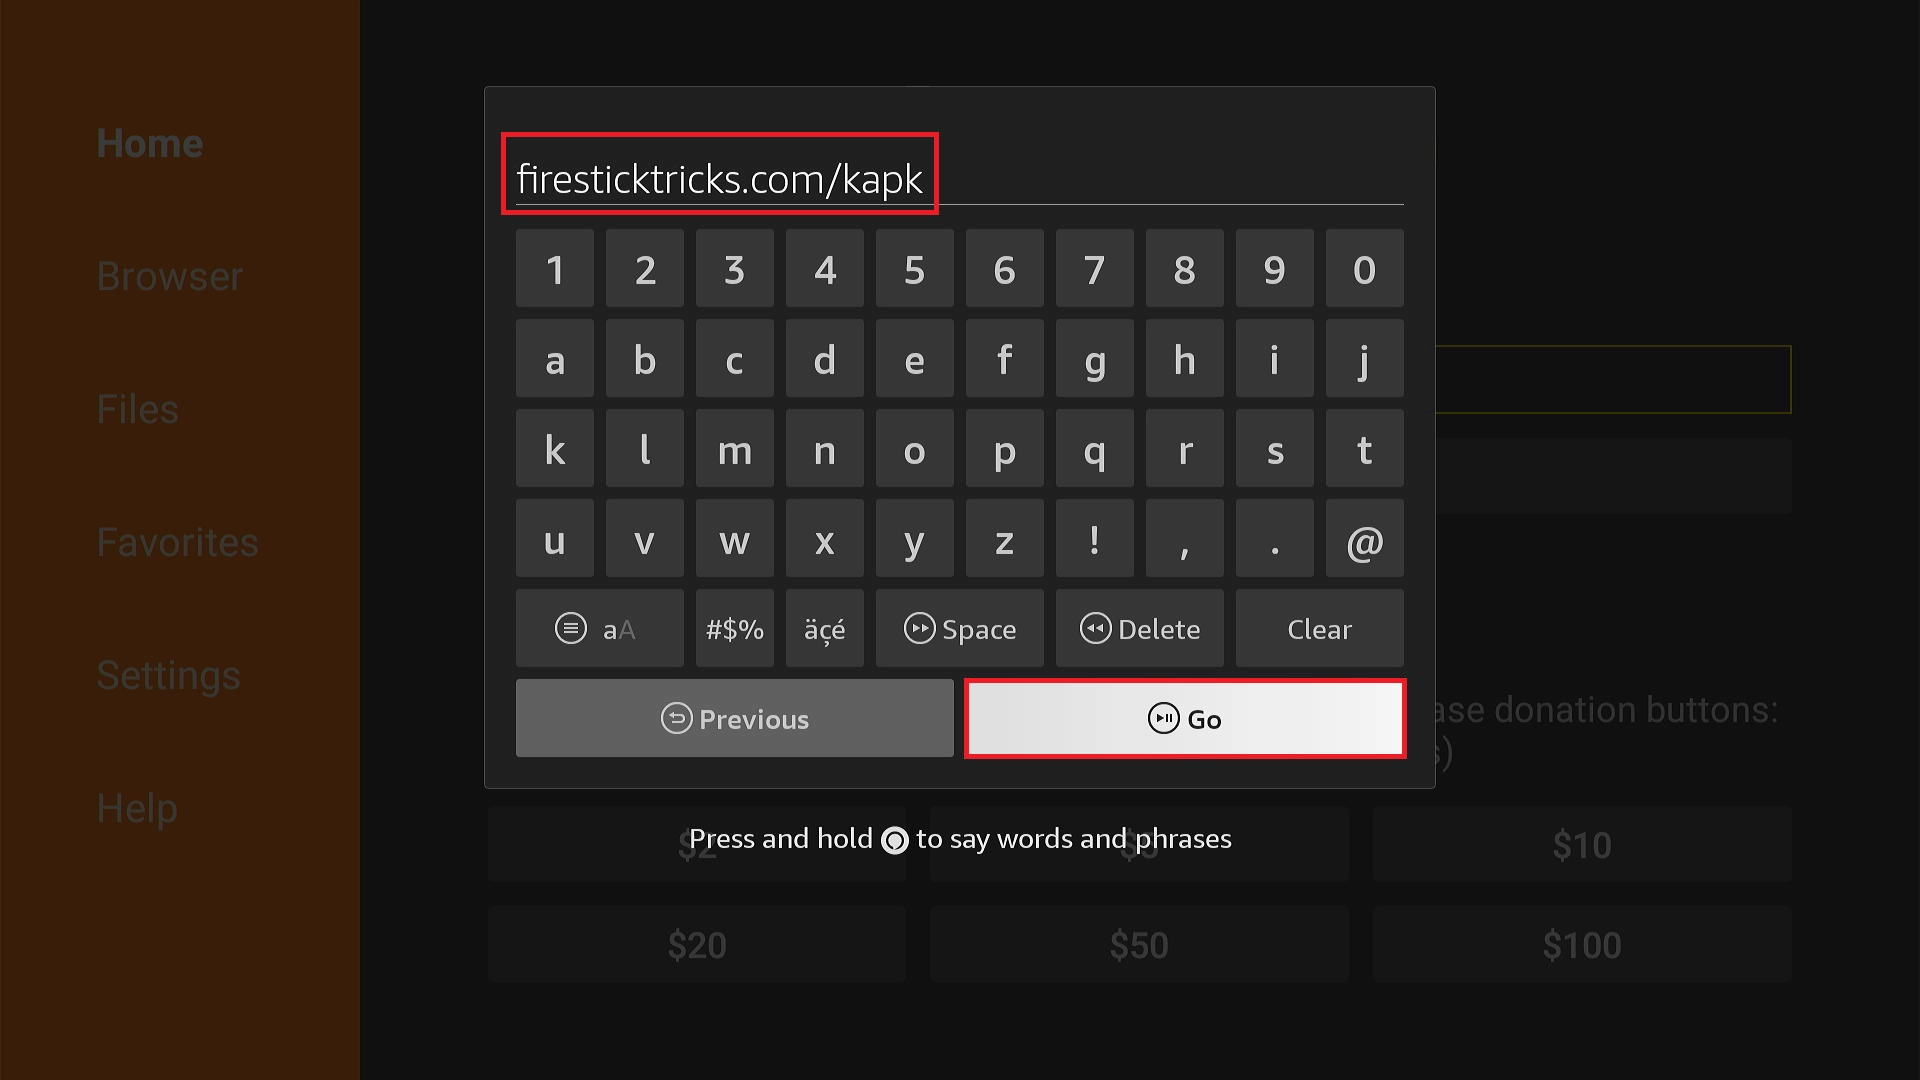
4. Carefully type in the following URL: firesticktricks.com/kapk, and then press the Go button.
Disclaimer: Please note that the provided URL serves as a redirect to an external source. Our website does not host any APK files.
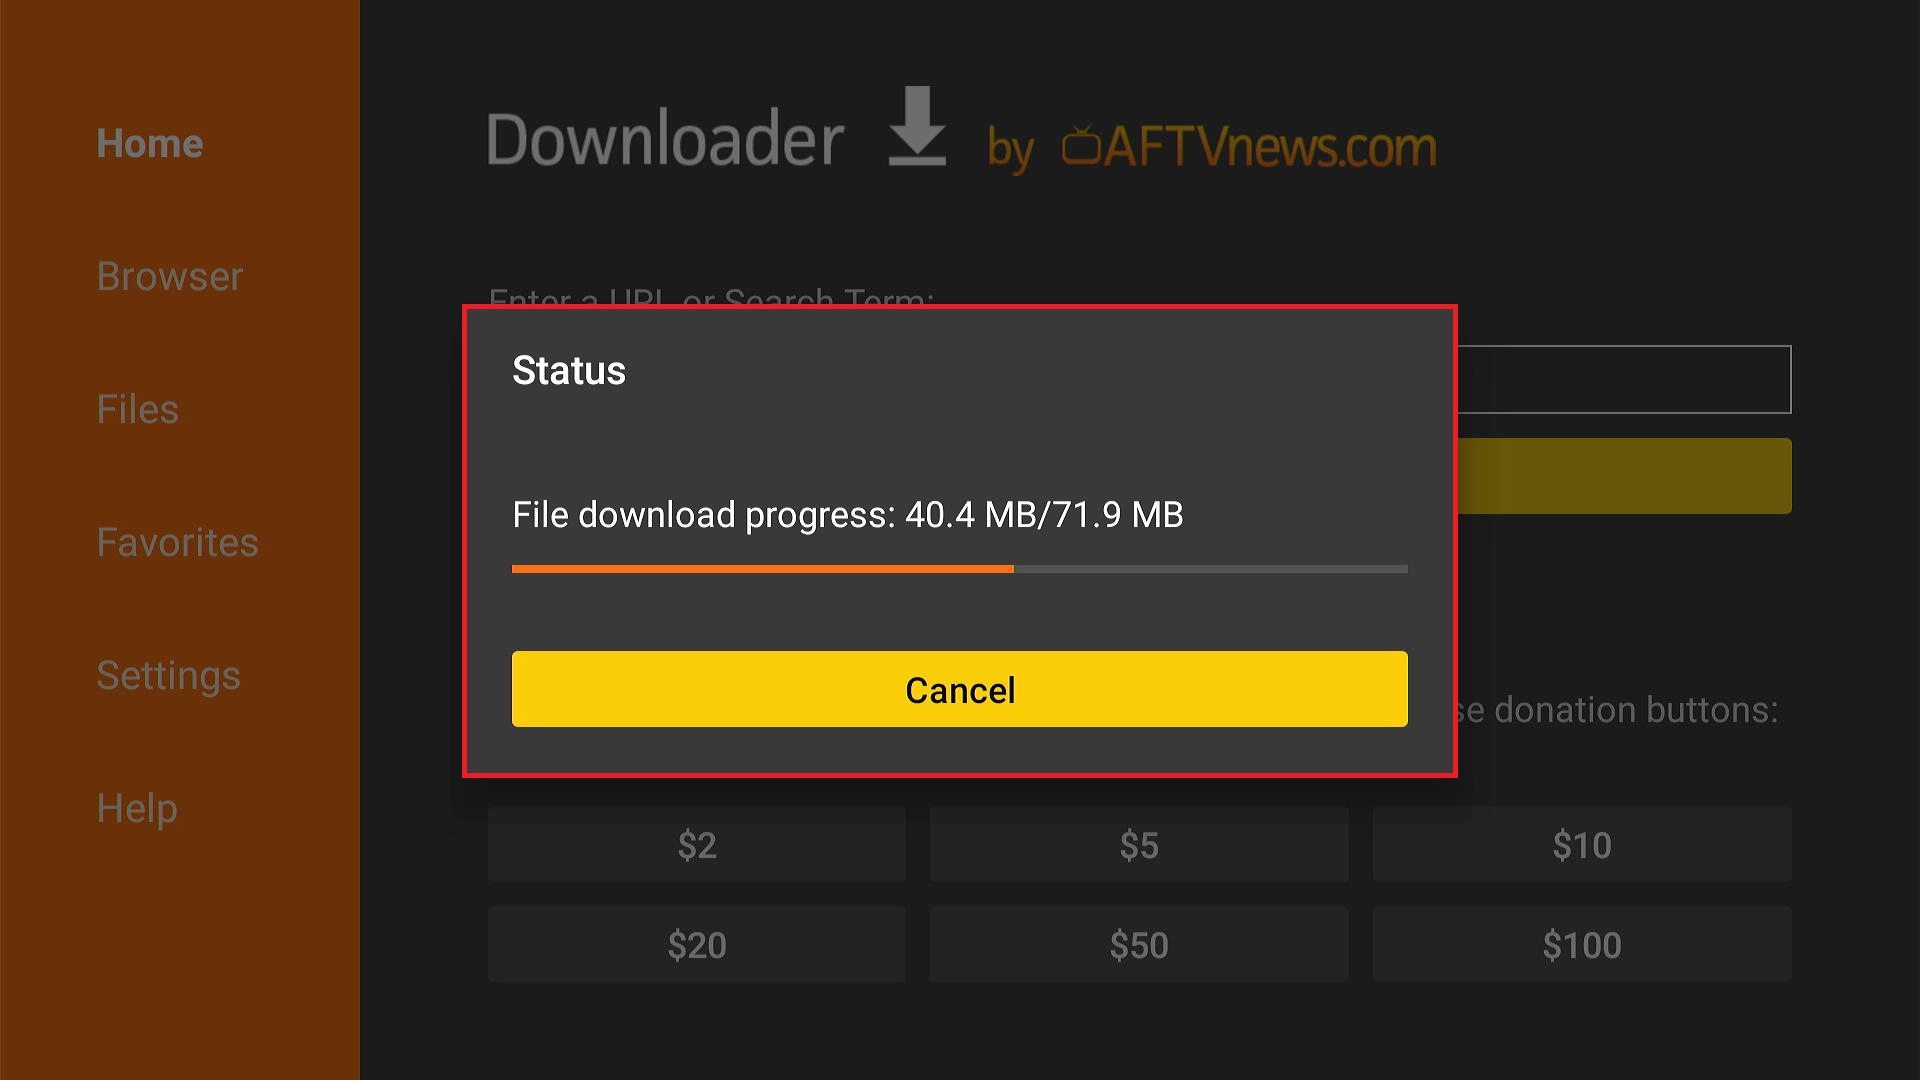
5. Allow some time for the download process to complete.
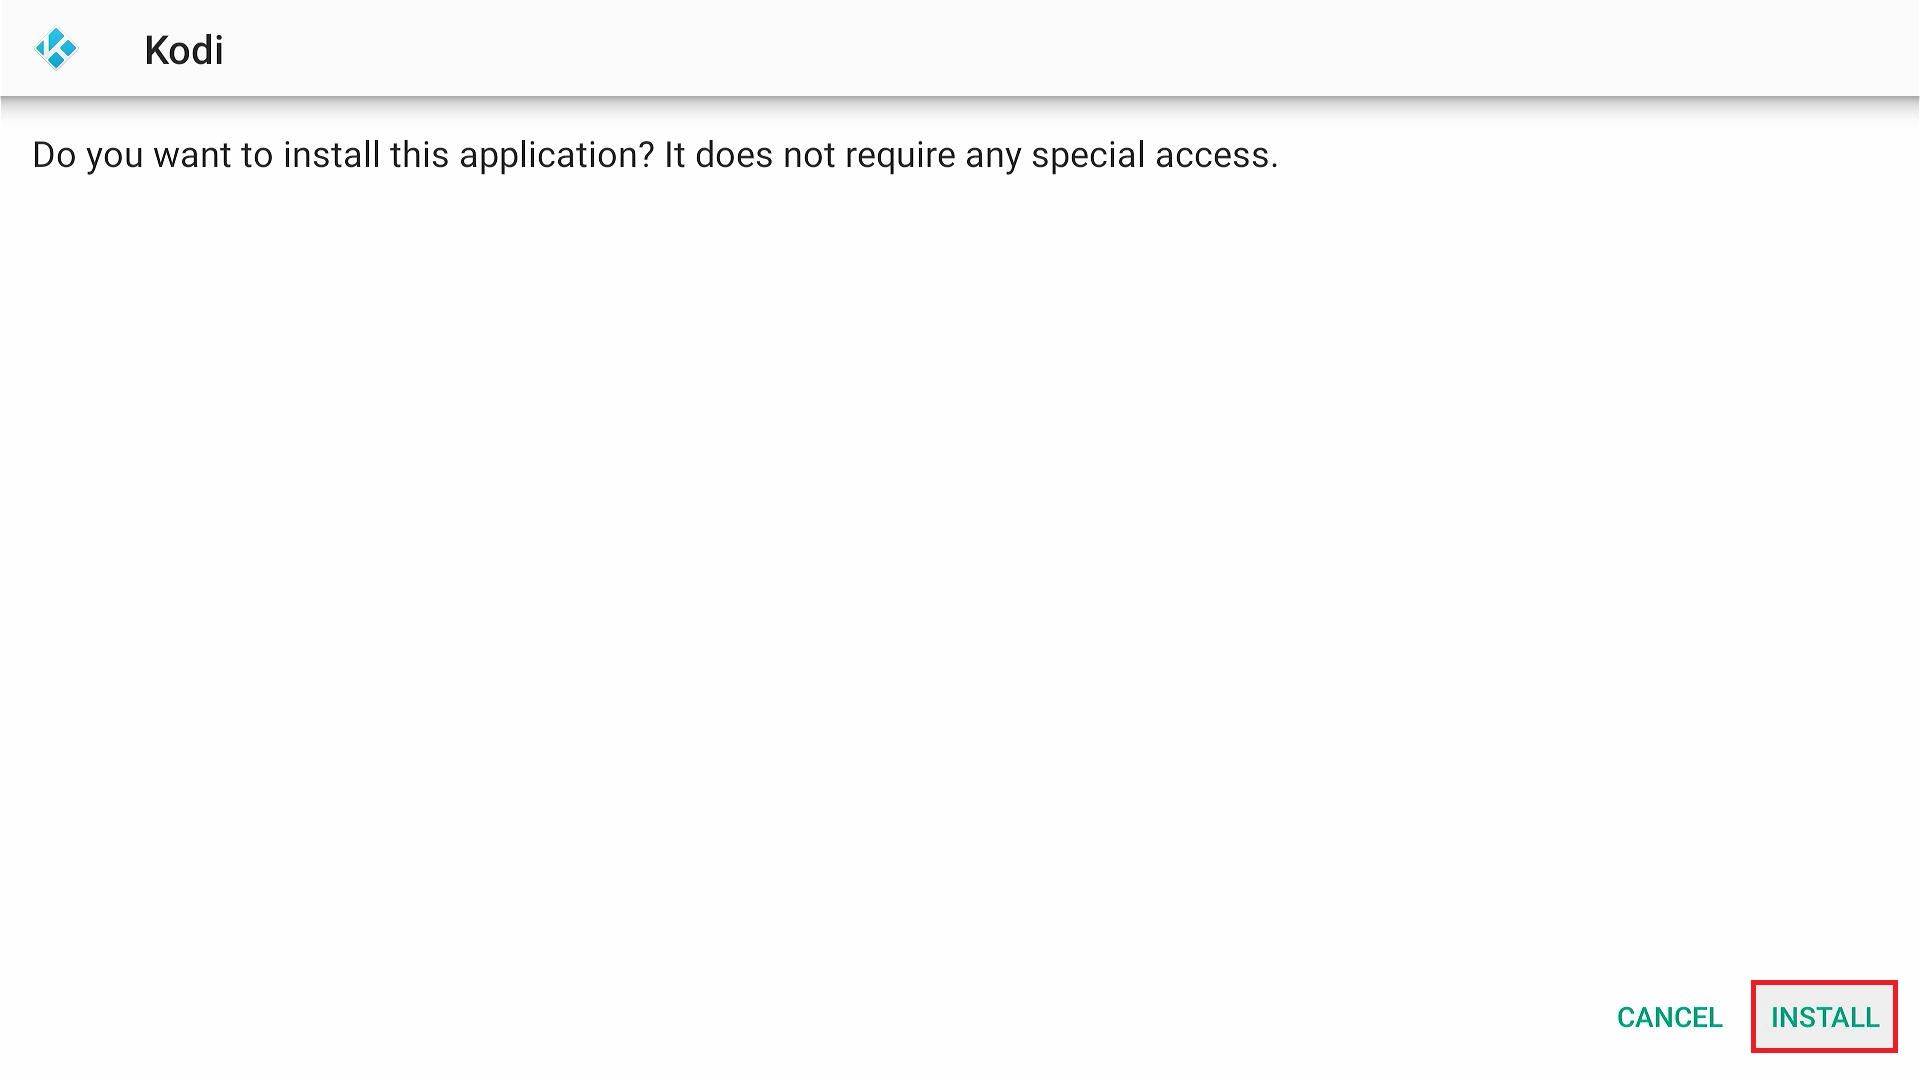
6. Once the download is finished, click on the Install button.
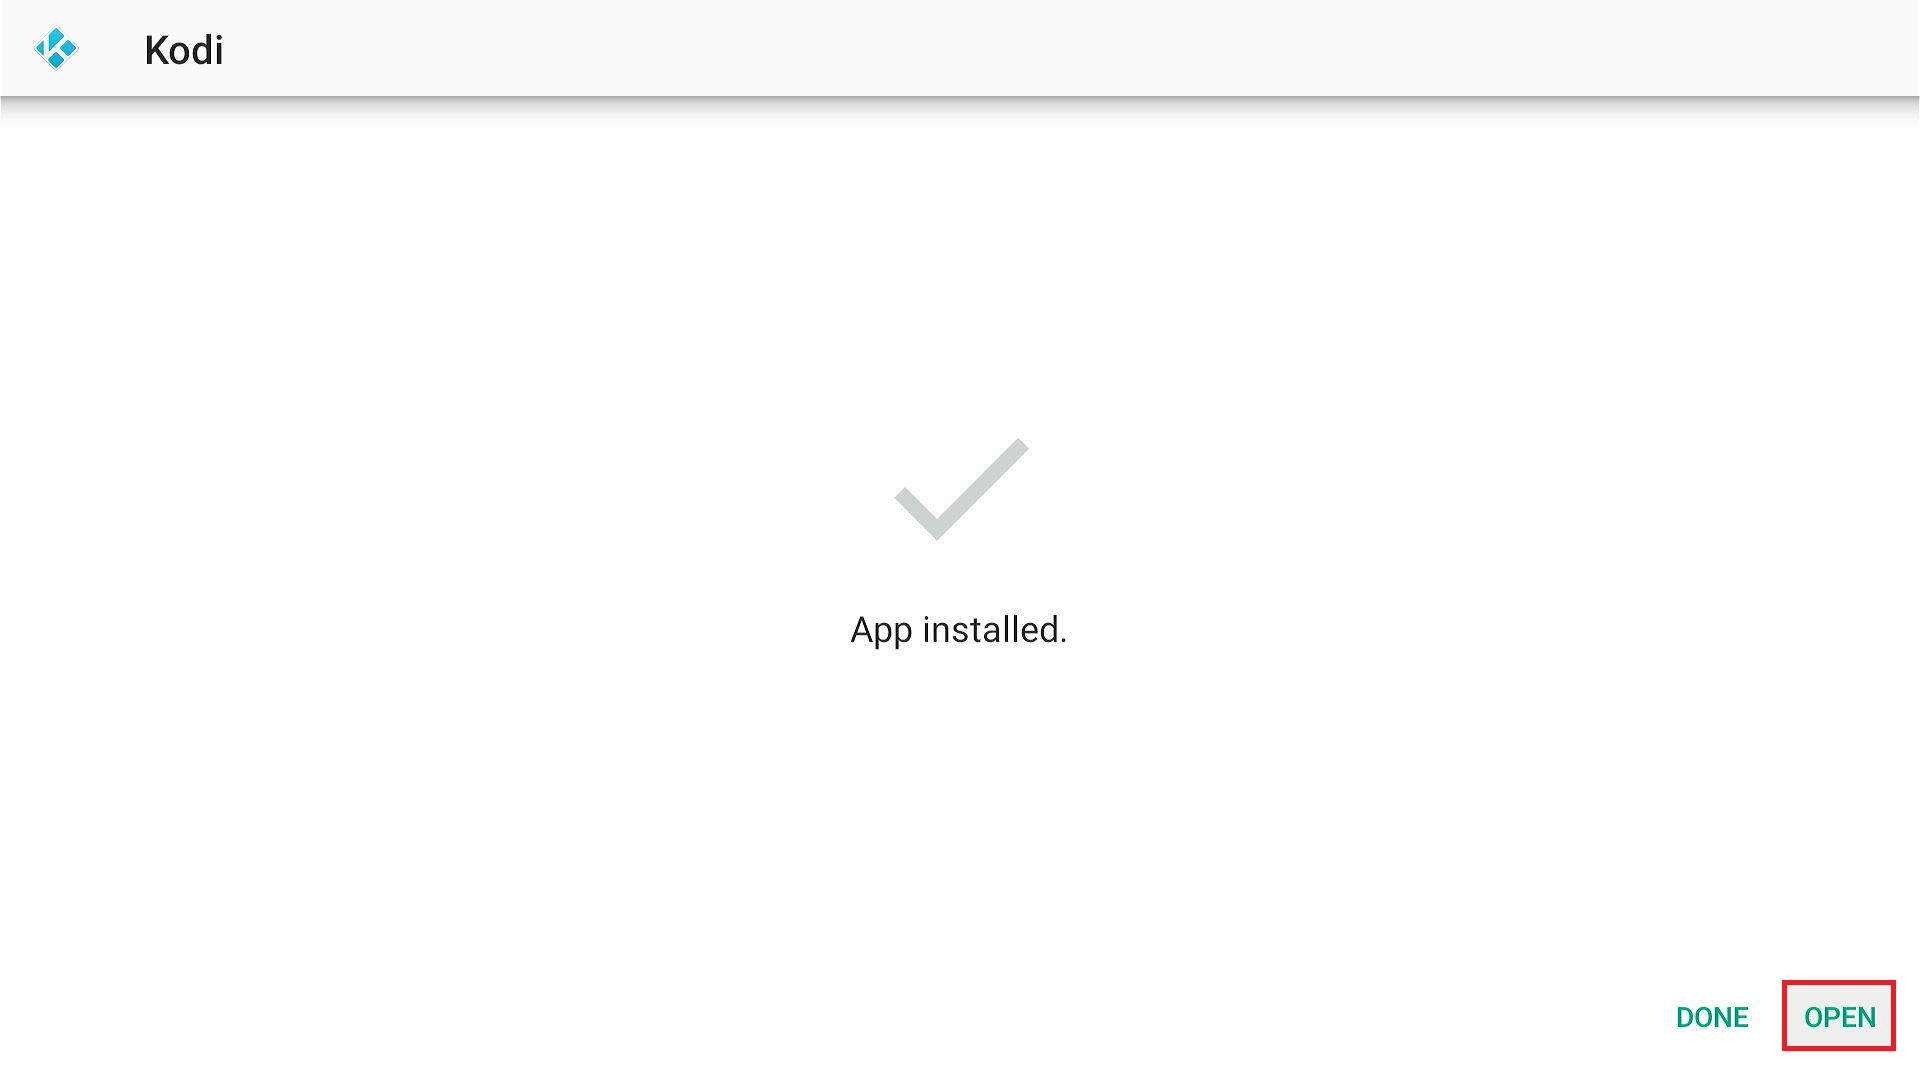
7. Click Open when the installation is complete.
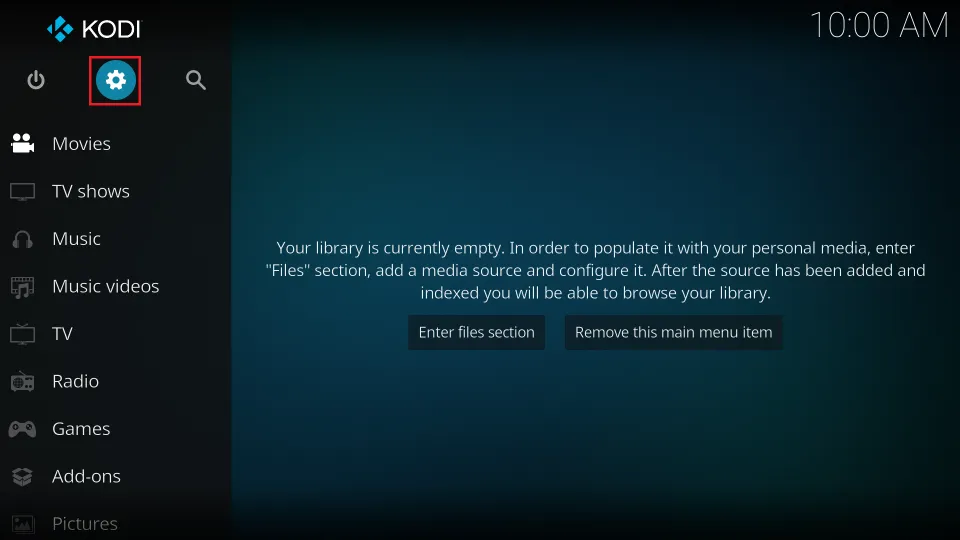
8. Click on the gear (settings) icon in the top-left corner to open the System menu.
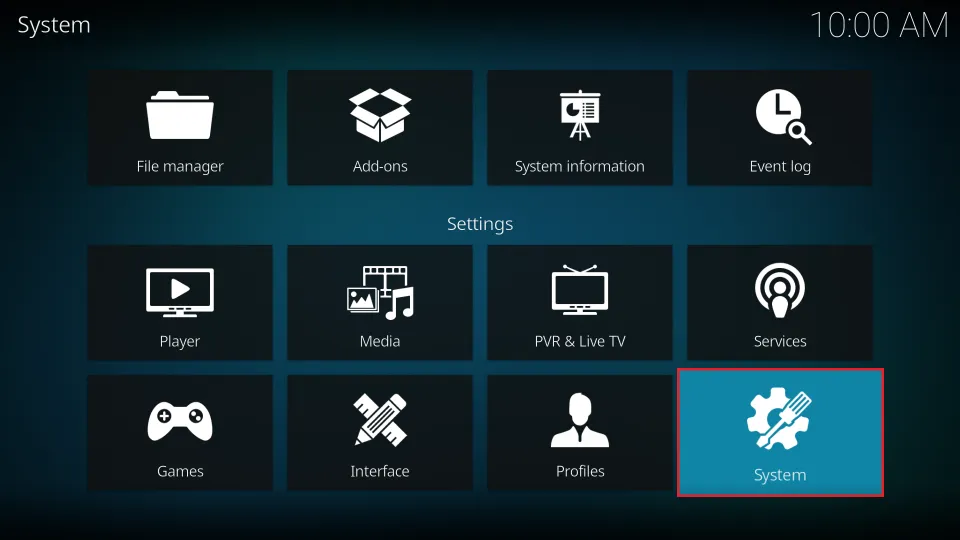
9. Select System.
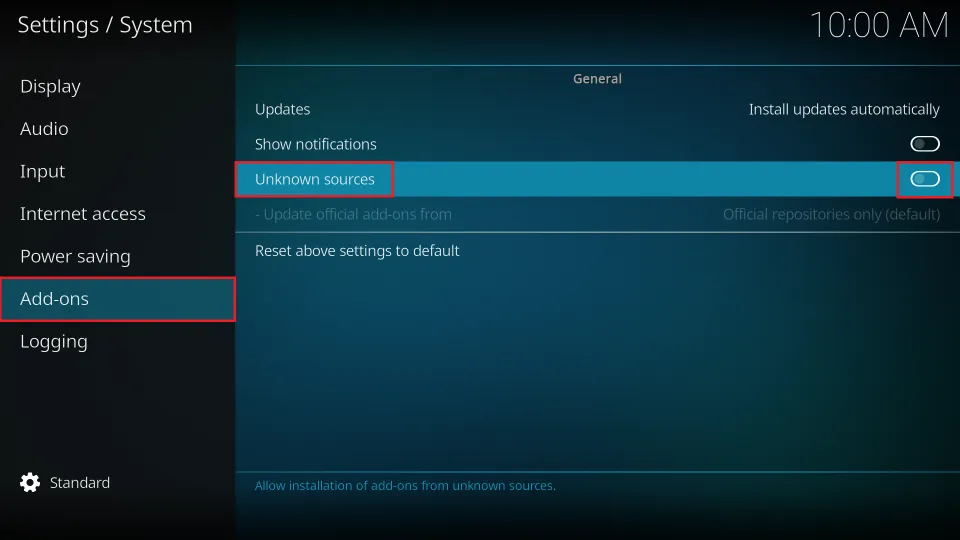
10. Click on Add-ons on the left sidebar. Toggle the Unknown Sources option to ON.
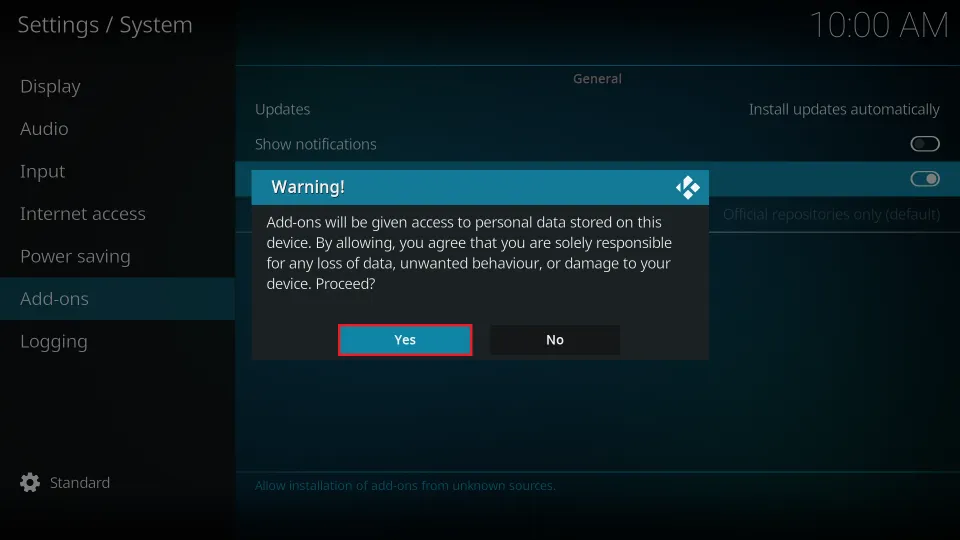
11. You’ll see a warning message. Click Yes to confirm.
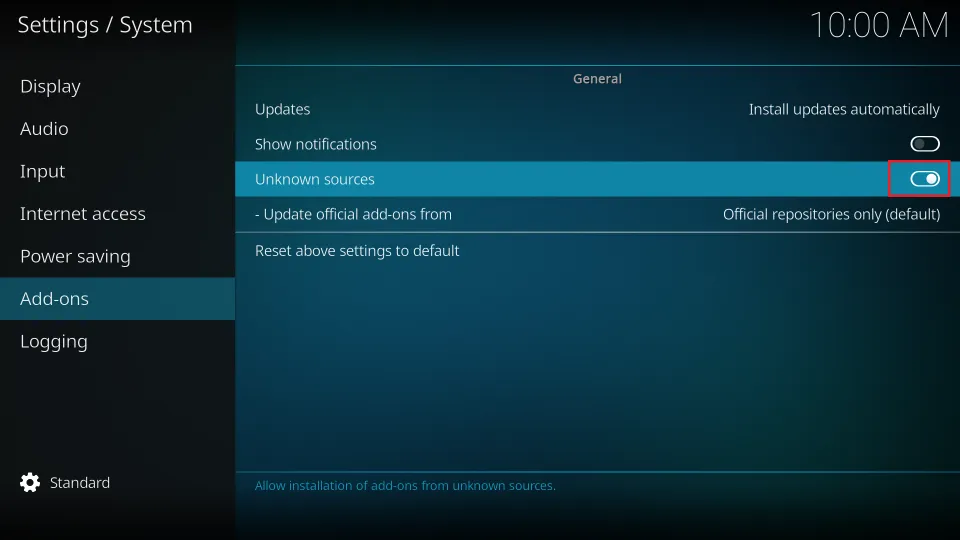
12. The toggle should be ON now.
Congratulations! You’ve successfully installed & set up Kodi on your FireStick.
Step 4: Superboost Your FireStick with Kodi Addons
In this section, you will learn how to install Kodi addons.
Imagine Kodi as a magical library for your TV. But here’s the catch: without addons, it’s like having a library with no books.
Addons are like the books that bring Kodi to life. They’re the secret sauce that lets you watch endless movies, shows, live TV, sports, and more from the internet. It’s these addons that make Kodi your gateway to an infinite world of entertainment!
You will superboost your FireStick with the following two addons:
- The Crew (multipurpose addon for movies, shows, live TV, sports, kids, family, and more)
- TV One (live TV and sports)
Addon 1: The Crew Kodi Addon
Follow these steps to install the Crew addon on Kodi to watch movies, shows, live TV, and other videos:
1. Go to the Kodi home screen. Click Settings (the gear icon).
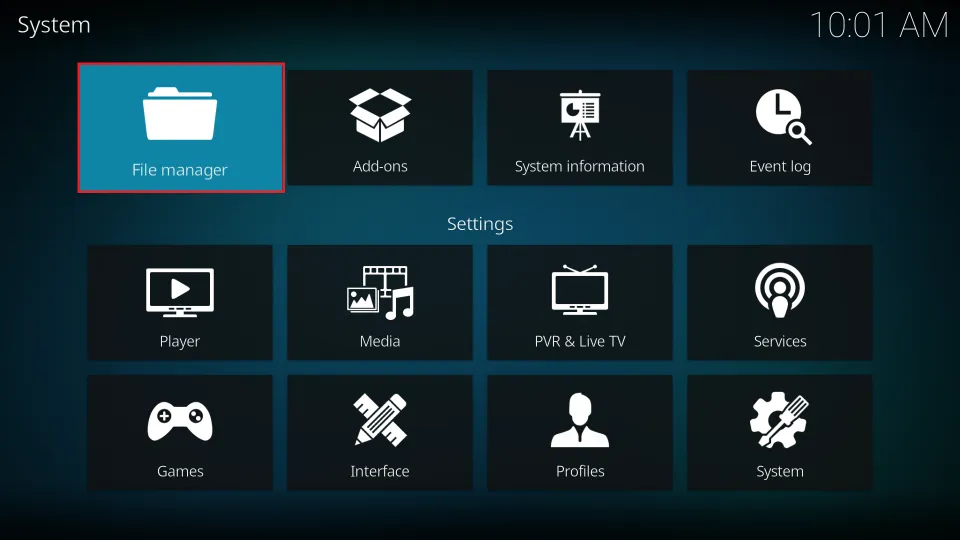
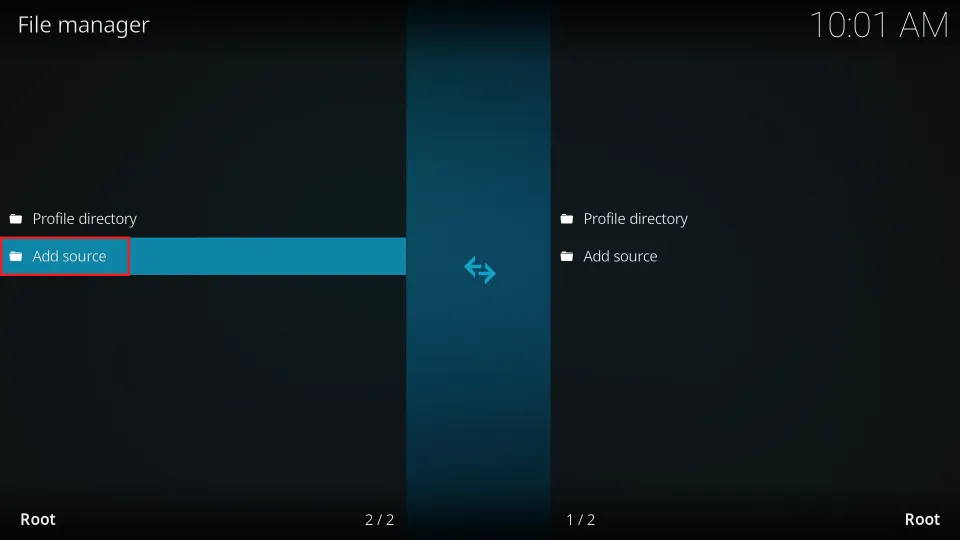
2. Select File manager.
3. Click Add source.
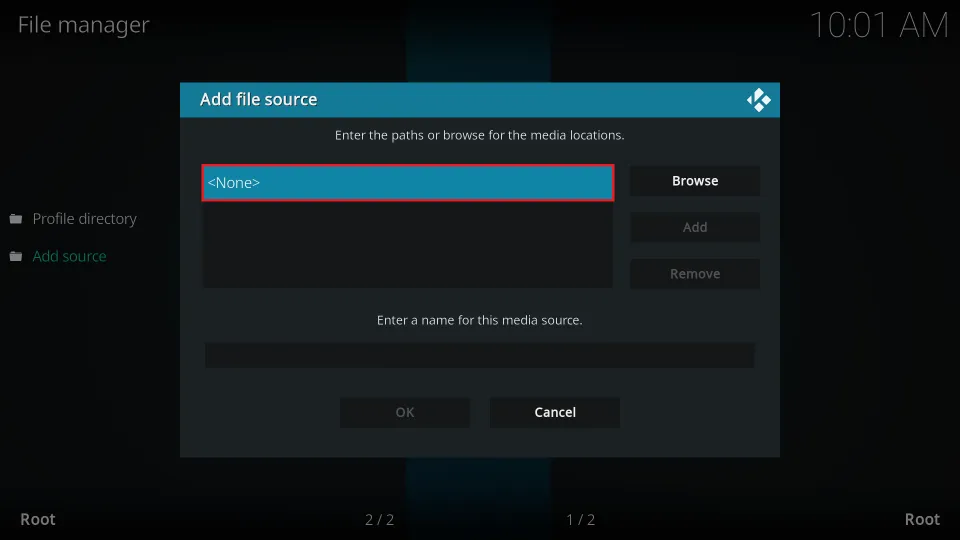
4. A dialog box will appear. Click on <None>.
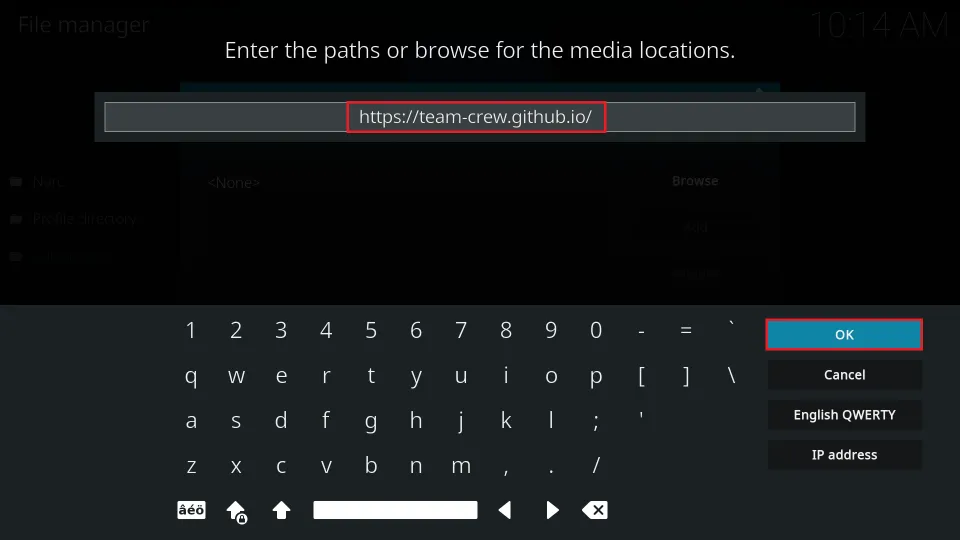
5. Enter the following URL for The Crew repository and click OK:
http://team-crew.github.io
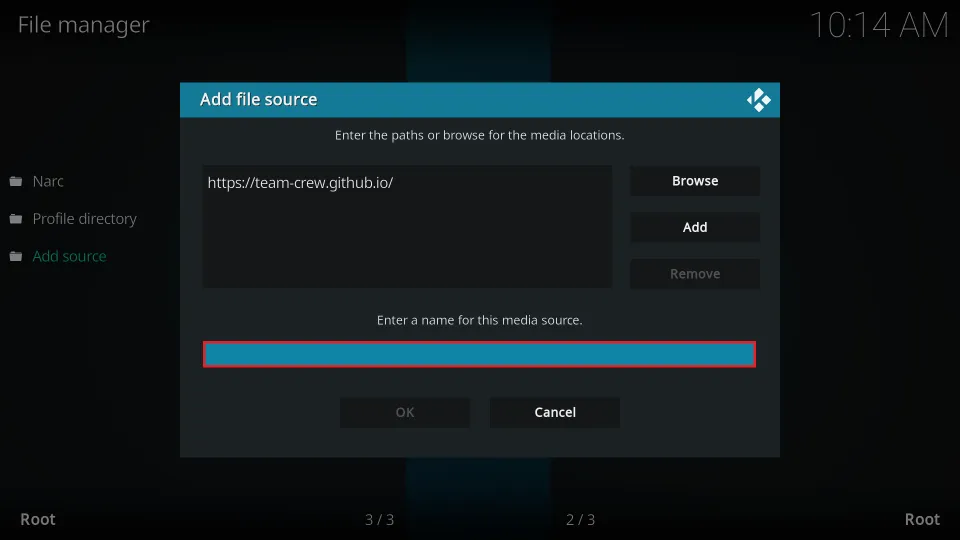
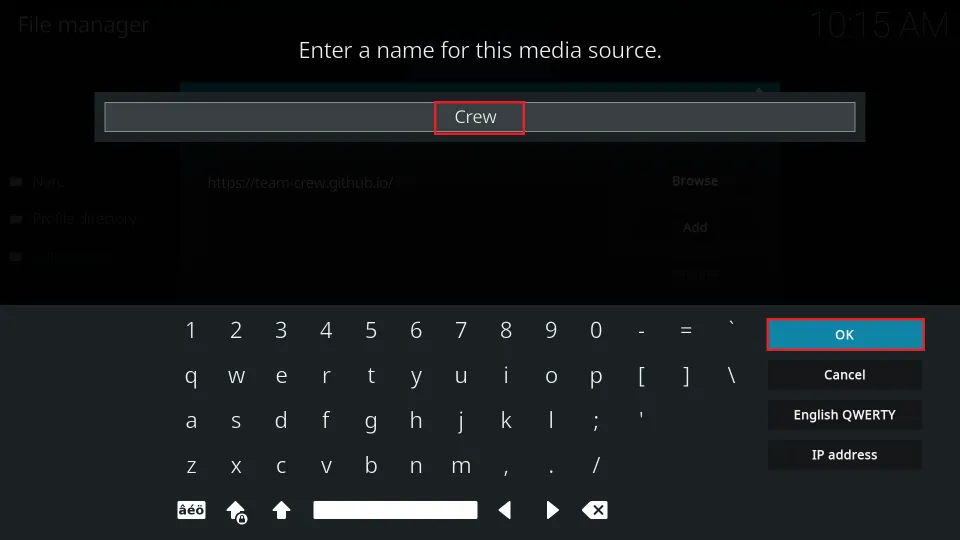
6. Click the box titled Enter a name for this media source.
7. Give it a name like Crew and click OK.
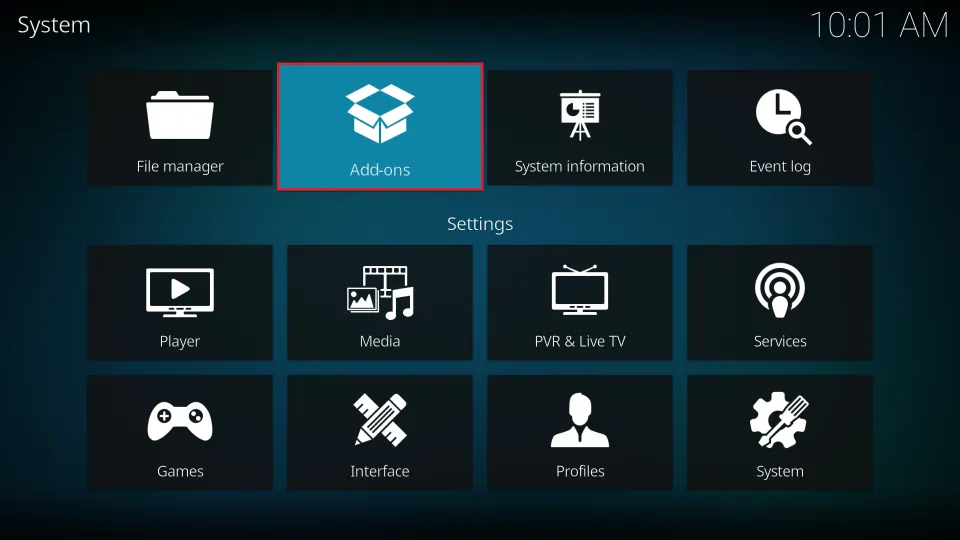
8. Go back to the Kodi Settings menu and click Add-ons.
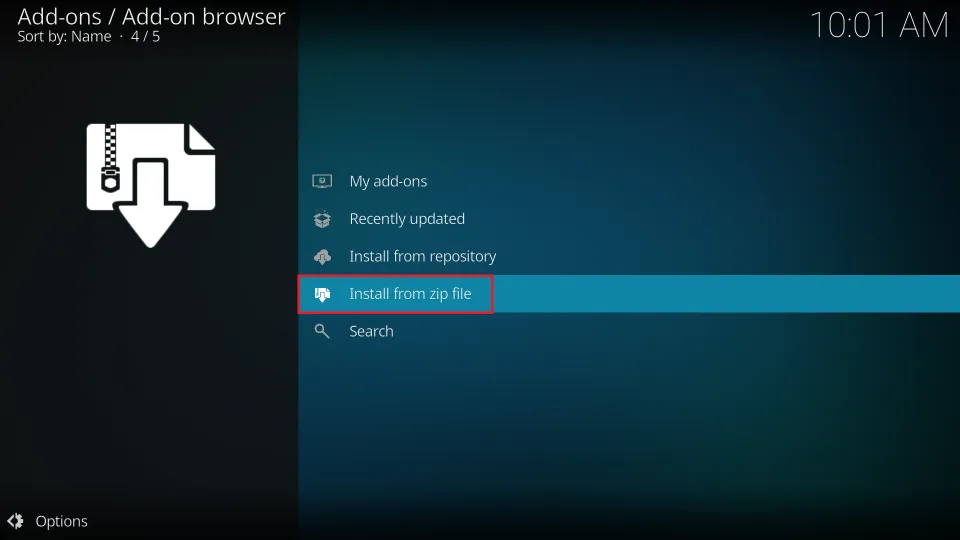
9. Click Install from zip file.
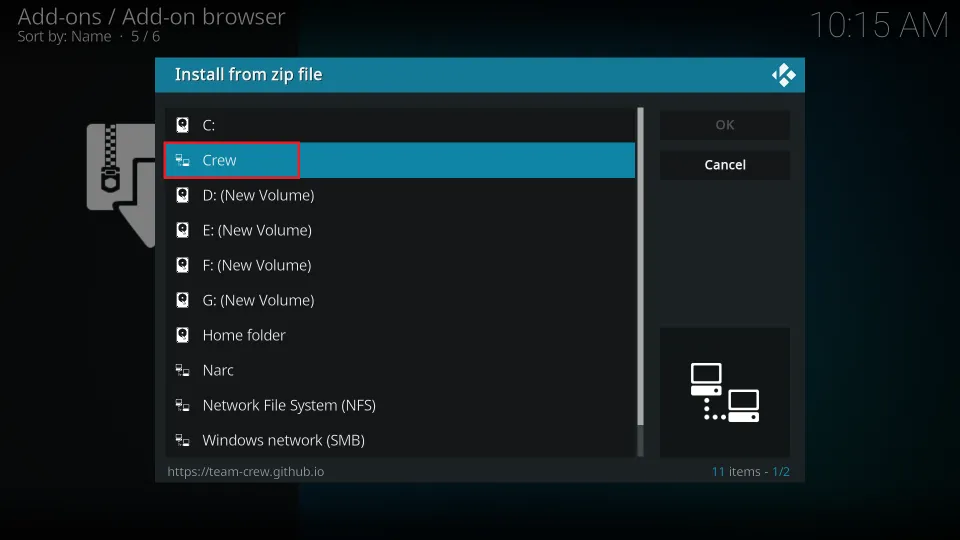
10. Find and select Crew (or whatever name you gave the source) from the list.
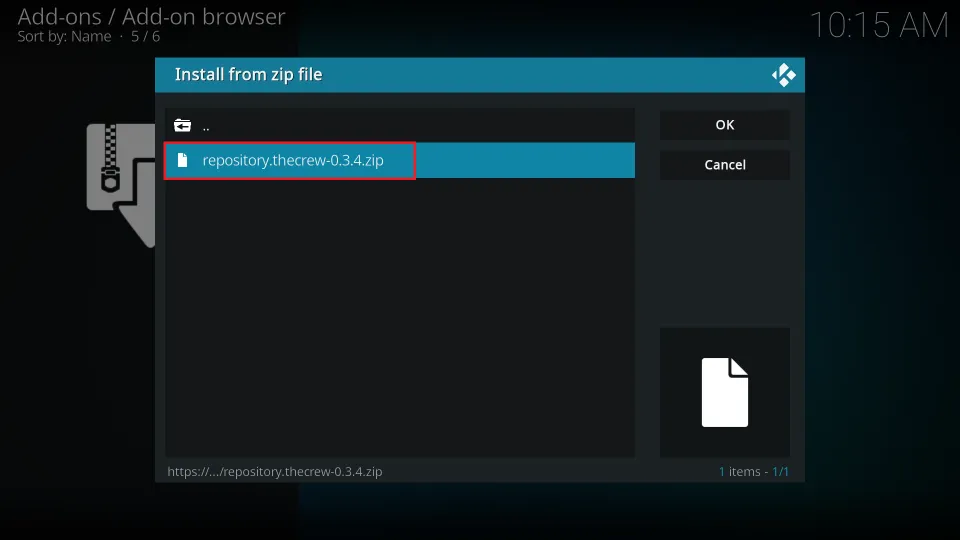
11. Click on the repository zip file, which may be named something like repository.thecrew-x.x.x.zip. (The version numbers may vary.)
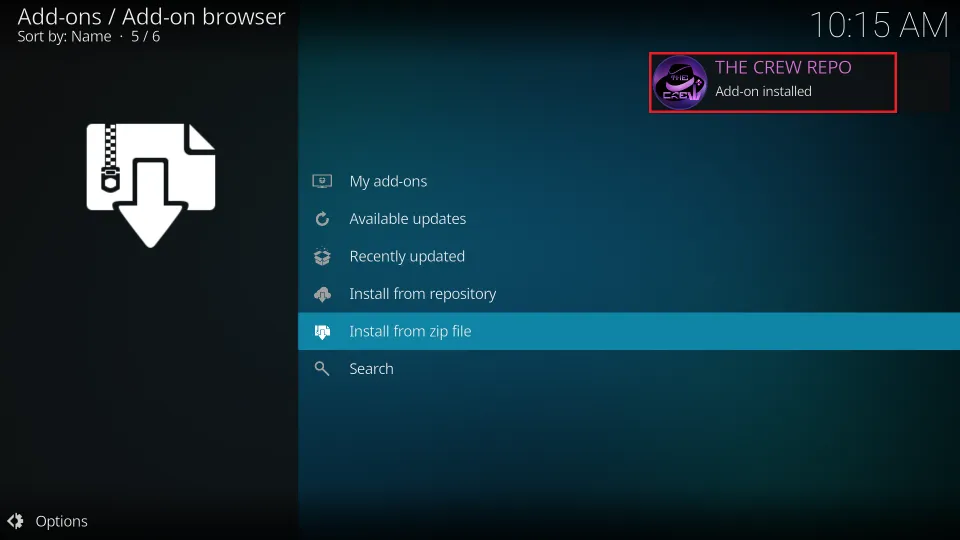
12. Wait for the The Crew Repo Add-on installed notification to appear in the top-right corner.
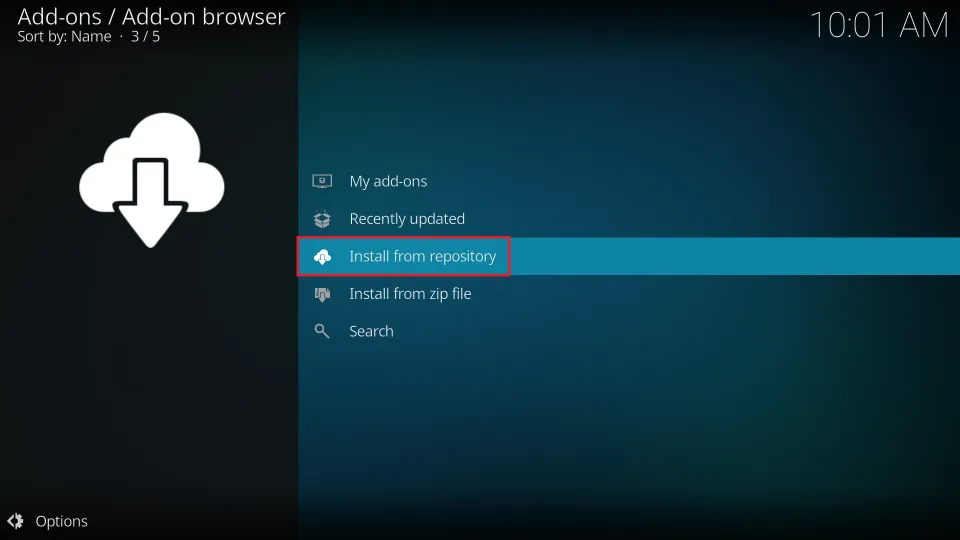
13. Still in the same menu, select Install from repository.
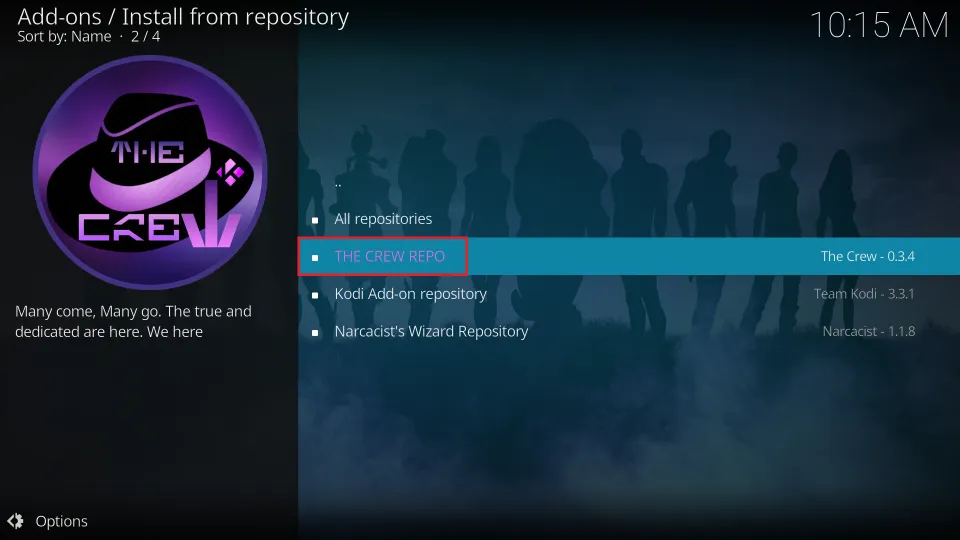
14. Choose The Crew Repo.
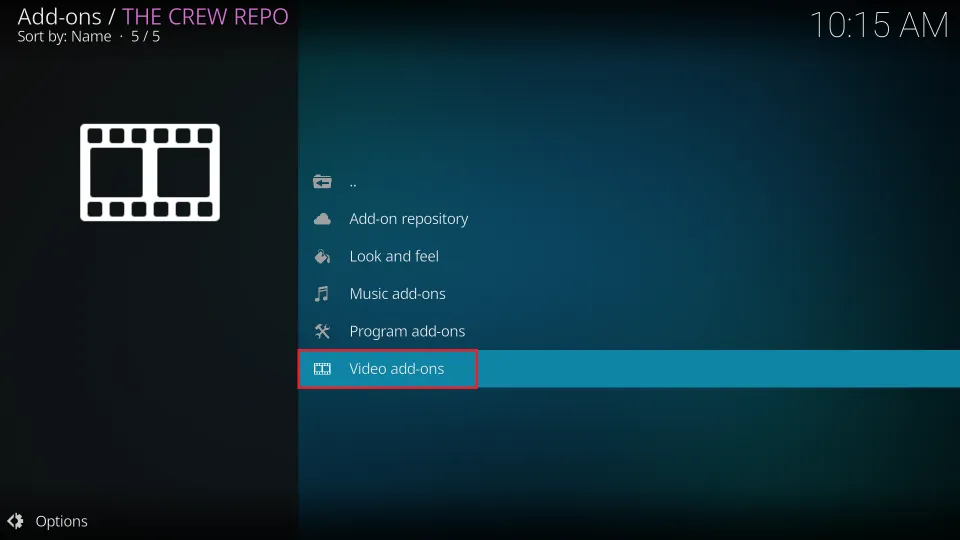
15. Select Video add-ons.
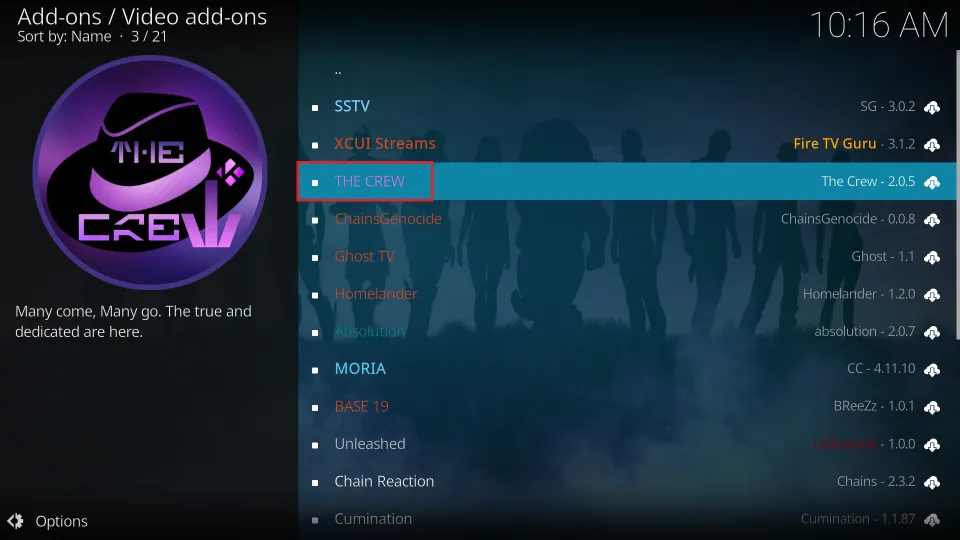
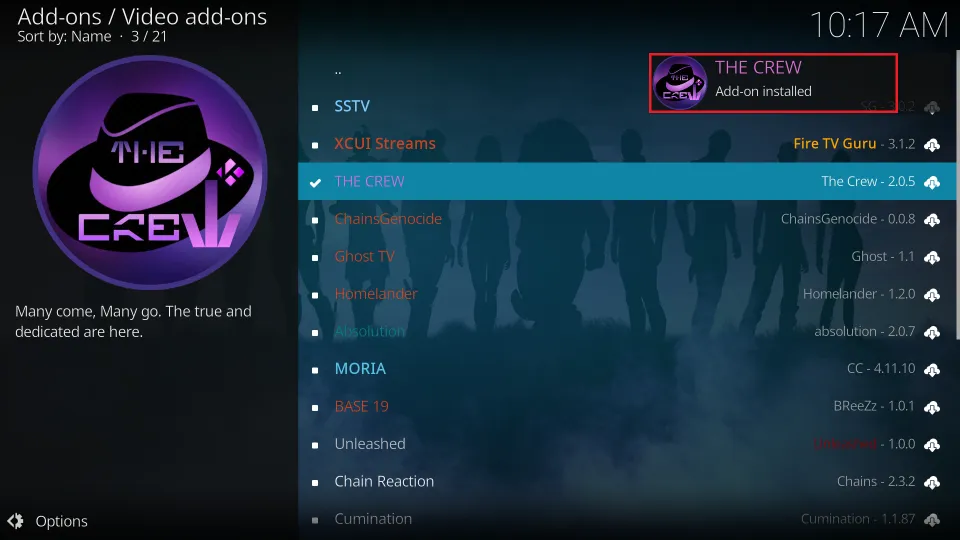
16. Find and click on The Crew from the list of available add-ons.
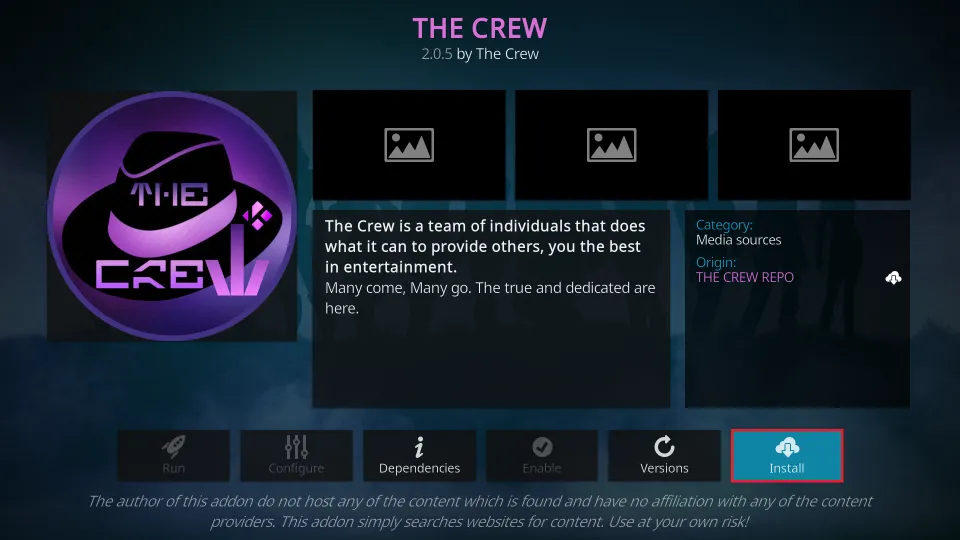
17. Click the Install button.
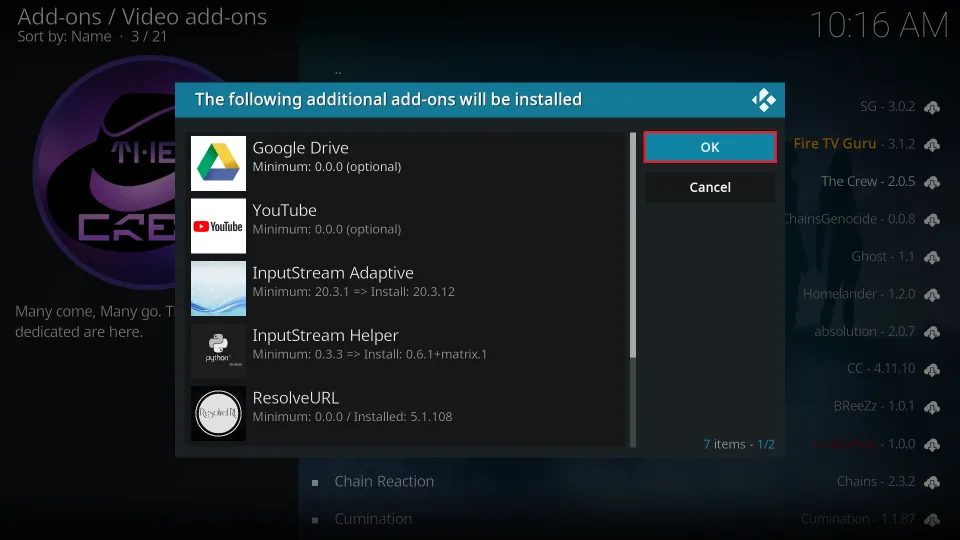
18. Click OK on the prompt.
19. Wait for the The Crew Add-on installed notification to appear.
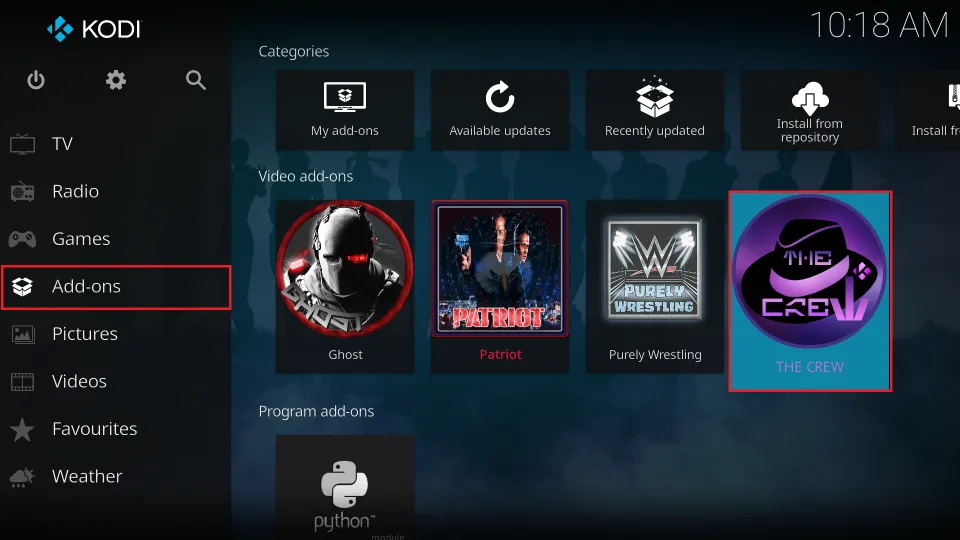
20. You have successfully installed The Crew addon. To access it, return to the Kodi main menu. Highlight Add-ons. Find The Crew in the list of installed add-ons and click on it to open.
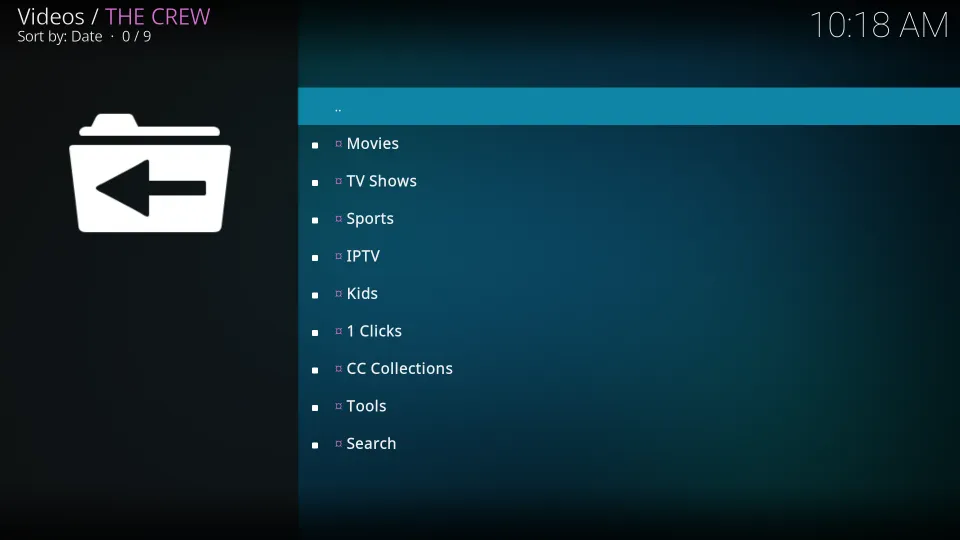
21. Here is the main screen of The Crew addon. You may start streaming by picking one of the categories, including Movies, TV Shows, Sports, IPTV, Kids, 1Clicks, and CC Collections.
Important!!! In the next few steps, I will show you how to integrate Real Debrid with The Crew addon. Even though it’s optional, I highly recommend Real Debrid. It will give you access to premium video links and enhance your streaming experience dramatically.
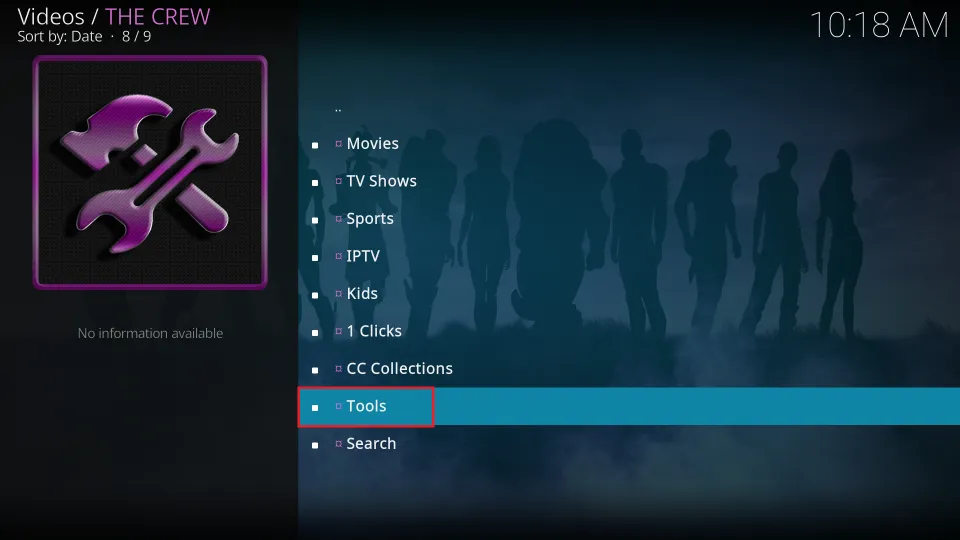
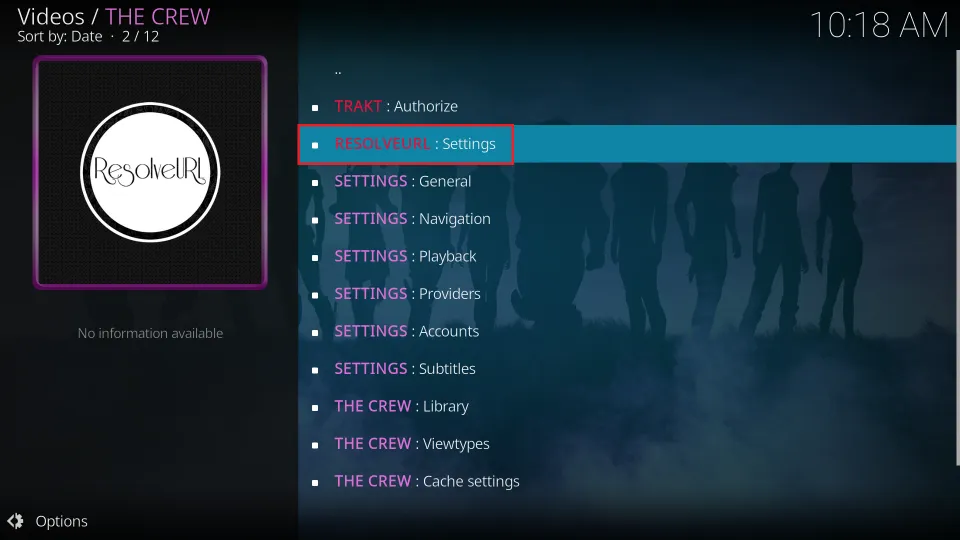
22. Click Tools on the Crew main menu (first, get a Real Debrid subscription if you don’t have one).
23. Click ResolveURL: Settings.
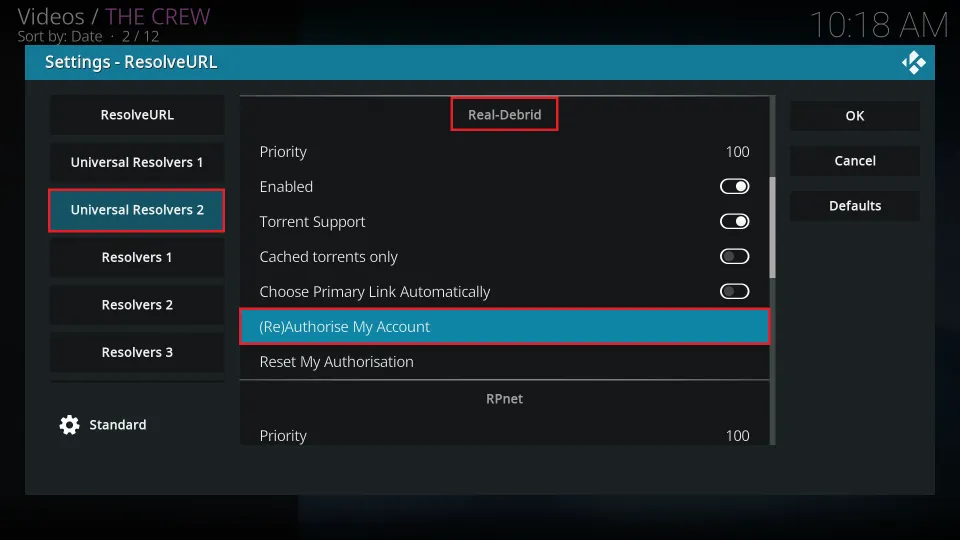
24. Click Universal Resolvers 2 on the left and (Re)Authorize My Account in the Real Debrid section.
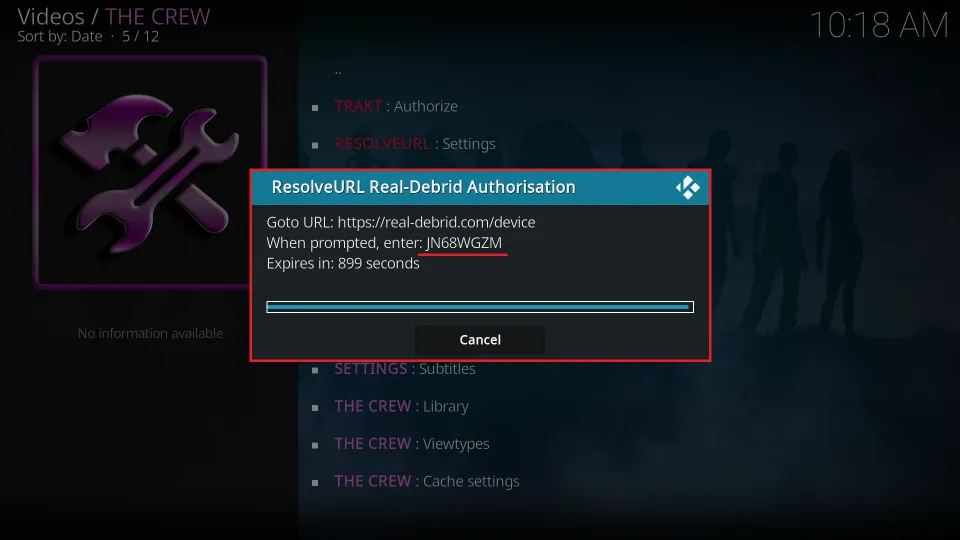
25. Note the code in the prompt. Go to real-debrid.com/device and enter the code (login to your Real Debrid account if needed).
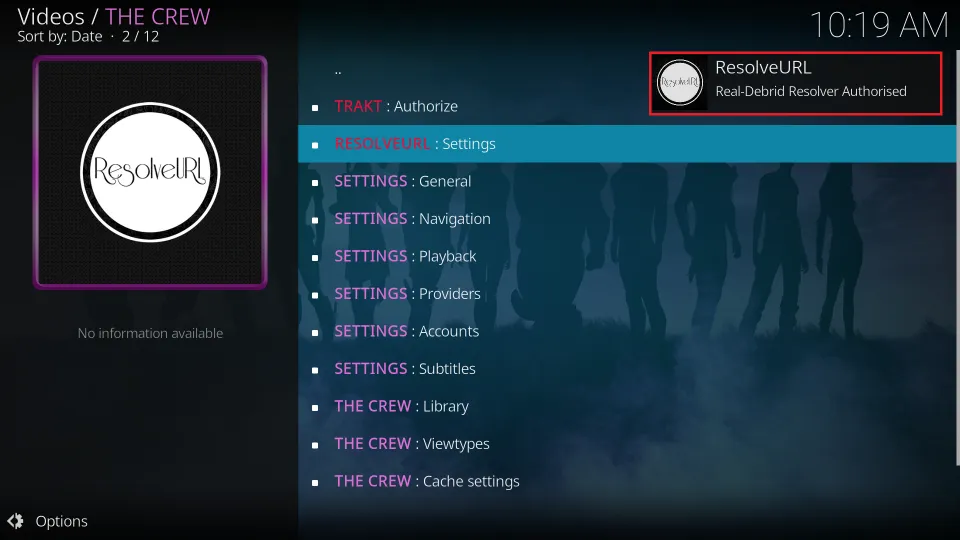
26. A prompt will appear in the top-right corner verifying the successful authorization of Real Debrid with The Crew addon.
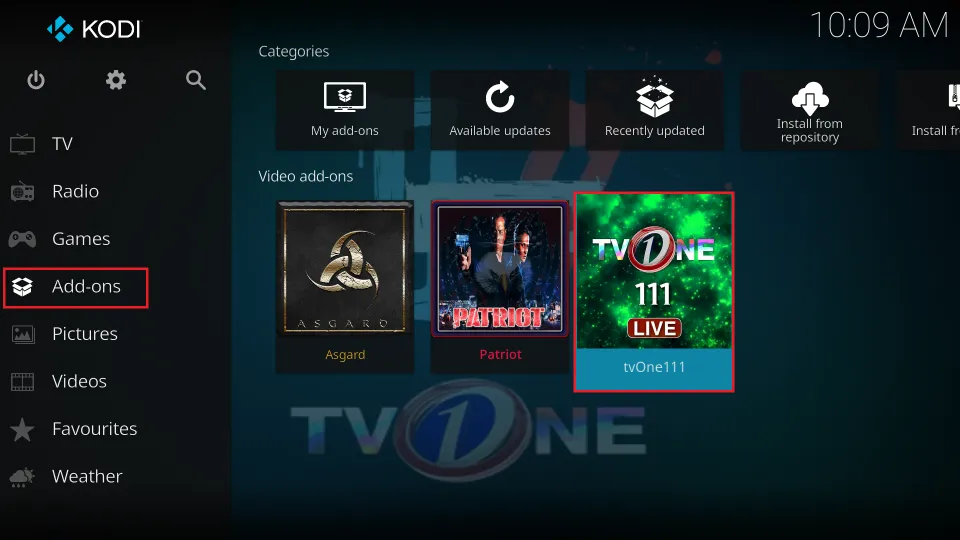
Addon 2: TV One Kodi Addon
TVOne is the addon for watching live TV and sports on Kodi. Please follow these steps to install the addon on Kodi:
1. Go to the Kodi home screen. Click Settings (the gear icon).
2. Select File manager.
3. Click Add source.
4. A dialog box will appear. Click on <None>.
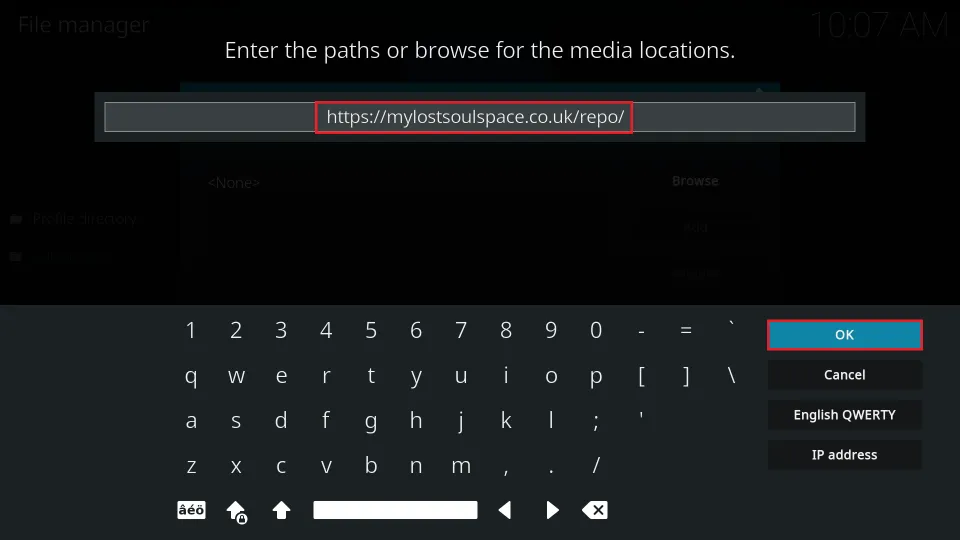
5. Enter the following URL for The Crew repository and click OK:
https://mylostsoulspace.co.uk/repo
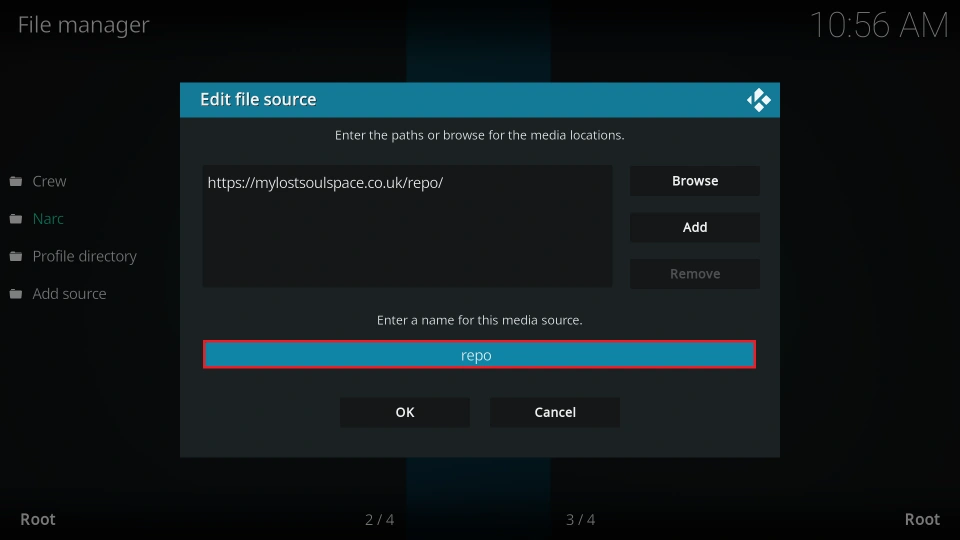
6. Click the box titled Enter a name for this media source where it says repo.
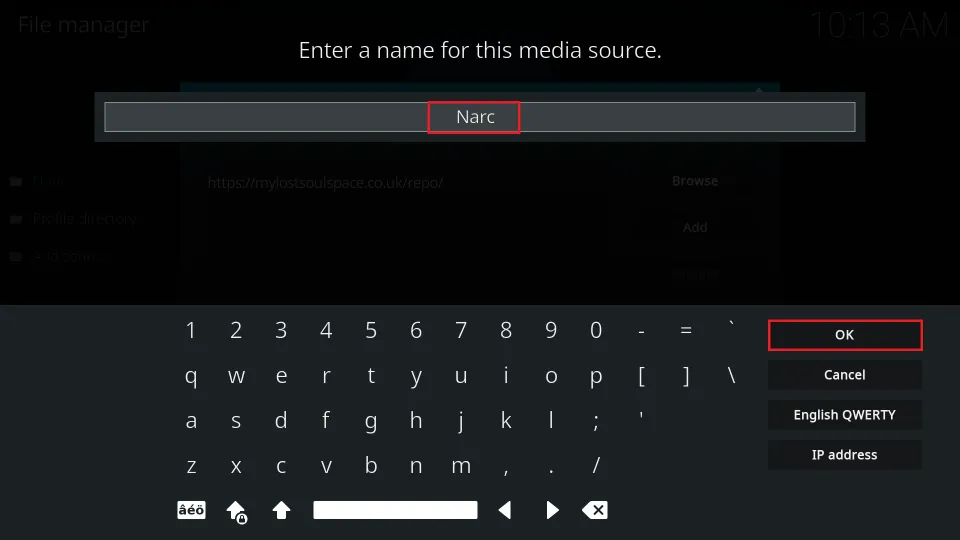
7. Give it a custom name like Narc. Click OK.
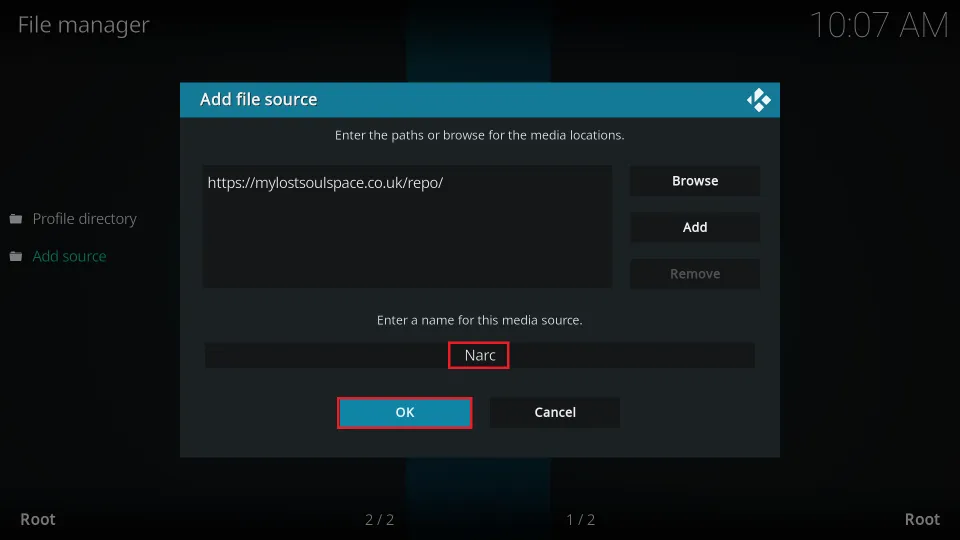
8. You should see the new name. Click OK again.
9. Go back to the Kodi Settings menu and click Add-ons.
10. Click Install from zip file.
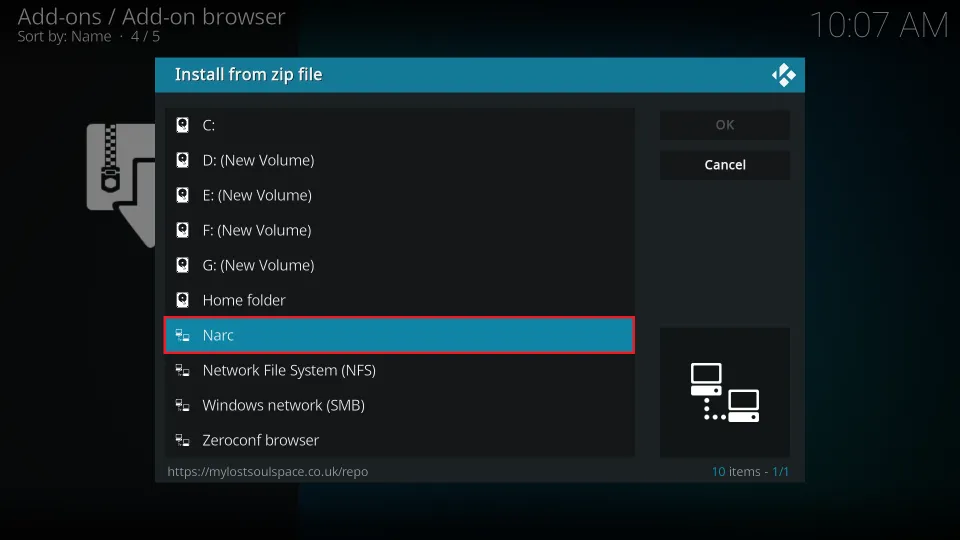
11. Find and select Narc (or whatever name you gave the source) from the list.
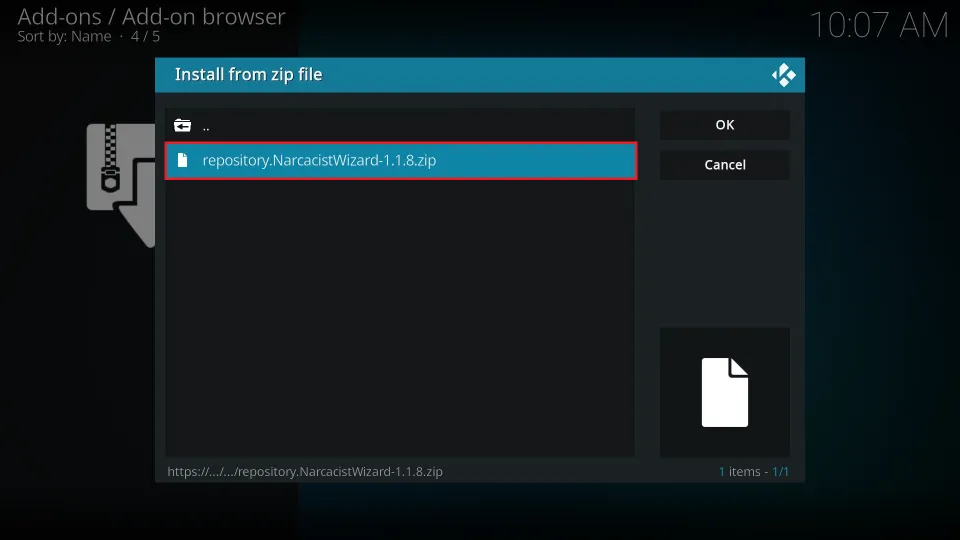
12. Click on the repository zip file, which may be named something like repository.NarcacistWizard-x.x.x.zip. (The version numbers may vary.)
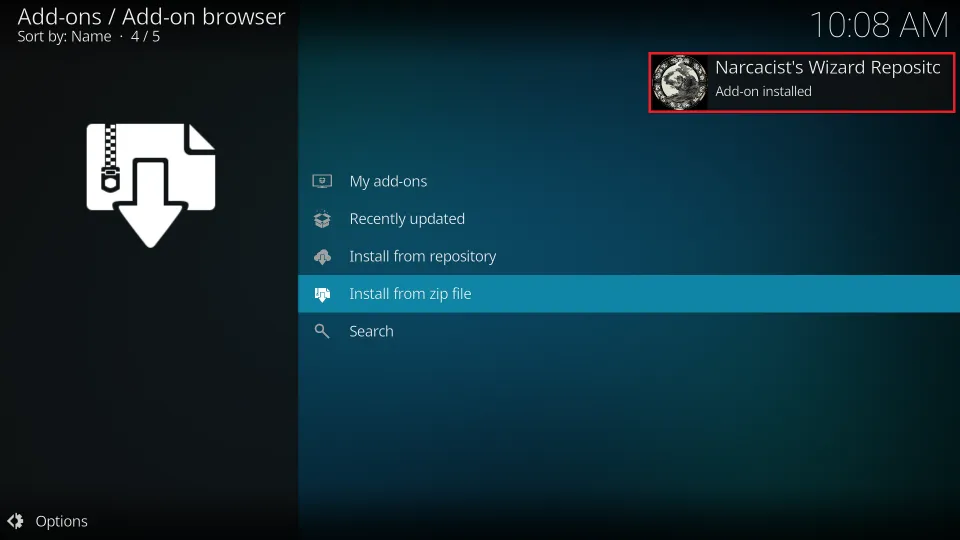
13. Wait for the Narcacist’s Wizard Repository Add-on installed notification to appear in the top-right corner.
14. Still in the same menu, select Install from repository.
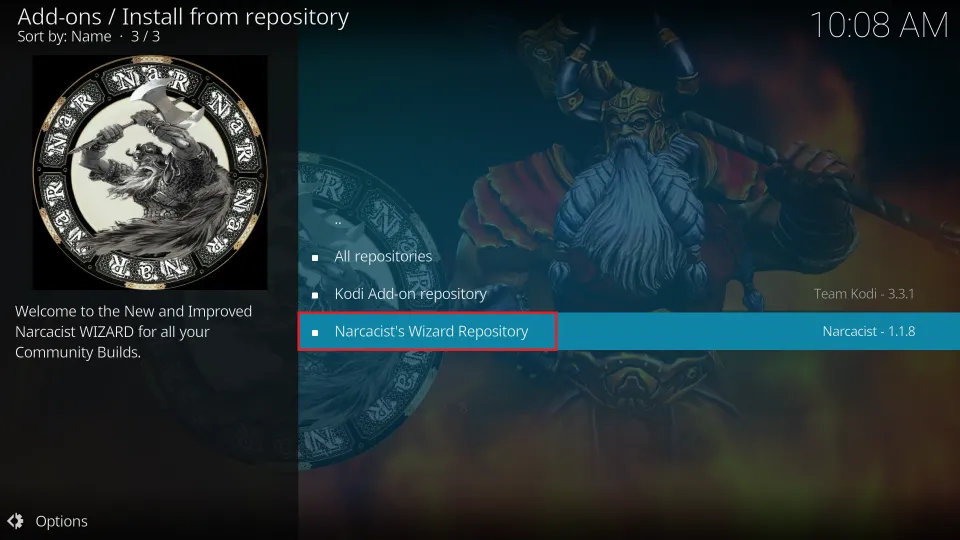
15. Choose the Narcacist’s Wizard Repository.
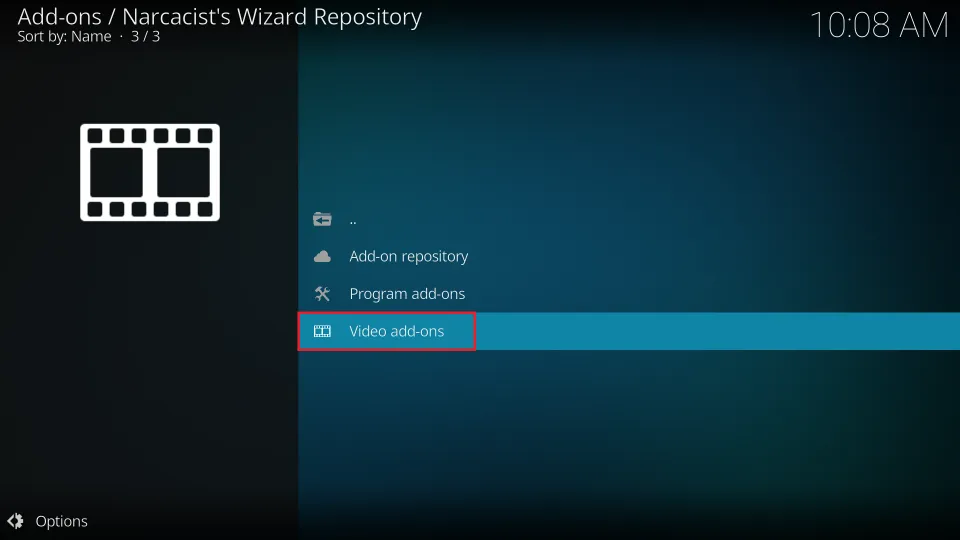
16. Select Video add-ons.
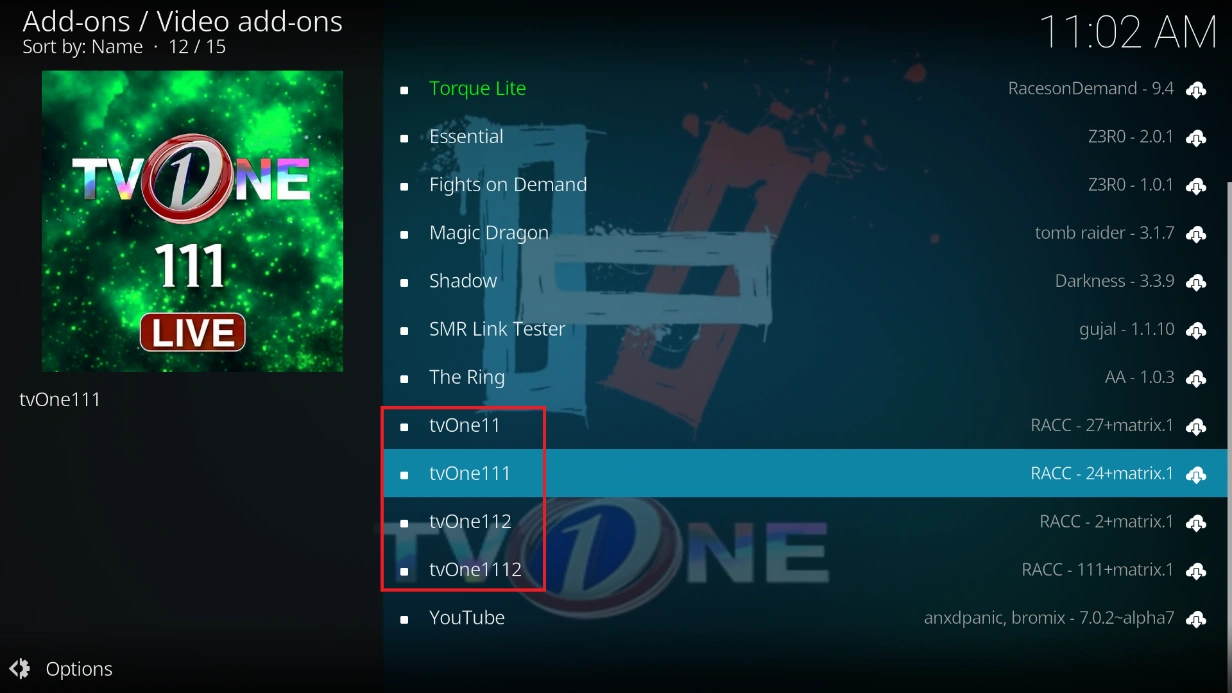
17. Find and click on one of the four variants of TVOne addon from the list of available add-ons. I have found the variant tvOne111 to be the most reliable.
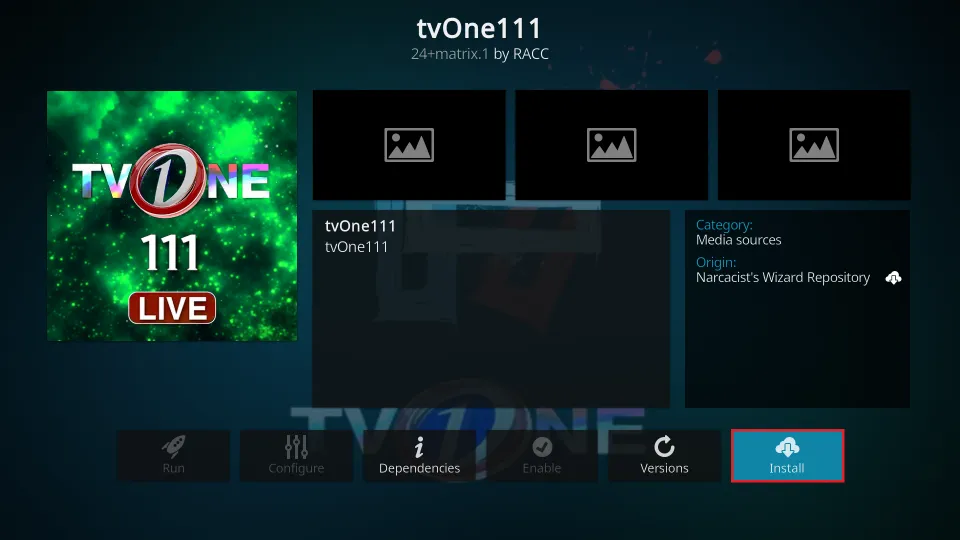
18. Click the Install button.
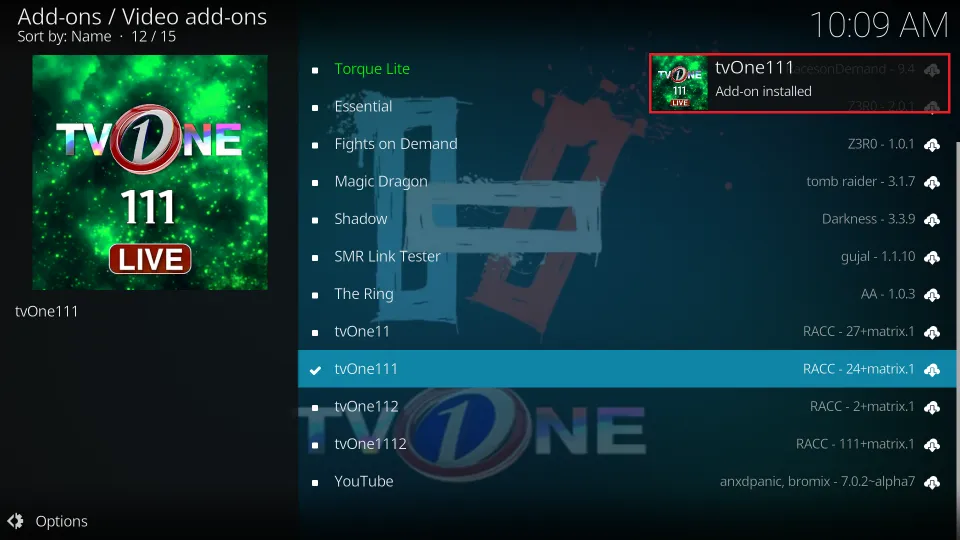
19. Wait for the Add-on installed notification to appear.
20. You have successfully installed the TVOne addon. To access it, return to the Kodi main menu. Highlight Add-ons. Find the TVOne addon variant you installed and click it to open.
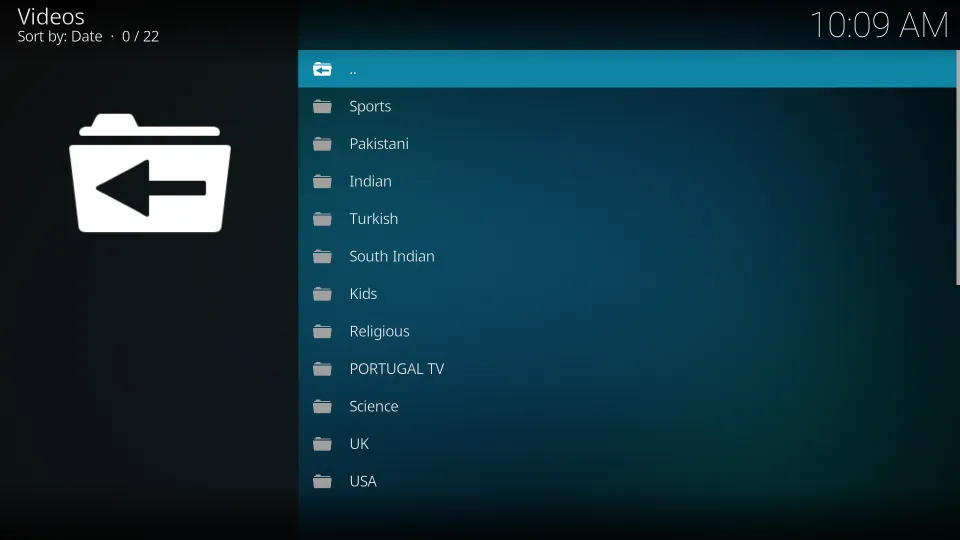
21. Here is the main screen of the TVOne111 addon. You may start streaming by picking one of the categories. You can watch sports or pick channels from the USA, UK, and other countries.
Step 5: Superboost Your FireStick with APKs/Apps
You will now superboost your FireStick with APKs. The APKs give you access to tons of free content, including movies, shows, live TV, and more.
We will install the following two APKs:
- Cinema HD APK (for movies, shows, and on-demand content)
- Live Net TV (for live TV, sports, live events, and more)
APK 1: Cinema HD
Cinema HD is the most popular third-party app for FireStick. It has a wide selection of movies, shows, miniseries, docuseries, documentaries, anime, content for kids and families, short films, and more.
Here are the steps to install Cinema HD on FireStick:
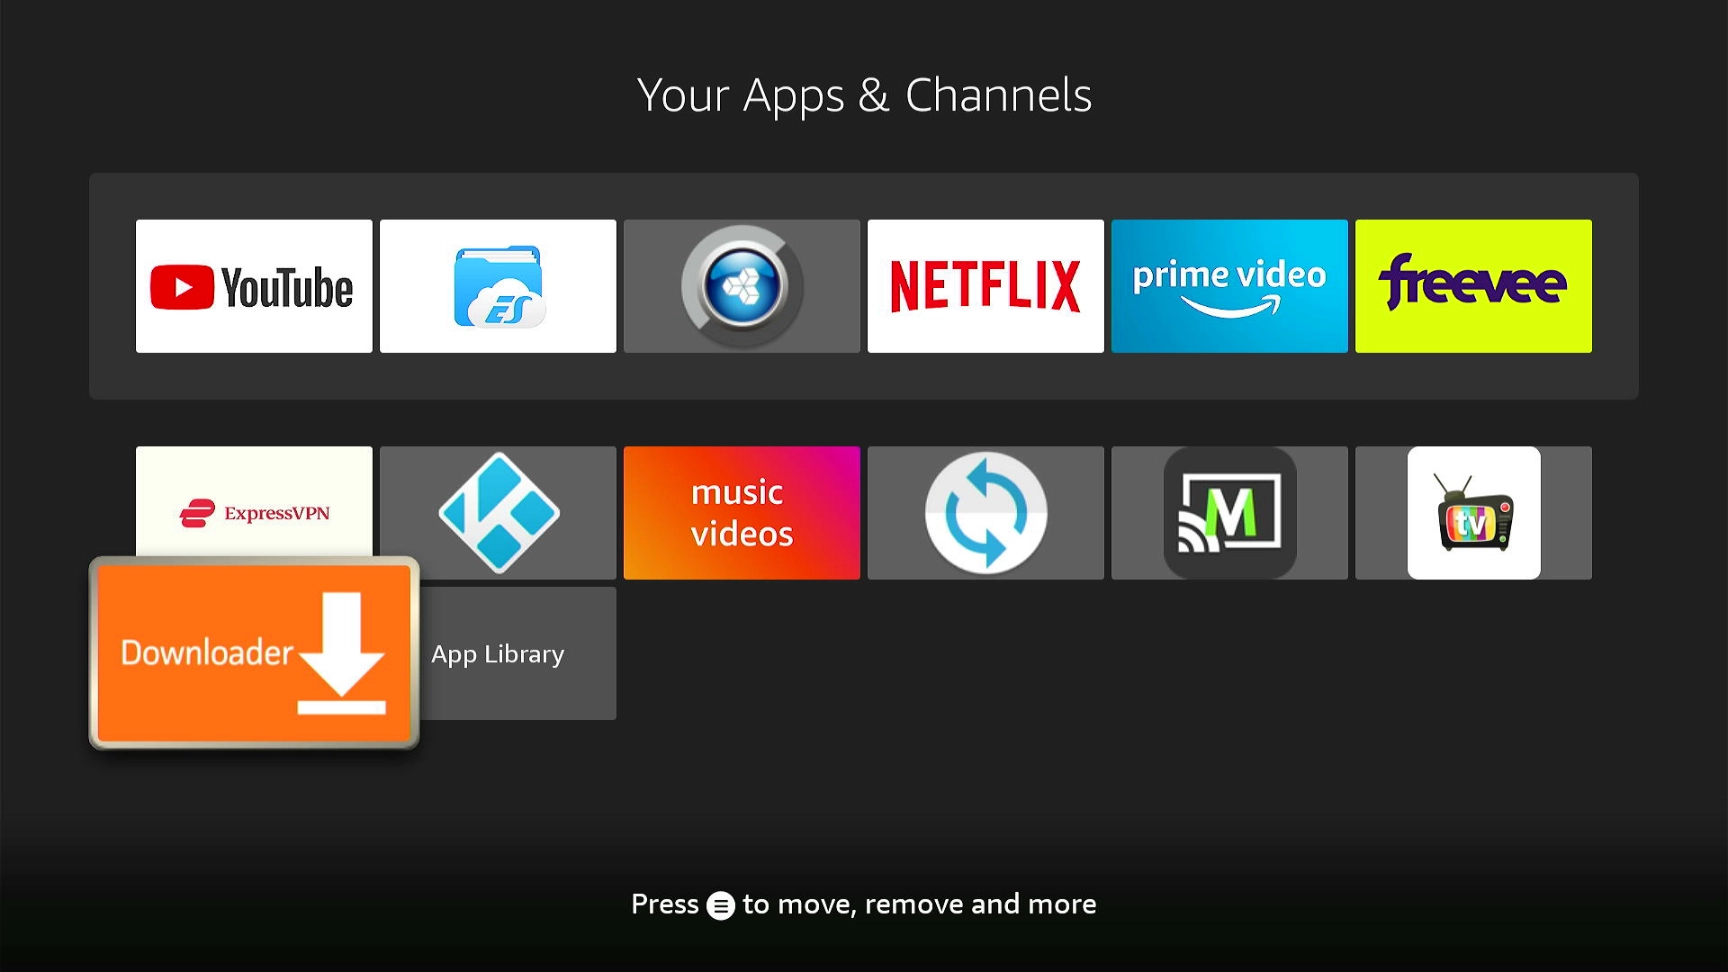
1. Click the Apps & Channels icon on the FireStick home screen or press the same button on your remote.
2. Open the Downloader app.
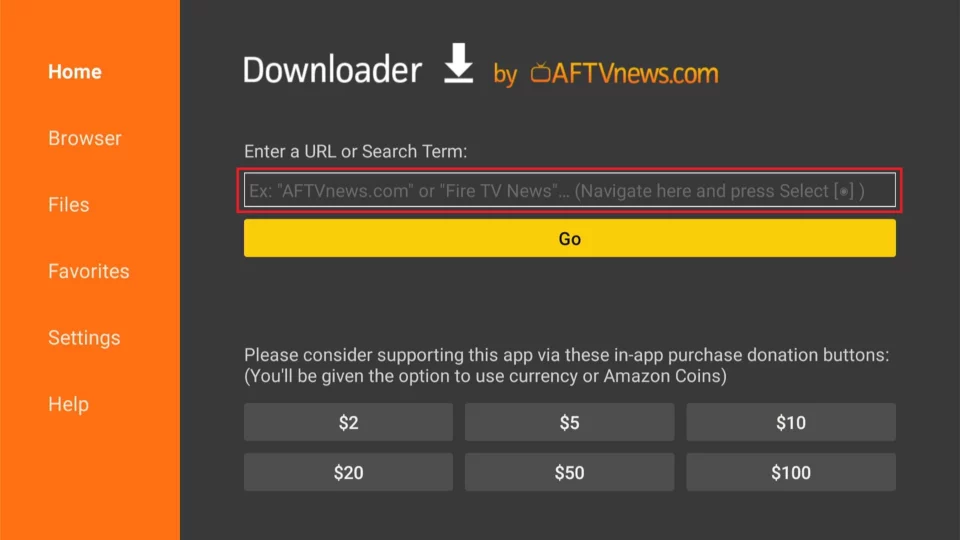
3. Click the URL field in the middle of the Downloader app home screen.
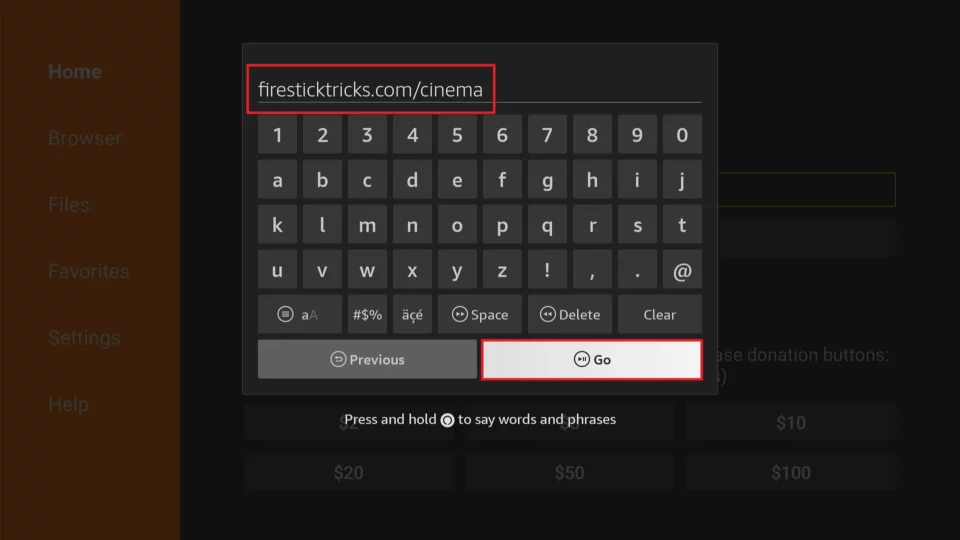
4. Type the following URL and click Go:
firesticktricks.com/cinema
Disclaimer: This URL is hosted on an external server. FireStickTricks does not own this URL or the APK.
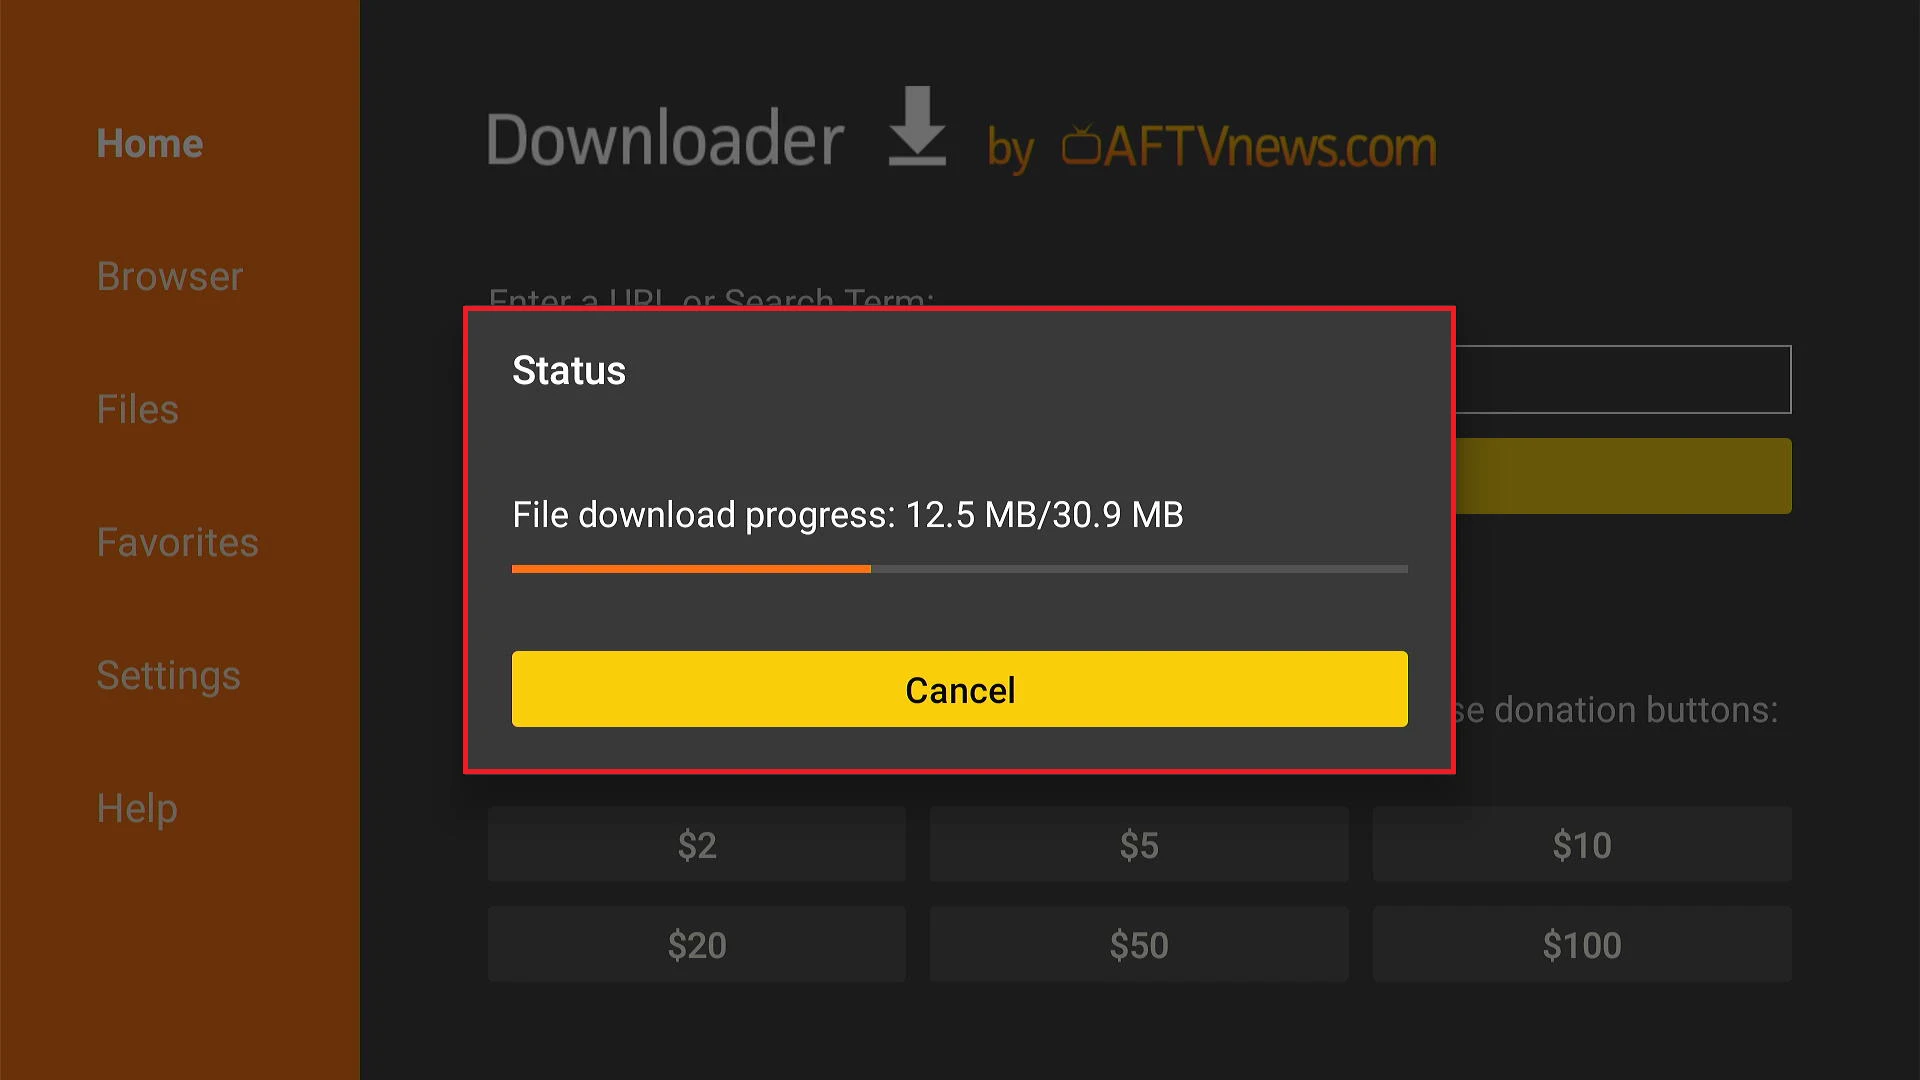
5. Wait for the APK to download.
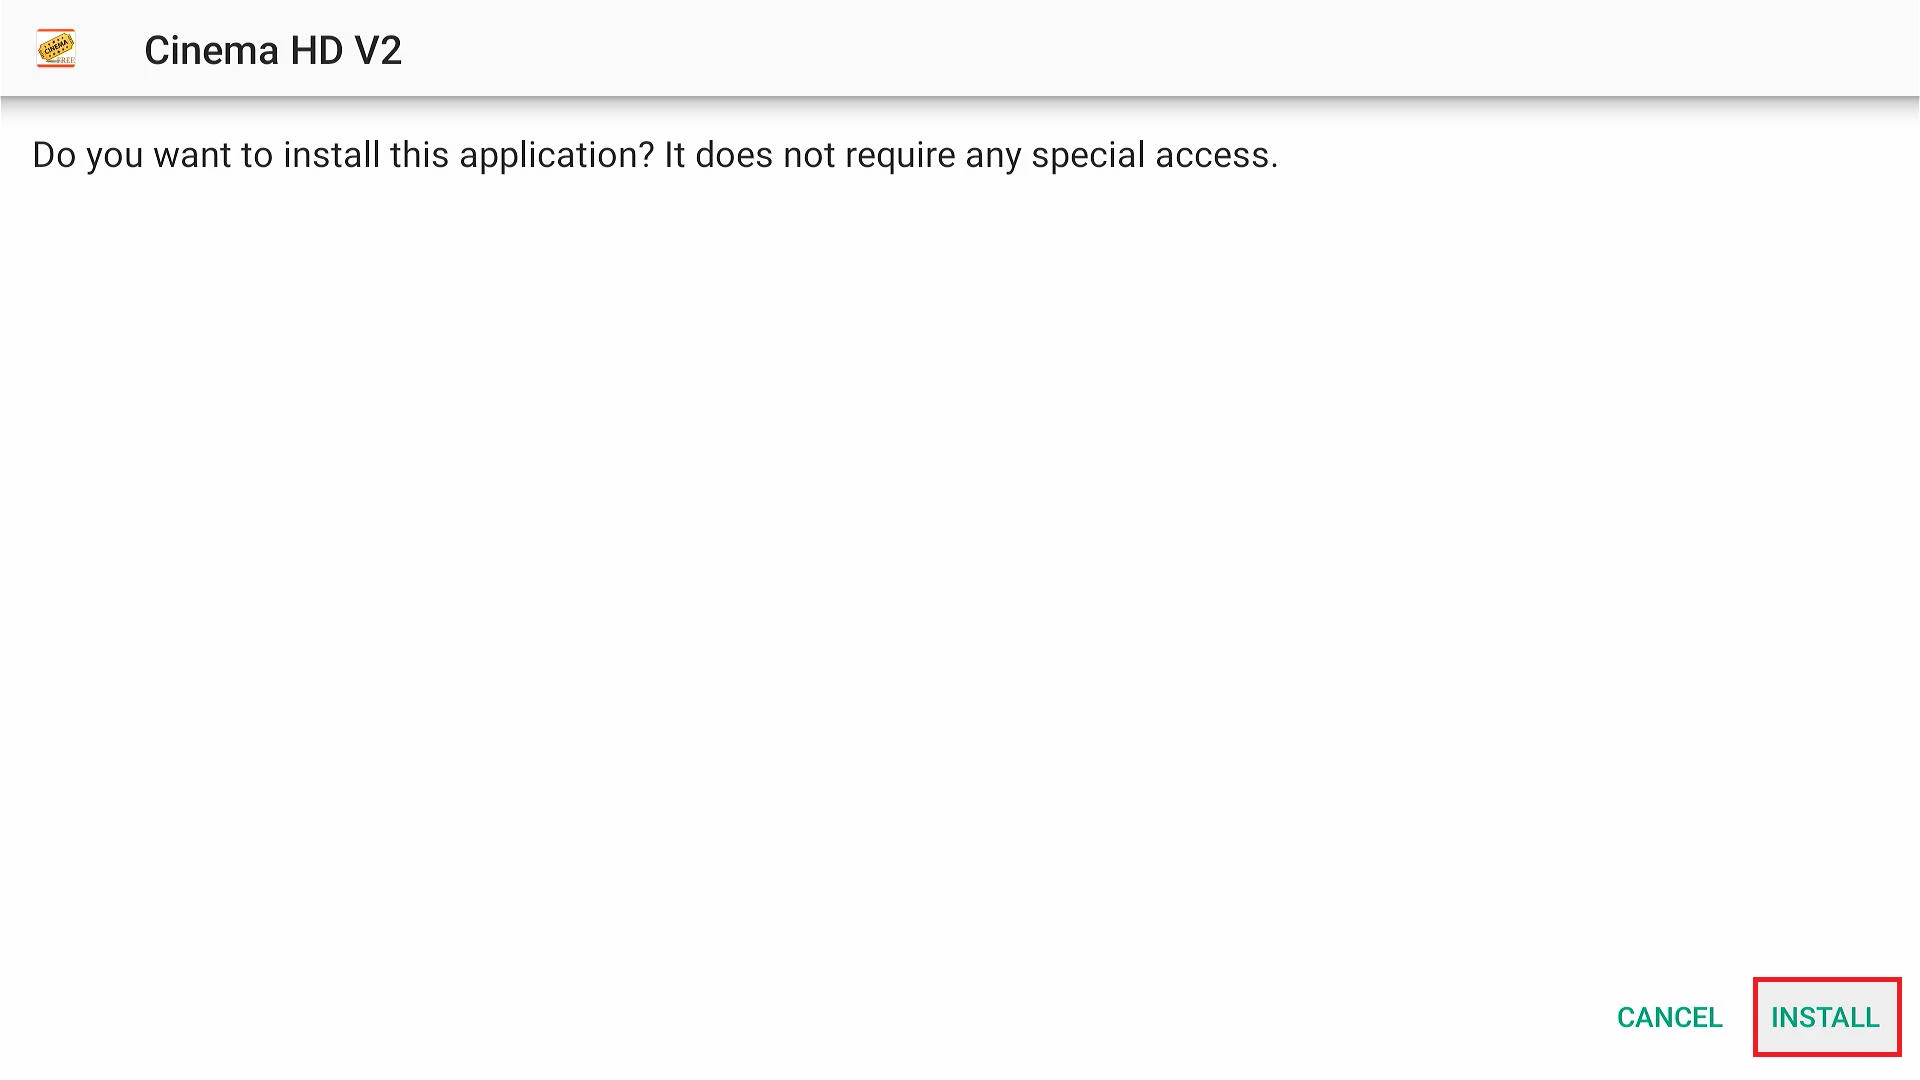
6. Click Install after the APK has been downloaded.
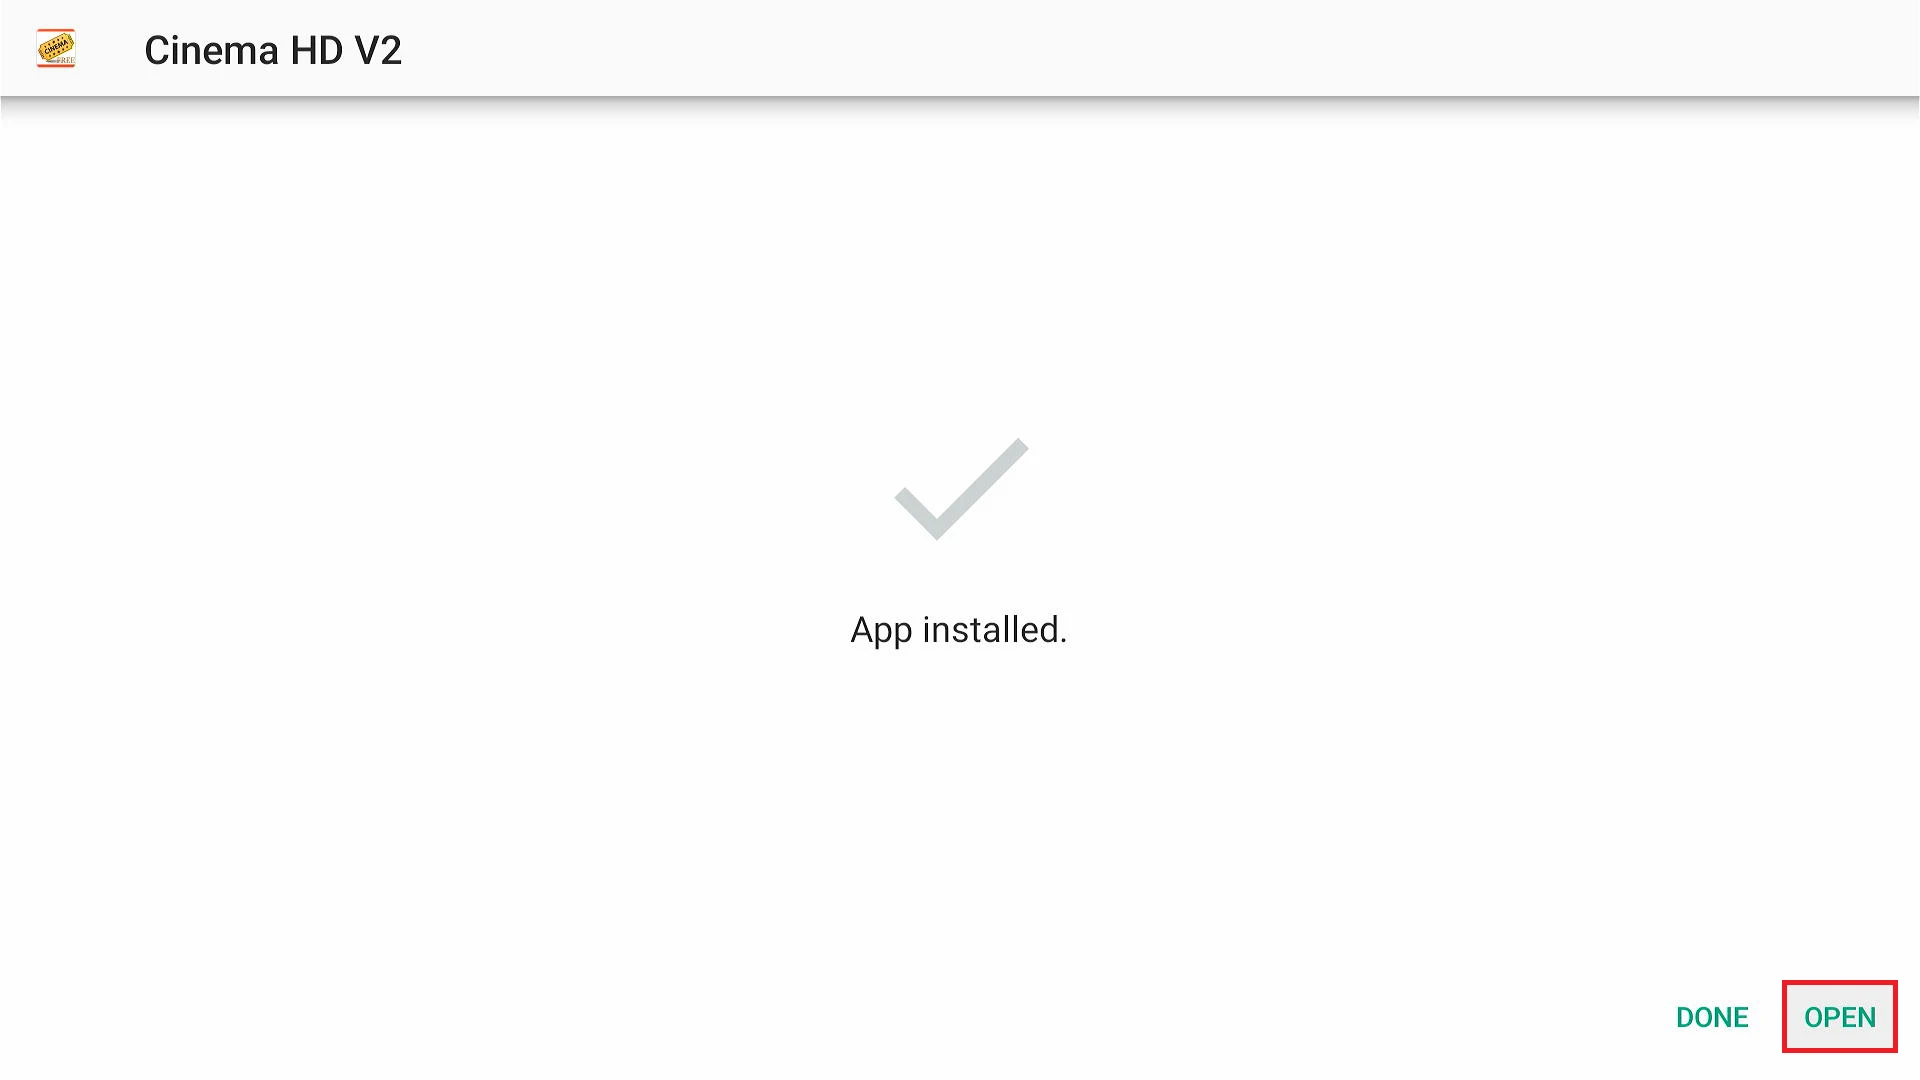
7. You have successfully installed Cinema APK on FireStick. Click Open to launch the app.
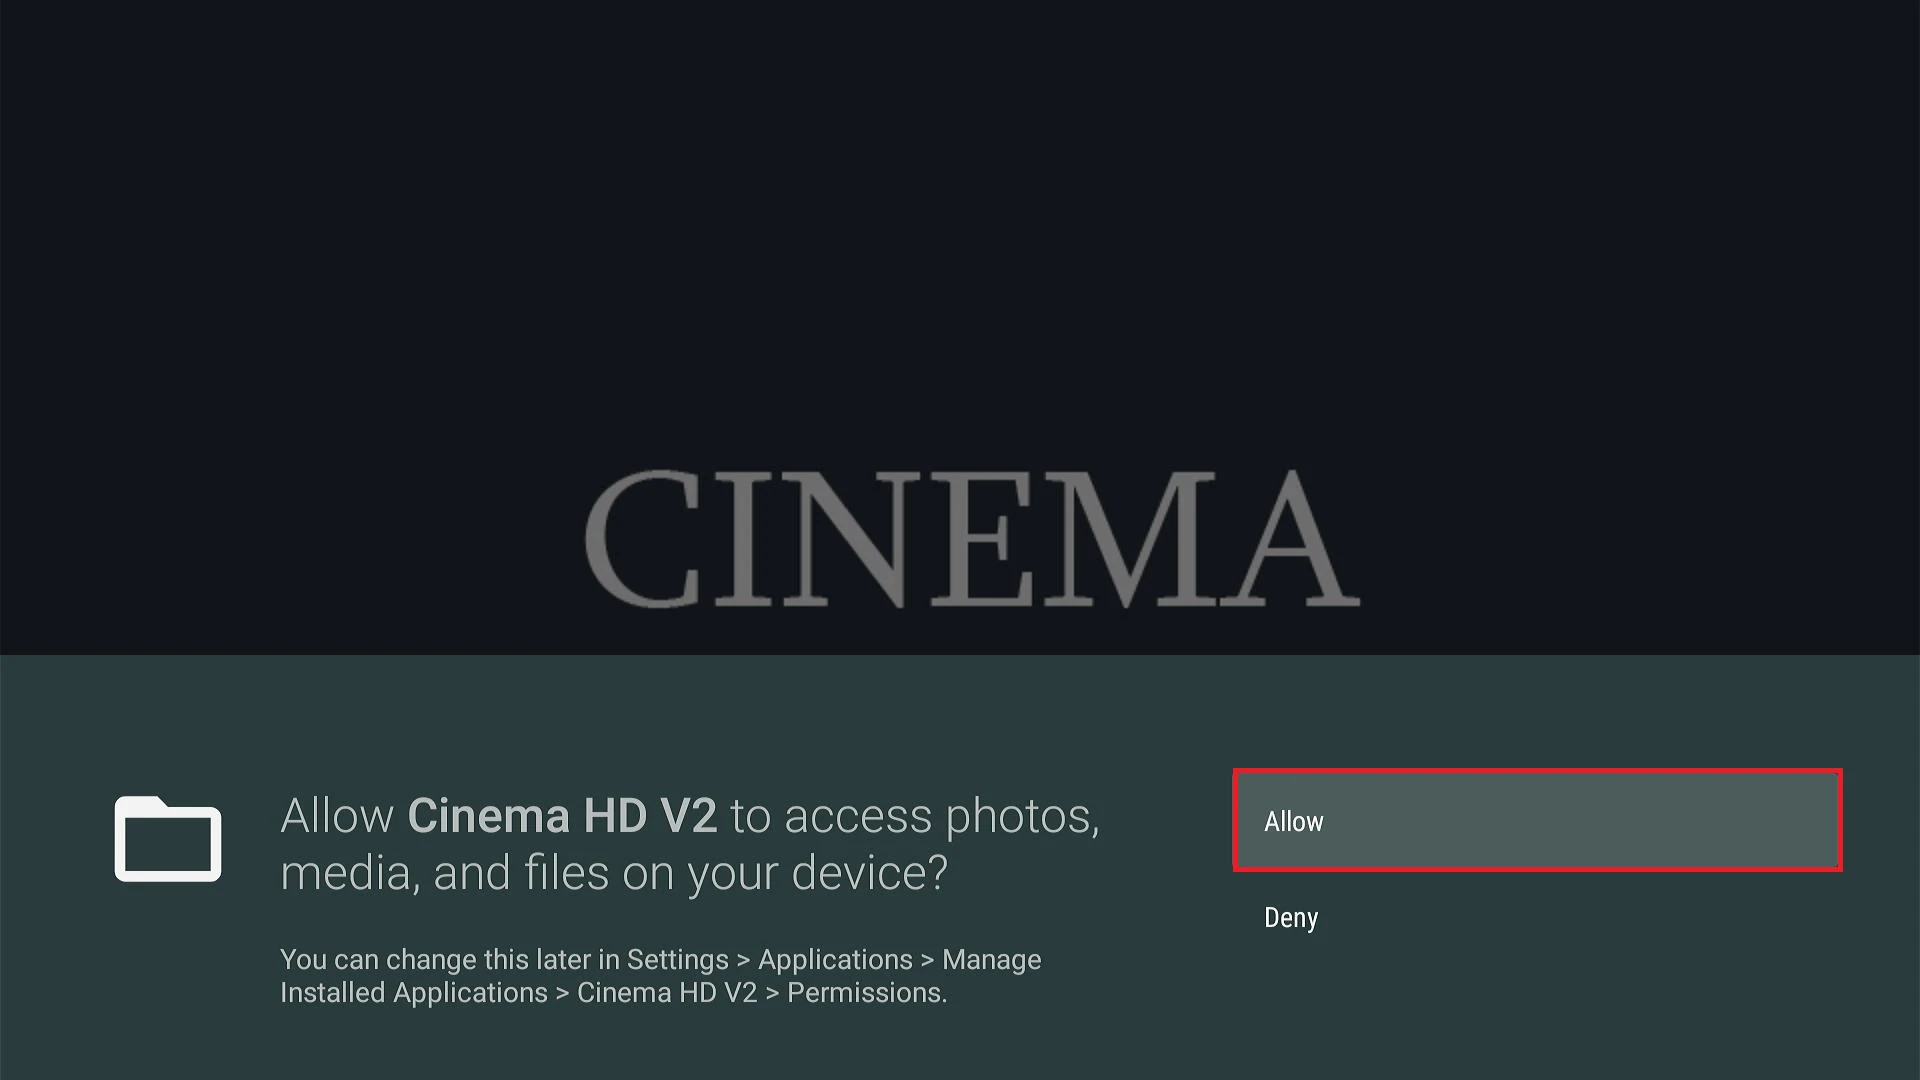
8. Click Allow if prompted.
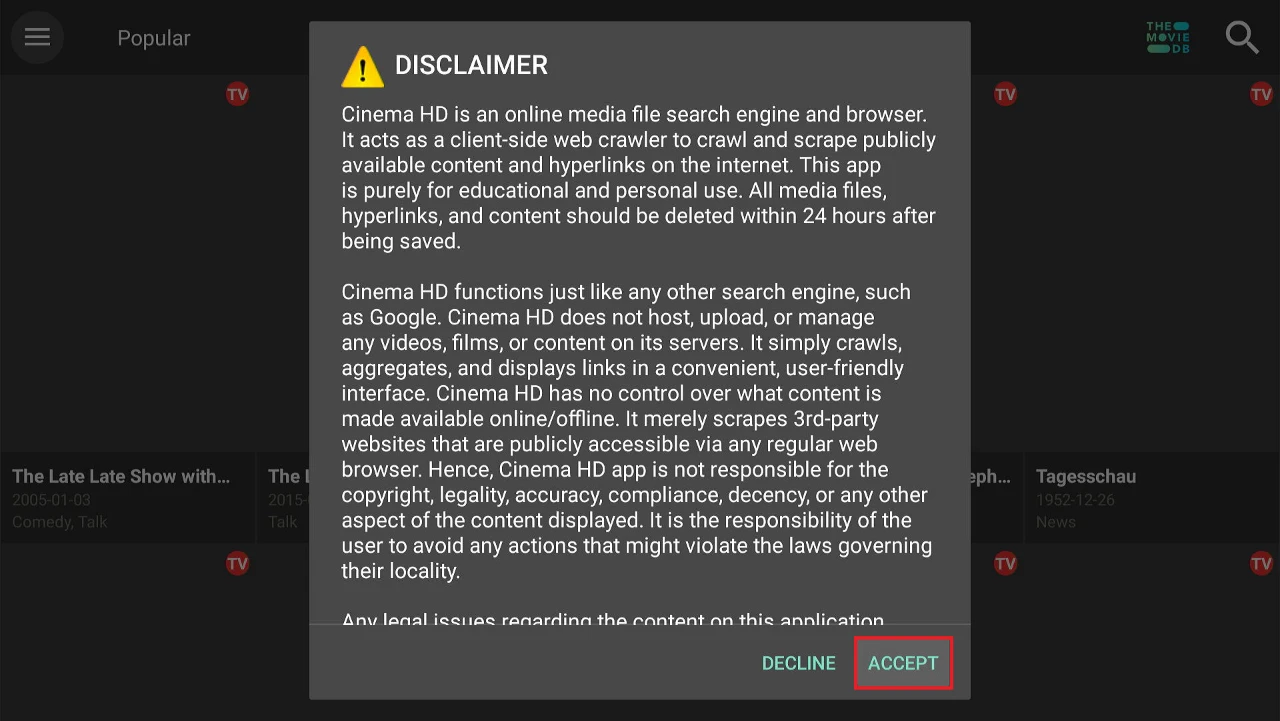
9. Click Accept on the Disclaimer prompt to continue.
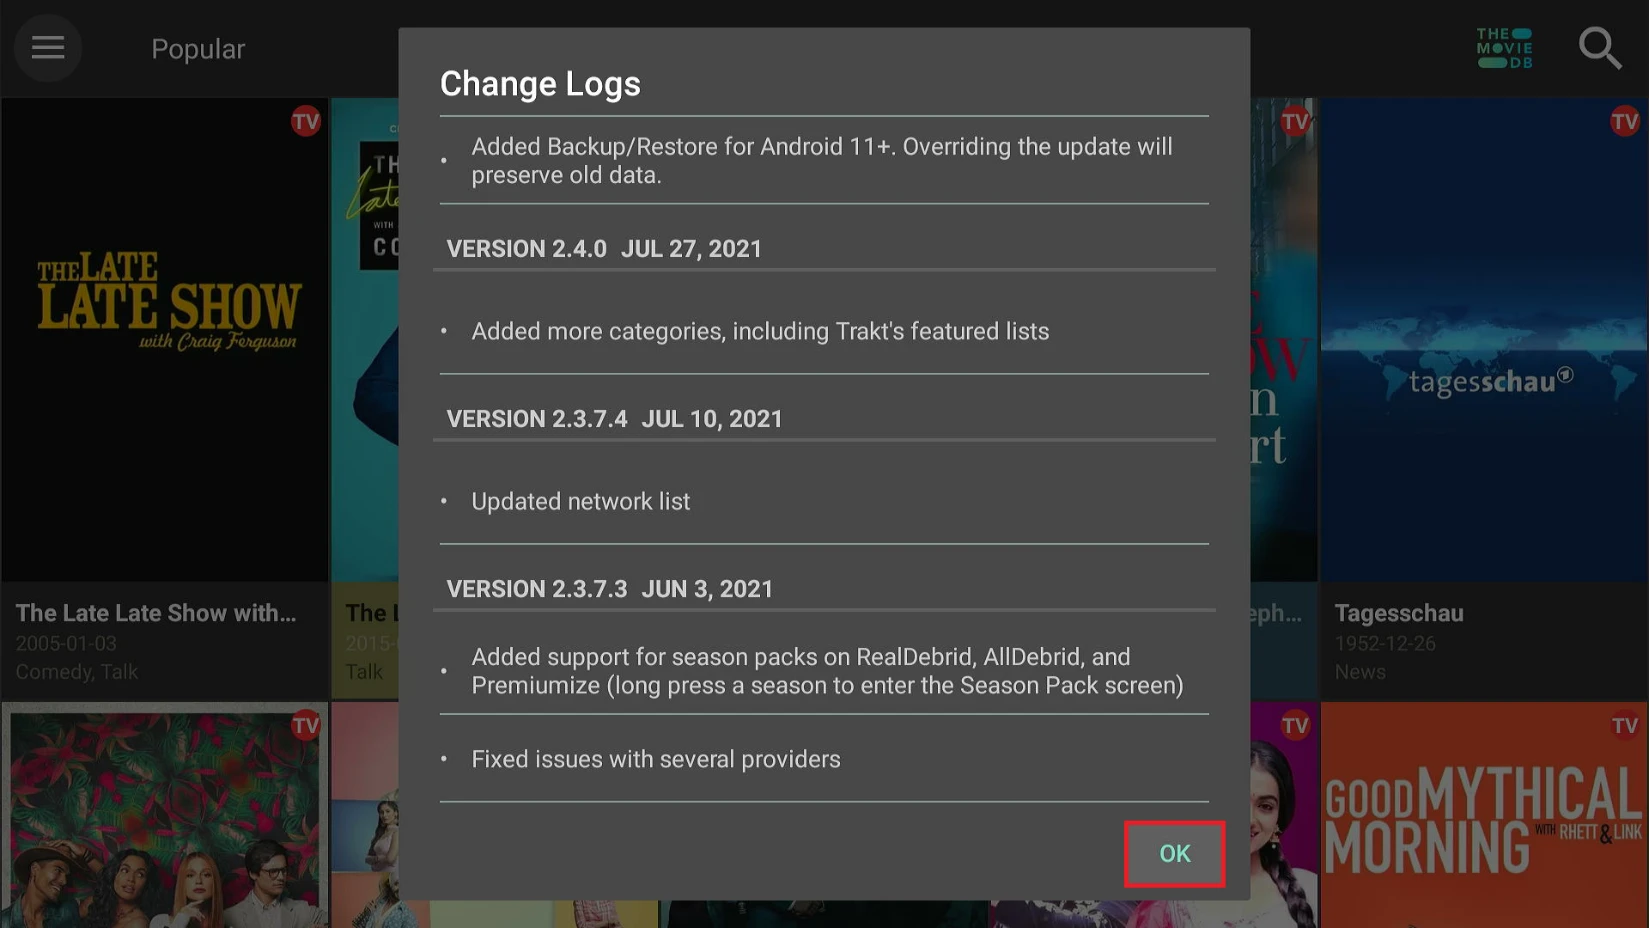
10. Click OK on the Change Logs window.
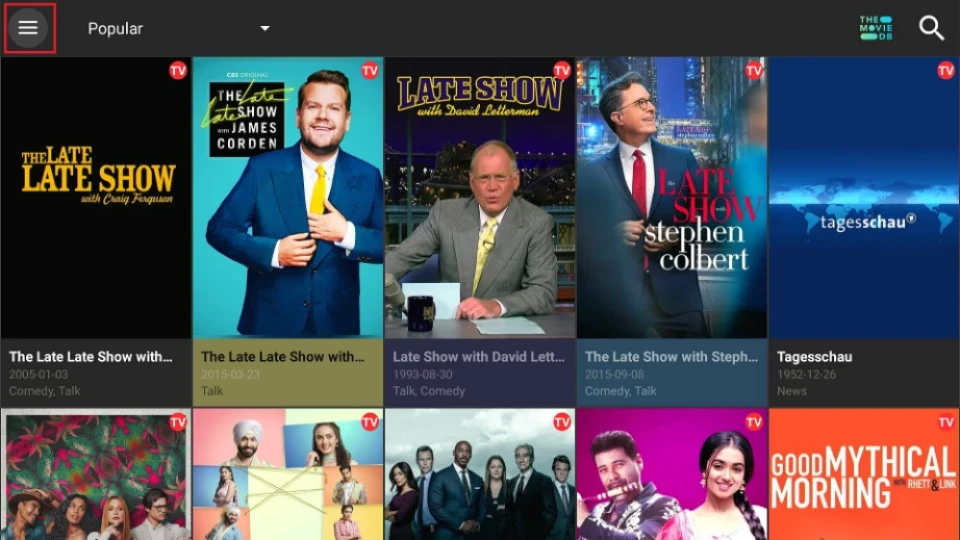
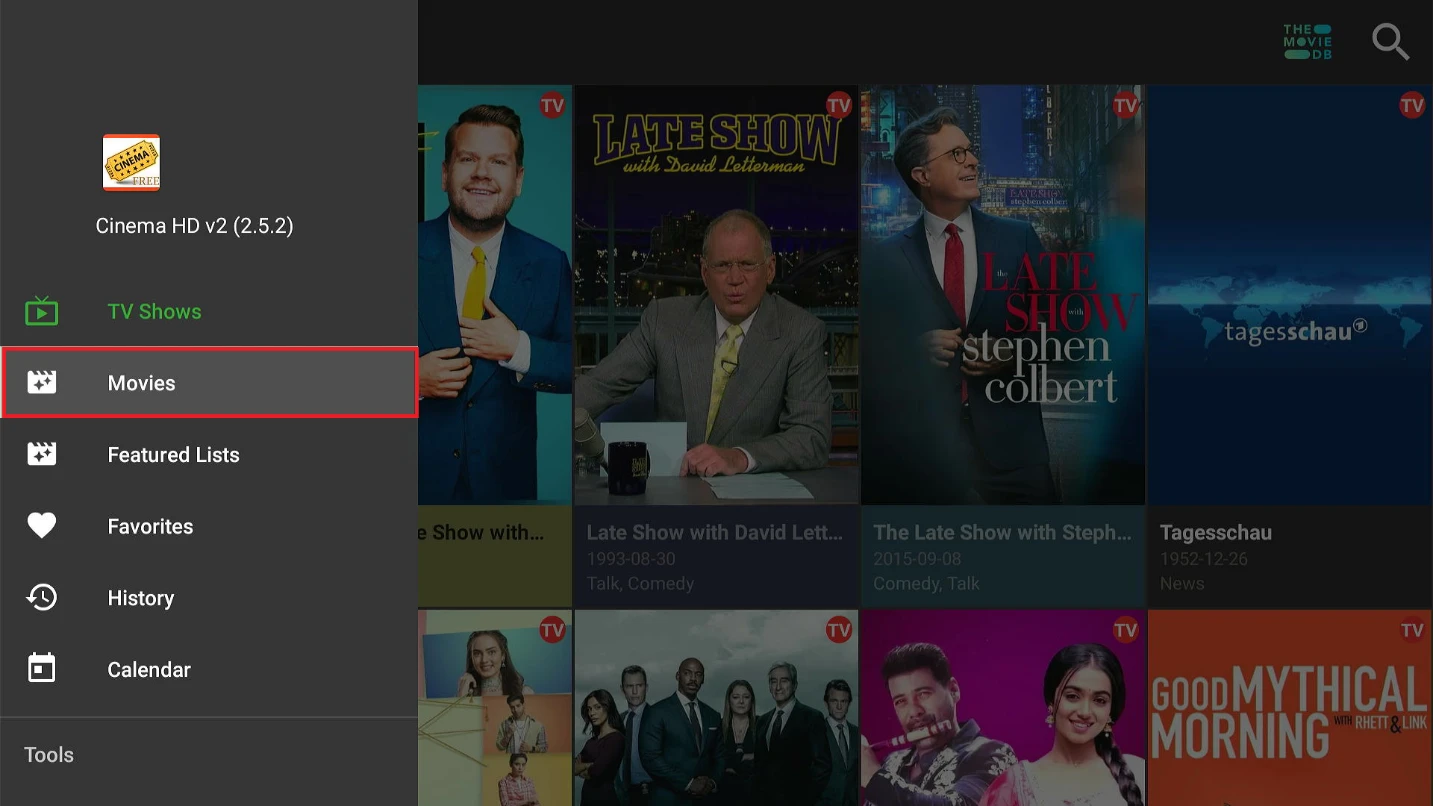
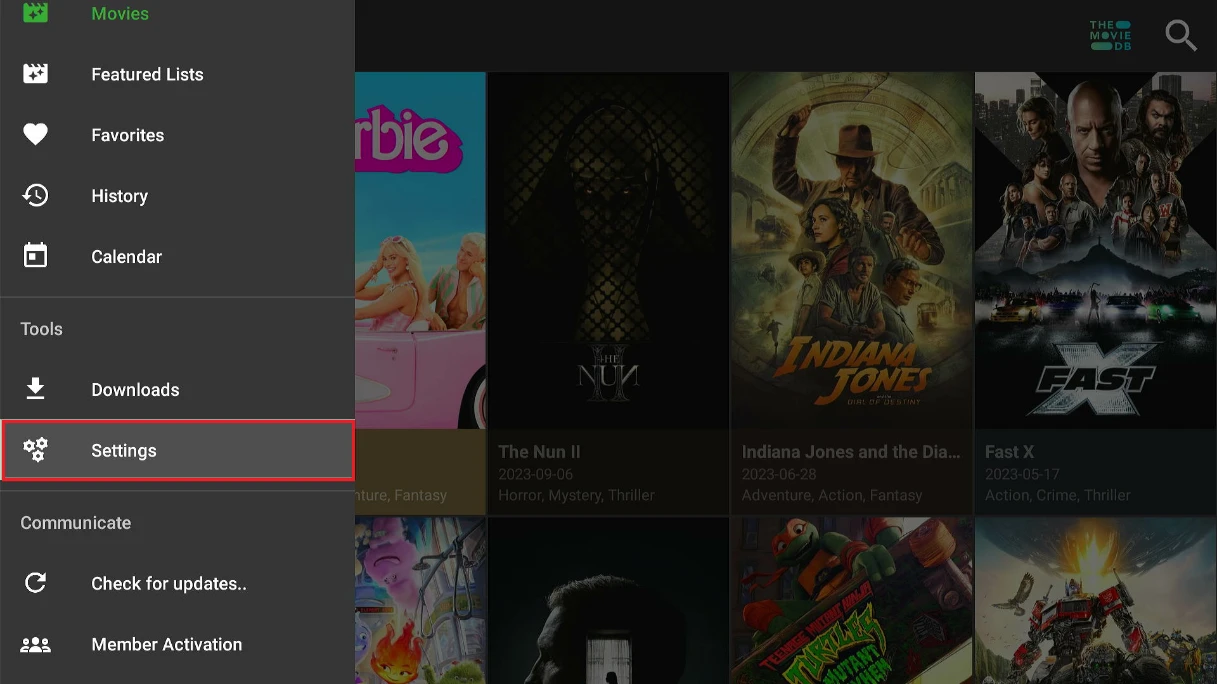
11. This is the home screen of Cinema APK. It displays TV shows by default. Click the menu button in the top-left corner to browse movies.
12. Click Movies in the dropdown menu.
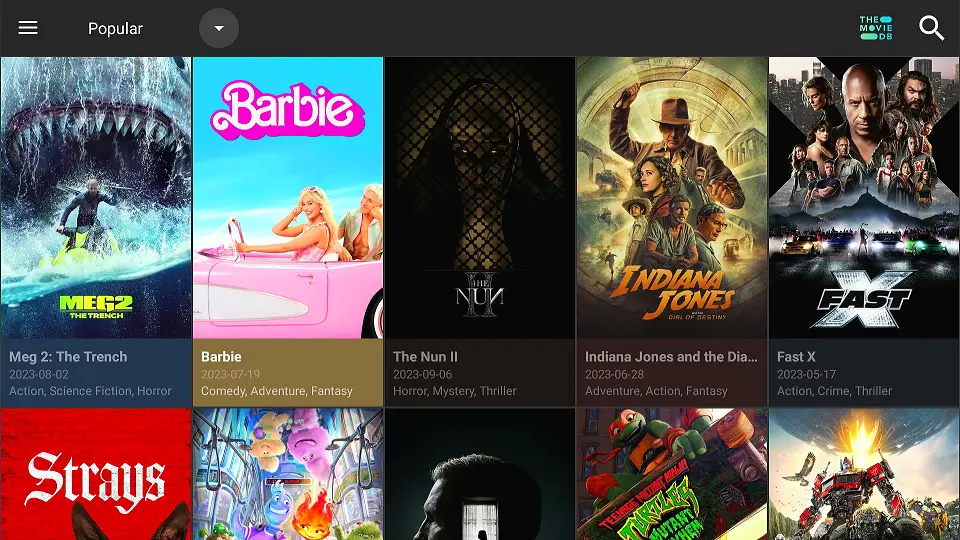
13. Here’s the selection of movies.
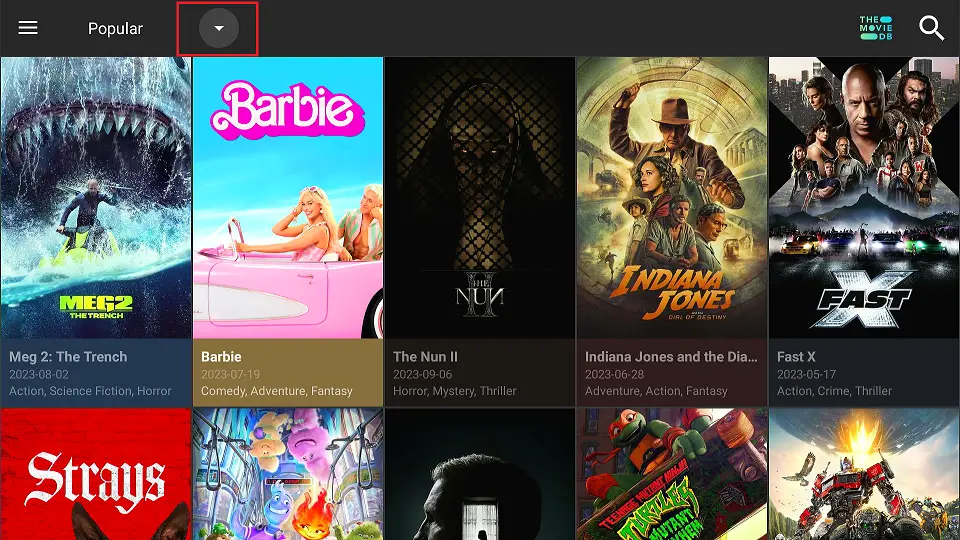
14. You can explore more movies or shows by category by clicking the inverted triangle icon at the top.
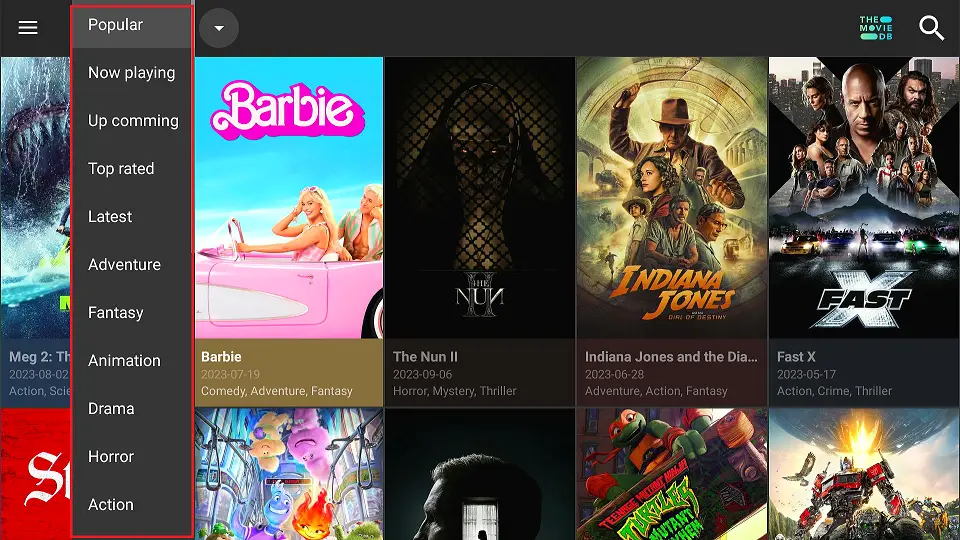
15. Here is a quick look at some of the categories in which the content is sorted.
16. I recommend integrating Cinema HD APK with Real Debrid. This integration provides access to a substantial selection of premium streaming links, enhancing the overall quality of your streaming experience.
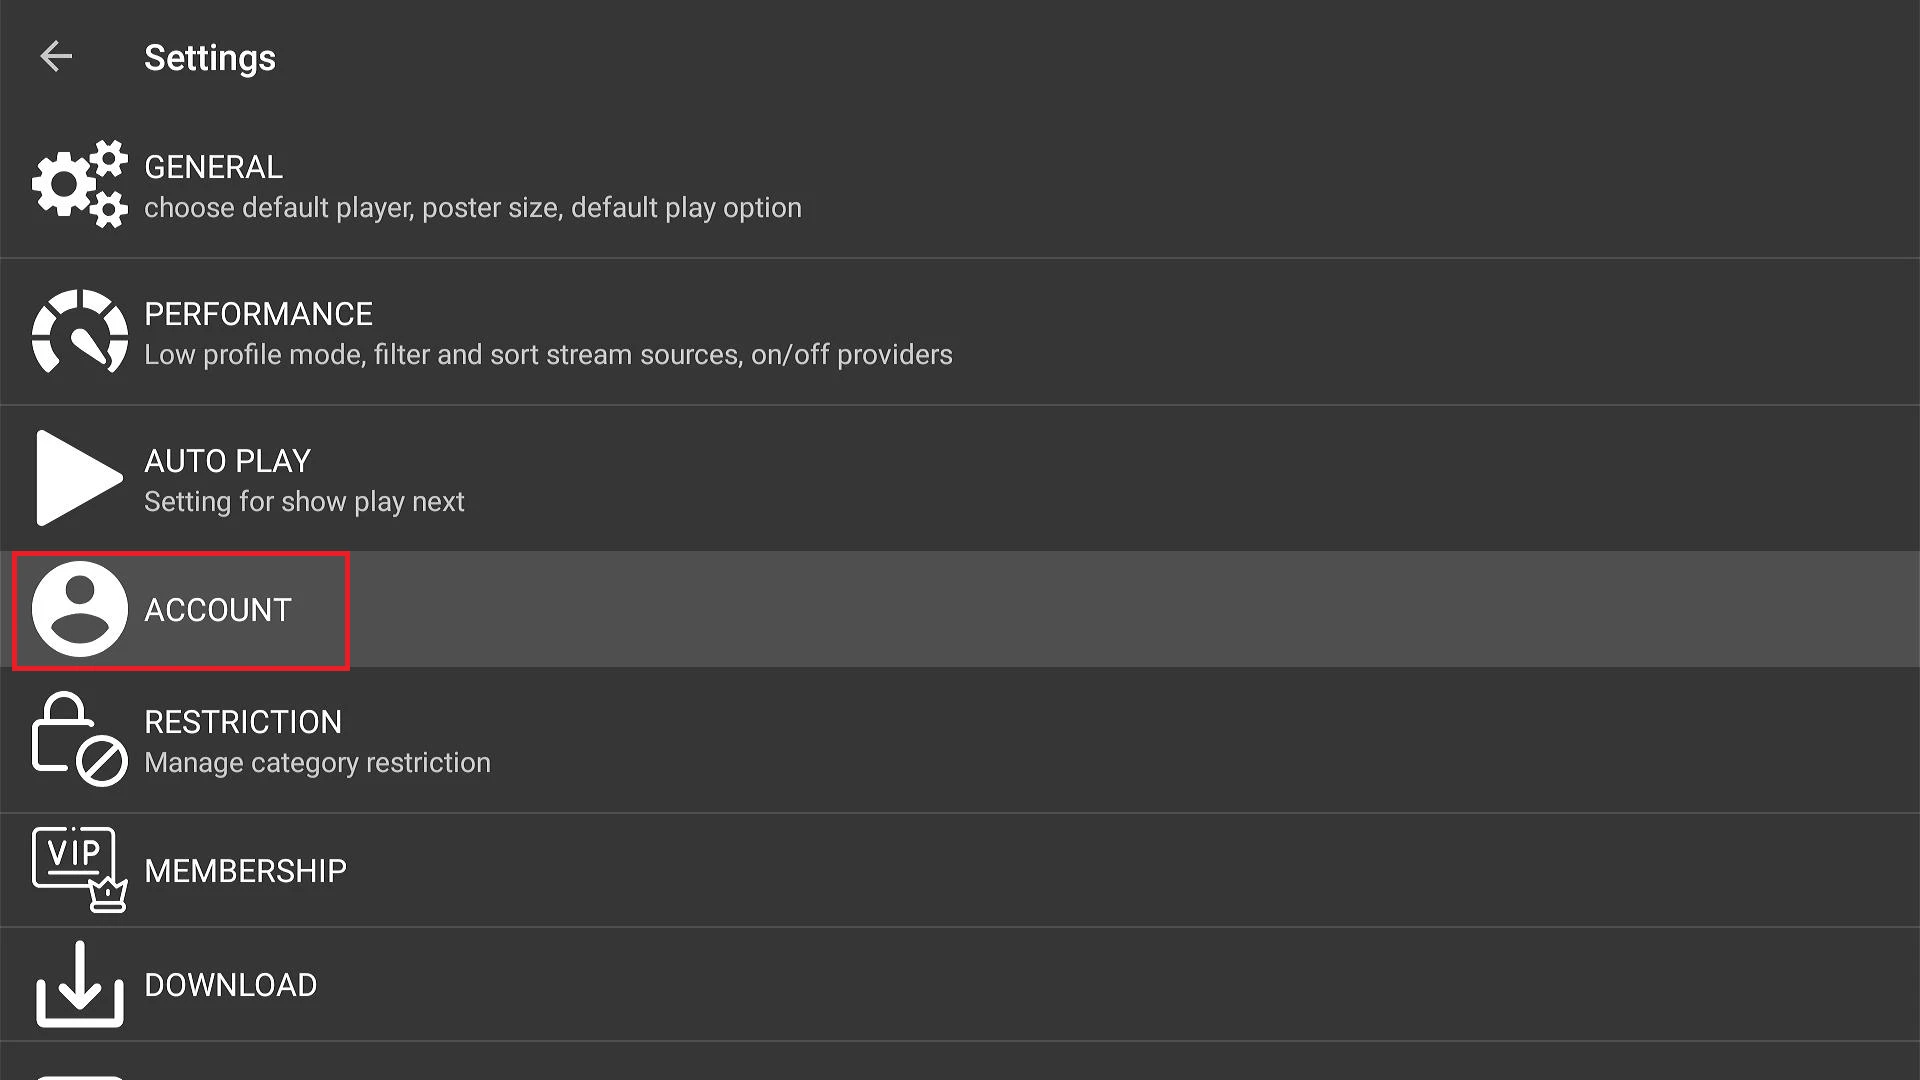
Subscribe to Real Debrid if you haven’t done that already. Click the menu button on the Cinema APK again and click Settings in the dropdown menu.
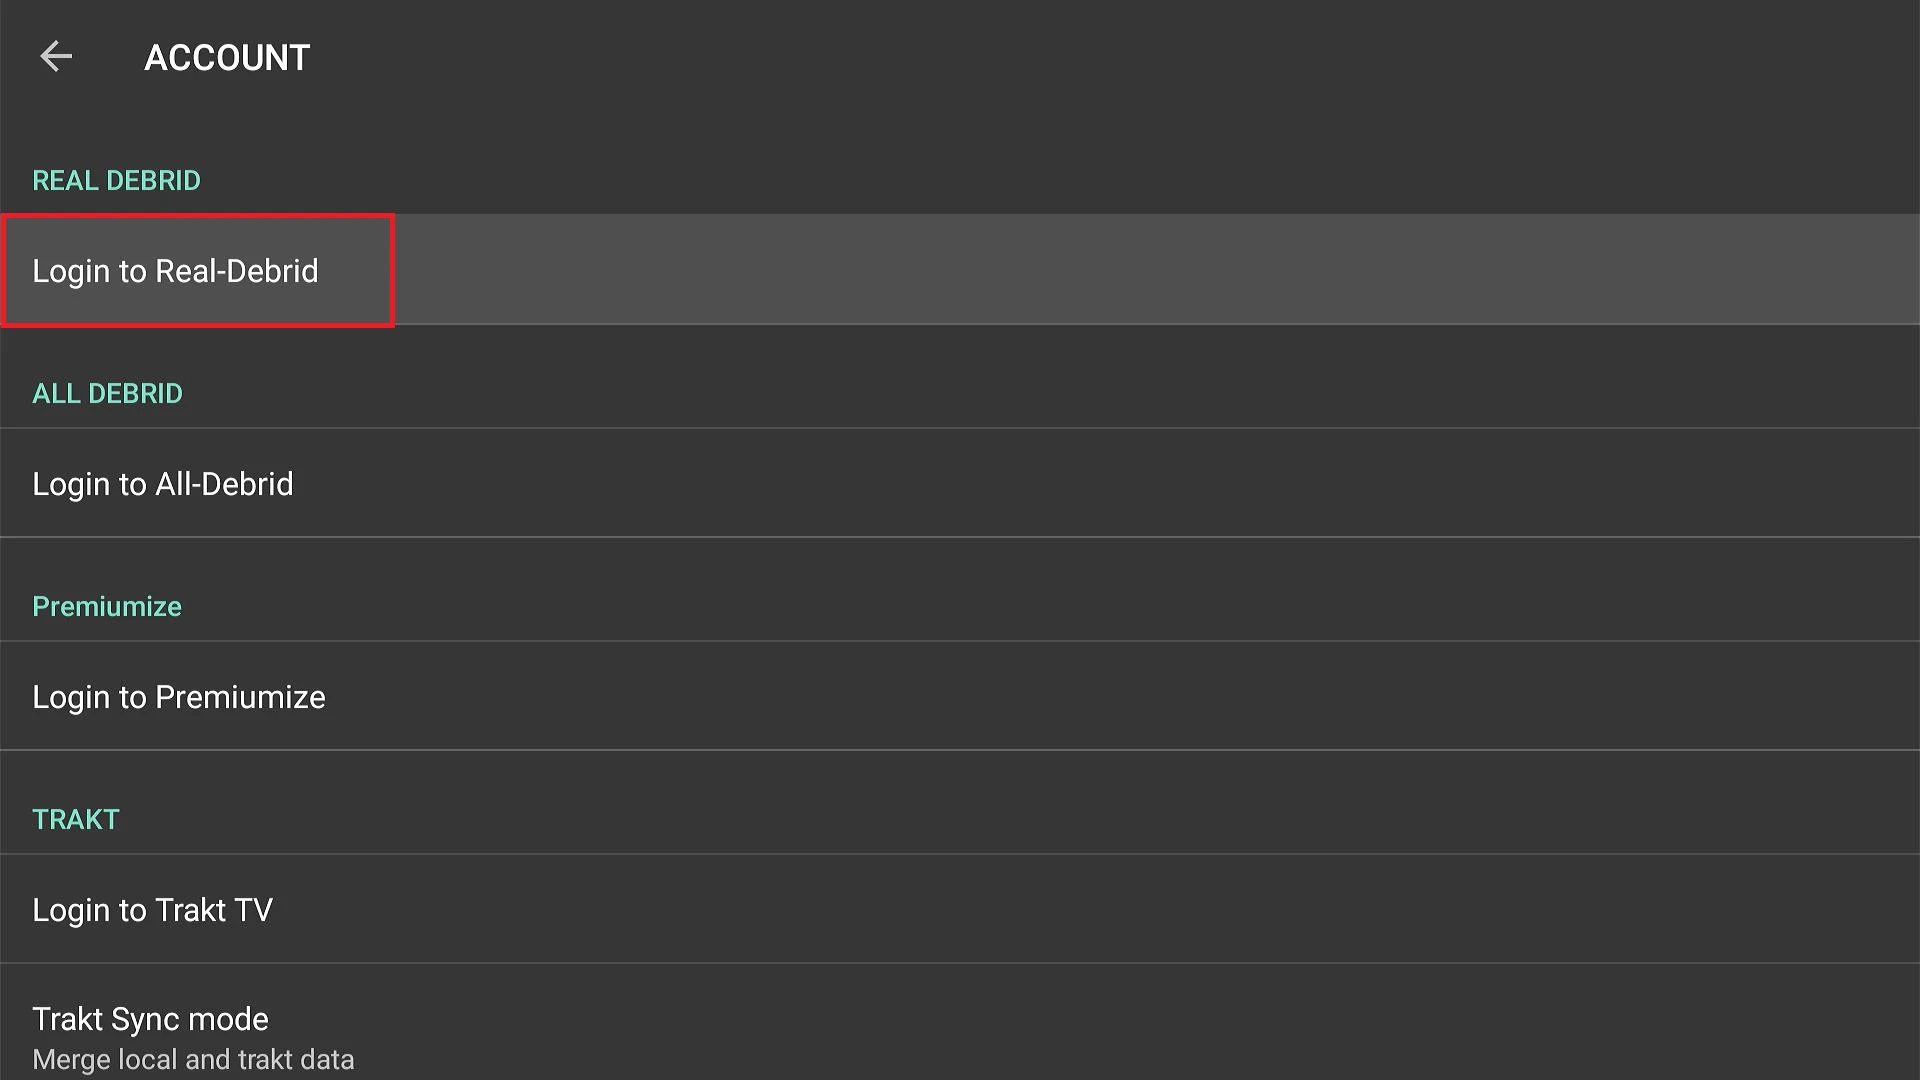
17. Click Account.
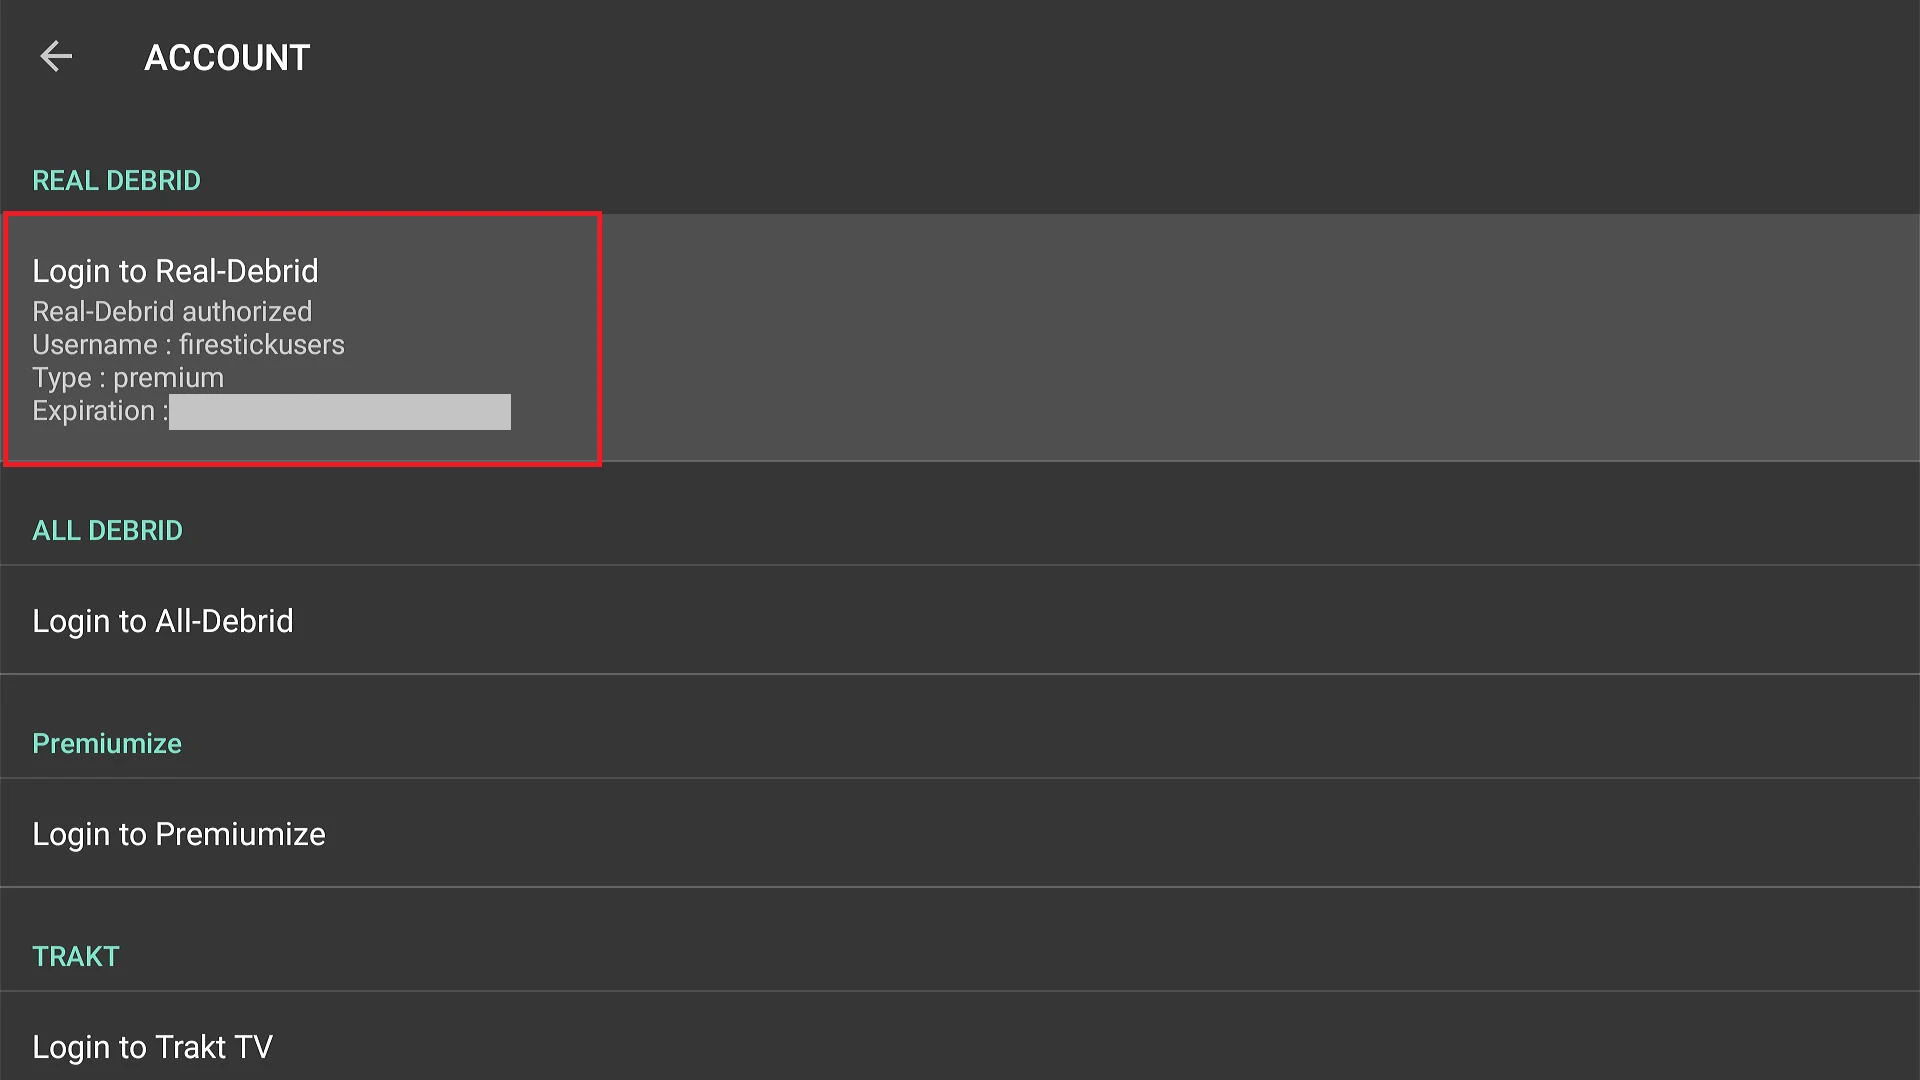
18. Click Login to Real-Debrid.
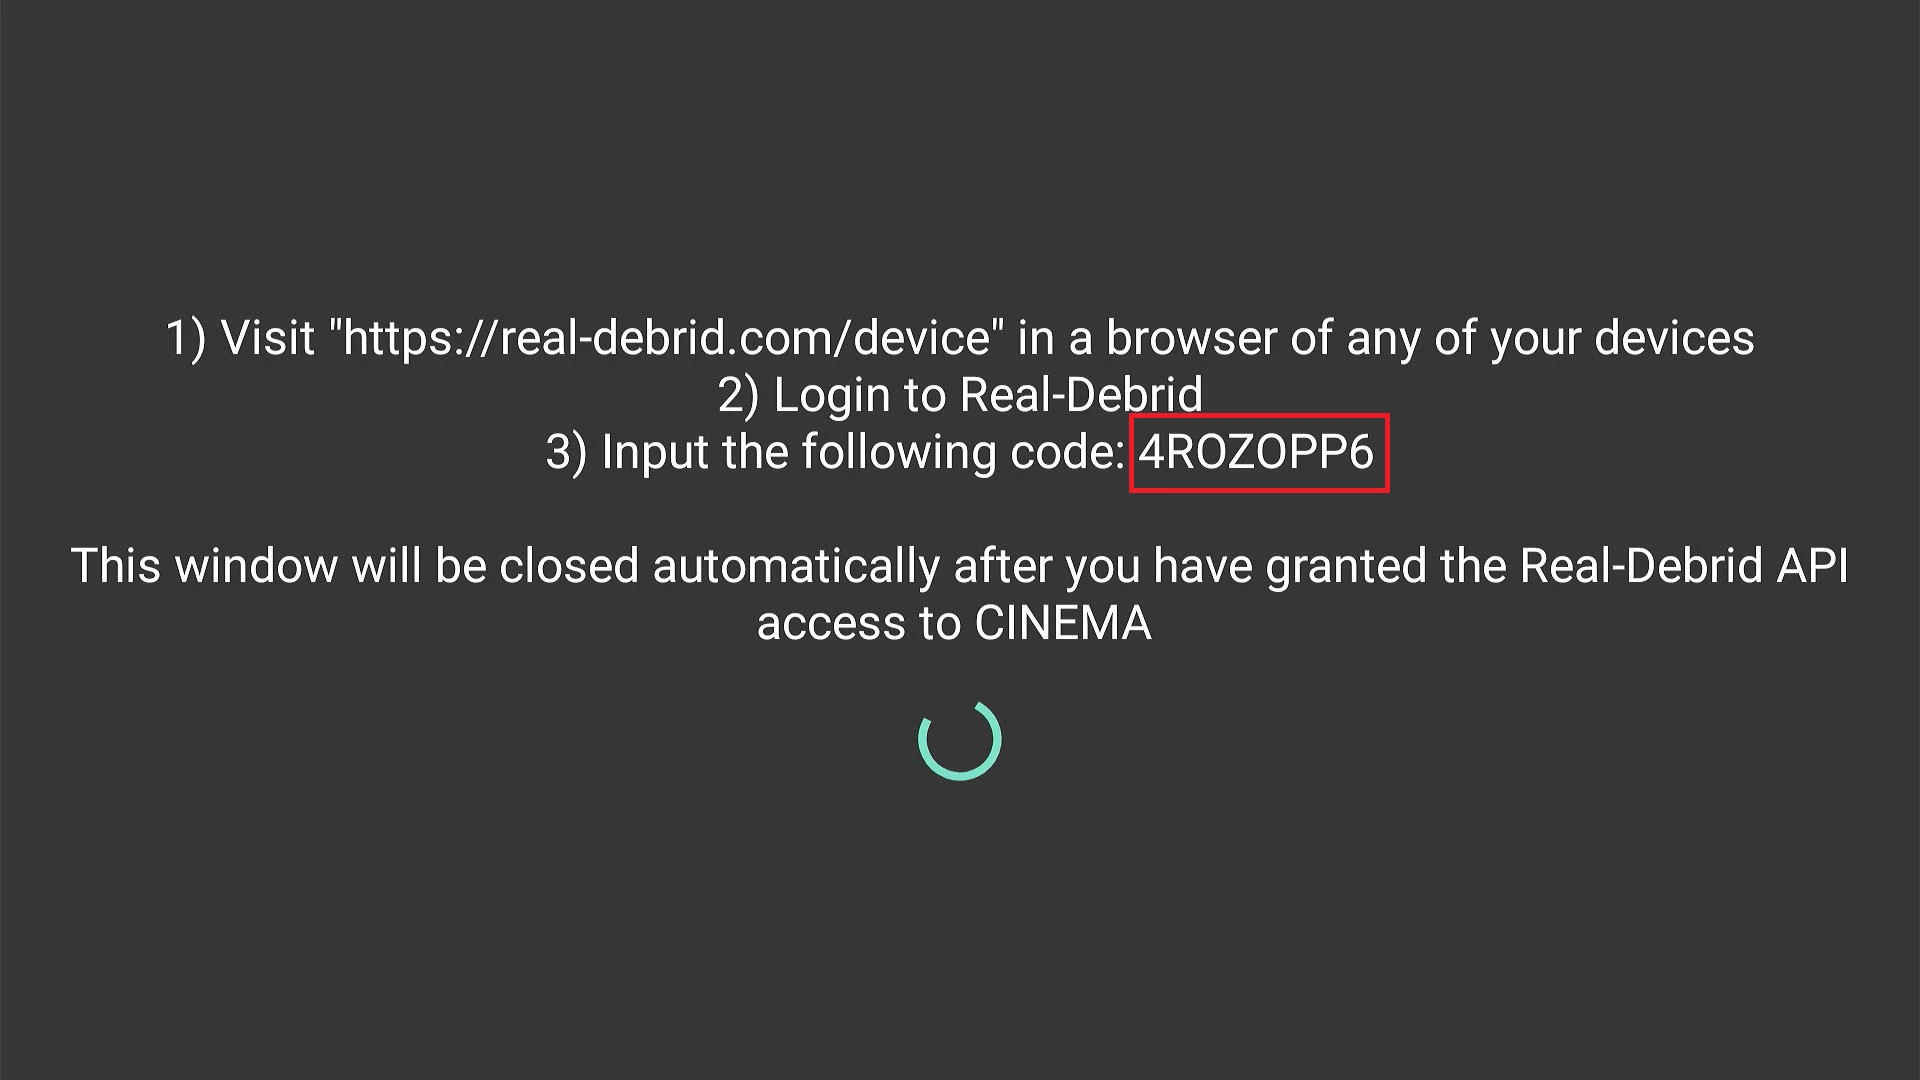
19. Note down the code on your Cinema APK screen. Go to real-debrid.com/device and authenticate with the code.
20. When the authentication is successful, you will see your Real Debrid username on the screen.
Congratulations! You have super boosted your FireStick with Cinema APK.
APK 2: Live Net TV
Live Net TV is one of the best options to watch Live TV on FireStick. It lets you stream live cable TV channels, live events, and more.
Here are the steps to install Live Net TV on FireStick:
1. Click the Apps & Channels icon on the FireStick home screen or press the same button on your remote.
2. Open the Downloader app.
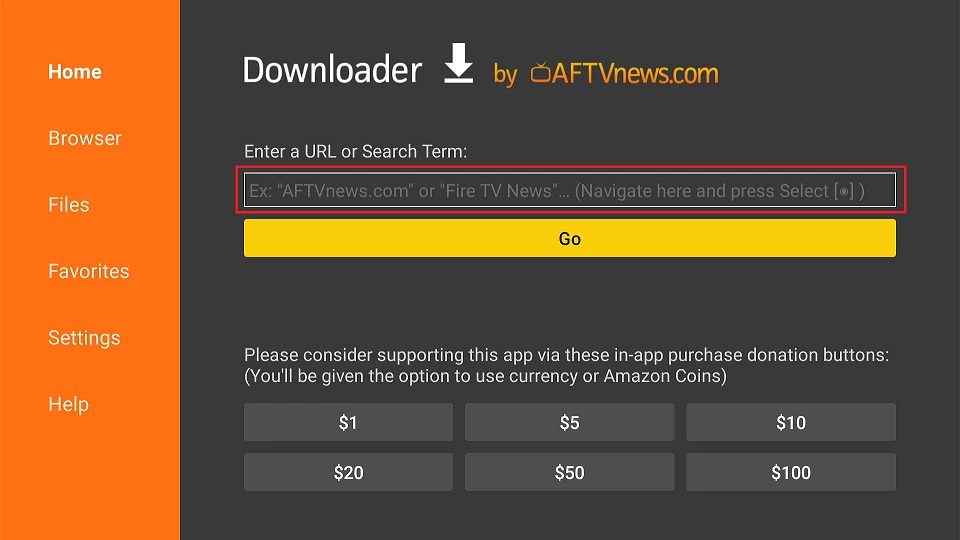
3. Click the URL field in the middle of the Downloader app home screen.
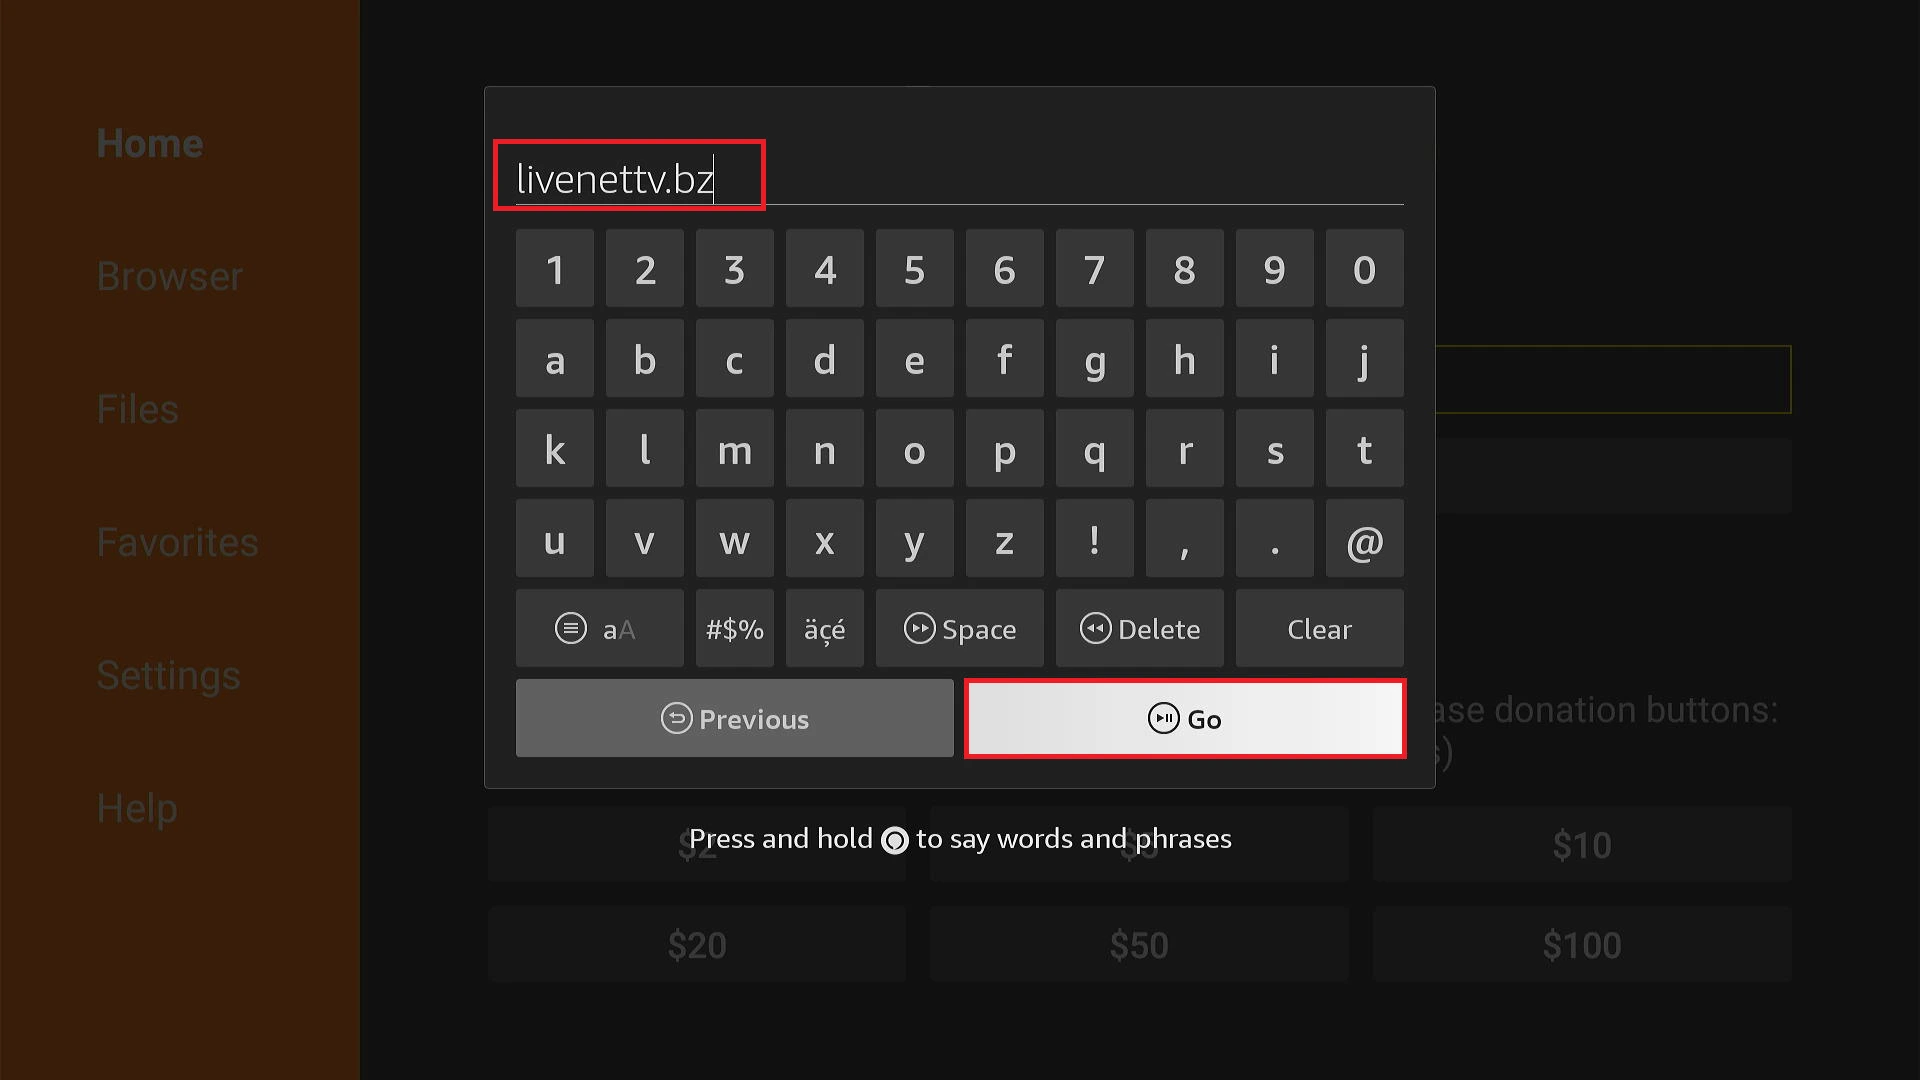
4. Type the following URL and click Go:
livenettv.bz
Disclaimer: This URL is hosted on an external server. FireStickTricks does not own this URL or the APK.
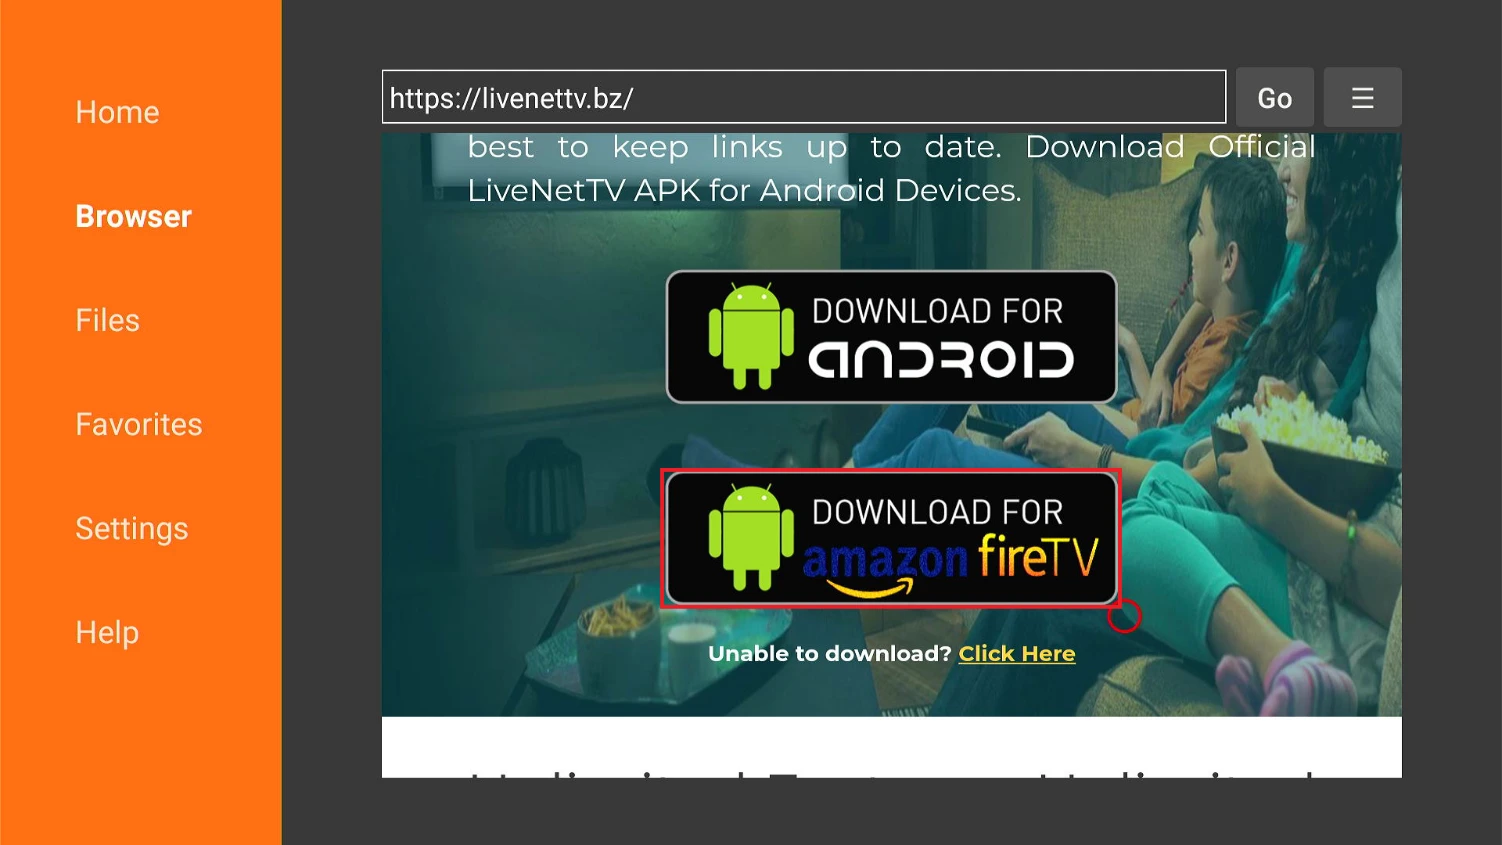
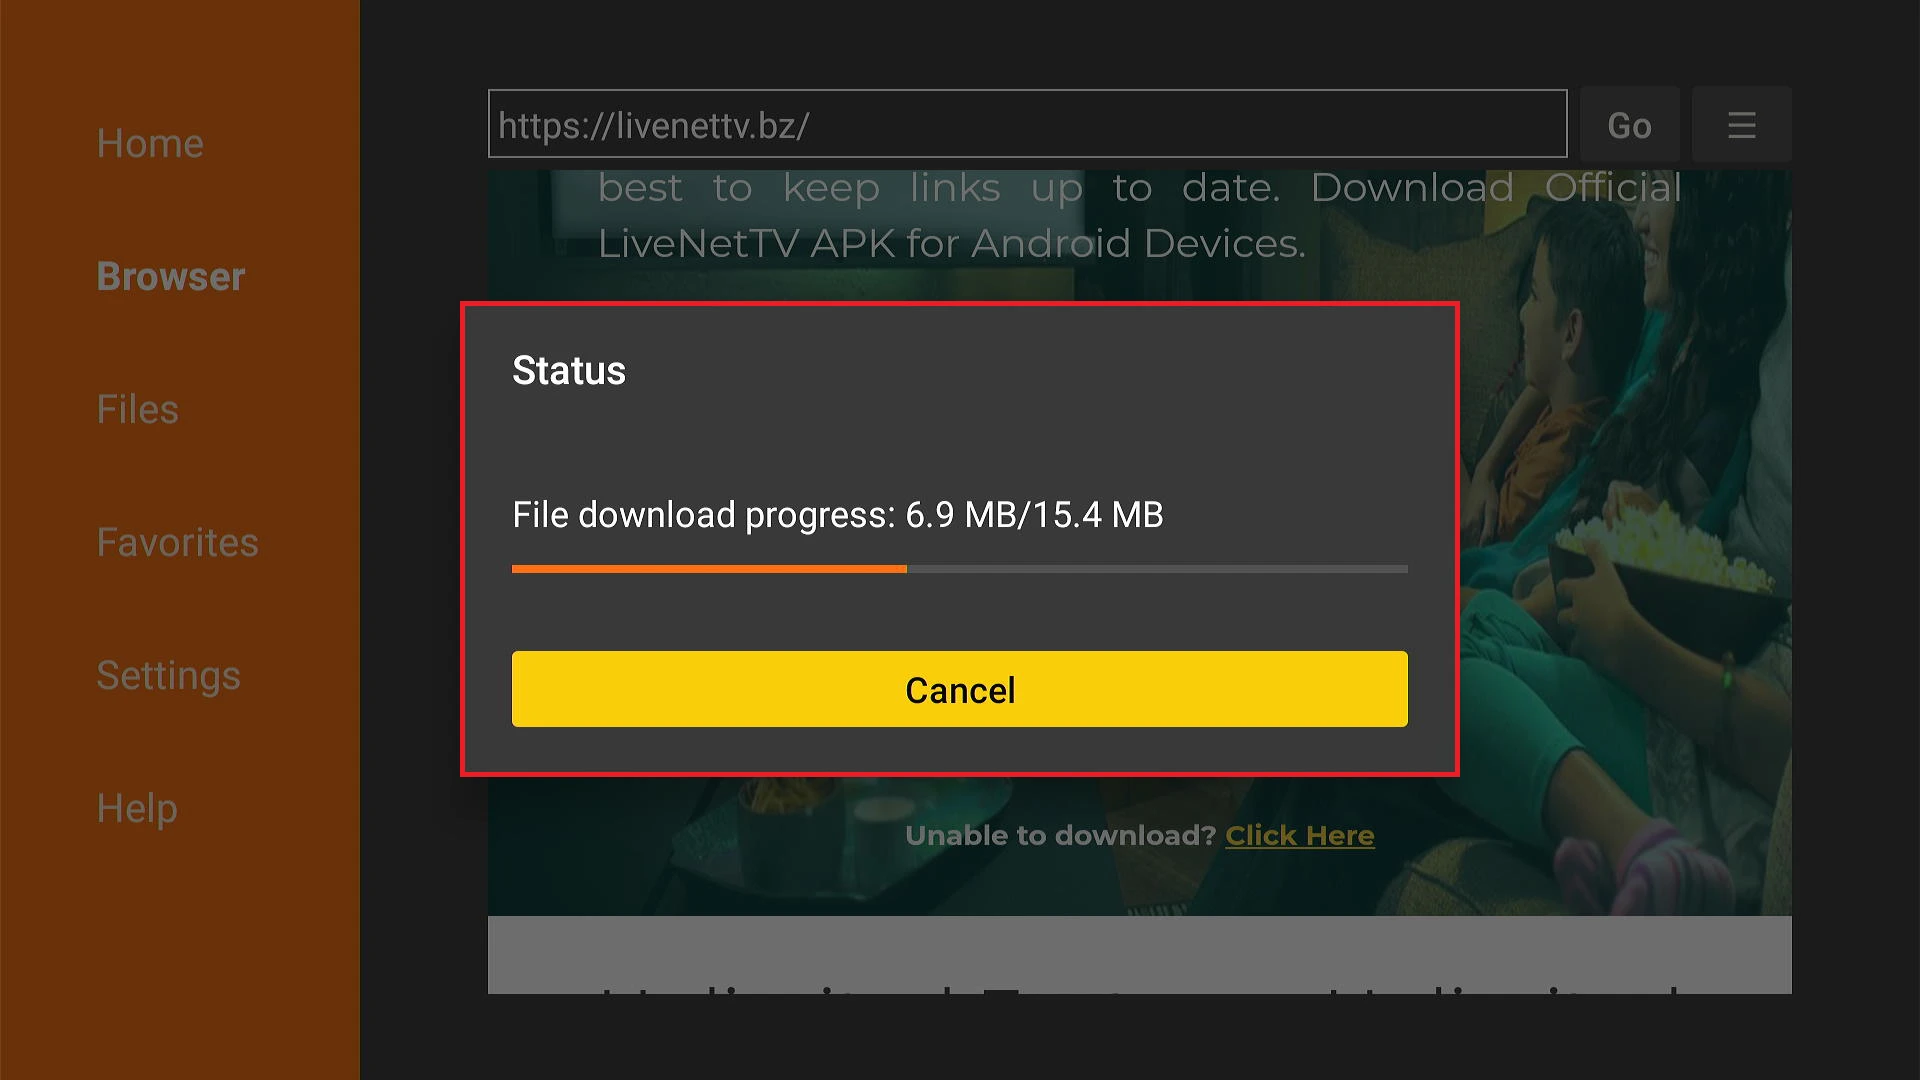
5. The official website of Live Net TV will load. Scroll down and click Downloader For Amazon Fire TV button.
6. Wait for the APK to download.
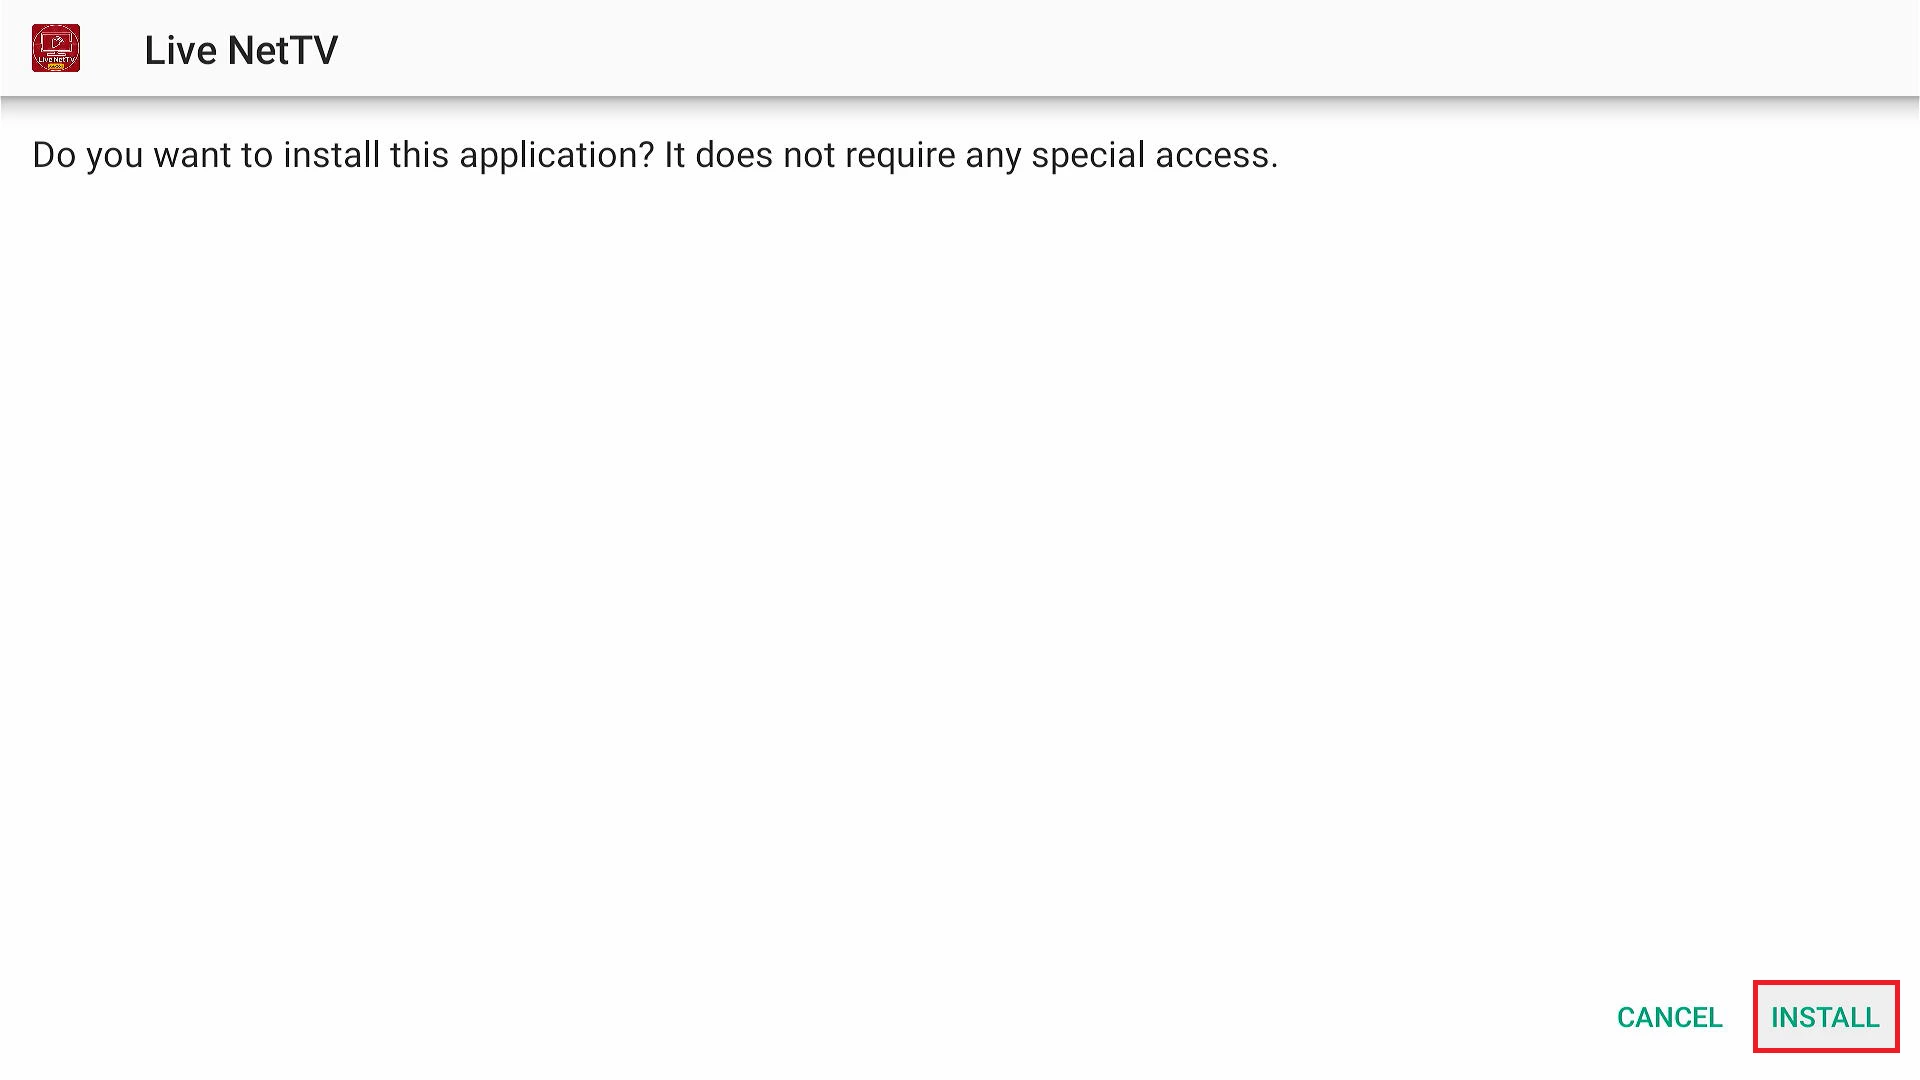
7. Click Install after the APK has been downloaded.
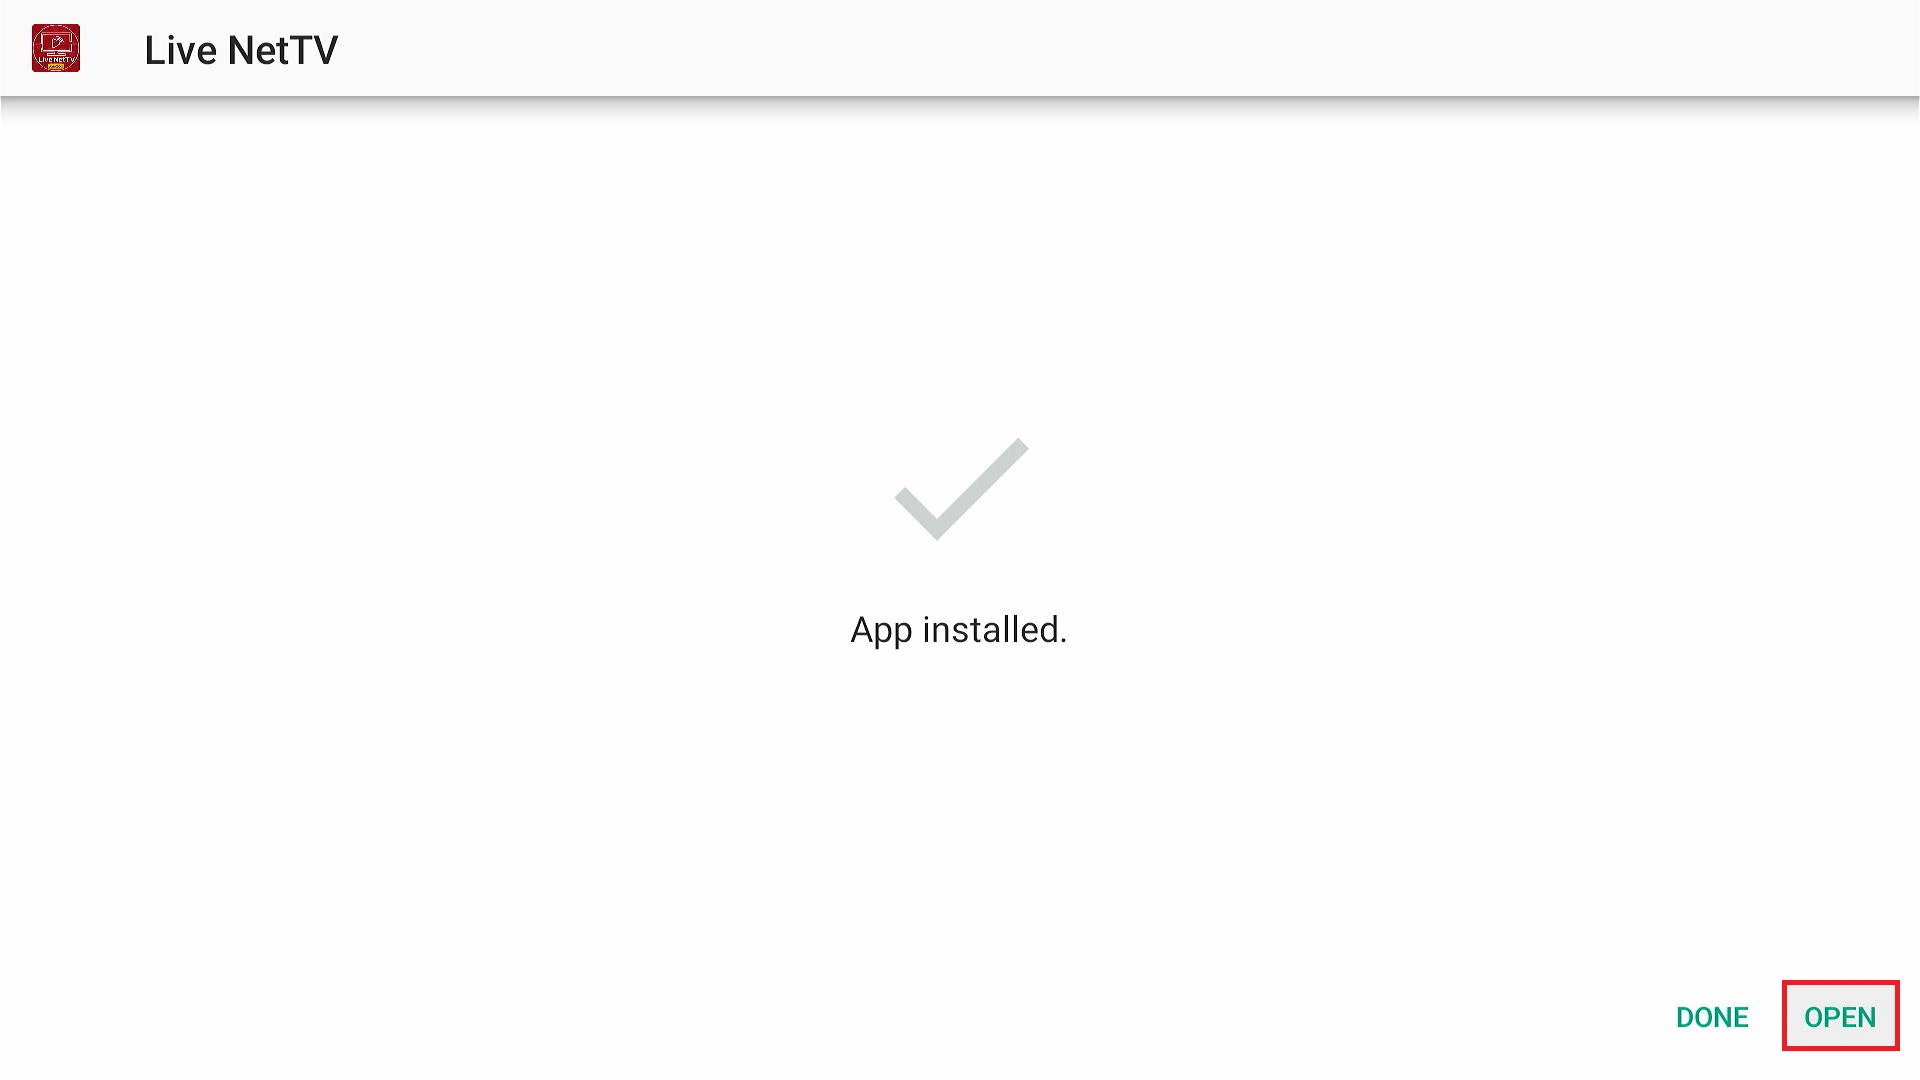
8. You have successfully installed Live Net TV on FireStick. Click Open to launch the app.
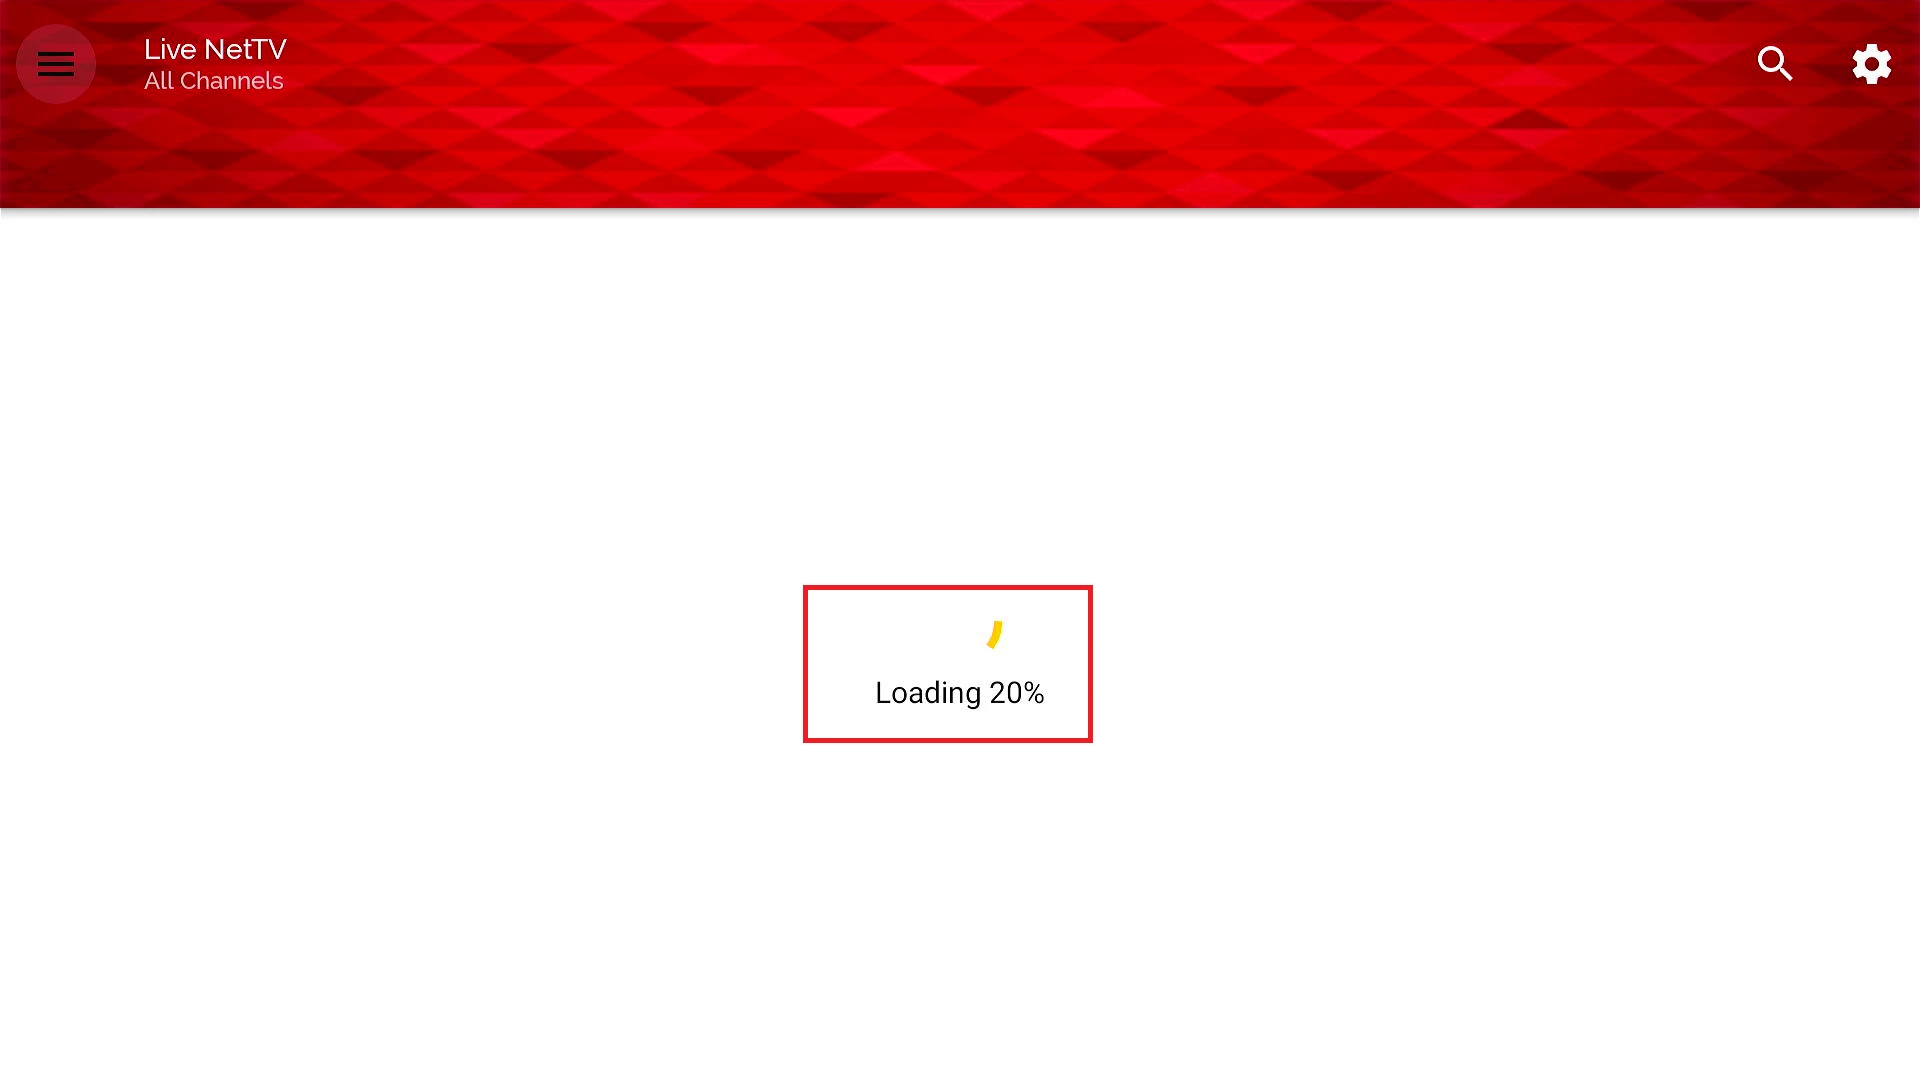
9. Wait for a few seconds for the app to load.
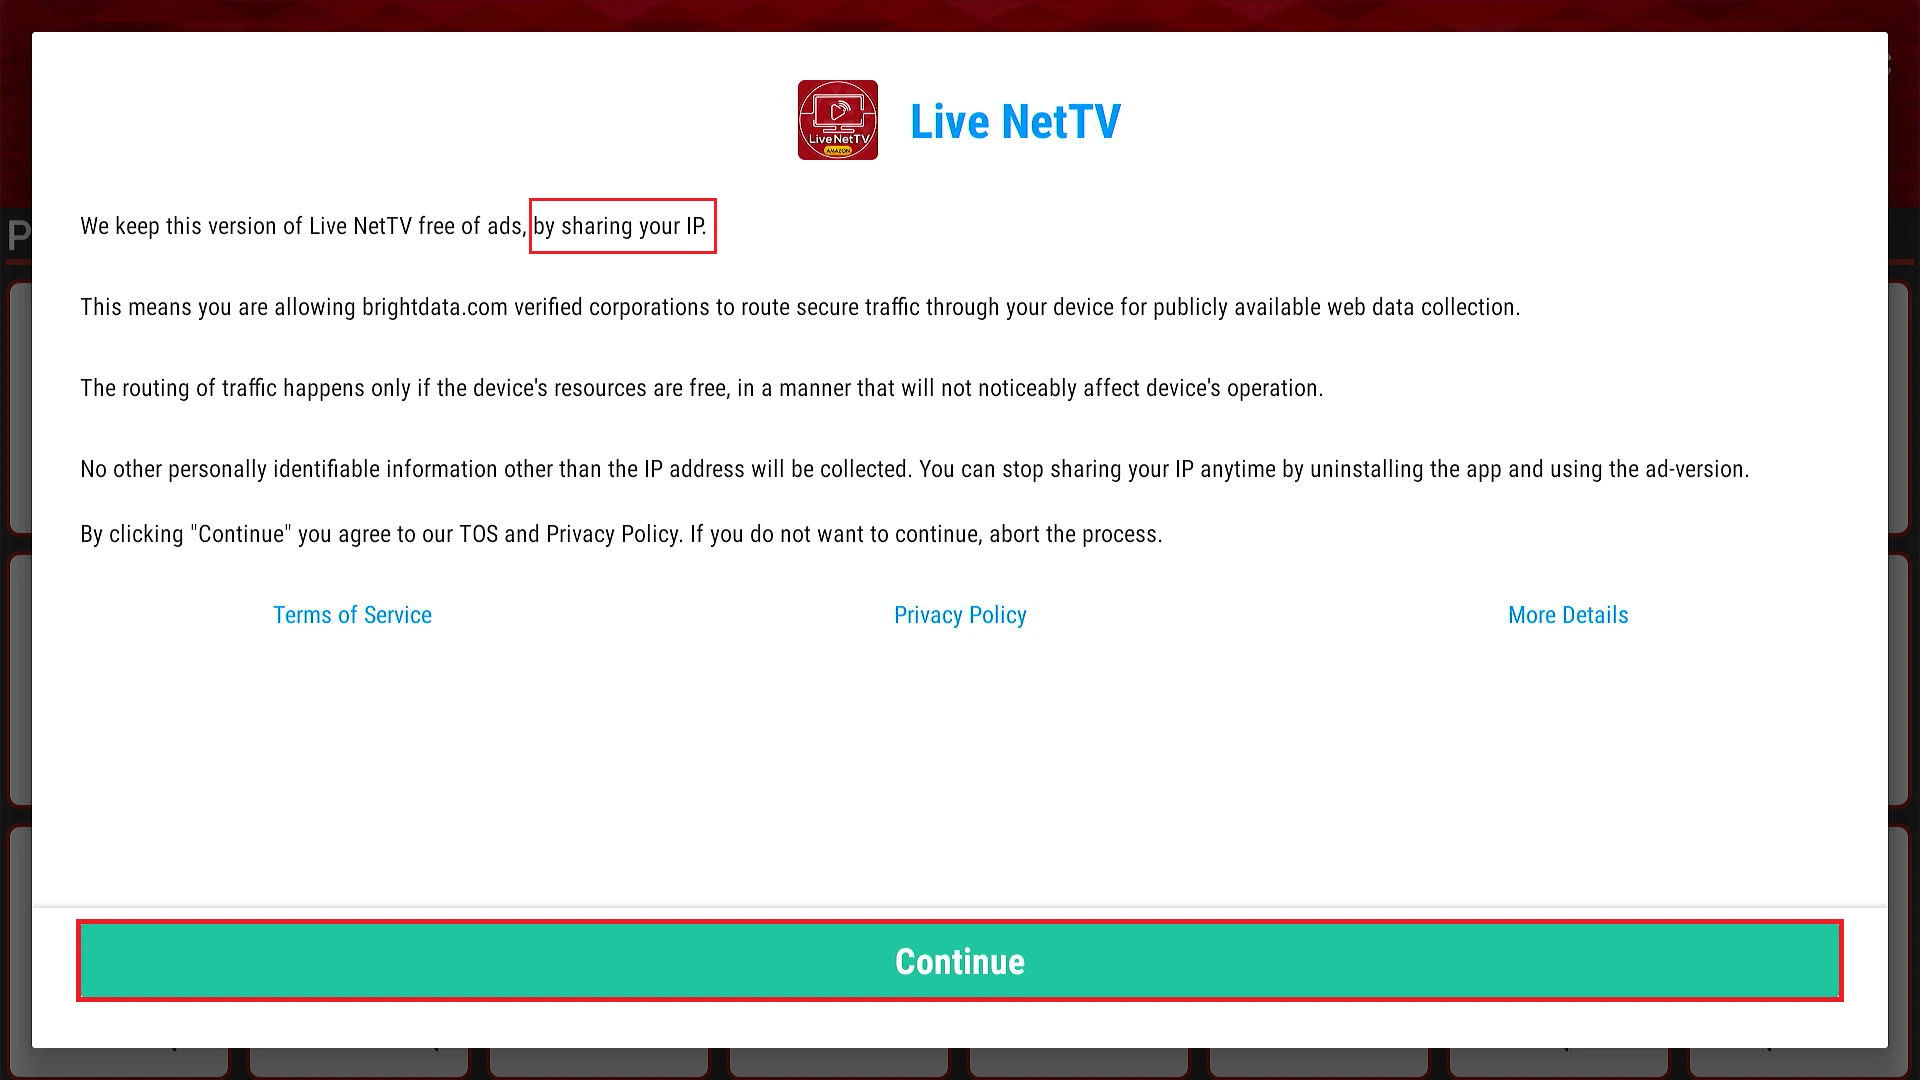
10. A disclaimer popup declares that your IP address is shared with a third-party vendor. By using the app, you will allow brightdata.com corporation to route its traffic through your device.
This is a common practice among many apps. However, I am not a huge fan of it. Therefore, I always hide my IP address from these apps by using ExpressVPN.
Click Continue to proceed.
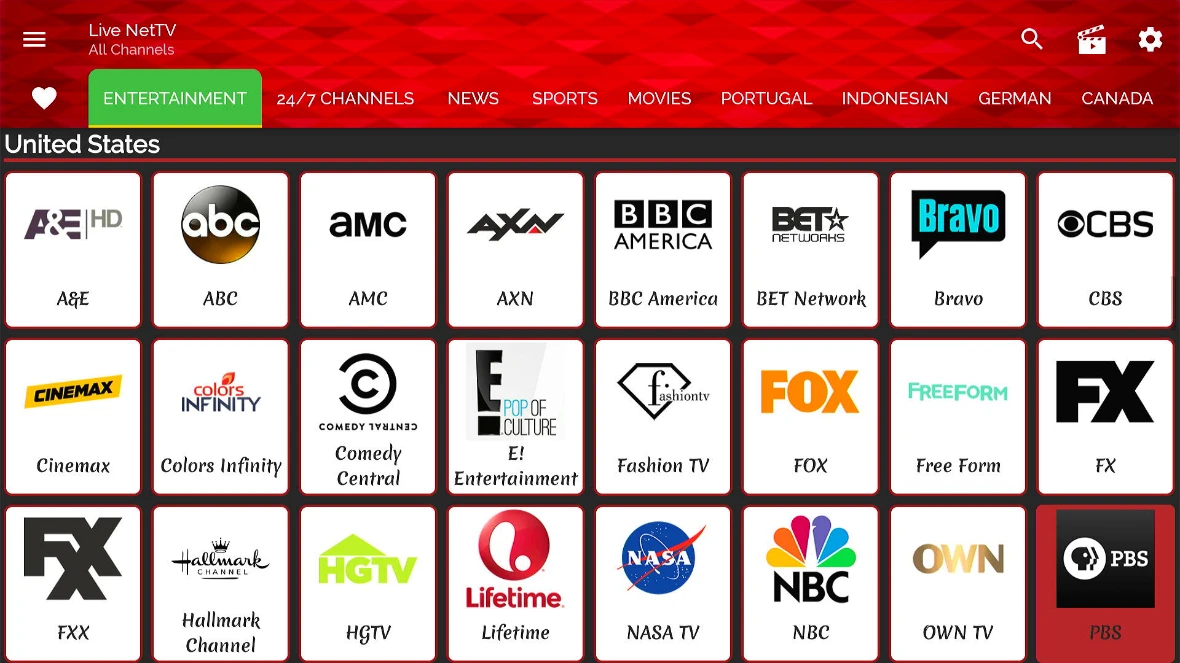
11. Here is the home screen of the Live Net TV app. You can start streaming now.
Great! You are now ready to superboost your FireStick with Live Net TV.
Step 6: Install Utility Apps for Performance
In this section, we’ll explore two essential utility apps for optimizing your FireStick experience:
- Fast Task Killer for swiftly terminating background apps with 1-click
- Internet Speed Test App to ensure a smooth streaming and browsing experience.
Utility App 1: Install Fast Task Killer on FireStick
Apps running in the background slow down your FireStick and affect your streaming experience. Fast Task Killer removes all the background apps with just one click so that you may enjoy streaming without trouble.
Here are the steps to install Fast Task Killer on FireStick:
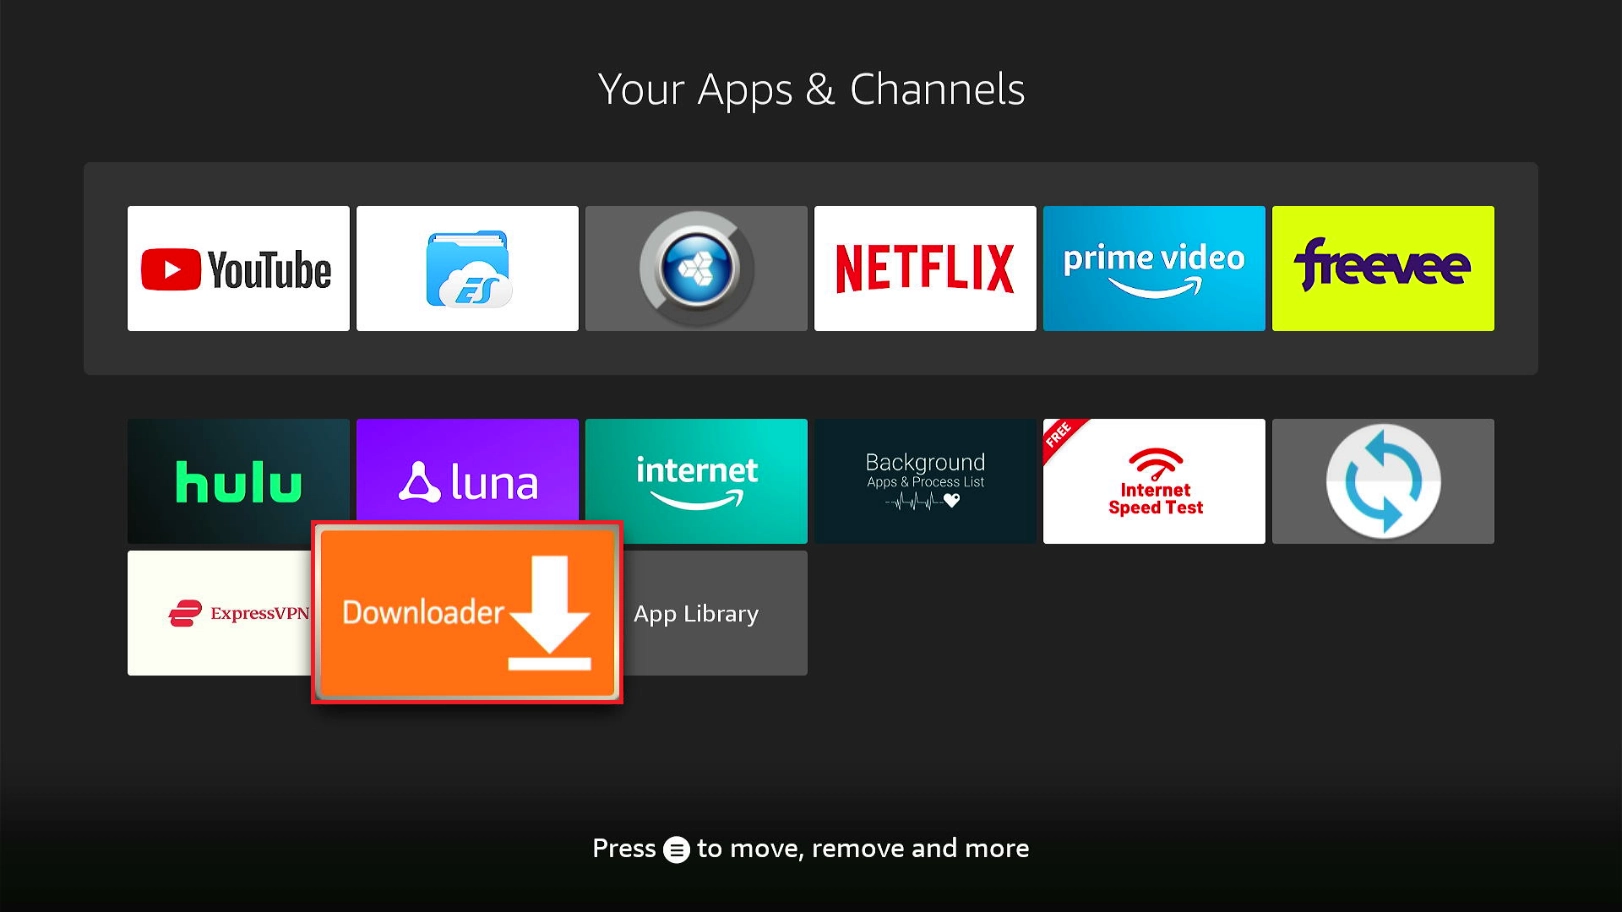
1. Click the Apps & Channels icon on the FireStick home screen or press the same button on your remote.
2. Open the Downloader app.
3. Click the URL field in the middle of the Downloader app home screen.
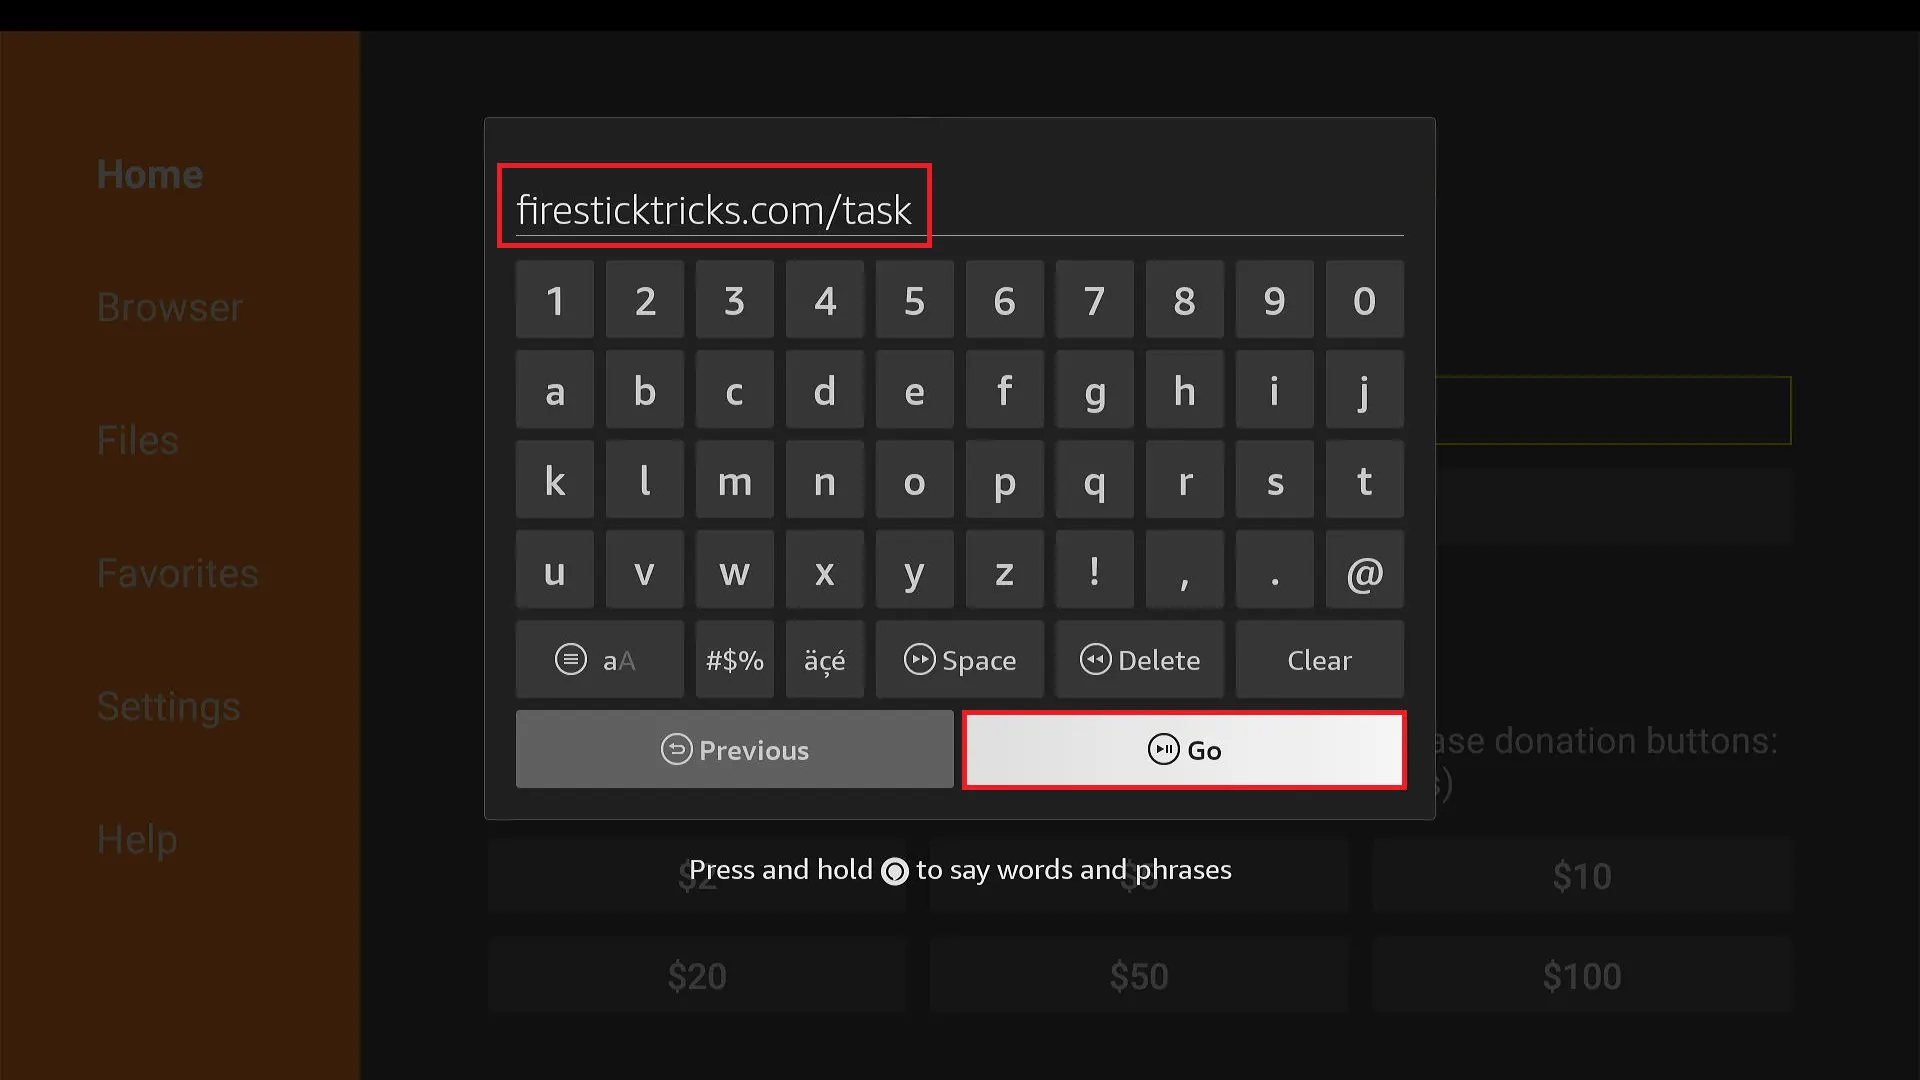
4. Type the following URL and click Go:
firesticktricks.com/task
Disclaimer: This URL is hosted on an external server. FireStickTricks does not own this URL or the APK.
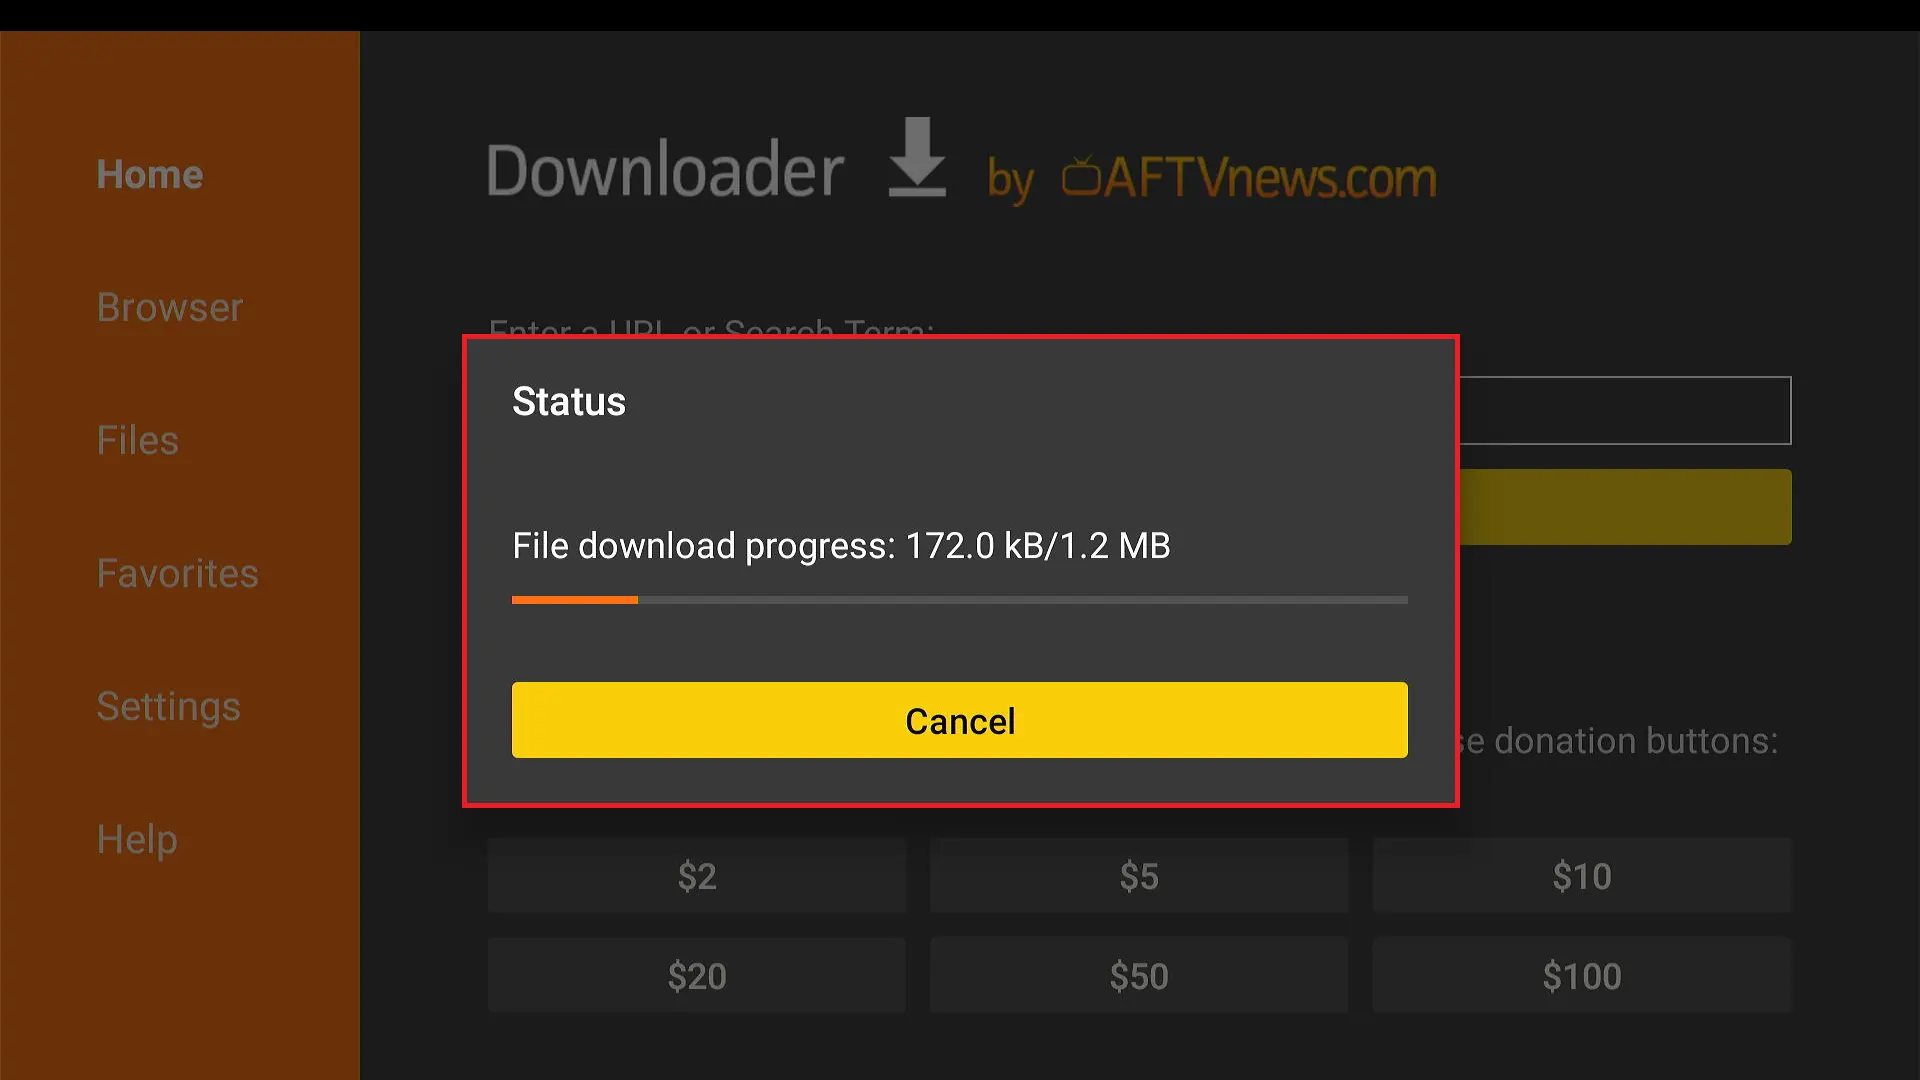
5. Wait for the APK to download.
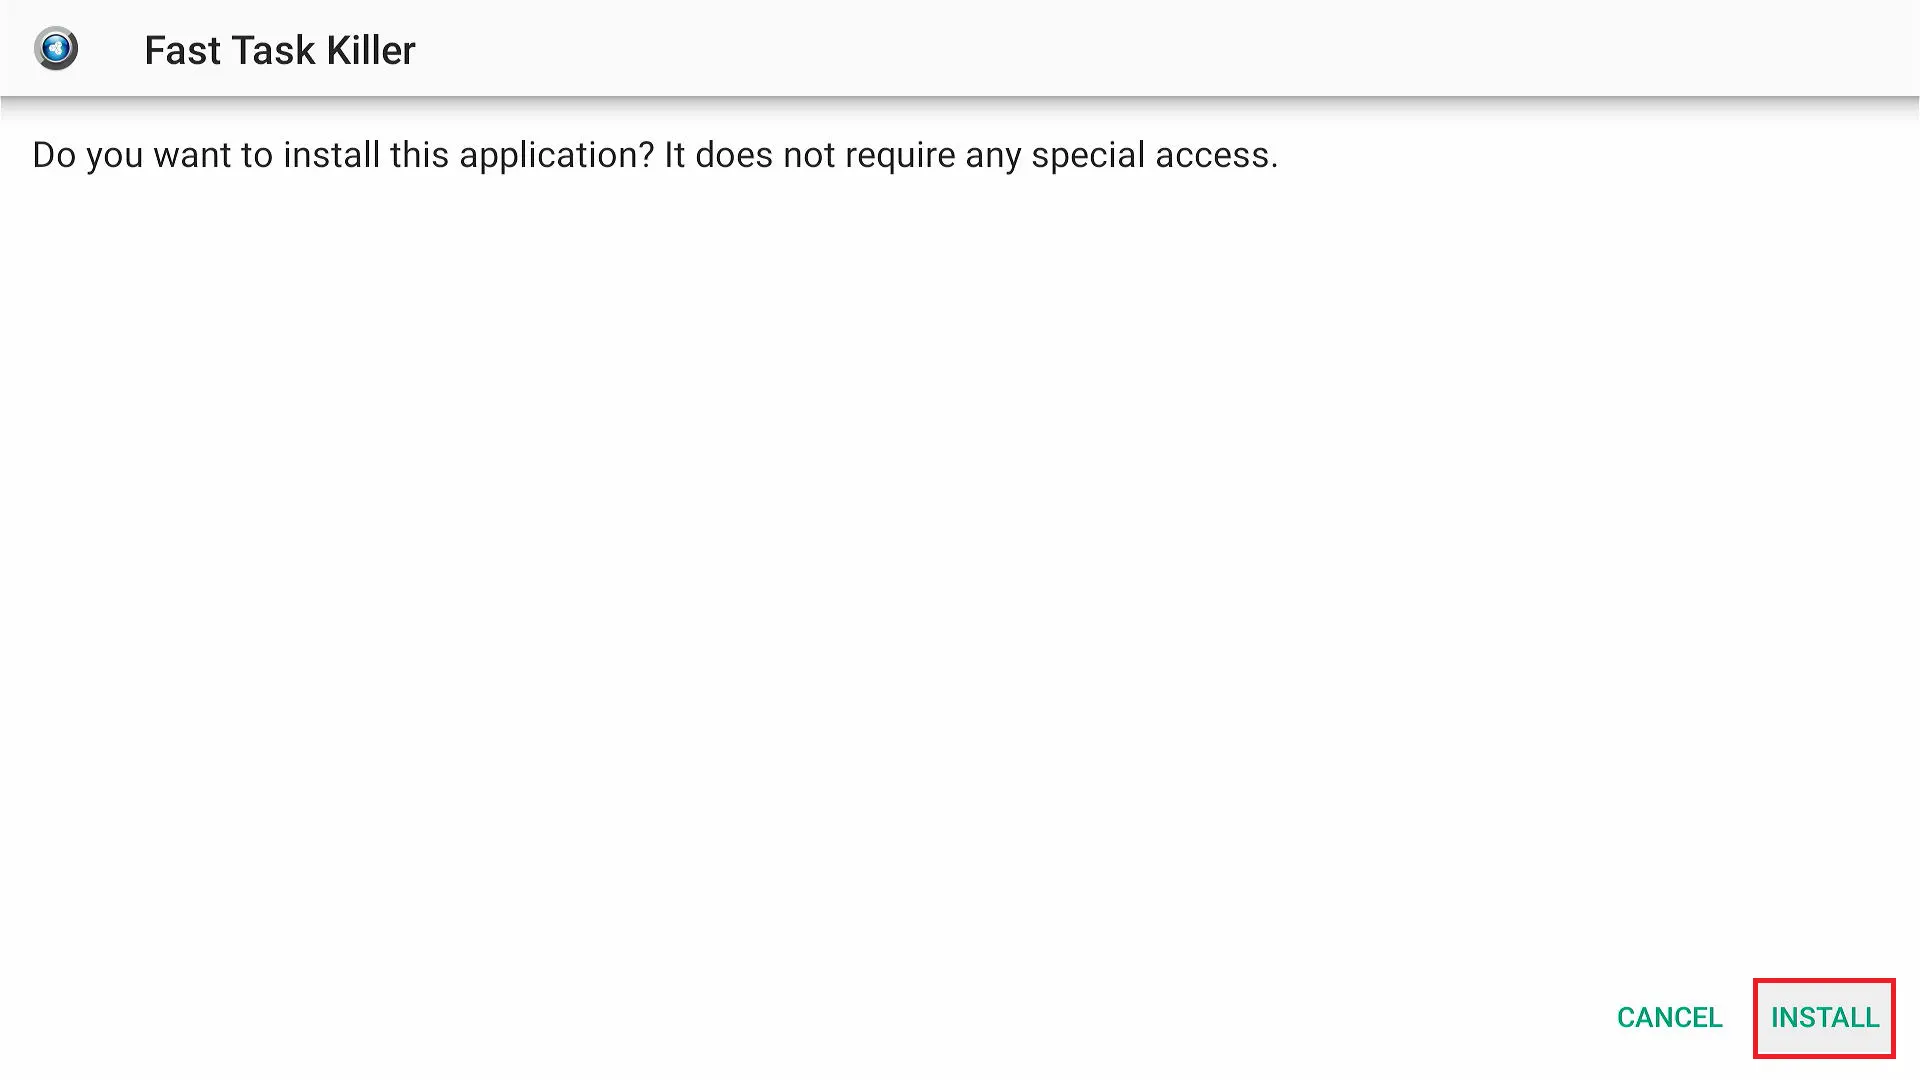
6. Click Install after the APK has been downloaded.
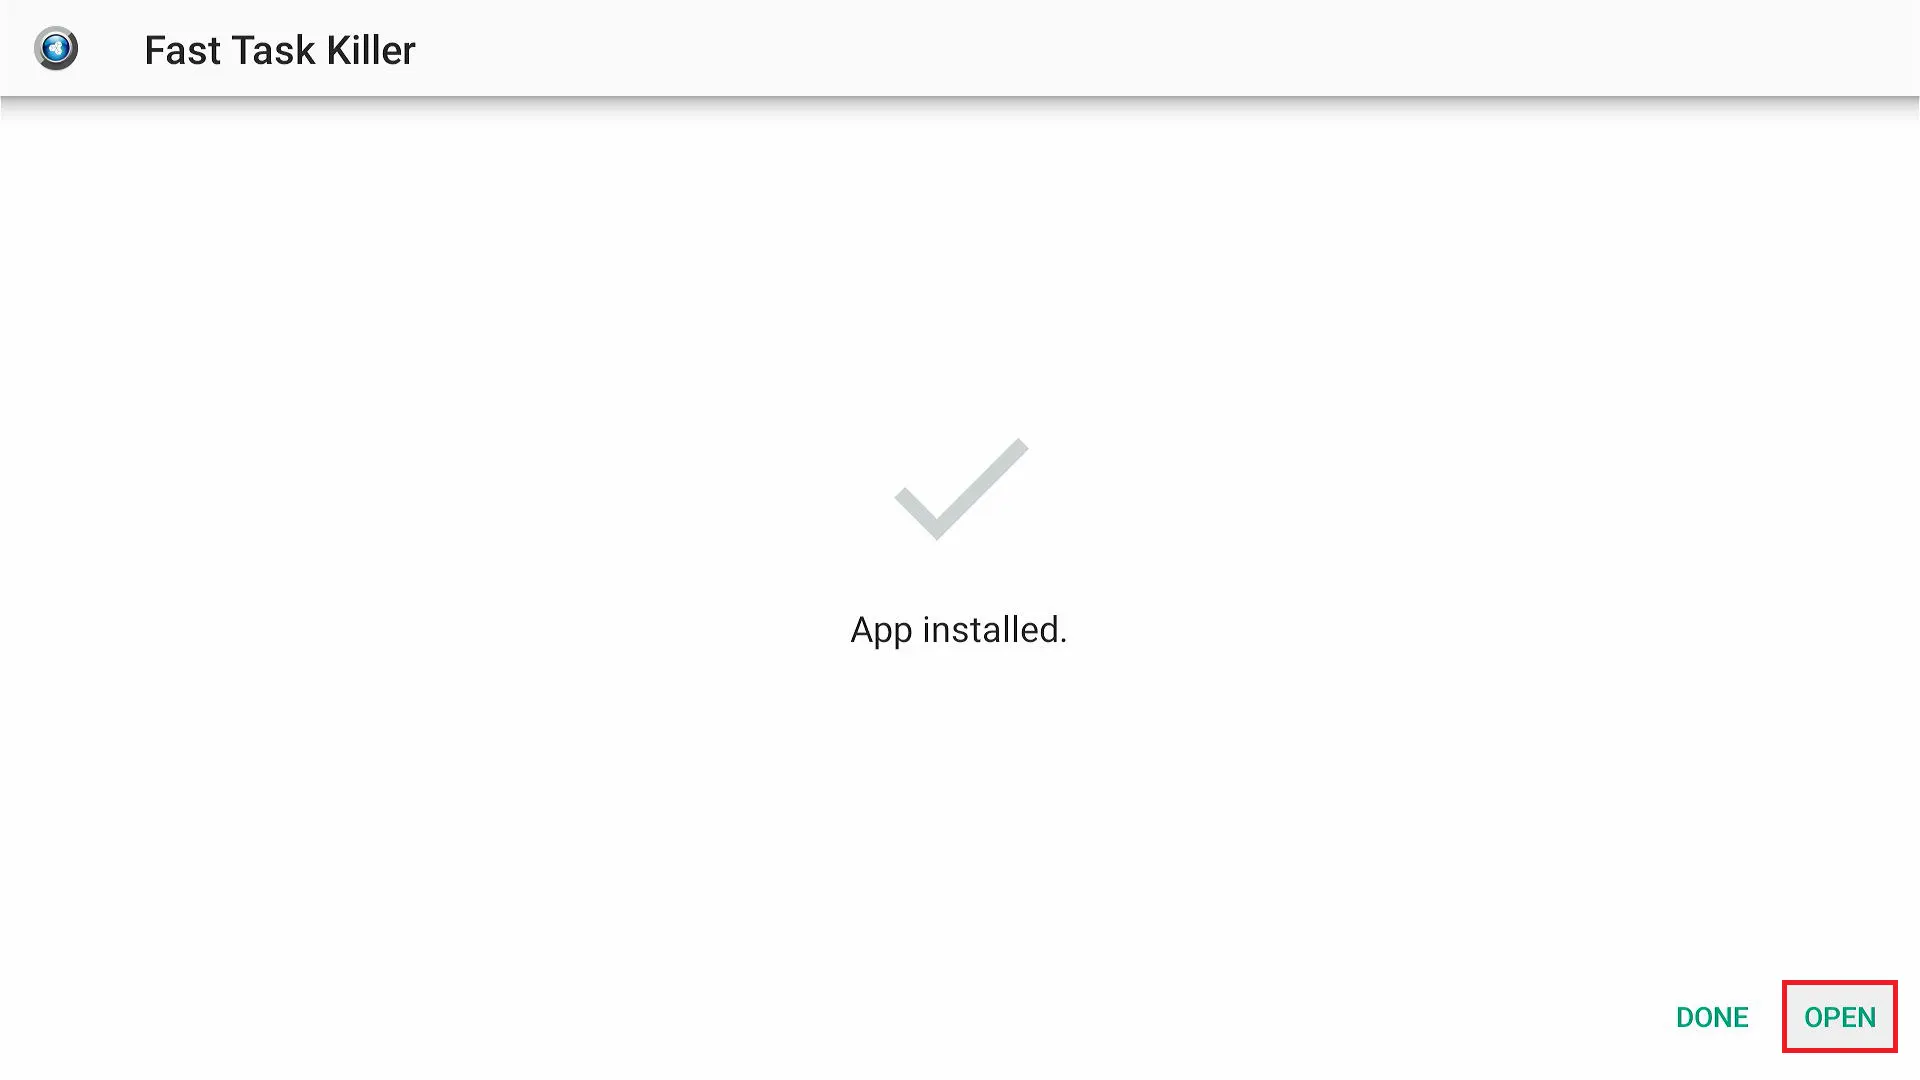
7. Click Open to run Fast Task Killer.
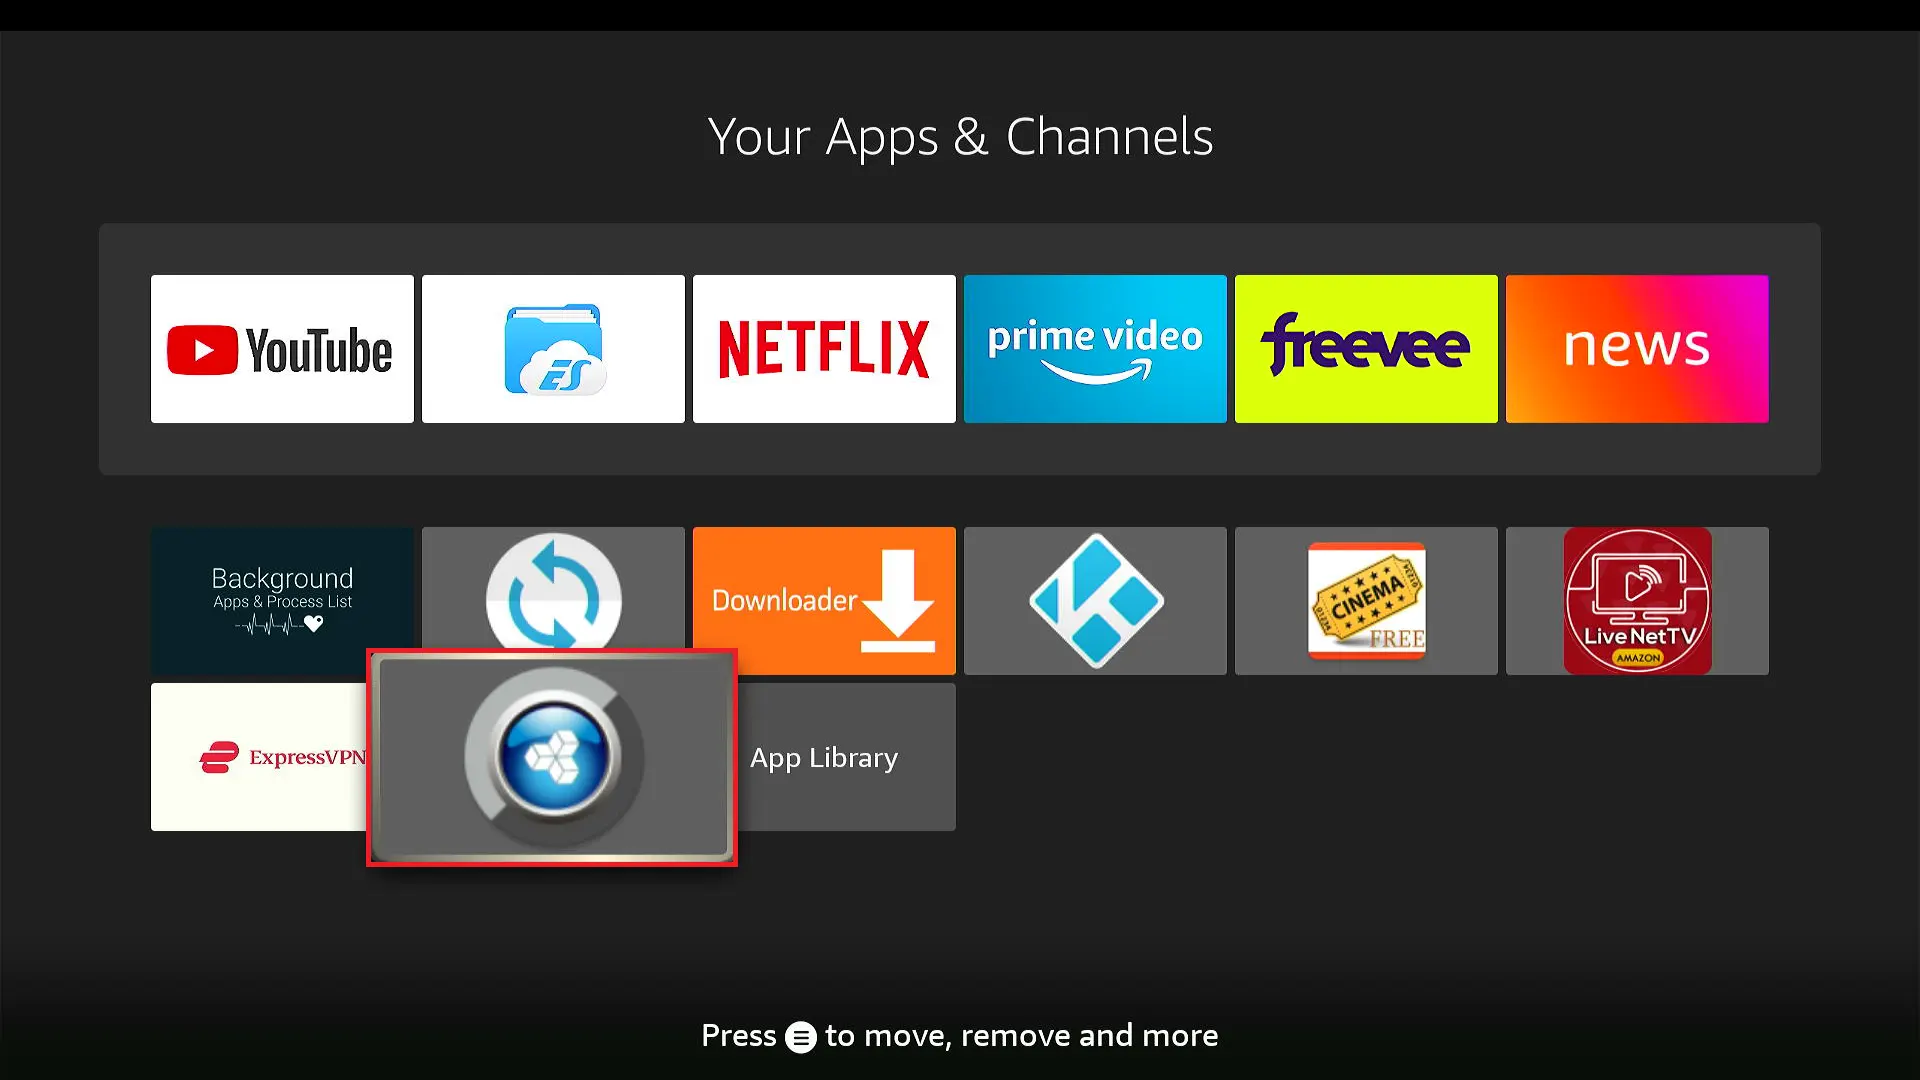
8. To use the app any other time, click the Apps & Channels icon on the home screen or the same button on the remote.
9. Find and open the Fast Task Killer app.
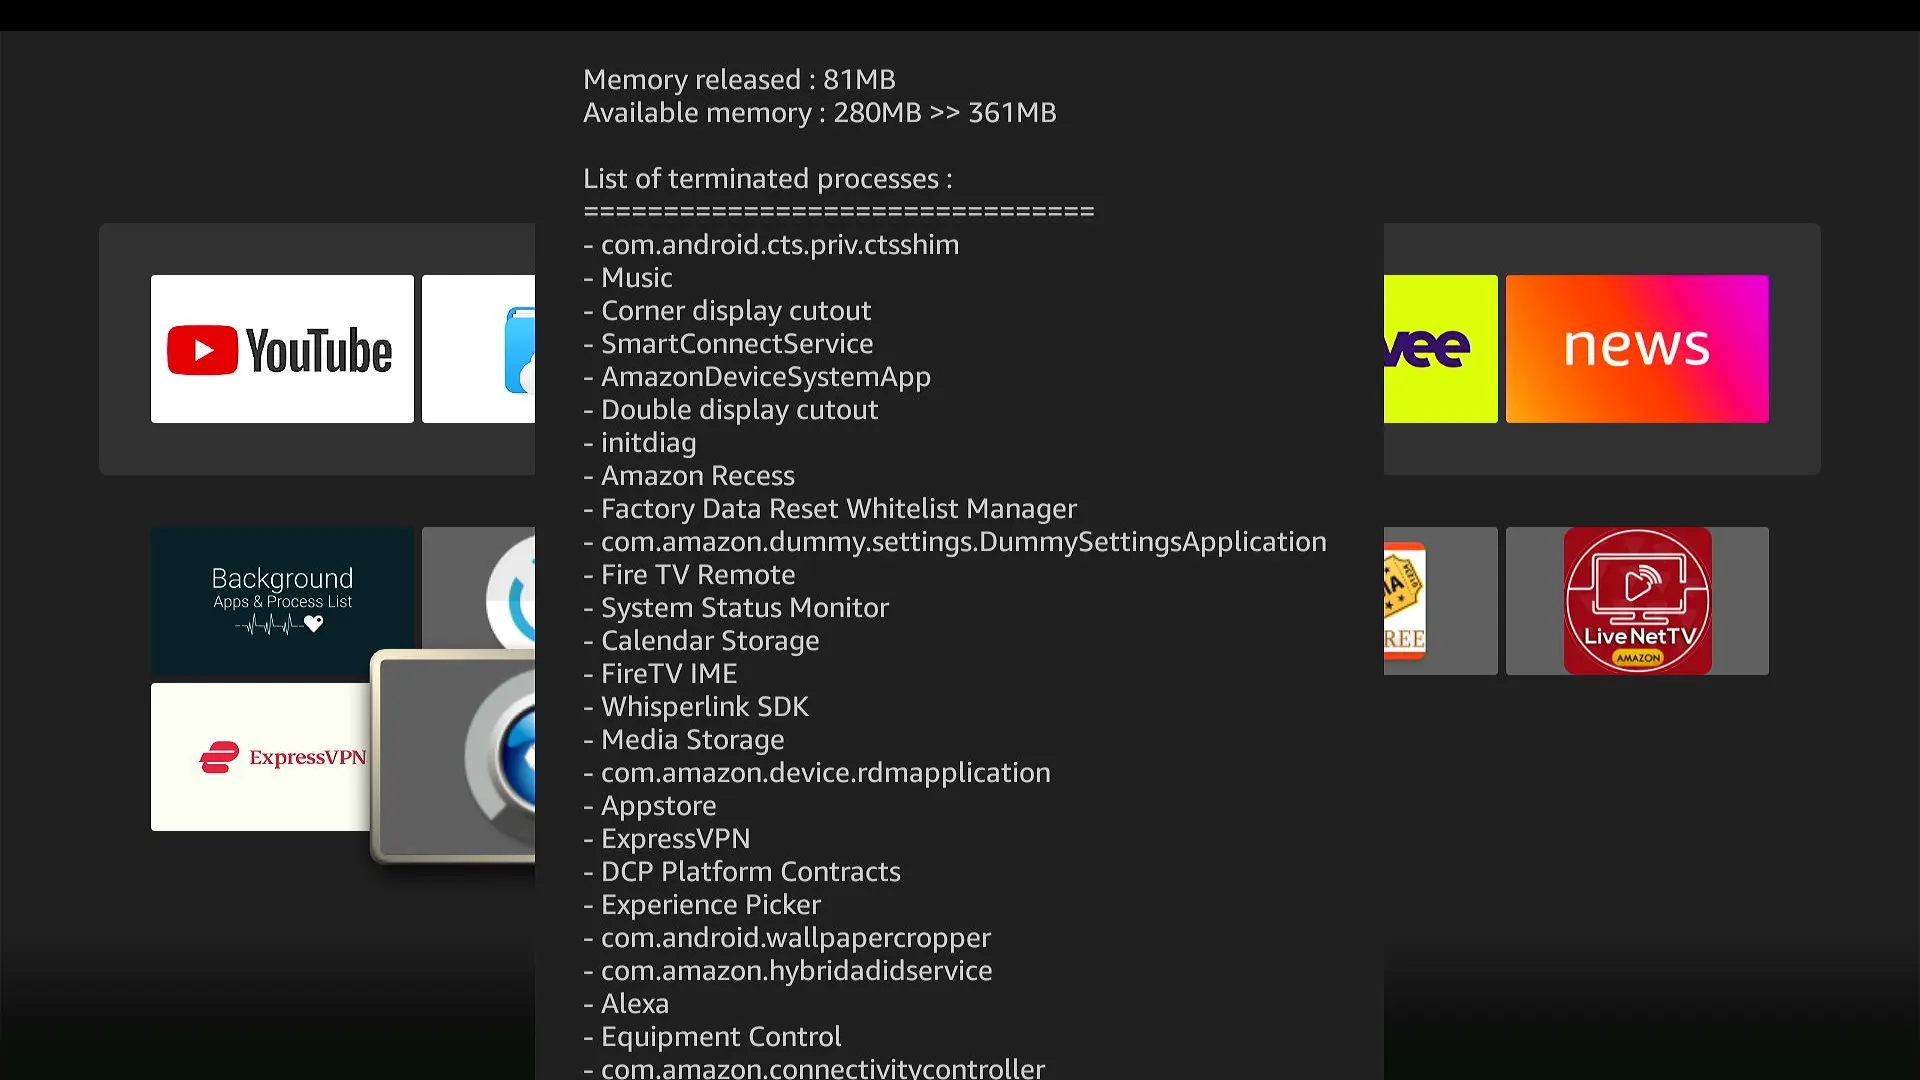
10. A prompt appears briefly on the screen with the list of all the background apps and processes the app terminated.
Great! You now have this excellent utility tool on your FireStick.
Utility App 2: Install Internet Speed Test App
To stream your favorite videos without trouble, you need a steady and fast internet connection. With the Internet Speed Test App, you can check the Wi-Fi speed with one click.
ISPs are known for throttling internet speed, especially when they detect a lot of streaming activities. The Internet Speed Test App lets you quickly find out if the speed has been curtailed.
I also recommend using ExpressVPN to hide your streaming activities and avoid ISP throttling.
Internet Speed Test App is an official app. Here are the steps to install it from the Amazon Store:
1. Select the magnifying glass icon on the menu bar of the FireStick home screen and press the down navigation button on the remote.
2. Click Search.
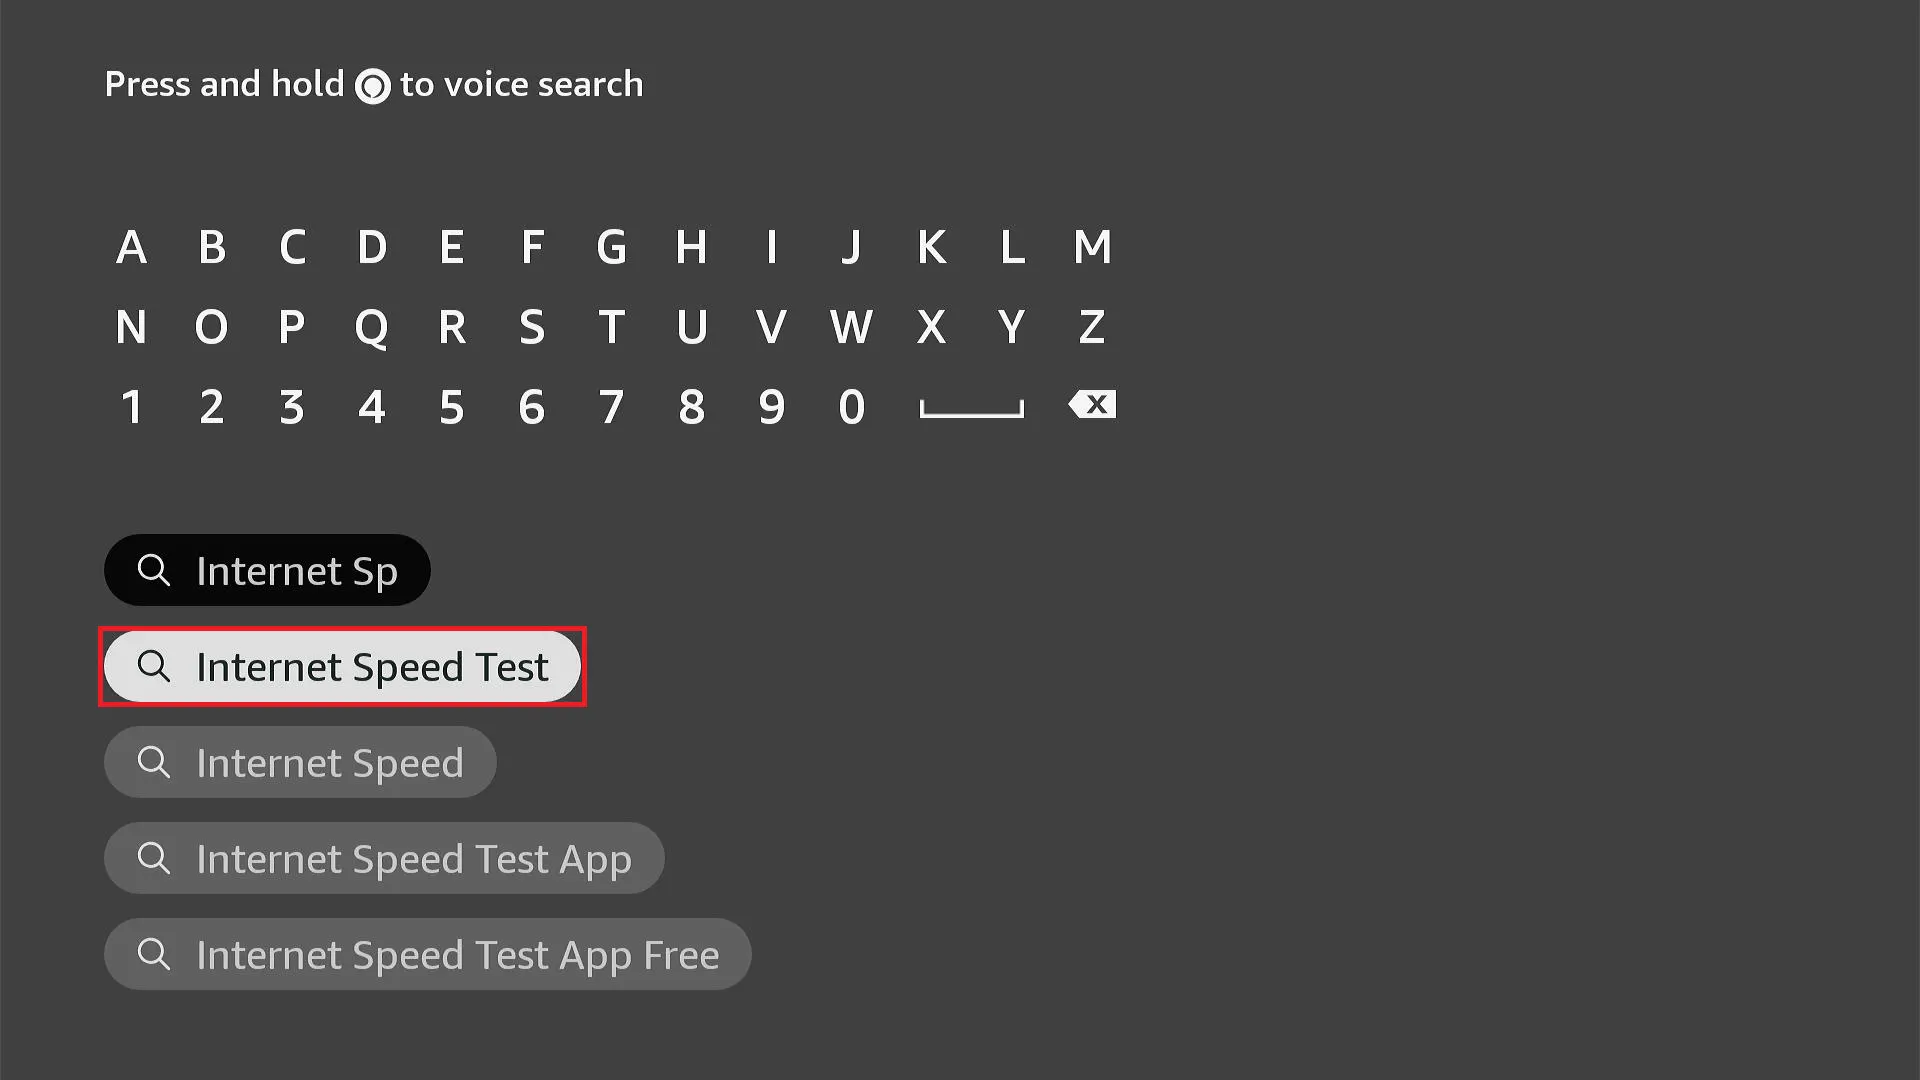
3. Start typing Internet Speed Test and click it in the search results.
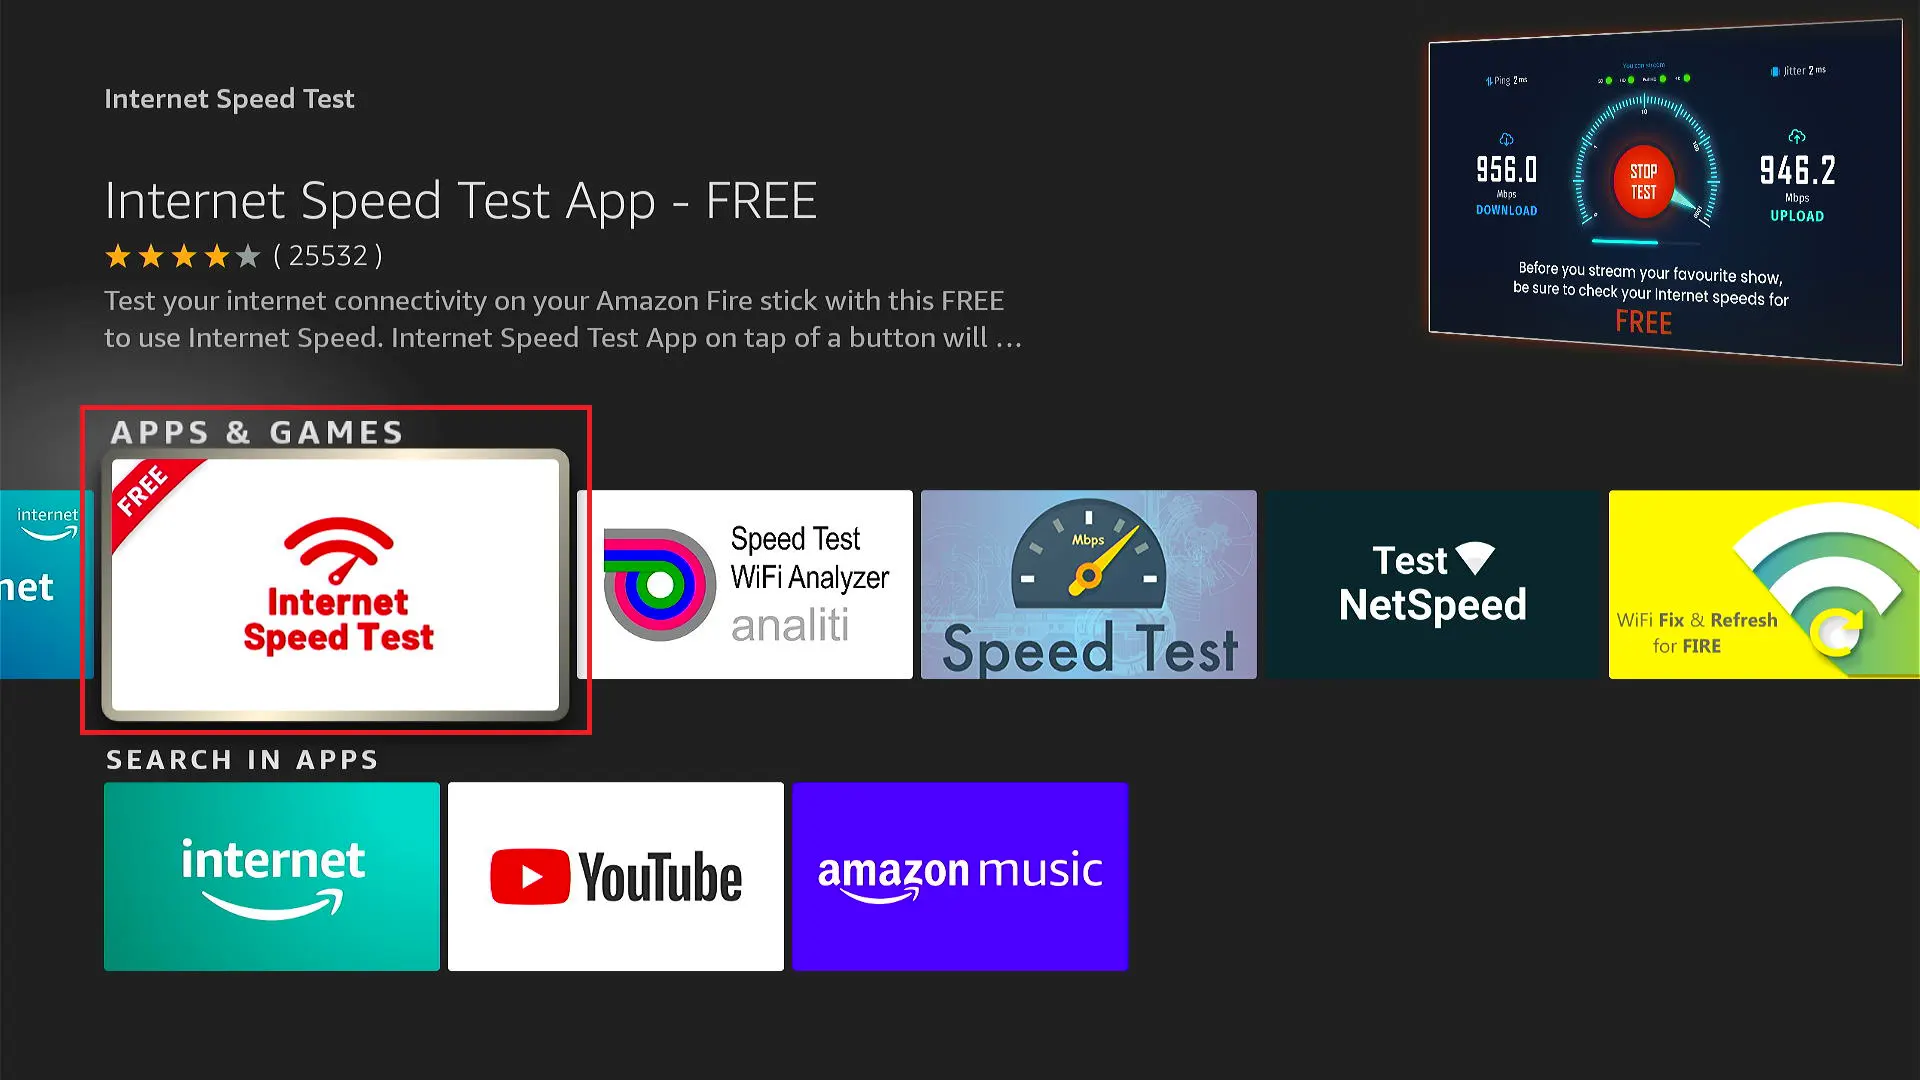
4. Click the Internet Speed Test app tile on the next screen under Apps & Games.
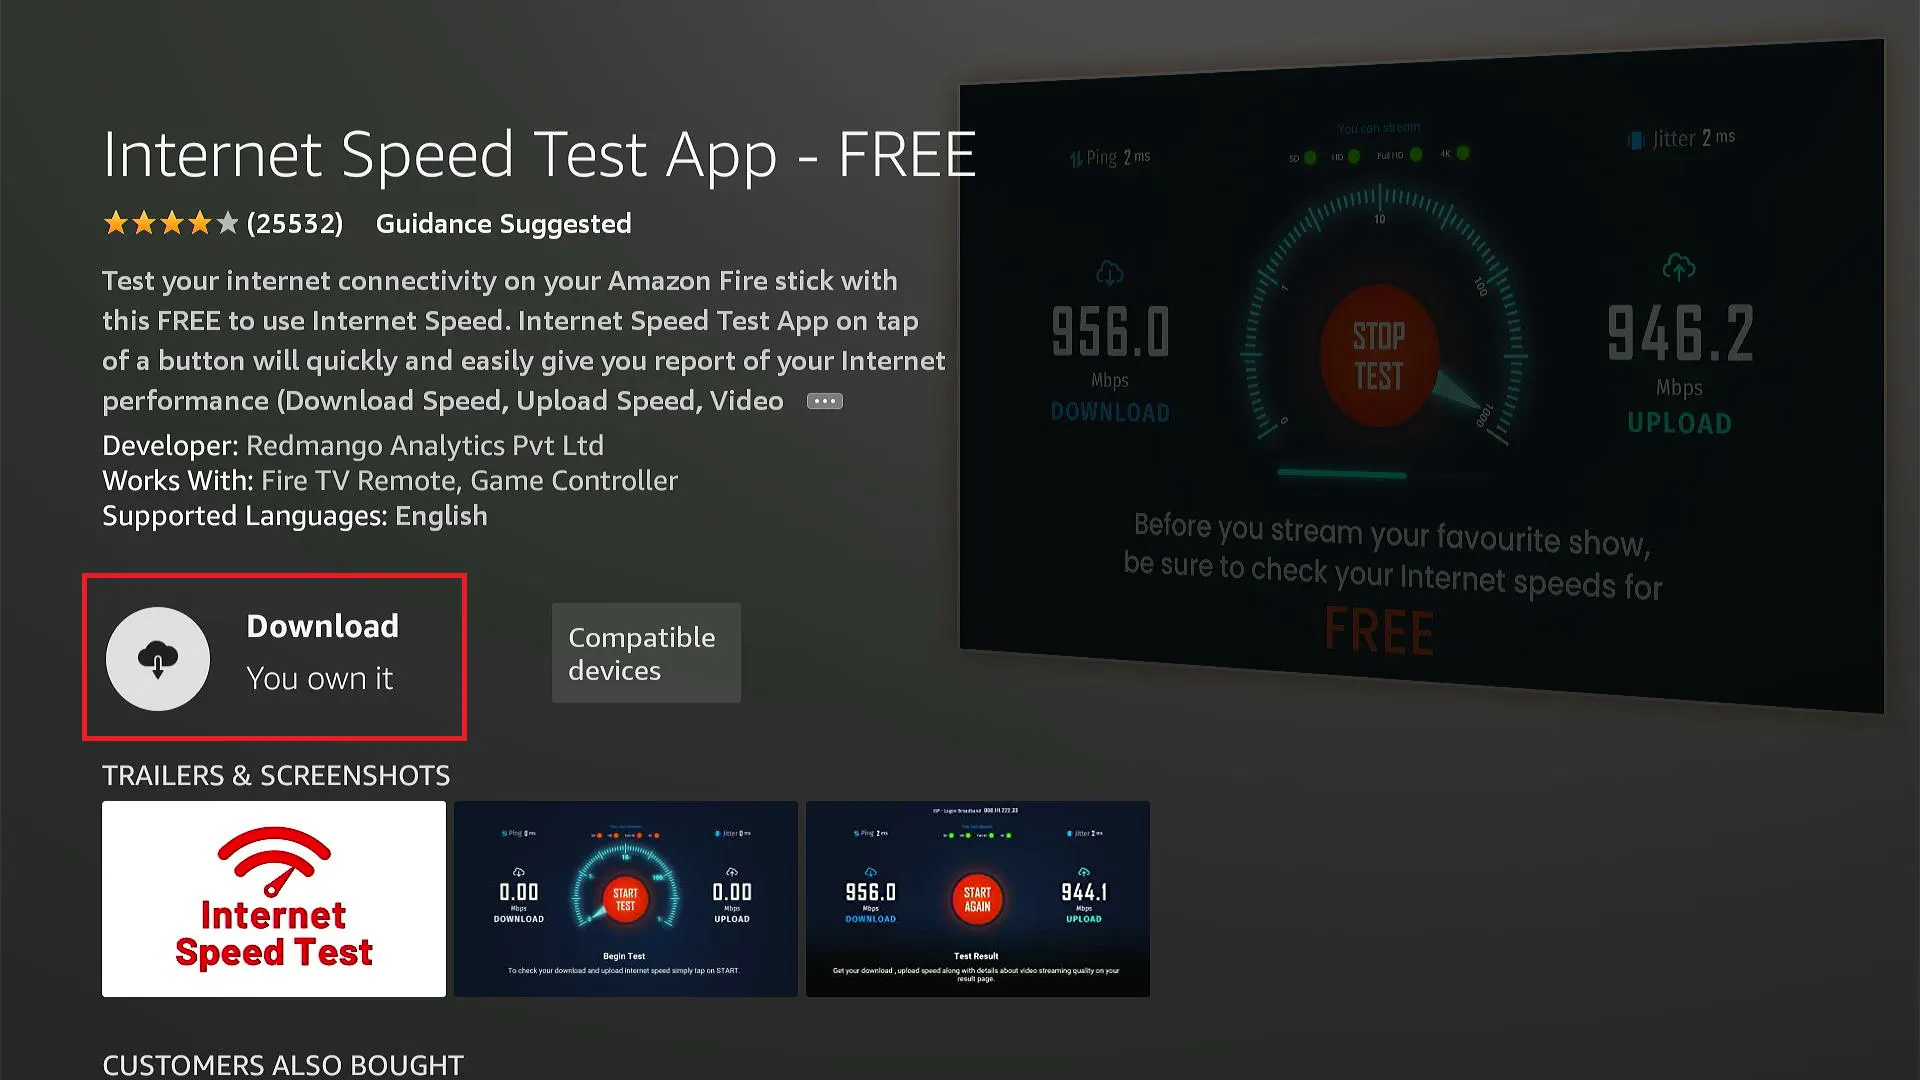
5. Click Download or Get.
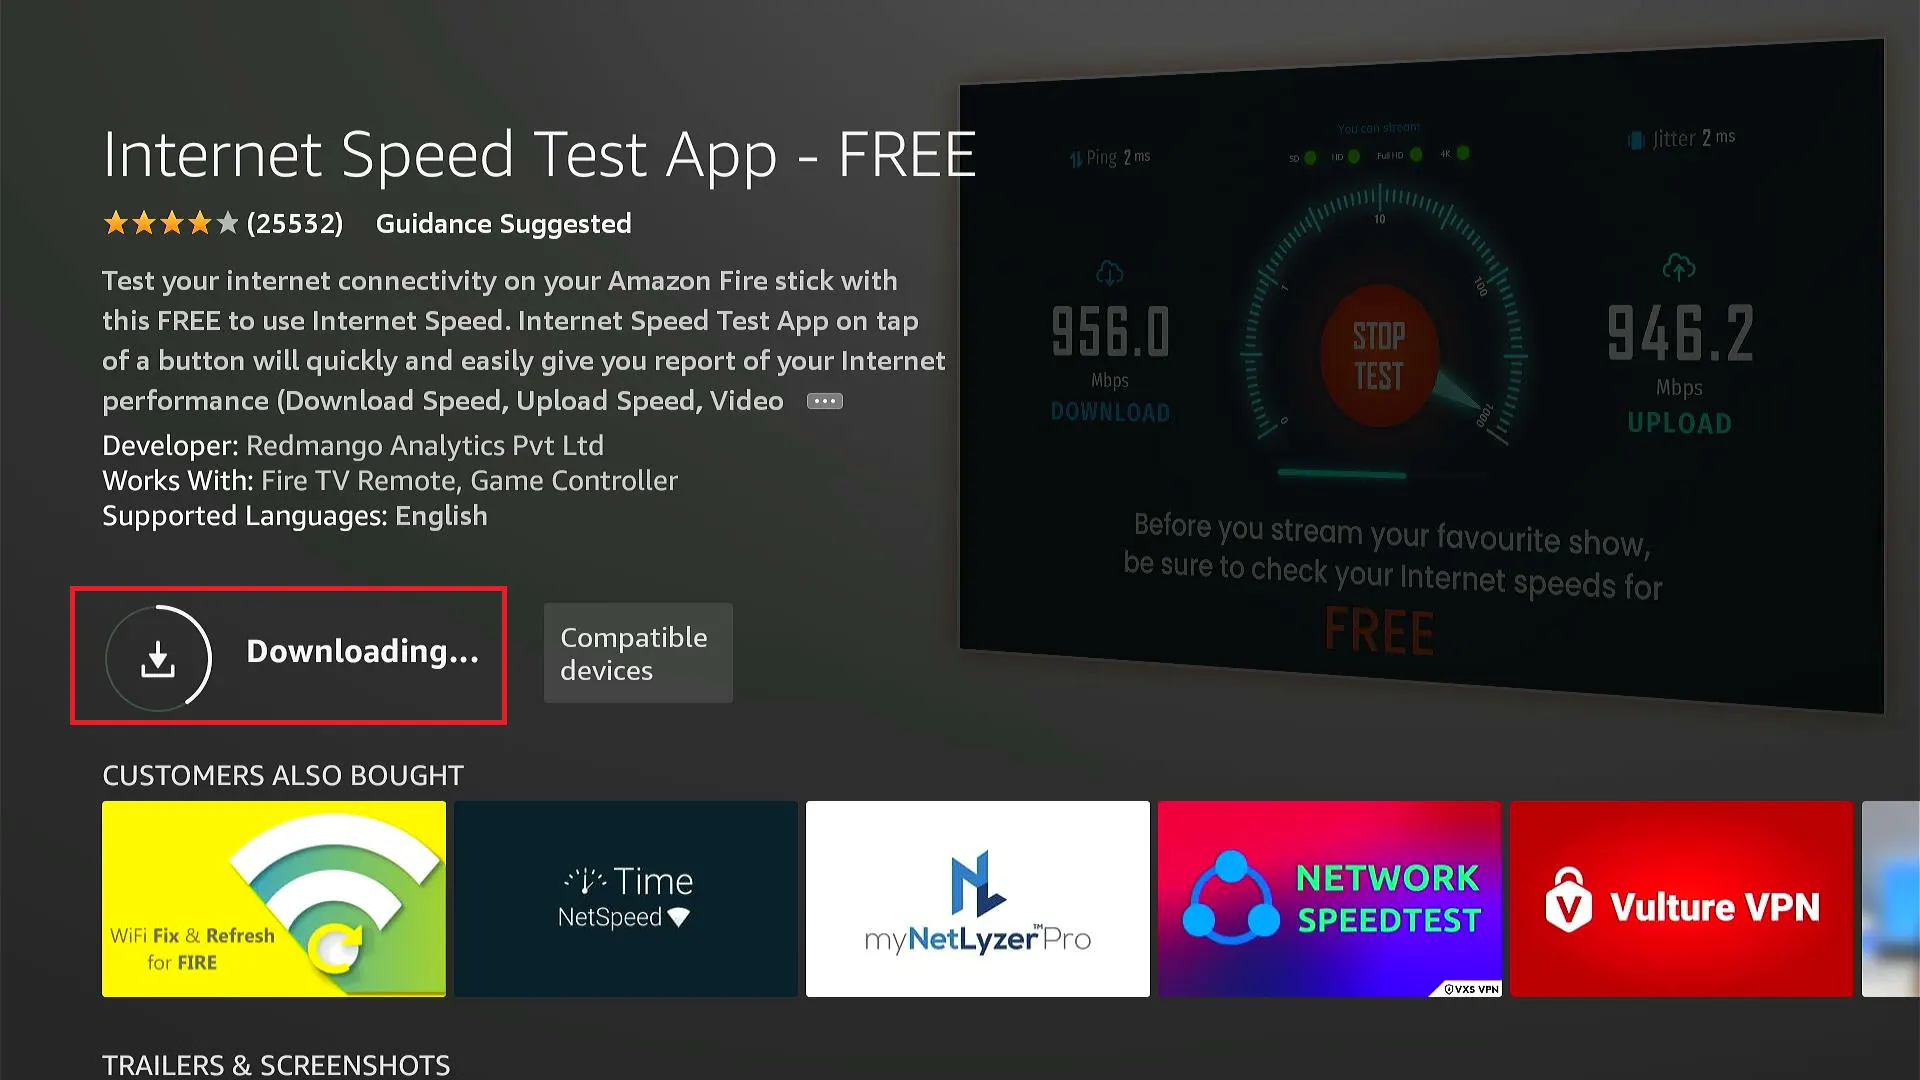
6. Wait for the app to download and install.
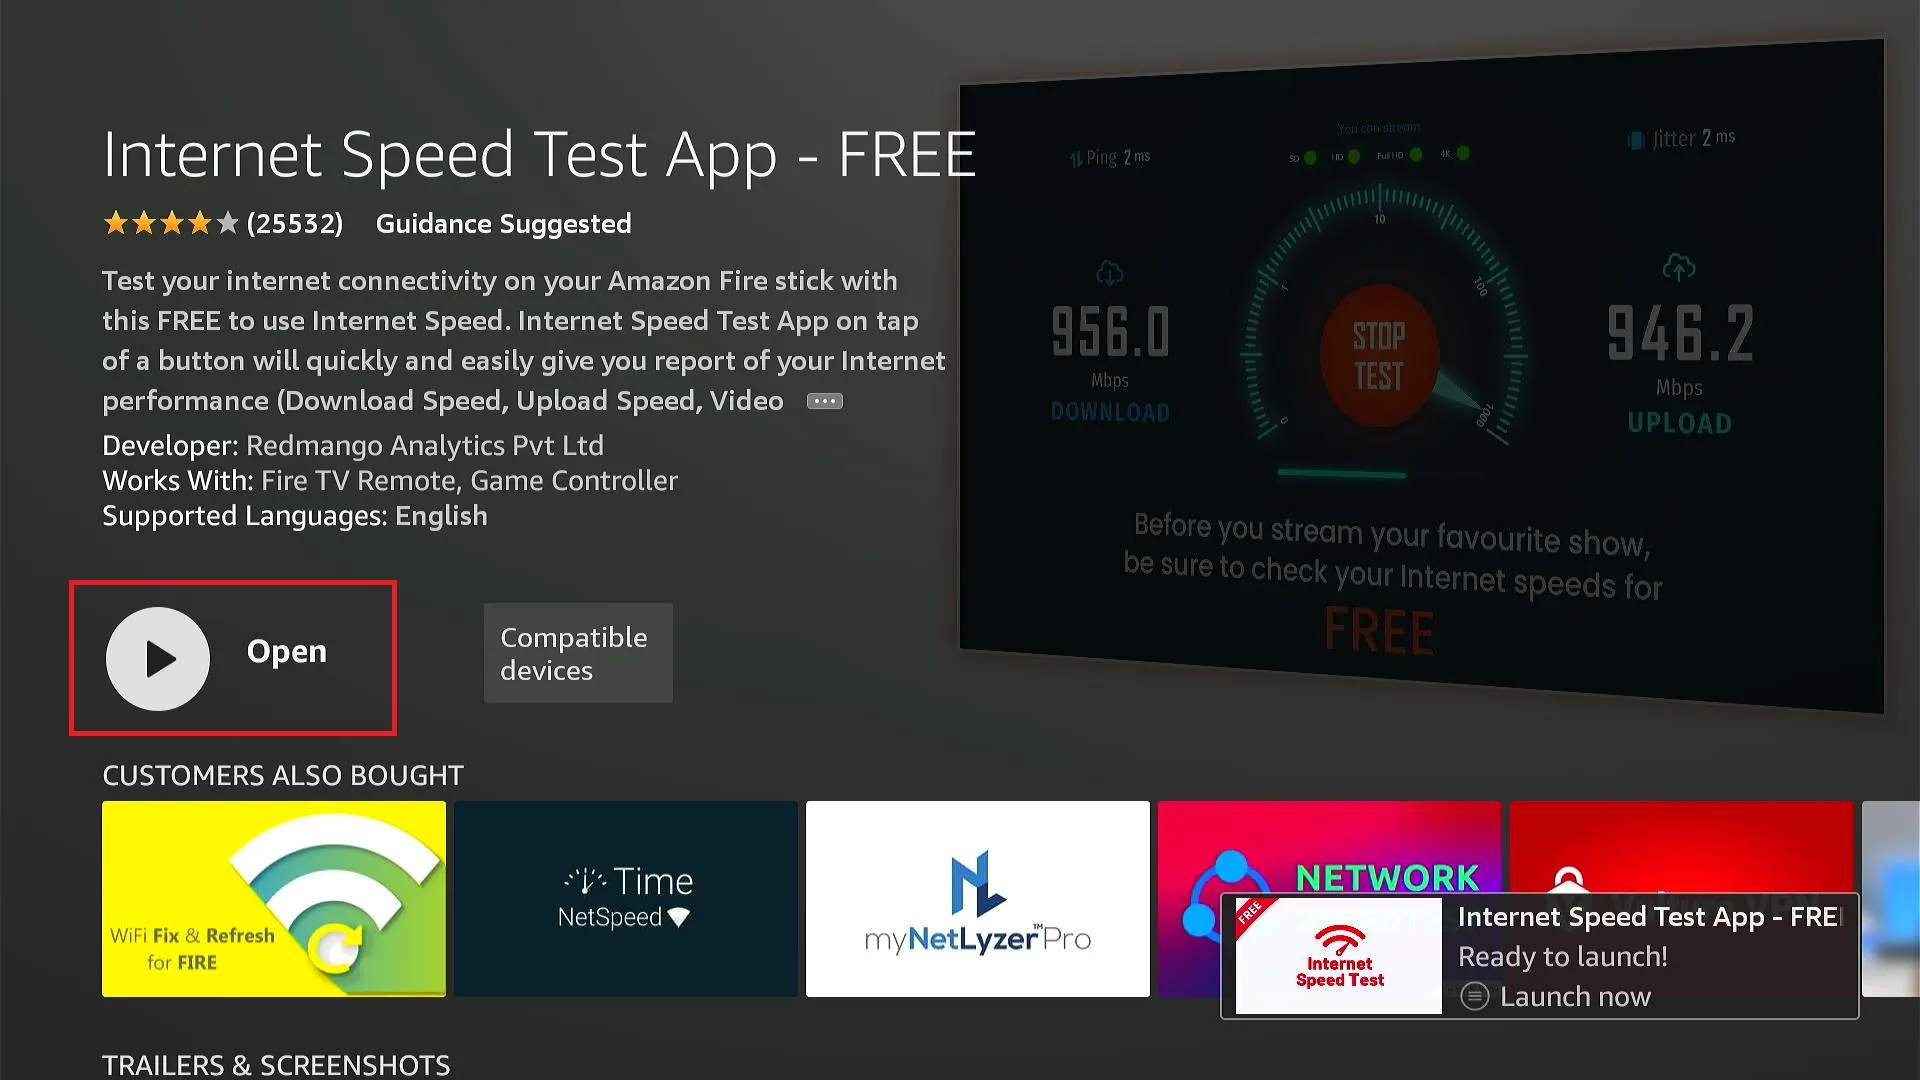
7. Click Open to launch the app.
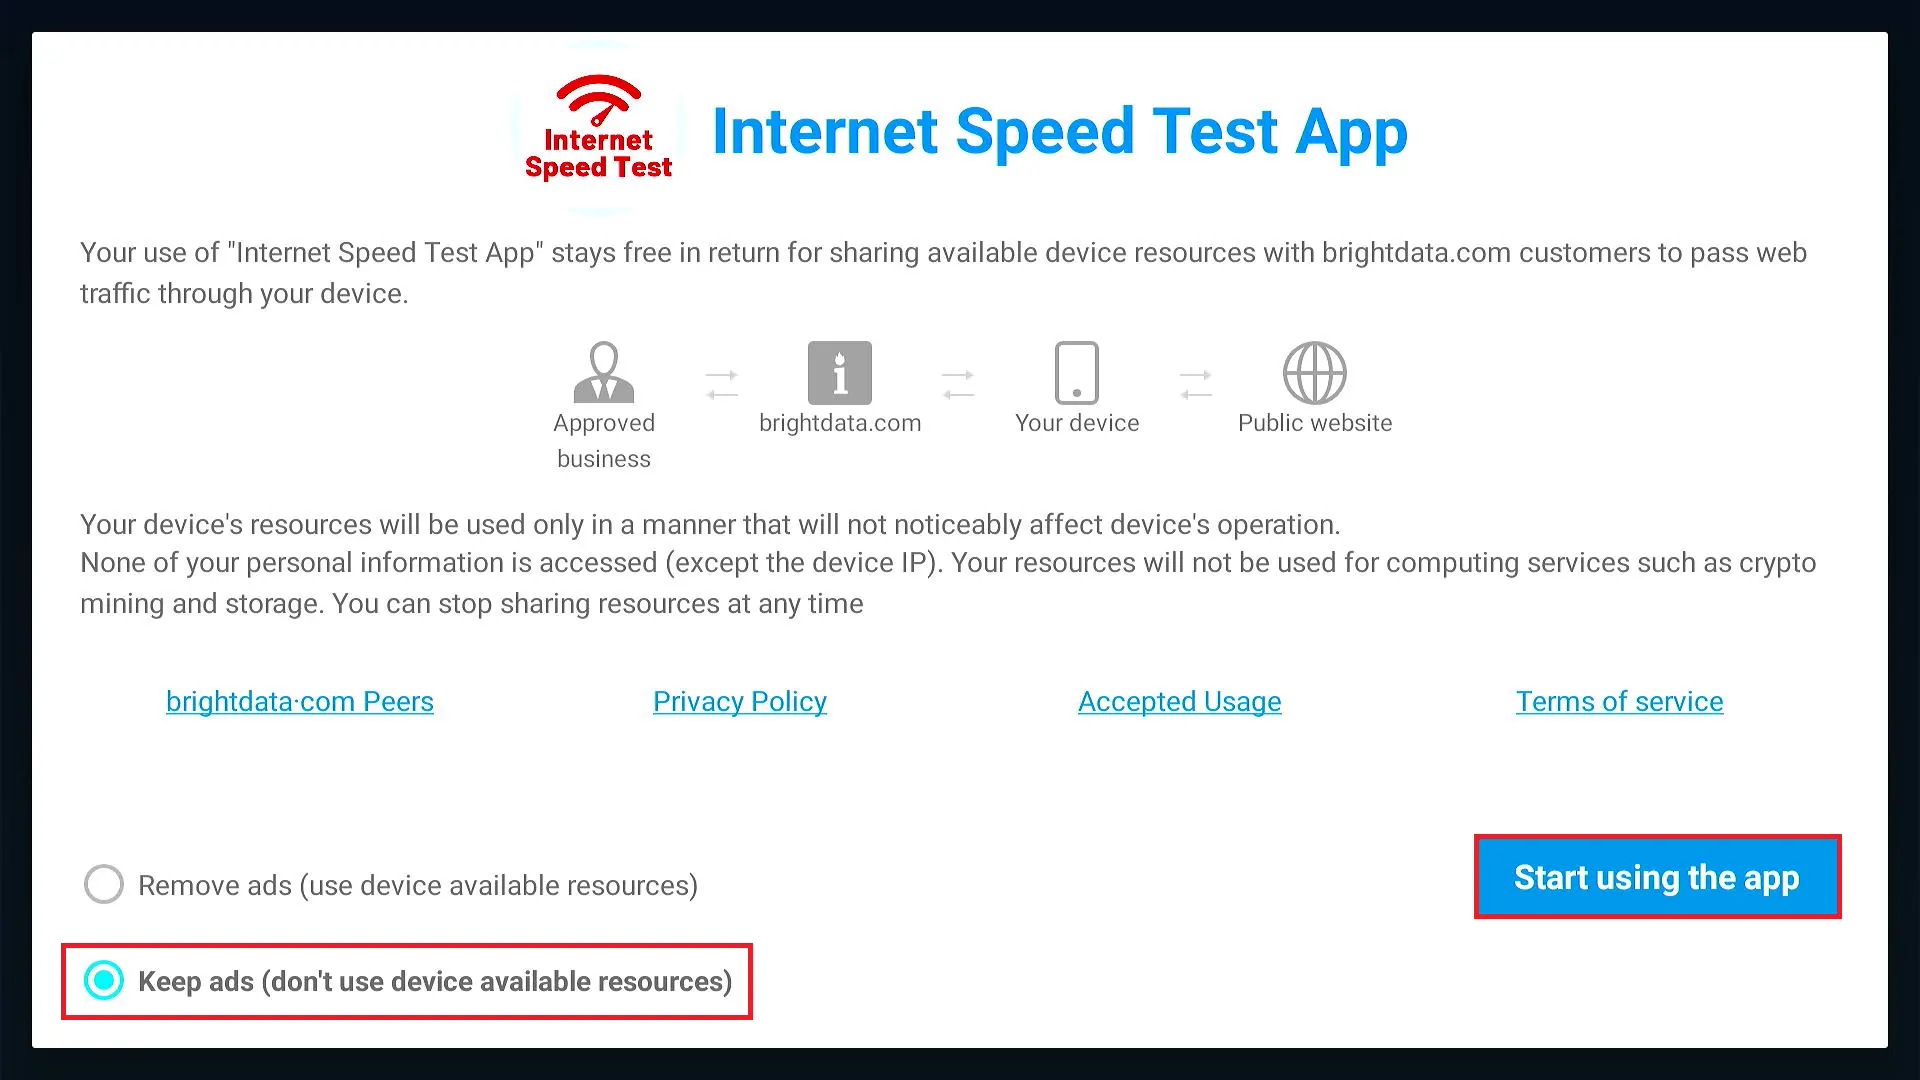
8. The Internet Speed Test App will use your device resources even though it is an official app from the Amazon Store. I am choosing to keep ads and not to share my resources. Click Start using the app after selecting the desired option.
To eliminate ads and prevent your resources from being utilized, consider connecting to ExpressVPN.
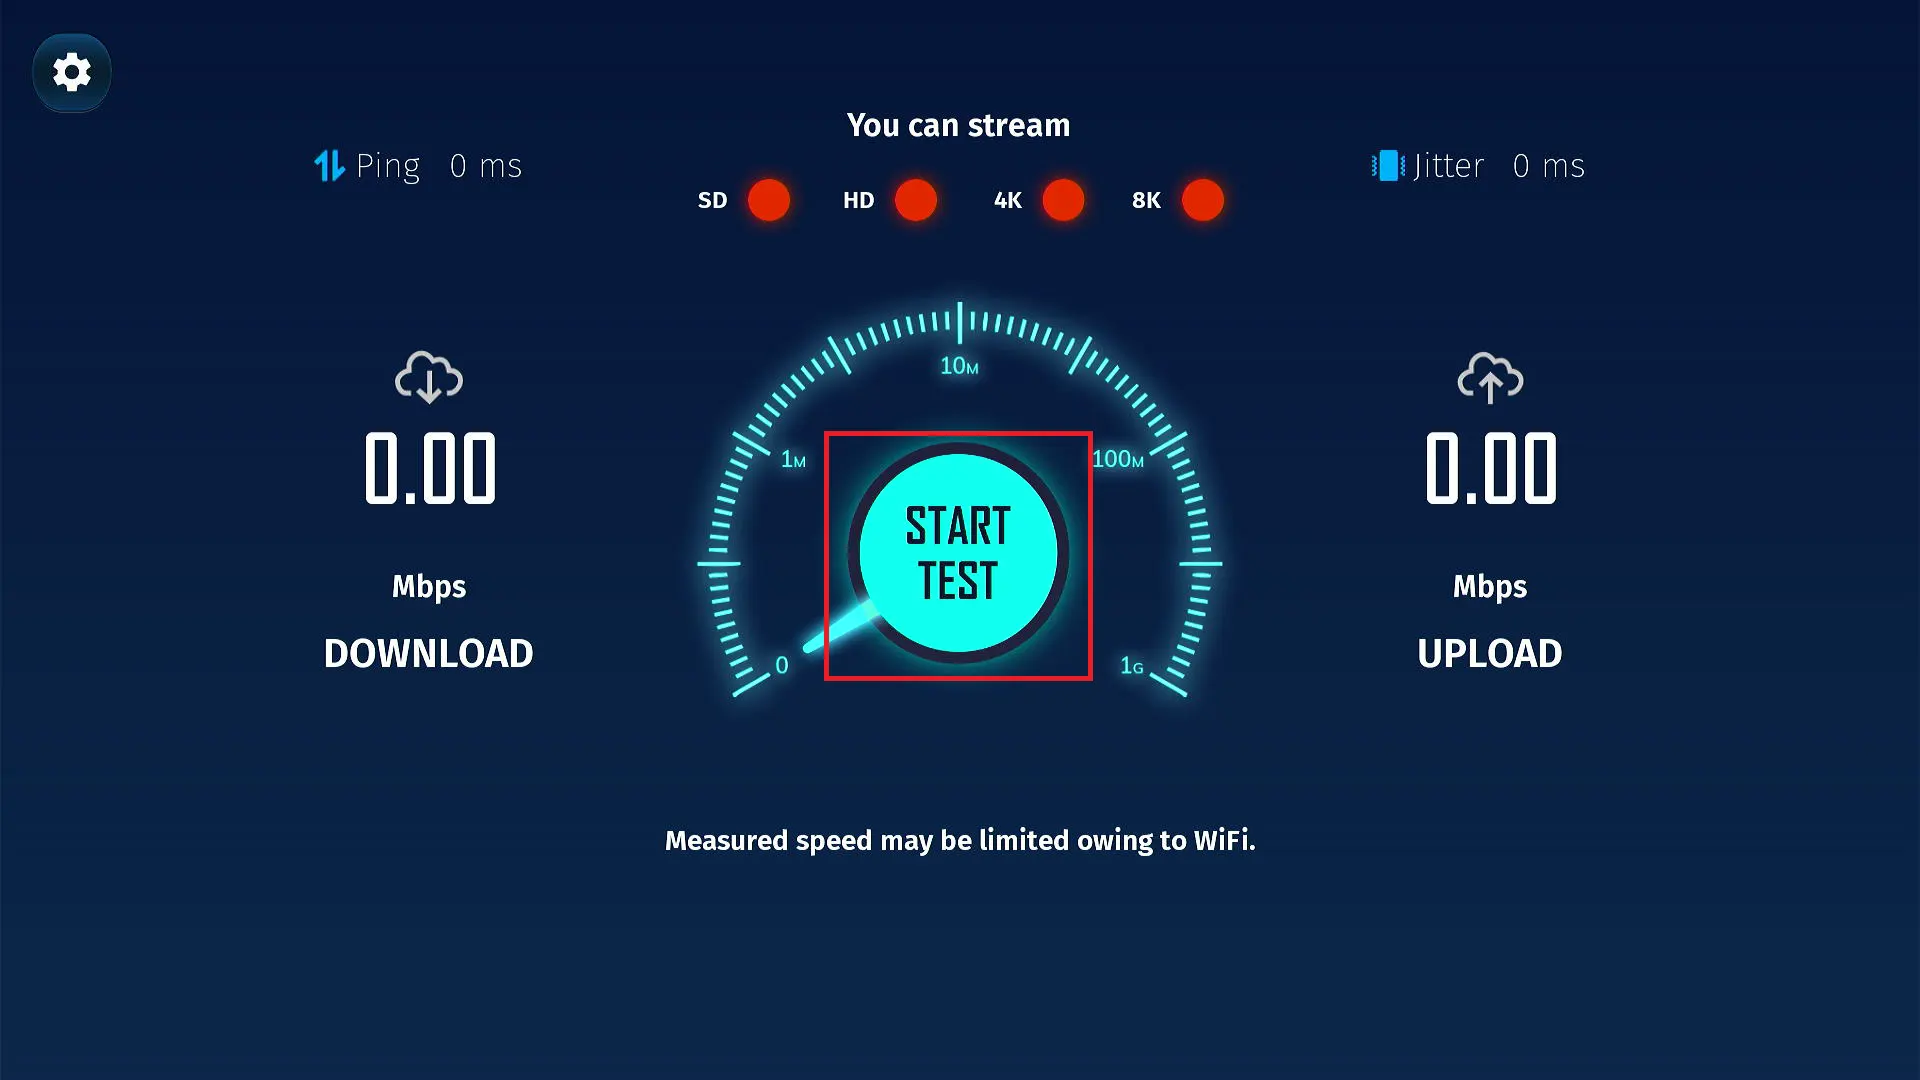
9. Click Start Test to begin the test.
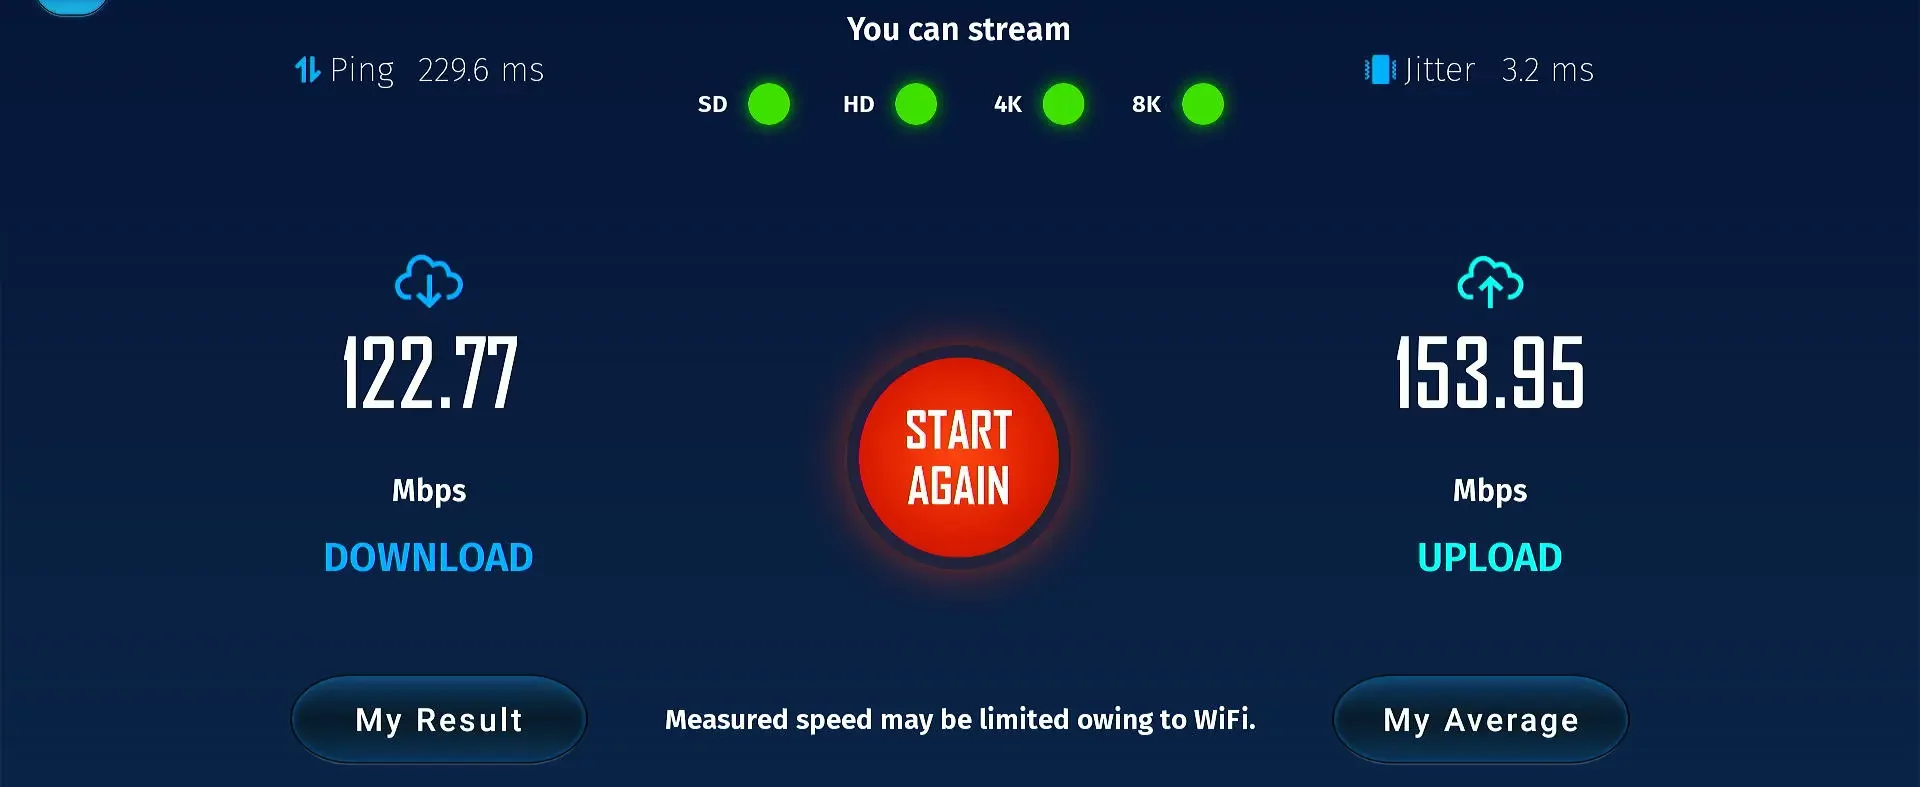
10. Wait for a minute. Once the test is complete, the app will display the results.
Wrapping Up
In summary, our Superboost guide transforms your Amazon FireStick into the ultimate entertainment hub. You’ve secured your streaming with ExpressVPN and expanded your content options with tools like Kodi and addons like The Crew and TV One.
Apps like Cinema HD and Live Net TV, along with Real Debrid for premium links, give you more choices. To enhance performance, we recommend tools like Fast Task Killer and the Internet Speed Test App.
Now, enjoy limitless entertainment on your FireStick. Grab your remote and dive into movies, shows, sports, and live TV. Happy streaming!
