This guide aims to help you install 9 Lives Kodi addon on your favorite device. I took the images used in this post on Windows 11. However, since Kodi has an identical display across devices, you can use the instructions to install the addon on FireStick, FireStick Lite, 4K, 4K Max, Fire TV Cube, all Android TVs and Boxes, Android and iOS mobile devices, Linux, macOS, and more.
What Is 9 Lives?
9 Lives is a Kodi addon for watching movies and shows. While you will find documentaries and other videos on 9 Lives, the addon’s primary focus is films and series.
Named after the famous adage, the cats have nine lives, this addon offers an extensive library of videos. From the latest to old-time movies and shows, you will find it all here.
You can enhance your experience further by enabling Real Debrid and Trakt services with 9 Lives.
The addon is available on the third-party Grindhouse Repository. It is among the most popular Kodi addons for watching on-demand videos.
Attention Kodi Users!
Governments and ISPs worldwide monitor your online activities. If you use third-party Kodi addons, you should always use a reliable Kodi VPN to hide your identity and prevent issues with your streaming experience. Currently, your IP is visible to everyone.
I use ExpressVPN, the fastest and most secure VPN in the industry. It is very easy to install on any device, including Amazon Fire TV Stick, PC, Mac, and Smartphones. It also includes a 30-day money-back guarantee. If you're not satisfied with their service, you can request a refund. ExpressVPN is offering a special NEW YEAR deal: get 4 months free and save 78% on the 2-year plan.
Install and Use Best Kodi VPN | Why you must use a VPN at all times
Is Nine Lives Safe & Legal?
9 Lives is from the Grindhouse Repository. Unfortunately, this repository comes from an unofficial source. Therefore, it is essential to verify the repository for safety.
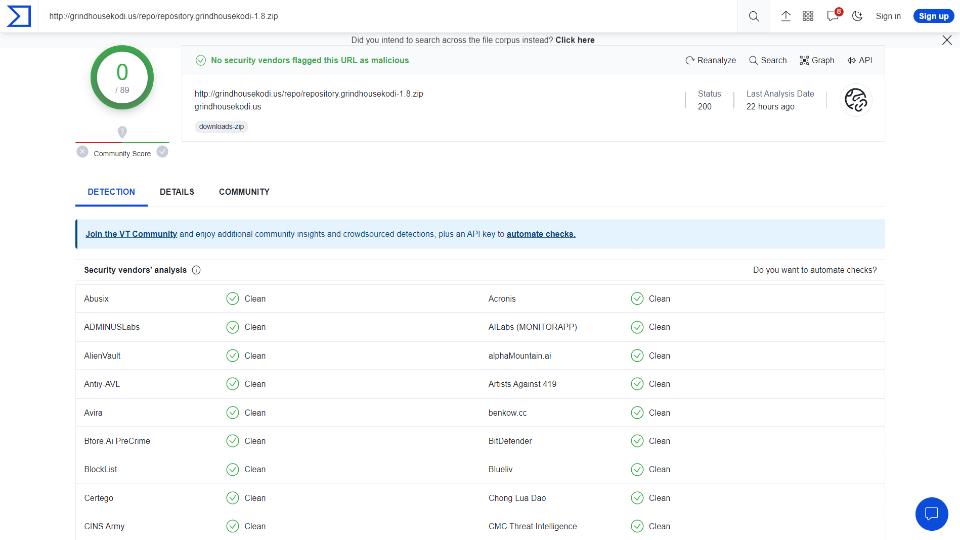
I am using Virus Total to scan the installation file of the repository. The scan shows that 1 out of 79 vendors has flagged the file as suspicious. However, none of them have flagged it as malicious. You can see this in the scan result enclosed below:
Nine Lives Kodi addon uses scraping technology to scoop out streaming links from dozens of global providers. Unfortunately, FireStickTricks does not have the necessary resources to investigate each provider independently. Therefore, we cannot confirm whether streaming from the Nine Lives addon will violate copyright laws.
There is a solid chance of running into unauthorized streams from these sketchy providers. Therefore, I recommend you stick to the public-domain videos if you can identify them. However, if unsure, get ExpressVPN and hide your online activities from everyone.
How to Install Nine Lives Kodi Addon
9 Lives Kodi addon comes from the unofficial repository Grindhouse. Therefore, you will need to provide the source web address and install the Grindhouse repository before installing the Nine Lives addon. I will take you through the entire process in three parts as follows:
Legal Disclaimer: This guide is for informational purposes only. FireStickTricks.com does not own, host, operate, resell, or distribute any apps, services, or content mentioned.
Part 1: Enable Installation of Grindhouse Repository
By “Enable Installation,” I mean we remove Kodi’s restriction on sideloading external addons and repositories. It’s easy. Follow the steps below:
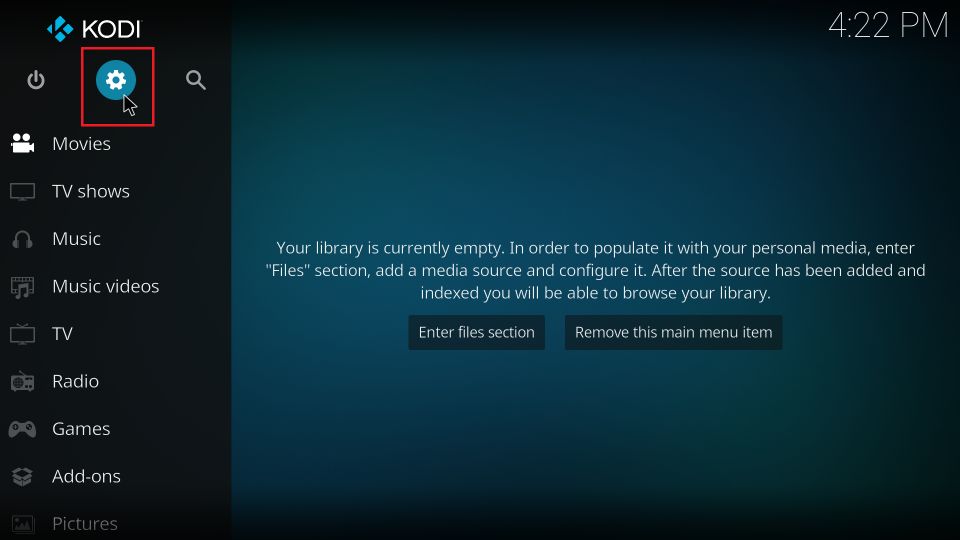
1. Run the Kodi app and when the home screen loads up, click the cogwheel icon in the top-left corner. It will open Settings.
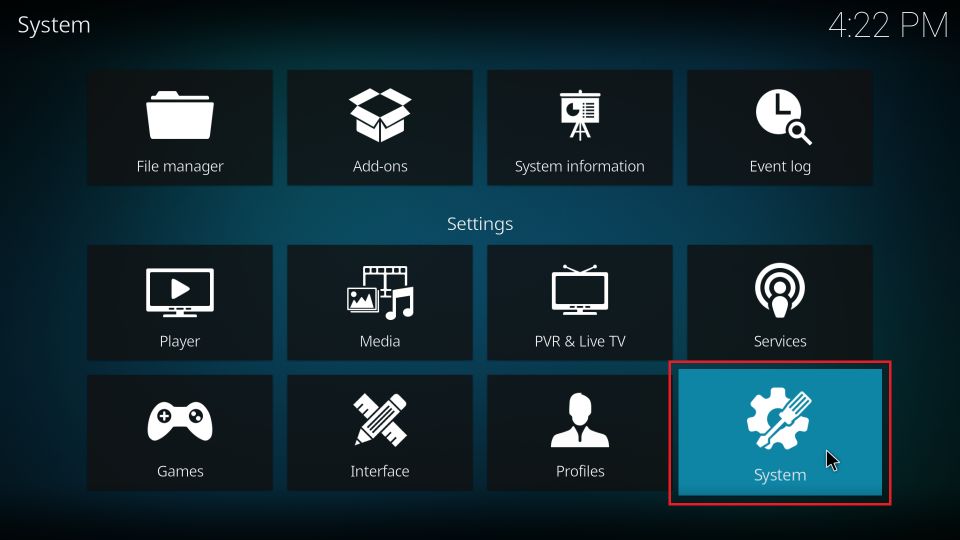
2. Click System.
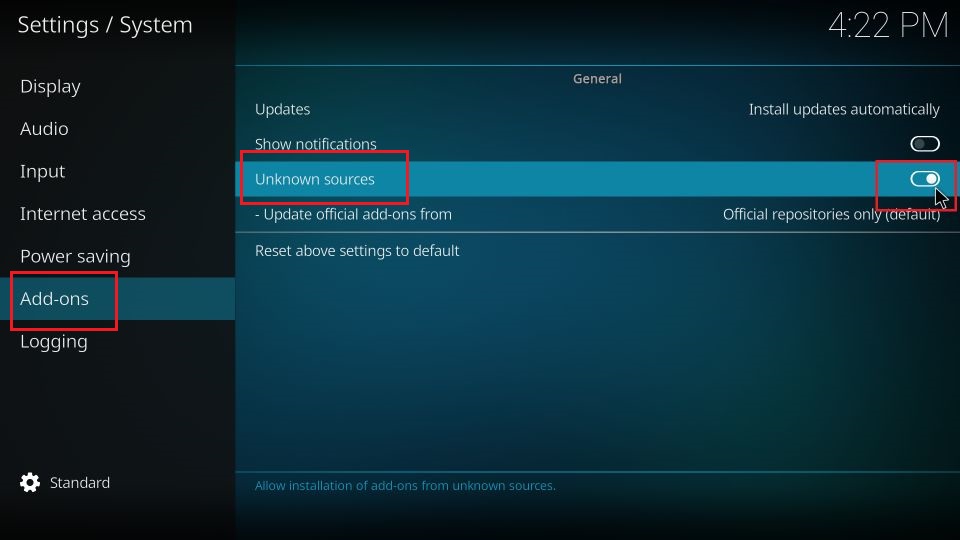
3. Click Add-ons in the side panel and click Unknown Sources on the right. The idea is to flip the switch to enable the option. By default, it is off.
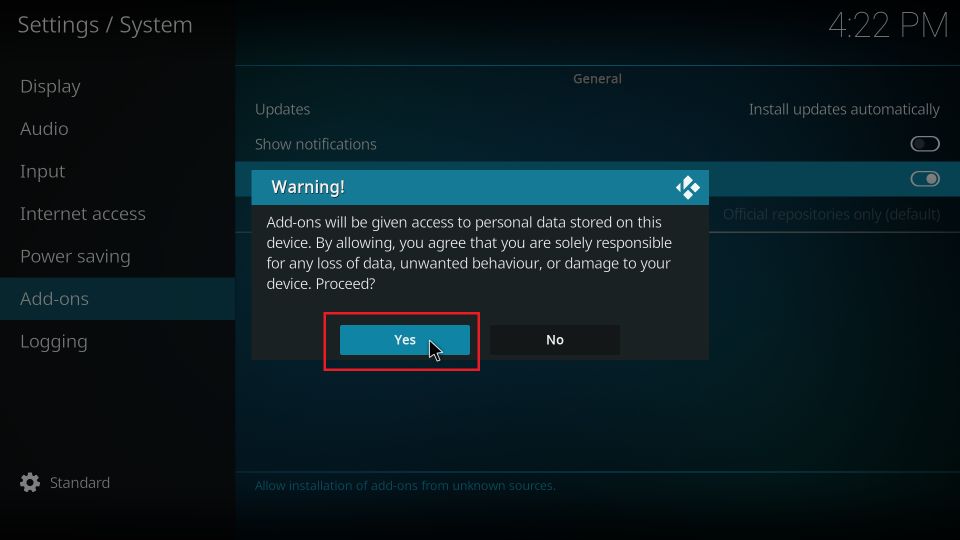
4. Click Yes on the prompt.
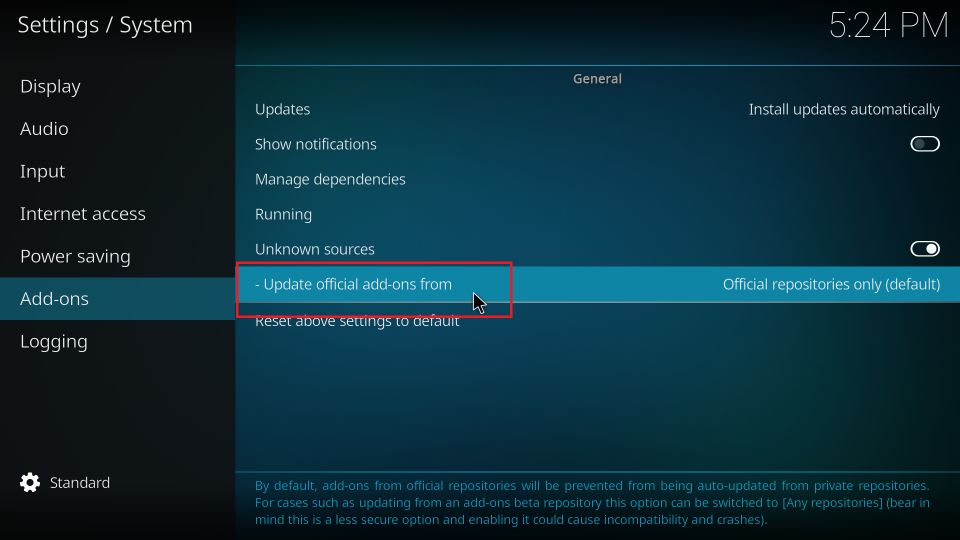
5. You may now click the option Update official add-ons from. It is not mandatory because it is not related to the installation of the 9 Lives addon. However, I recommend it because it will ensure your addons are updated timely.
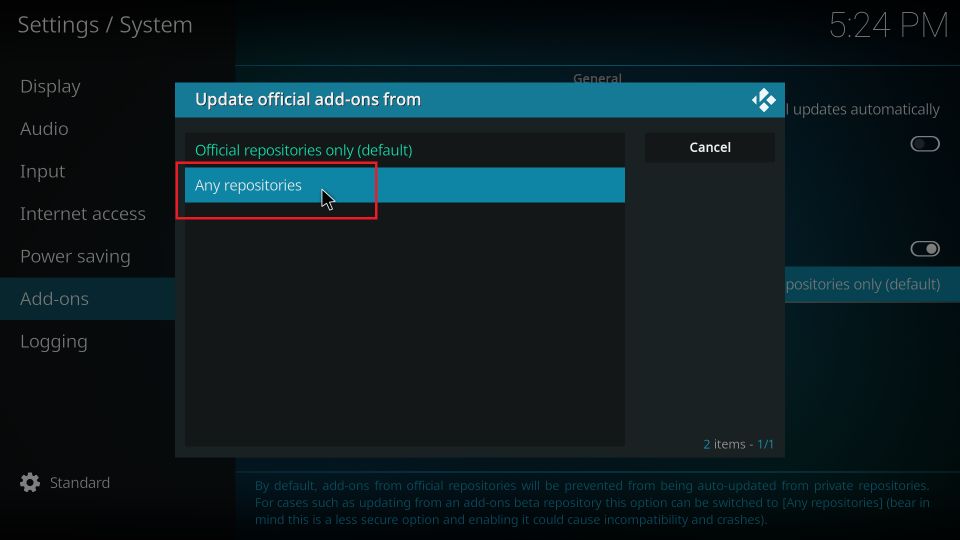
6. Choose Any Repositories on the popup window.
Part 2: Add the Grindhouse Repository Source Address
The Grindhouse repository is hosted on an external website. We will provide the URL or location of the website in this part. Here are the steps:
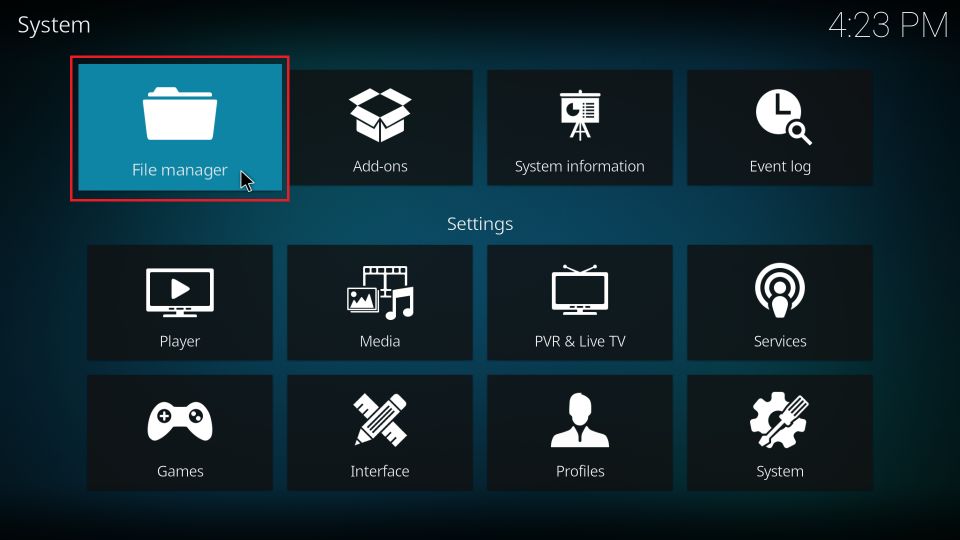
1. Go to Kodi Settings again and choose File manager.
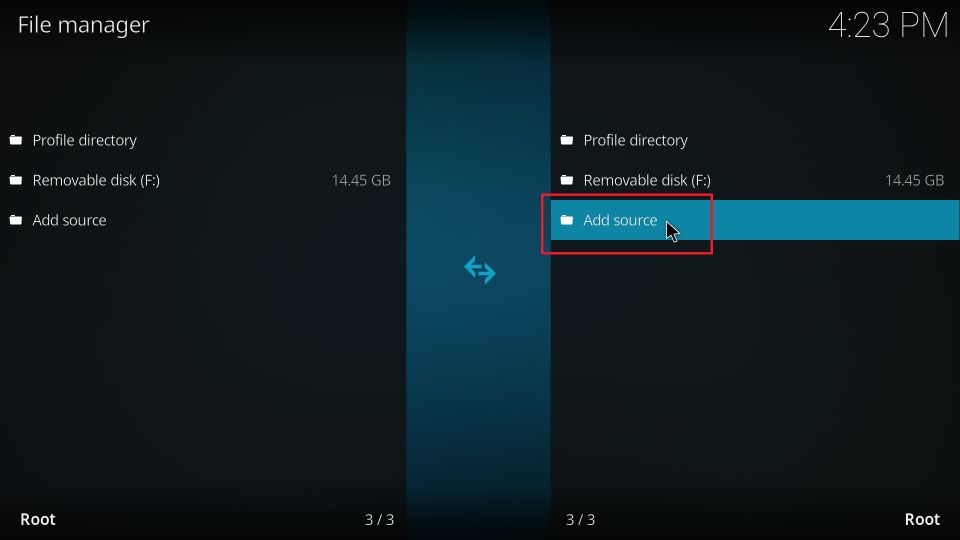
2. Click the option Add source once (or twice if needed).
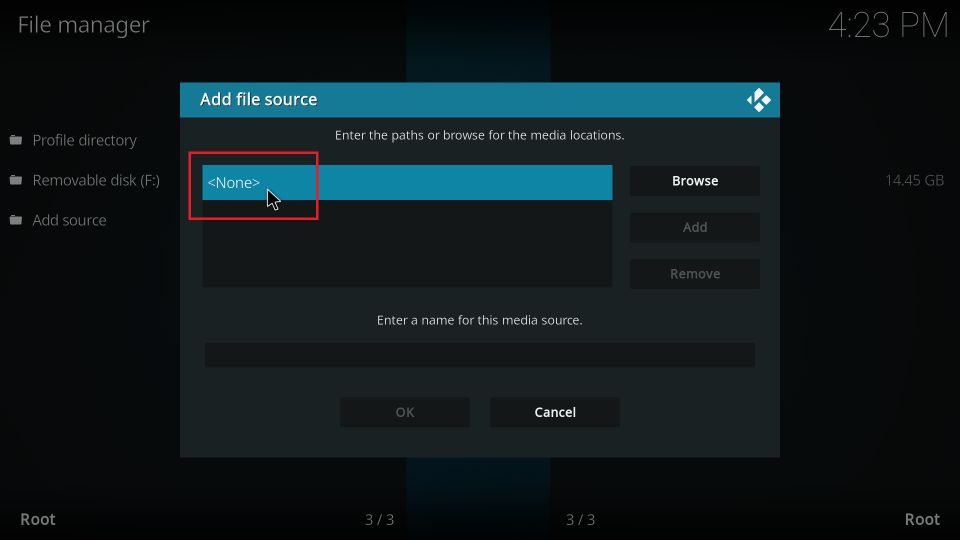
3. Click <None> on the popup window to add the source location.
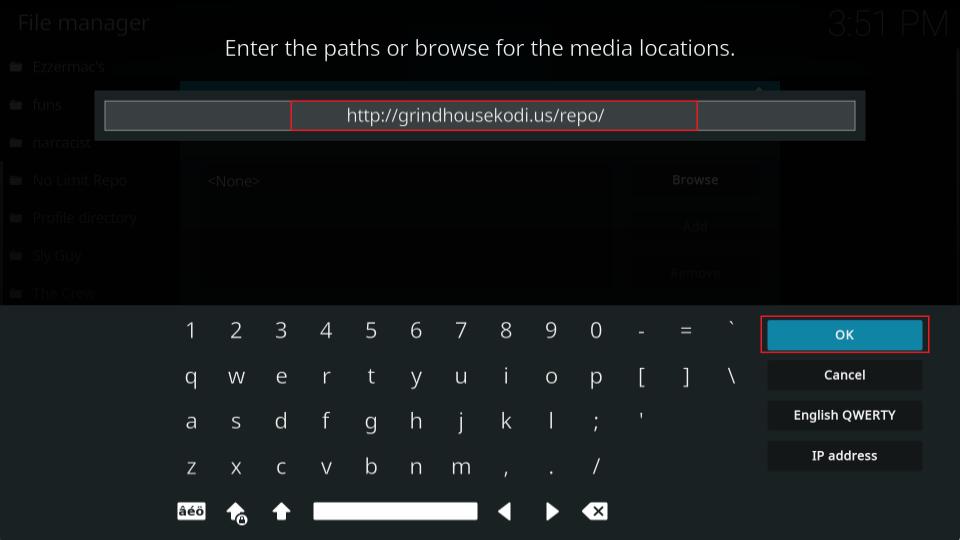
4. Type http://grindhousekodi.us/repo in the input box and then click OK. Proofread the web address at least once to ensure it does not contain typos.
Note: The URL hosts the Grindhouse Repository. It points to the source saved on an external location. FireStickTricks.com does not have any association with the developers.
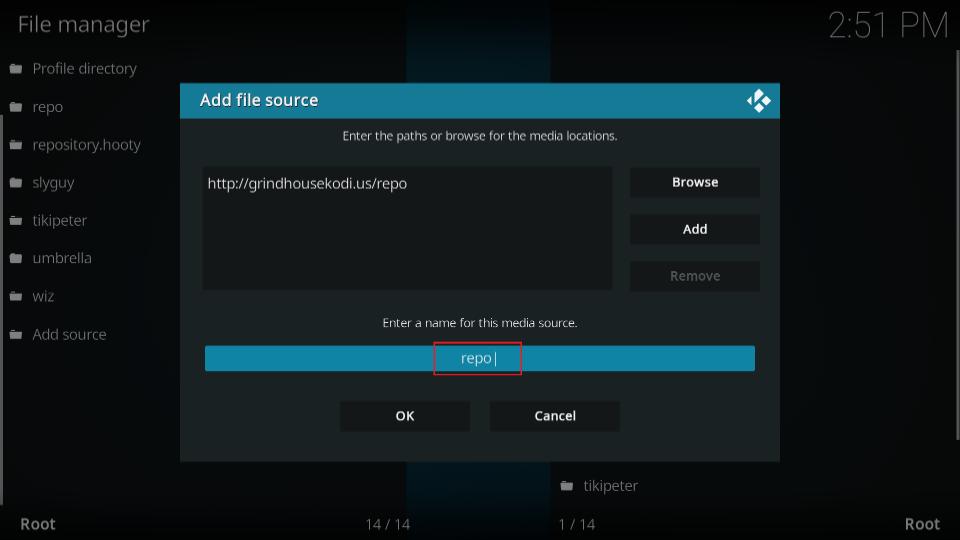
5. The default source name is “repo” (marked in the image below). You may keep this name, but I recommend changing it to something more relevant. You will need it later. Click the text box to change it.
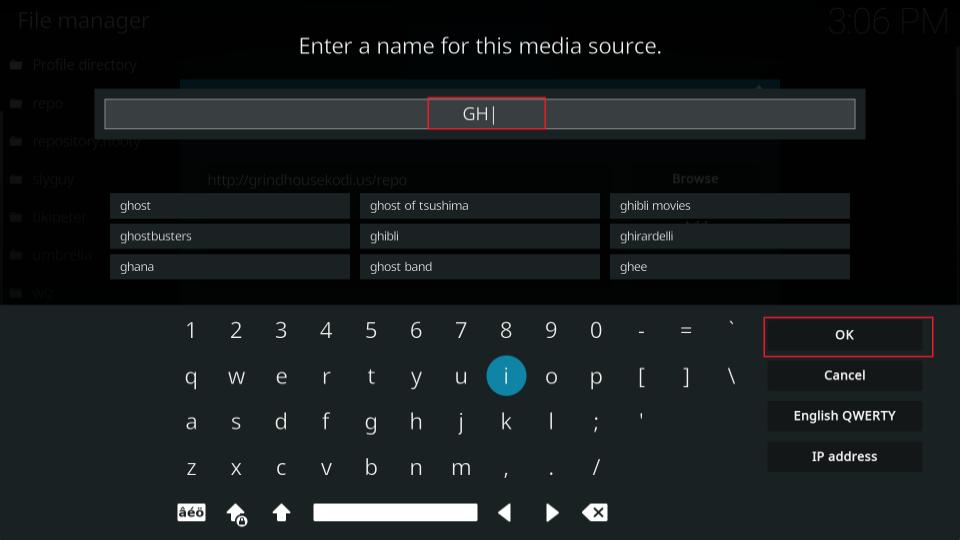
6. Delete the existing value and then type GH. Finally, click OK to accept the new name.
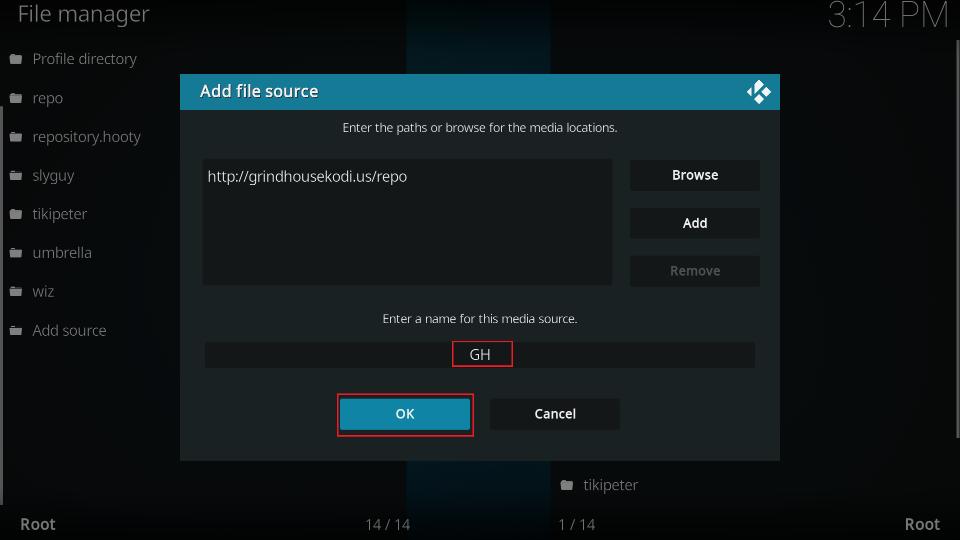
7. The new name GH replaces “repo.” Click OK and save the repository source.
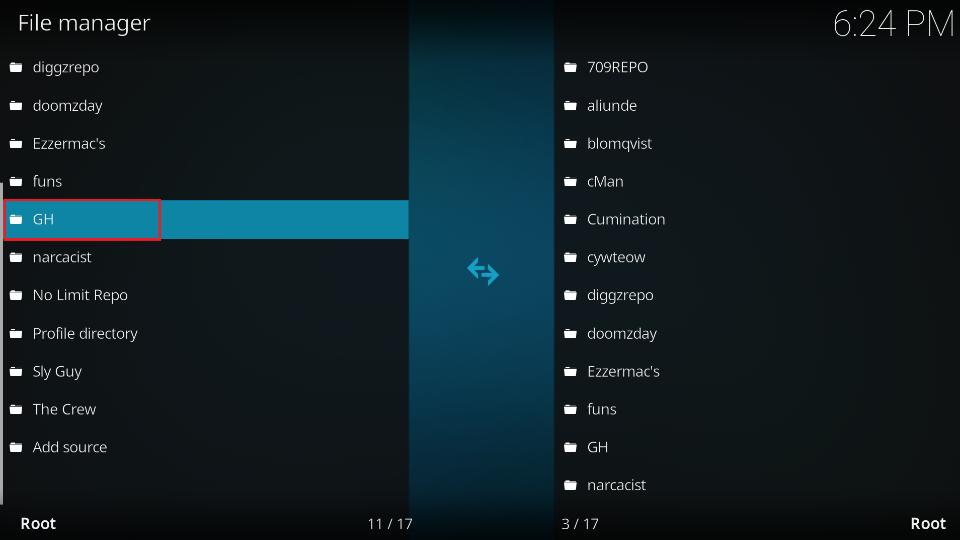
8. The name GH is visible on this window.
Part 3: Install 9 Lives Kodi Addon
We will install the Grindhouse Repository in this section. Afterward, we will get the 9 Lives addon from the repository. Let’s start with the following:
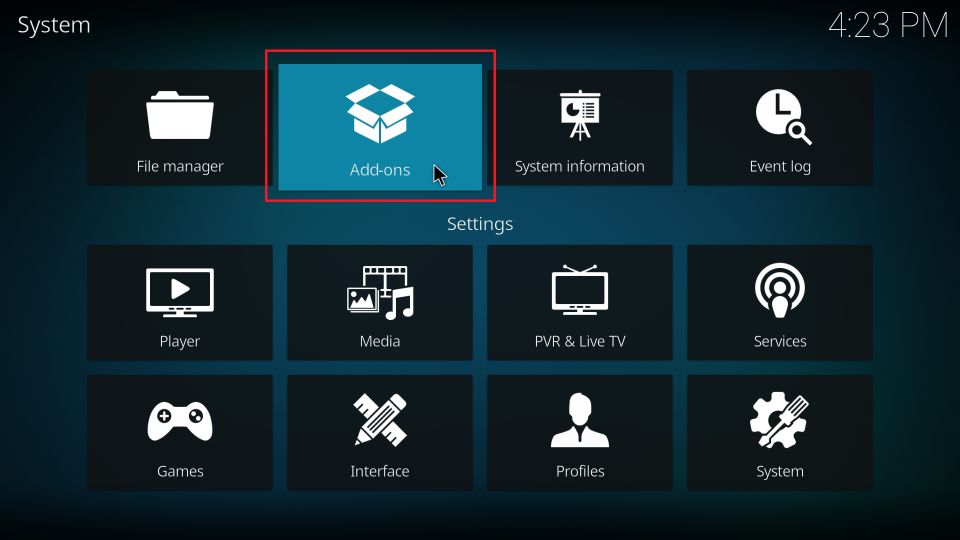
1. Navigate to the Kodi Settings page from the home screen one last time.
2. Click Add-ons on the following screen.
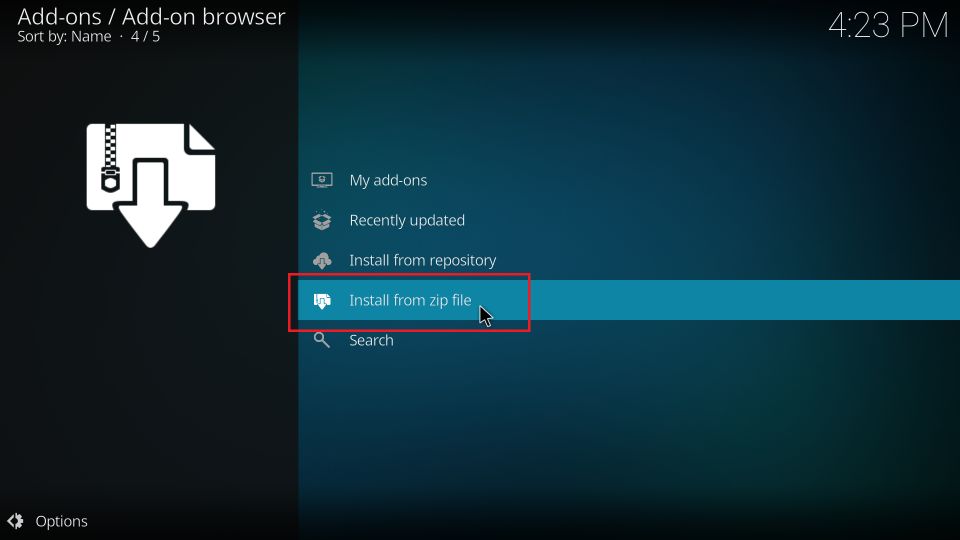
3. Open the item Install from zip file.
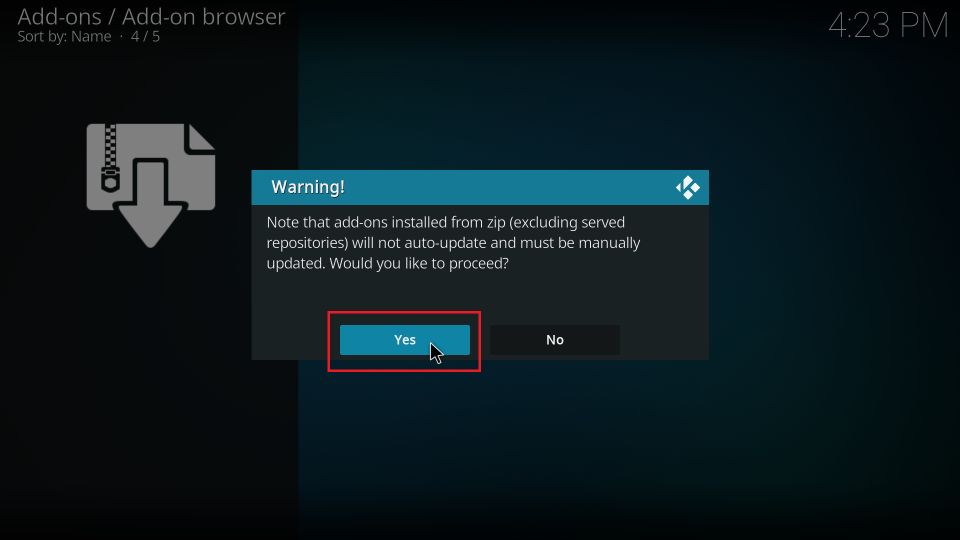
4. Click Yes when this prompt appears (it does not appear on Kodi 21 Omega or Kodi 20 Nexus).
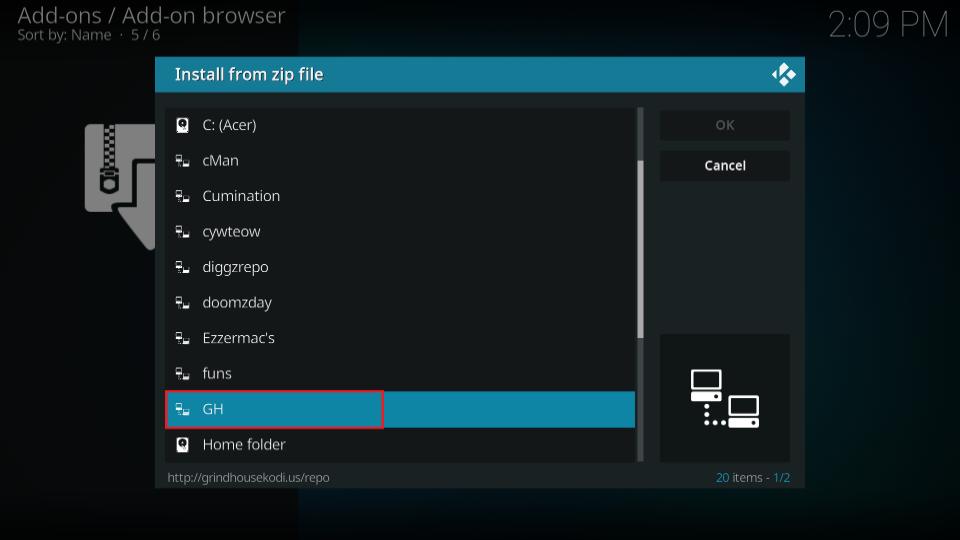
5. Click GH or any other repository media source name you picked earlier.
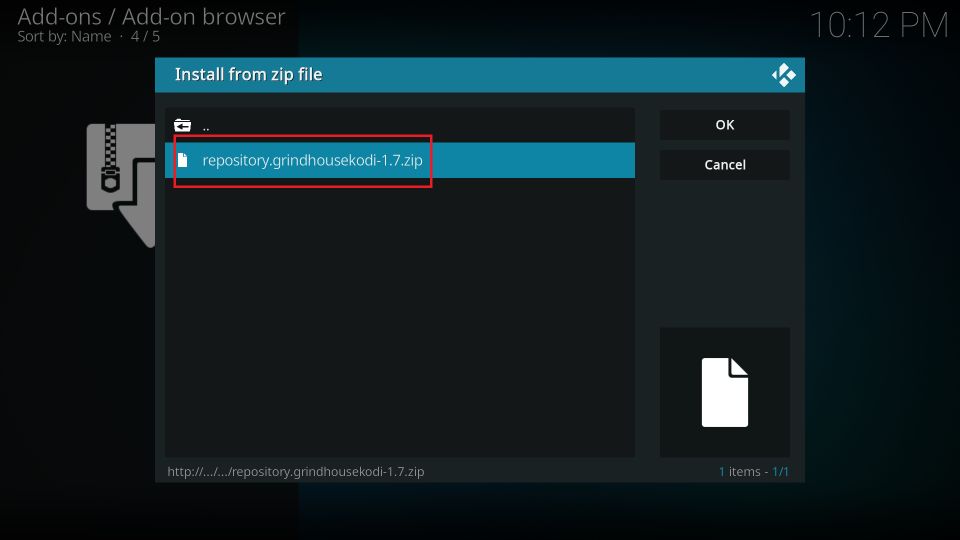
6. Click the zip file on this screen named repository.grindhousekodi-x.x.zip. The file number keeps changing. That’s why I have substituted it with x.x.
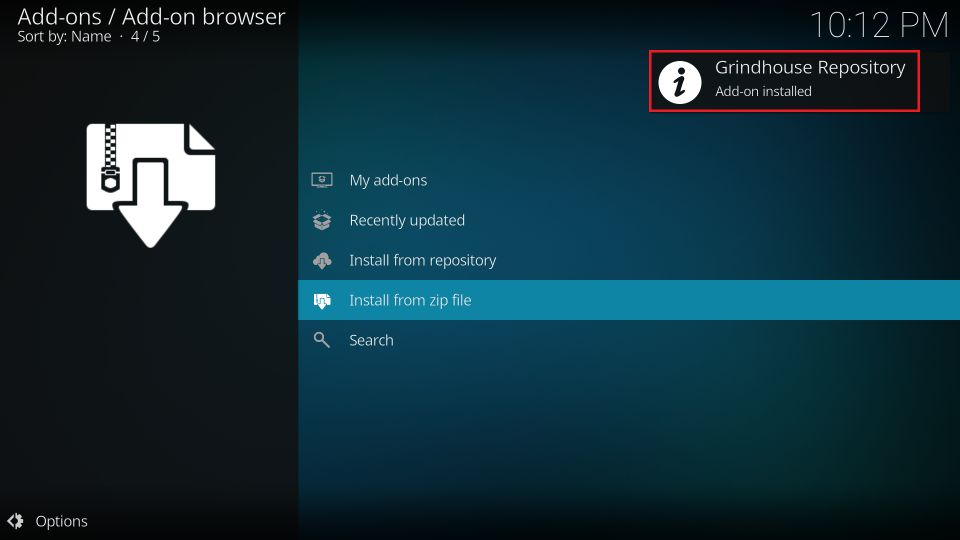
7. You will see the Grindhouse Repository installation confirmation in the upper-right part of the screen in some time. Stay on this window.
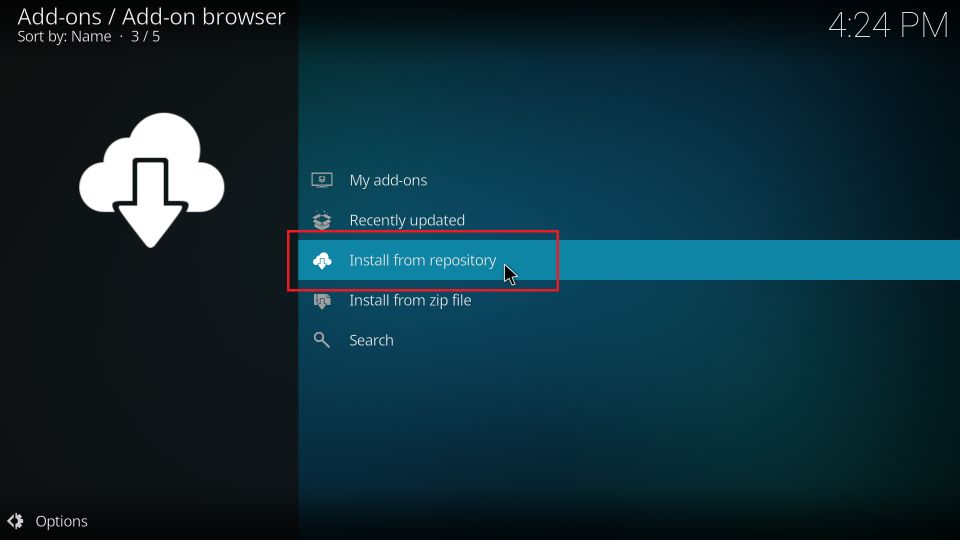
8. Click Install from repository.
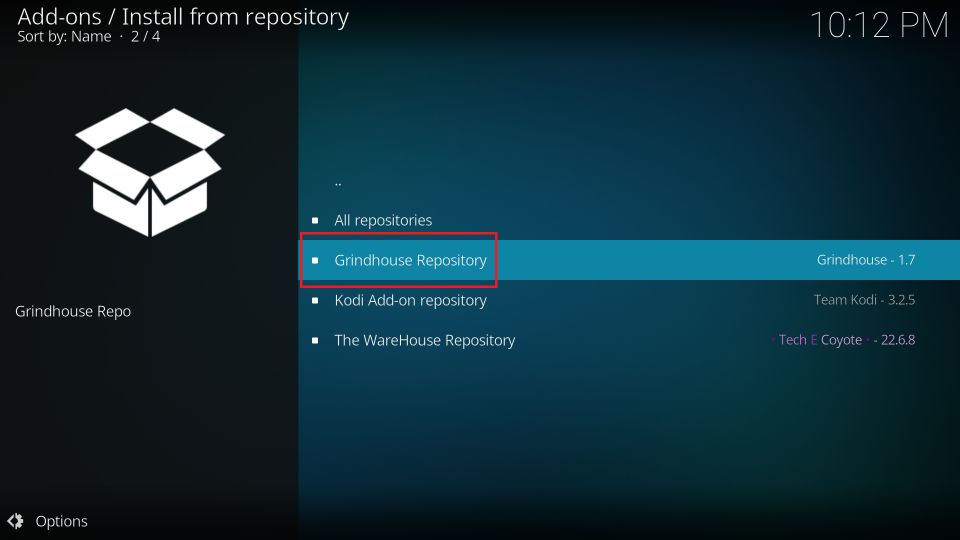
9. On the next window, click the Grindhouse Repository you just installed.
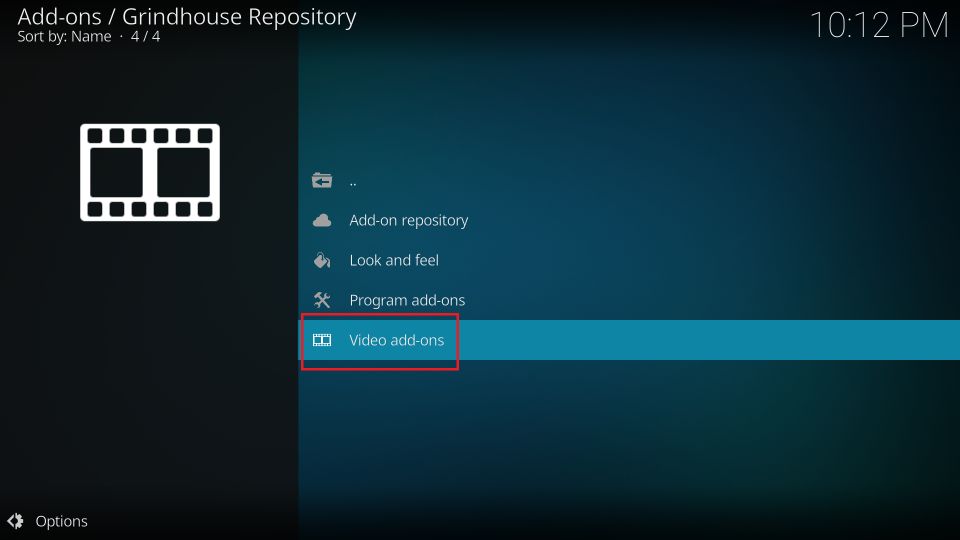
10. Click Video add-ons on the following screen.
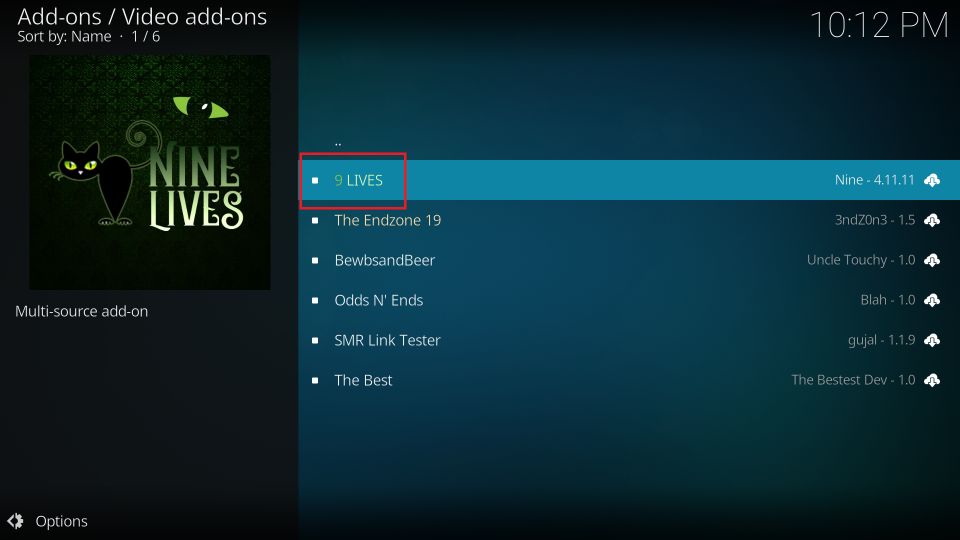
11. Click the 9 Lives addon entry here.
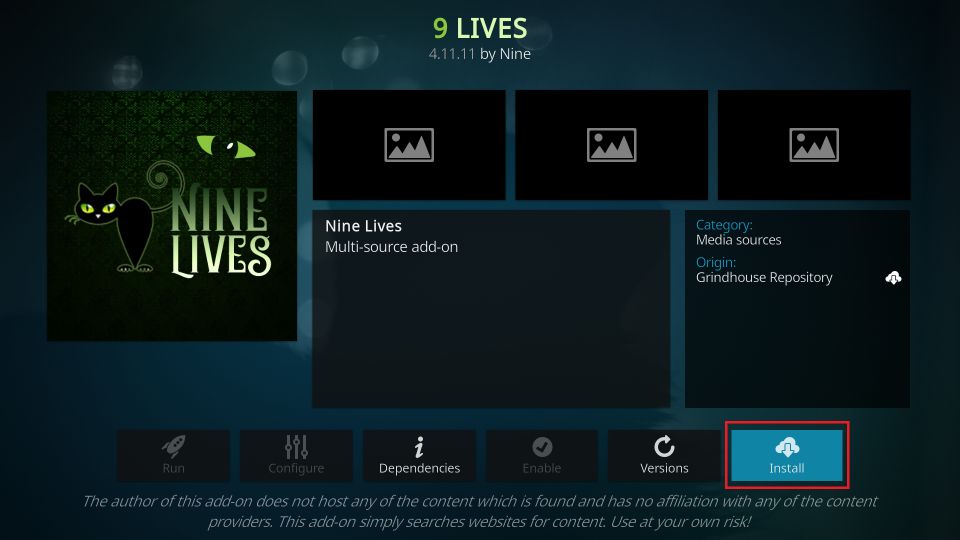
12. You should now see this window which gives you a brief overview of the 9 Lives addon and looks like a dashboard. Click Install.
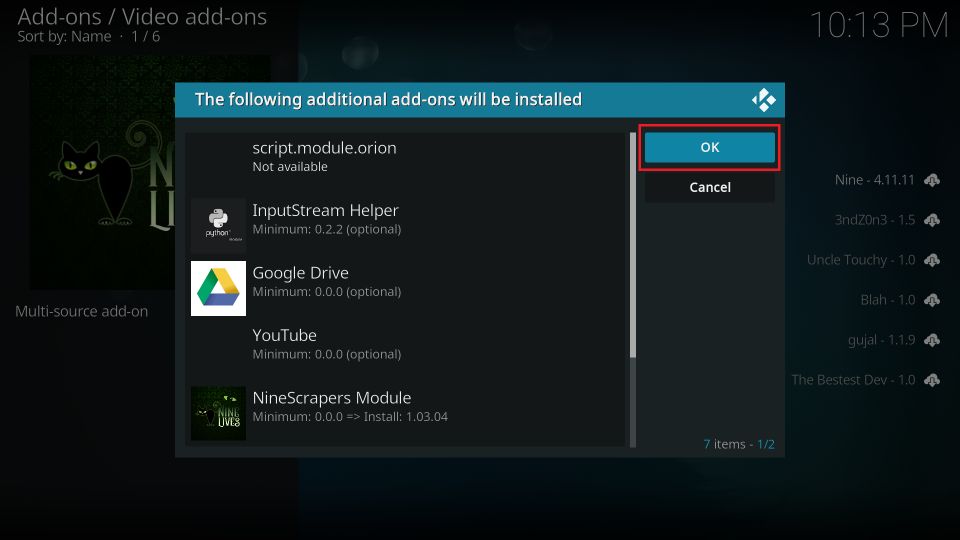
13. Another window displays supporting addons required for 9 Lives to work. Click OK.
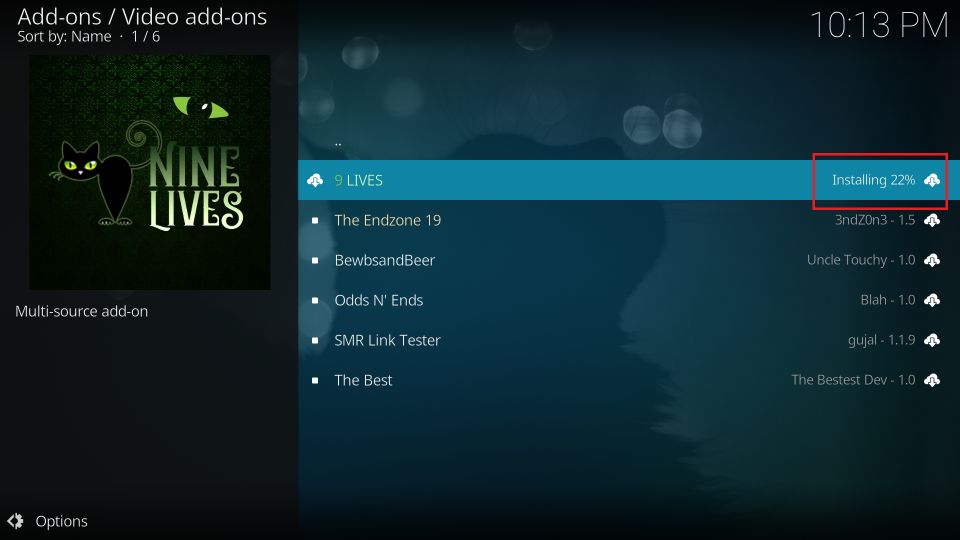
14. You can observe the installation progress on the screen. Usually, it takes less than a minute.
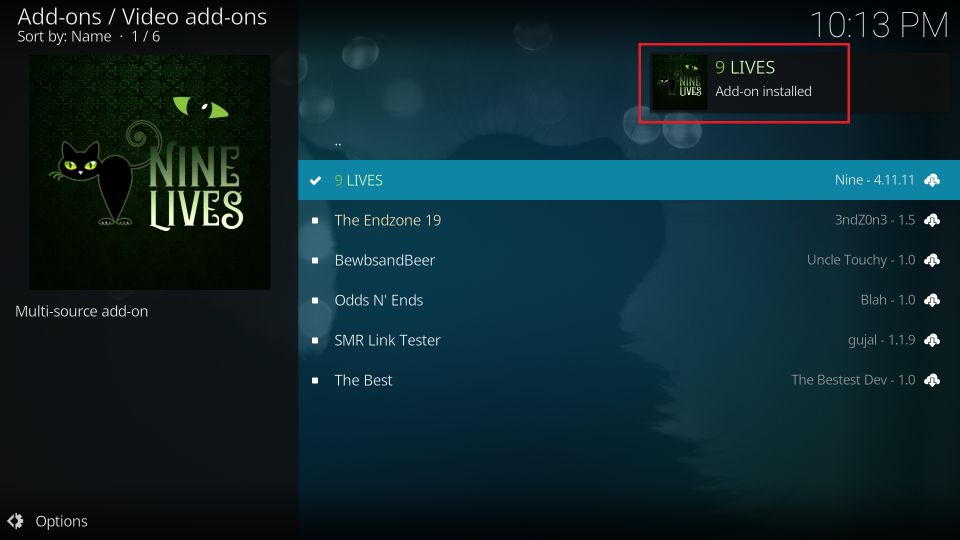
15. In a short while, a notification will pop up in the screen’s upper-right corner. This notification confirms the installation of the 9 Lives addon
That’s it! You have successfully installed the 9 Lives Kodi addon.
Before you start streaming with Kodi Addons or Builds, I would like to warn you that everything you stream on Kodi is visible to your ISP and Government. This means, streaming copyrighted content (free movies, TV shows, live TV, and Sports) might get you into legal trouble.
Thankfully, there is a foolproof way to keep all your streaming activities hidden from your ISP and the Government. All you need is a good VPN for Kodi. A VPN will mask your original IP which is and will help you bypass Online Surveillance, ISP throttling, and content geo-restrictions.
I personally use and recommend ExpressVPN, which is the fastest and most secure VPN. It is compatible with all kinds of streaming apps and devices.
NOTE: We do not encourage the violation of copyright laws. But, what if you end up streaming content from an illegitimate source unintentionally? It is not always easy to tell the difference between a legit and illegal source.
So, before you start streaming on Kodi, here's how to get VPN protection in 3 simple steps.
Step 1: Get the ExpressVPN subscription HERE. It comes with a 30-day money-back guarantee. Meaning, you can use it free for the first 30-days and if you are not satisfied with the performance (which is highly unlikely), you can ask for a full refund.
Step 2: Click HERE to download and install the ExpressVPN app on your streaming device. If you are using a FireStick, I have given the exact steps starting with Step 4 below.
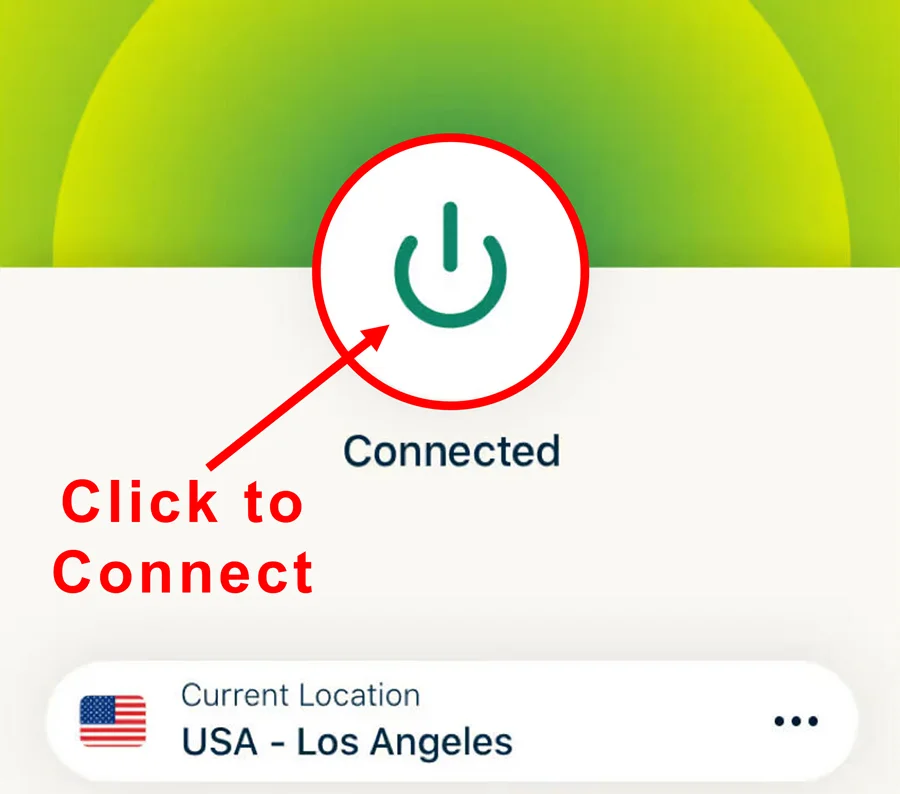
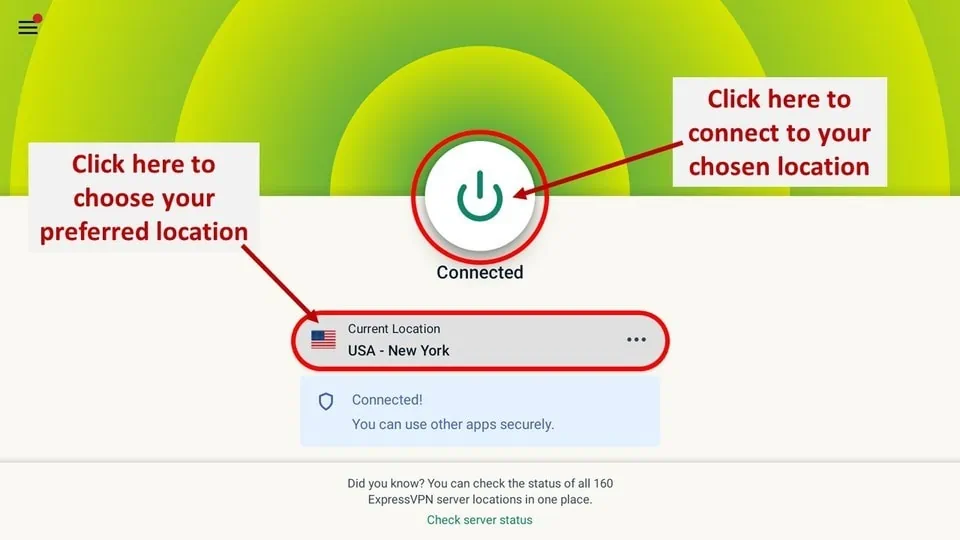
Step 3: Click the Power icon to connect to a VPN server. That's all. Your connection is now secure with the fastest and best VPN for Kodi.
The following are the steps to install Kodi VPN on your Fire TV devices. If you have other streaming devices, follow Step 1-3 above.
Step 4: Subscribe to ExpressVPN HERE (if not subscribed already).
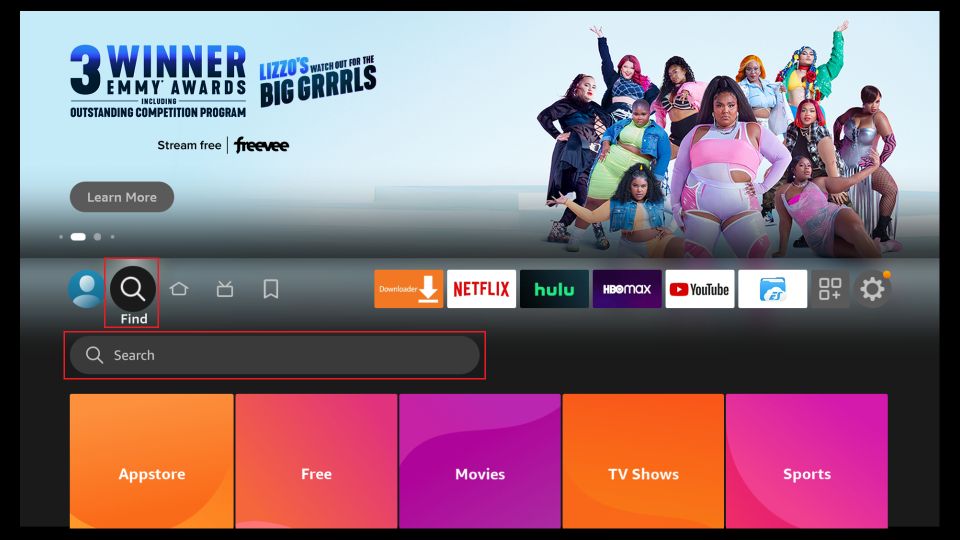
Step 5: Go to Fire TV Stick home screen. Click Find followed by Search option (see image below).
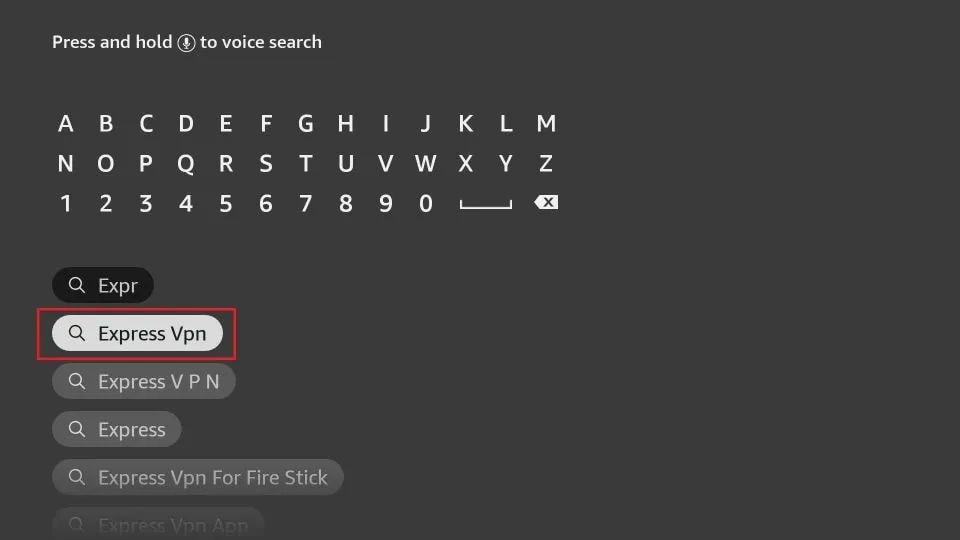
Step 6: Type Expressvpn in the search bar and select when it shows up.
Step 7: Click Download.
Step 8: Open the ExpressVPN app and Sign in using the email ID and password that you created while buying the ExpressVPN subscription.
Step 9: Click the Power icon to connect to a VPN server. That’s all. Your FireStick is now secured with the fastest VPN.
How to Use 9 Lives Kodi Addon
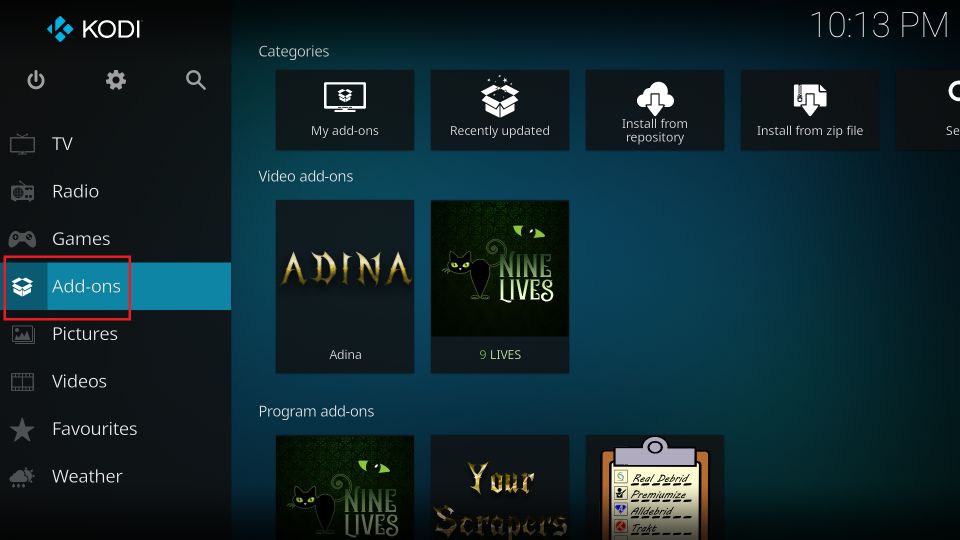
You can launch the addon from the Kodi home screen. Select Add-ons in the menu bar and find the 9 Lives addon in the Video add-ons row.
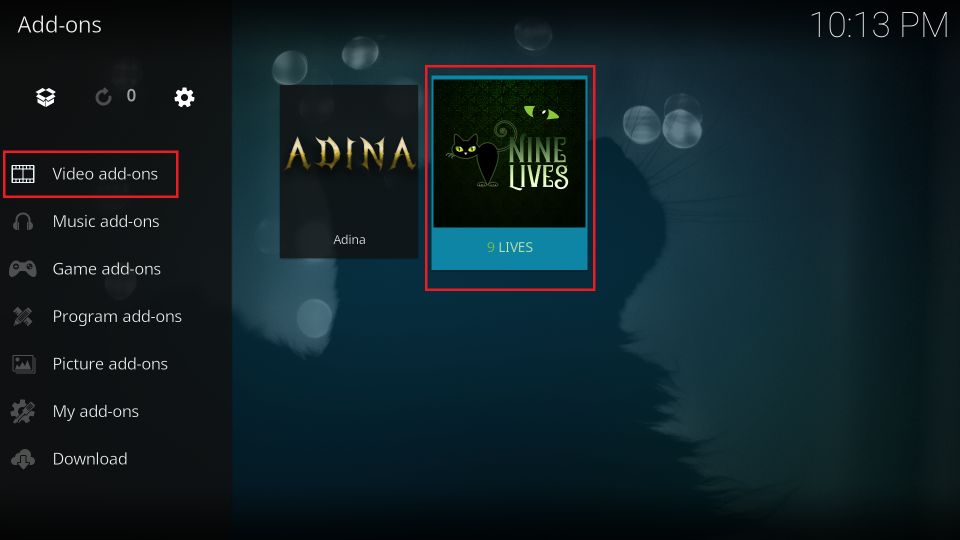
Alternatively, go to Add-ons > Video add-ons and start 9 Lives from there.
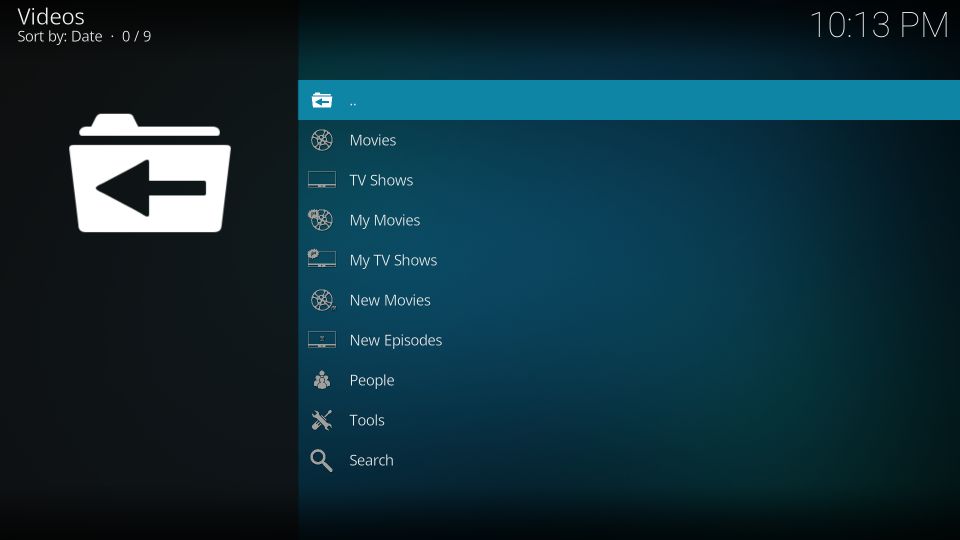
You are now on the home window of the 9 Lives Kodi addon. The interface looks strikingly similar to Exodus Redux. However, 9 Lives employs much-advanced scraping technology and works on Kodi 19 Matrix.
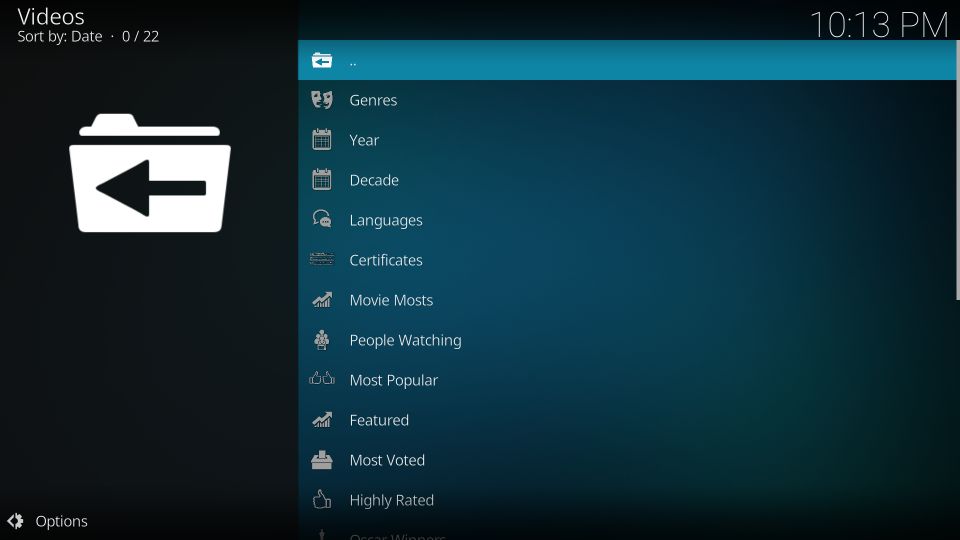
The addon features two primary categories – Movies and TV Shows. Click one of them to explore their subcategories. For instance, within Movies, you can browse videos in Genres, Year, Decade, Languages, and several other subsections.
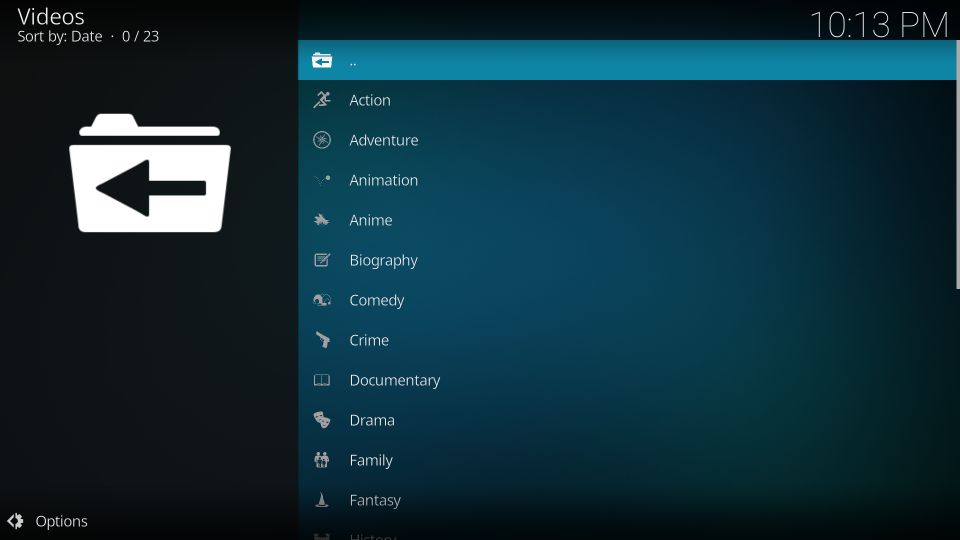
Some of these subcategories are further divided into subcategories. For example, the Genres option organizes content in various genres, including Action, Adventure, Animation, Anime, Comedy, Crime, and others.
The sections My Movies and My TV Shows work only when you sign in with the Trakt account. I have provided the steps to do so later in the guide.
The Search option lets you find videos by names or keywords. So, for example, if you can’t find the public-domain movie Africa Screams in any of the categories, you can look it up in the Search screen.
To browse content by artists, click the option People.
Enabling Real Debrid on 9 Lives
If you want the best streaming experience, I recommend getting Real Debrid for premium-quality links.
If you are not aware of Real Debrid, you can quickly learn more about it and know why it is so popular.
You can easily enable Real Debrid on 9 Lives. Here are the steps:
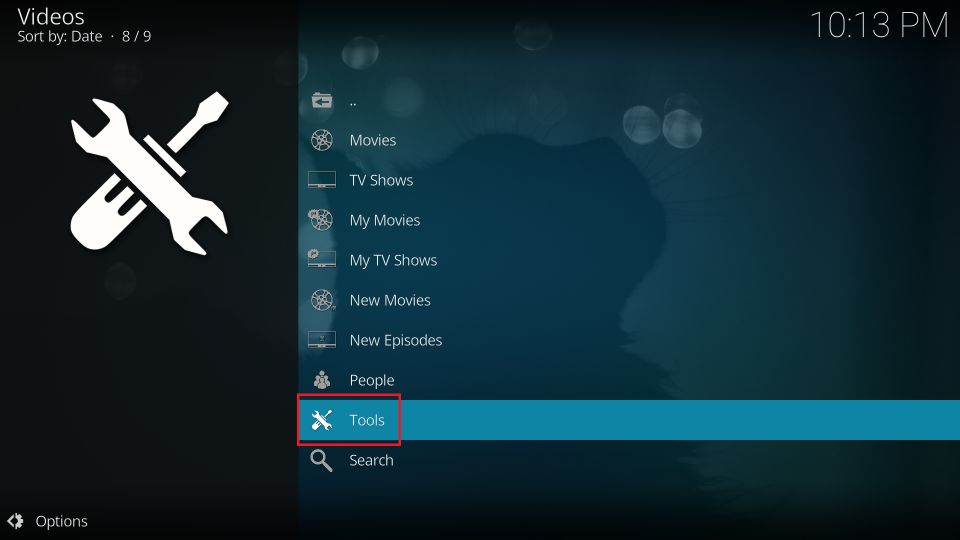
1. On the main screen of the addon, click Tools.
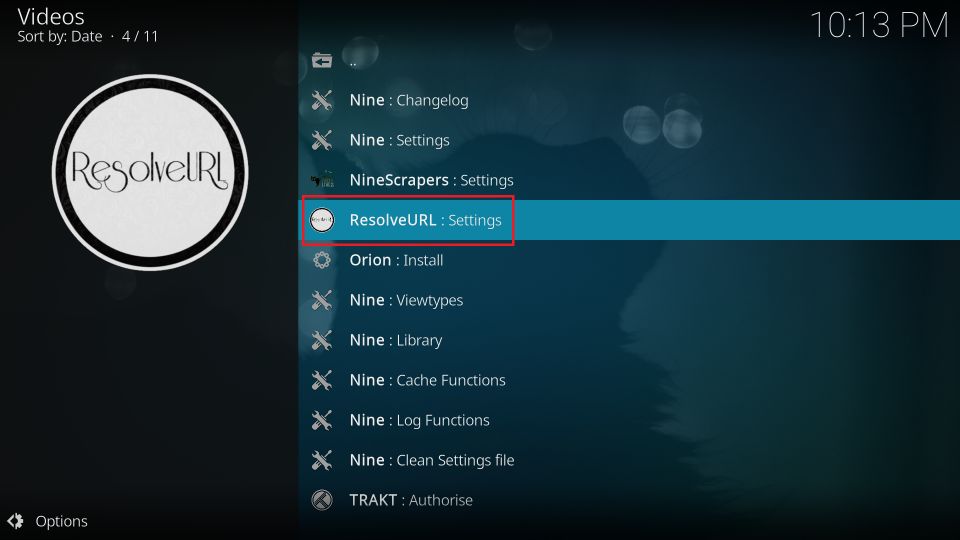
2. On the following page, click ResolverURL: Settings.
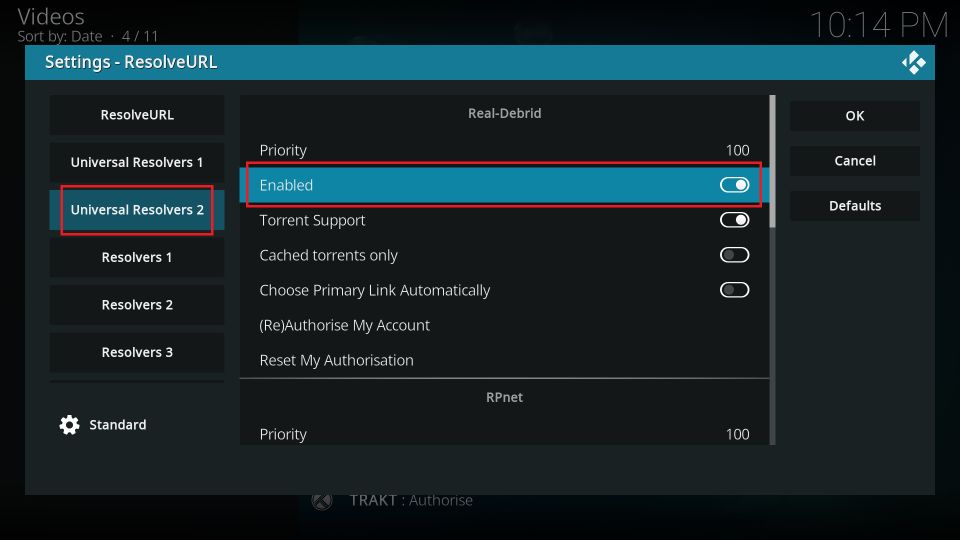
3. Select the tab Universal Resolvers 2. If the Enabled switch is off, turn it on.
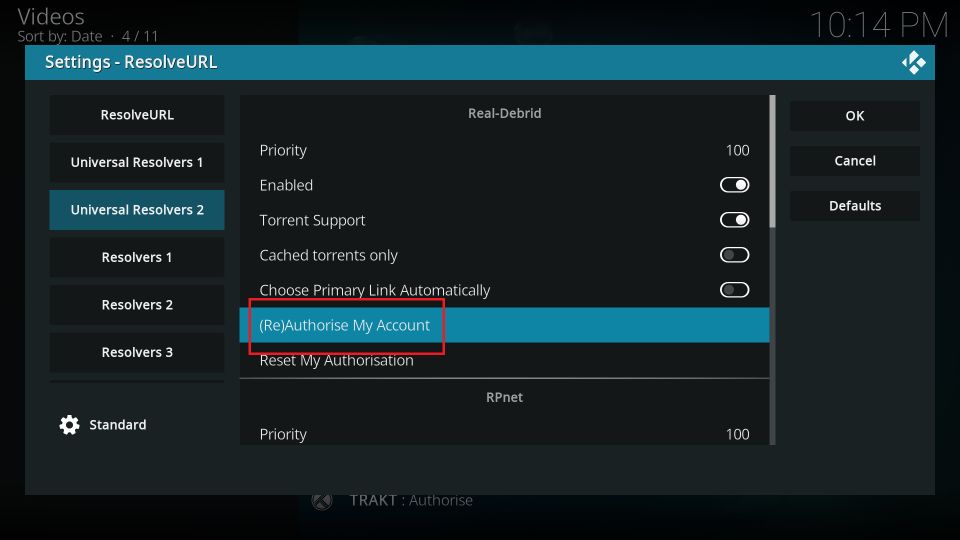
4. Click the option to authorize the Real Debrid account, as marked in the following image.
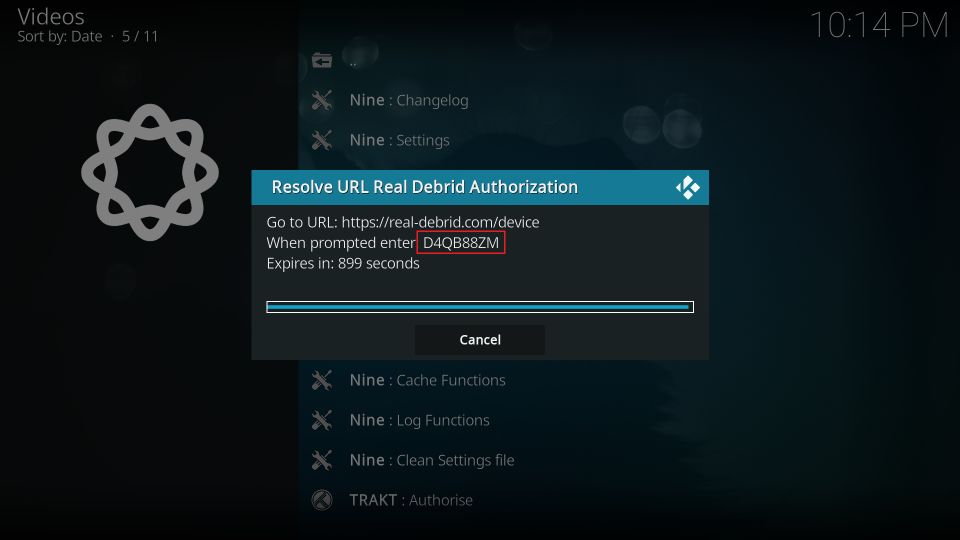
5. A popup opens with a code to authorize Real Debrid on the 9 Lives addon. First, make a note of the code on your screen. Then, go to the web address mentioned on the popup to activate Real Debrid.
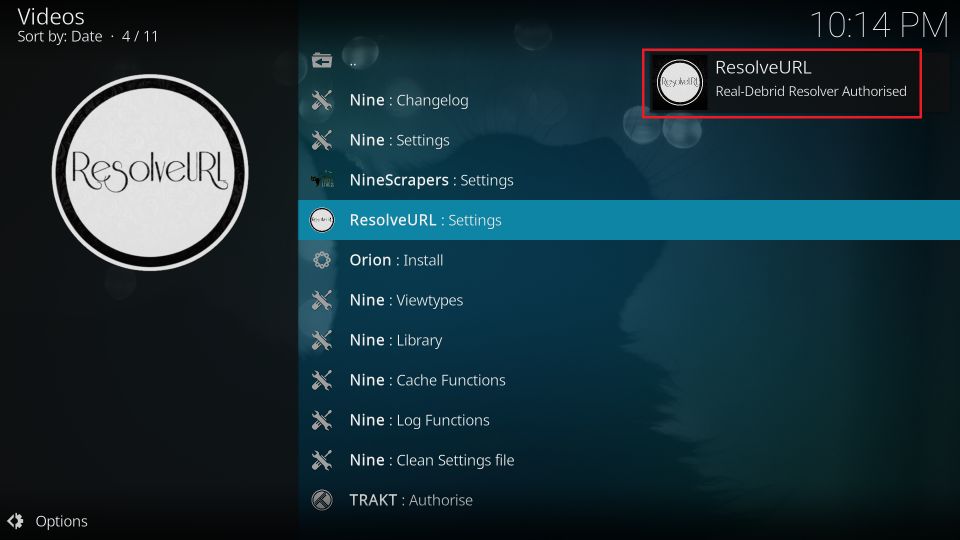
6. When the authorization is complete, Kodi will notify about ResolveURL in the top-right corner.
How to Enable Trakt on 9 Lives
Trakt allows you to sync and manage your watchlist online. You can set up the same Trakt account with multiple apps on multiple devices and share the same watchlist.
Trakt is free, but you can buy a premium plan if you are looking for advanced features. I use the free version of Trakt, which I believe is good enough for most users. You can easily set up Trakt with Kodi. To enable and use Trakt with 9 Lives, follow the instructions below:
1. Click Tools on the main window of the addon.
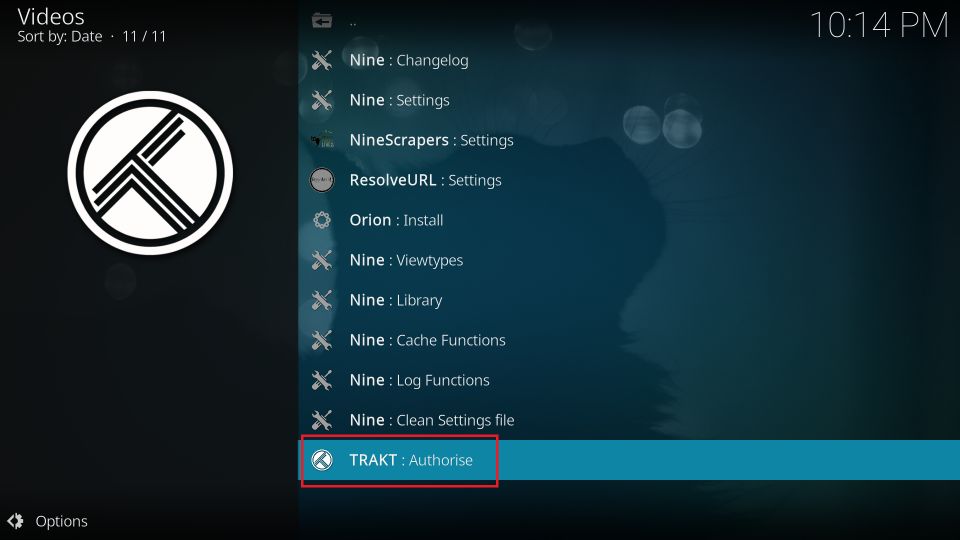
2. Scroll down and then click Trakt: Authorise.
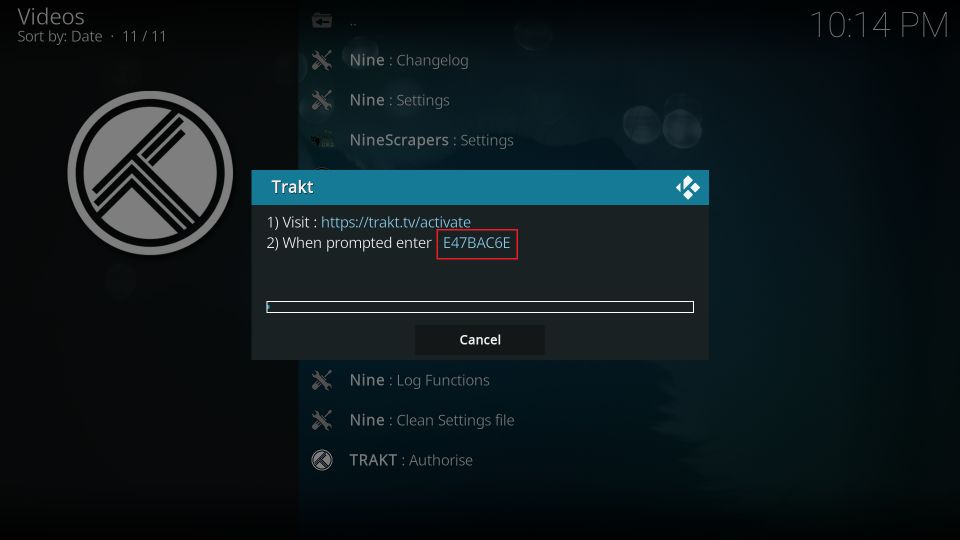
3. Go to the web address trakt.tv/activate and type the Trakt authorization code on your screen. You may need to login with your Trakt account credentials.
4. To verify whether the authorization was successful, click Tools on the main window, followed by Nine: Settings on the next screen.
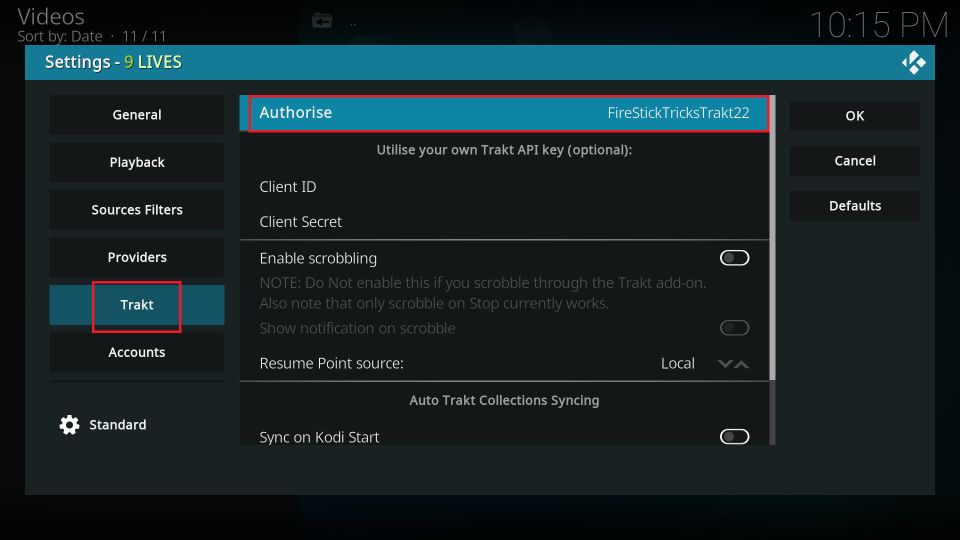
5. Click the Trakt tab in the left menu bar. On the right, the row Authorise will display your Trakt username. If you don’t see the username, the authorization was unsuccessful.
Winding Up
In this post, you learned how to install 9 Lives Kodi addon. The addon offers you an extensive collection of movies and shows. You will also find other types of videos, such as documentaries, comedy shows, and more. Even though the process involves several steps, it is still easy. Let me know if you found this guide helpful. Also, feel free to contact me via the comments box if you have any questions or feedback.
Related:
- How to Install Stirr Kodi Addon
- Base 19 Kodi Addon
- Install Elementum Kodi Addon
- Scrubs v2 Kodi Addon

Suberboost Your FireStick with My Free Guide
Stay Ahead: Weekly Insights on the Latest in Free Streaming!
No spam, ever. Unsubscribe anytime.




Leave a Reply