In this guide, I will show you how to install the Skynet addon on Kodi. This addon will work on any device that supports Kodi. This includes Fire TV, FireStick, Android TV box, PC, Mac, Mobiles, and more.
 The Skynet Kodi addon streams on-demand content including movies and shows. The content collection is quite big with almost all the titles and episodes you can think of.
It is a lightweight and simple addon. You can start streaming immediately after the installation.
Skynet addon supports Real Debrid as well as Trakt.
Attention Kodi Users!
Governments and ISPs worldwide monitor your online activities. If you use third-party Kodi addons, you should always use a reliable Kodi VPN to hide your identity and prevent issues with your streaming experience. Currently, your IP is visible to everyone.
I use ExpressVPN, the fastest and most secure VPN in the industry. It is very easy to install on any device, including Amazon Fire TV Stick, PC, Mac, and Smartphones. It also includes a 30-day money-back guarantee. If you're not satisfied with their service, you can request a refund. ExpressVPN is offering a special NEW YEAR deal: get 4 months free and save 78% on the 2-year plan.
Install and Use Best Kodi VPN | Why you must use a VPN at all times
How to install Skynet addon on Kodi
This is a third-party addon and we are going to install it from a third-party source. To install such addons, you must first tweak a security setting within Kodi. Follow these steps:
Legal Disclaimer: This guide is for informational purposes only. FireStickTricks.com does not own, host, operate, resell, or distribute any apps, services, or content mentioned.
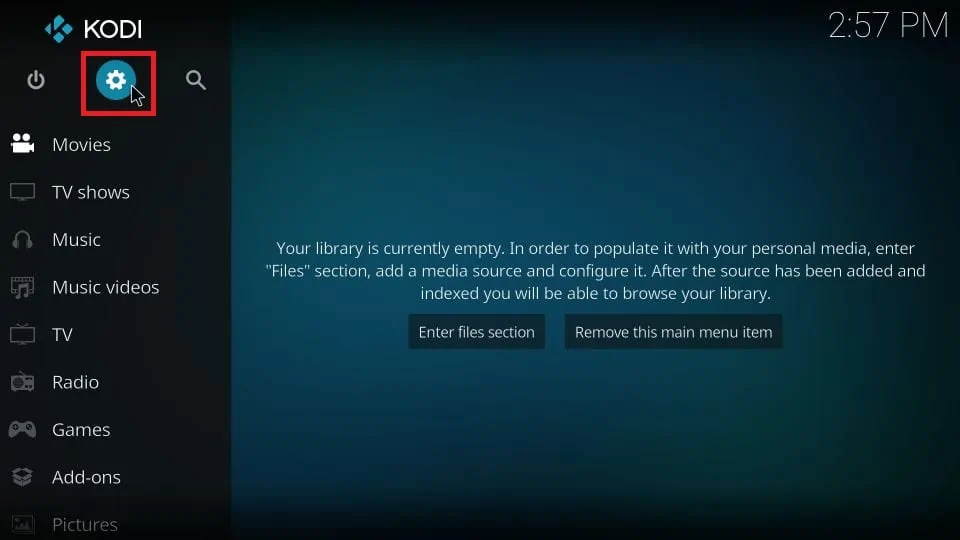
1. Open the Kodi application and then go to the Settings menu by clicking the gear icon. It is in the upper-left corner of the home screen
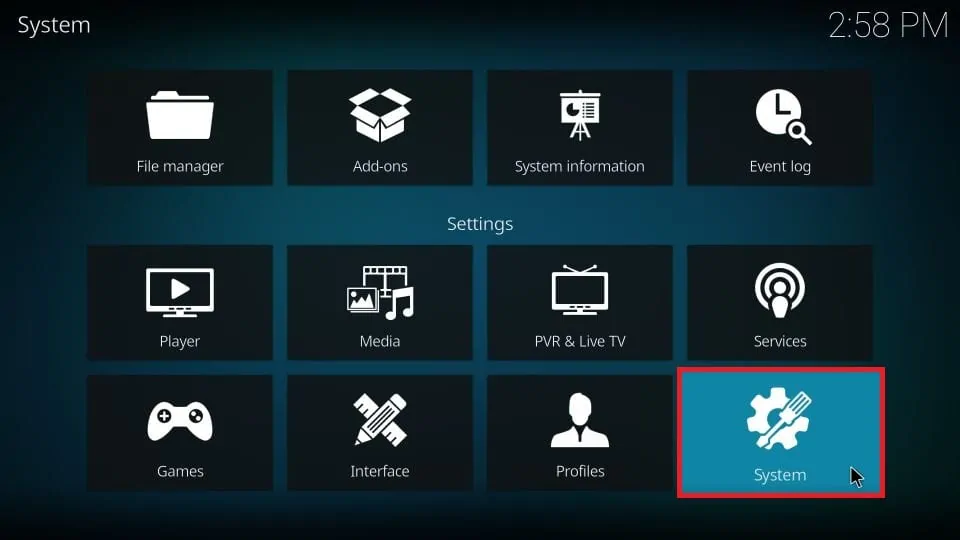
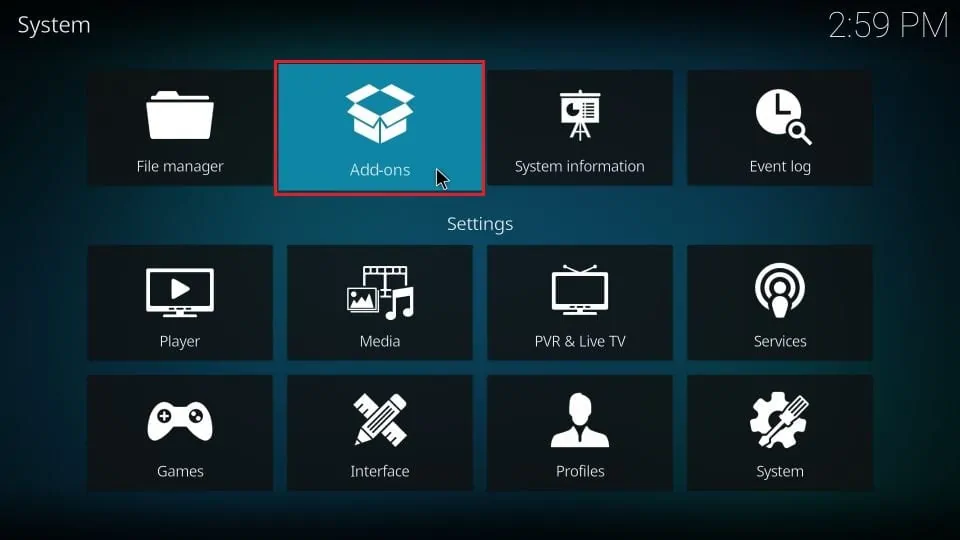
2. Open the System tile next
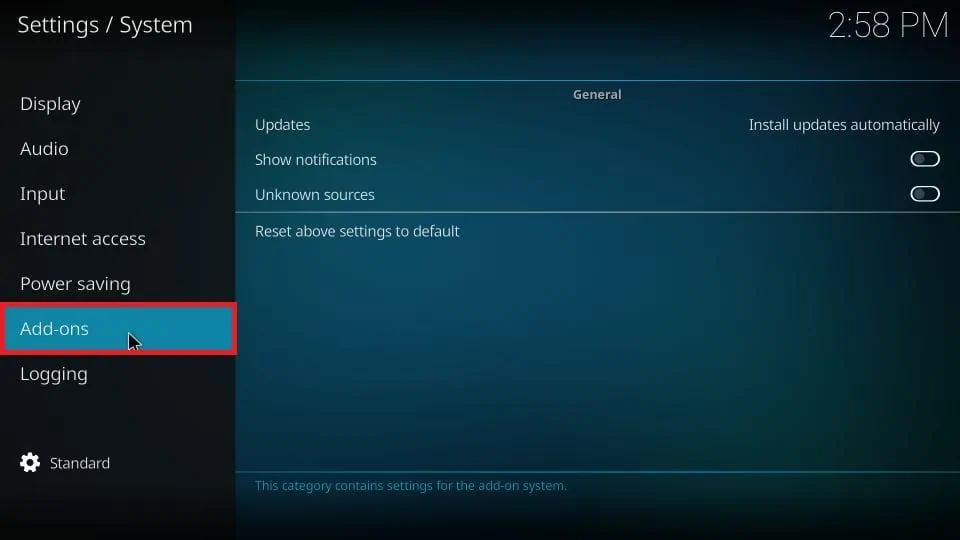
3. When you are on this window, choose Add-ons on the left
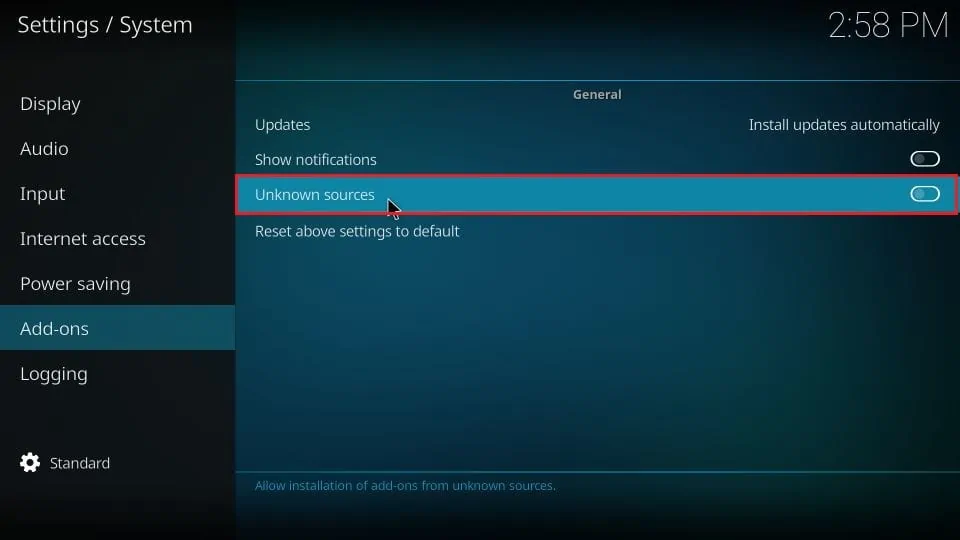
4. Now, you need to check whether Unknown Sources on the right is on or off. If it is off, click the toggle and turn it on
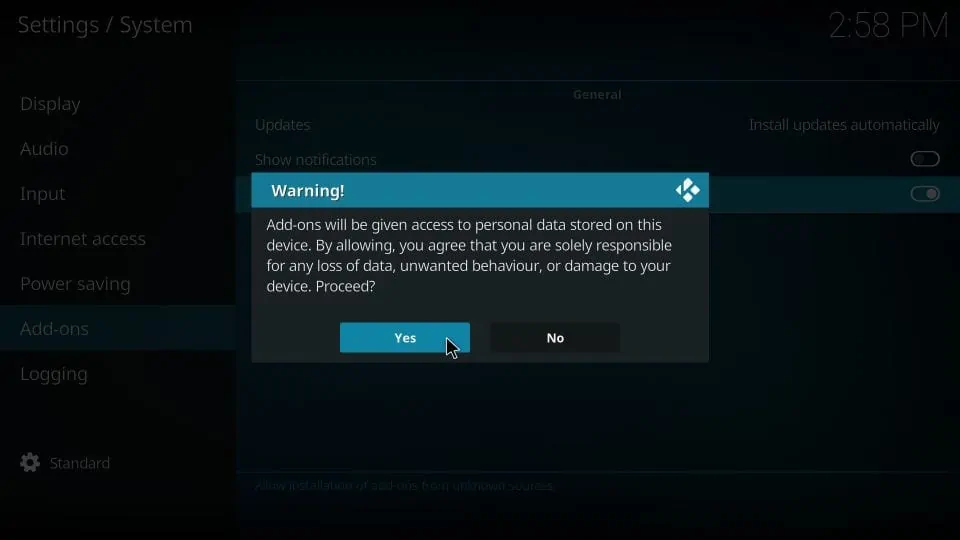
5. You will now see the following prompt (image below). Click Yes in order to confirm
Kodi has been set up to install third-party addons like Skynet. Let’s get started.
Installation steps for Skynet Kodi addon
Follow the instructions below to install the Skynet addon on Kodi in just a few minutes:
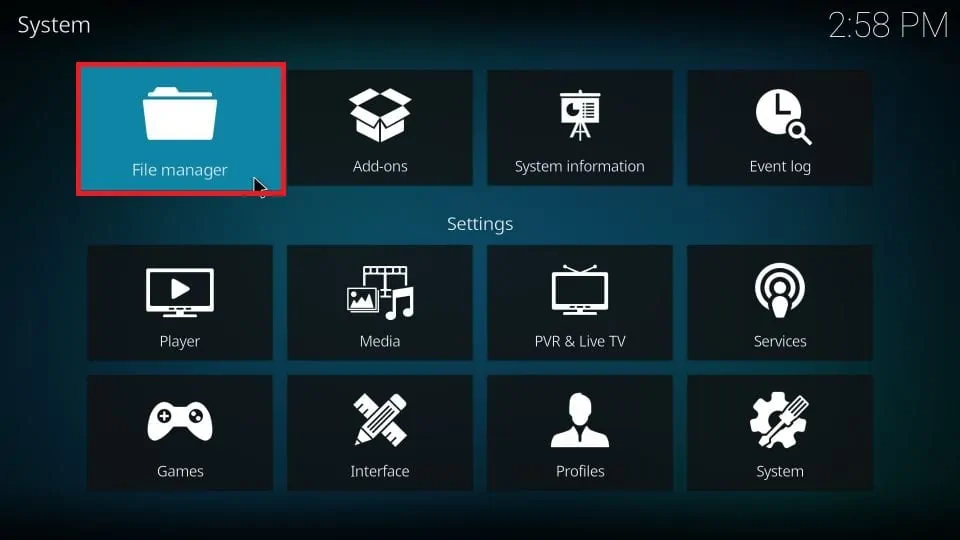
1. Open the Kodi Settings window again from the home screen and click the File manager tile
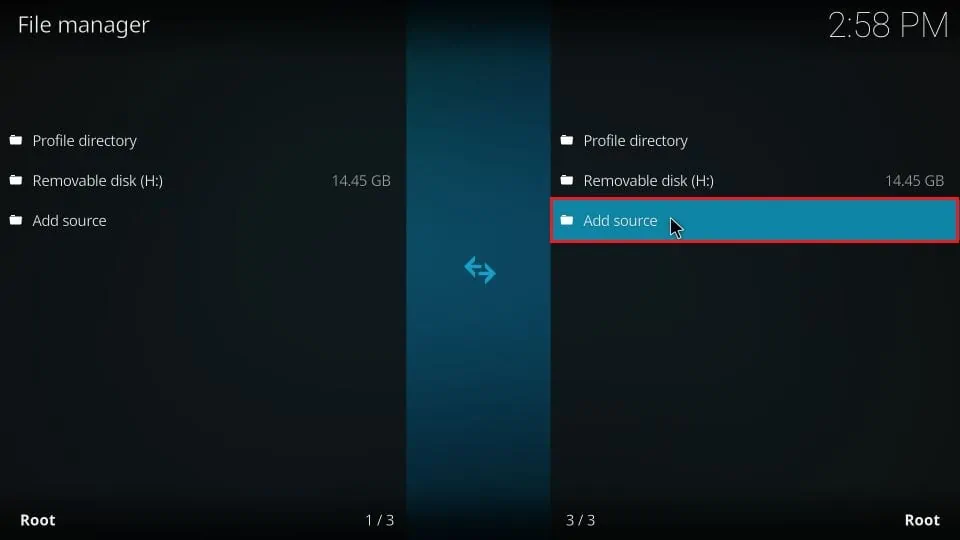
2. Click Add source on either side of this window
Note: If you use Kodi on a computer, you will need to double click
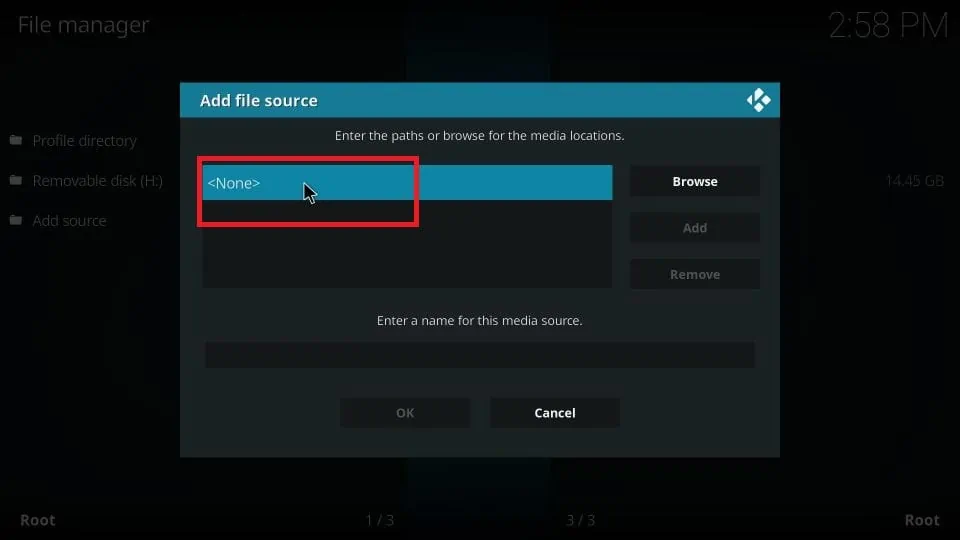
3. A new dialog box will appear. Here, just click the area where it reads <None>
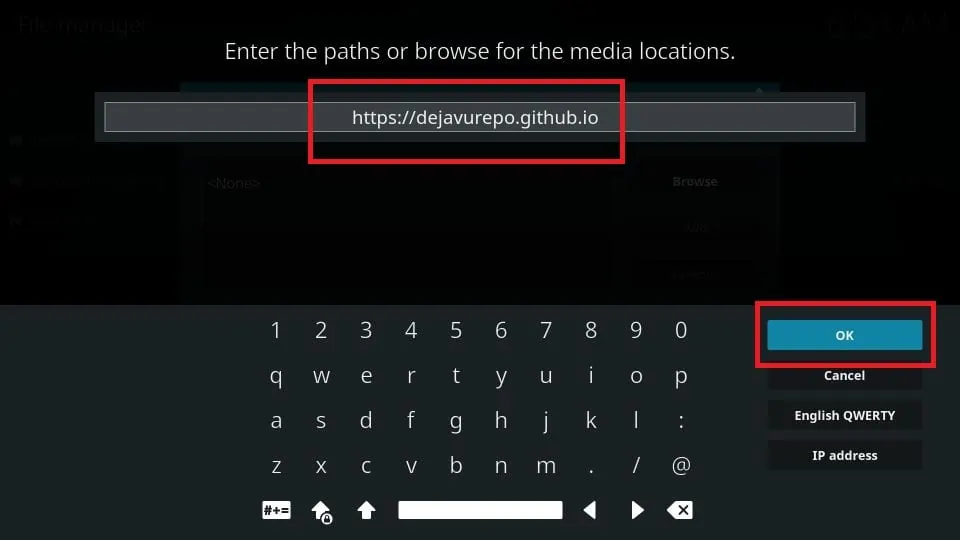
4. What you see now is a window with an empty text box and keypad. Carefully type the following URL https://dejavurepo.github.io while making sure there are no typos
Click OK
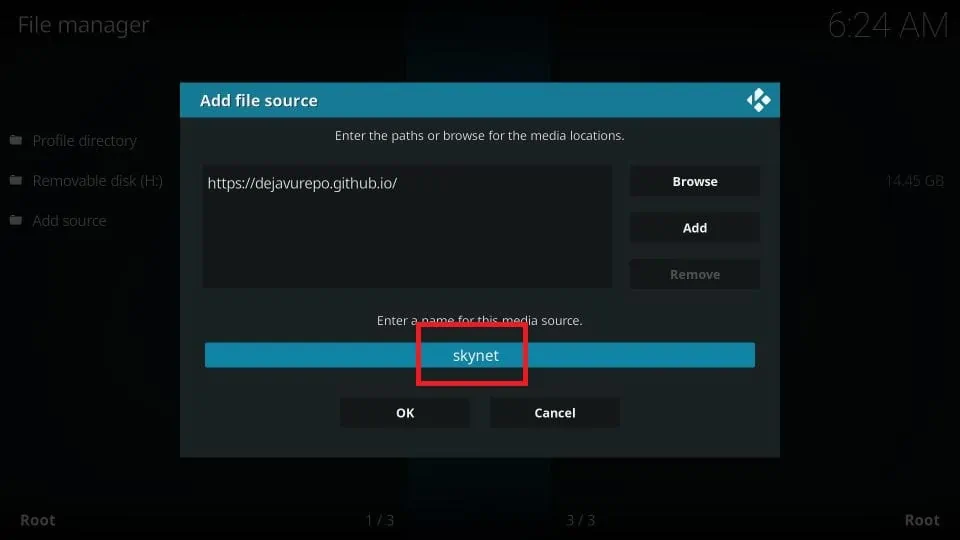
5. Select the section for the media source name and type any name you like. For this guide, we will be using the name Skynet
Click OK
6. We are now going to go back to the Settings window again and click the Add-ons tile
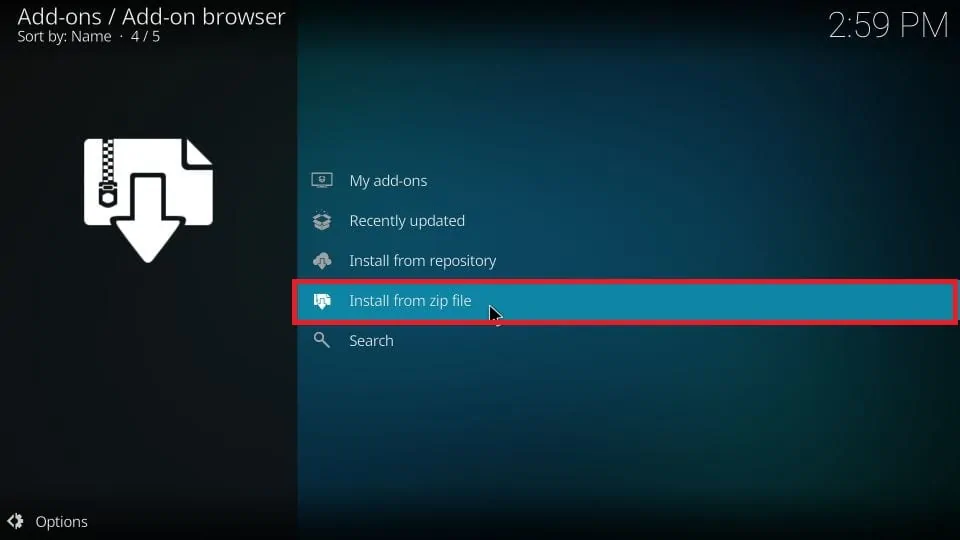
7. Choose the option Install from zip file
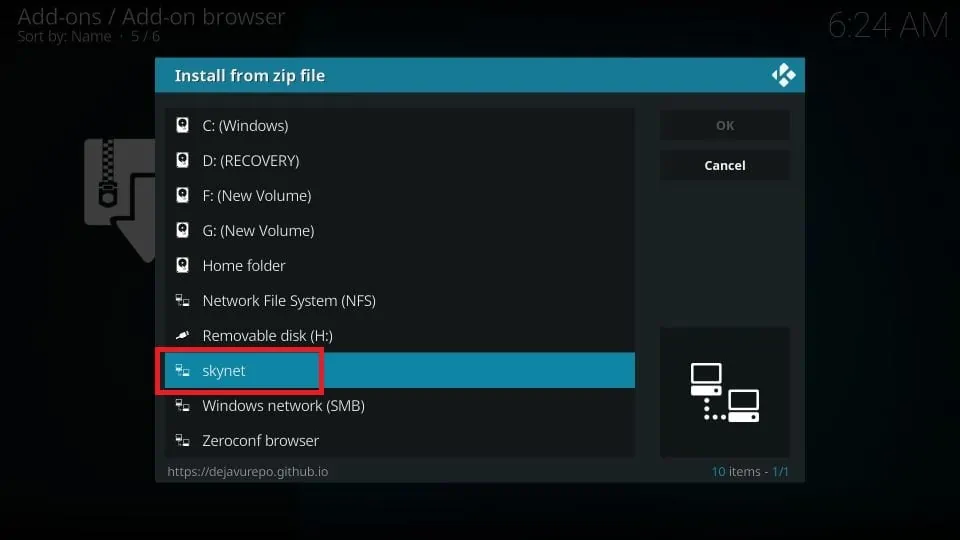
8. When this window pops up, click the source name skynet (or any other name you chose earlier)
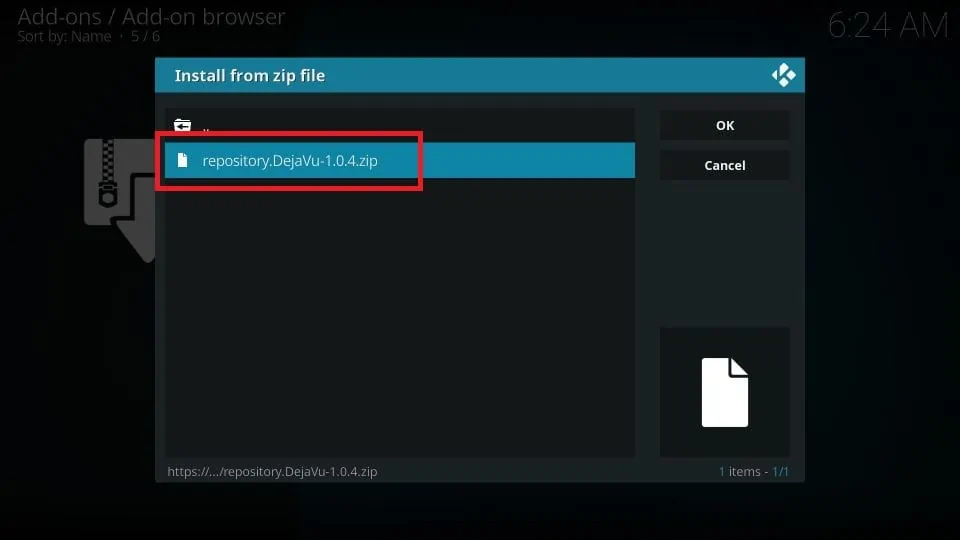
9. Click the zip file on this window: repository.Dejavu-x.x.x.zip
10. Wait for a few moments for the repository to install
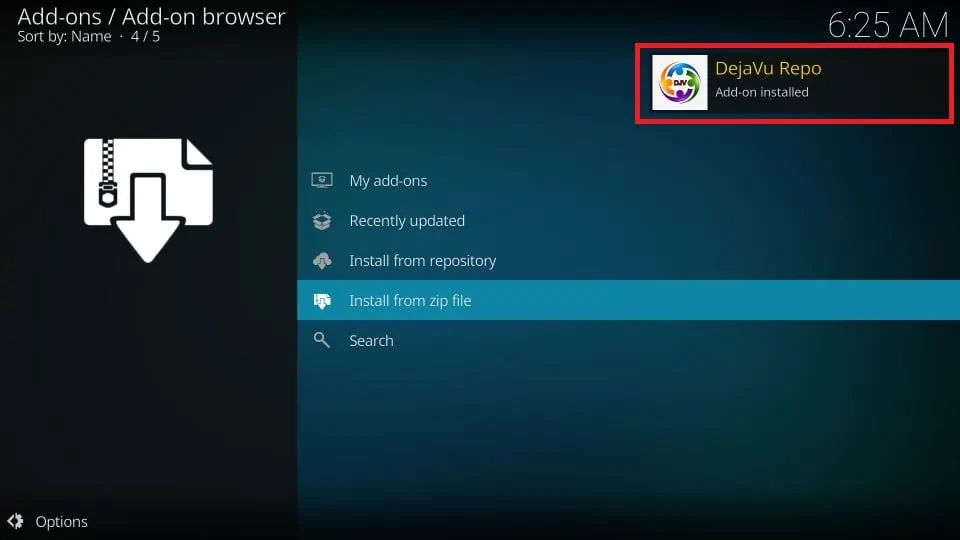
The notification saying DejaVu Repo Add-ons installed appears in the top-right part of the window
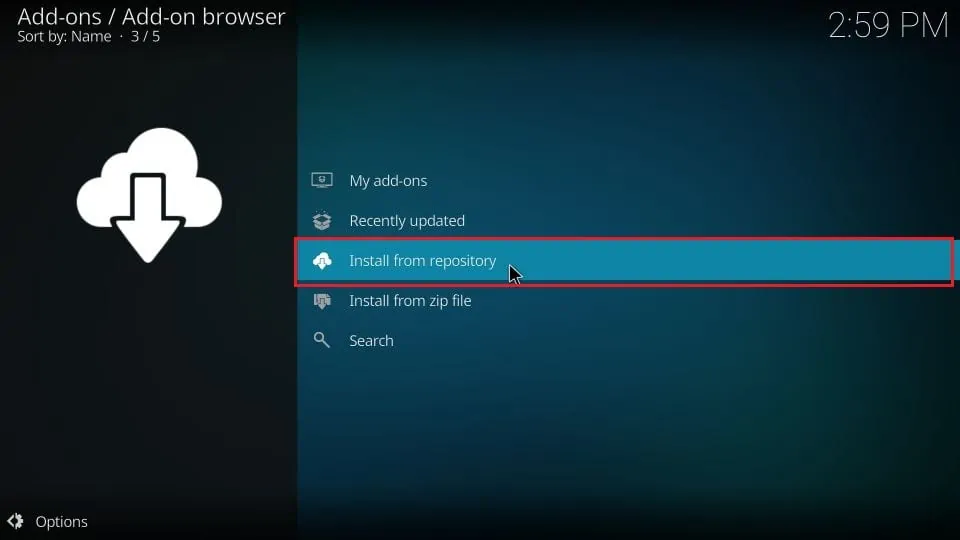
11. Open Install from repository
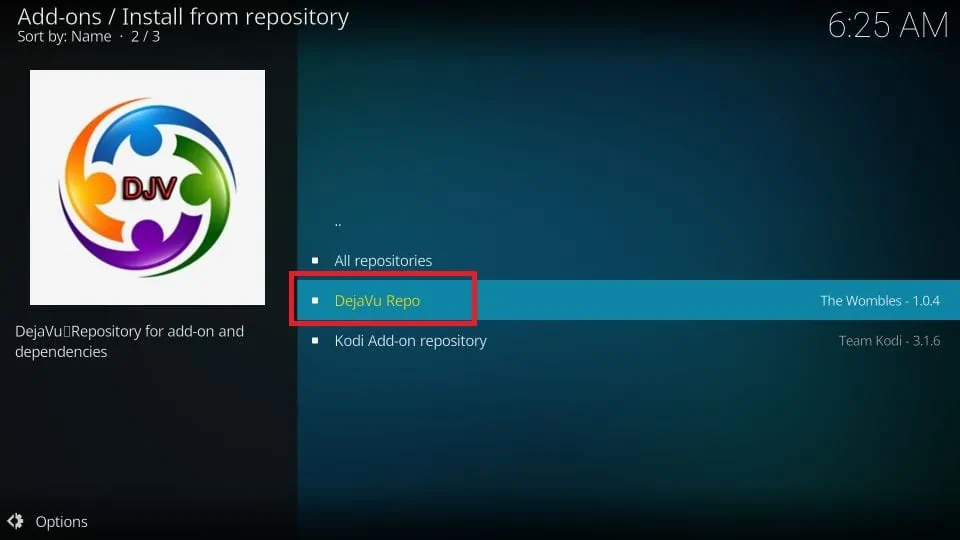
12. Click DejaVu Repo option here
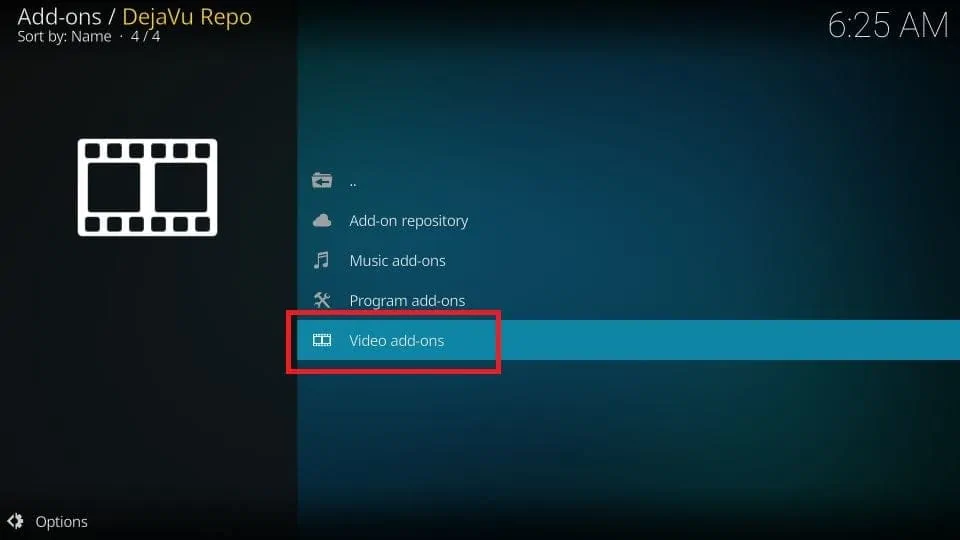
13. Click the option Video add-ons on the following screen
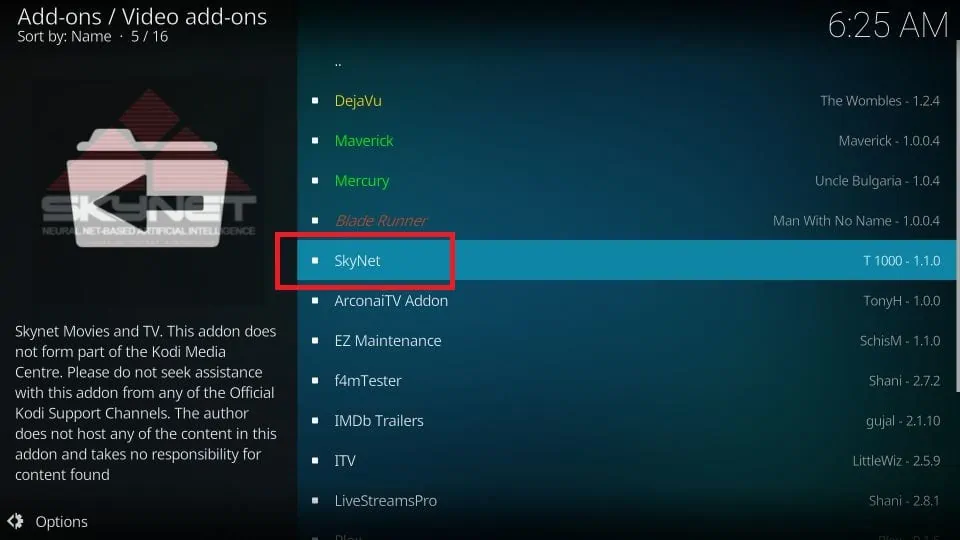
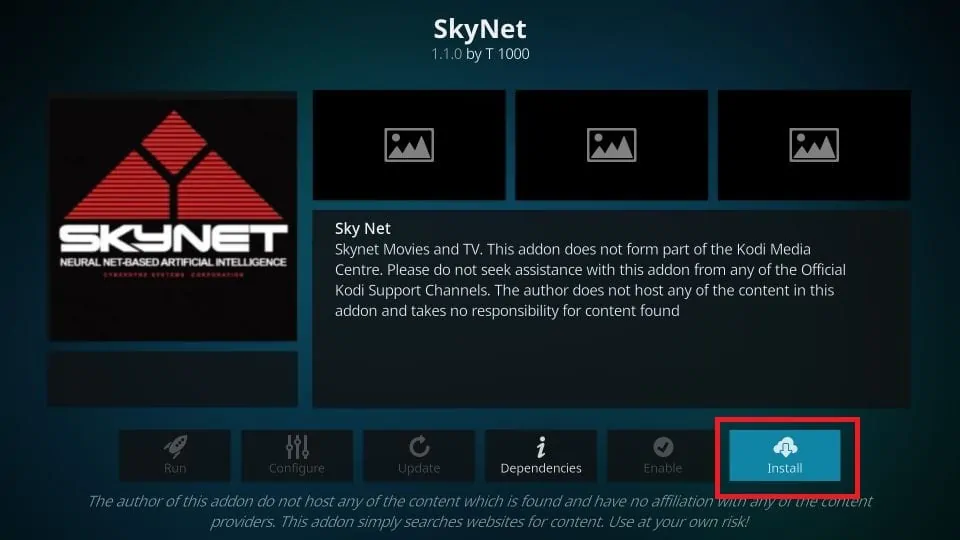
14. Select and click Skynet addon on this list of addons
15. Click Install near the bottom-right area of the next window
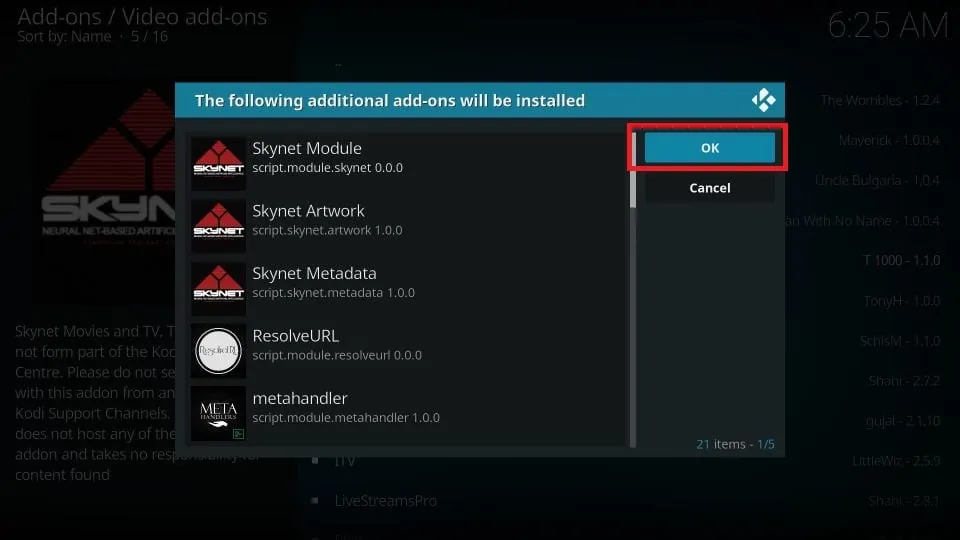
16. Click OK when this prompt appears with the list of additional addons
17. It will take a couple of minutes to install the addon and the notification SkyNet Add-on installed will appear on your display in the top-right corner
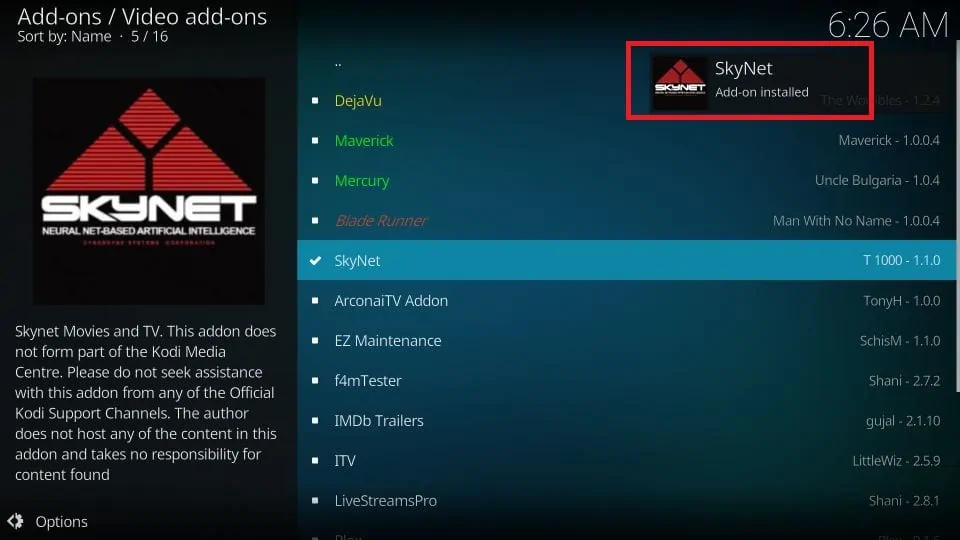
That would be all. You have successfully installed the Skynet addon on Kodi.
Before you start streaming with Kodi Addons or Builds, I would like to warn you that everything you stream on Kodi is visible to your ISP and Government. This means, streaming copyrighted content (free movies, TV shows, live TV, and Sports) might get you into legal trouble.
Thankfully, there is a foolproof way to keep all your streaming activities hidden from your ISP and the Government. All you need is a good VPN for Kodi. A VPN will mask your original IP which is and will help you bypass Online Surveillance, ISP throttling, and content geo-restrictions.
I personally use and recommend ExpressVPN, which is the fastest and most secure VPN. It is compatible with all kinds of streaming apps and devices.
NOTE: We do not encourage the violation of copyright laws. But, what if you end up streaming content from an illegitimate source unintentionally? It is not always easy to tell the difference between a legit and illegal source.
So, before you start streaming on Kodi, here's how to get VPN protection in 3 simple steps.
Step 1: Get the ExpressVPN subscription HERE. It comes with a 30-day money-back guarantee. Meaning, you can use it free for the first 30-days and if you are not satisfied with the performance (which is highly unlikely), you can ask for a full refund.
Step 2: Click HERE to download and install the ExpressVPN app on your streaming device. If you are using a FireStick, I have given the exact steps starting with Step 4 below.
Step 3: Click the Power icon to connect to a VPN server. That's all. Your connection is now secure with the fastest and best VPN for Kodi.

The following are the steps to install Kodi VPN on your Fire TV devices. If you have other streaming devices, follow Step 1-3 above.
Step 4: Subscribe to ExpressVPN HERE (if not subscribed already).
Step 5: Go to Fire TV Stick home screen. Click Find followed by Search option (see image below).

Step 6: Type Expressvpn in the search bar and select when it shows up.

Step 7: Click Download.

Step 8: Open the ExpressVPN app and Sign in using the email ID and password that you created while buying the ExpressVPN subscription.

Step 9: Click the Power icon to connect to a VPN server. That’s all. Your FireStick is now secured with the fastest VPN.

How to use the Skynet Kodi addon
I am quickly going to cover how to access Skynet addon on Kodi as many readers find it difficult to locate the addon they have installed.
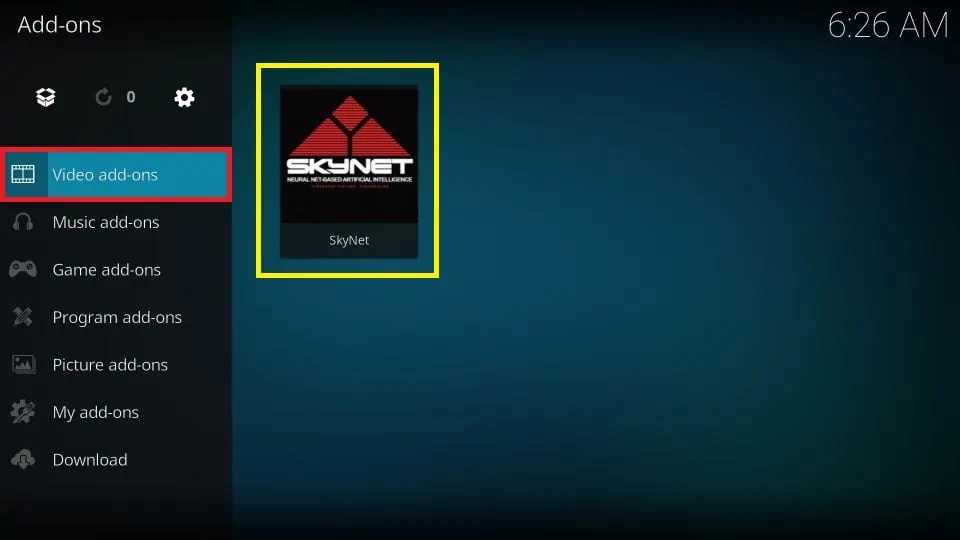
You want to return to the home screen of Kodi. In the left menu, when you will highlight the Add-ons option, you will find all your addons on the right. Alternately, you can click Add-ons on the home screen and highlight Video add-ons on the following screen. You will find the Skynet addon here
This is what the home screen of Skynet Kodi addon looks like:
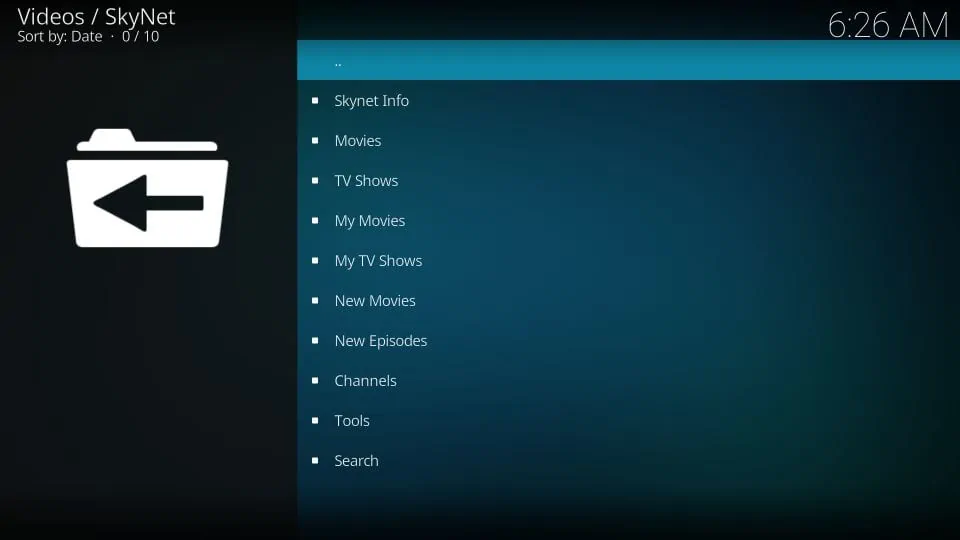
As you can see, it has some pretty straightforward categories that let you get started right away. You can choose Movies and TV Shows categories depending upon the type of content you want to watch.
You can explore the various subcategories and genres and find the titles you wish to stream.
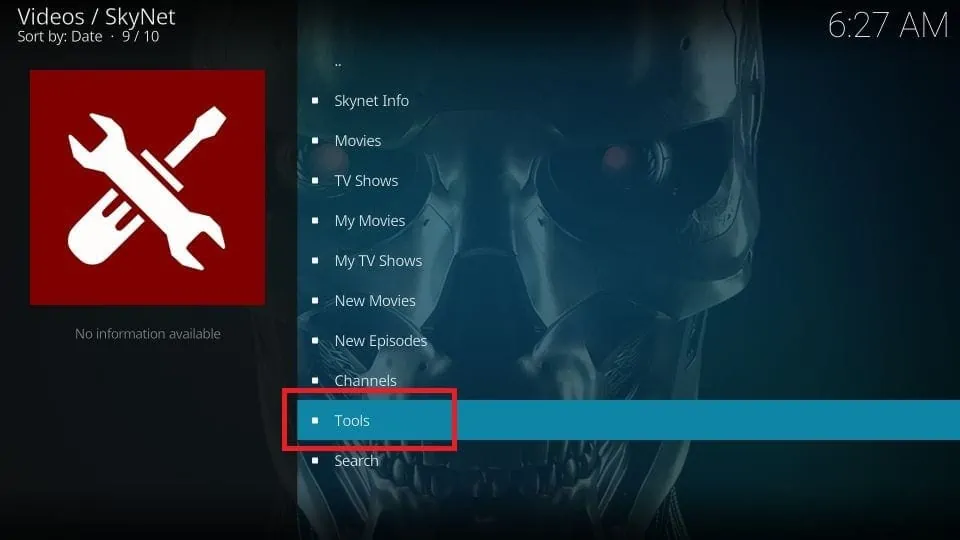
While Skynet Kodi addon offers free streams, it works best with Real Debrid.
We have a detailed guide for Real Debrid on Kodi. Here, I am providing the quick steps to set up Real Debrid with Skynet addon.
Click Tools on the main screen of the addon
Scroll down to the bottom on the next screen and click ResolveURL: Settings
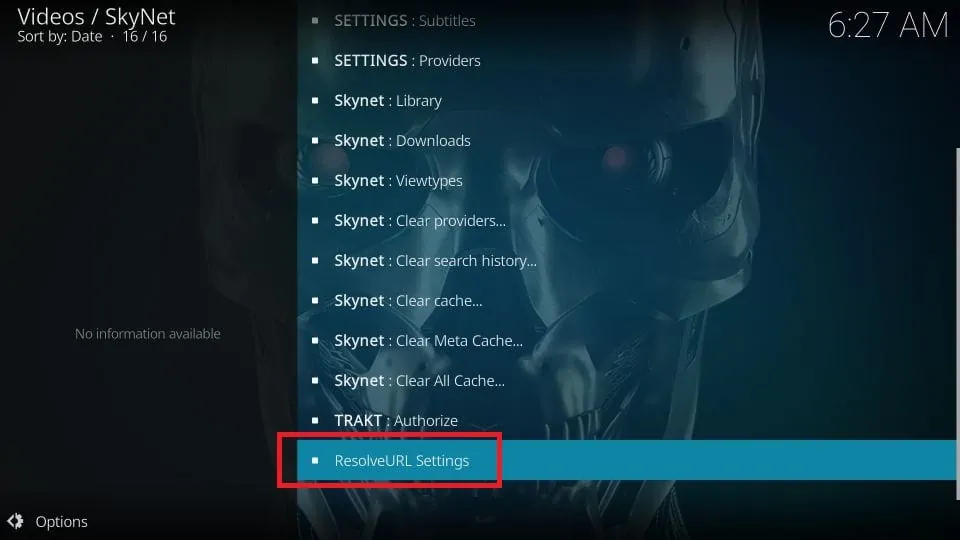
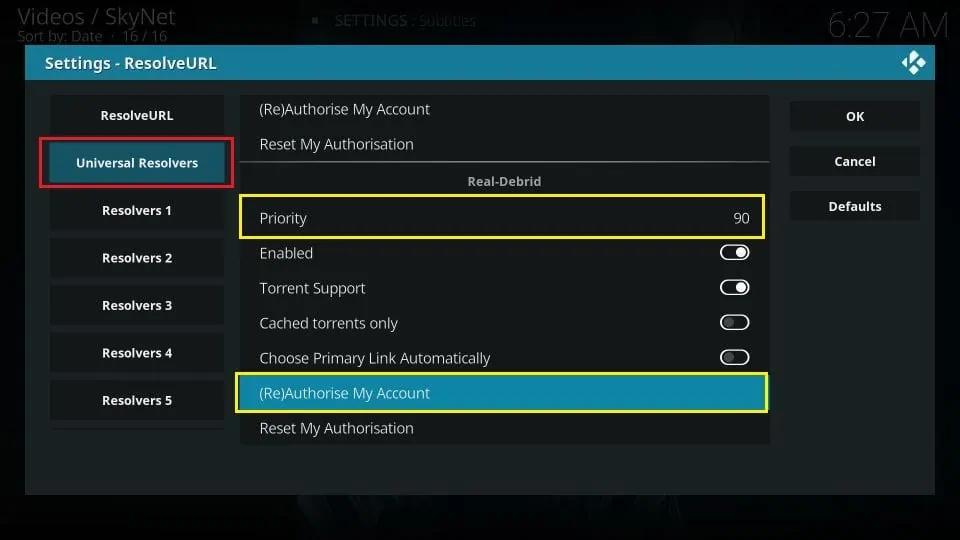
On this popup, click Universal Resolvers in the left menu and scroll down to the Real Debrid section on the right
Edit priority value to 90 and click (Re)Authorize My Account
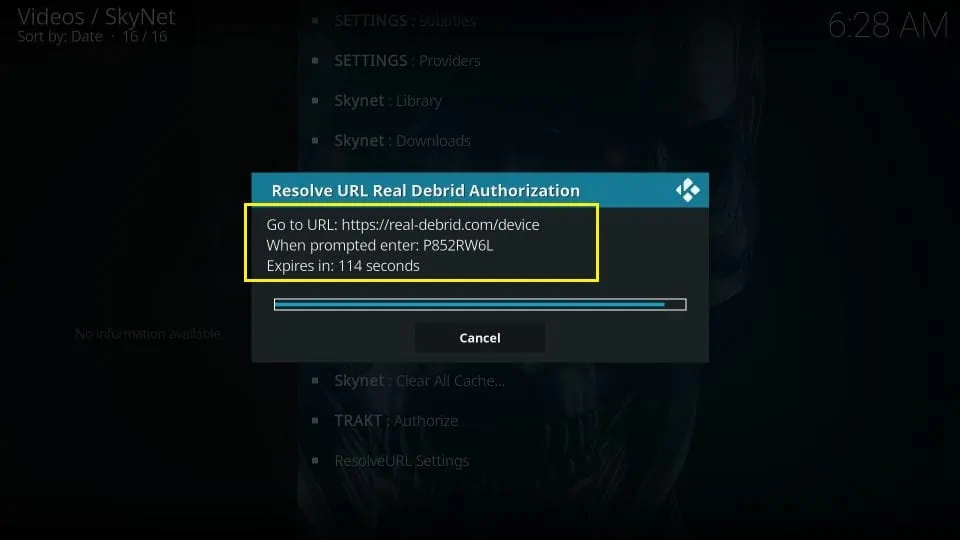
You should see a popup window like this on your Kodi screen. This prompt has the Real Debrid authorization code.
Go to https://real-debrid.com/device in any web browser and enter this code to authorize Real Debrid with Skynet Kodi addon (you may need to log in to your Real Debrid account)
Wrapping Up
Skynet Kodi addon is a simple addon for on-demand content. You can get this addon from the popular DejaVu Repository. It is one of the newer add-ons and works great with Real Debrid.
Related:
- How to Install Multiple Kodi Builds on FireStick
- How to Get Subtitles on Kodi with OpenSubtitles
- How to Install Netflix Kodi Addon on FireStick
- How to Install Free Addon on Kodi & FireStick

Suberboost Your FireStick with My Free Guide
Stay Ahead: Weekly Insights on the Latest in Free Streaming!
No spam, ever. Unsubscribe anytime.

Leave a Reply