This guide will teach you how to install and use Turbo VPN on FireStick. This guide can also be used on other Amazon Fire TV devices, such as FireStick 4K, FireStick Lite, and Fire Cube TV. I will show you how to install and set up Turbo VPN along with the required companion apps.
 Concerns about privacy on the internet are growing rapidly. We are being tracked via cookies, by the big tech companies, as well as our internet providers. In such times, the usage of a VPN has become essential. For those unaware, a VPN (virtual private network) helps protect the user’s identity and anonymity while surfing on the internet. It creates an encrypted network, due to which your ISP (internet service provider) can’t access what you’re surfing. It basically acts as a barrier between your ISP and the internet.
VPNs are also helpful in other aspects. For example, they can allow you to access geo-restricted content. In other words, using a VPN can help you stream a certain show that might not be available in your region.
There are plenty of VPN providers. One such provider is Turbo VPN. In this article, I will guide you through its features, its pricing, and ultimately how to set it up and use it on your FireStick.
Why Choose Turbo VPN Over Other VPN Services?
Turbo VPN packs a lot of punch for its price. You can also use it for free if you don’t intend to use its premium servers or features. Turbo VPN is a decent choice if you need a VPN to bypass geo-restrictions to access content, as it currently has servers in 35+ countries, plus servers dedicated to streaming.
However, as they say, there’s no such thing as a free lunch. Despite claiming a no-logs policy, a deeper dive into the terms and conditions reveals that they indeed store minimal information and share with third-party advertisers. This isn’t a good sign. The free version also displays ads.
Additionally, Turbo VPN doesn’t offer official support for FireStick devices. And, as you’ll discover, it requires a rather tedious set-up procedure involving multiple applications.
That said, Turbo VPN makes up for these shortcomings by providing a plethora of features at a reasonable price. So if you’re willing to overlook the aforementioned cons, Turbo VPN may be just right for you.
Disclosure: Turbo VPN emerges as a good option when you compare its pros and cons. However, I personally like to use ExpressVPN on my various devices, including FireStick. Learn more about using ExpressVPN on FireStick.
Below are some of the notable features of Turbo VPN.
Security Protocol
Turbo VPN uses AES-256 encryption. This is a really good cryptographic encryption standard that provides a high level of security and is used by various tech giants, including Microsoft. Turbo VPN also uses the OpenVPN tunneling protocol to protect users’ data from various prying eyes.
Dedicated Streaming Servers
One of the biggest use cases for a VPN service on FireStick is to stream region-locked content. Turbo VPN has dedicated streaming servers in various countries. The premium subscription includes specialized streaming servers for various platforms like Netflix, BBC iPlayer, Hotstar, Hulu Sport, and ESPN, among others. These specialized servers are located in different countries so you can access the content in those countries easily.
Split Tunneling
Split tunneling is a really useful feature that allows users to route certain apps or programs through a safe, masked IP address while other apps or programs can have direct access to the internet. This feature comes in handy when certain apps perform poorly on VPN servers. With Turbo VPN, you can simply de-select those applications, and they won’t be used with the VPN.
Support for Multiple Devices
Turbo VPN’s premium subscription supports up to 5 devices simultaneously. This is useful if you intend to use these services on devices other than your FireStick, like your smartphone, or if you want to share the subscription with a few other people.
Dedicated Gaming Servers
Just like dedicated streaming servers, the premium subscription for Turbo VPN also includes dedicated gaming servers. They have various servers located in Singapore dedicated to games like Call of Duty and Pubg. While these aren’t necessarily useful on FireStick, its still nice to have them on your other devices.
Is Turbo VPN for FireStick Safe and Legal?
Here, things enter a bit of a gray area. While Turbo VPN is a legal service with an official app on the Android Play Store, it doesn’t have an official FireStick app. As a result, using Turbo VPN on a FireStick involves sideloading the Android app on to your FireStick.
But even then, things aren’t as straightforward as sideloading the app on FireStick. The official Turbo VPN App was built for Android smartphones. Hence, it has various UI scaling, resolution, and navigation issues on FireStick. To overcome these issues and ensure a relatively smoother experience, we will need to sideload two other apps, namely Mouse Toggle for FireStick and Rotate Screen Orientation App.
These apps aren’t officially available on any app stores either. Hence, they may raise some privacy or safety issues. FireStickTricks.com can’t verify the safety or legality of these applications, as we don’t have access to the required resources, like the base code and the data collected by these apps. Therefore, user discretion is advised.
If you would like to proceed, I have described the installation and set-up procedure for all three apps in detail below. But first, let’s talk about the pricing structure for Turbo VPN.
Turbo VPN Pricing and How to Subscribe
Turbo VPN can be used even without a paid plan. However, the experience is ad-filled, and most of the features are locked. I recommend using Turbo VPN with a paid subscription. Here are the available plans:
- $11.99 for 1 month
- $39.99 for 6 months ($6.67/month)
- $59.99 for 12 months ($5/month)
- $99.99 for 24 months ($4.17/month)
A 7-day free trial is also provided. This trial will help you to get acquainted with the service and see for yourself if the price tag is worth it for you. Turbo VPN offers a 30-day money-back guarantee in case you ultimately decide it’s not the VPN for you.
Competitors like ExpressVPN are slightly more expensive at $132.97 for 48 months. But ExpressVPN is much more secure and has a larger server network. So if you need a cheap service, Turbo VPN has an edge over the competition in the sense that it provides good value for the price. But for the best VPN on FireStick, I still recommend you go with ExpressVPN.
You can purchase a Turbo VPN subscription from the official Turbo VPN website. You can pay using PayPal or credit card. They also accept Bitcoin as payment for secure and anonymous transactions. Once you’ve created your account, keep your login details on hand, as you’ll need them when we install the Turbo VPN app on FireStick.
Now I will explain how to set up your FireStick to install the apps you’ll need to make the most of Turbo VPN on your FireStick.
How to Install Turbo VPN on FireStick
Turbo VPN and the two other required apps aren’t officially available on FireStick. Hence, we will need to sideload them. Downloader is an official application available for free in the Amazon App Store. We will use it to download and install all three apps. This process will take place in four parts.
Part 1: Prepare Your FireStick to Download Turbo VPN and Companion Apps
The Downloader app allows users to download APK files from the internet and install them on their FireStick. This app comes in handy to sideload a variety of apps. Follow these steps to install and set up Downloader on FireStick.
Note: If you already have Downloader installed and ready to go, skip to Part 2.
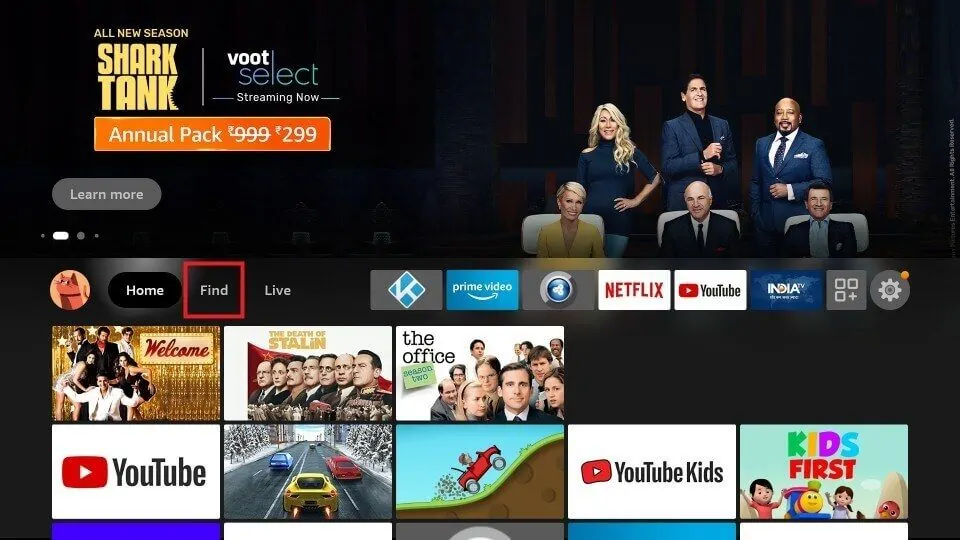
1. Launch your FireStick, or press the home button on your FireStick remote to go to the home screen. From there, click on Find.
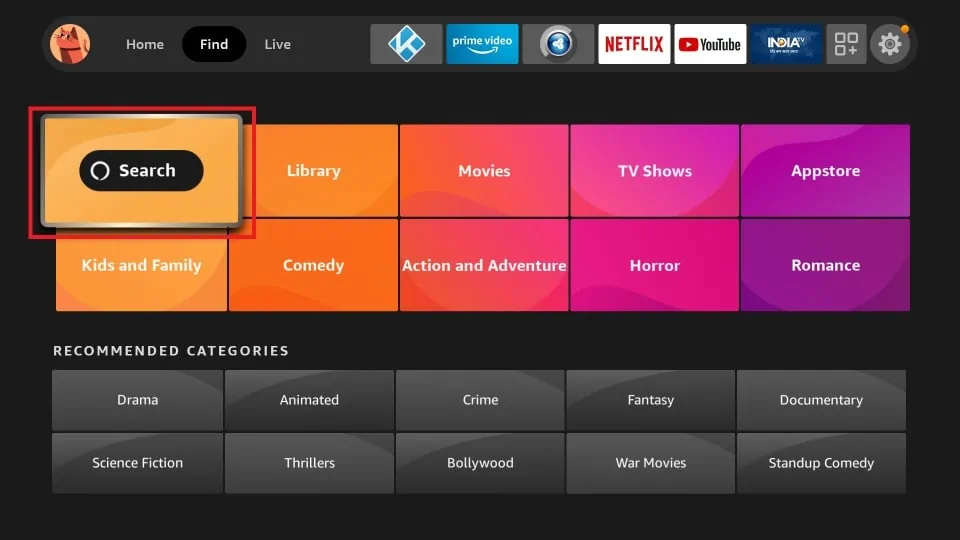
2. Click on the Search option.
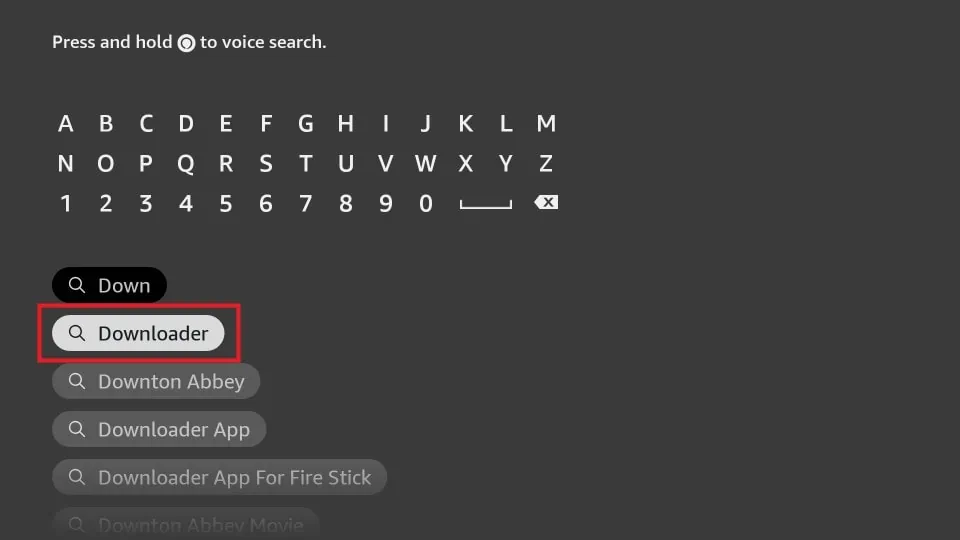
3. A virtual keyboard will be displayed.
4. Using the virtual keyboard, start typing Downloader. Select Downloader when it appears in the section below the virtual keyboard.
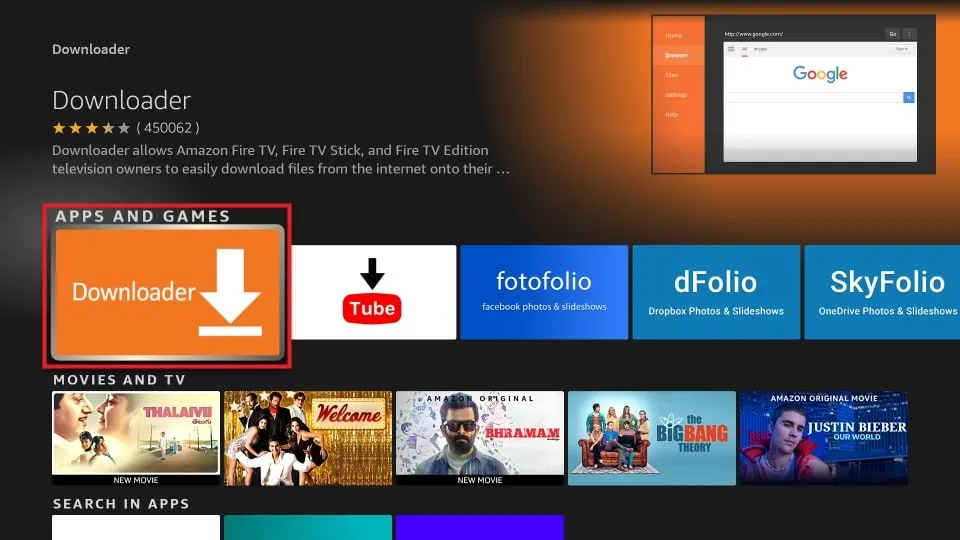
5. Click on the Downloader tile below APPS AND GAMES.
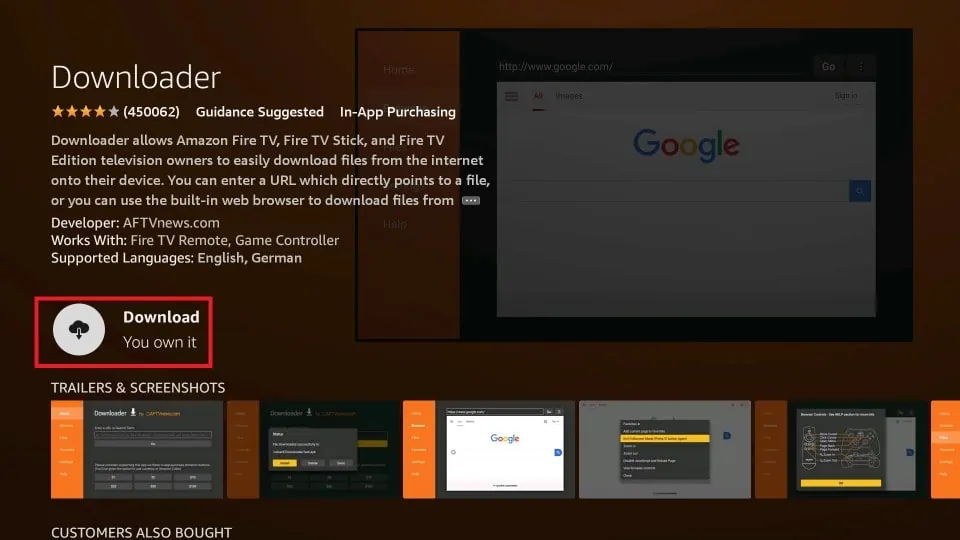
6. Click on the Download or Get button.
The Downloader App will now be downloaded and installed on your FireStick. This process may take up to a minute or two depending on your internet connection. Before we proceed to install Turbo VPN, we will need to change a few settings. Without changing them, Downloader will be restricted from installing new apps. Follow these steps to make the required changes.
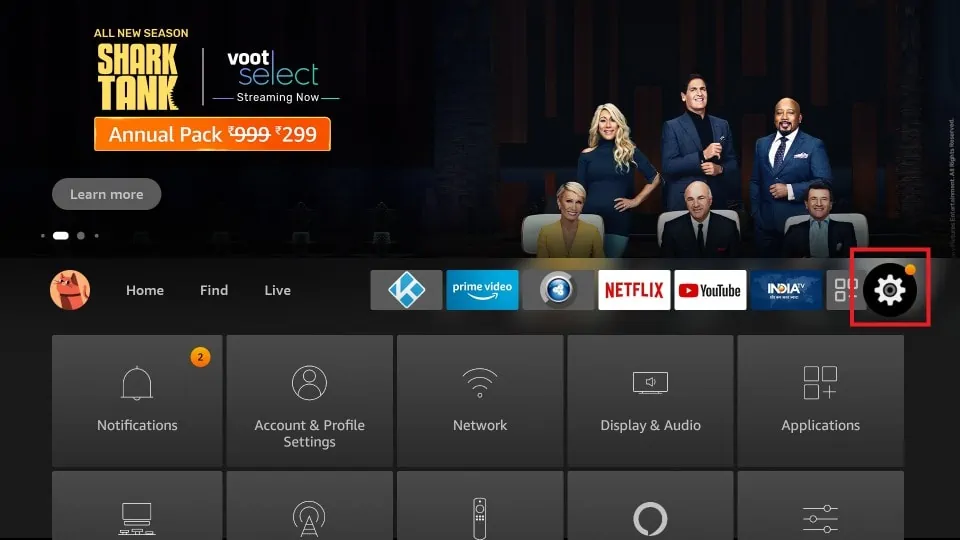
7. Press the home button on your remote to return to the home screen. Now, click on the settings gear icon on the far right.
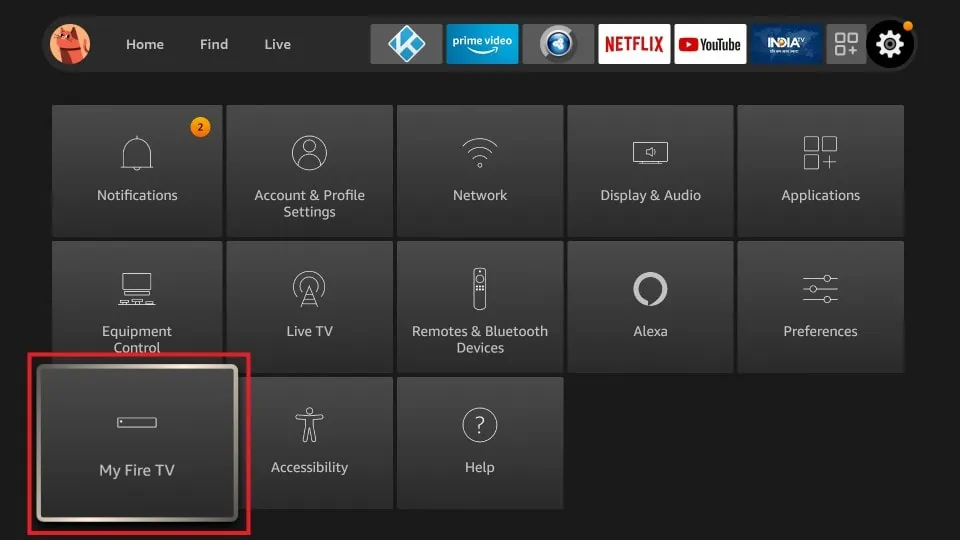
8. Scroll down and select My Fire TV.
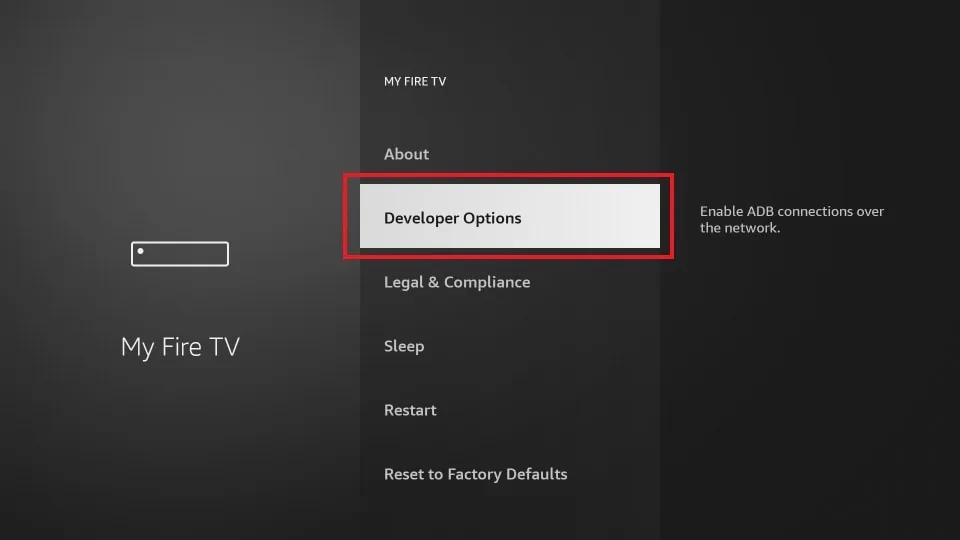
9. Click on Developer Options.
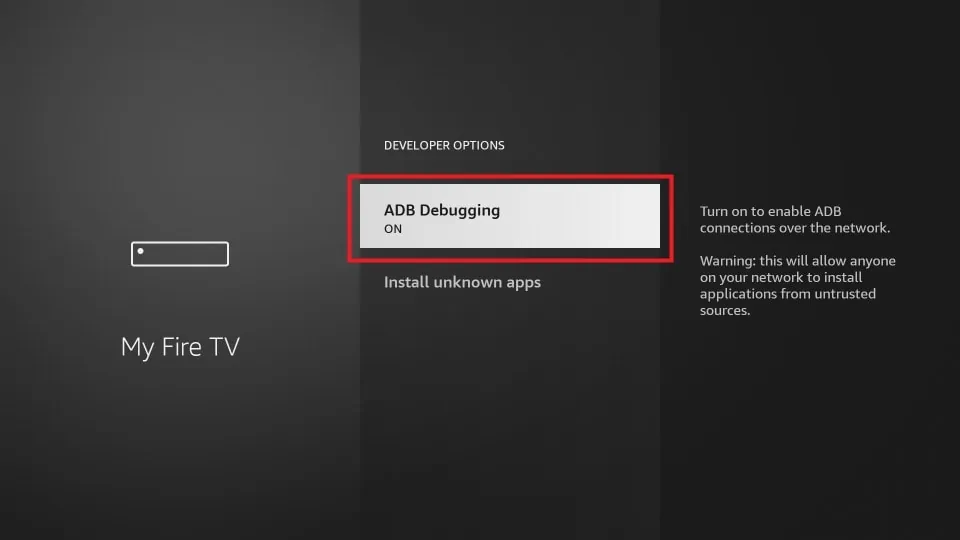
10. Select ADB Debugging to turn it ON. This change is necessary to use the Mouse Toggle app.
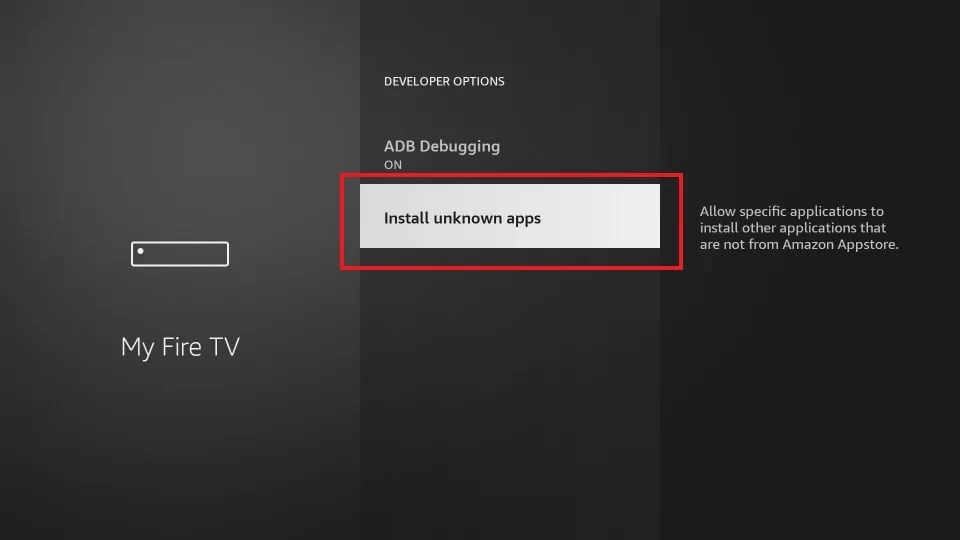
11. Next, select Install unknown apps.
Note: On some software versions, you might see Apps from Unknown Sources instead. In that scenario, simply turn it ON and skip step 12 below.
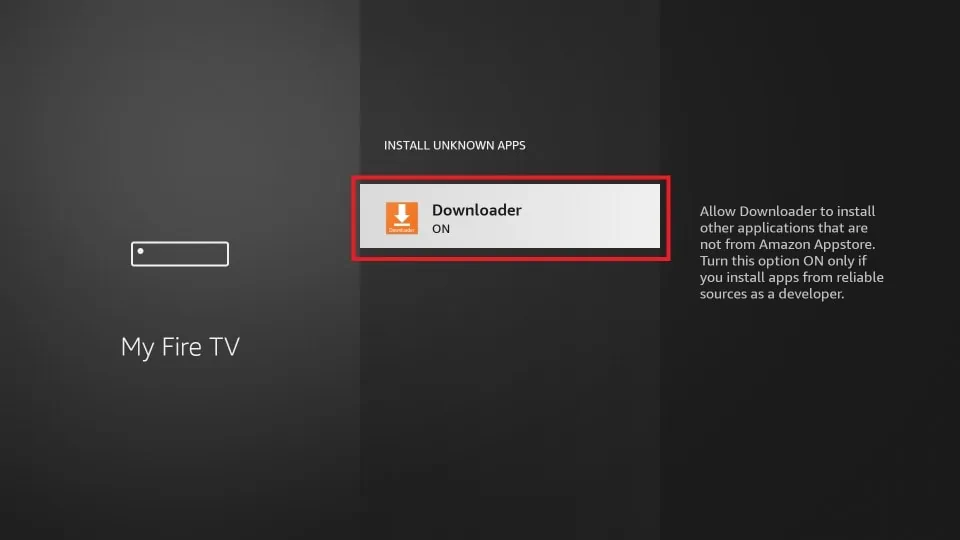
12. Find Downloader. If it’s OFF, click on it to turn it ON.
With these steps completed, your FireStick is now ready to sideload Turbo VPN and its companion apps. In the following three parts, I will show you how to install and use Mouse Toggle, Rotate Screen Orientation App, and finally Turbo VPN.
Part 2: Install Mouse Toggle App on FireStick
Turbo VPN’s Android APK is primarily built for touch devices. Hence, it doesn’t interact well with the FireStick remote. The Mouse Toggle app allows users to navigate using a mouse pointer without connecting an actual mouse. You can control this pointer using the direction keys on your FireStick remote. This app will help us overcome the navigation issues that are present when we use Turbo VPN on FireStick.
Note: If you already have Mouse Toggle installed on your FireStick, skip to Part 3.
Below are the steps to install and set up the Mouse Toggle app.
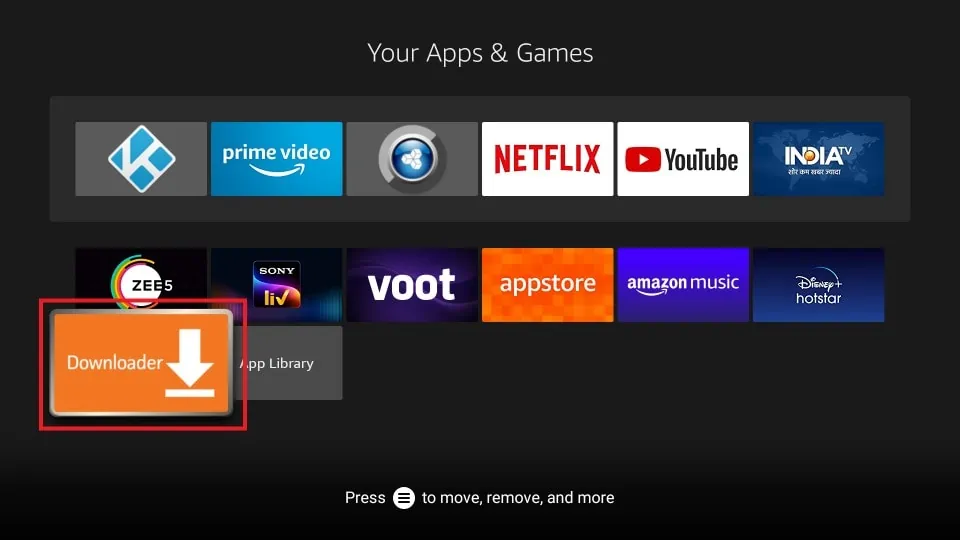
1. Press the home button your FireStick remote. Go to the app menu on your FireStick home screen. It’s just beside the settings gear icon.
2. Scroll to Downloader and click on it.
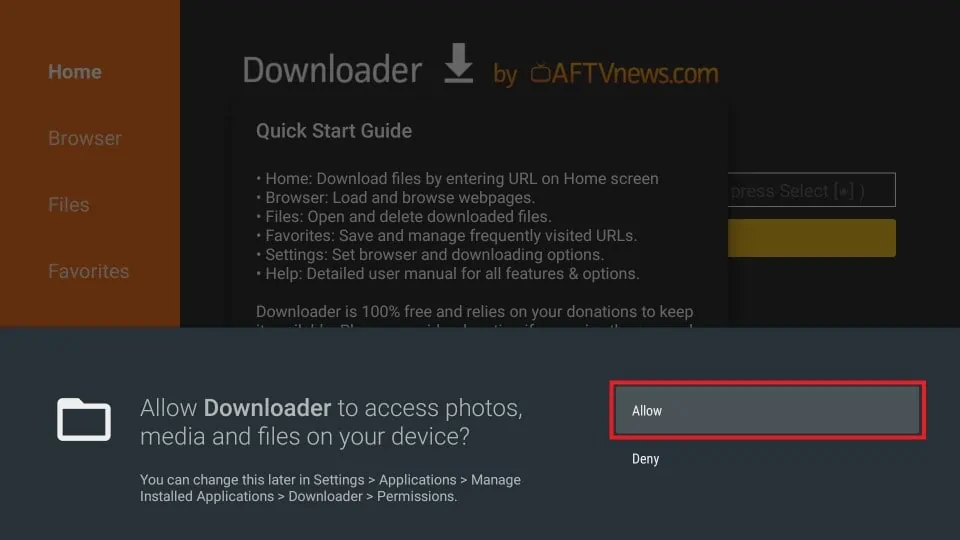
3. Click on Allow if it asks for permission to access photos, media and files. It needs these permissions to install apps.
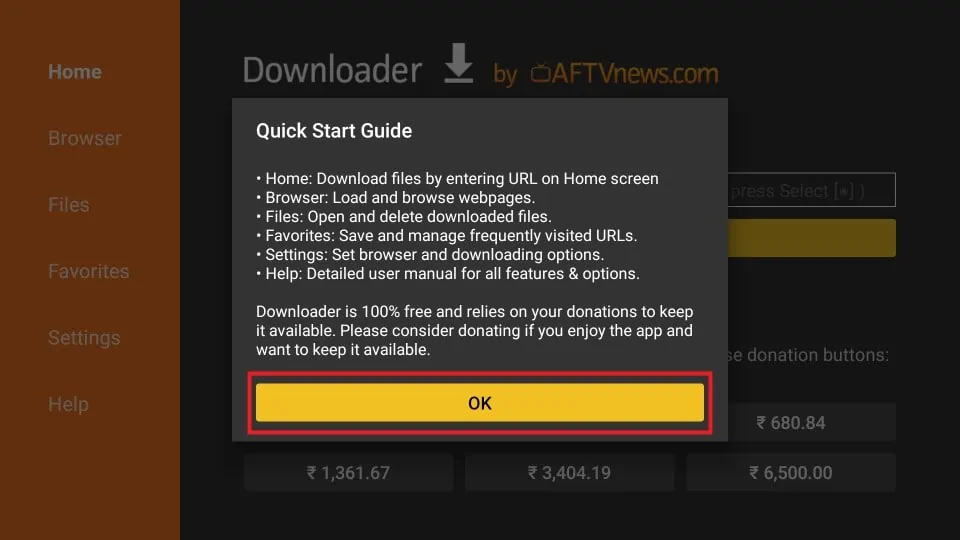
4. When the Quick Start Guide pops up, read it and click on OK.
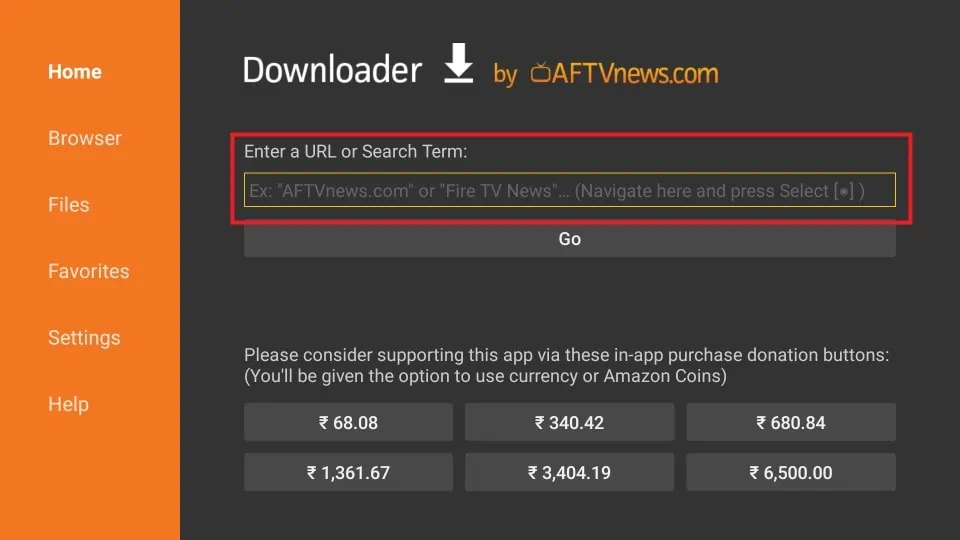
5. Click on the URL text box present on Downloader’s main screen.
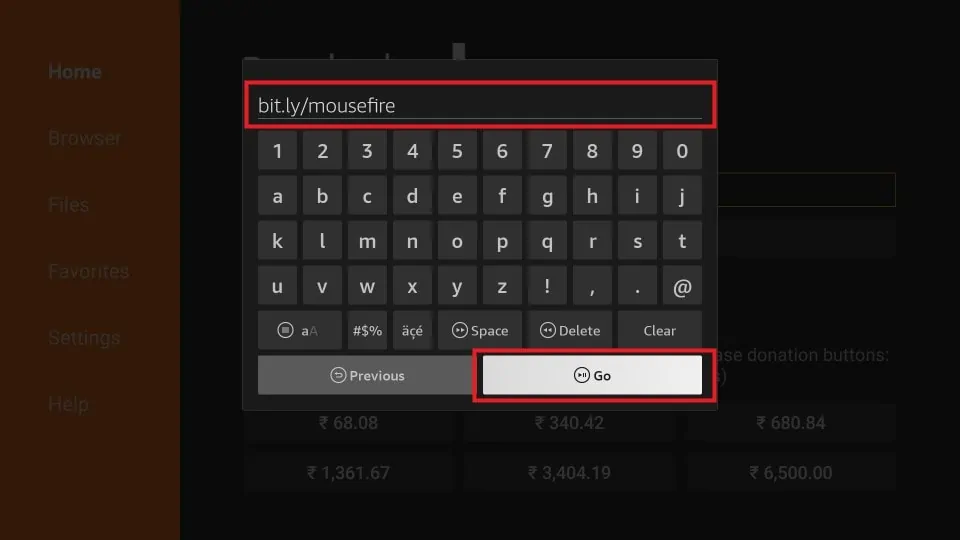
6. A virtual keyboard will pop up. Enter the following URL using the virtual keyboard.
- For Fire Stick Gen 1, Fire Stick Gen 2, Fire TV 1, Fire TV 2, or Fire TV Cube: firesticktricks.com/mouse
- For FireStick Lite, FireStick 4K, or FireStick 4K Max: bit.ly/mousefire
Note: These files are hosted and distributed on MediaFire.com, not on FireStickTricks.com. If a URL doesn’t work for you, try typing out the full version: https://www.firesticktricks.com/mouse or https://www.bit.ly/mousefire
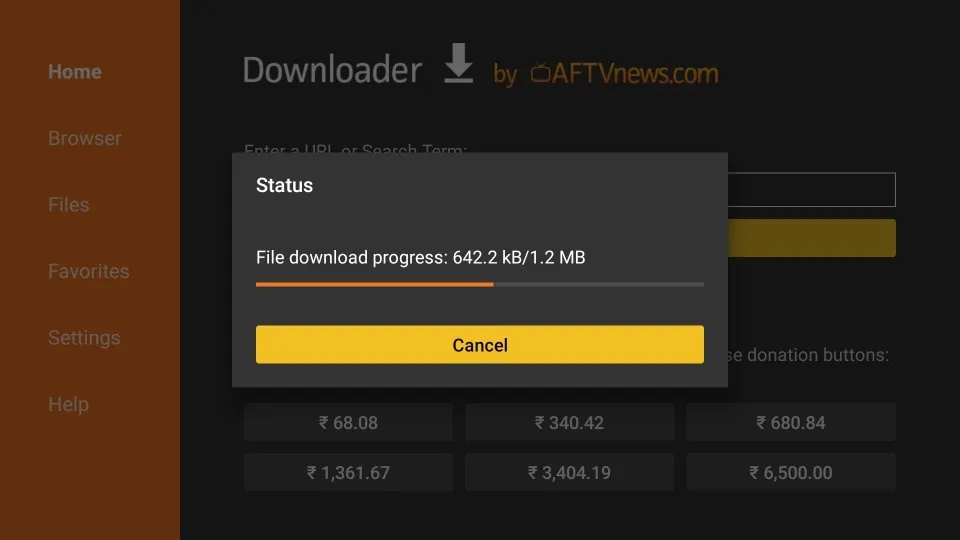
7. The APK file will start to download.
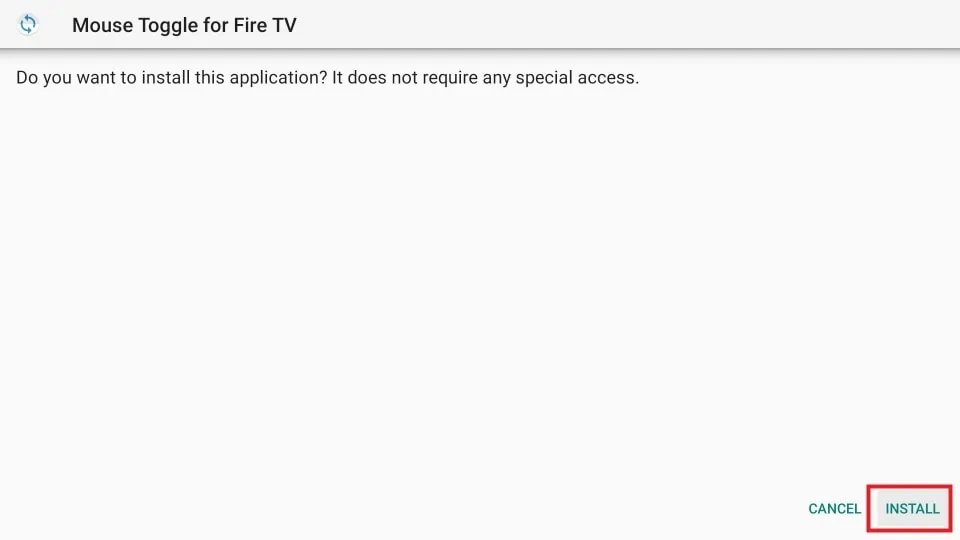
8. When the download is done, click on INSTALL.
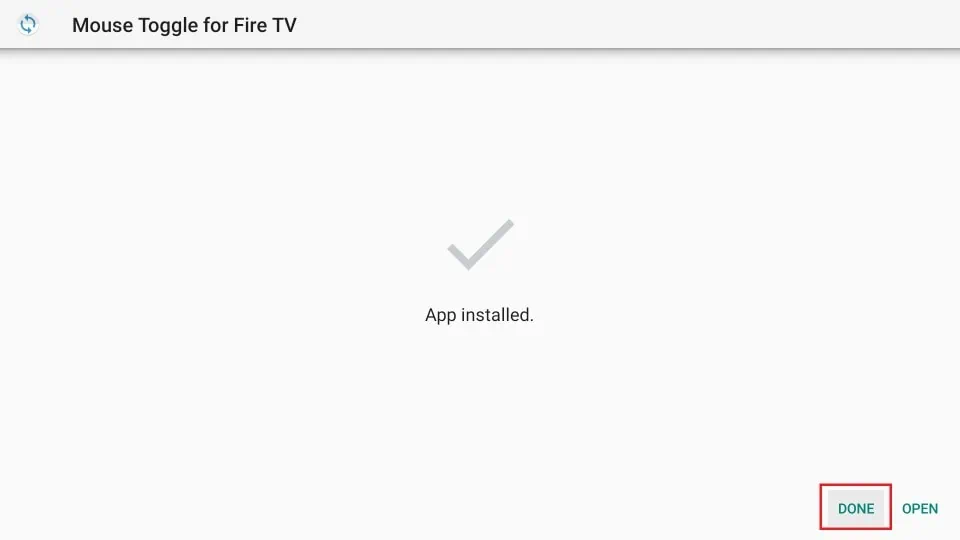
9. Click on DONE.
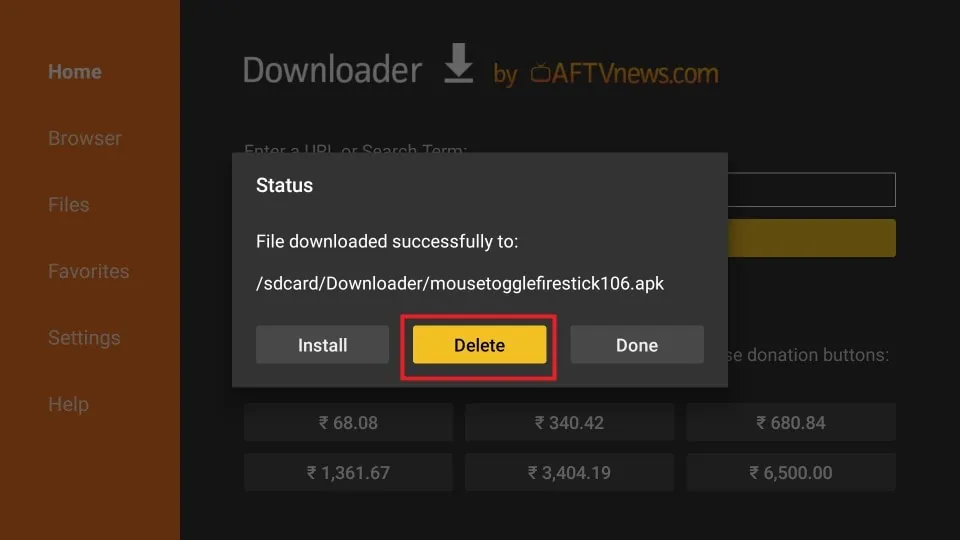
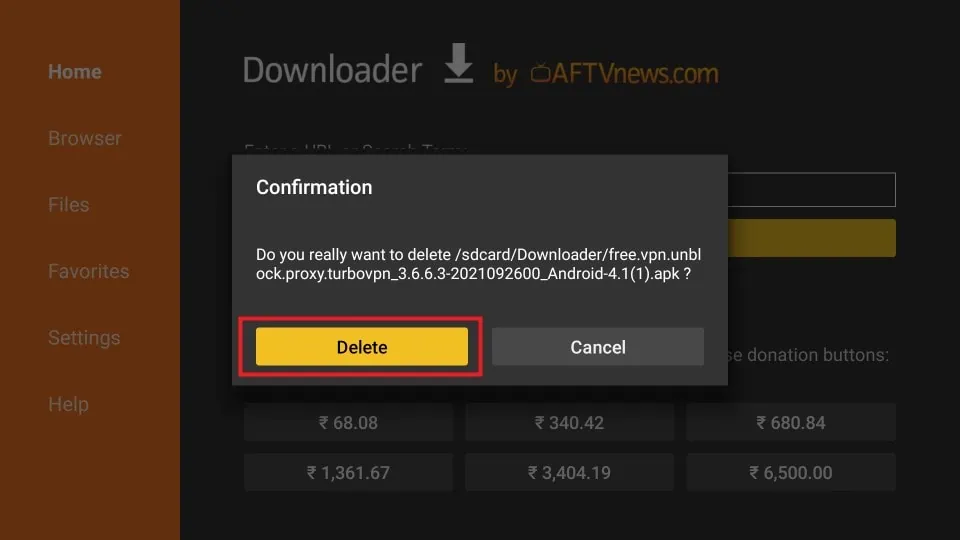
10. A window will be displayed. Click on Delete to delete the APK file, as its only purpose is the installation itself. Deleting APK files after apps have been installed helps to free up storage on your FireStick.
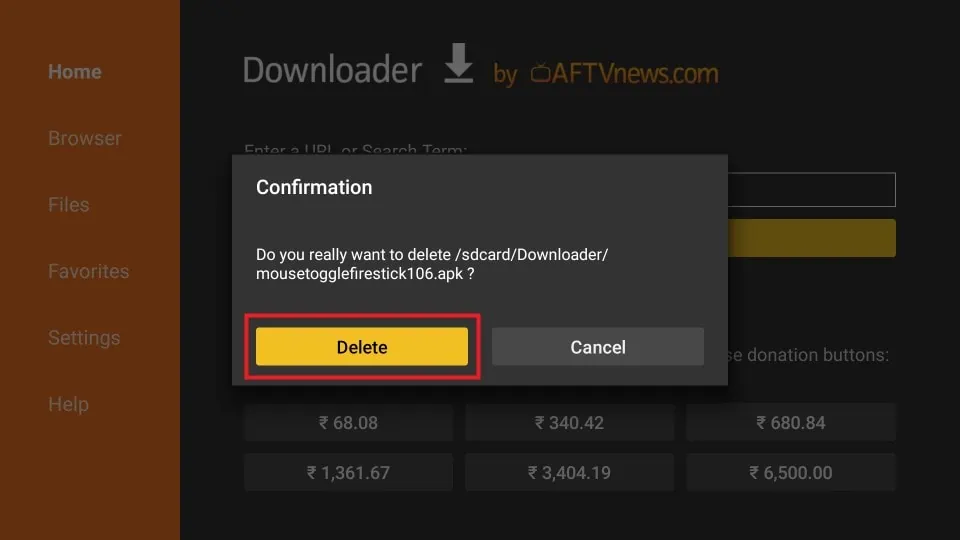
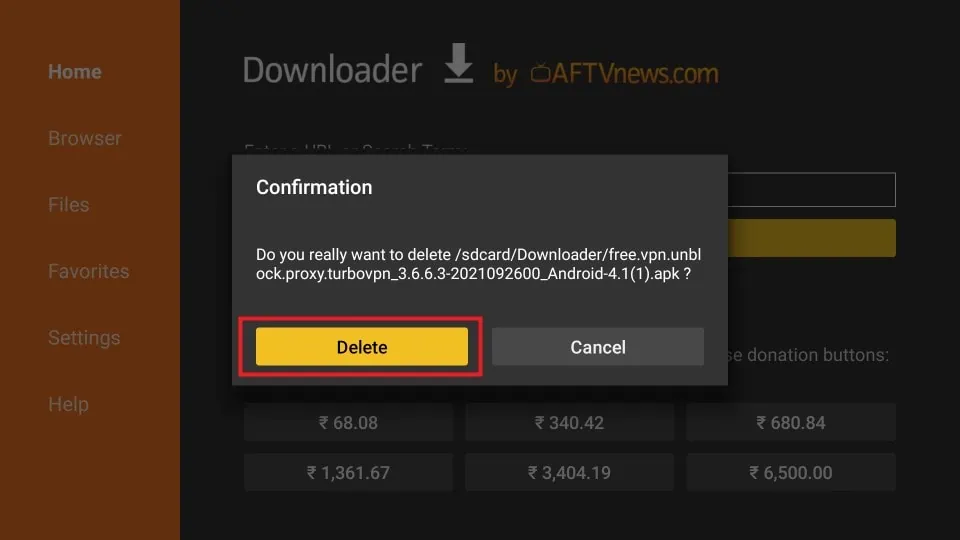
11. Again select Delete to delete the APK.
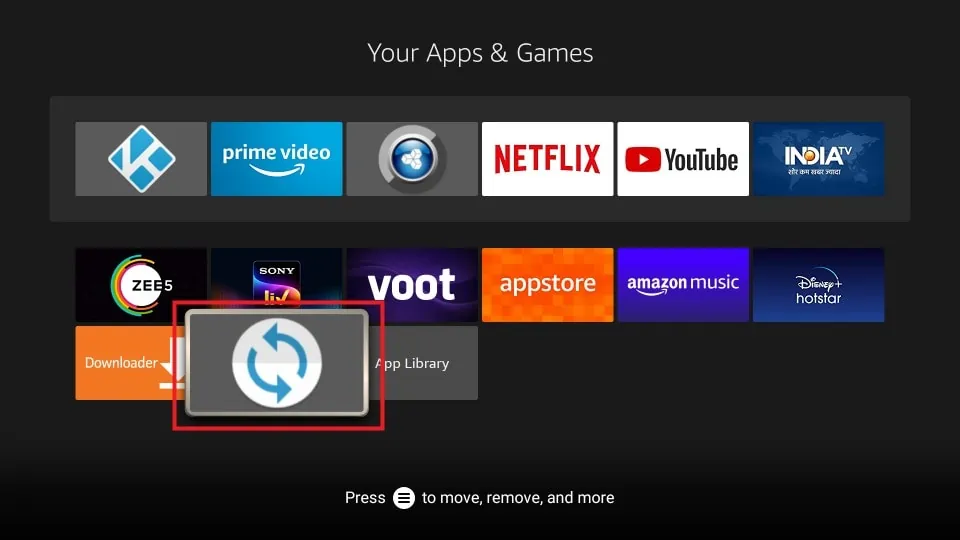
12. Press the home button on your remote to go back to your FireStick home screen. Click on the app menu button.
13. Scroll down and select the Mouse Toggle banner.
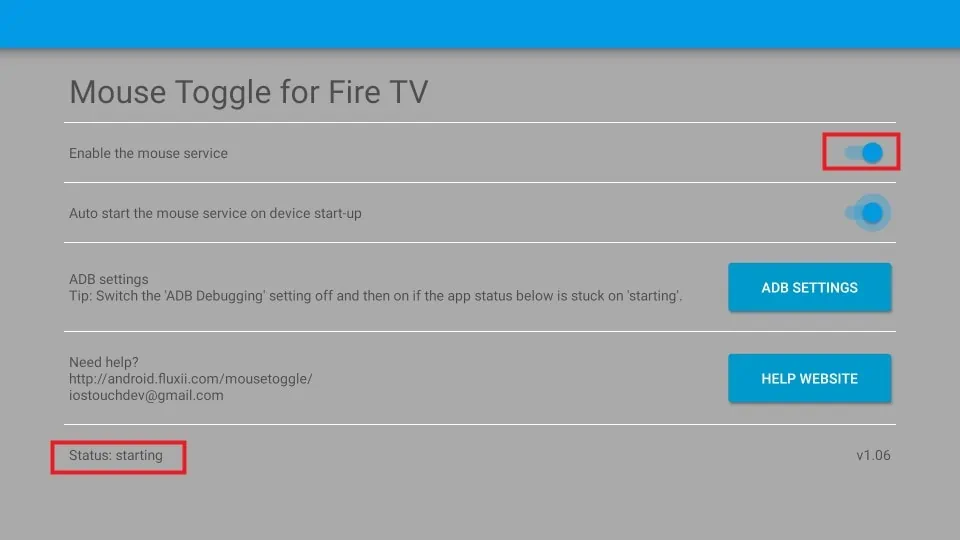
14. Turn on the toggle Enable the mouse service if it is off.
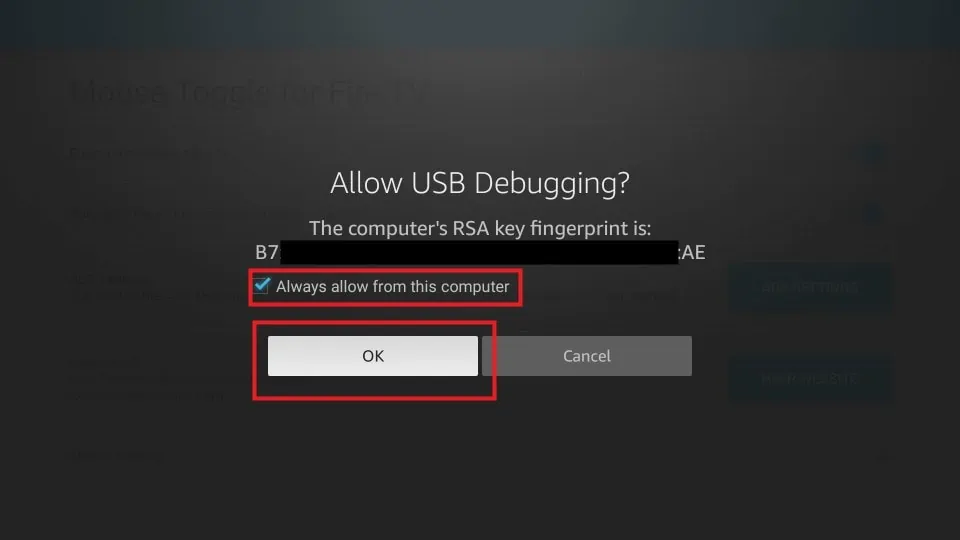
15. A USB Debugging window may pop up. Tick the box Always allow from the computer and click on OK.
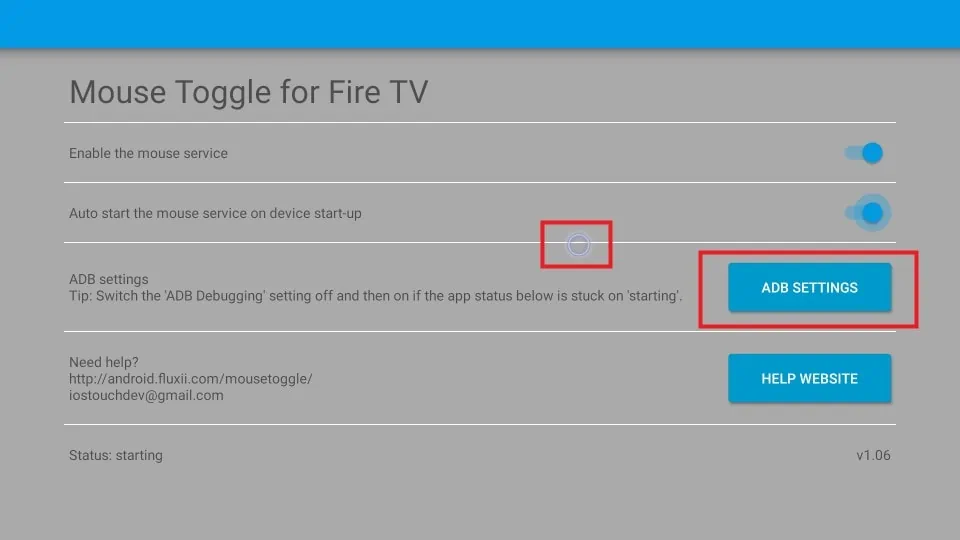
16. The status at the bottom of the screen should go from starting to started.
If the status is stuck at starting, click on the blue ADB SETTINGS box to restart ADB. This should solve the issue. As you can see in the screenshot below, this fix made the mouse cursor appear for me.
Note: In some cases, the status can get stuck on starting even after trying the ADB fix. Simply ignore the warning and proceed to turn on the pointer by double-pressing the play/pause button on your remote. This may solve the issue for you.
You can now use the mouse pointer by double-pressing the play/pause button on your FireStick remote. The simulated mouse cursor can be controlled via the directional buttons on the remote. Double-pressing the play/pause button again will disable the mouse pointer.
You have successfully set up the Mouse Toggle app. We will now start the installation process for the Rotate Screen Orientation app.
Part 3: Install Rotate Screen Orientation App on FireStick
As I mentioned earlier, since Turbo VPN isn’t officially available for FireStick devices, there are certain issues that need to be fixed to iron out the experience. Turbo VPN is made for portrait screens, whereas FireStick is made for landscape TV screens. This leads to scaling and resolution issues. To fix them, we can use the Rotate Screen Orientation app on FireStick. To install the app, follow these steps.
Note: If you have the Rotate Screen Orientation app installed on your FireStick, skip to Part 4.
1. Open the Downloader app. Remember you can access any app by pressing and holding the home button on your FireStick remote, going to Apps, and selecting the app you want to launch.
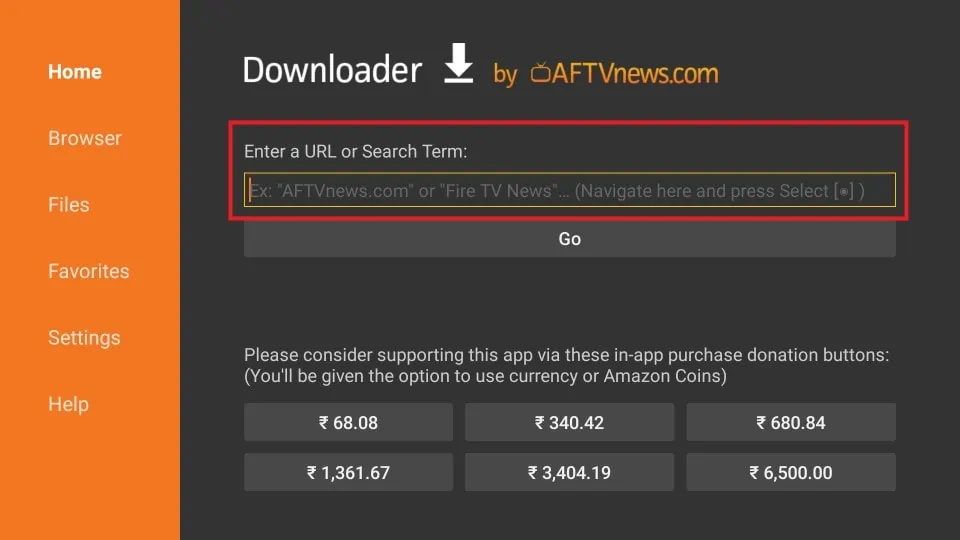
2. Click on the URL text box.
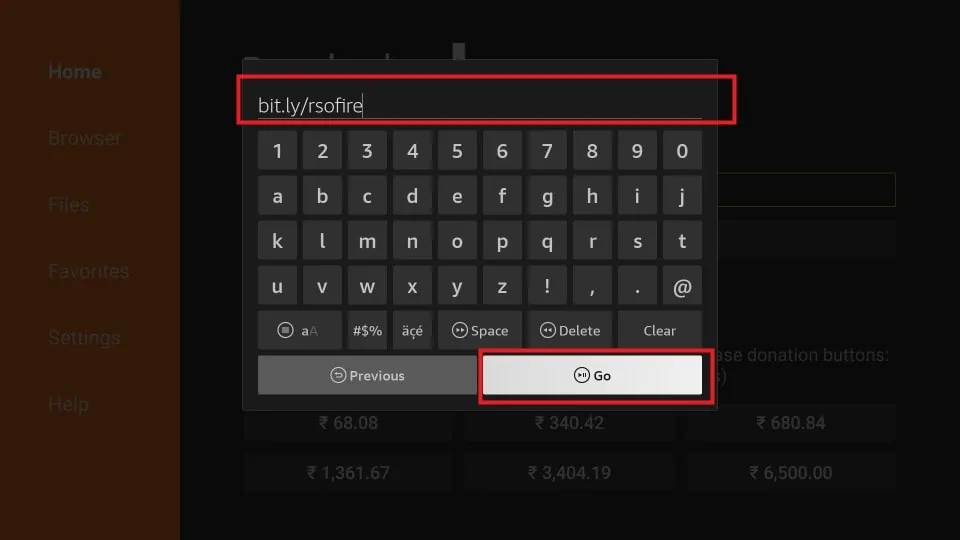
3. Use the virtual keyboard to type bit.ly/rsofire and click on Go. The APK will be downloaded.
Note: The APK file is hosted and distributed by MediaFire.com, not FireStickTricks.com. If the URL doesn’t work for you, try typing out the full version: https://www.bit.ly/rsofire
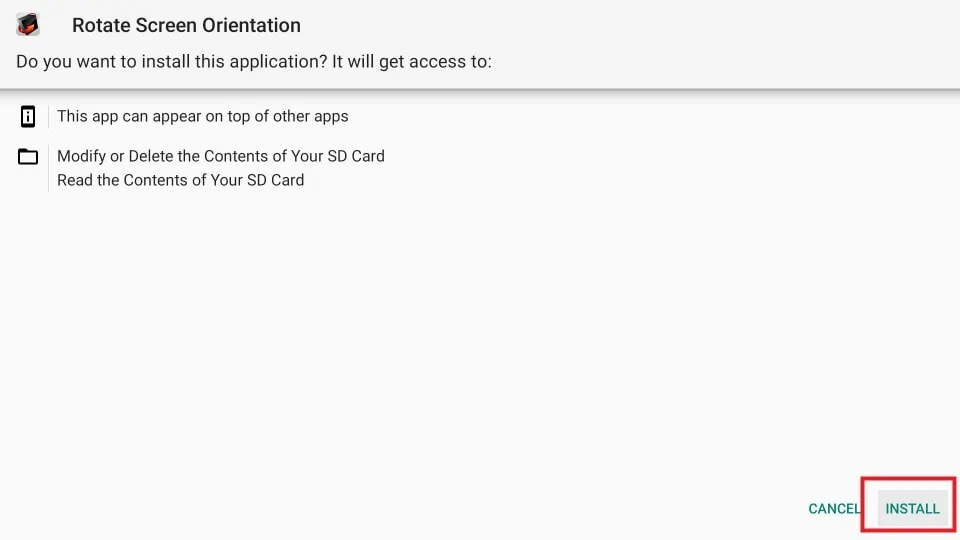
4. After the download, click on INSTALL.
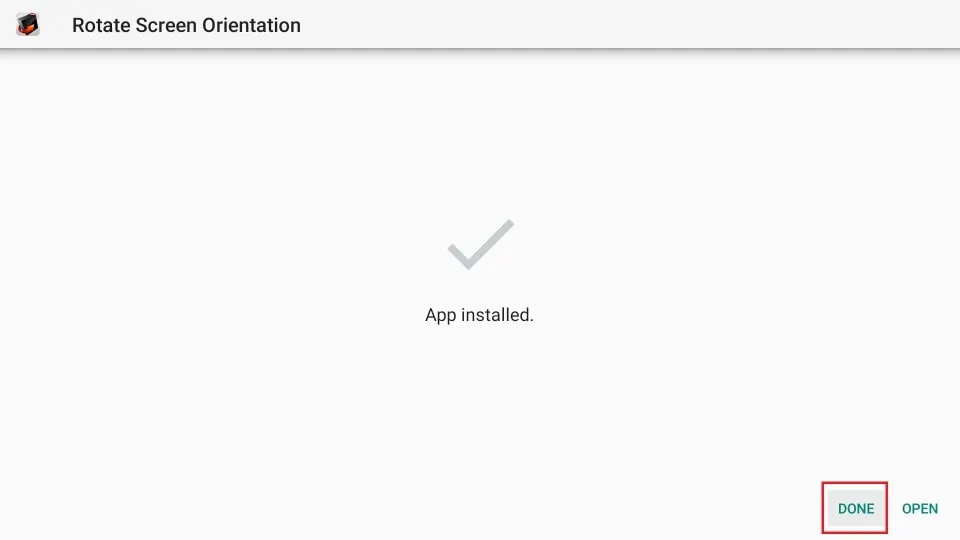
5. Select DONE.
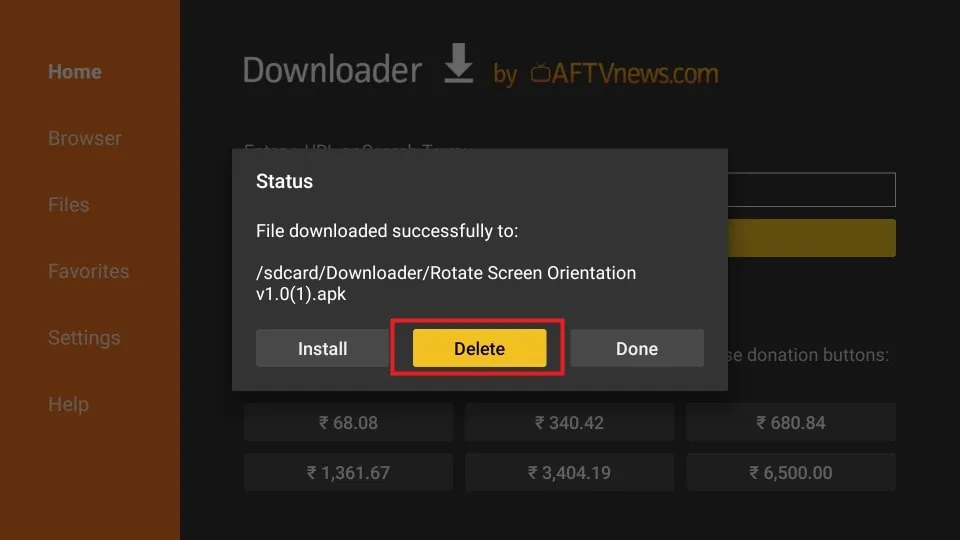
6. Select the Delete button to delete the APK file, as it’s no longer needed.
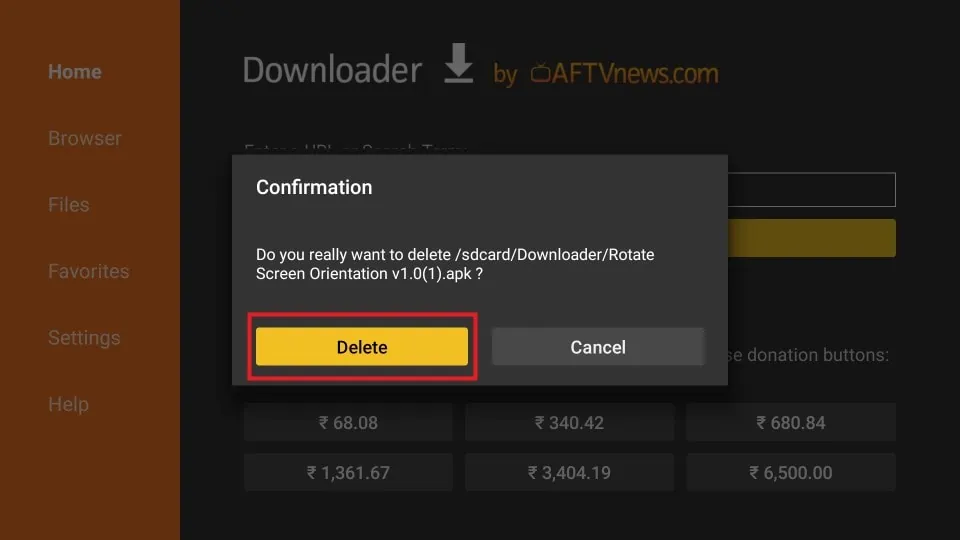
7. Click Delete again.
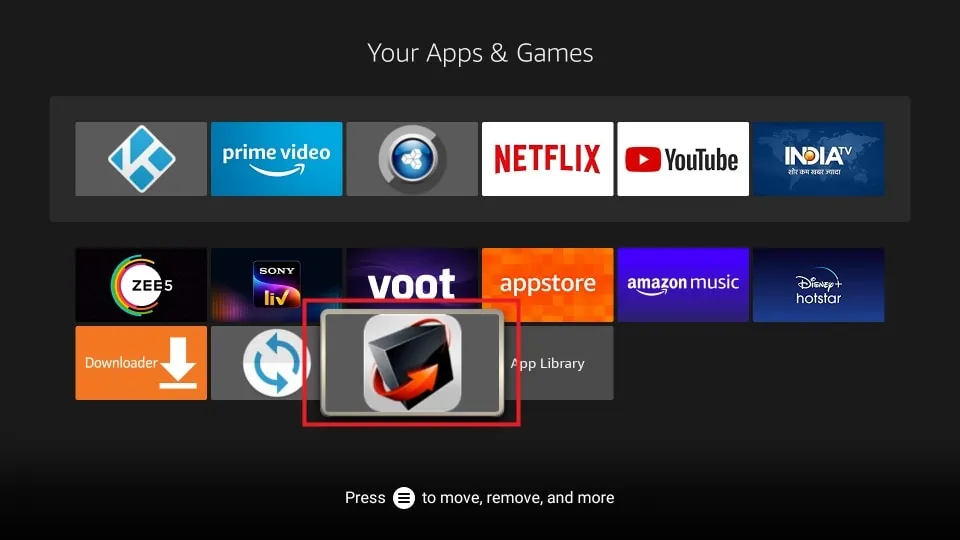
8. The app is installed on your FireStick. Let’s open it. Press the home button on your FireStick remote and go to the app menu.
9. Click on the Rotate Screen Orientation app banner (refer to the image below).
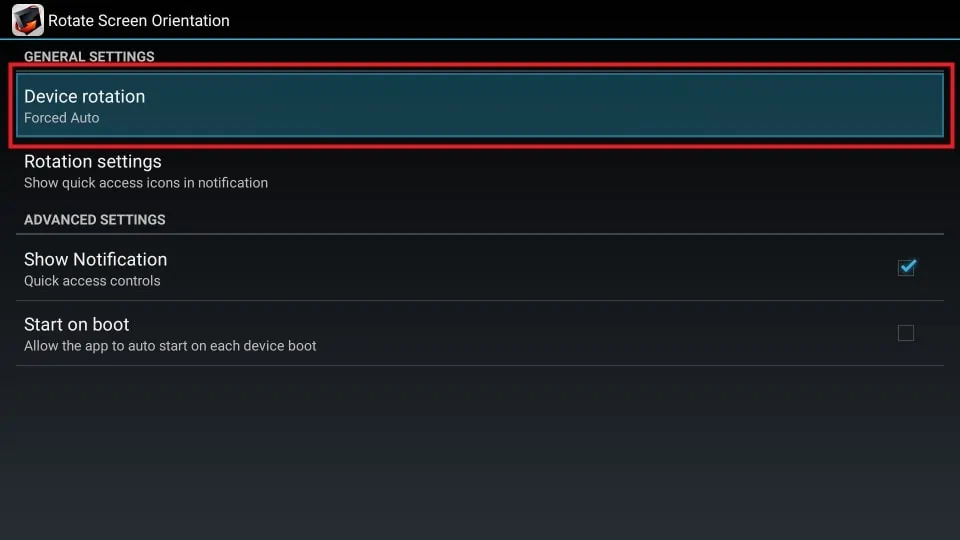
The app is quite straightforward to use. For optimal functioning of the Turbo VPN app, change these settings in the Rotate Screen Orientation app.
10. Click on Device rotation.
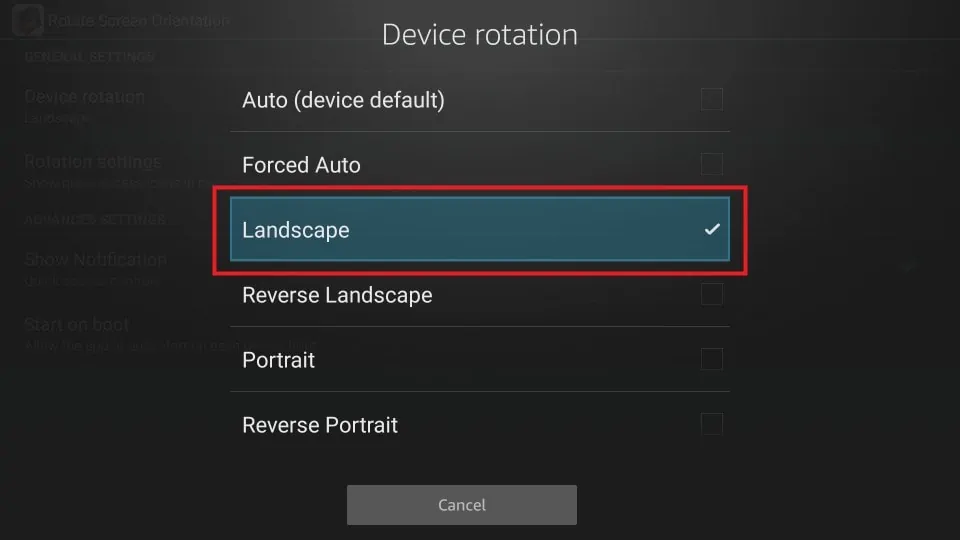
11. Select the Landscape option.
The FireStick is now completely set up to properly run the Turbo VPN app.
Finally, I will now show you how to sideload Turbo VPN on your FireStick.
Part 4: Install Turbo VPN on FireStick
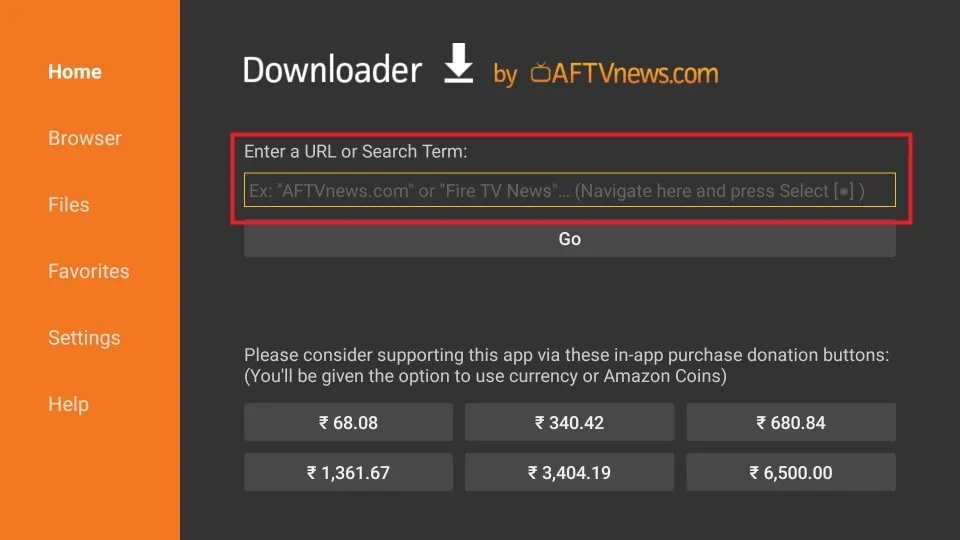
1. We will begin the installation process by launching the Downloader app. Same procedure as before: Press your remote’s home button and select the app menu.
2. Click on Downloader to launch it.
3. Click on the URL text box.
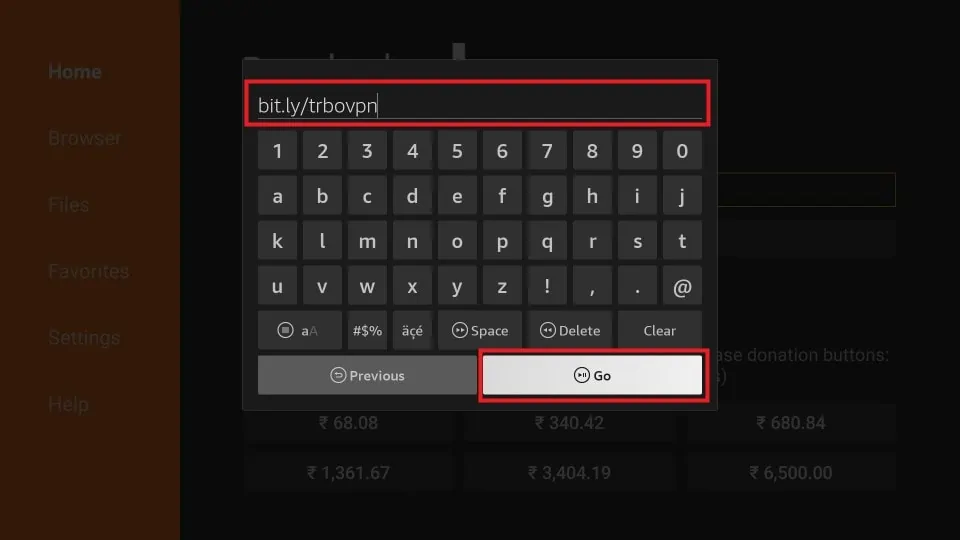
4. A virtual keyboard will pop up. Type bit.ly/trbovpn in the text box and select Go.
Note: The APK file is hosted on MediaFire.com and not on FireStickTricks.com. If the URL doesn’t work for you, try typing out the full version: https://www.bit.ly/trbovpn
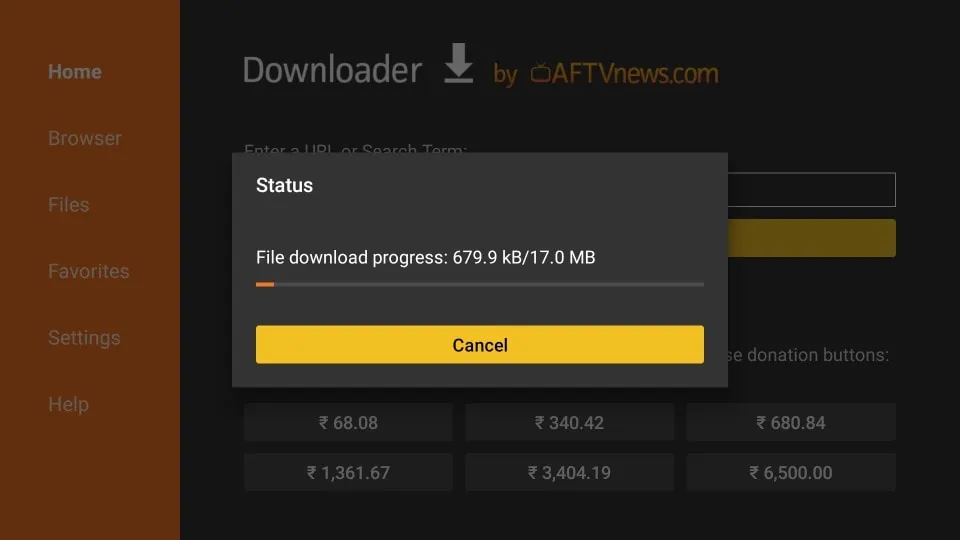
5. The download process will begin.
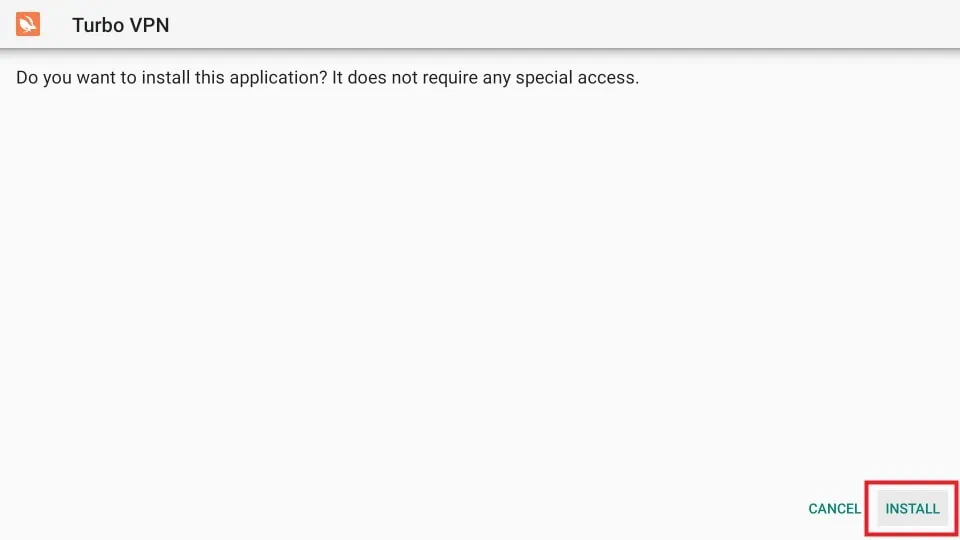
6. When it’s done, click on INSTALL.
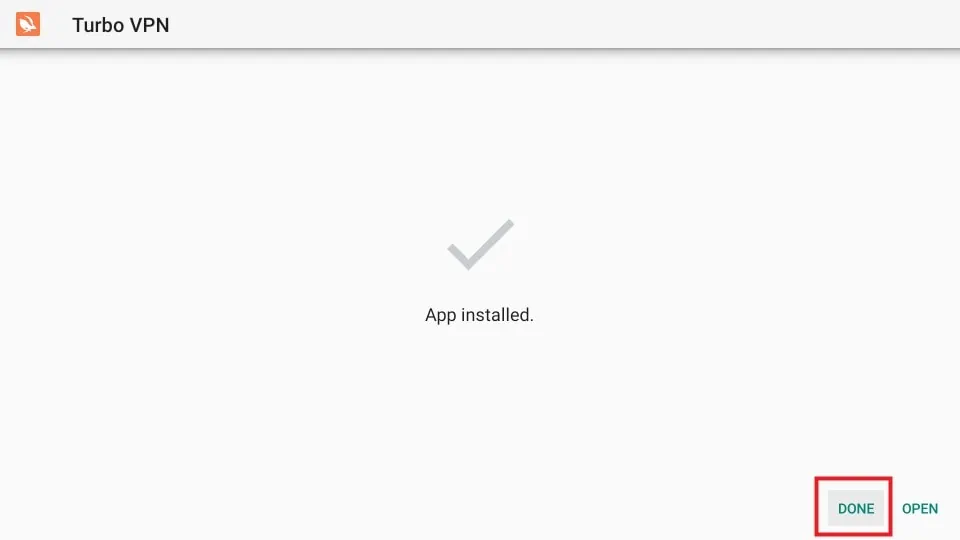
7. Then click on DONE.
8. Select Delete to delete the APK file.
9. Click on Delete once more.
Turbo VPN is successfully installed on your FireStick. Turbo VPN will now work without any issues, as we have already installed the required apps for its smooth functioning.
Add Turbo VPN to FireStick Home Screen
You may need to use a VPN service frequently. I suggest you make a shortcut for the app on your home screen. To do so, follow these steps:
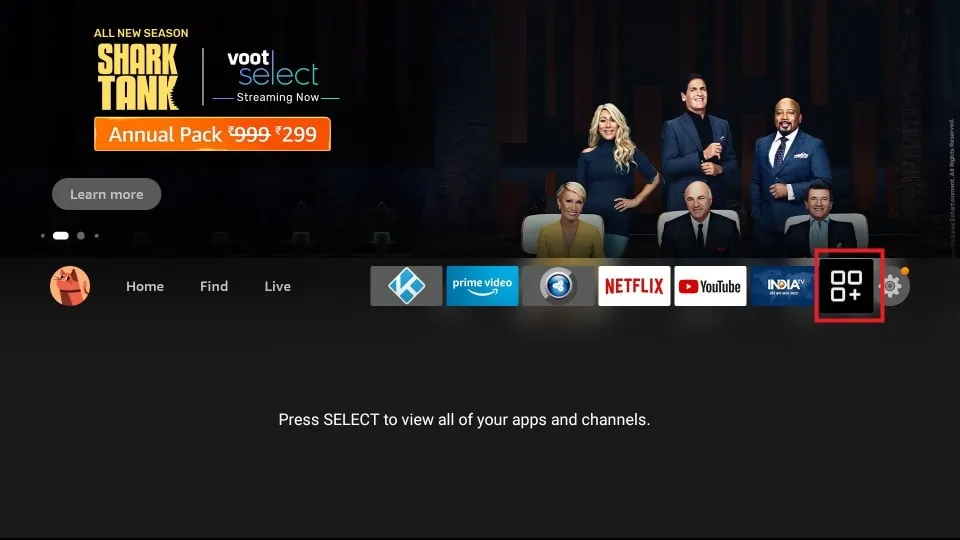
1. Press the home button on your FireStick remote to launch the home screen. Navigate to the app menu on far right of the screen and click on it.
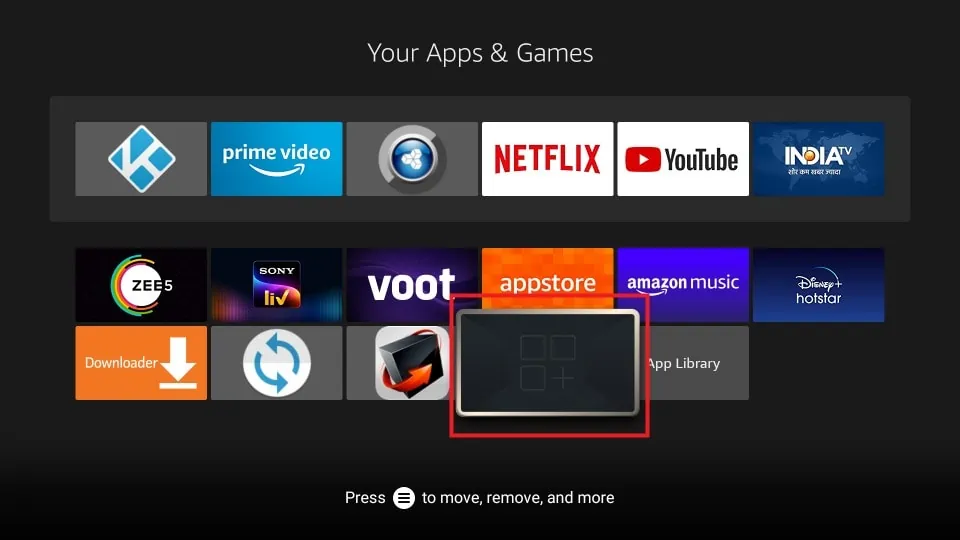
2. Scroll down to the Turbo VPN banner, but don’t select it (it looks like a blank app tile).
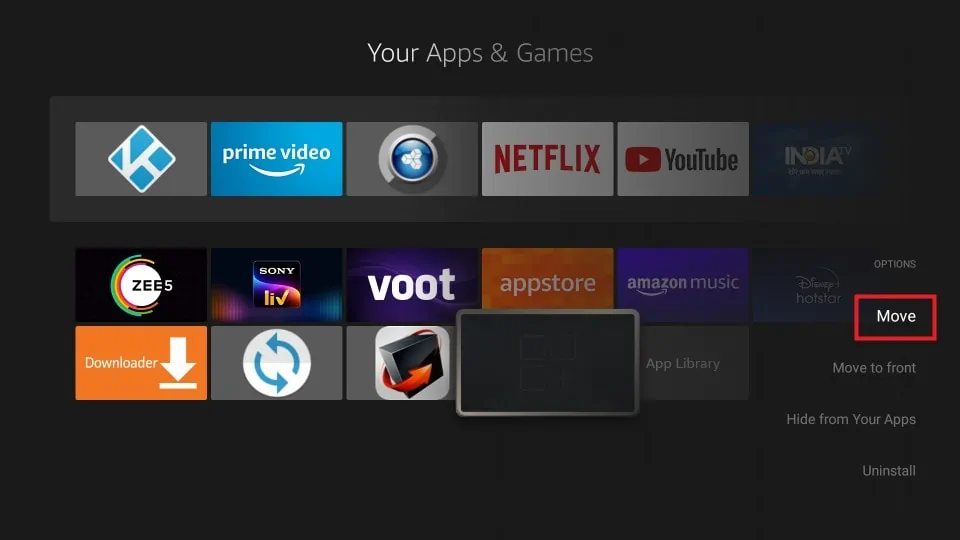
3. Press the menu button (three horizontal lines) on your remote. Select Move.
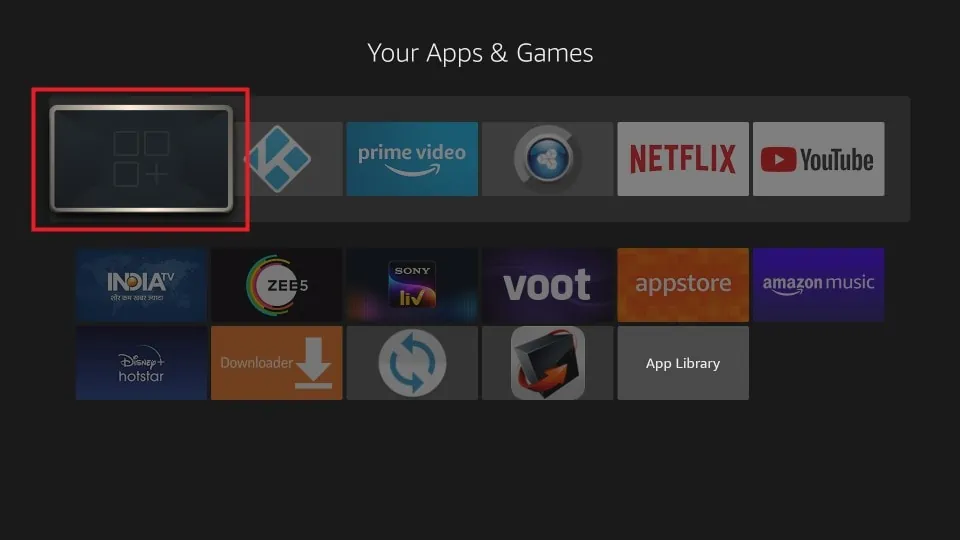
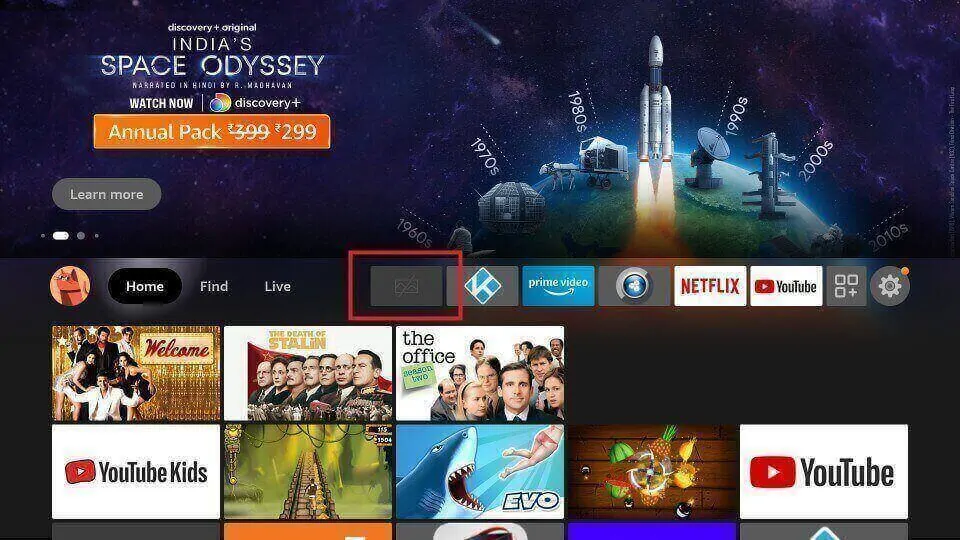
4. Move Turbo VPN to the top row of apps, which are the ones accessible from your FireStick home screen. Press the select button on your remote to confirm the new location.
You have now created a quick-access shortcut for Turbo VPN on your home screen. You can launch the app anytime by clicking on the tile.
How to Set Up and Use Turbo VPN on FireStick
Now I’ll show you how to get started using Turbo VPN.
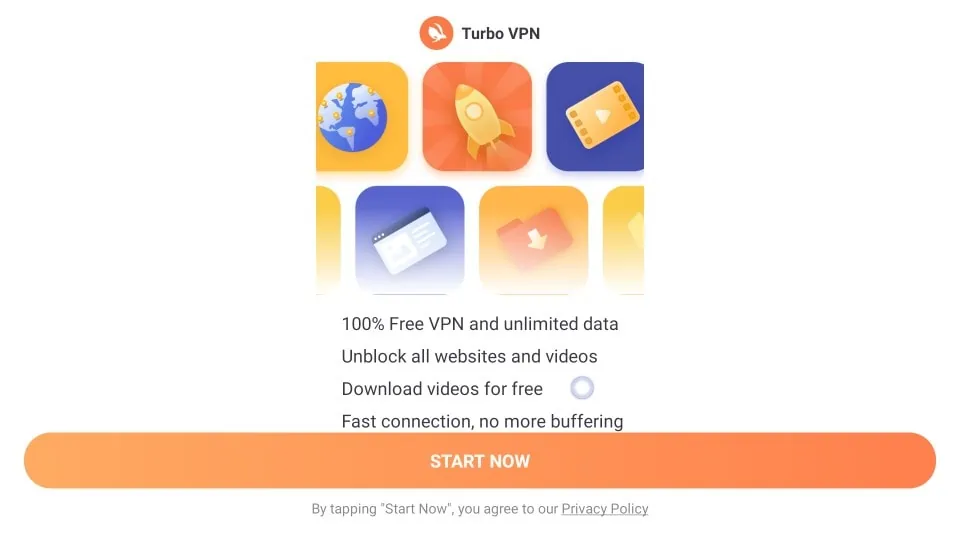
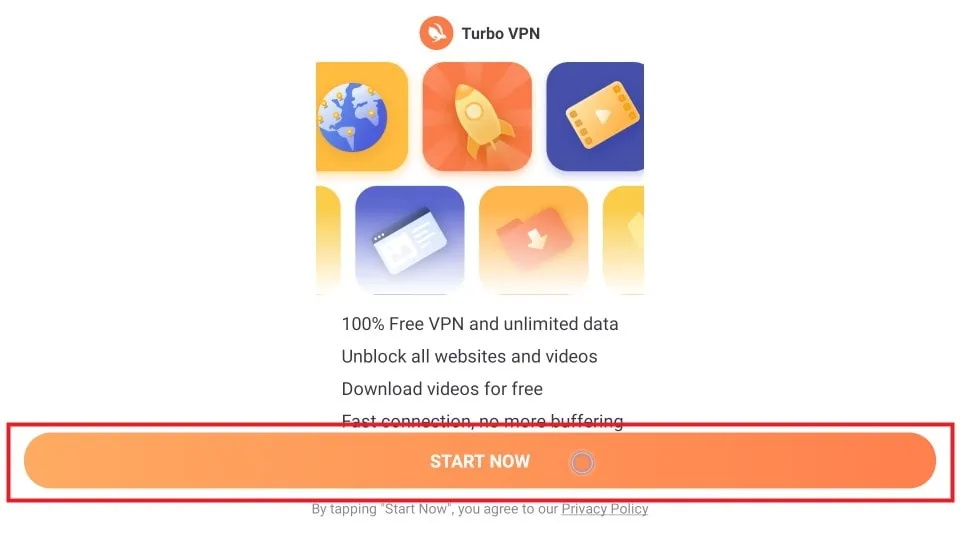
1. First, launch the Turbo VPN app from your home screen or the app menu. The first time you launch the app, you will be greeted by a welcome screen that highlights the major features of the VPN.
2. To navigate within the Turbo VPN app, we will need to activate Mouse Toggle. Let’s do that now. Double-press the play/pause button on your FireStick remote to activate the mouse cursor.
Note: If the cursor disappears at any point, you can get it back by double-pressing the play/pause button again.
3. Move your cursor to START NOW and select it.
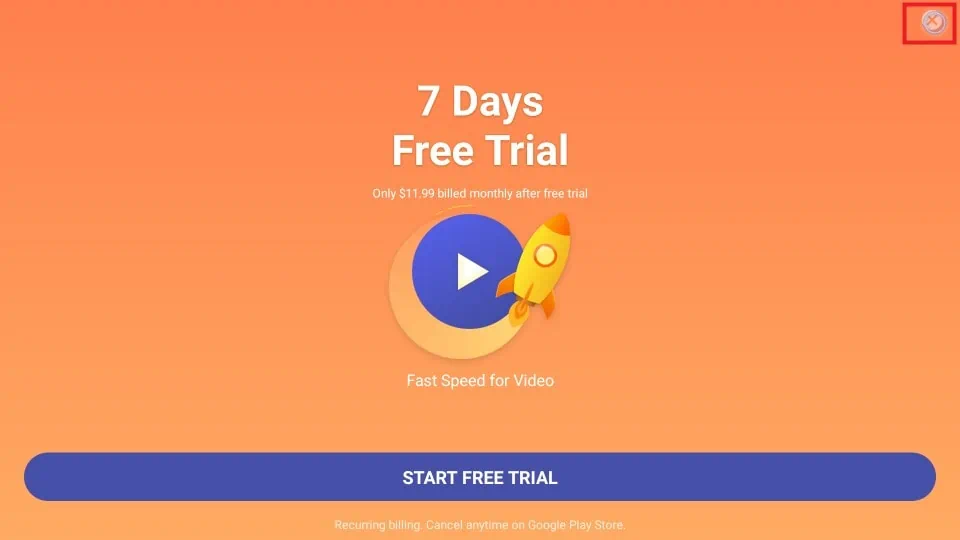
4. You should have already bought a subscription or activated your 7-day free trial, so click the X button in the top-right corner.
Note: Don’t click on the START FREE TRIAL button, as you may end up on a never-ending loading screen! If you don’t have a trial or subscription yet, go ahead and get one using a different device, and then come back to this step.
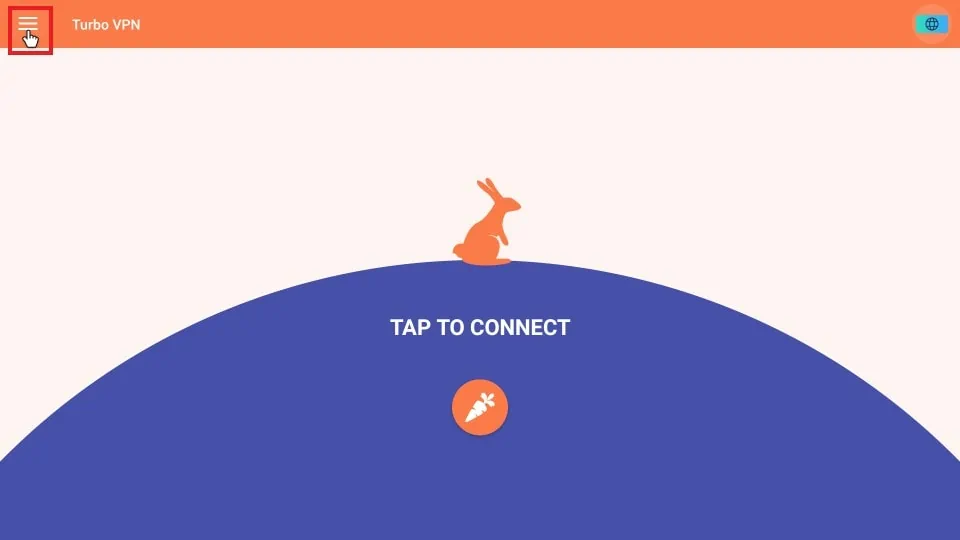
5. To log in, select the hamburger menu (three lines) in the top left.
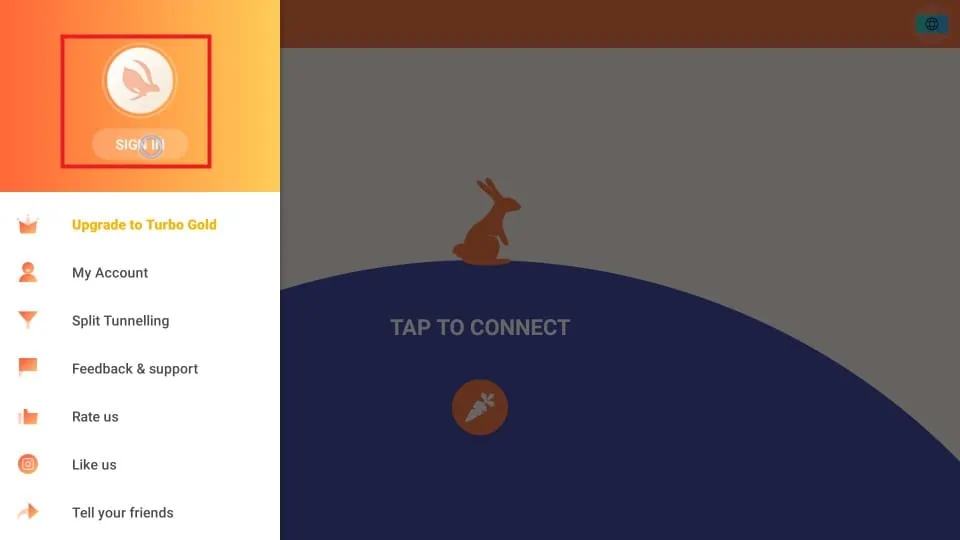
6. Click on SIGN IN.
7. An orange screen will appear. Now disable the mouse cursor by double-pressing the play/pause button.
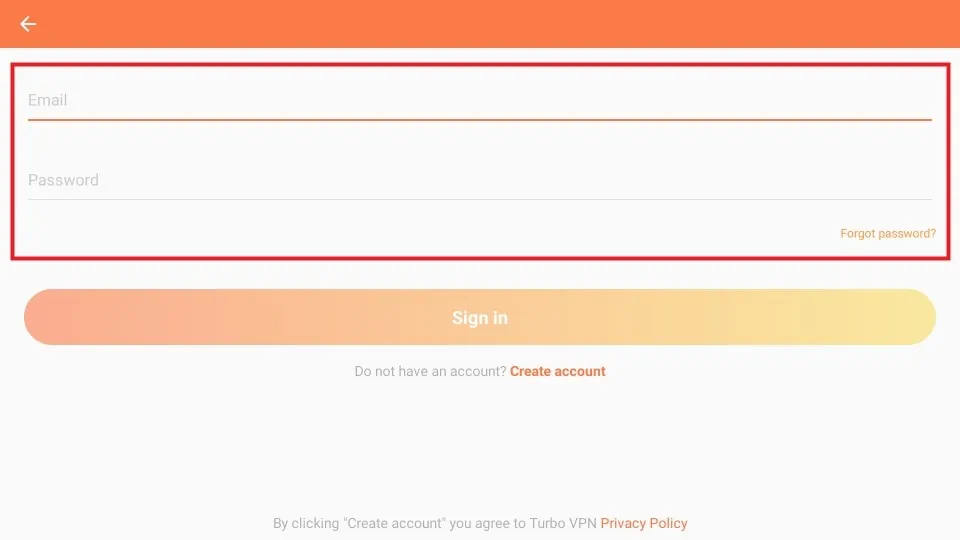
8. Once you’re back to the standard input method, press the down button on your remote to reveal the login page.
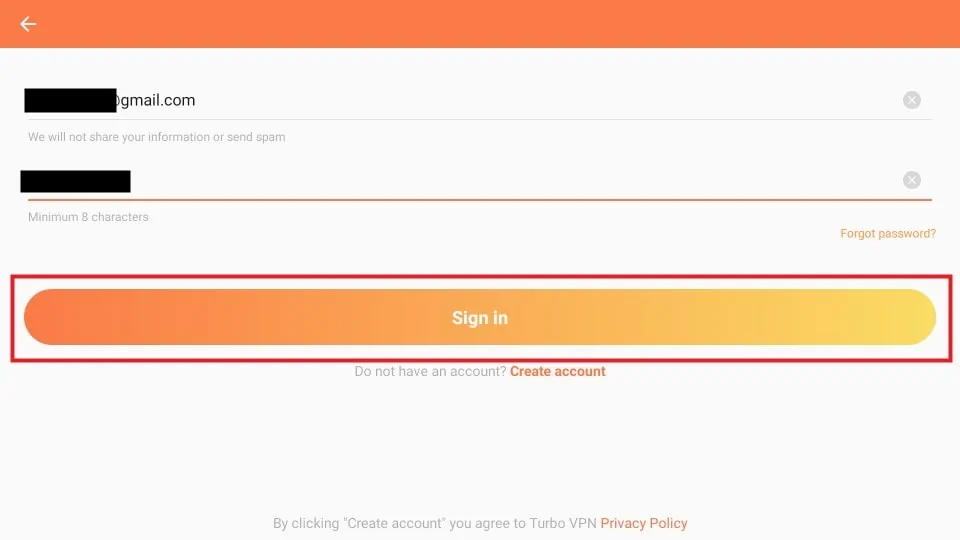
9. Enter your account details using the virtual keyboard and press Sign In.
If you signed in with a paid account, you can now enjoy all the premium benefits of Turbo VPN on your FireStick. Remember to enable Mouse Toggle again for easy navigation.
How to Enable Split Tunneling
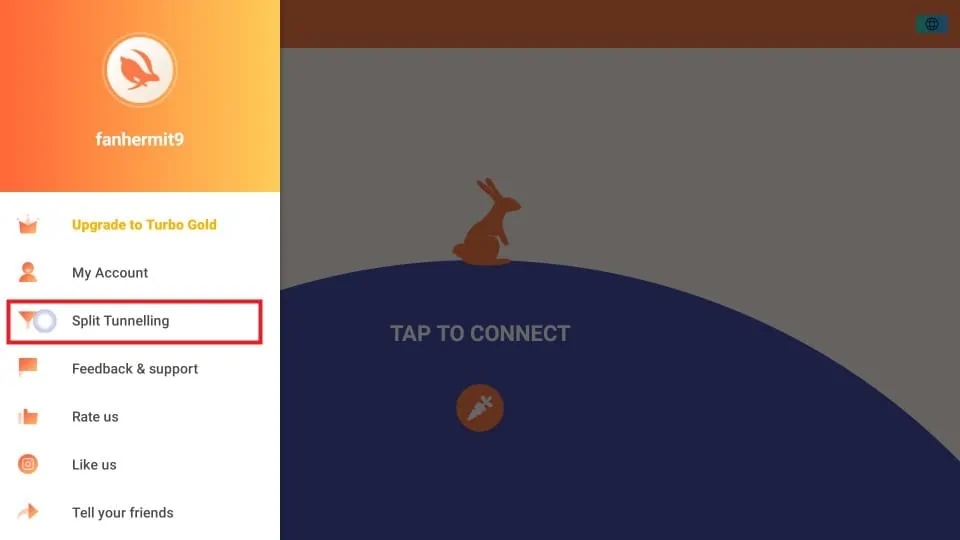
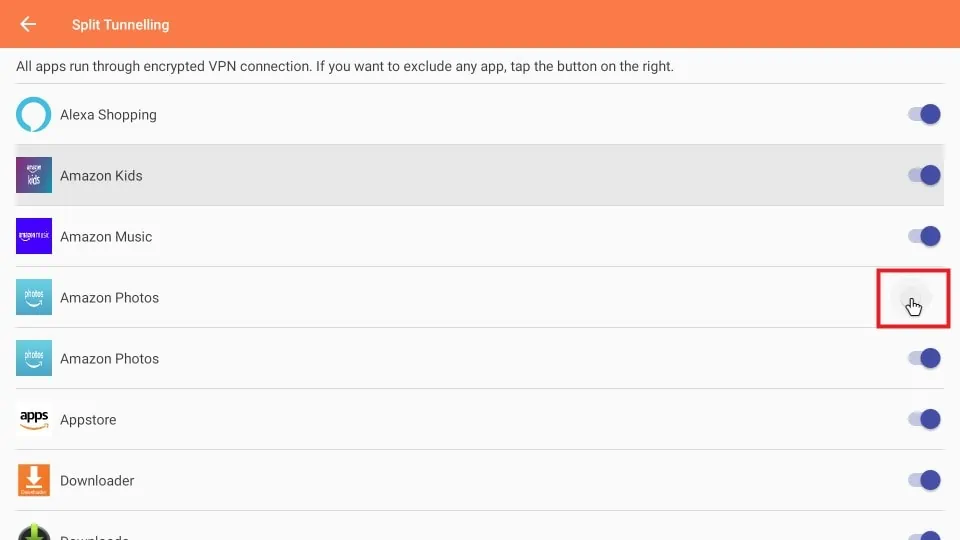
You can use the split tunneling feature to exclude any apps from running through the VPN network. Do the following to access this feature:
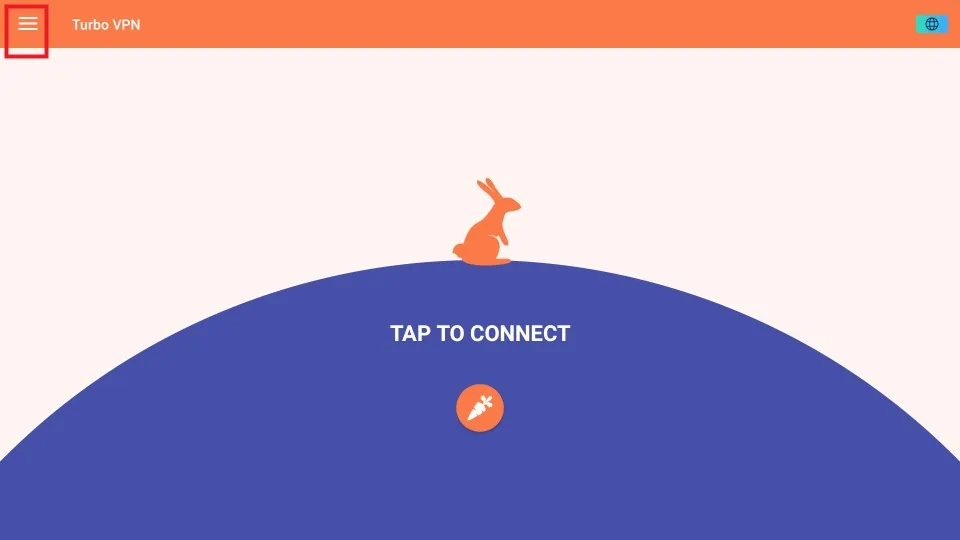
1. Click on the three-line hamburger menu.
2. Select Split Tunnelling.
3. Turn the toggle off for the apps that you want to exclude from running through Turbo VPN. While you’re using these apps, Turbo VPN will be deactivated.
Activating the VPN and Choosing a Server
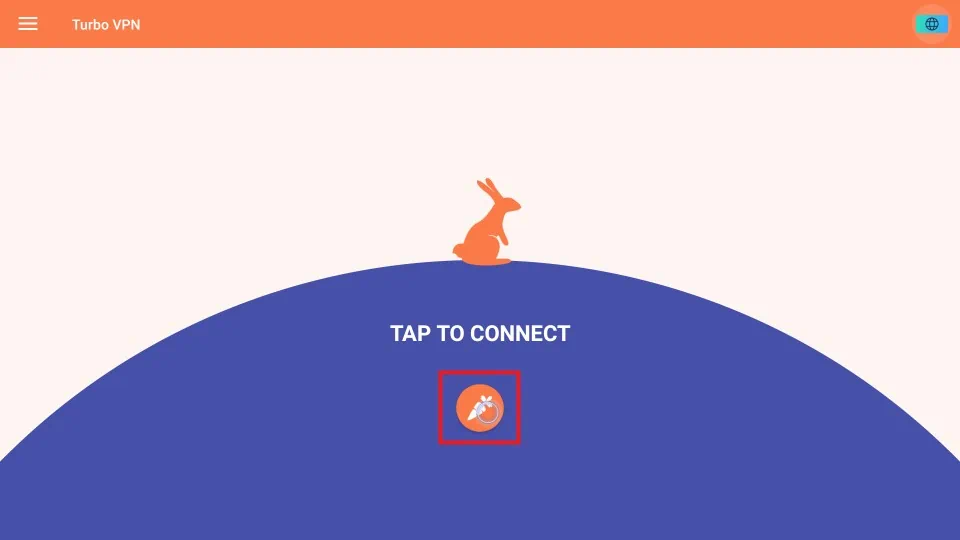
Now that the app and your account are both set up, we can finally turn on the VPN to connect to a private server. You can simple click on the orange carrot button to activate a connection to the fastest server available. This feature is useful when you simply need a fast and private connection irrespective of the target country.
Simply click on the red Disconnect button when you want to end a session. Then click DISCONNECT again to confirm.
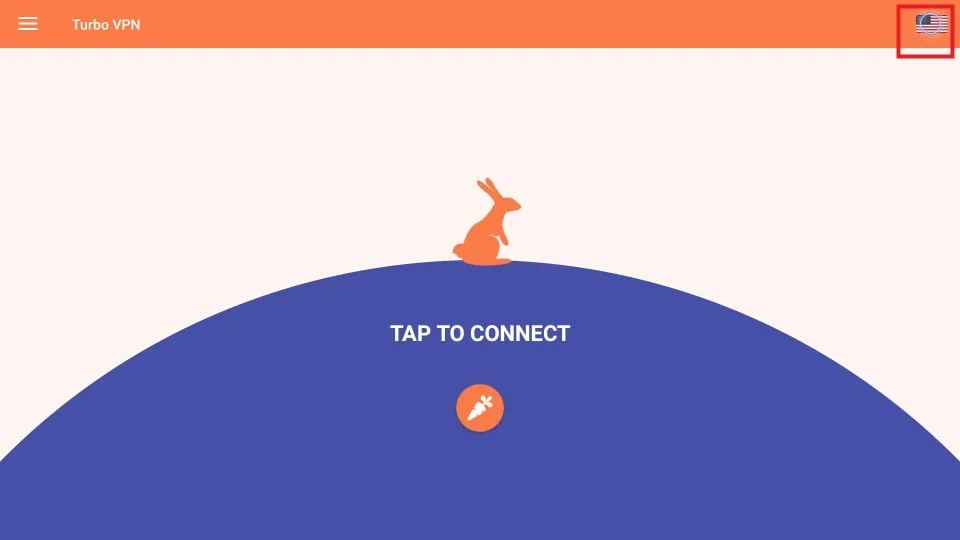
To connect to a server in a particular country, click on the flag icon in the top-right corner of your screen. This icon will change based on the location of the last session.
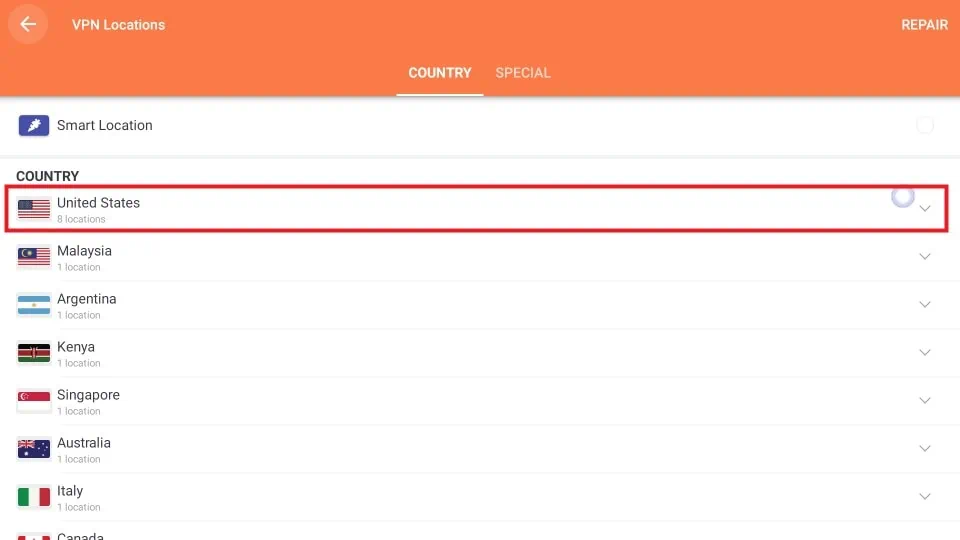
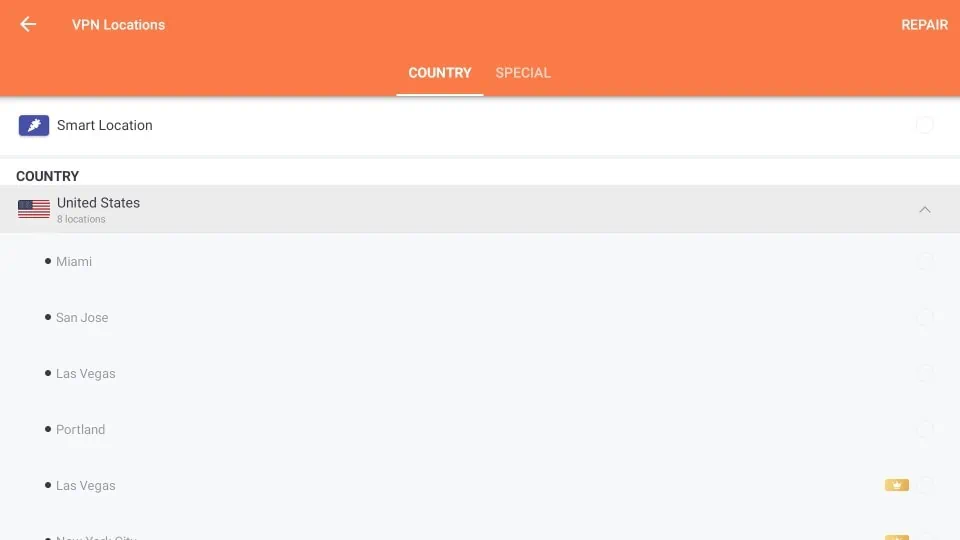
You will find the complete list of servers segregated by country. Scroll down to your desired country and click on it.
Clicking on your desired country will reveal the list of city-specific servers. Select your desired city and click on it. The VPN service will begin, making your connection private.
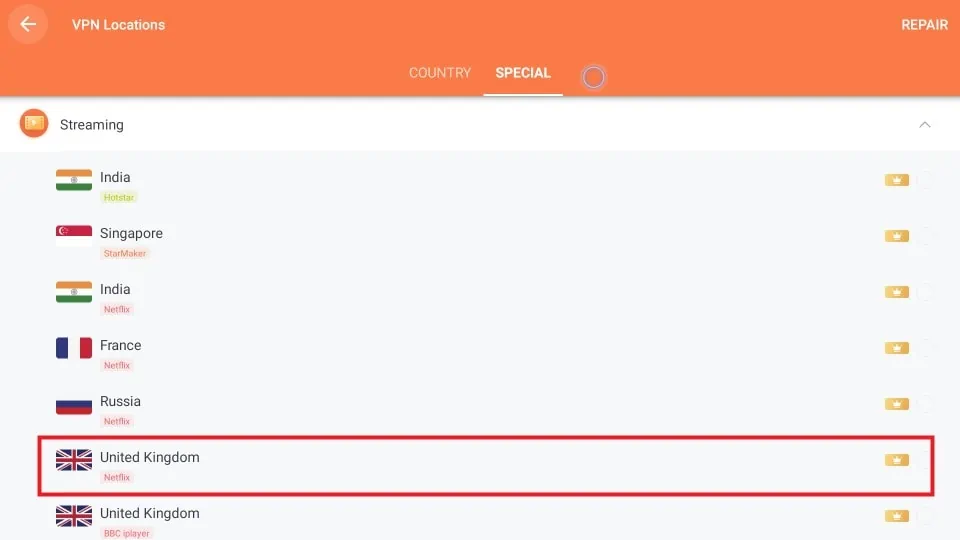
Where Turbo VPN shines is its collection of dedicated servers for streaming. Clicking on the SPECIAL tab at the top reveals a list of various servers around the world dedicated to different streaming sites. For example, clicking on United Kingdom Netflix will allow you to access the content available in Netflix’s UK library.
Wrapping Up
I hope this guide helped you learn how to install Turbo VPN on FireStick and put it to good use. A VPN is great way to easily stream region restricted content anywhere. It can really enhance your experience and unlock new ways of enjoying content on your FireStick. Turbo VPN has a decent subscription plan backed up by a bunch of features and servers. Let me know how well Turbo VPN serves you!
Related:
- Best VPNs for Streaming on FireStick
- Best VPNs for Netflix
- How to Install ExpressVPN on FireStick
- How to Install CyberGhost VPN on FireStick

Suberboost Your FireStick with My Free Guide
Stay Ahead: Weekly Insights on the Latest in Free Streaming!
No spam, ever. Unsubscribe anytime.




Leave a Reply