This guide will show how to install Crazy Canucks Kodi Addon on FireStick.However, this guide is valid for all the devices/operating systems that support Kodi, such as Windows, Android, Mac, Nvidia Shield, and more. Note that the Crazy Canucks addon is available on both Kodi 20 Nexus and 19 Matrix.
What Is Crazy Canucks
The Crazy Canucks addon, available at Canucks Repository, is a versatile addon to stream TV shows, movies, YouTube, and more. The addon lets you stream everything from blockbuster movies to classical shows and anime.
One standout feature of Crazy Canucks is its built-in access to the all-time famous Odin addon. In addition, you can directly use the addon to stream free 4K content. Although Crazy Canucks is free, you can add a paid Real Debrid account for enhanced performance and a broader range of streaming links.
Additionally, Crazy Canucks supports Trakt integration, allowing you to sync your watch history across devices. Crazy Canucks is an excellent addon to stream content without buffering or quality issues. It is added to our list of Best Kodi Addons.
Attention Kodi Users!
Governments and ISPs worldwide monitor your online activities. If you use third-party Kodi addons, you should always use a reliable Kodi VPN to hide your identity and prevent issues with your streaming experience. Currently, your IP is visible to everyone.
I use ExpressVPN, the fastest and most secure VPN in the industry. It is very easy to install on any device, including Amazon Fire TV Stick, PC, Mac, and Smartphones. It also includes a 30-day money-back guarantee. If you're not satisfied with their service, you can request a refund. ExpressVPN is offering a special NEW YEAR deal: get 4 months free and save 78% on the 2-year plan.
Install and Use Best Kodi VPN | Why you must use a VPN at all times
Is Crazy Canucks Safe & Legal?
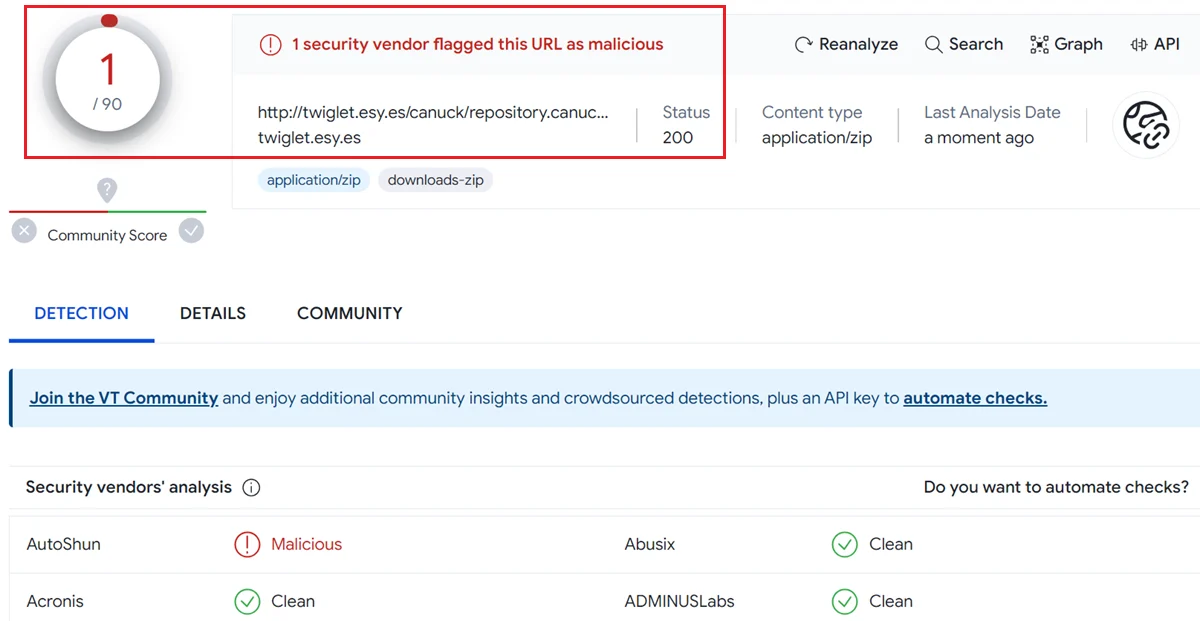
Crazy Canucks is a third-party addon available on the Canucks Repository. That’s why there’s always doubt about its safety and legality. However, I have tried to make things a bit clearer for you. First, my FireStickTricks team and I found nothing fishy about the add-on. Although we aren’t the developers of Kodi add-ons, everything felt okay.
Also, here’s a screenshot of the online antivirus analysis we did of the Canucks Repository file, which shows only one vendor marked it as malicious.
Next, we have the legality issue. At FST, we don’t have sufficient resources to identify if Crazy Canucks is entirely legal or illegal. Simply because there’s a ton of content on the add-on, and we can’t check if it’s being streamed via an official source.
I recommend using a Kodi VPN to avoid legal issues if you step on something illegal.
How to Install Crazy Canucks on Kodi
I have divided the installation process into three parts so you can easily follow along.
Let’s get started.
Legal Disclaimer: This guide is for informational purposes only. FireStickTricks.com does not own, host, operate, resell, or distribute any apps, services, or content mentioned.
Part 1: Enable Unknown Sources on Kodi
In this part, we’ll first enable the Unknown Sources on Kodi. Without it, we won’t be able to add a third-party repository or addon like Crazy Canucks. By default, the option is turned off. So, here’s how to turn on Unknown Sources on Kodi.
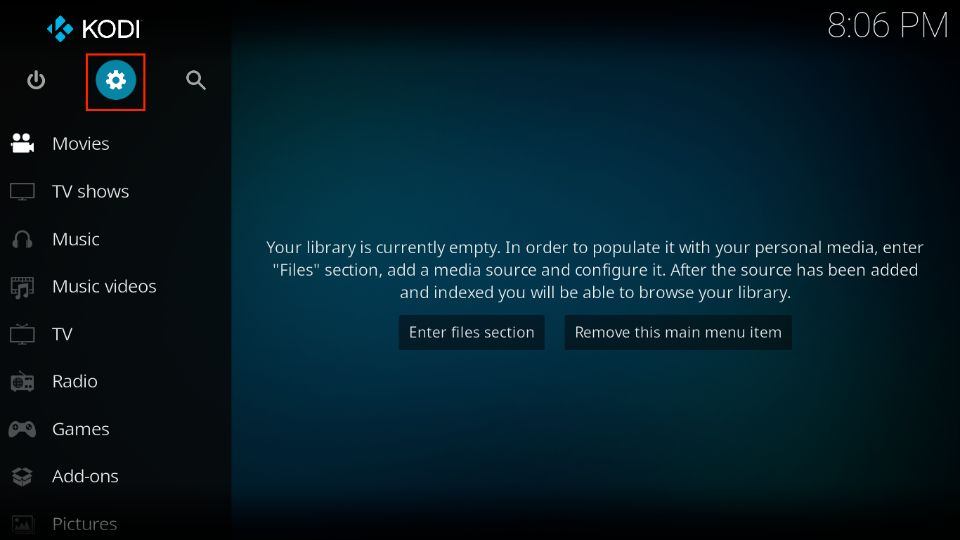
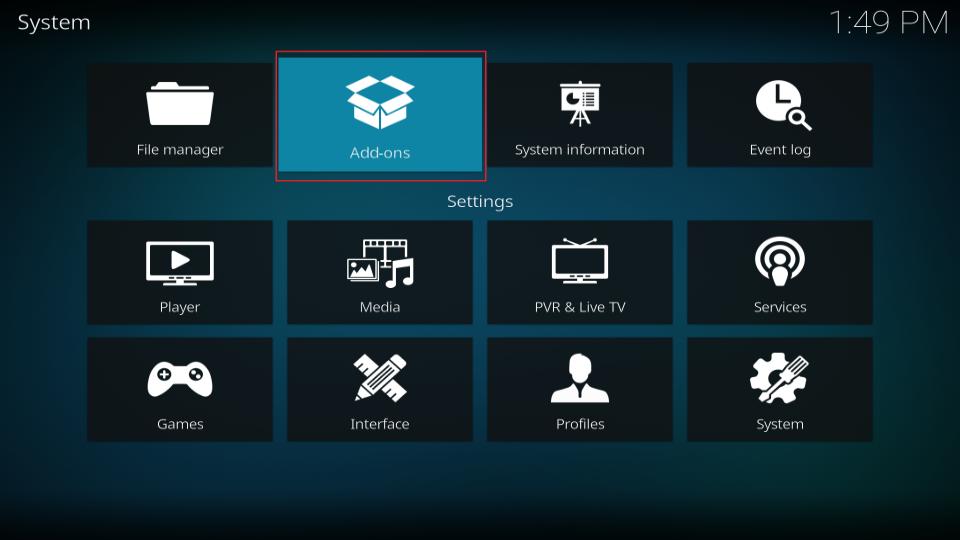
1. Click the Settings Gear icon on the top left (just below the Kodi logo) on the Kodi Home screen.
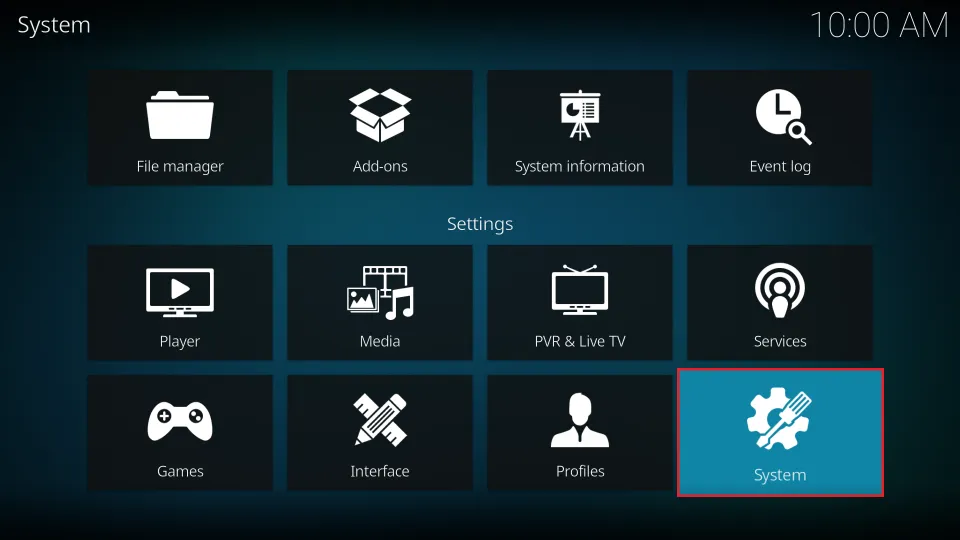
2. On the next page, click on System of your screen.
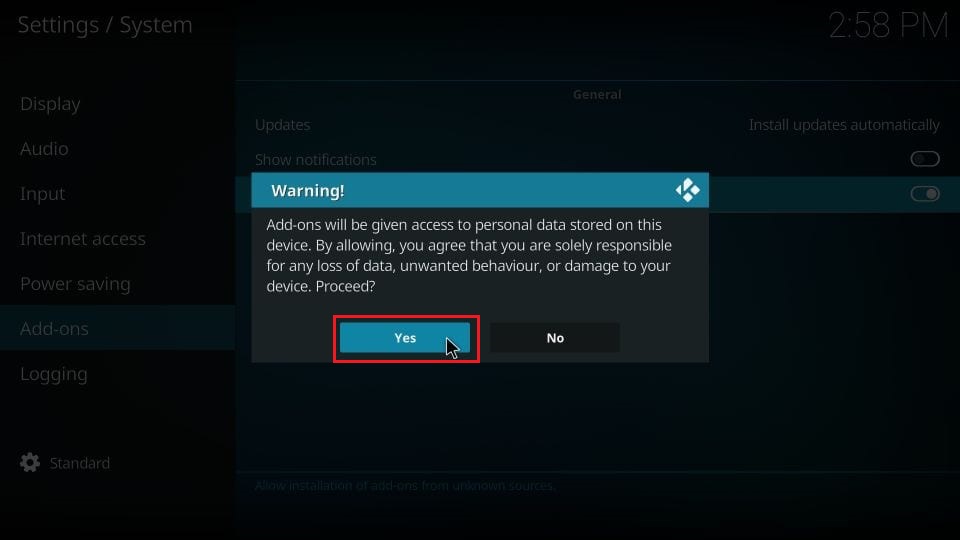
3. On the system screen, scroll down to the Add-ons tab from the left-hand-side panel. Next, enable the Unknown Sources option on your screen’s right pane.
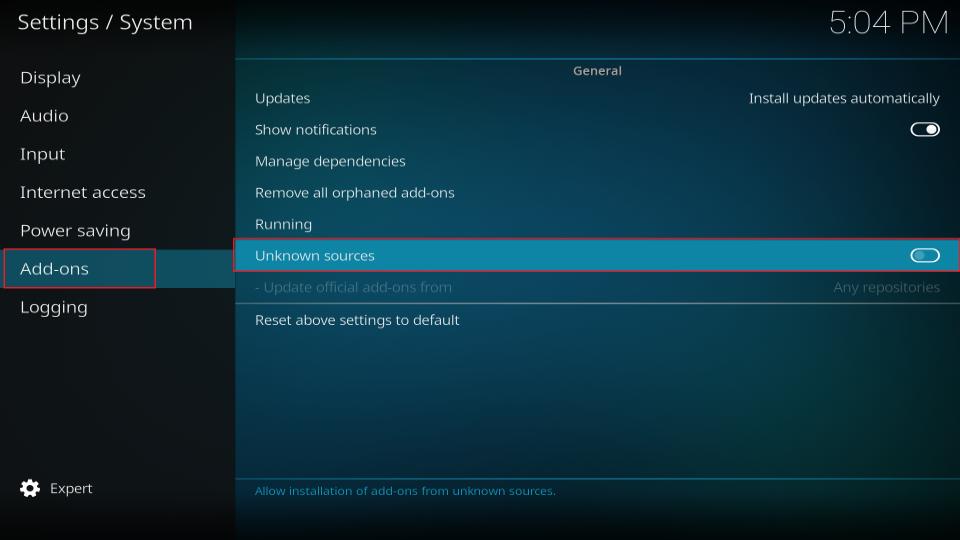
4. A warning sign will appear. Click the Yes button to continue.
Part 2: Install the Repository with Crazy Canucks
In this part, we will add the Canuck repository where Crazy Canucks resides. Here’s how you can add it to your Kodi app:
1. Click the Settings Gear/Cog icon on the Kodi home screen.
2. On the Settings page, click on the File Manager option.
![]()
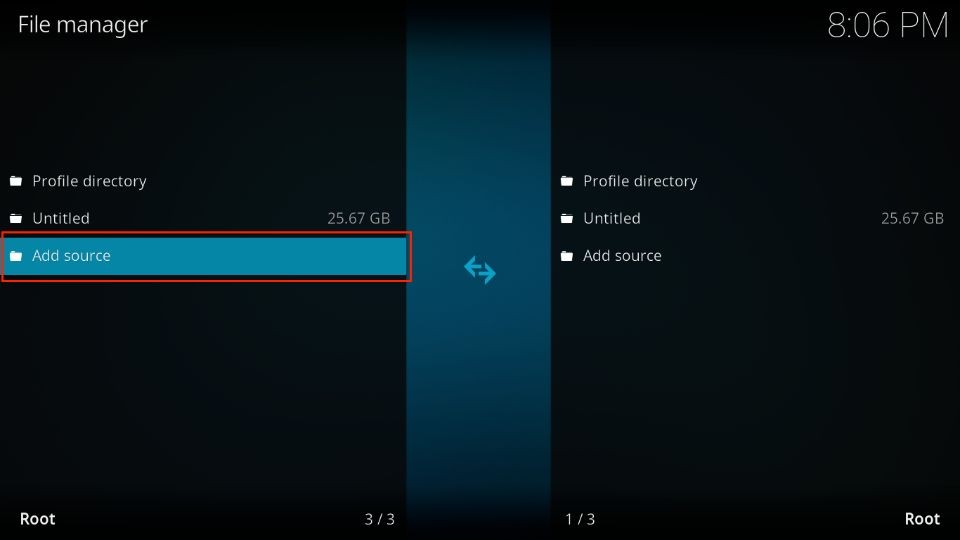
3. On the next page, click Add Source.
Note: If you have added other repos in the past, you’ll find the option at the end of the list.
4. Add File Source window will appear. Click on the <None> option.
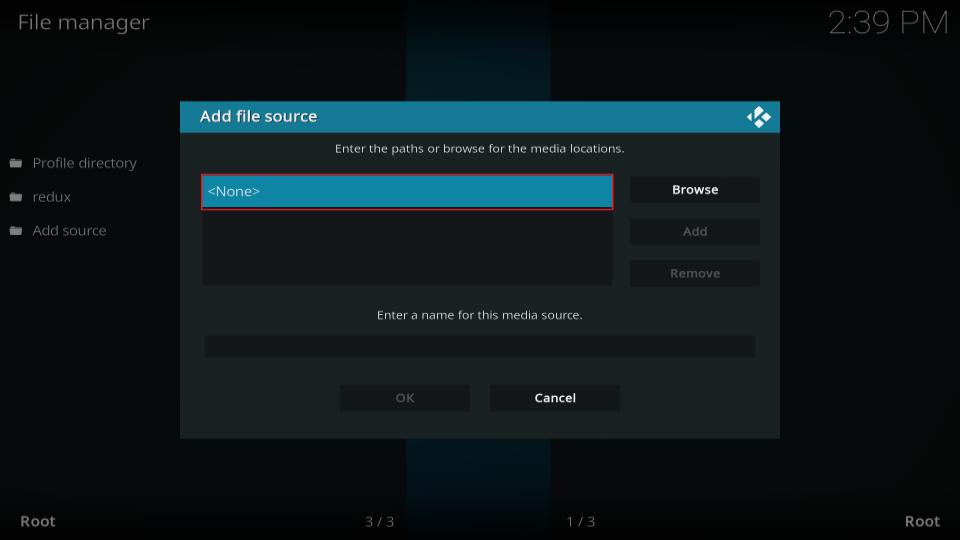
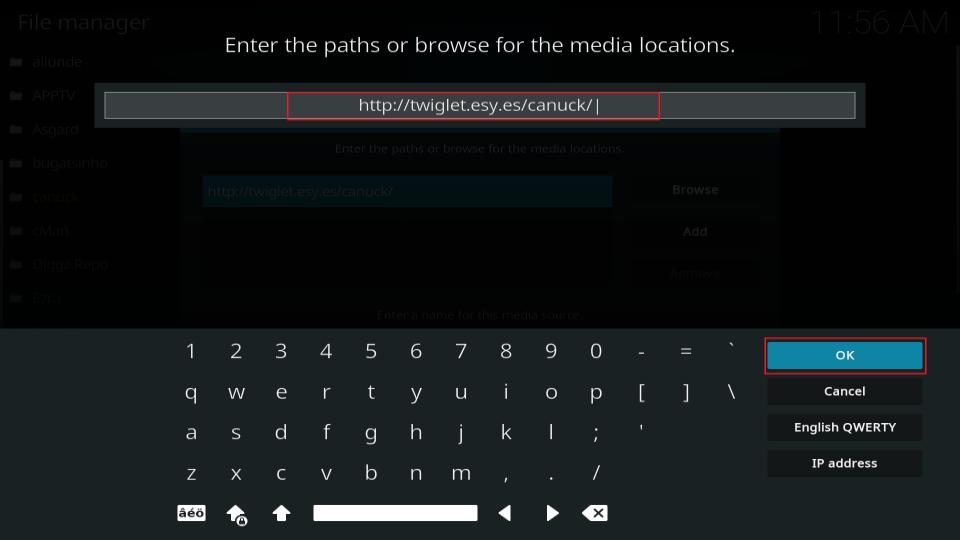
5. Another window will pop up. Here, enter the URL of the Canuck Repository – http://twiglet.esy.es/canuck/ in the input box. Then, click on the OK button to save the link.
Note: I have provided you with the official link to the Canuck Repository. My team at FST and I don’t host or own the URL. In the future, if the link stops working, we’ll update it as soon as possible.
6. Automatically, a name would appear for the Canuck Repository under the Enter a name for this media source option. You can change it by selecting the name and entering a custom one. However, we’ll go with the default one.
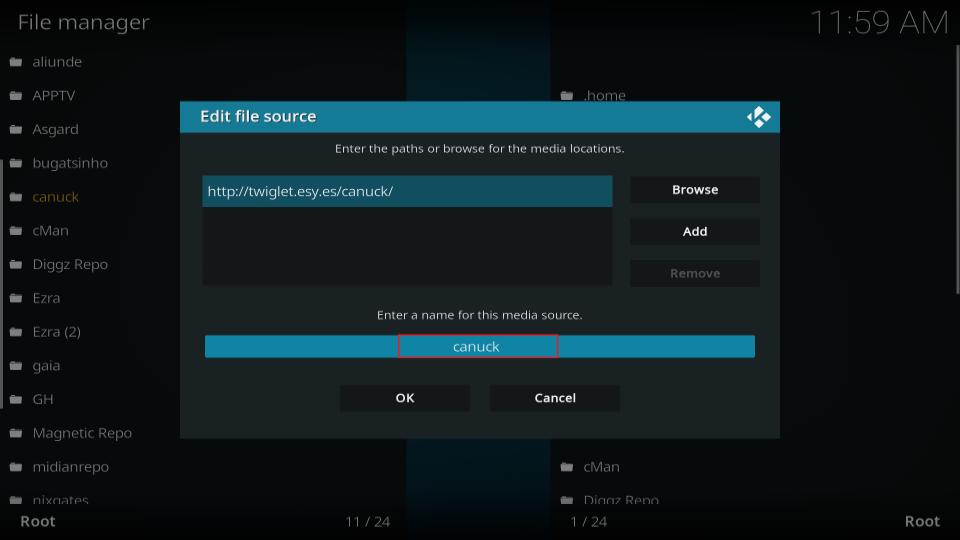
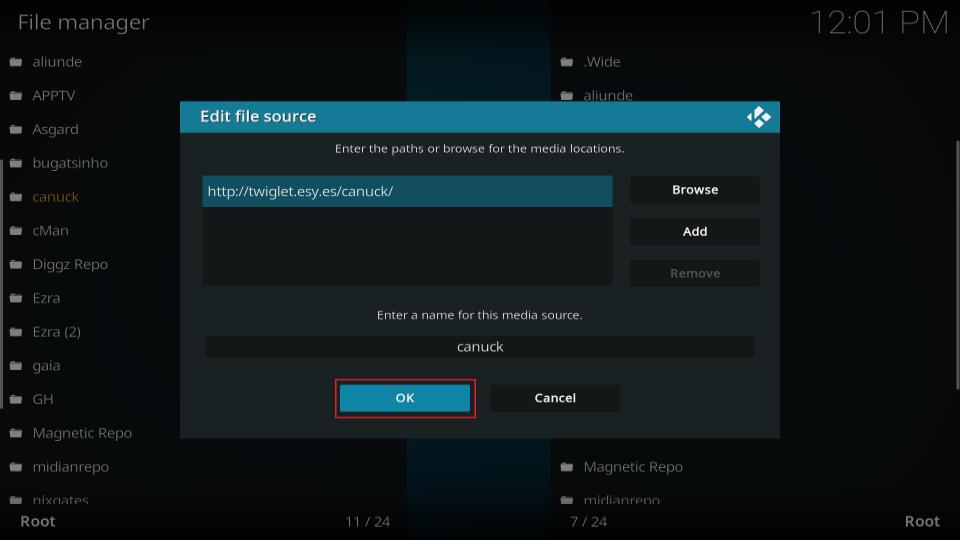
7. Once done, click the OK button to save the source on the Kodi app.
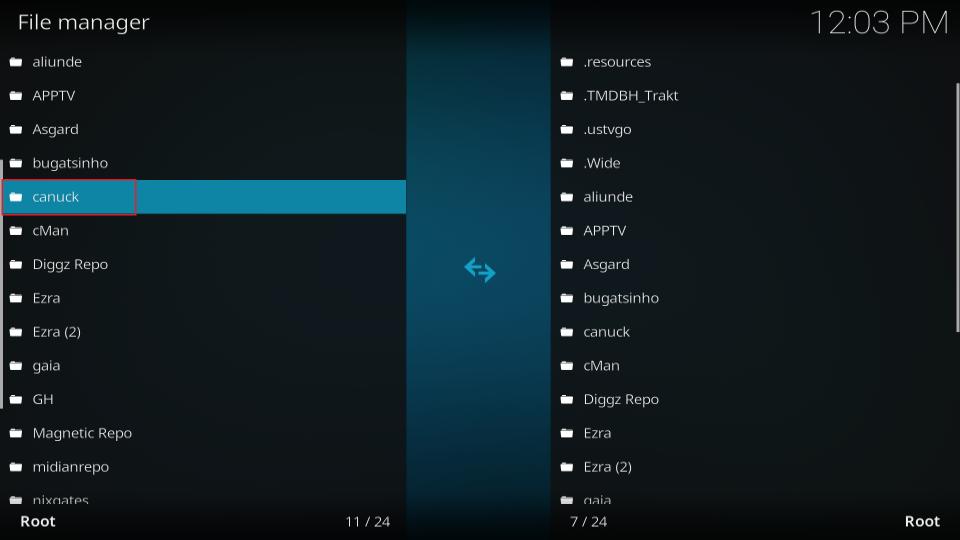
8. You’ll see the source added to the File Manager list with your chosen name.
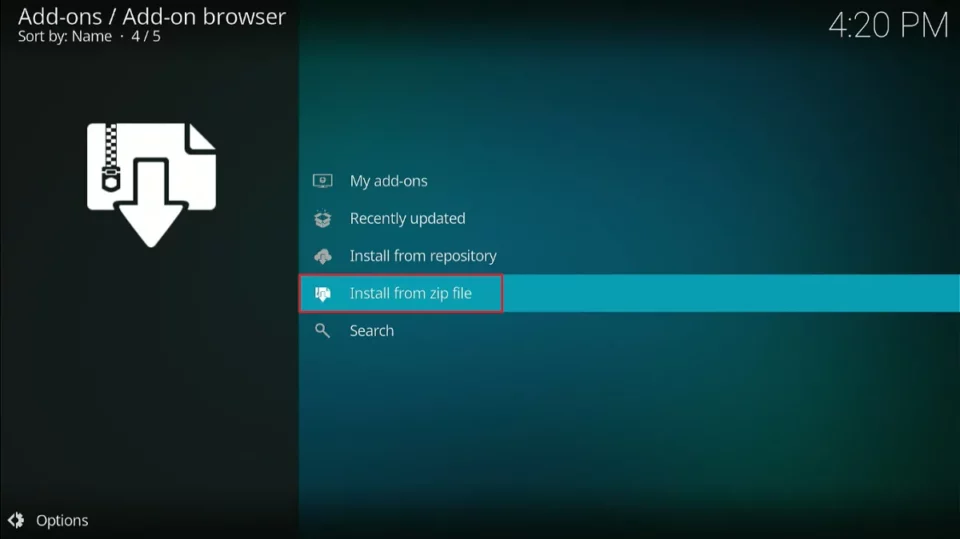
9. Now, return one step to the Settings page and click the Add-ons option. It is located next to File Manager.
10. On the Add-ons screen, select the Install from zip file option.
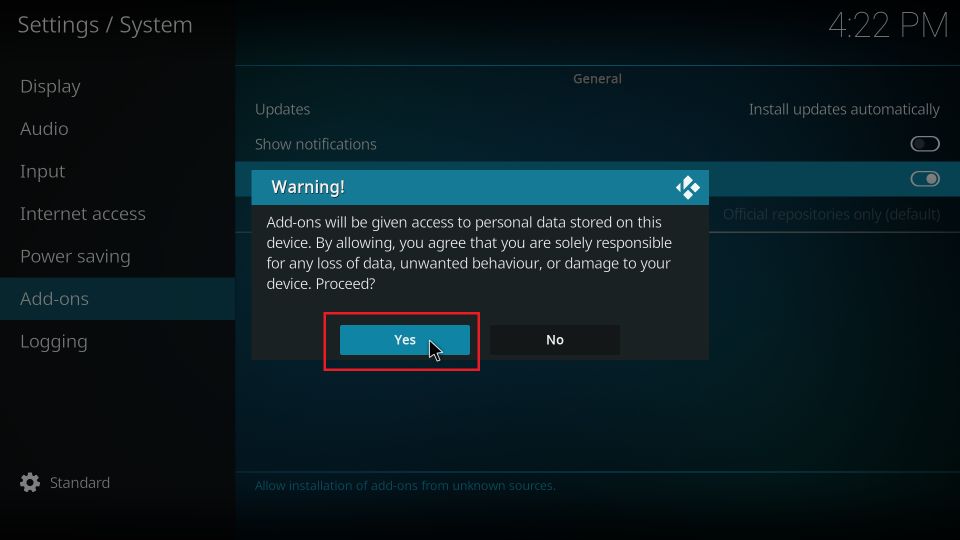
11. You’ll receive a warning sign if you are on the Kodi 19 Matrix. Read it and click on the Yes button to continue.
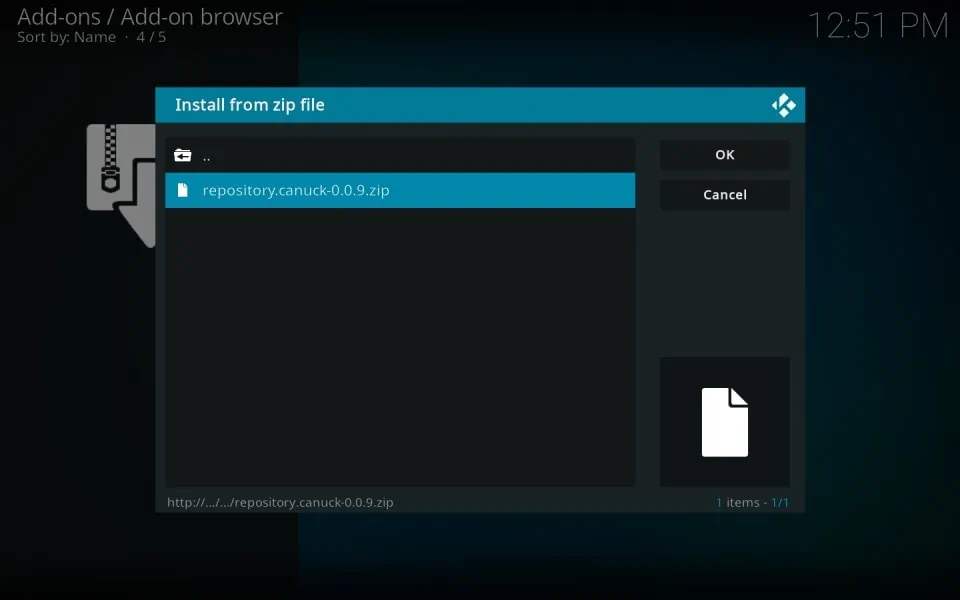
12. Install from zip file window will appear. Scroll down and select the name you have set for the Canuck Repository in the previous steps. For me, it’s canuck.
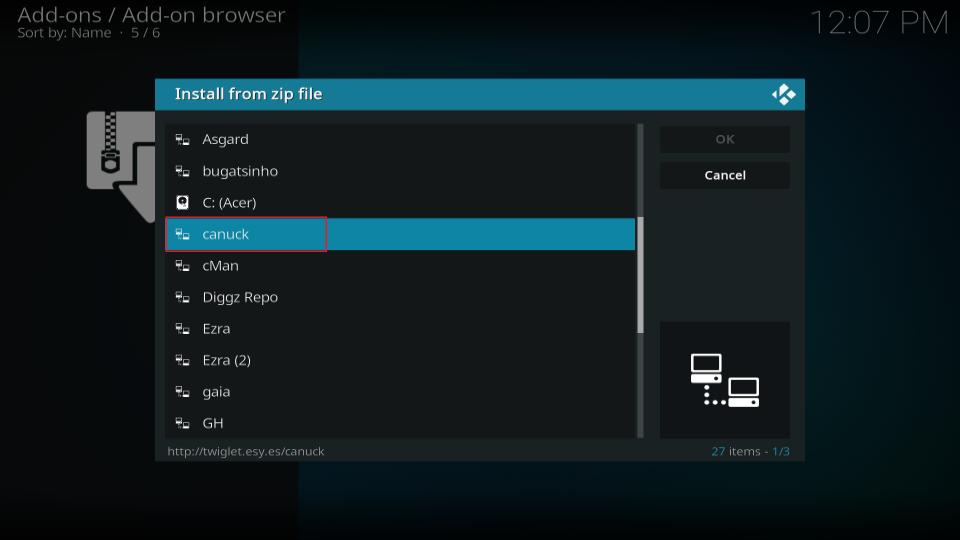
13. Next, a zip file named repository.canuck-x.x.x.zip will appear. Click on it to start the installation process.
Note: The version of the repository can change; that’s why I have marked it with X.
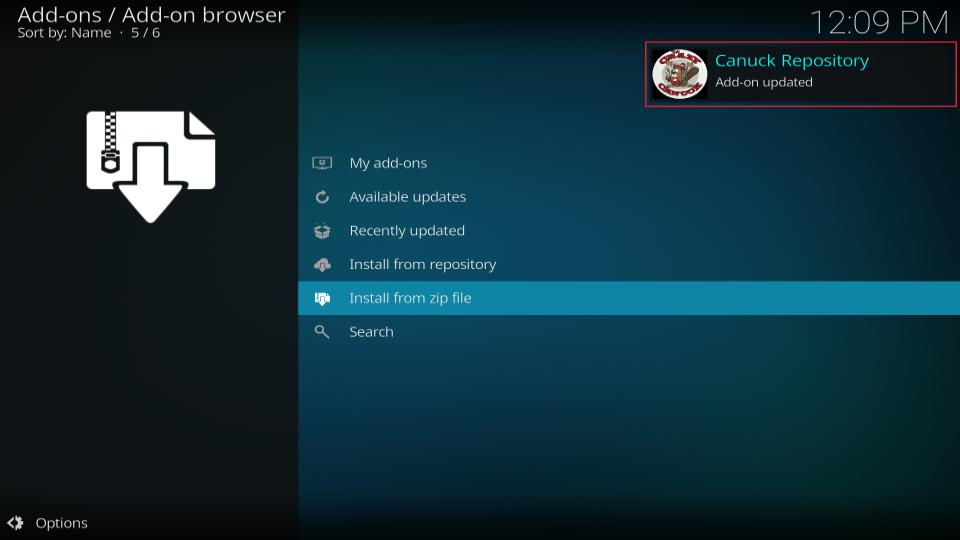
14. Wait for a few seconds to let Kodi download and install the repo. Once done, you’ll receive a notification on the top right side of your screen – Canuck Repository Add-on installed.
Part 3: Install Crazy Canucks
We have laid out all the foundations to install Crazy Canucks. So let’s move forward and see how you can install the addon on your Kodi app:
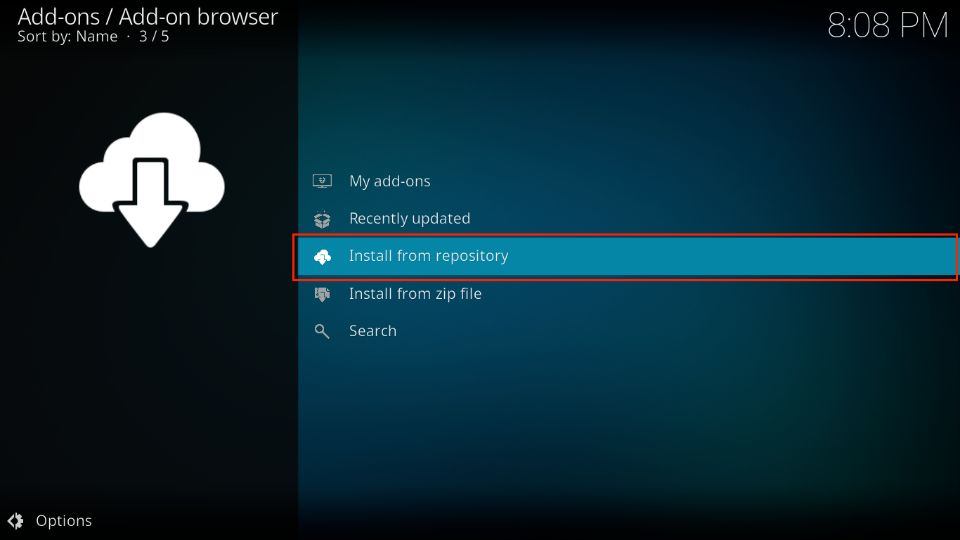
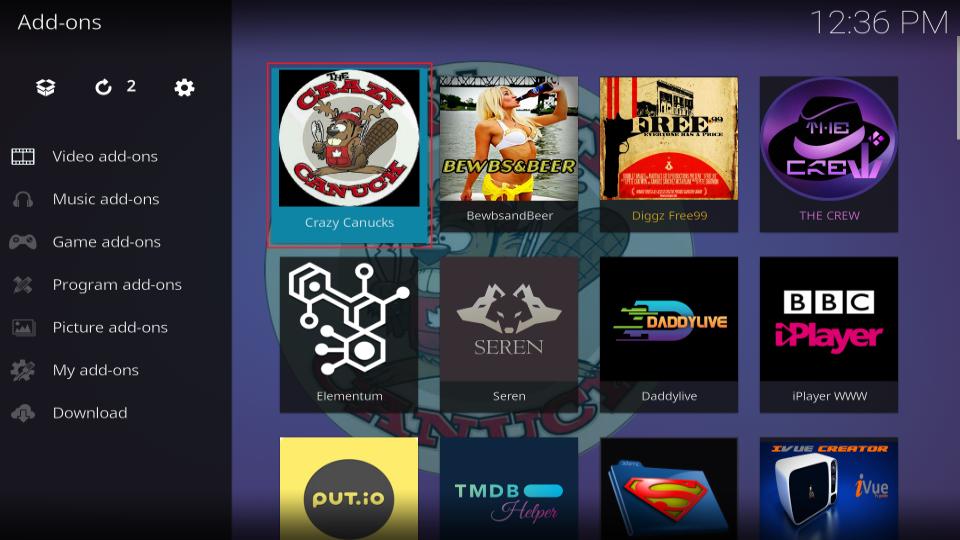
1. On the Add-ons page, scroll up and select Install from repository.
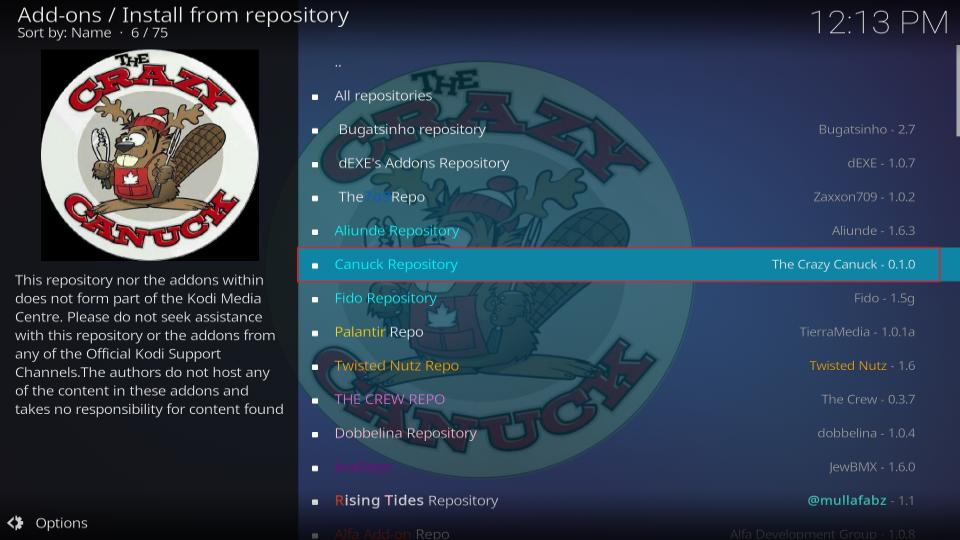
2. Next, select the Canuck Repository.
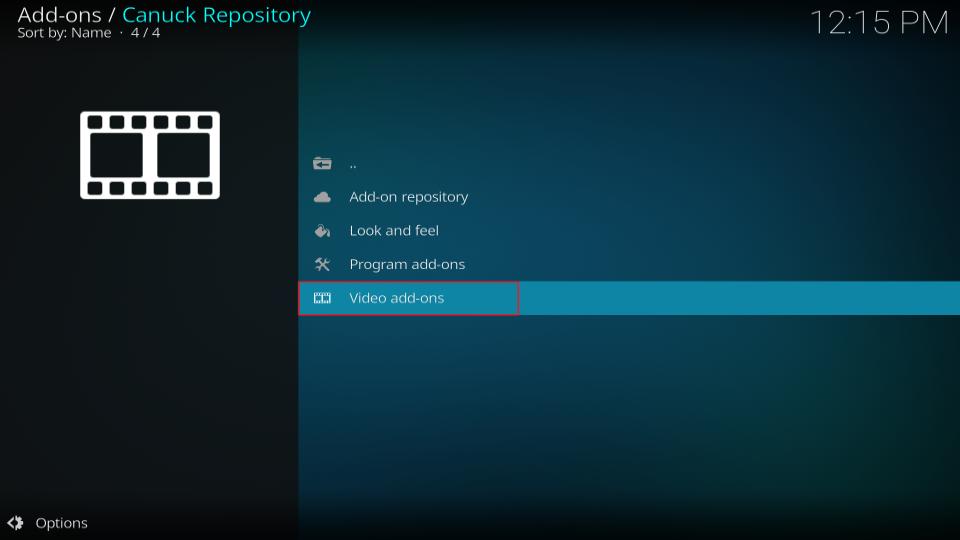
3. On the next page, scroll down and select Video Add-ons.
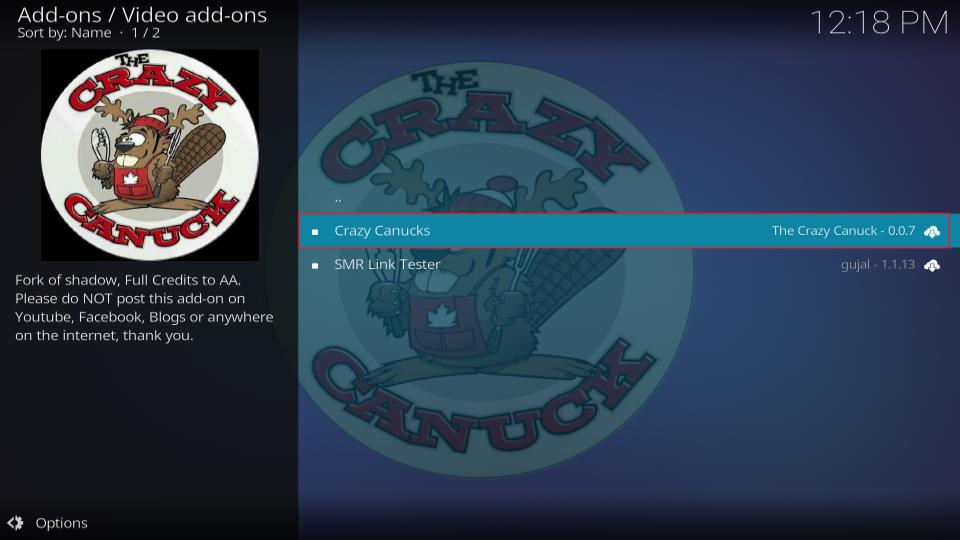
4. On the next screen, select Crazy Canucks.
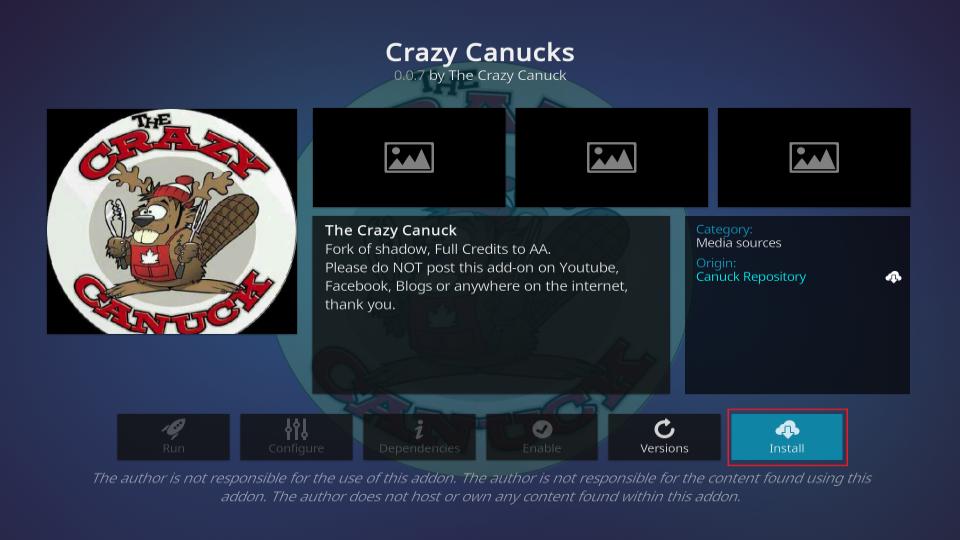
5. On the next screen, you will see the Crazy Canucks’s dashboard. Click Install, located on the bottom right side of your screen.
6. Once the download is complete, you’ll receive a notification on the top right side of your screen – Crazy Canucks Add-on installed.
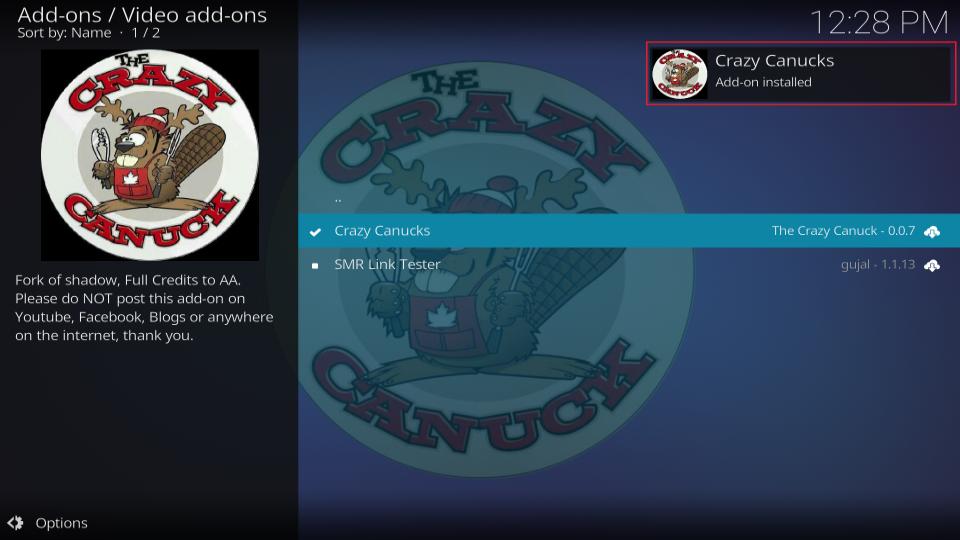
Congratulations! You have successfully installed the Crazy Canucks addon on your Kodi app.
Before you start streaming with Kodi Addons or Builds, I would like to warn you that everything you stream on Kodi is visible to your ISP and Government. This means, streaming copyrighted content (free movies, TV shows, live TV, and Sports) might get you into legal trouble.
Thankfully, there is a foolproof way to keep all your streaming activities hidden from your ISP and the Government. All you need is a good VPN for Kodi. A VPN will mask your original IP which is and will help you bypass Online Surveillance, ISP throttling, and content geo-restrictions.
I personally use and recommend ExpressVPN, which is the fastest and most secure VPN. It is compatible with all kinds of streaming apps and devices.
NOTE: We do not encourage the violation of copyright laws. But, what if you end up streaming content from an illegitimate source unintentionally? It is not always easy to tell the difference between a legit and illegal source.
So, before you start streaming on Kodi, here's how to get VPN protection in 3 simple steps.
Step 1: Get the ExpressVPN subscription HERE. It comes with a 30-day money-back guarantee. Meaning, you can use it free for the first 30-days and if you are not satisfied with the performance (which is highly unlikely), you can ask for a full refund.
Step 2: Click HERE to download and install the ExpressVPN app on your streaming device. If you are using a FireStick, I have given the exact steps starting with Step 4 below.
Step 3: Click the Power icon to connect to a VPN server. That's all. Your connection is now secure with the fastest and best VPN for Kodi.

The following are the steps to install Kodi VPN on your Fire TV devices. If you have other streaming devices, follow Step 1-3 above.
Step 4: Subscribe to ExpressVPN HERE (if not subscribed already).
Step 5: Go to Fire TV Stick home screen. Click Find followed by Search option (see image below).

Step 6: Type Expressvpn in the search bar and select when it shows up.

Step 7: Click Download.

Step 8: Open the ExpressVPN app and Sign in using the email ID and password that you created while buying the ExpressVPN subscription.

Step 9: Click the Power icon to connect to a VPN server. That’s all. Your FireStick is now secured with the fastest VPN.

How to Use Crazy Canucks
The Crazy Canucks addon is now installed on your Firestick. Let us now explore how to use it. So, without further ado, let’s start.
Go to the Kodi home screen, scroll down, and select the Add-ons tab.
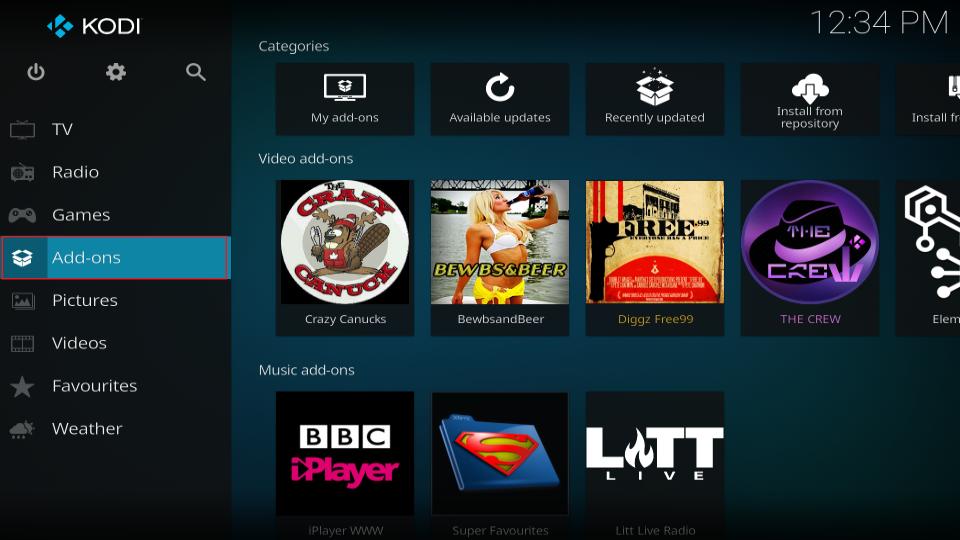
Next, on the Video add-ons tab, open Crazy Canucks.
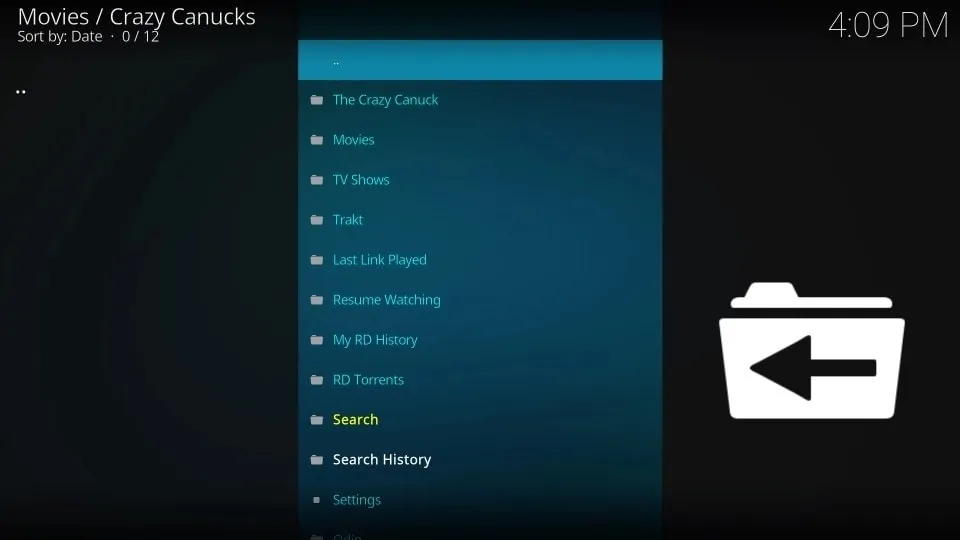
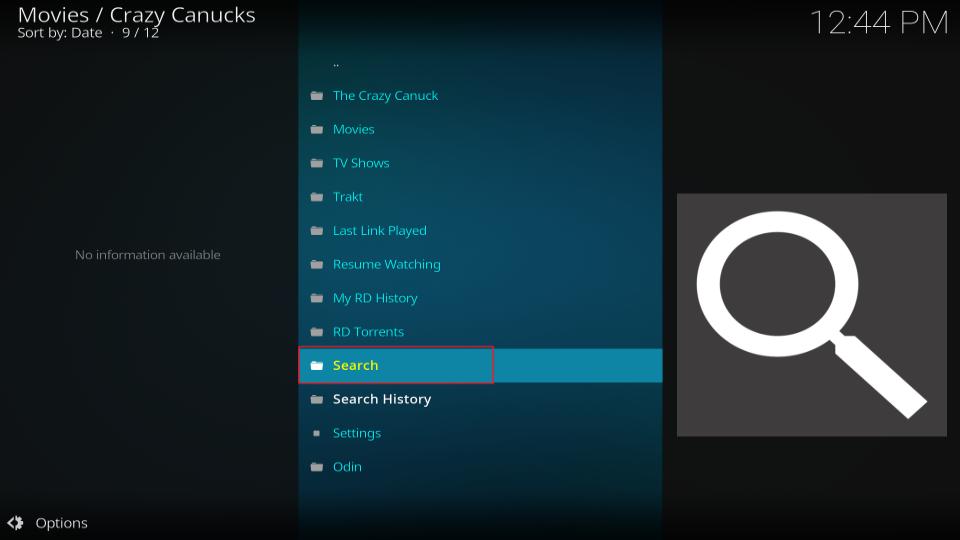
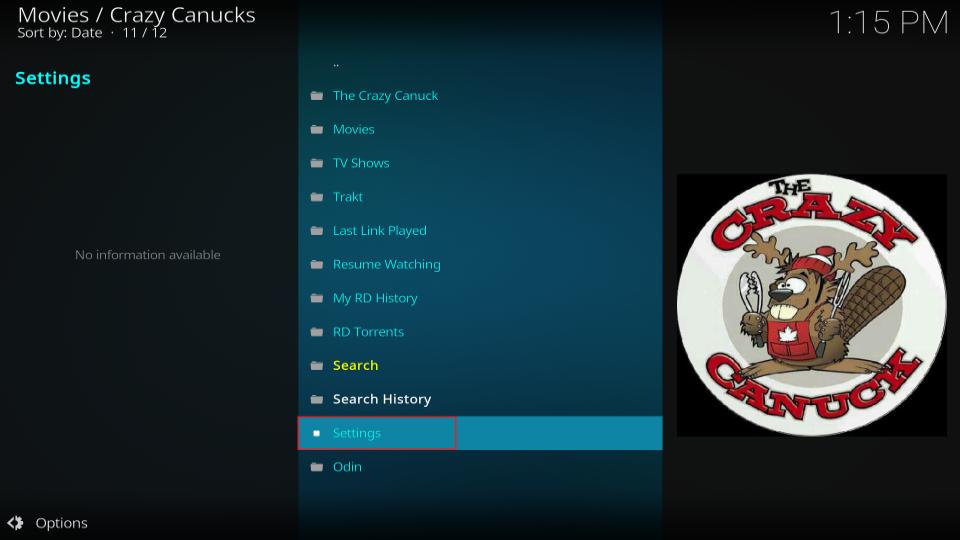
You’ll reach the home screen of Crazy Canucks where you will find folders like The Crazy Canuck, Movies, TV Shows, and more. These are they folders 12 folders you’ll see on the add-on’s home screen:
- The Crazy Canuck
- Movies
- TV Shows
- Trakt
- Last Link Played
- Resume Watching
- My RD History
- RD Torrents
- Search
- Search History
- Settings
- Odin
Crazy Canucks Movies Section
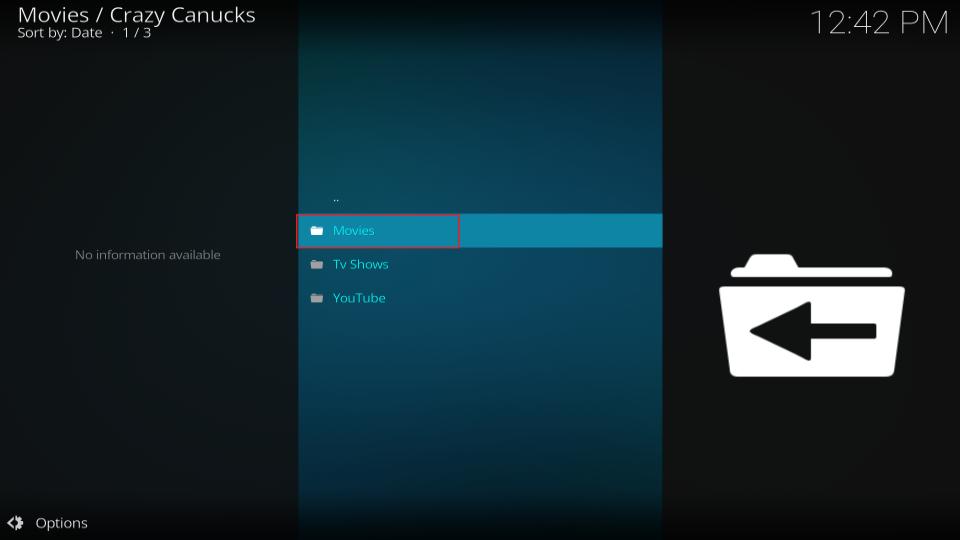
The Crazy Canuck is the first folder. Let’s open it to find out what it contains.
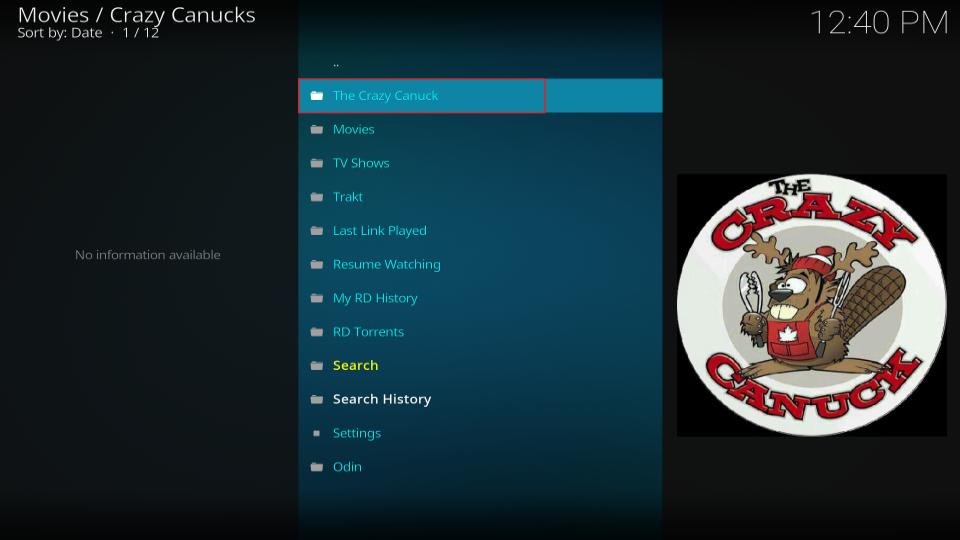
It contains three sub-folders: Movies, TV Shows, and YouTube. Open Movies.
Under the Movies category, you’ll see multiple sections such as Search, Movies-Years, Trending Movies, Popular Movies, IMDB 100 Best Thriller movies, TMDB Popular, and more.
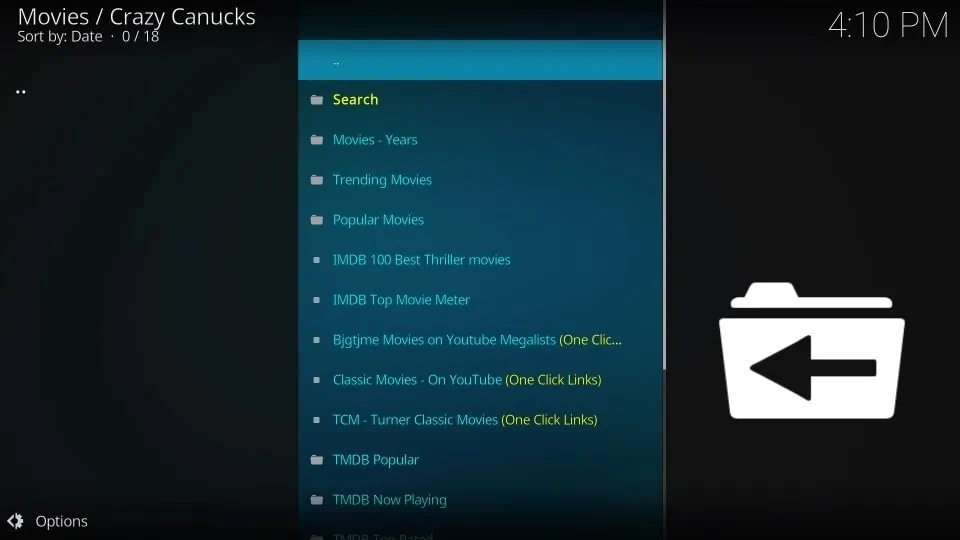
You can also explore other categories from the main screen of the add-on.
Searching for Content on Crazy Canucks
Want to search for your favorite content to see if it’s available on The Crazy Canucks add-on? Head to the home screen of the add-on, scroll down, and select Search.
Now, enter your search terms and click on the OK button. Wait for a few seconds for the addon to work. Finally, you’ll see a long list of all the items that match your search terms.
Turning Off Debrid to Avoid Errors on Crazy Canucks
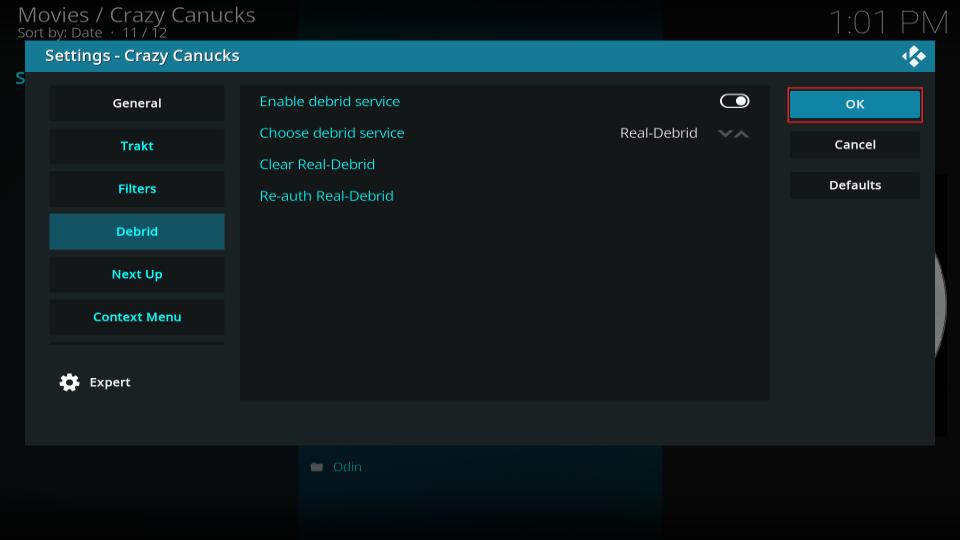
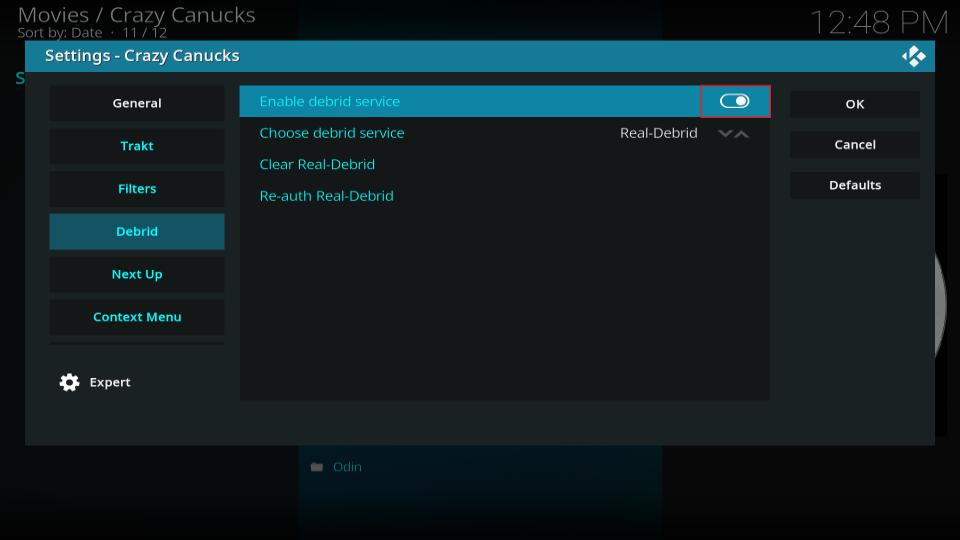
Go to the Crazy Canucks home page, scroll down, and select Settings. It will open the addon’s settings page. Now, go to the Debrid tab.

After that, turn off the Enable debrid service option.

Lastly, click on the OK button to save the changes.
Setup Real Debrid With Crazy Canucks
If you have a paid Real Debrid account, you can make the most of the Crazy Canucks add-on. With it, you’ll be able to unlock the premium links of content that provide a buffer-free streaming experience.
Here’s a detailed article on how to Install and use Real-Debrid on Kodi / FireStick. If you are new to Debrid services, go through it. Here’s how you can set up your Real Debrid account with Crazy Canucks:
Firstly, go to the Crazy Canucks home screen page. After that, scroll down and select Settings.

Add-on’s settings page will appear. Next, go to the Debrid tab.
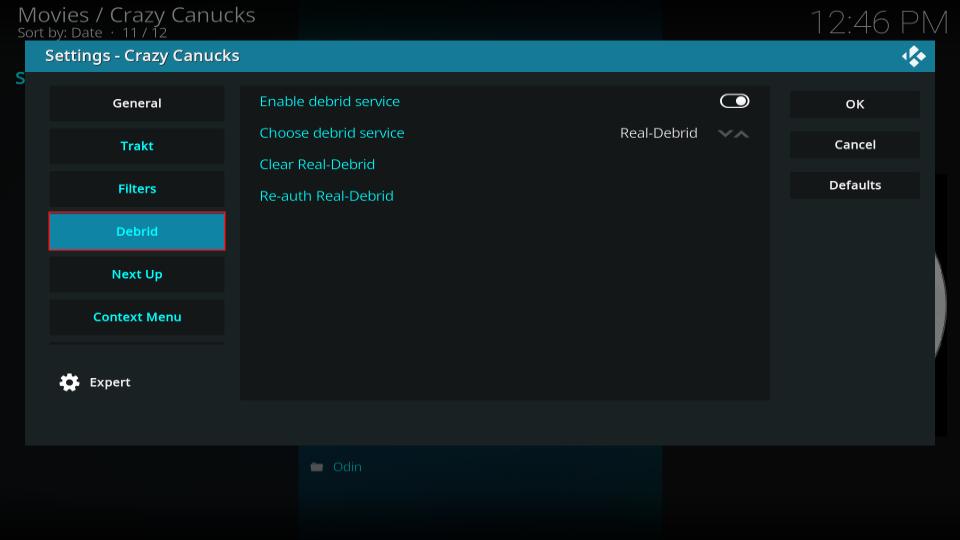
Then, make sure Enable debrid service is enabled.
After that, click on Re-auth Real-Debrid.

Now, go to www.real-debrid.com/device on your PC, laptop, tablet, or phone and enter the code you see on your screen. Make sure you are logged into your account.

Setup Trakt With Crazy Canucks
With Trakt, you can track what you watch, how much you watch, and everything else. It is a comprehensive platform for seamlessly manage and monitor your content consumption seamlessly.
Trakt includes almost all films and TV shows with their schedule. You can connect a supportable streaming service with Trakt, log your activity, and access it anywhere! Fortunately, Crazy Canucks supports Trakt. So whatever you watch, like, and dislike on it can be synced to your Trakt account. Here’s how to set up Trakt with Crazy Canucks:
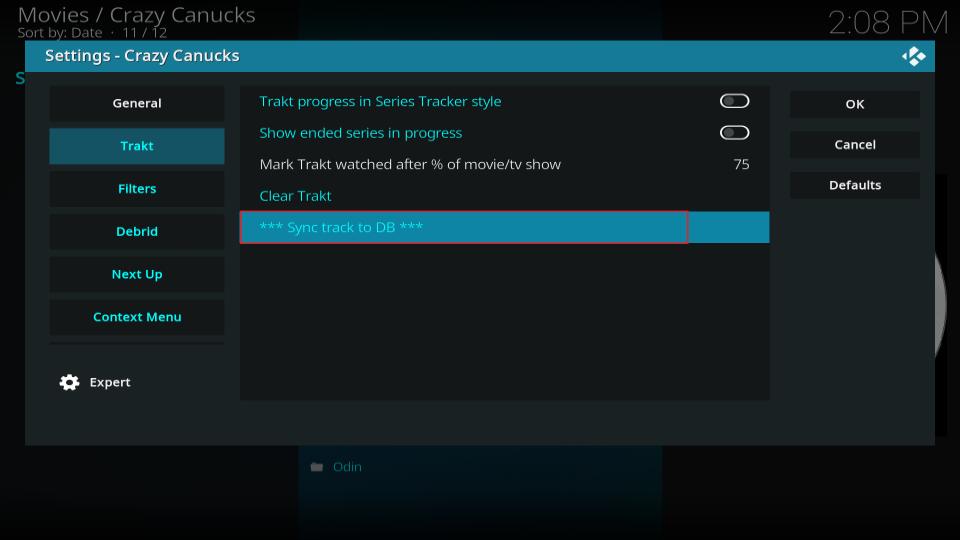
First, go to the Crazy Canucks home page and select Settings.
On the Settings page, go to the Trakt tab.
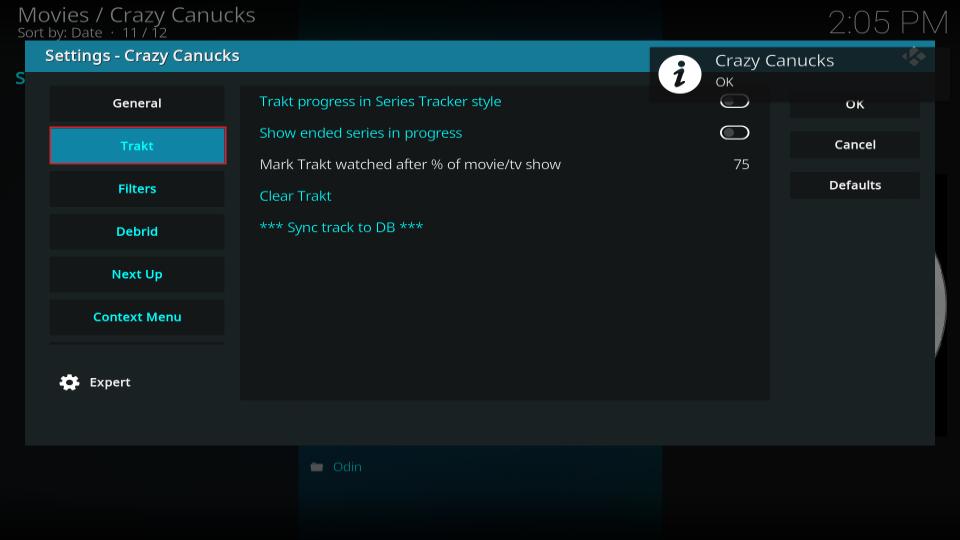
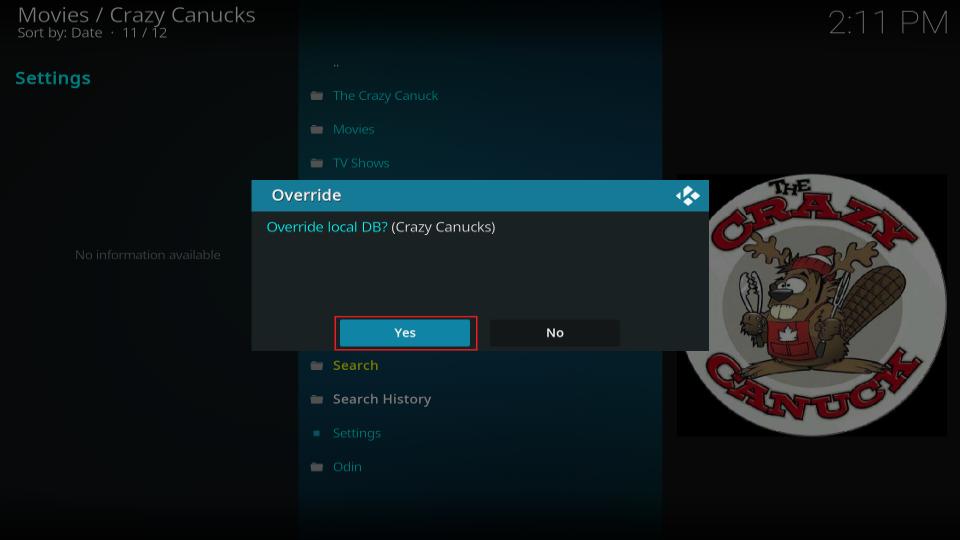
After that, select *** Sync track to DB ***.
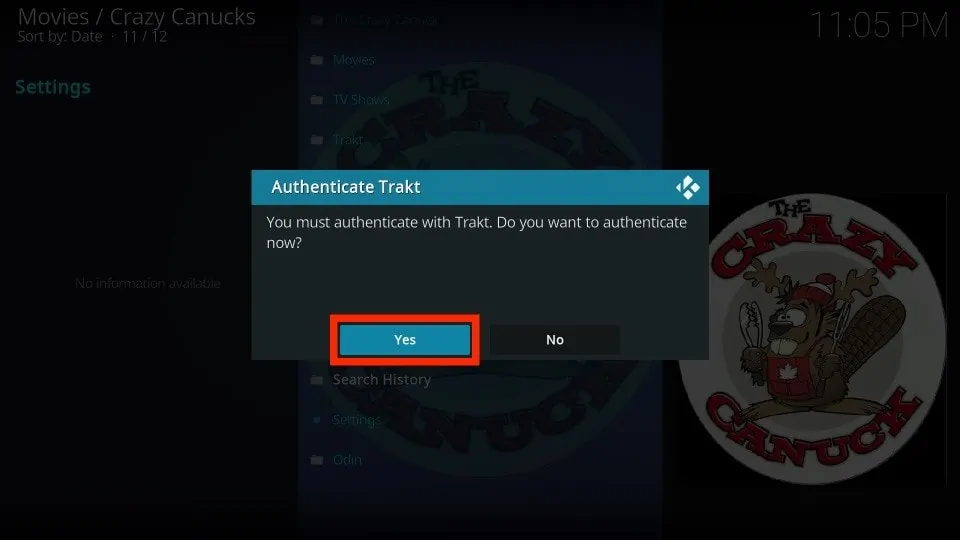
The addon will ask you to override local DB; click Yes.
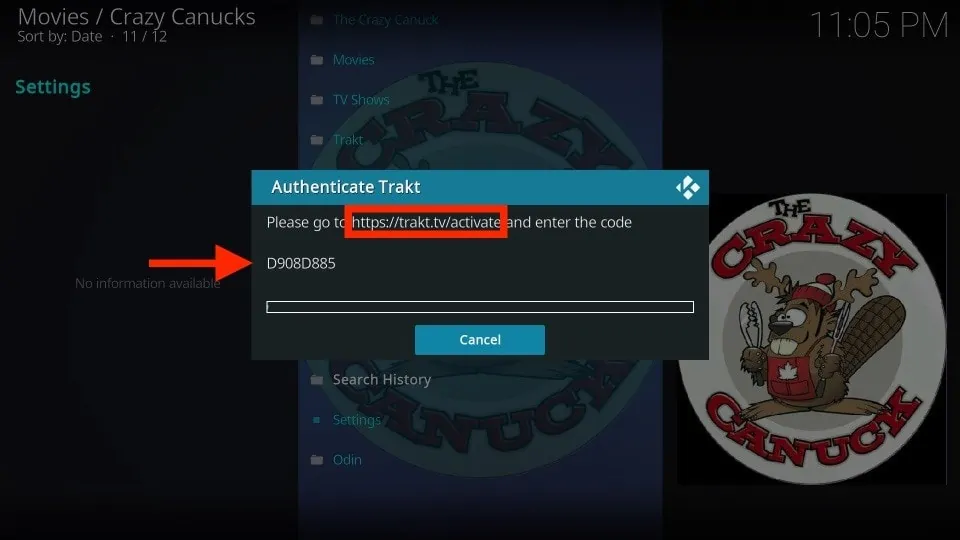
Then, a Trakt authentication prompt will appear; click Yes to continue.
Now, go to www.trakt.tv/activate and enter the code on your screen.
Wrapping Up
This post demonstrated how to install the Crazy Canucks Kodi addon. Crazy Canucks is a fantastic addon for Kodi users who are looking forward to enjoying free TV shows, movies, Youtube, and more. Similarly, its built-in integration with the popular Odin addon makes it even better.
Related:
- How to Install MP3 Streams Kodi Addon
- How to Install The Loop Kodi Addon
- Install Patriot Kodi Addon
- How to Install Base 19 Kodi Addon

Suberboost Your FireStick with My Free Guide
Stay Ahead: Weekly Insights on the Latest in Free Streaming!
No spam, ever. Unsubscribe anytime.

Leave a Reply