In this guide, you will learn to install Slamious Build on Kodi. The steps provided here work on FireStick, Mac, Linux, Windows, Mobiles, Raspberry Pi, and more.
 Slamious comes from the big catalog of Slamious Wizard. Even though Slamious Wizard has many builds, Slamious Kodi build stands out. This thoughtfully designed build is perfect for not just the beginners but also the experienced users.
The build takes care of all your streaming needs through the top Kodi addons that come preinstalled with it. The user-friendly interface makes sure you never experience any difficulty while exploring and navigating the build. Almost everything you need is already available on the main screen.
When I started using this build, I was clear I will write you a guide and also include it in our list of Best Kodi Builds.
Legal Disclaimer: This guide is for informational purposes only. FireStickTricks.com does not own, host, operate, resell, or distribute any apps, services, or content mentioned.
How to Install Slamious Build on Kodi
The build installation process is easy but usually long-drawn. So, let’s break it down into two broad parts so that it is easier for you to follow. Here is what we are going to do:
Part 1: Allow Builds from the Unknown Sources (prerequisite)
Part 2: Install Slamious Kodi Build
We can now start with each part separately.
I personally use and recommend ExpressVPN which is the best VPN for Kodi. You get 4 months free and save 78% on its 2-year plan.
Part 1: Allow the Unknown Sources
Slamious is a third-party Kodi build. When you try to install such a build, the internal security system of Kodi will prevent you from doing so. This is to make sure no malicious programs get installed automatically. Slamious build is safe. Therefore, we will bypass this restriction by following these steps:
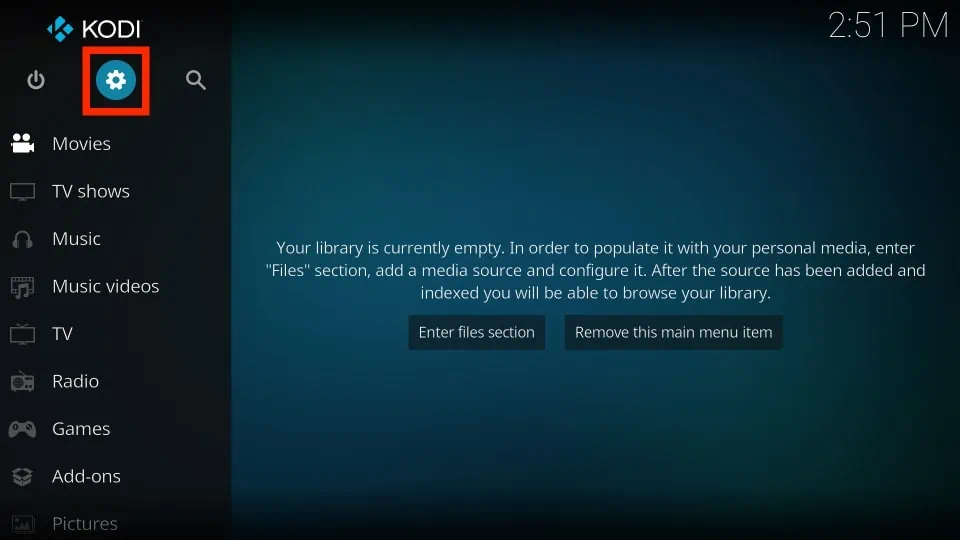
1. Access Settings from the home screen of the Kodi application. You will find this option in the top-left.
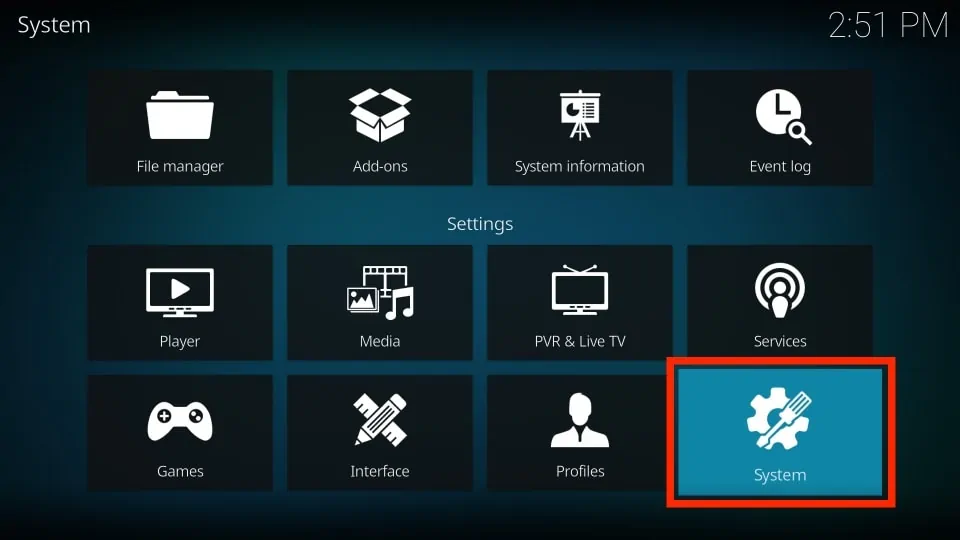
2. Open the item System on the following screen.
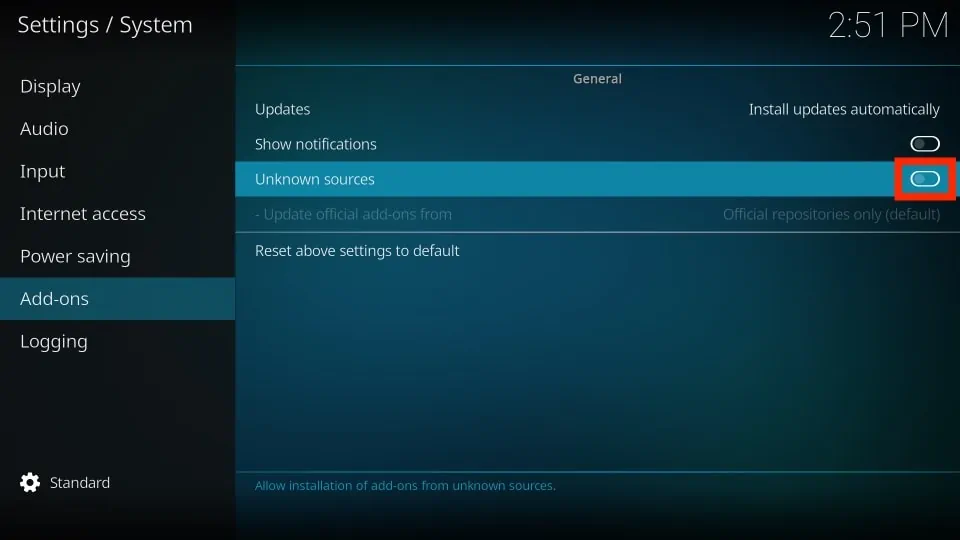
3. What you need to select now is the item on the left Add-ons. When you do that, you see related options on the right. One of them is Unknown Sources. This is the option you want to make sure is ON. Switch its toggle and turn it ON if it is OFF.
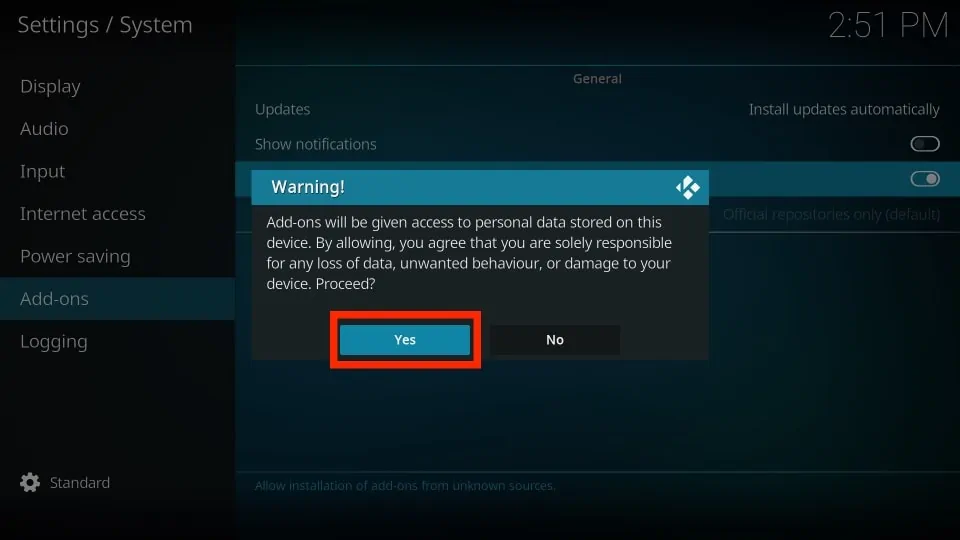
4. When this warning is displayed on your screen, go ahead and click Yes. Again, you are ignoring this warning because Slamious Kodi build is a hundred percent safe.
Part 2: Install Slamious Build on Kodi
Now, you may install the build on Kodi. The installation process will include adding the source path/link, installing Slamious Wizard and eventually installing the Slamious Kodi build. We are going to cover everything in the steps that follow:
1. Access the Kodi Settings again.
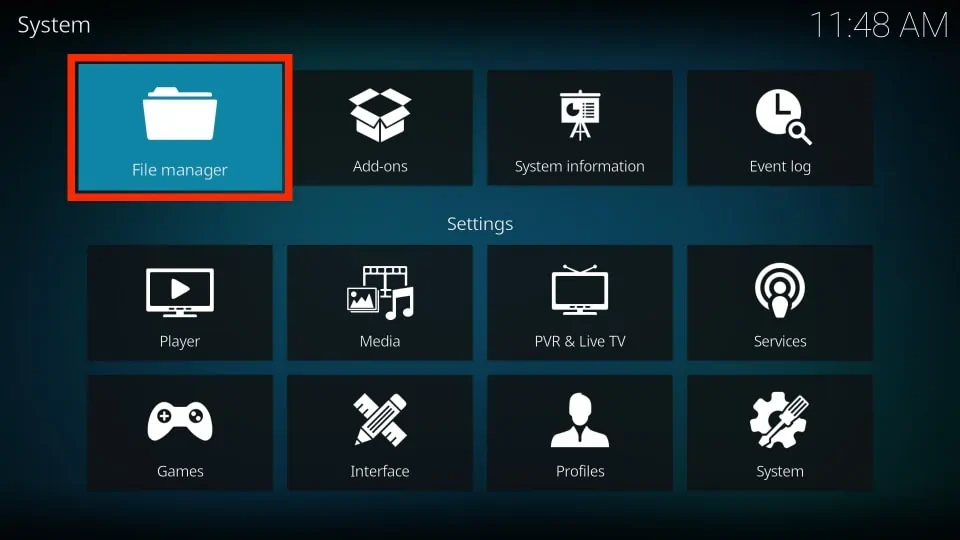
2. Now go to the File manager and open it.
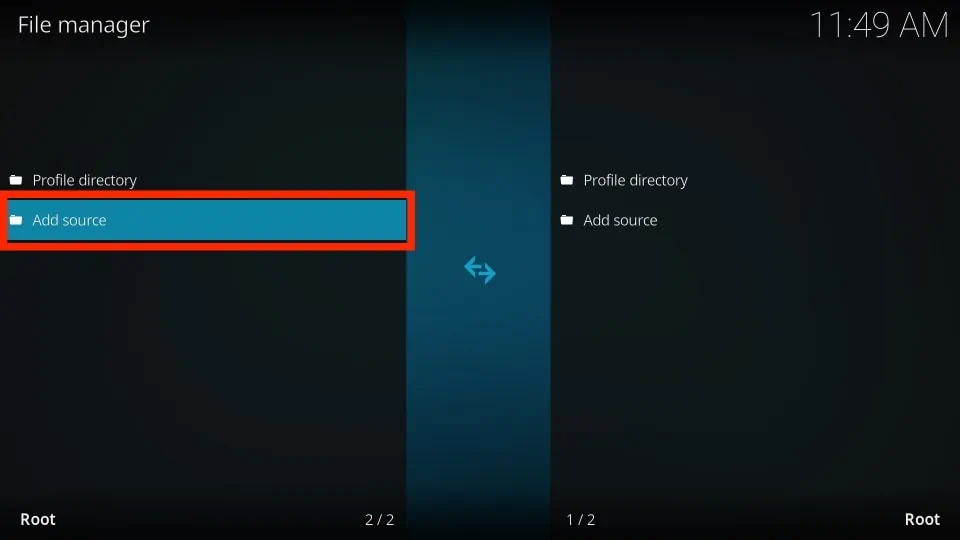
3. Choose the option Add source on the next window (either side).
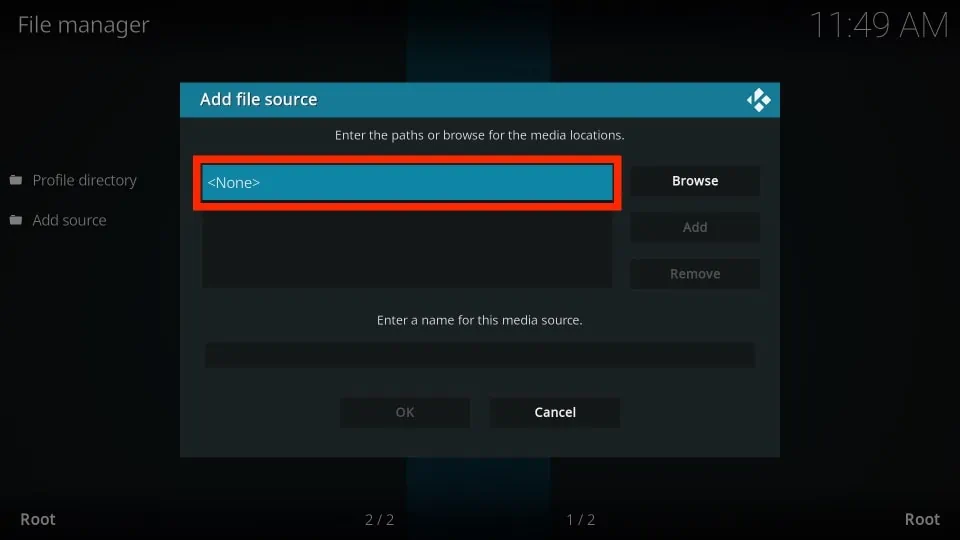
4. Go ahead and click <None> on the following popup window.
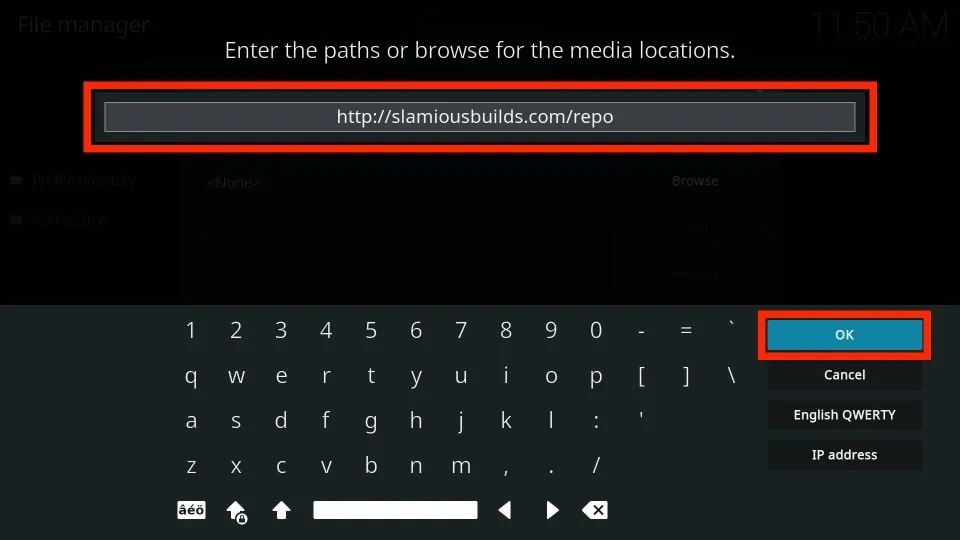
5. When prompted, enter the following link in the designated area: http://slamiousbuilds.com/repo.
Click OK to proceed.
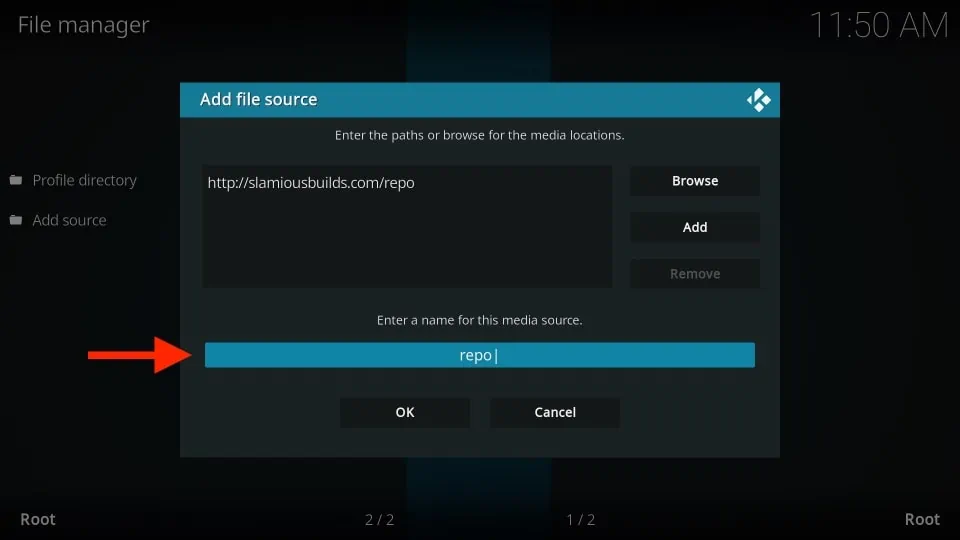
6. Now highlight the area where it asks you to Enter a name for this media source.
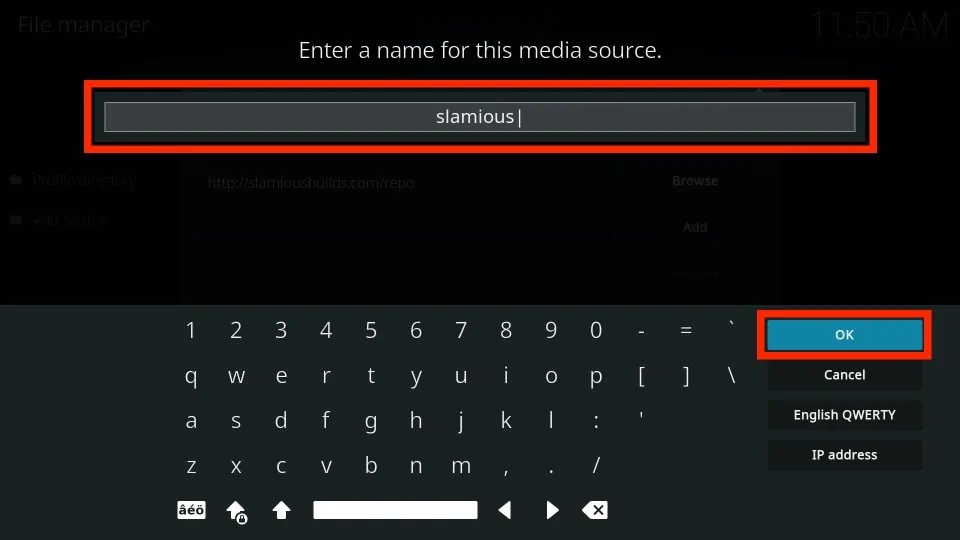
7. Next, type a name for the repo. You may enter slamious as I did. Click OK.
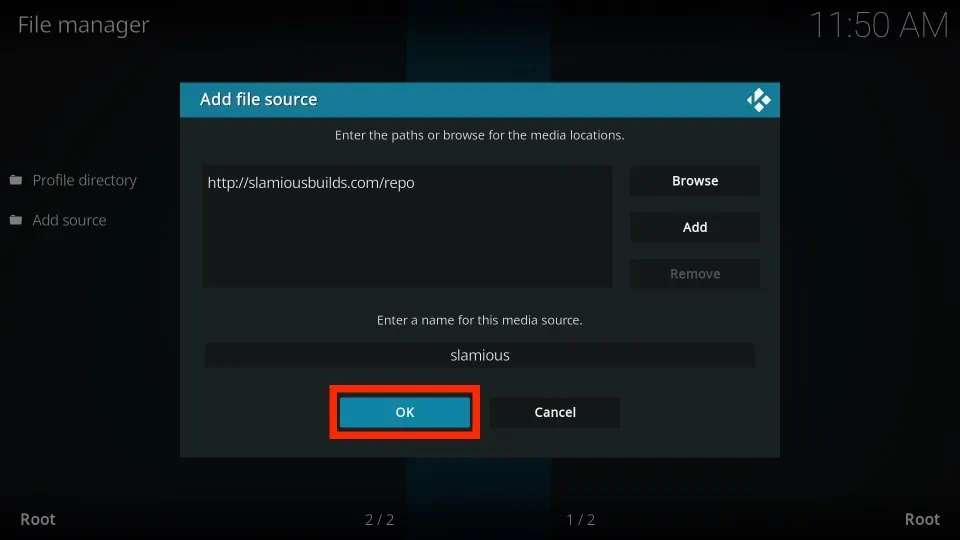
8. Enter OK to save the repo.
You have successfully added the source link. We get to the next part now: Install Slamious Wizard
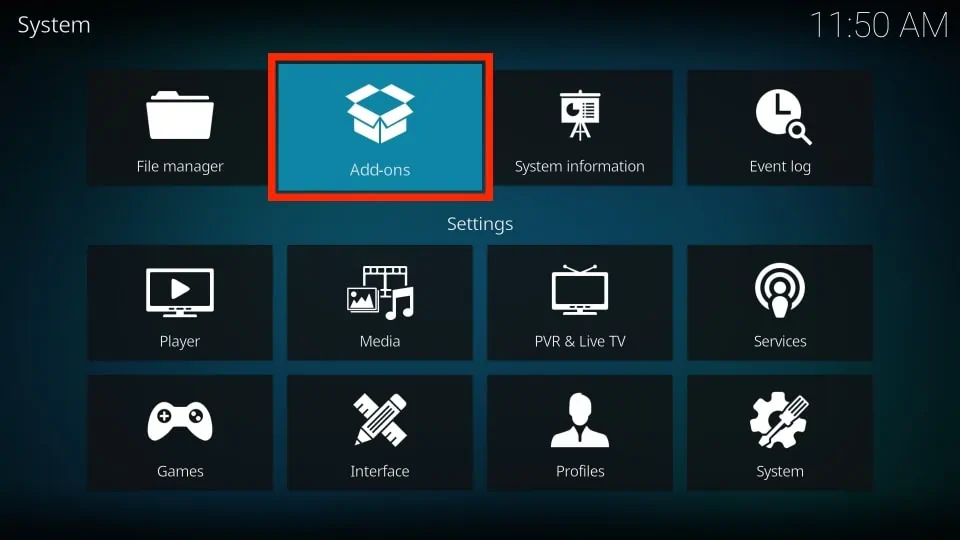
9. Now go back to the Kodi Settings and click Add-ons.
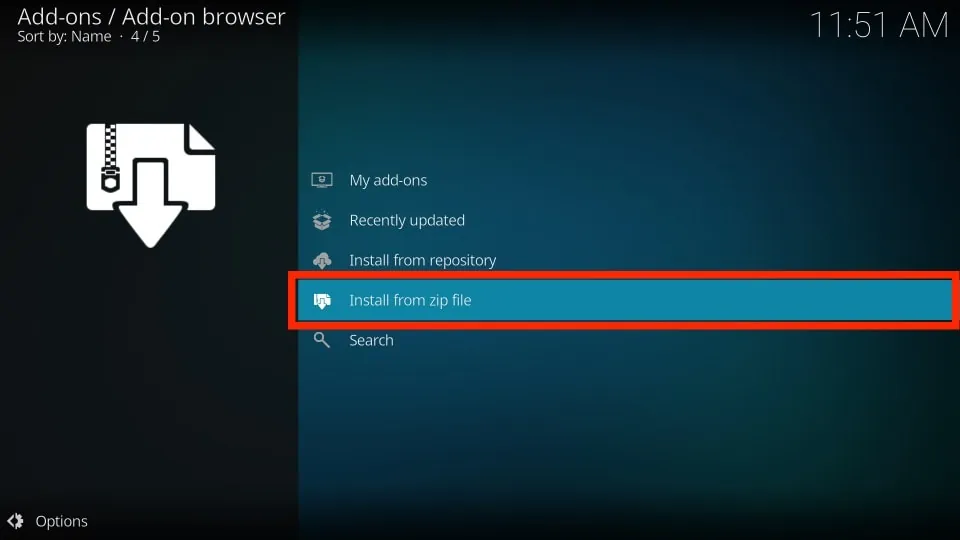
10. Open the option Install from zip file.
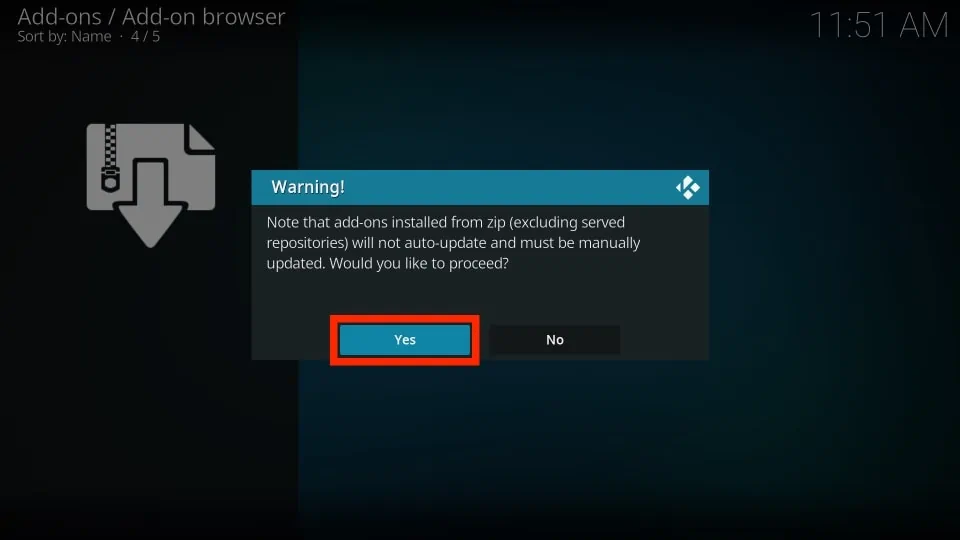
11. At this point, you will see an additional popup if you use Kodi 19. Click Yes in order to continue.
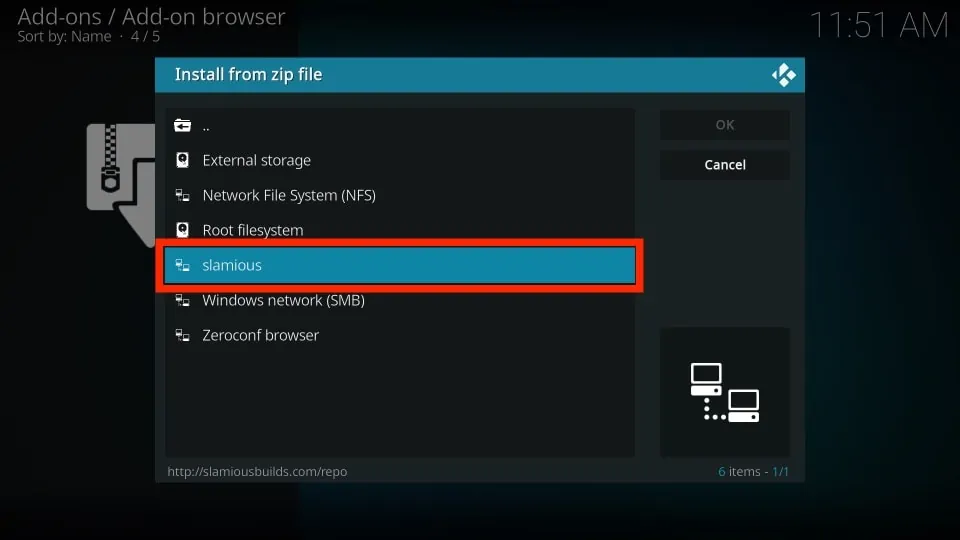
12. Go ahead and click slamious or the name that you chose earlier.
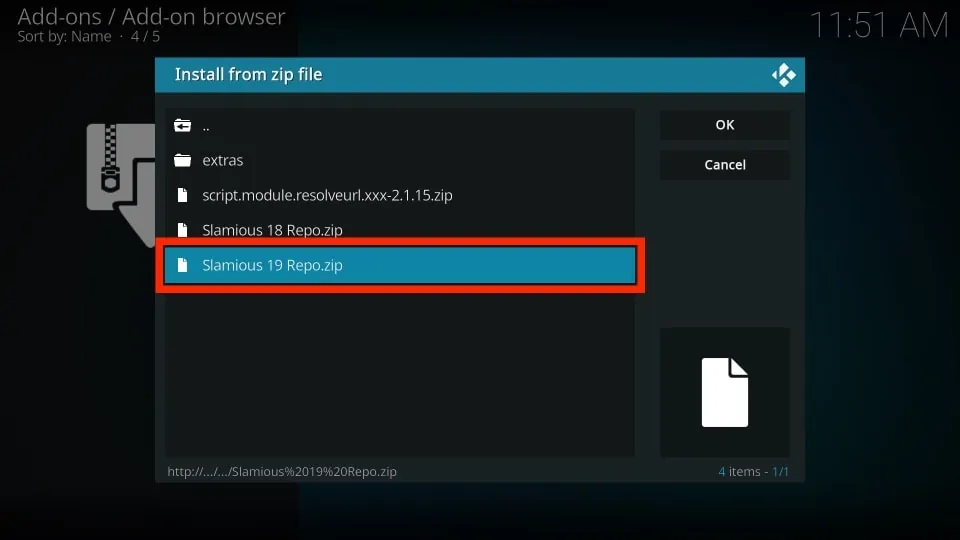
13. You should now see a zip file on this screen. Click it. It is named Slamious Repo x.zip.
If you use Kodi 19, choose the Kodi 19 version of the zip file and vice versa.
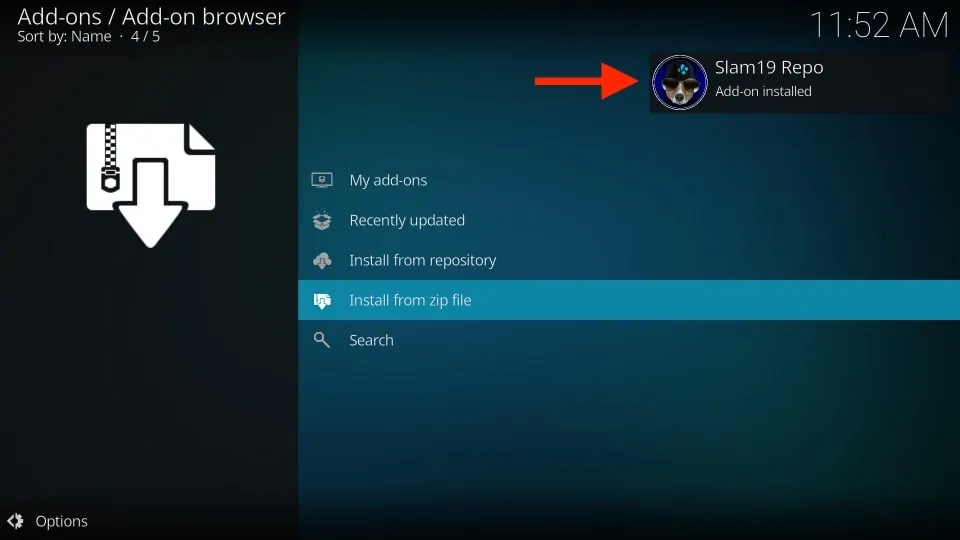
14. Wait for the Slamious Repo Add-on installed message. It is displayed in the top-right corner.
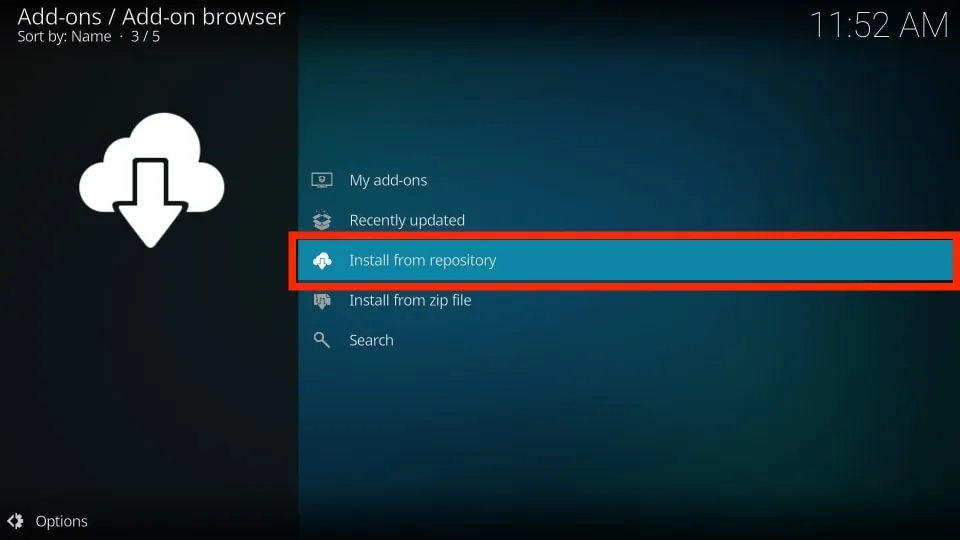
15. Now, click Install from repository.
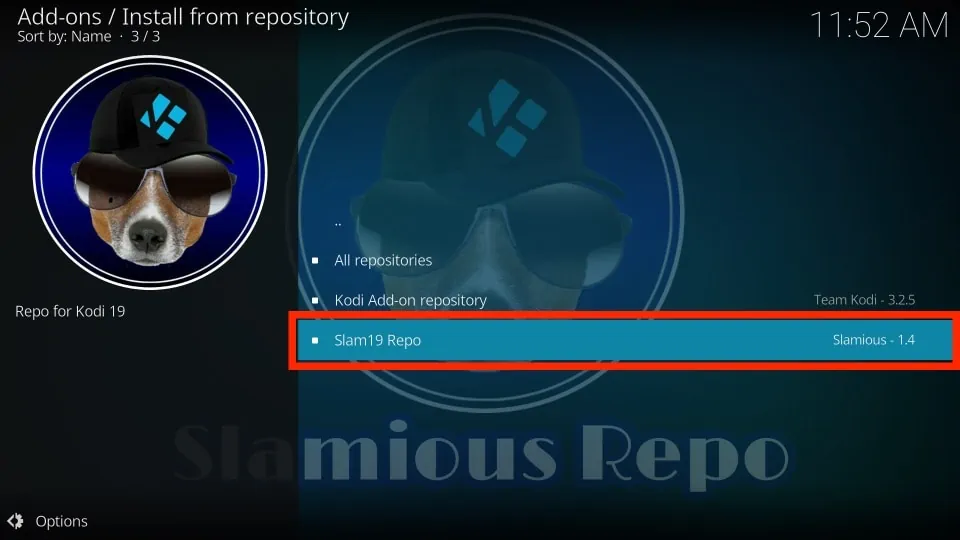
16. Click Slamious Repo (or Slam19 Repo on Kodi 19).
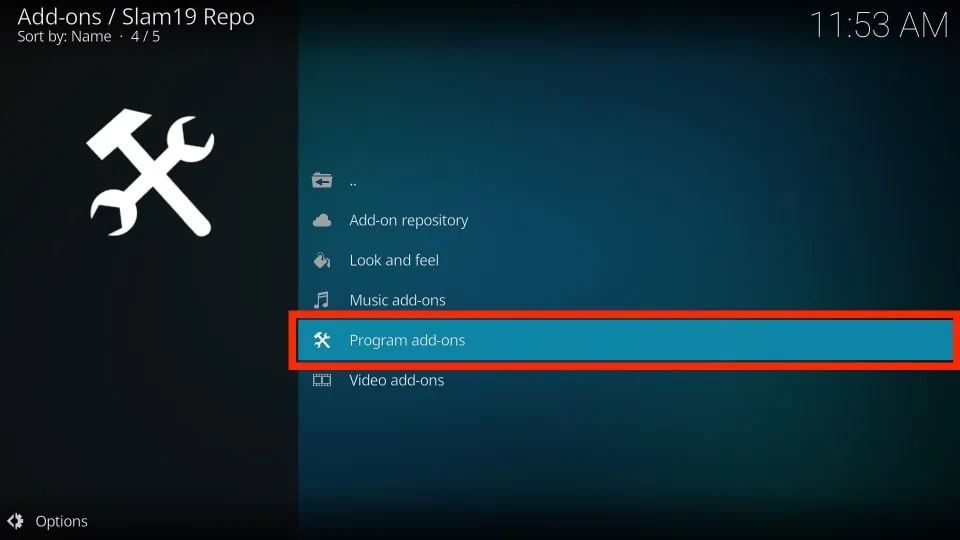
17. Click Program add-ons.
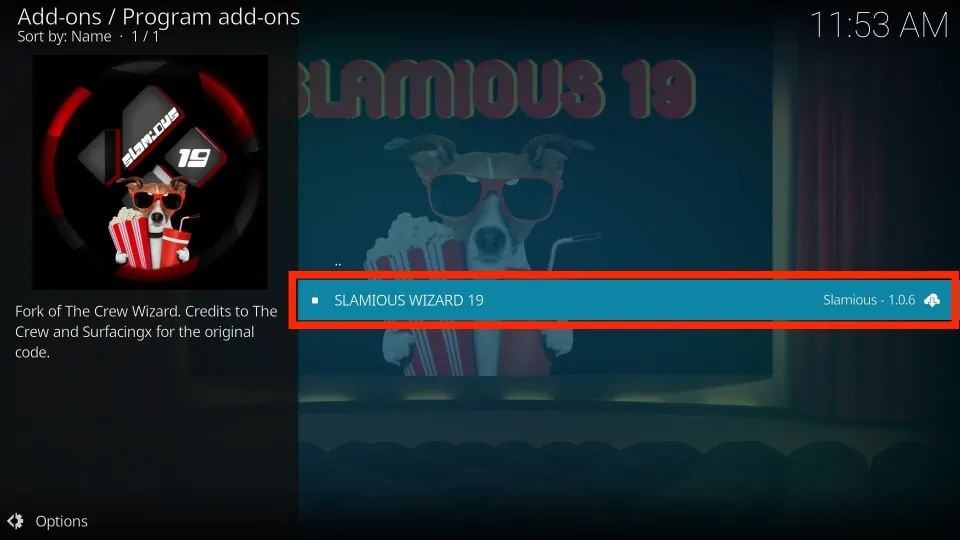
18. Open Slamious Wizard (or Slamious Wizard 19 on Kodi 19).
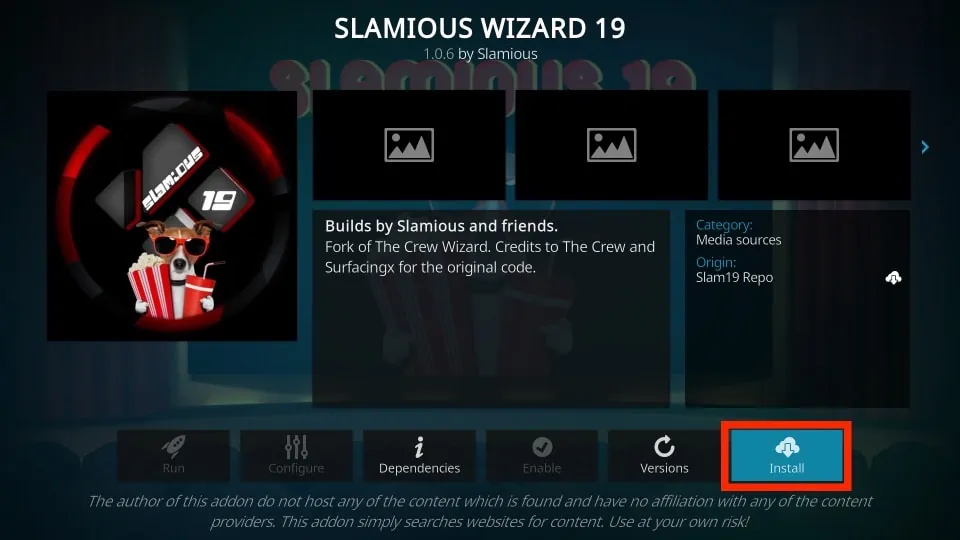
19. Click Install.
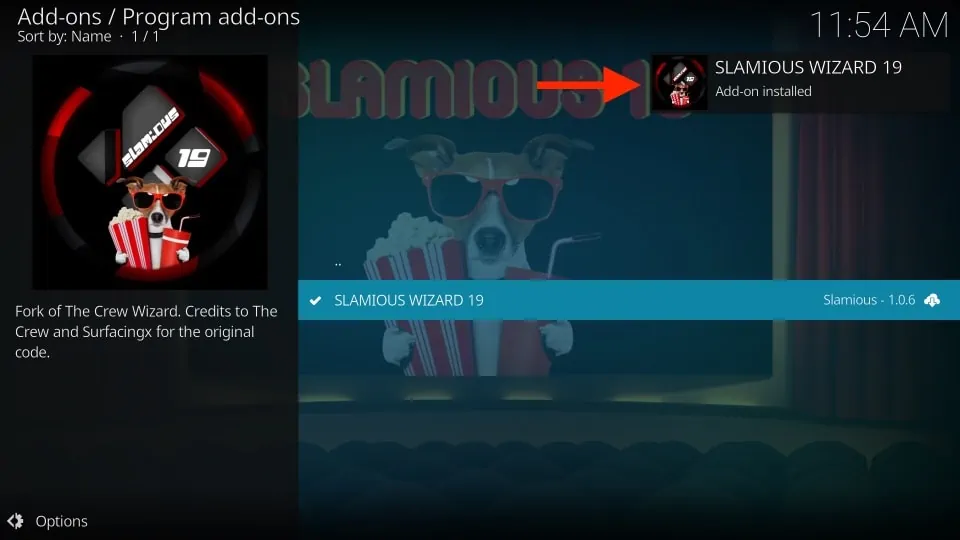
20. Wait for the Slamious Wizard (or Slamious Wizard 19) Add-on installed message.
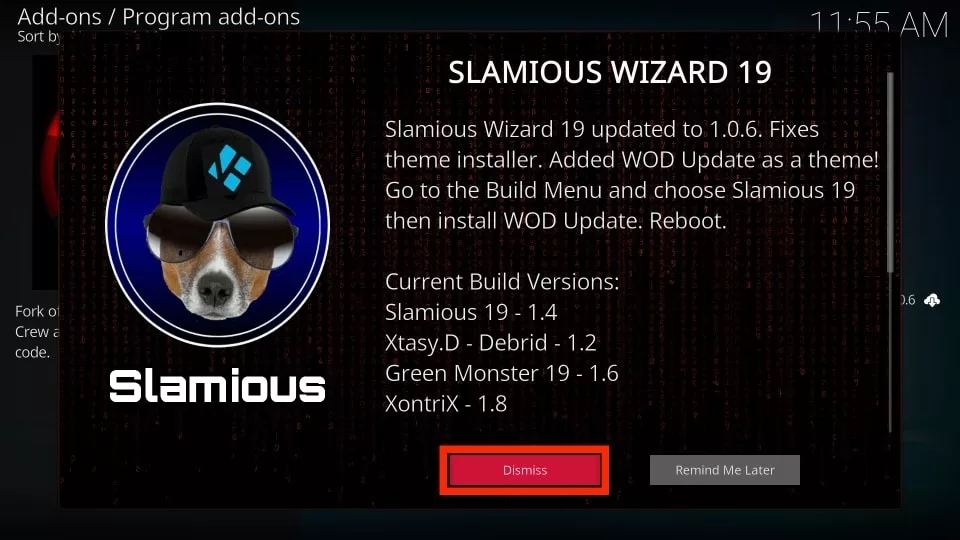
21. Click Dismiss when this prompt is displayed.
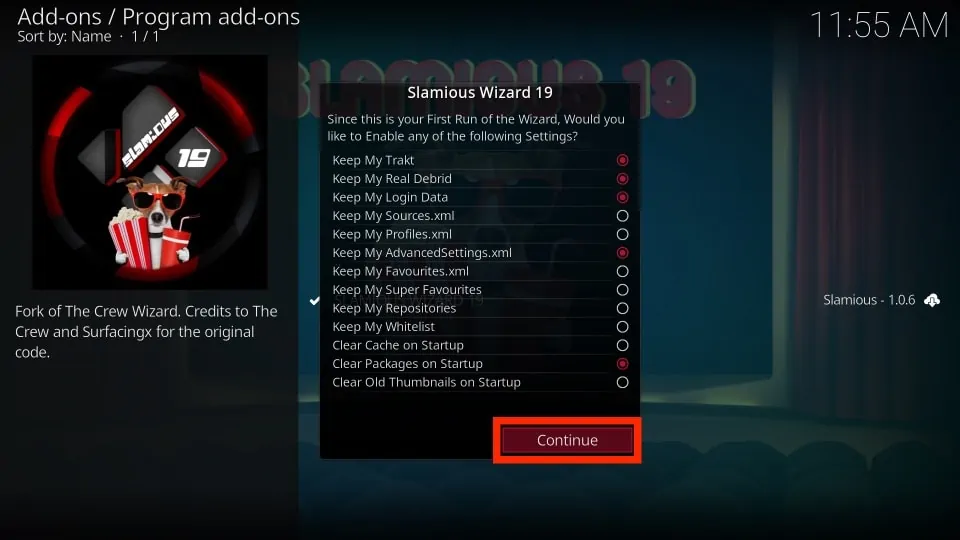
22. You may now see a popup window with a set of Settings. Click Continue.
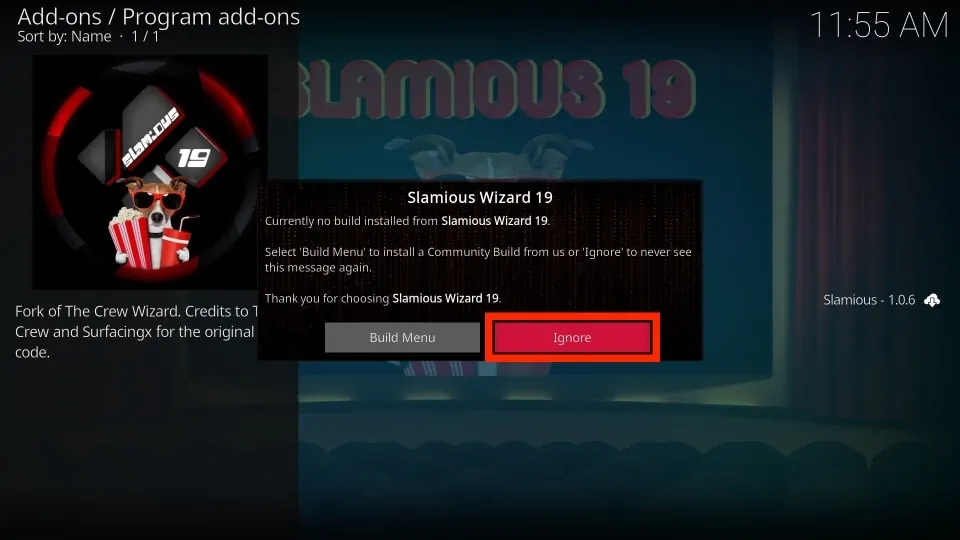
23. Now, you see this popup. Click Build Menu and start installing Slamious Kodi build.
However, if you clicked Ignore and now need to access the Slamious build menu, follow the next two steps.
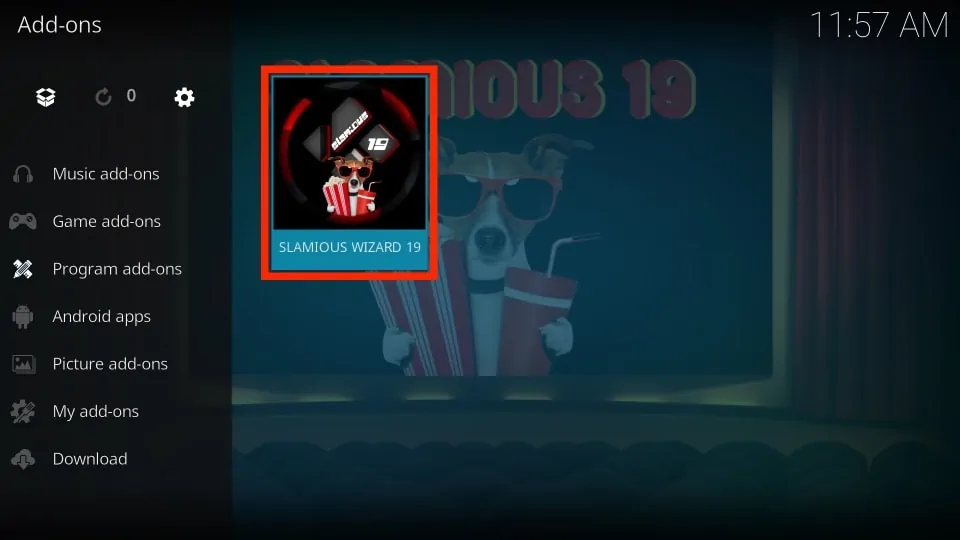
24. Go to the Kodi home-screen and navigate to Add-ons > Program add-ons. Here, you will find the Slamious Wizard (or Slamious Wizard 19). Click it!
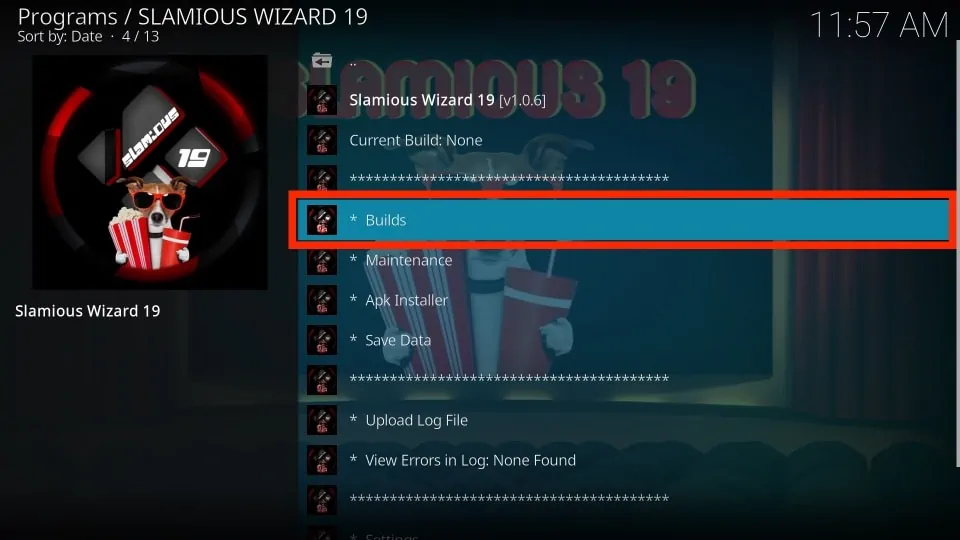
25. Next, click Builds.
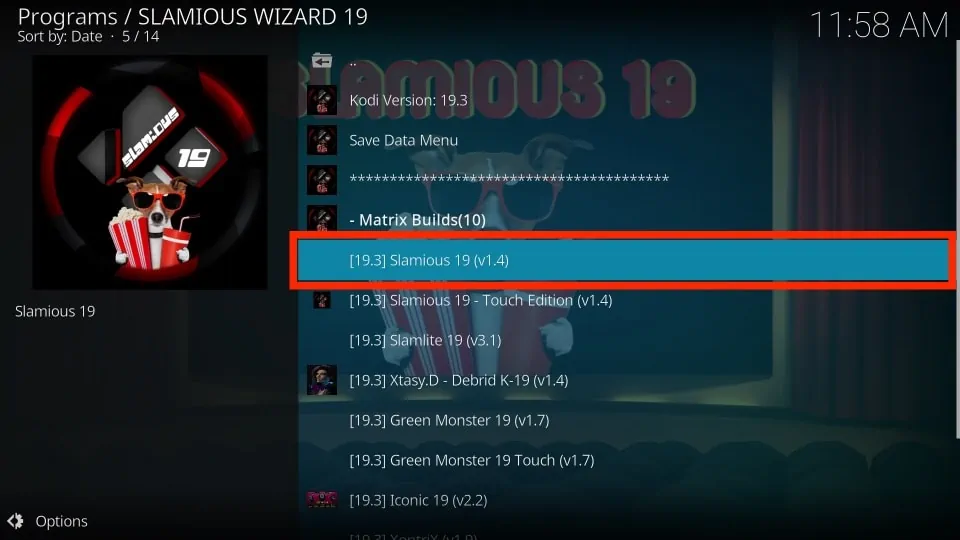
26. Now, here is the Slamious Build Menu for you. Click the Slamious or Slamious 19 build.
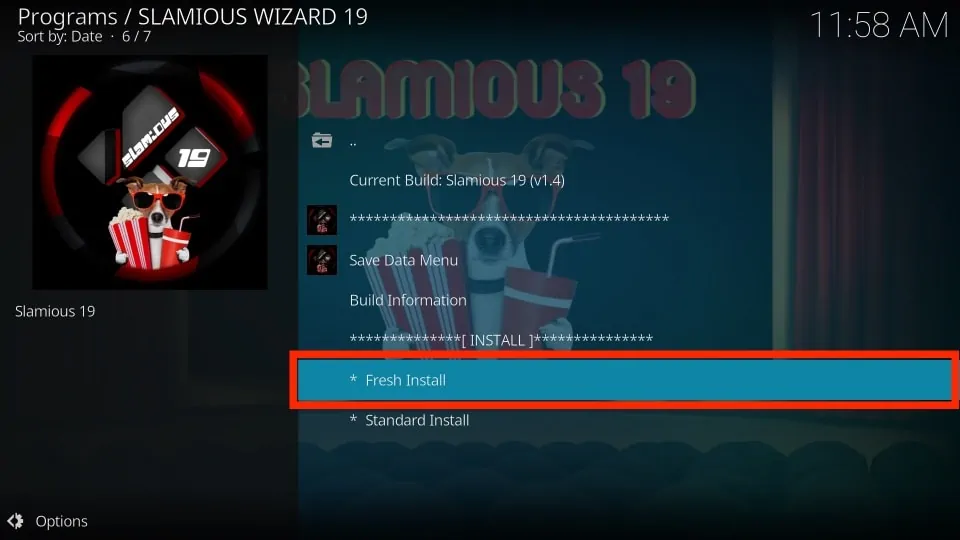
27. You need to choose between Fresh Install and Standard Install.
Fresh Install is always my personal choice because I believe any build works better when it is installed from scratch on Kodi.
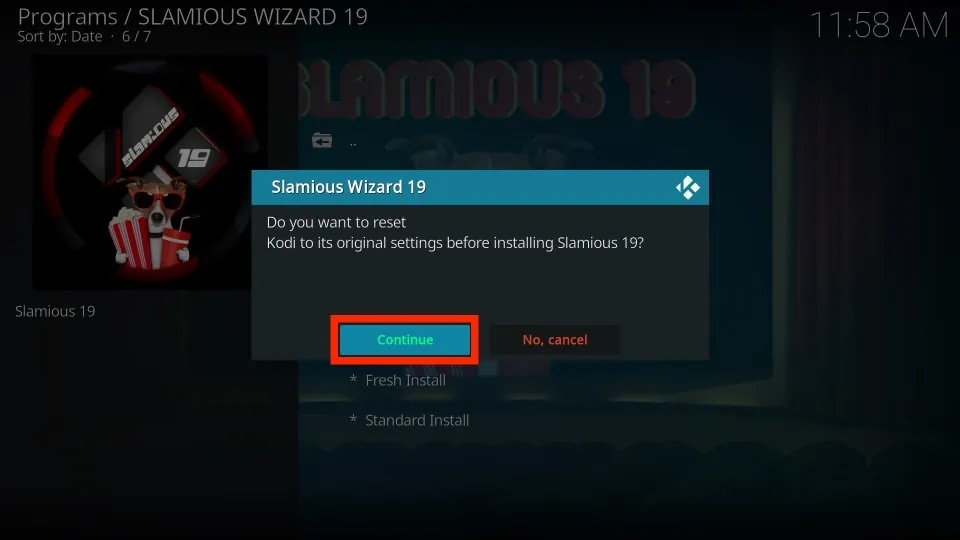
28. If you chose Fresh Install, Kodi will confirm whether you wish to go ahead with your choice. Click Continue for your consent.
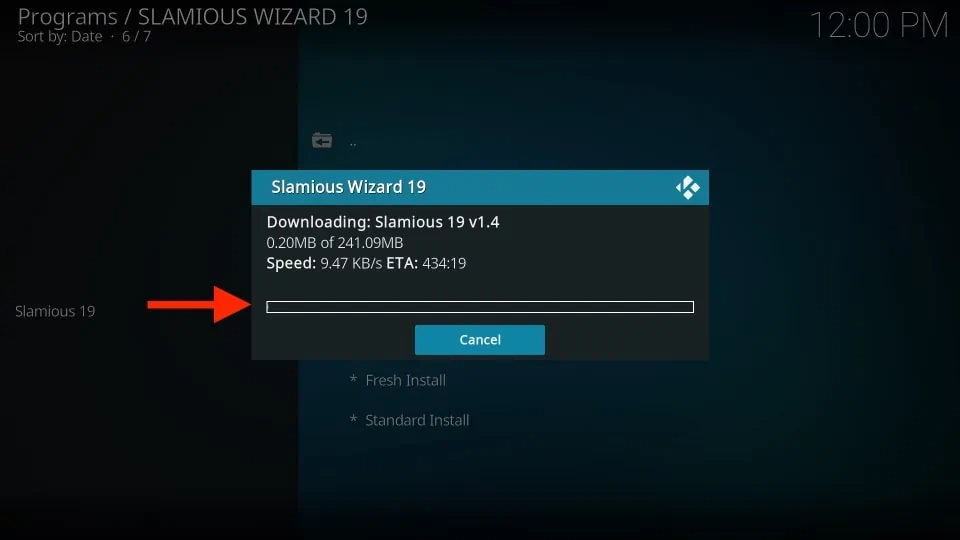
29. The Slamious Wizard will first quickly wipe Kodi clean and then start downloading the Slamious Kodi Build. This usually takes two to three minutes. However, it may vary depending upon your network connection and device specs.
Once the downloading is done, the build will start installing. And after that, Kodi will automatically force close. Open Kodi to experience the Slamious 19 build.
This is how you install Slamious build on Kodi from the Slamious Wizard.
Before you start streaming with Kodi Addons or Builds, I would like to warn you that everything you stream on Kodi is visible to your ISP and Government. This means, streaming copyrighted content (free movies, TV shows, live TV, and Sports) might get you into legal trouble.
Thankfully, there is a foolproof way to keep all your streaming activities hidden from your ISP and the Government. All you need is a good VPN for Kodi. A VPN will mask your original IP which is and will help you bypass Online Surveillance, ISP throttling, and content geo-restrictions.
I personally use and recommend ExpressVPN, which is the fastest and most secure VPN. It is compatible with all kinds of streaming apps and devices.
NOTE: We do not encourage the violation of copyright laws. But, what if you end up streaming content from an illegitimate source unintentionally? It is not always easy to tell the difference between a legit and illegal source.
So, before you start streaming on Kodi, here's how to get VPN protection in 3 simple steps.
Step 1: Get the ExpressVPN subscription HERE. It comes with a 30-day money-back guarantee. Meaning, you can use it free for the first 30-days and if you are not satisfied with the performance (which is highly unlikely), you can ask for a full refund.
Step 2: Click HERE to download and install the ExpressVPN app on your streaming device. If you are using a FireStick, I have given the exact steps starting with Step 4 below.
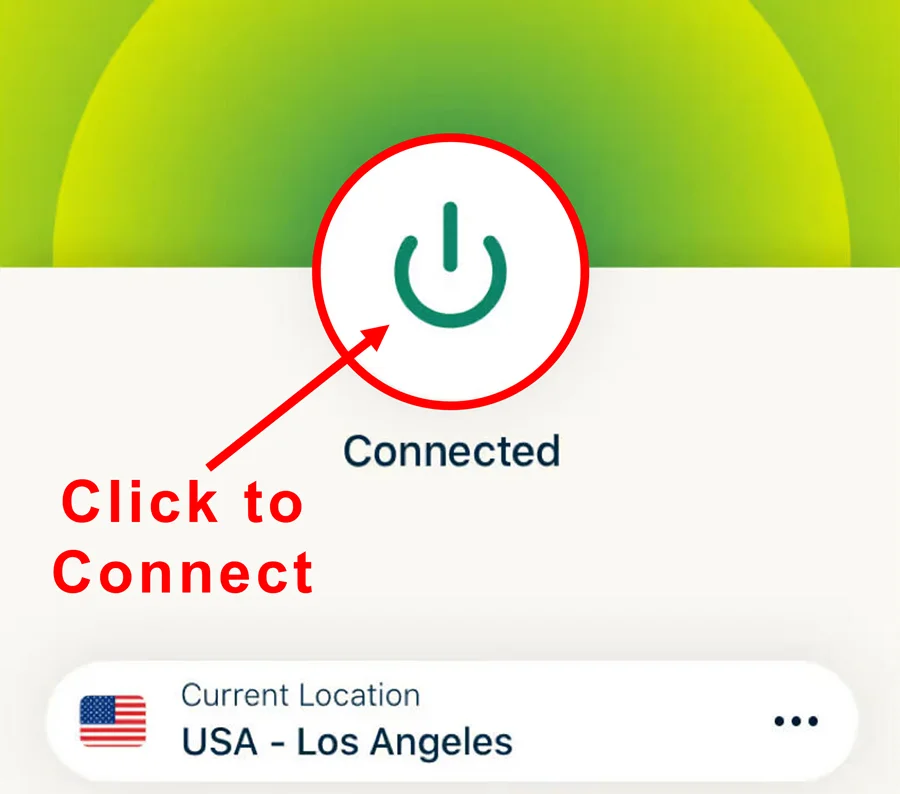
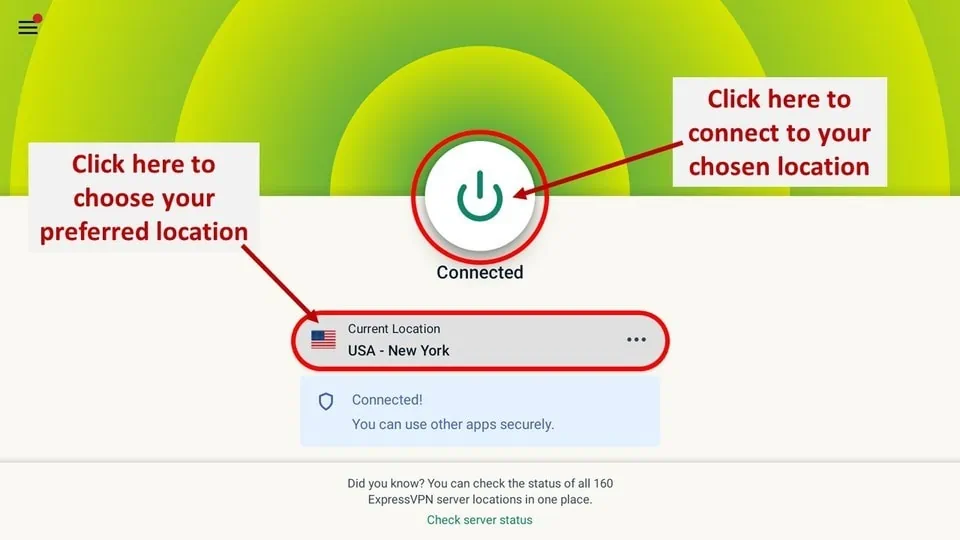
Step 3: Click the Power icon to connect to a VPN server. That's all. Your connection is now secure with the fastest and best VPN for Kodi.
The following are the steps to install Kodi VPN on your Fire TV devices. If you have other streaming devices, follow Step 1-3 above.
Step 4: Subscribe to ExpressVPN HERE (if not subscribed already).
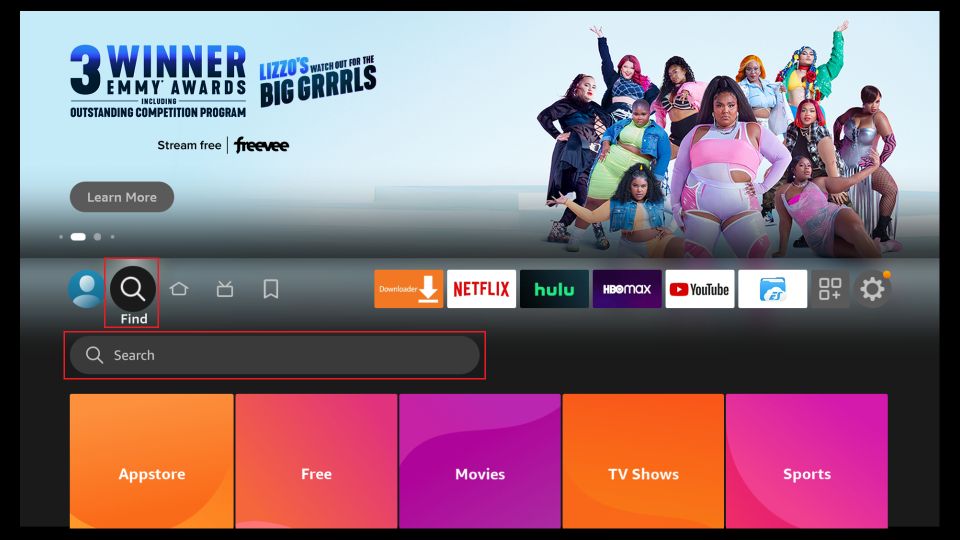
Step 5: Go to Fire TV Stick home screen. Click Find followed by Search option (see image below).
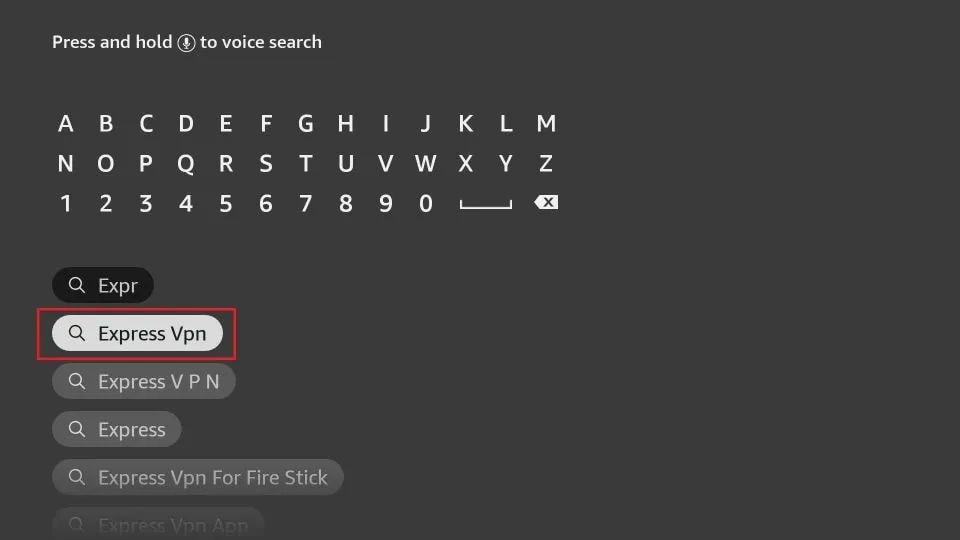
Step 6: Type Expressvpn in the search bar and select when it shows up.
Step 7: Click Download.
Step 8: Open the ExpressVPN app and Sign in using the email ID and password that you created while buying the ExpressVPN subscription.
Step 9: Click the Power icon to connect to a VPN server. That’s all. Your FireStick is now secured with the fastest VPN.
Overview of the Slamious Kodi Build
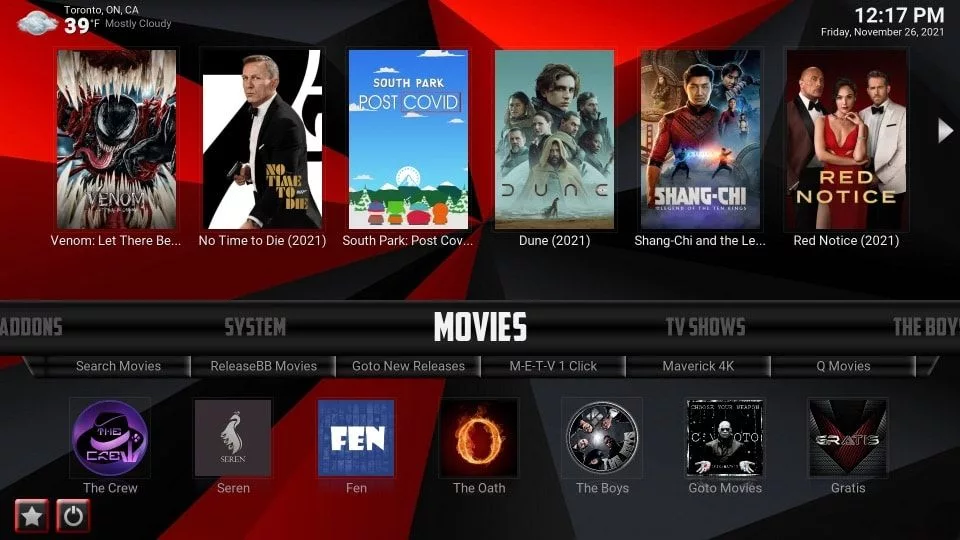
Once you have installed the build, you can access it by reopening the Kodi application. You will be presented with the following home screen:
If this is the first run, please make sure you allow the build a few minutes to update its addons, plugins, and settings. This takes a bit, however, makes sure your build runs smoothly later.
Following are the categories on the main screen of the Slamious build that let you start streaming instantly:
- Movies
- TV Shows
- Live TV
- Sports
- Kids
- Addons
- The Boys
These categories are lined up on the main menu bar on the main screen. Upon selecting a category, the submenu bar further displays the relevant option. For instance, in the screenshot above, I chose Movies and the related options including Video-addons, New Releases, etc. filled the submenu bar.
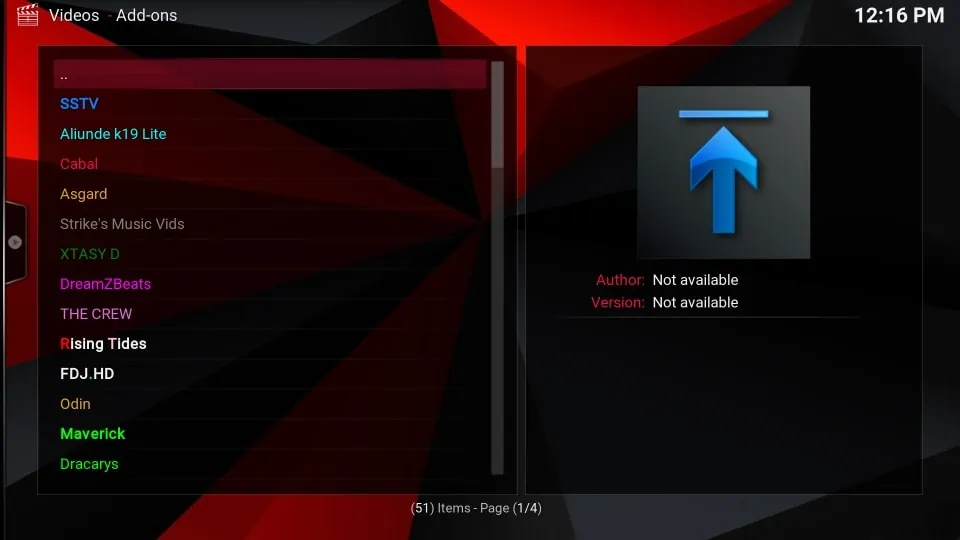
If you wish to explore the complete list of preinstalled addons that come with Slamious Kodi build, you can go to Add-ons > Video Add-ons from the main menu on the home screen.
Here is the list of some of the popular video addons available with Slamious:
Verdict
Slamious wizard is host to more than a dozen builds. I have tried many and believe that Slamious is one of their best. Let’s talk about addons first, one very important aspect of any Kodi build. Slamious packs plenty of preloaded addons as I have listed above. It lets you stream shows, movies, sports, live TV and more.
The user interface of the build is simple and yet appealing. Slamious Kodi build is fluid and allows you to ease through navigation. Overall, it is designed for great user experience. The build is lightweight too and hence works hassle-free on low-RAM devices as well.
Related:
- How to Install Kodi on FireStick
- How to Update Kodi
- How to Install Cloud 9 Kodi Addon on FireStick
- How to Install Revolution Kodi Addon on FireStick

Suberboost Your FireStick with My Free Guide
Stay Ahead: Weekly Insights on the Latest in Free Streaming!
No spam, ever. Unsubscribe anytime.




Slamious was one of my favorite Builds.. It had just enough stuff and was all you needed. Too bad the developer has announced the decision to discontinue the wizard (builds) and repos on Dec 2, 2021.
Hi Mark. Slamious was a great build. Fortunately, we have a complete list of our best Kodi Builds. There are a lot to choose from, such as Xenon or Doomzday.
I’m trying to load slamious build on kodi v19.3 (i’ve have been using various builds on multiple firesticks for years). I keep getting a “couldn’t retrieve directory information” error (couldn’t connect to network server). I’m connected to the network as I can stream other apps on this firestick. I tried v19.2 and get same error. I have deleted kodi and currently have v19.3 installed. Allow Unknown sources is on. Slamious works fine on other sticks. both on 19.2 and 19.3. Express VPN in use. Any suggestions. I’m going to try another build, although i really like this one. I’m also considering resetting the Stick to factory defaults – last resort option).
Hi Joe. The Slamious build is no longer functioning. You can try some other builds like Diggz Xenon or Plutonium.
Is this build still working?
Hi Danielle. The Slamious build is no longer functioning. You can try some other builds like Diggz Xenon or Plutonium.
I love the build just not the dog on startup? Is there a way to delete it or change staRTUP WITHOUT A DOG? mIKE
Hi Mike, don’t think that would be possible.
How to get Alldebrid to work in place of Real debrid?
Hi Robert, you could go to Alldebrid.com and buy a subscription plan. You can later configure it with the addons and apps. However, Real Debrid is better than AllDebrid in my personal opinion.
Wouldn’t install
Hi Tracy, I just tried and it worked. You may have run into a temporary problem. Please try again and let me know.
I’ve installed Slaminous and was wondering if I have to authorize Real Debrid for each addon or jus the Real Debrid section for the build.
Hi Mitchell, you can do it universally using the Real Debrid section of the build.
how can i activate scrubbler in slamious?
Hi Rico, I am not sure what Scrubbler exactly is. Could you please explain?