This tutorial outlines the steps to install the CrewNique build on Kodi 20 Nexus and Kodi 19 Matrix. I took the screenshots for this guide using Windows 11. However, since the Kodi interface is identical across devices, you can use these steps on FireStick (4K, 4K Max, and other variants), Android TV, macOS, Windows 10, Raspberry Pi, iOS, Android, and more.
What is CrewNique Build?
CrewNique is a Kodi build that enhances the appearance and functionality of the Kodi media player.
It gives Kodi new skin, making the appearance more appealing. The build completely transforms the interface of the regular Kodi. The new interface is more user-friendly and streaming-friendly.
The build also comes bundled with many video addons for movies, shows, live TV, sports, and more. With these addons already included, you may not need any addons separately.
The CrewNique build is available on the Crew Repo, a popular third-party Kodi repository best known for The Crew addon.
The Crewnique build provides users access to seamless, comprehensive entertainment with minimal setup.
CrewNique is one of the best Kodi builds I have used.
Attention Kodi Users!
Governments and ISPs worldwide monitor your online activities. If you use third-party Kodi addons, you should always use a reliable Kodi VPN to hide your identity and prevent issues with your streaming experience. Currently, your IP is visible to everyone.
I use ExpressVPN, the fastest and most secure VPN in the industry. It is very easy to install on any device, including Amazon Fire TV Stick, PC, Mac, and Smartphones. It also includes a 30-day money-back guarantee. If you're not satisfied with their service, you can request a refund. ExpressVPN is offering a special NEW YEAR deal: get 4 months free and save 81% on the 2-year plan.
Install and Use Best Kodi VPN | Why you must use a VPN at all times
Is CrewNique Safe and Legal?
Let’s discuss the safety first. The Crew Repo is a third-party program that is not available in Kodi’s official repository, so we cannot be 100 percent sure that it is safe.
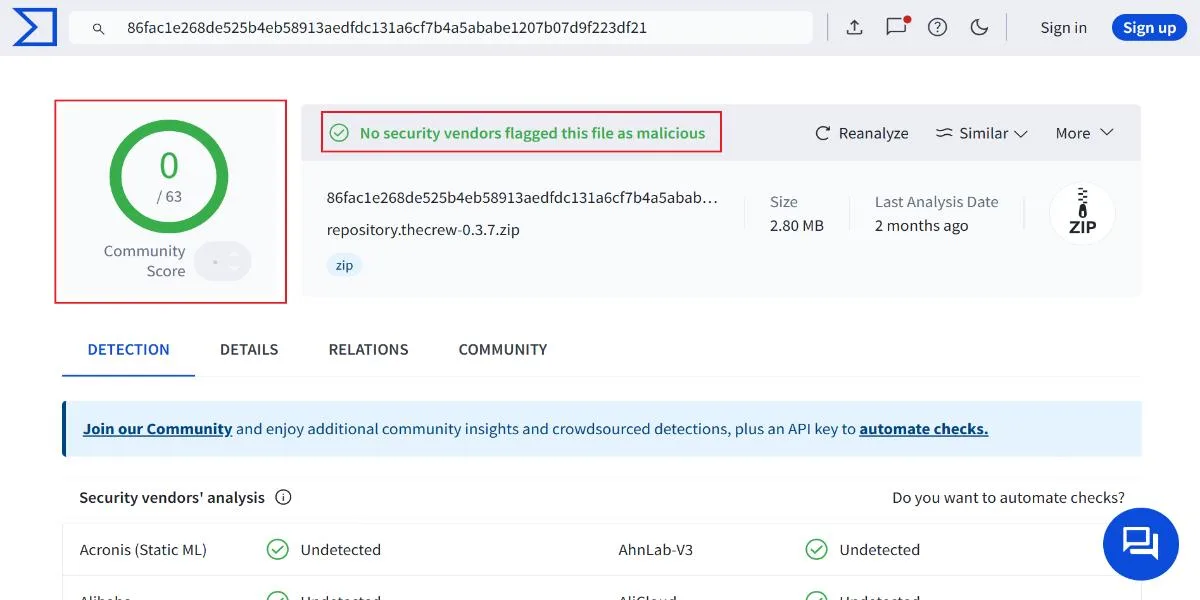
However, I had no issues with my device while using the build. Furthermore, when I ran the repository with Virus Total, I found nothing concerning. The image below shows the scan result. No security vendors have flagged it as malicious.
We cannot tell whether CrewNique is legal because FireStickTricks lacks the resources to check each build or addon and determine its legal status.
The build comes bundled with many unofficial addons that procure streaming links from unknown providers. Whether these providers have copyright licenses or streaming rights cannot be determined.
ExpressVPN is the best way to maintain your privacy and peace of mind because ExpressVPN allows you to hide all your streaming activities.
How to Install CrewNique Build on Kodi
Installing a build unavailable in the official repository of the Kodi app involves plenty of work. However, following the steps below will make it easy. The following steps will show you how to download and install the build from its original source.
Let’s get started:
Legal Disclaimer: This guide is for informational purposes only. FireStickTricks.com does not own, host, operate, resell, or distribute any apps, services, or content mentioned.
Part 1: Changing a Kodi Setting to Enable Unknown Sources
The Crewnique build comes from a third-party website, an unknown source. To allow Kodi to install Crewnique, you have to enable Kodi to allow the installation of unknown sources. You must make some changes to the Kodi settings do the same:
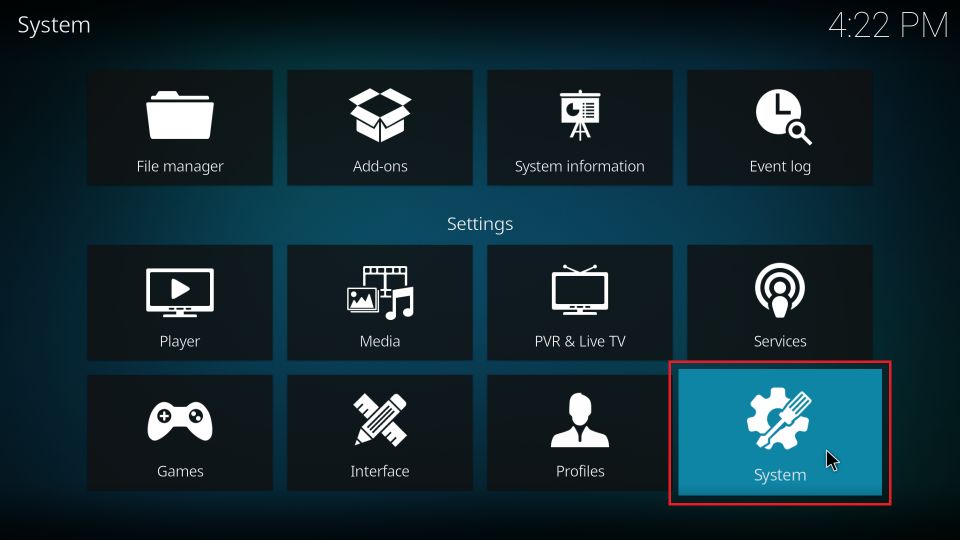
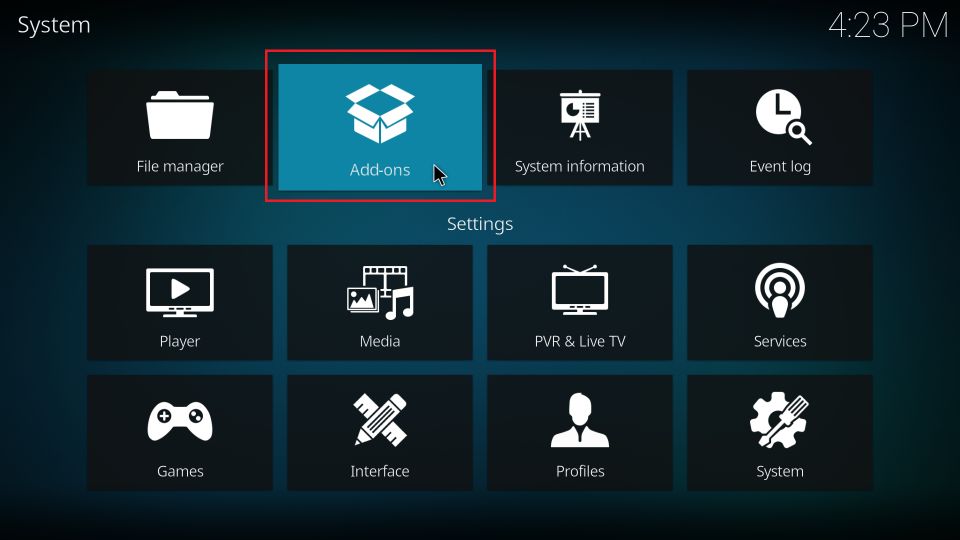
1. Open the Kodi home window. Scroll to the top left. Click the cog icon to open Settings.

2. Go to the System folder on the next screen and click it.
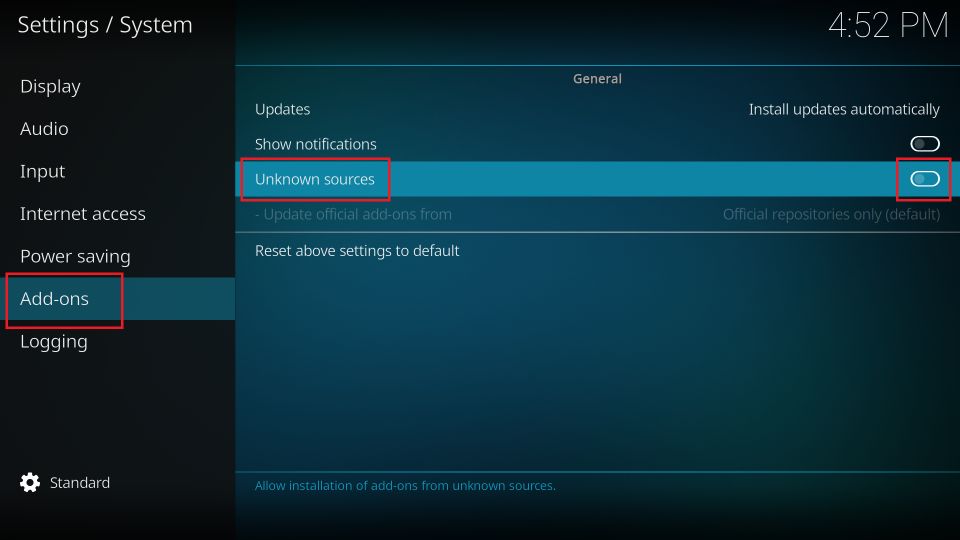
3. Scroll down to the Add-ons on the left and then enable Unknown Sources on the right. If it is off, this option should be turned on.
4. You get a prompt with a warning message. For now, let’s ignore this message and click Yes.
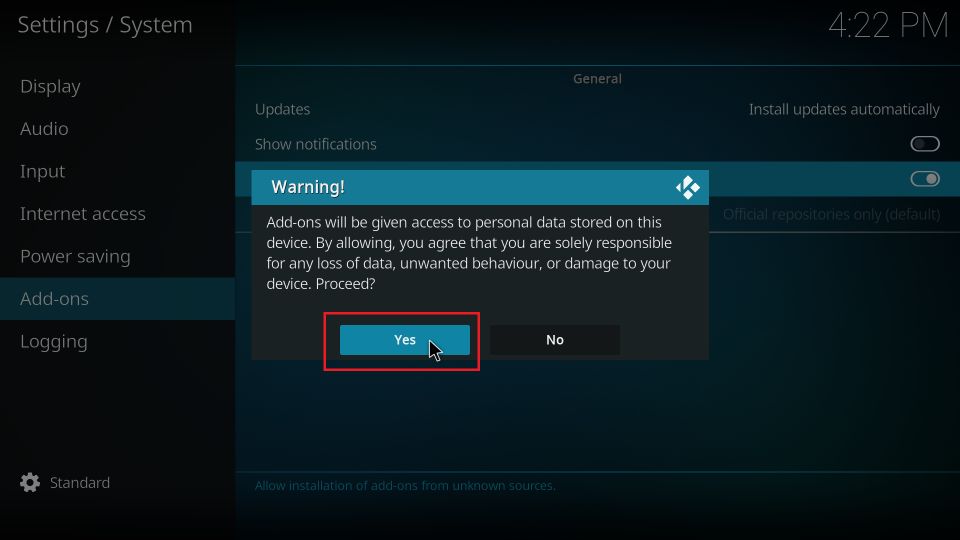
You have allowed CrewNique Kodi Build installation from an unknown source.
Part 2: Provide the Source Path & Install the Crew Repository
Now you know that the CrewNique build is from an unknown source. Next, we will install the Crew Repository on Kodi. In the following steps, we will provide the URL of the source:
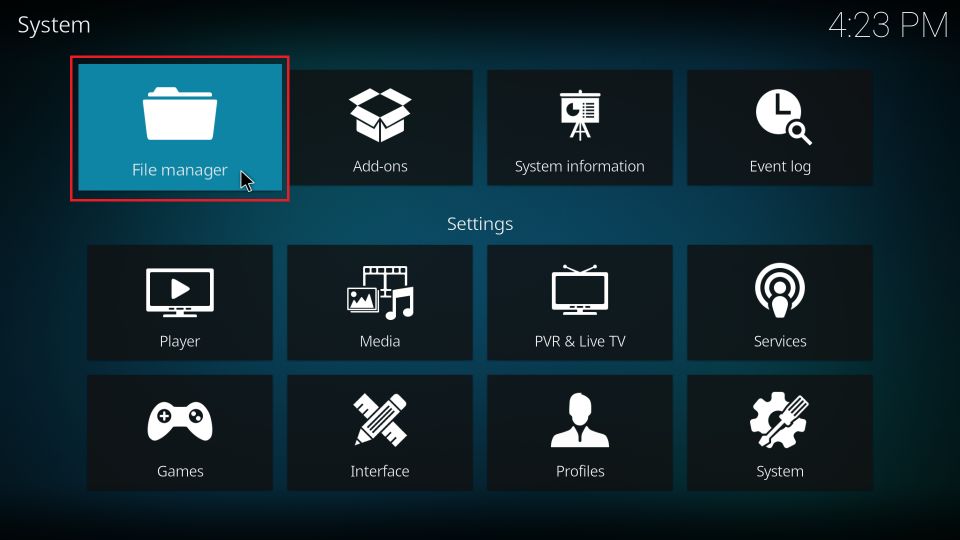
1. Navigate to the Kodi Settings window one more time.
2. Open the folder titled File manager.
3. Look for Add source on this screen. Click or double-click it, depending on what works on your device.
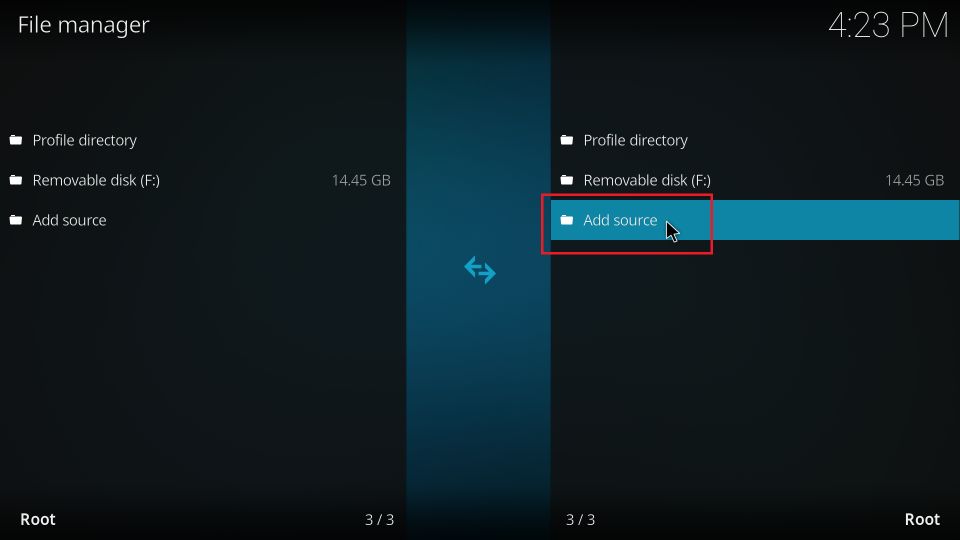
4. Your Kodi screen must now display a popup. Locate and click <None>.

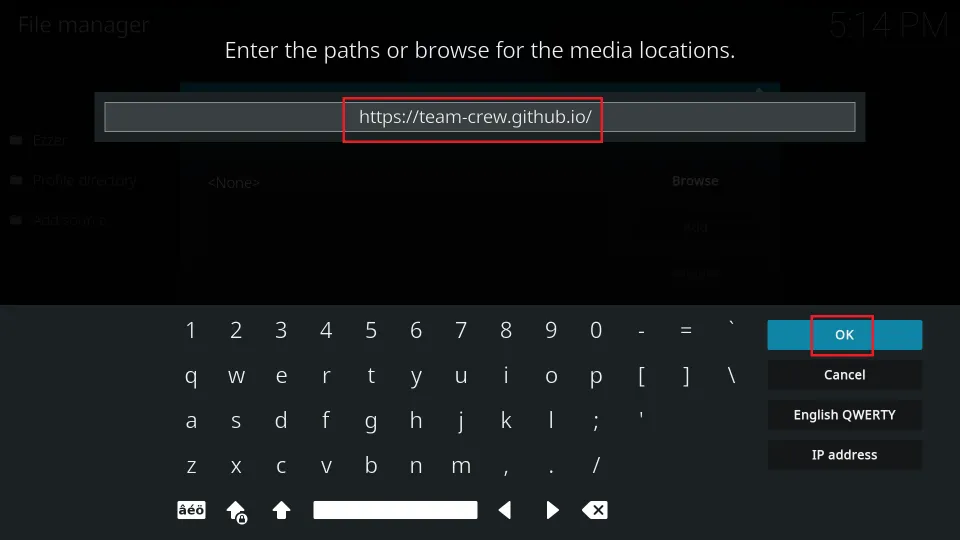
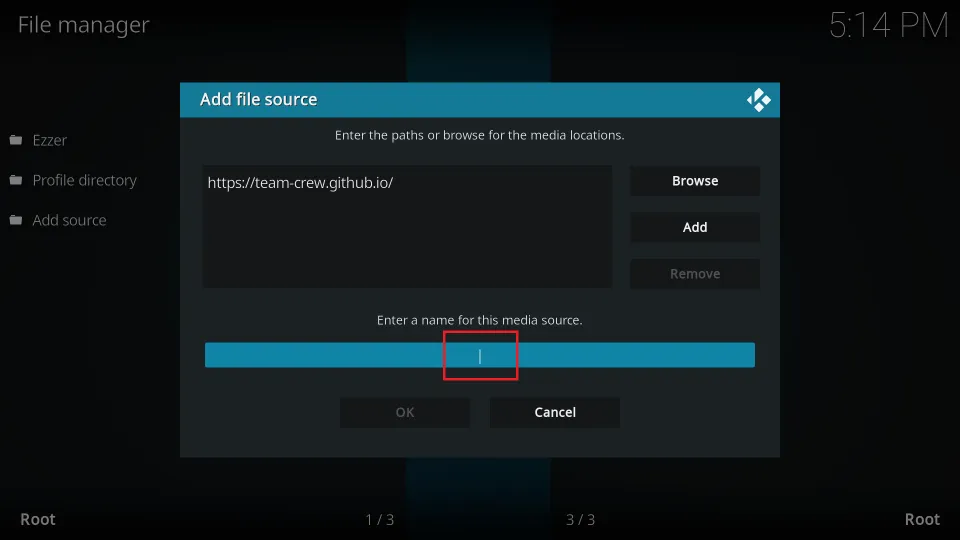
5. On this window, you provide the path or URL, which is https://team-crew.github.io
Type it carefully to avoid mistakes because one typo can cause installation problems later. Save the URL by clicking OK.
Note: You just typed the URL to the source of the Crew Repository. It is a third-party source. FireStickTricks.com has no association with its owners.
6. The text box for the source name is blank. Click the box to type a name.
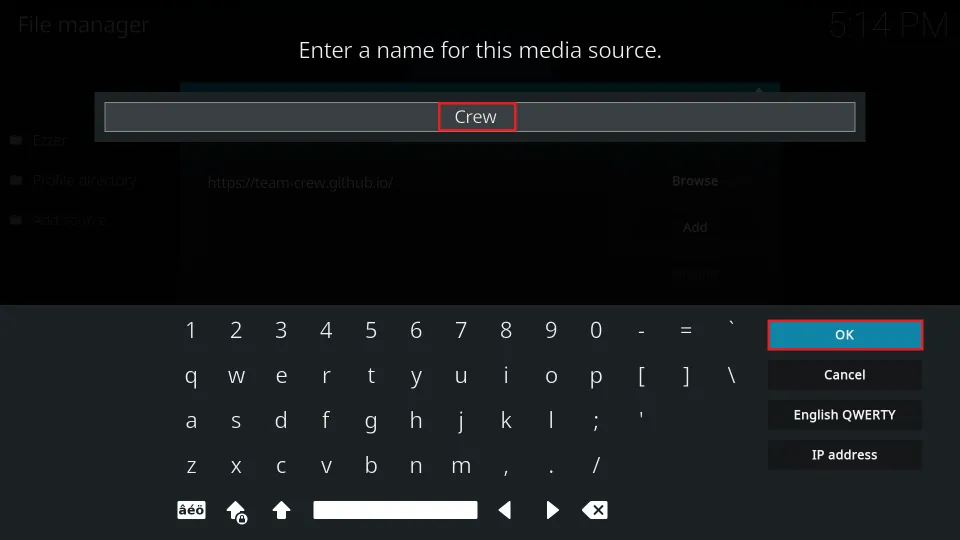
7. Since we are installing the build from the Crew repo, we will use the name Crew (or you may choose a different name). It is entirely up to you. Click OK.
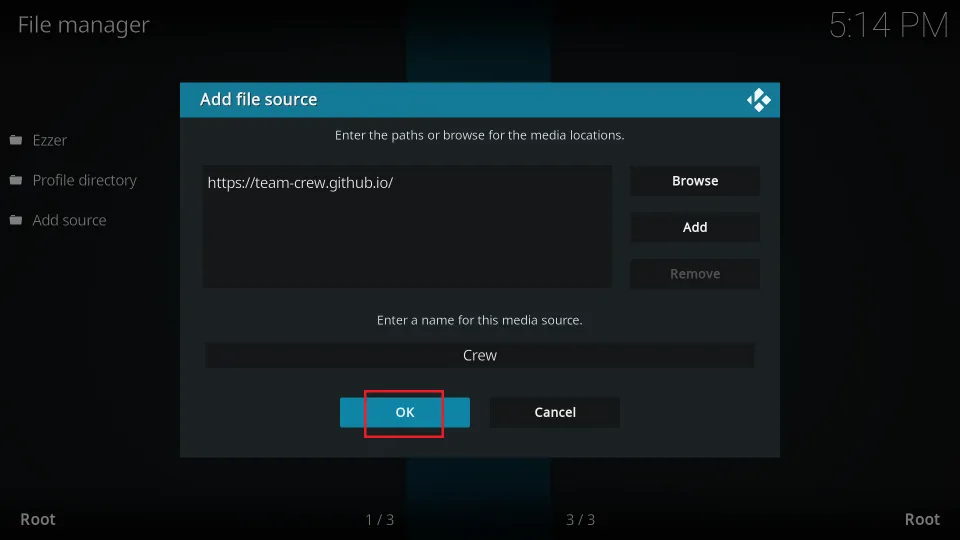
8. Confirm everything is right and click OK to save the changes.
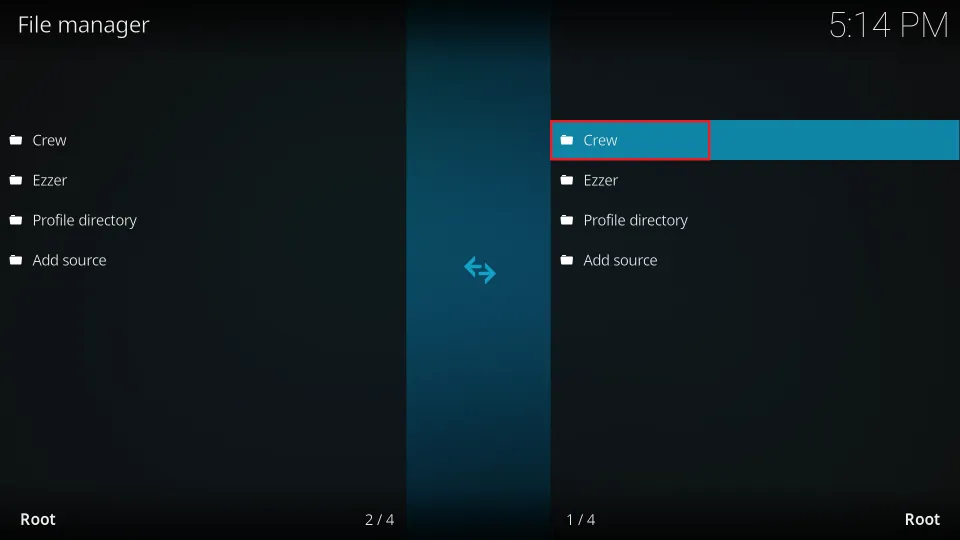
9. You should see the name you have chosen in this window. Press the back button.
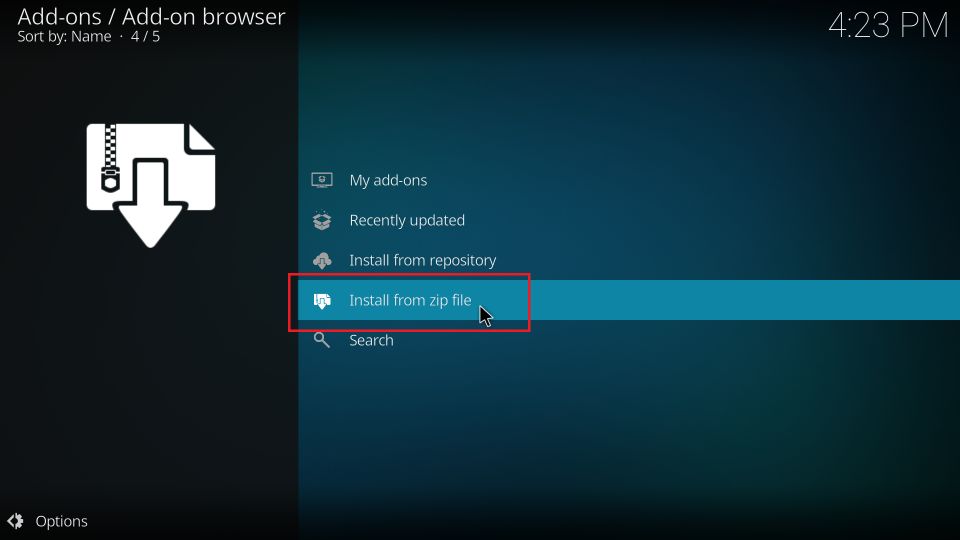
10. You must now return to the Settings window. If you are in another window, click the cogwheel icon on the home screen to return to this window. Then click Add-ons.
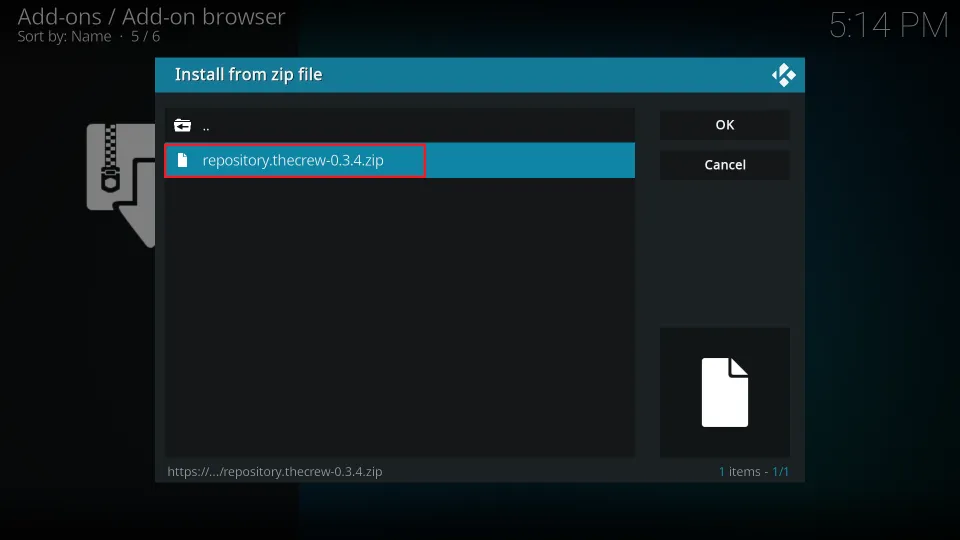
11. Open the item Install from zip file.
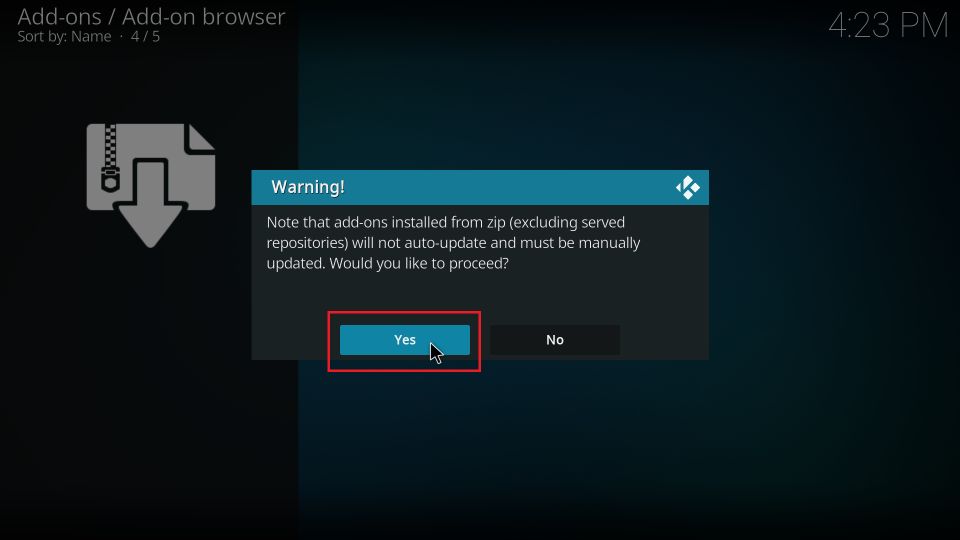
12. If this prompt is displayed, click Yes.
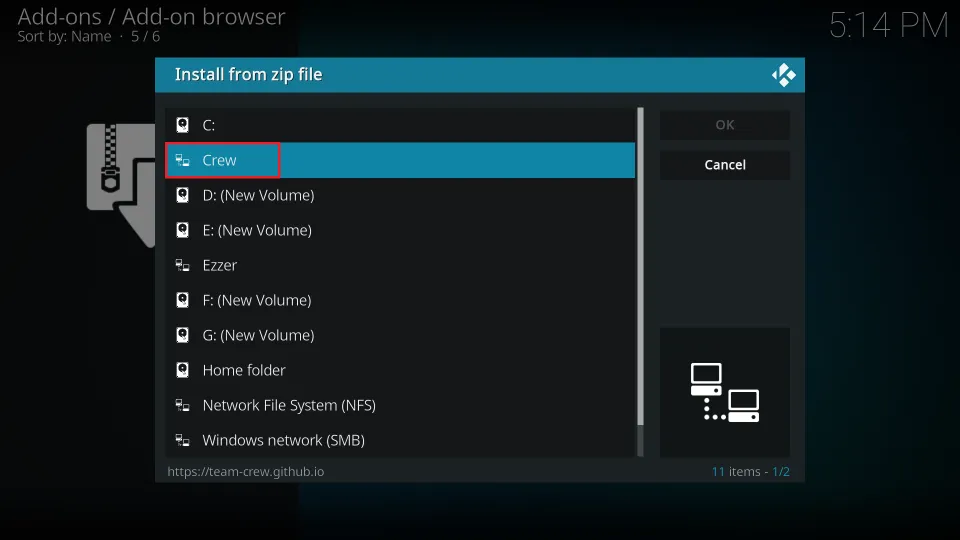
13. A popup window now appears. It contains the list of the sources you have added. Click Crew or whatever name you gave it earlier.
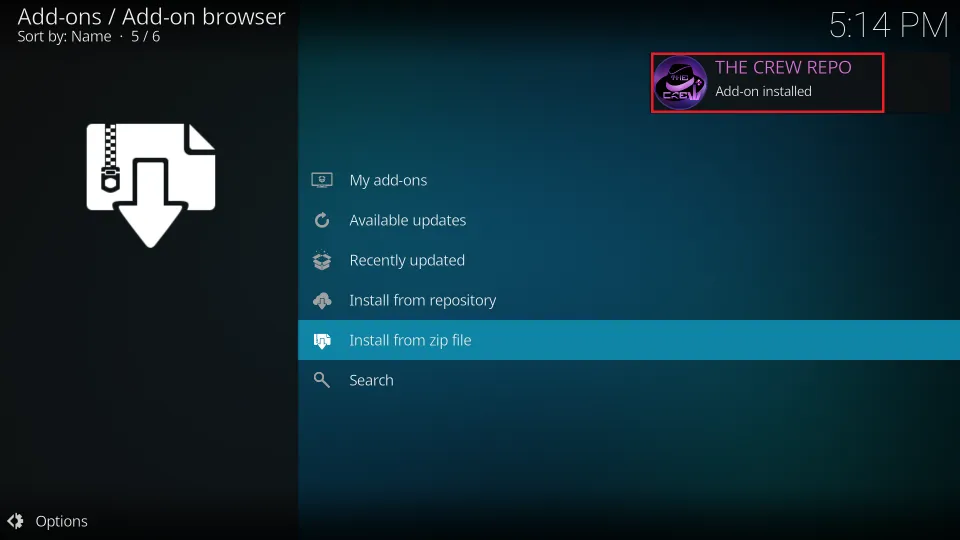
14. You will now see this screen with a zip file. Click the zip file. It will install the Crew repository.
15. It will take no time. Wait until a notification says the repository installation is complete (upper-right).
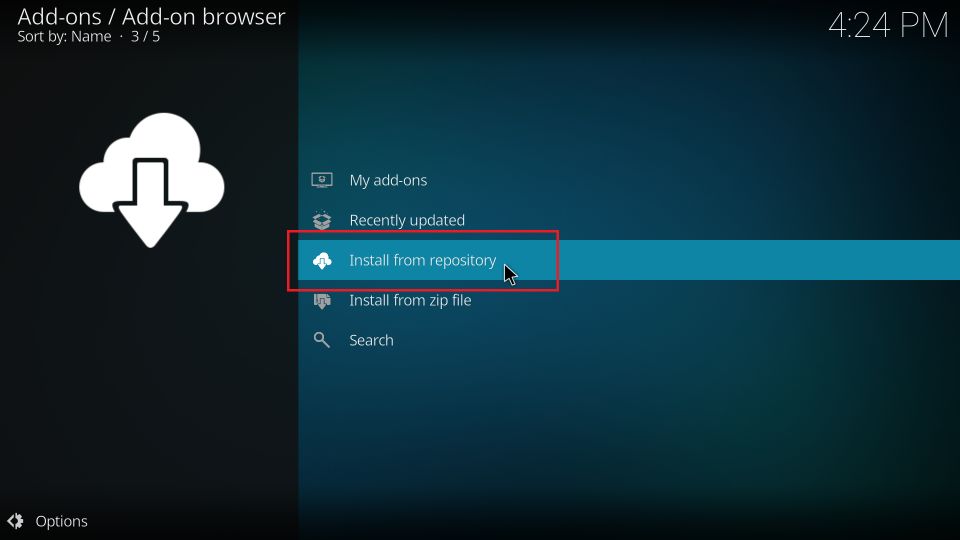
16. Choose the option from the same screen Install from repository.
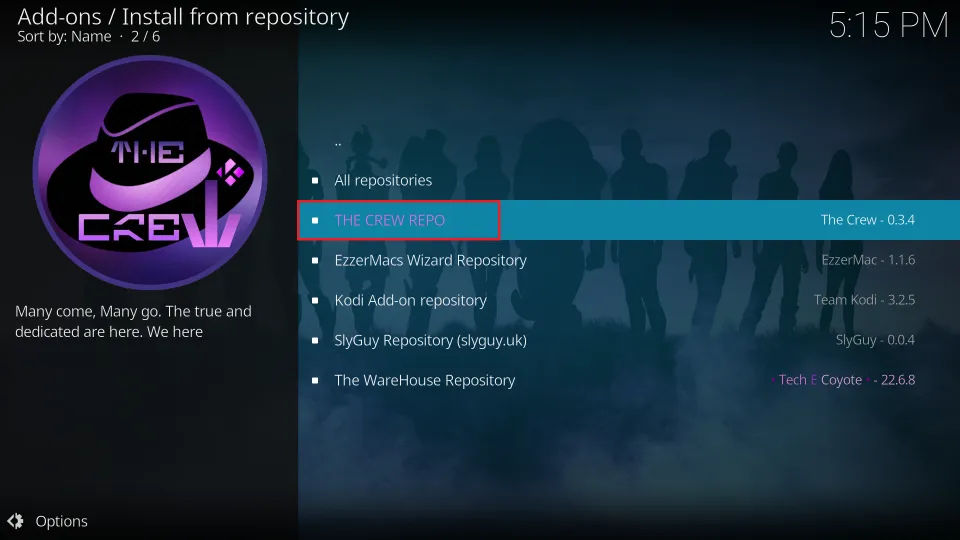
17. Open the Crew Repo you installed moments ago.
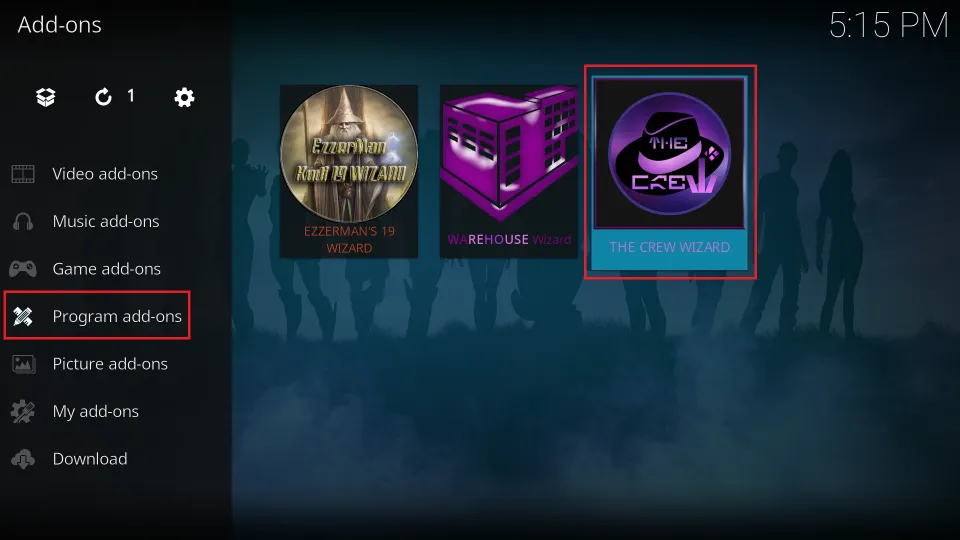
18. On the next screen, click Program add-ons from the options.
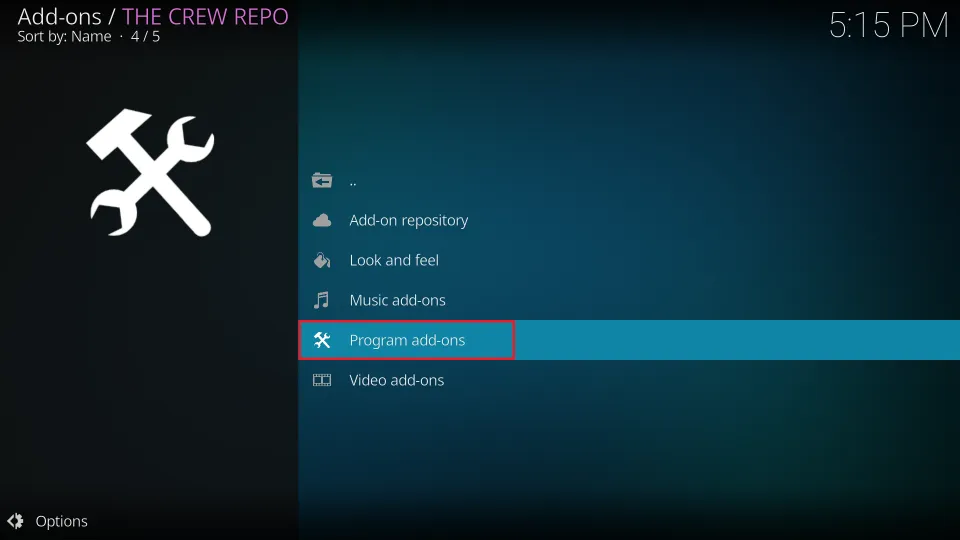
19. This window shows you the list of the Wizards. Each Wizard contains its own set of builds. We are picking The Crew Wizard.
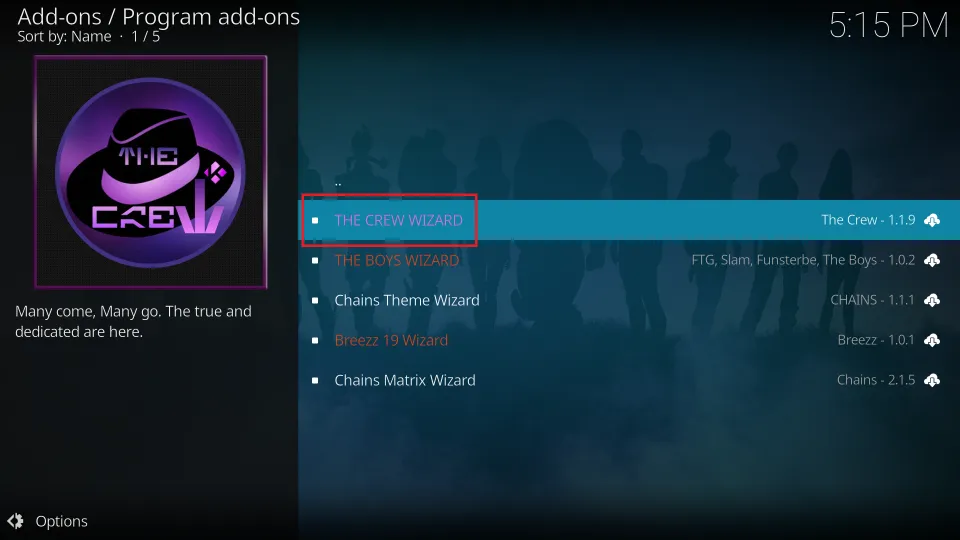
20. Click the Install button at the bottom of the Crew Wizard dashboard.
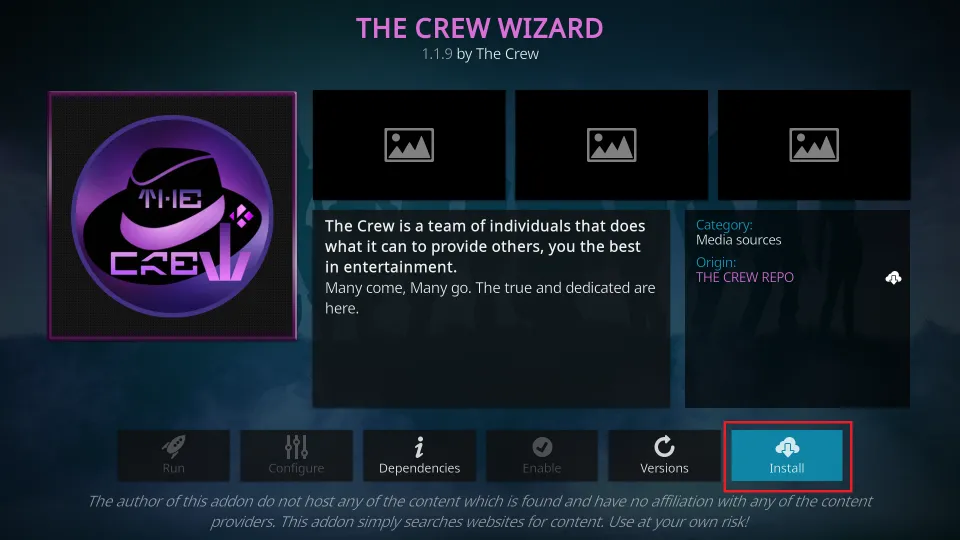
21. You are installing the Crew Wizard from the Crew Repo. It takes a few seconds. There will be a notification in the upper-right corner when the installation is finished.
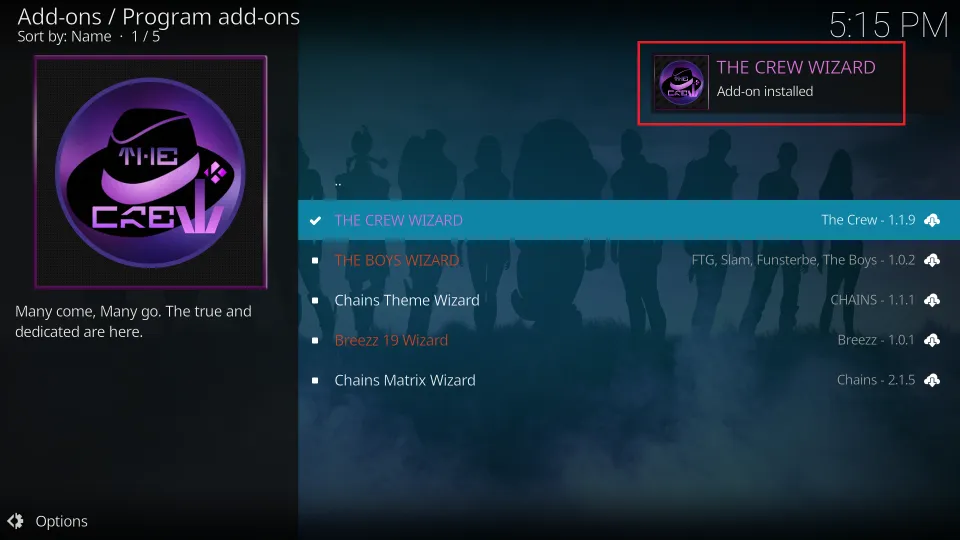
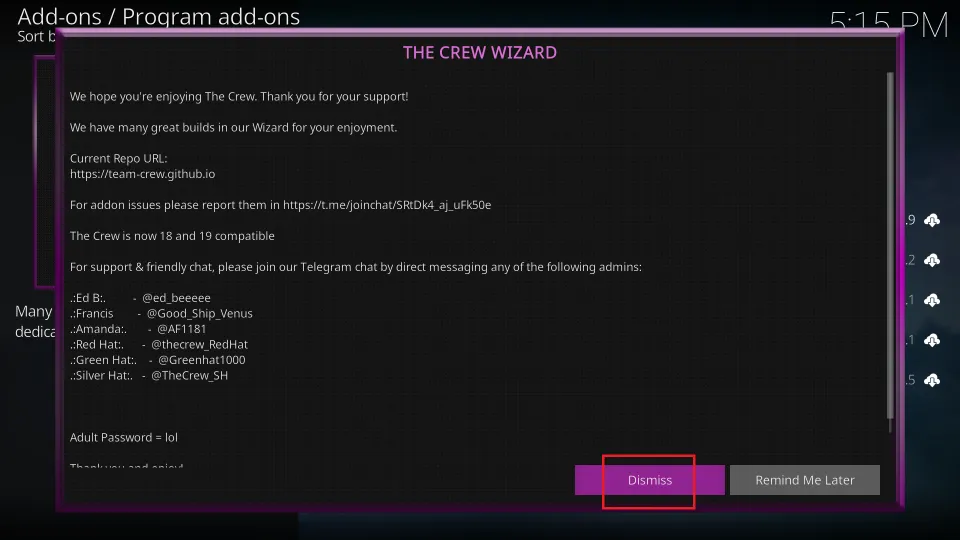
22. A prompt should also appear within moments from installation. Click Dismiss.
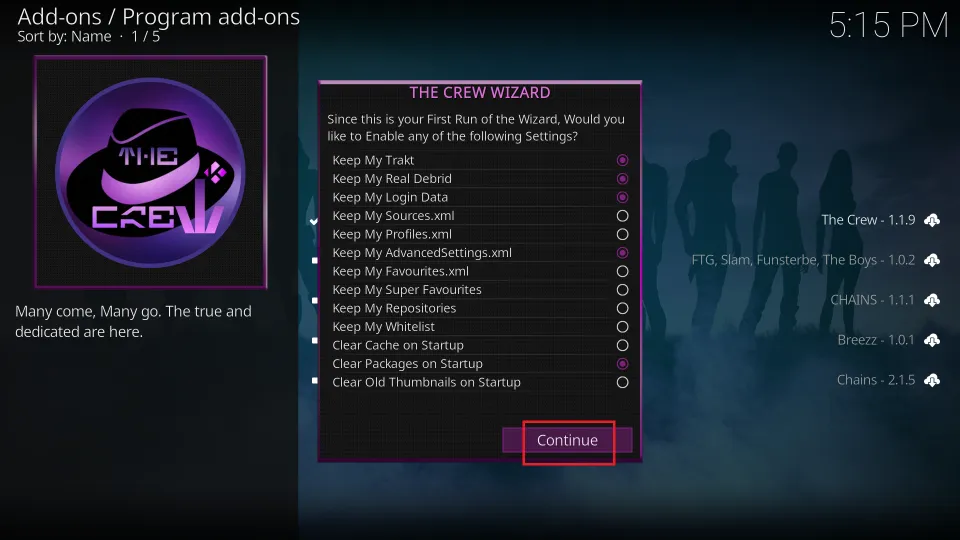
23. You do not need to change anything in this popup. You will be resetting Kodi before installing CrewNique. However, if you are confident in making changes, feel free to do so and click Continue.
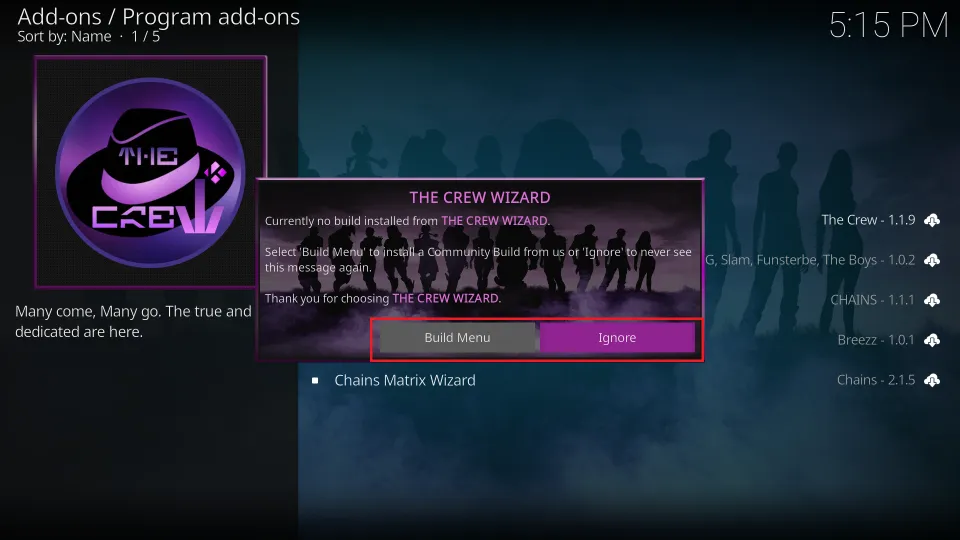
24. If you choose the Build Menu button at this prompt, you may skip the next few steps in the next section. I am choosing Ignore to show you how to open the Build Menu from the Kodi home screen (next section).
In this section, you installed the Crew Repo and the Crew Wizard. Now, let’s proceed to the next part.
Part 3: Install CrewNique Kodi Build
The Crew Wizard you just installed will let you install the CrewNique build. Let’s see how:
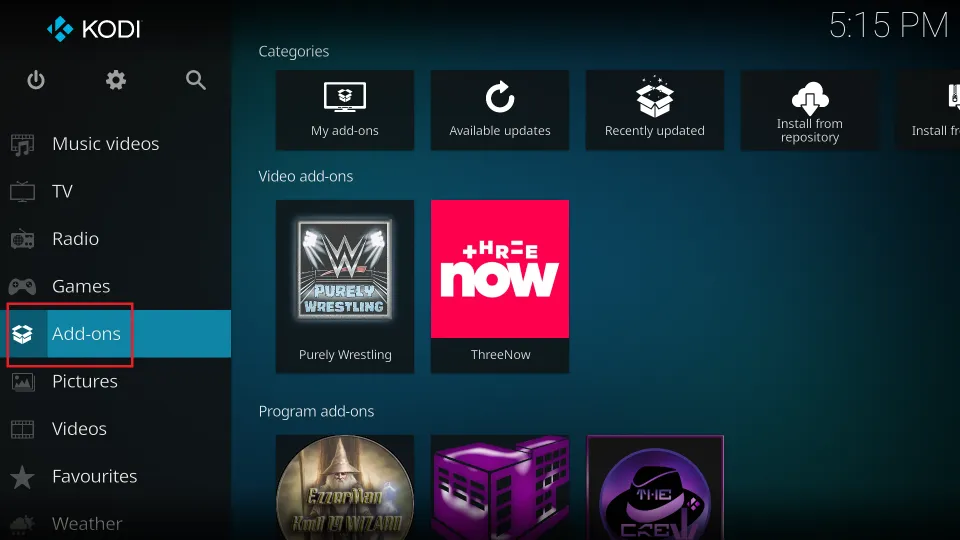
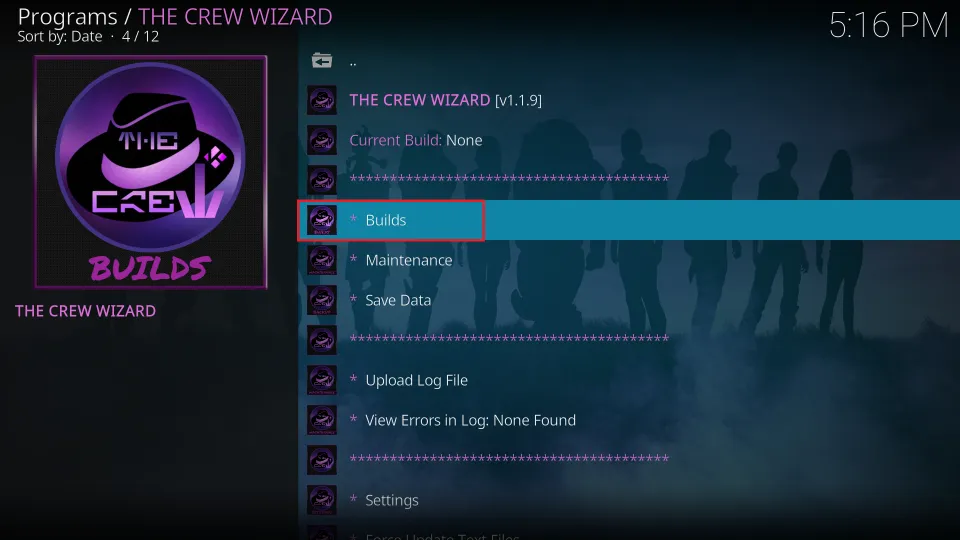
1. Go to the home screen of Kodi and then choose the option Add-ons in the menu.
2. Next, go to Program add-ons > The Crew Wizard.
3. Select the Builds folder.
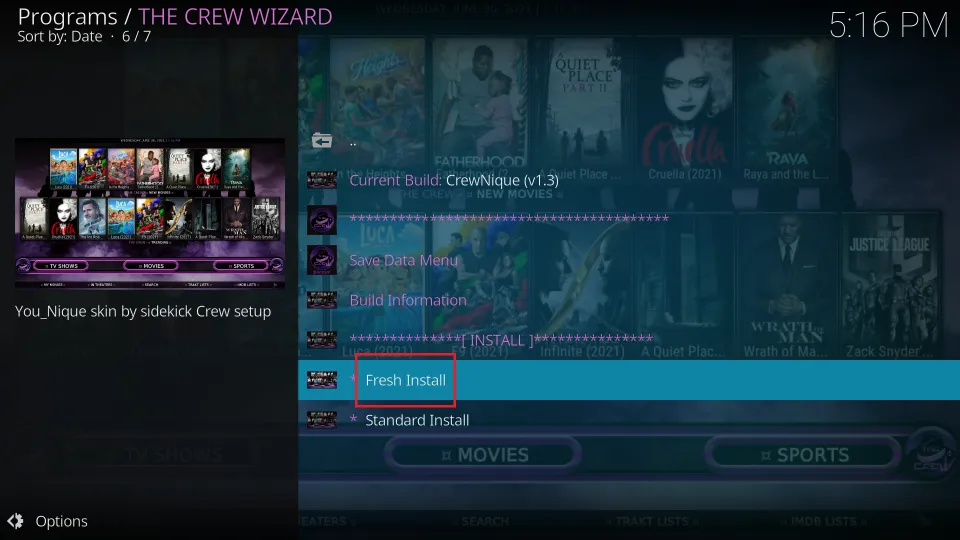
4. You can see multiple builds on the screen. Scroll down the options and click CrewNique on the build menu. You can try another build some other time by following the same steps.

5. You can install the CrewNique Kodi build using two different methods – Fresh or Standard Install. When you choose Fresh Install, you wipe out all the Kodi data, addons, and settings and reset Kodi to its factory settings. On the other hand, Standard Install retains some of your data, but there is no guarantee that it will save everything.
I recommend Fresh Install because I have experienced that the builds are more stable this way.
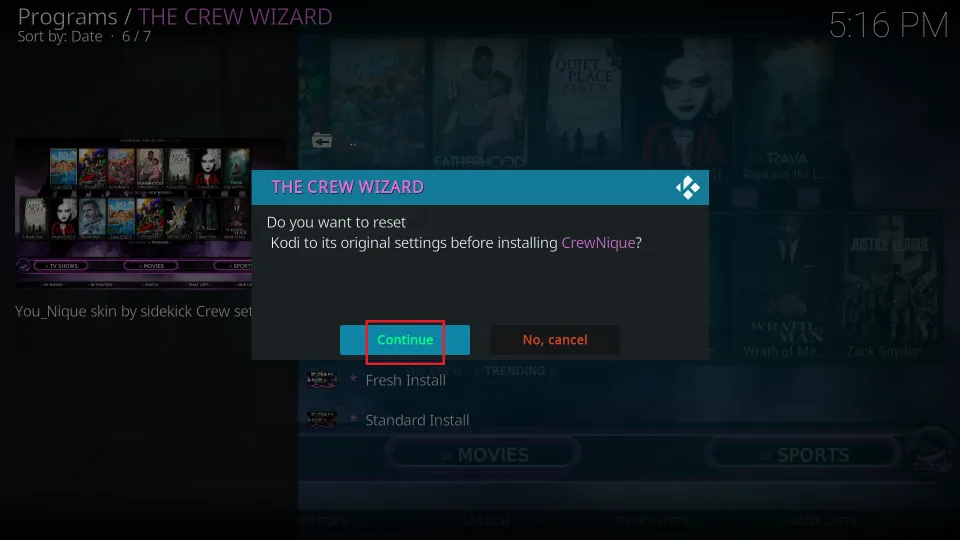
6. Confirm you wish to install the build fresh by clicking Continue.
7. The download has started. It usually takes less than a minute, but it also depends on your connection and the load on the server.
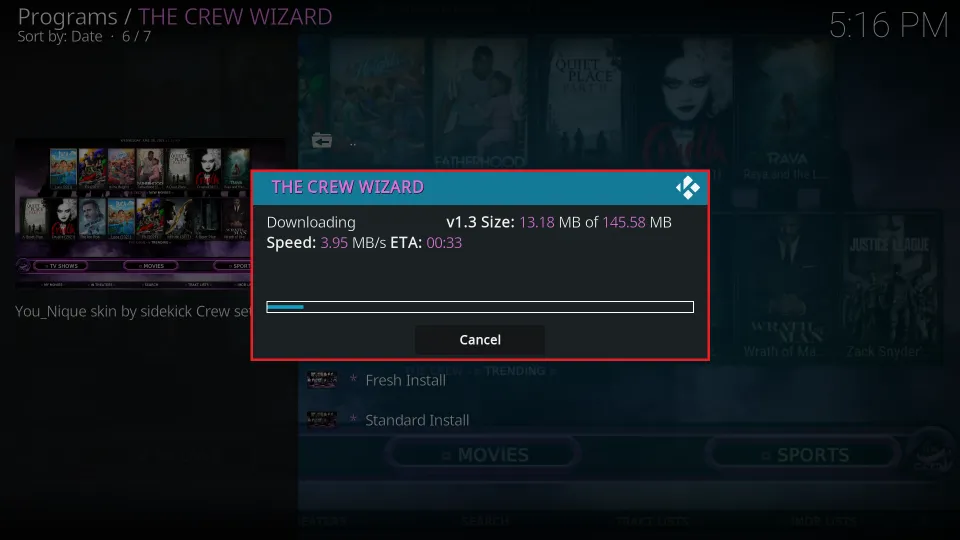
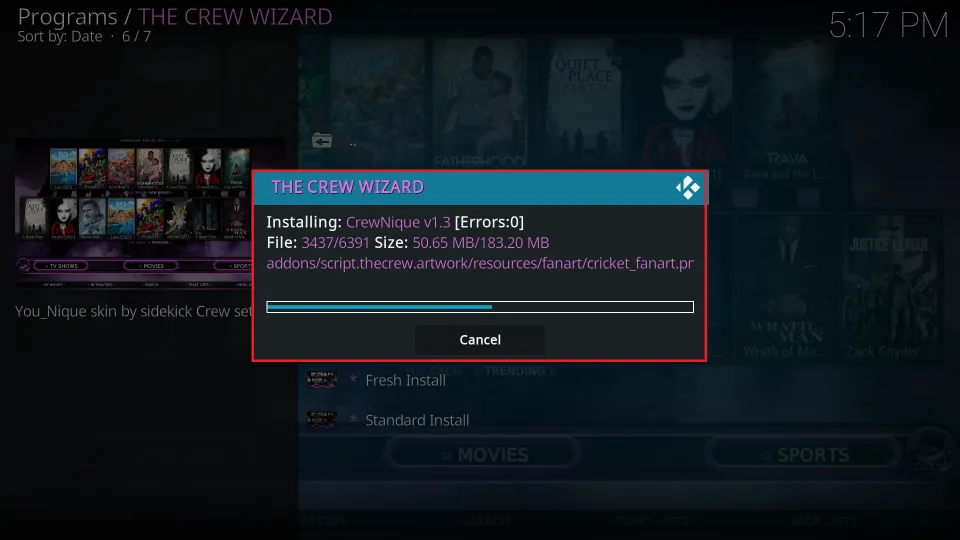
8. The CrewNique build is now getting installed. Wait for a few seconds.
That’s how you install CrewNique build on Kodi.
Before you start streaming with Kodi Addons or Builds, I would like to warn you that everything you stream on Kodi is visible to your ISP and Government. This means, streaming copyrighted content (free movies, TV shows, live TV, and Sports) might get you into legal trouble.
Thankfully, there is a foolproof way to keep all your streaming activities hidden from your ISP and the Government. All you need is a good VPN for Kodi. A VPN will mask your original IP which is and will help you bypass Online Surveillance, ISP throttling, and content geo-restrictions.
I personally use and recommend ExpressVPN, which is the fastest and most secure VPN. It is compatible with all kinds of streaming apps and devices.
NOTE: We do not encourage the violation of copyright laws. But, what if you end up streaming content from an illegitimate source unintentionally? It is not always easy to tell the difference between a legit and illegal source.
So, before you start streaming on Kodi, here's how to get VPN protection in 3 simple steps.
Step 1: Get the ExpressVPN subscription HERE. It comes with a 30-day money-back guarantee. Meaning, you can use it free for the first 30-days and if you are not satisfied with the performance (which is highly unlikely), you can ask for a full refund.
Step 2: Click HERE to download and install the ExpressVPN app on your streaming device. If you are using a FireStick, I have given the exact steps starting with Step 4 below.
Step 3: Click the Power icon to connect to a VPN server. That's all. Your connection is now secure with the fastest and best VPN for Kodi.

The following are the steps to install Kodi VPN on your Fire TV devices. If you have other streaming devices, follow Step 1-3 above.
Step 4: Subscribe to ExpressVPN HERE (if not subscribed already).
Step 5: Go to Fire TV Stick home screen. Click Find followed by Search option (see image below).

Step 6: Type Expressvpn in the search bar and select when it shows up.

Step 7: Click Download.

Step 8: Open the ExpressVPN app and Sign in using the email ID and password that you created while buying the ExpressVPN subscription.

Step 9: Click the Power icon to connect to a VPN server. That’s all. Your FireStick is now secured with the fastest VPN.

How to Use CrewNique Build on Kodi
Let me give you a rundown of the CrewNique Build.
When you launch the builds for the first time, they need time to prepare everything. Therefore, after installing the build, wait a few minutes before relaunching Kodi.
When the CrewNique build has set itself up and loaded completely, you see the home screen, as displayed in the image below.
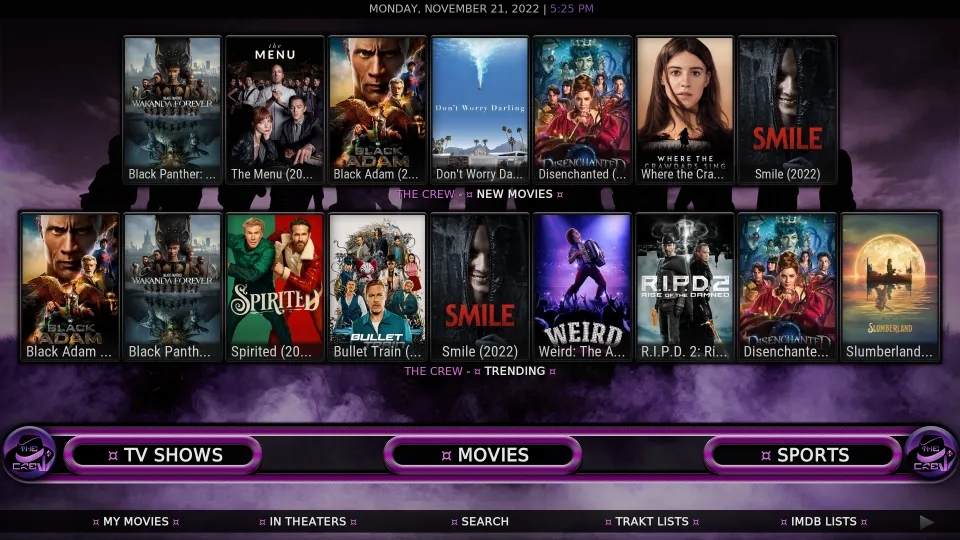
The interface of CrewNique is noticeably different from the standard Kodi layout. Unlike the default vertical menu bar positioned on the left as a sidebar, CrewNique features a horizontal menu with a rotating submenu at the bottom.
You can explore the regular categories through the menu bar, such as Movies, Shows, Sports, Live TV, and more.
Click a submenu to view related categories. For example, I clicked the Genres submenu within the Movies menu, which opened a new window with the following genres (image below).
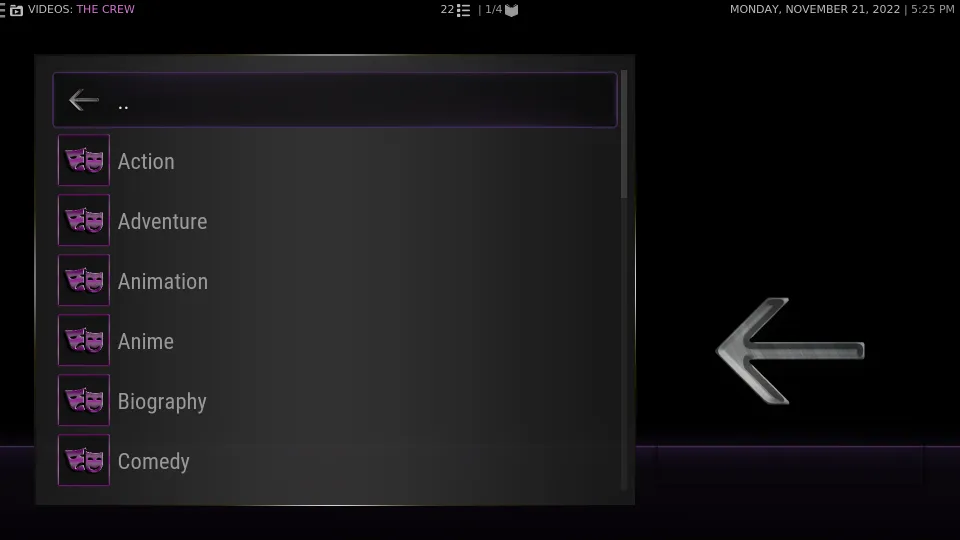
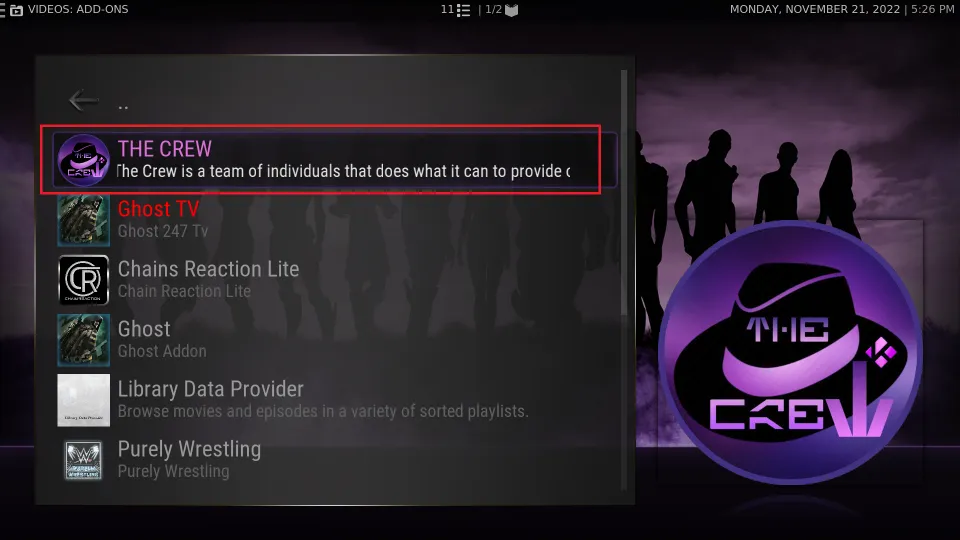
The above subcategories are from the Crew addon. You will find a bunch of other addons with the CrewNique build, including Ghost, Purely Wrestling, and more.
Go to Apps > Video Add-ons to explore all the addons bundled with the CrewNique Kodi build.
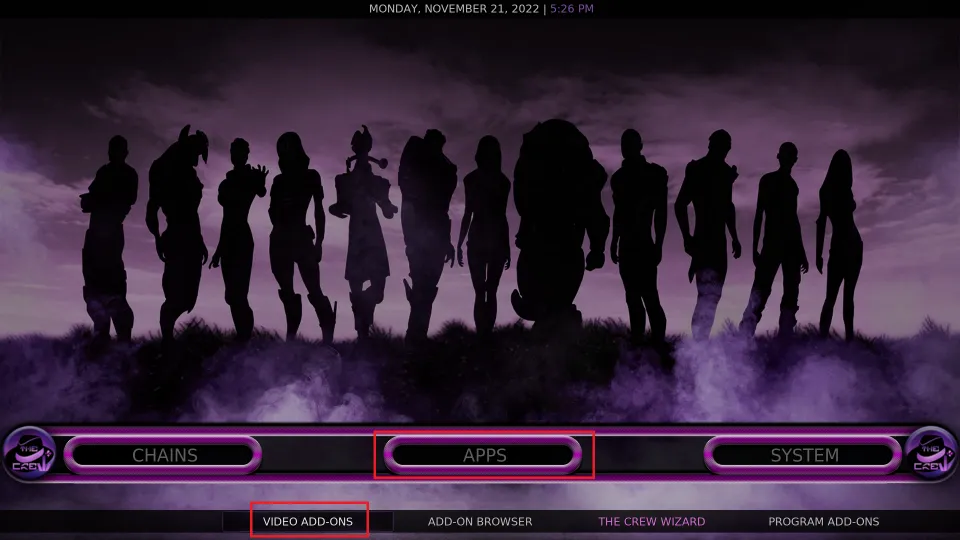
Here is the window with all the addons.

The CrewNique build is straightforward. Start exploring and discovering new and exciting features. If you need help, scroll down to the comments section and let me know.
How to Get Real Debrid and Trakt with CrewNique
Real Debrid and Trakt are two popular services among Kodi build users. Let me show you how to set them up with the CrewNique Build.
Setting Up Real Debrid
I always use Real Debrid with my builds. It enhances my streaming experience dramatically with tons of higher-quality links.
I will show you how to set up Real Debrid (RD) with The Crew addon. The Crew addon comes bundled with the CrewNique build. Setting up RD with the Crew will configure it with all other supported addons.
Here are the steps:
1. Go to Apps > Video Add-ons.
2. Open The Crew addon from the list.
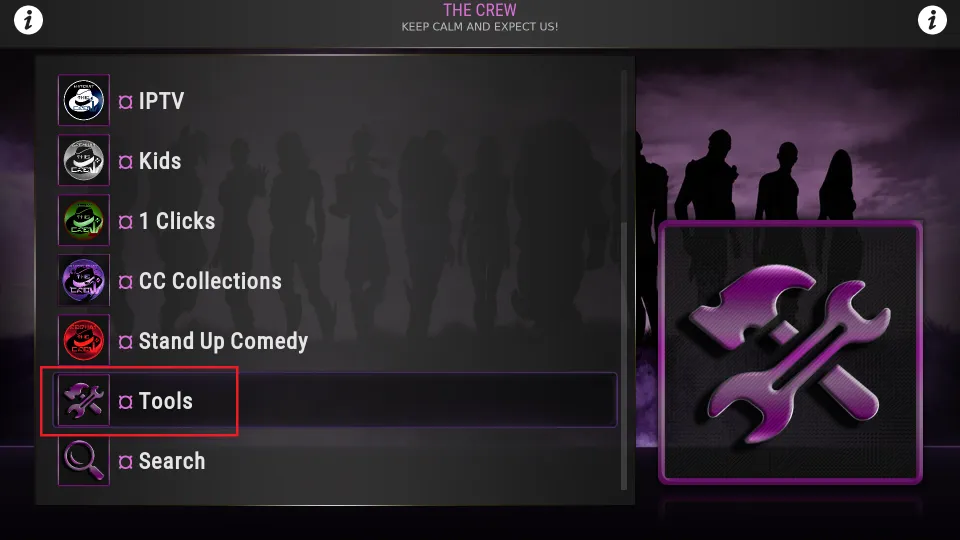
3. Scroll down and click Tools.
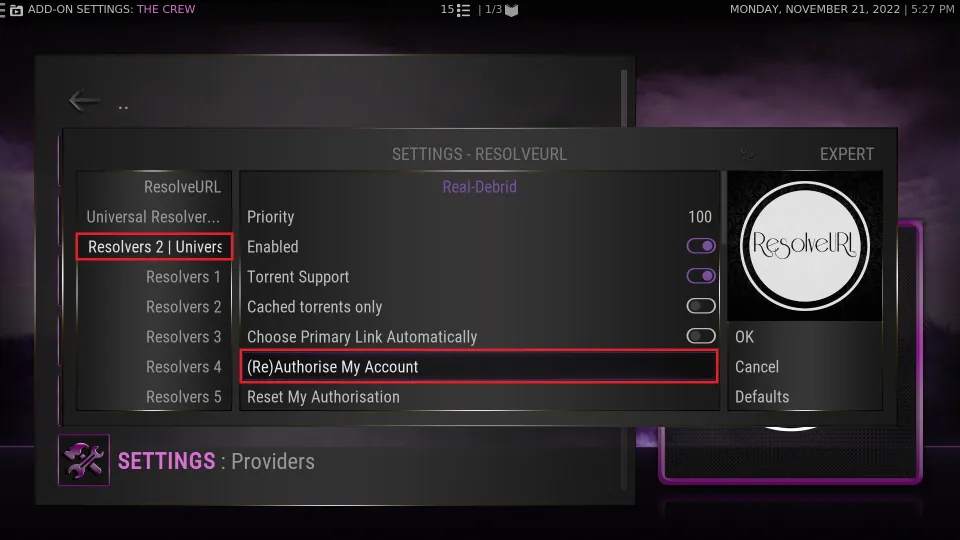
4. Click ResolveURL: Settings on the next screen.
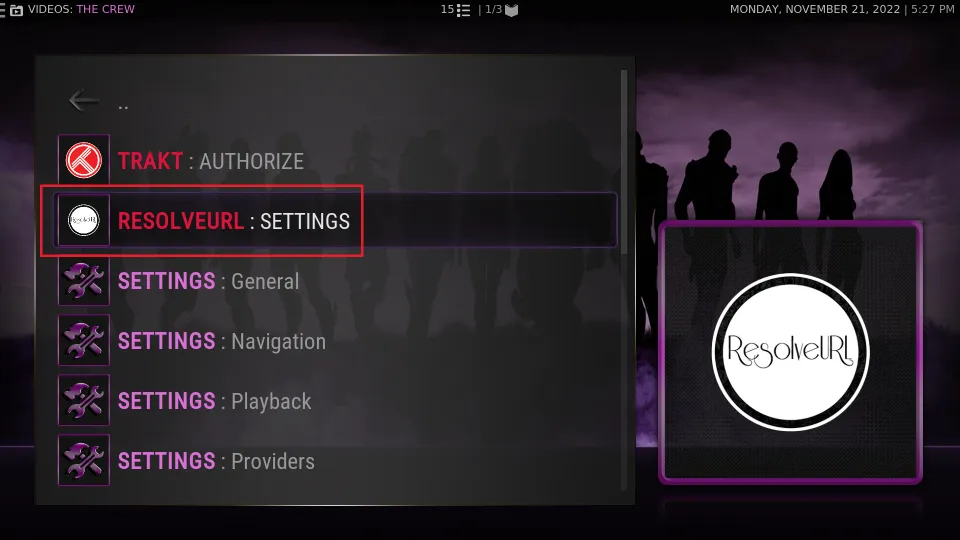
5. On the popup, select the tab Universal Resolvers 2 > (Re) Authorize My Account.
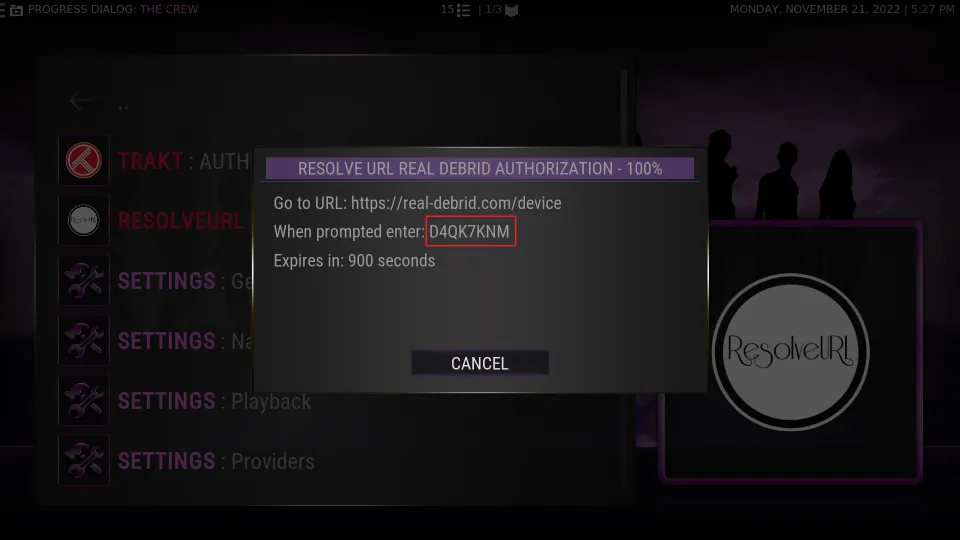
6. Wait for this popup window. As you can see, this window has a code. Note this code. Next, go to real-debrid.com/device and type this code to authorize RD. Sign in to your RD account if you haven’t already done so.
Setting Up Trakt
You can set up Trakt individually with each addon. I will show you how to do it with the Crew add-on.
1. Go to Apps > Video Add-ons.
2. Open The Crew addon from the list.
3. Scroll down and click Tools.
4. Click Trakt Authorize.
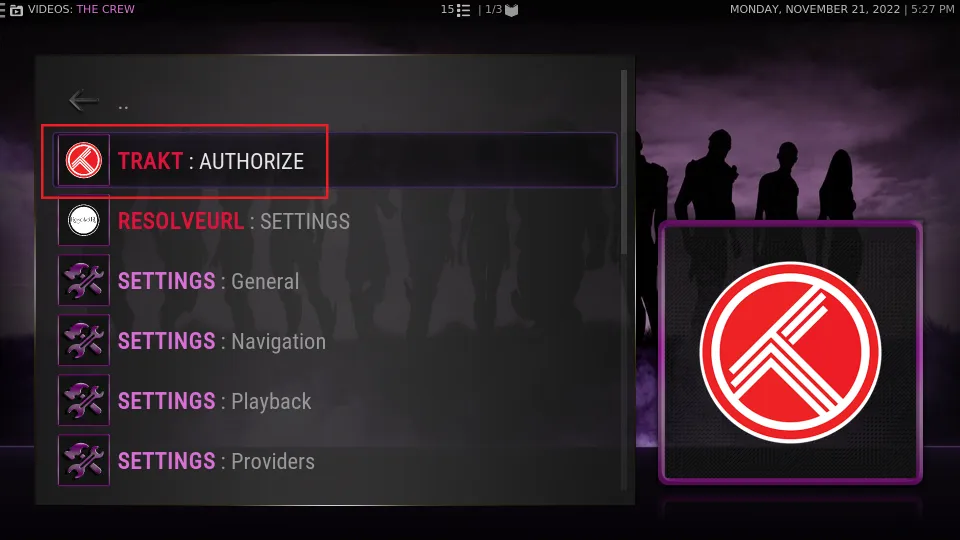
5. Note the code on the prompt. Go to Trakt.tv/activate to authorize. If you haven’t already, sign in to your Trakt account.

Wrapping Up
This guide showed you how to install CrewNique Kodi build. CrewNique is a simple and elegant build. It comes bundled with numerous Kodi addons so you can start watching your favorite content immediately. In addition, it has a stylish interface that makes Kodi more appealing.
Related:
- How to Install Green Monster Build
- How to Install Xenon Kodi Build
- How to Install Smokin Build
- How to Install HardNox Kodi Build

Suberboost Your FireStick with My Free Guide
Stay Ahead: Weekly Insights on the Latest in Free Streaming!
No spam, ever. Unsubscribe anytime.

Leave a Reply