🕒 Reading Time: 26 minutes
This review summarizes the best Kodi builds for FireStick, Android mobiles, Windows, Mac, and other compatible devices. Most of the builds in this list are compatible with Kodi 21 Omega and Kodi 20 Nexus. We have also included some builds for Kodi 19 Matrix and Kodi 18 Leia. We test these builds regularly and update the list to ensure you get the best and safest Kodi builds.
What’s Kodi?
Kodi is an open-source media player that can be installed on various devices, including the Amazon FireStick, mobile devices, smart TVs, and gaming consoles. It lets you stream free movies, TV shows, sports, music, live TV, and adult and kid content.
The app doesn’t host this content but allows you to install addons that fetch streaming links from the internet. You can get the official addons from Kodi’s official repository or install third-party addons from external sources.
Read: Beginner’s Guide to Kodi
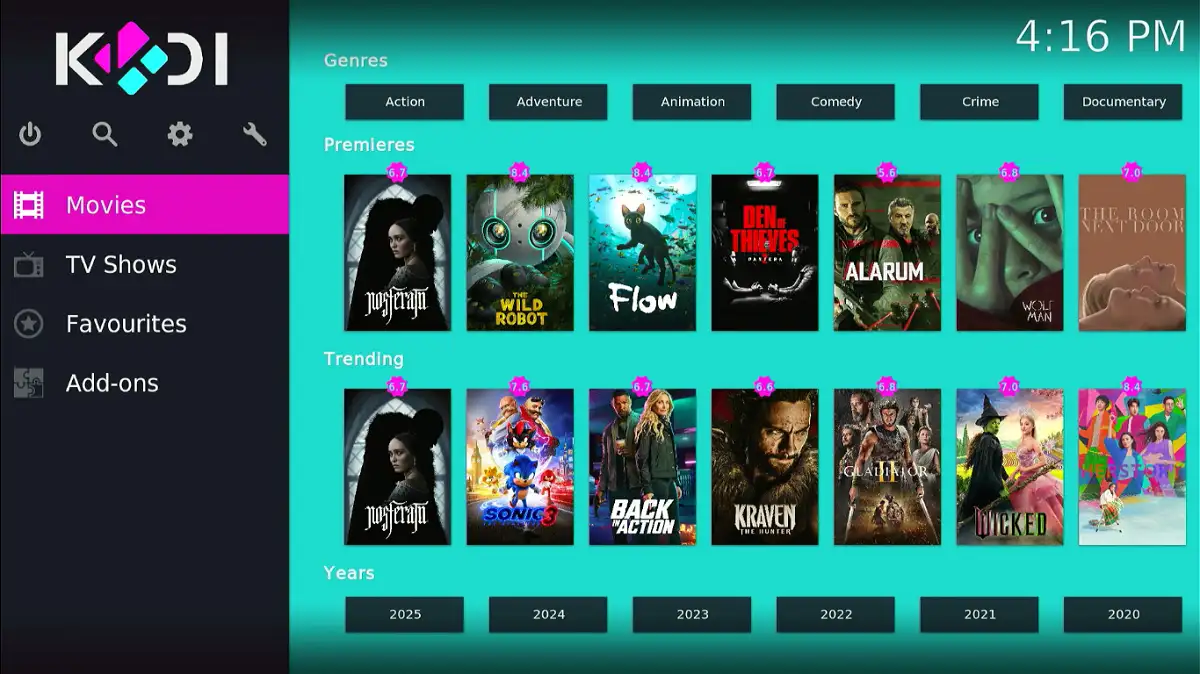
Besides streaming online content, Kodi lets you store and organize your local media files, play games, and browse the web. It’s highly customizable, making it a go-to media player for users who want a custom experience. You can change its appearance with various skins, themes, and builds.
What is a Kodi Build?
Kodi build is a prepackaged plugin with a custom skin and theme. It transforms the Kodi interface with new interactive elements. In addition, the build features pre-installed addons and custom settings.
Kodi builds are usually designed by third-party developers. You will not find them in the official Kodi repositories.
Many users find the original Kodi interface somewhat dull. However, a Kodi build makes it more intuitive and usually more exciting.
Since Kodi is open-source, it has a large and active community of developers. Therefore, hundreds of Kodi builds are available on the internet. Most of them are either unstable or unsafe.
We have tested dozens of builds and shortlisted only those that add real value.
How Can You Use Kodi?
What Are the Best Kodi Builds?
There are several fantastic Kodi builds. It makes it challenging to put a finger on one. However, if I had to pick one, I would go for Diggz Xenon.
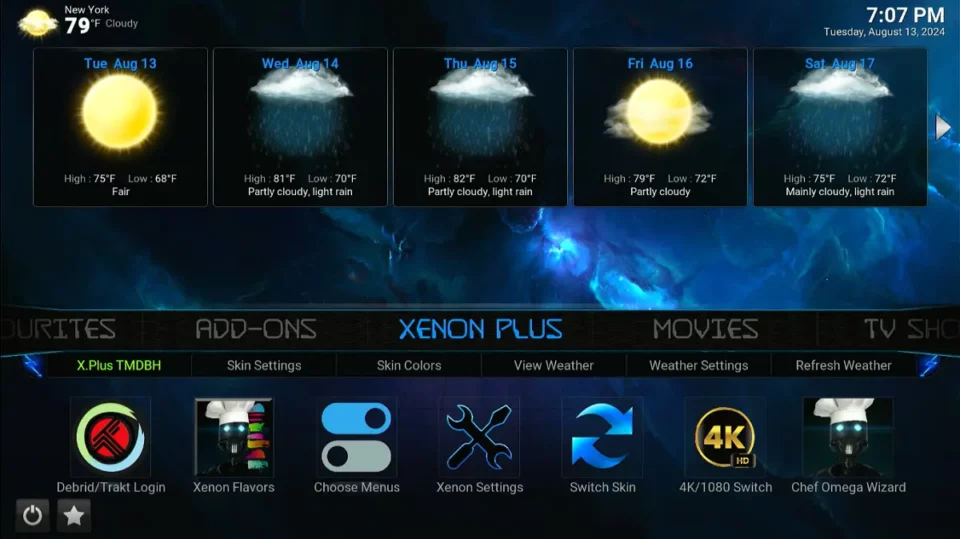
Xenon is one of the most widely used Kodi builds. It is powerful, versatile, and has an attractive user interface. Whether you are a new or old user, a heavy or casual streamer, or have a high-end or low-spec device, the Xenon build seems like a decent choice.
It also packs numerous high-quality video add-ons for all your streaming needs. These include addons to stream movies, TV shows, games, music, and live TV. It also lets you integrate Debrid services for quality streaming and Trakt to keep track of your watch history.
This list summarizes the best Kodi builds for Kodi 21 Omega and Kodi 20 Nexus. Take a look to discover the best choice for your Kodi streaming needs.
Attention Kodi Users!
Governments and ISPs across the world monitor your online activities. If you use third-party Kodi addons, you should always use a good Kodi VPN and hide your identity so your streaming experience doesn’t take a bad turn. Currently, your IP is visible to everyone.
I use ExpressVPN, the fastest and most secure VPN in the industry. It is very easy to install on any device, including Amazon Fire TV Stick, PC, Mac, and Smartphones. Also, it comes with a 30-day money-back guarantee. If you don't like their service, you can always ask for a refund. ExpressVPN also has a special deal where you can get 4 months free and save 61% on the 2-year plan.
Read: How to Install and Use Best VPN for Kodi
Best Kodi Builds for Kodi 21 Omega and Kodi 20 Nexus in 2025
The following is the list of best Kodi builds (starting with the builds compatible with Kodi 21 Omega):
Legal Disclaimer: This tutorial is purely educational. FireStickTricks.com doesn’t own, host, operate, resell, or distribute any streaming apps, addons, websites, IPTV or services. The page contains some unverified services, and we are not certain whether they hold legal licenses to distribute the content. FireStickTricks.com does not verify the legality of each app/service in all regions. Do your due diligence if you use any of the unverified apps/services, and stream only content that is available in the public domain. The end-user shall be solely responsible for the media accessed.
1. Diggz Xenon
Kodi 21 Omega & Kodi 20 Nexus
XENON is currently one of the most widely used Kodi builds. Its user interface is intuitive and easy to use.
The Xenon Kodi build comes packed with various entertainment options featuring several addons for streaming movies, shows, live TV, sports, and more.
Xenon works on any device that supports Kodi, including FireStick, Android TV, PC, Mac, Smartphones, and more.
- Categories: Movies, TV Shows, Sports, Music, Arcade, Kodi Library, Favorites, Addons, TV Guide
- Wizard: Chef Wizard
- Repository: Diggz Repository
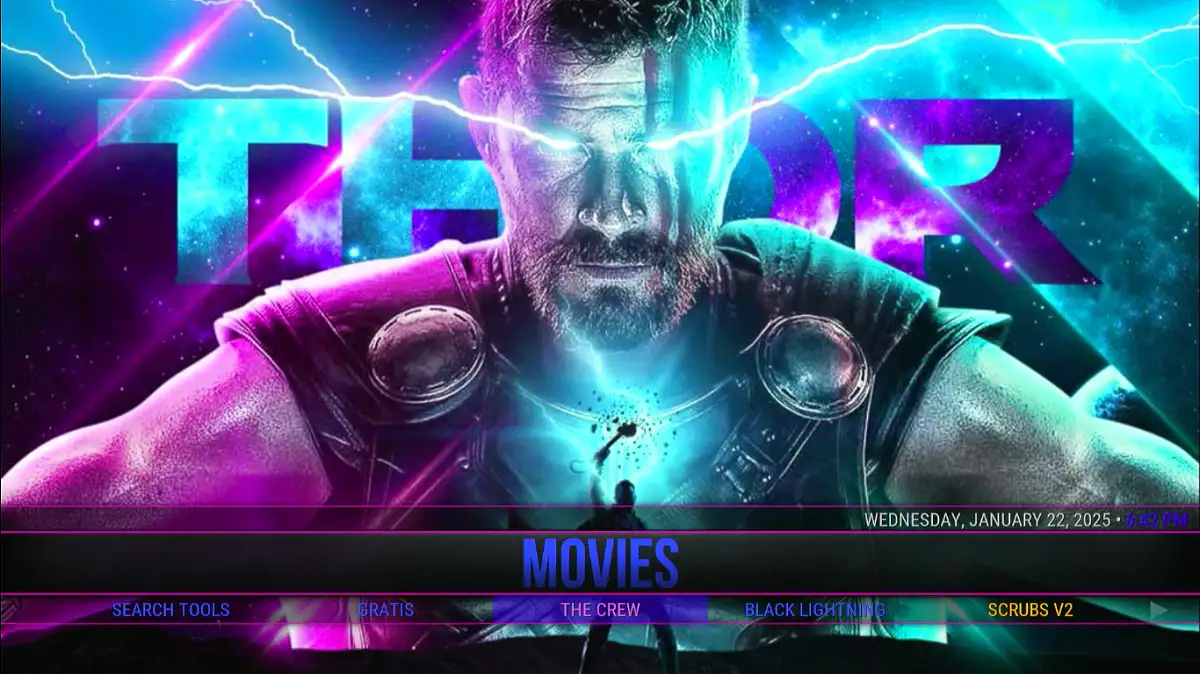
- Top Addons: The Crew, Mad Titan Sports, Scrubs V2
- Source URL: https://diggz1.me/diggzrepo
How to Install Diggz Xenon Kodi Build
2. Doomzday Wizard
Kodi 21 Omega & Kodi 20 Nexus
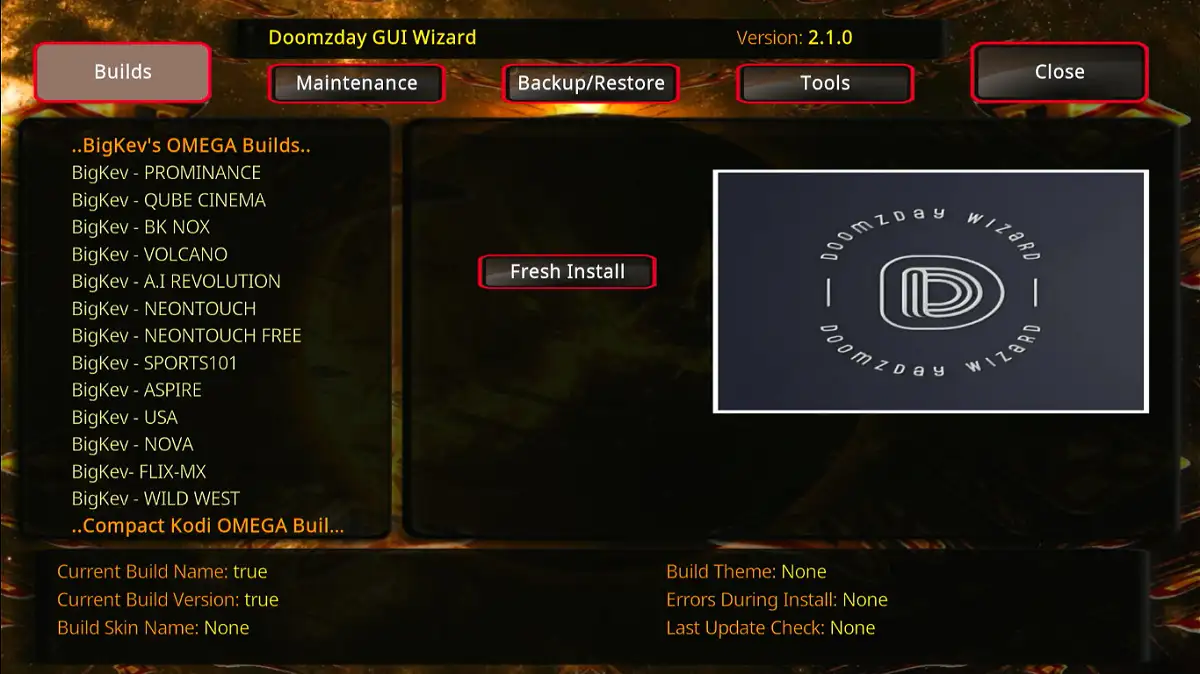
DoomzDay Wizard, also known as DoomzDay GUI Wizard, is not a single build but a collection of several builds. When you install it on Kodi, you can access up to 10 different builds. These include Nova TV, Serene, Aspire, Sports101 V2, and Plush.
Some lightweight builds (such as the Nova TV build) work smoothly on low-RAM devices. They are ideal for FireStick and Android TV Boxes.
There are also some powerful, feature-heavy builds designed to work smoothly on high-end smartphones or fully-equipped computers.
Nevertheless, there are plenty of choices, and you will surely find something that suits you best.
These builds come with various popular Kodi addons that let you stream all your favorite content. So, give DoomzDay a try, and you will not be disappointed.
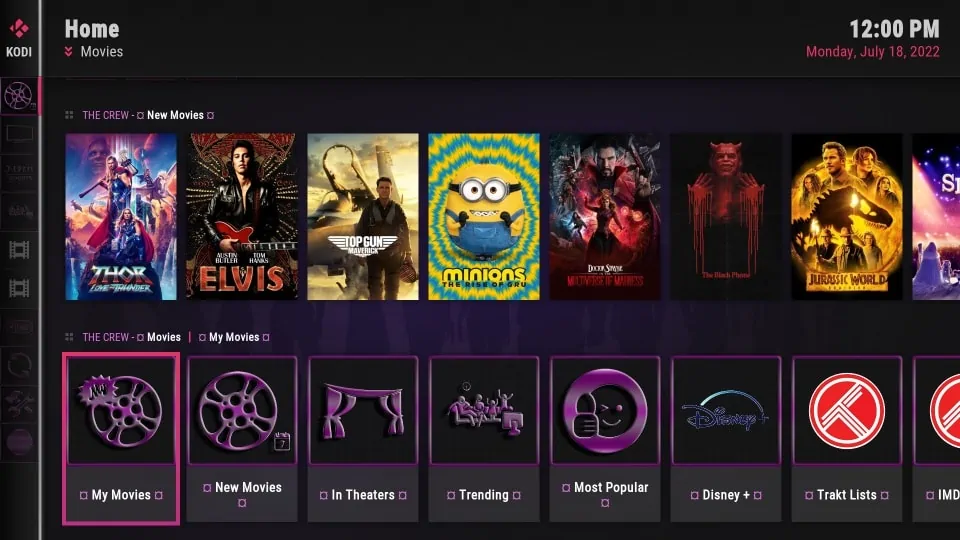
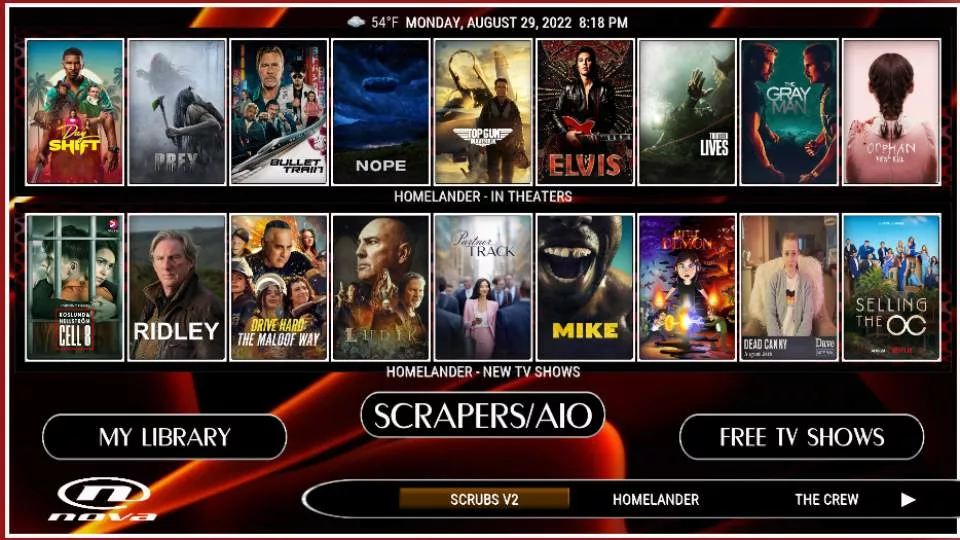
The screenshot above shows the Nova TV Kodi build from the DoomzDay Wizard.
- Categories: Movies, TV Shows, Debrid 4K, Free Zone, Allstars, Family, Live TV, Sports, Documentaries, Music.
- Top Addons: Asgard, Scrubs V2, The Crew, Rising Tides, Homelander, Apex Sports, Centry Sports, Fights on Demand, Mad Titan Sports, Magic Dragon
- Wizard: DoomzDay Wizard
- Repository: Doomzday Repo
- Source URL: https://doomzdayteam.github.io/doomzday
How to Install DoomzDay Kodi build
3. The Crew Wizard Kodi Builds
Kodi 21 Omega & Kodi 20 Nexus
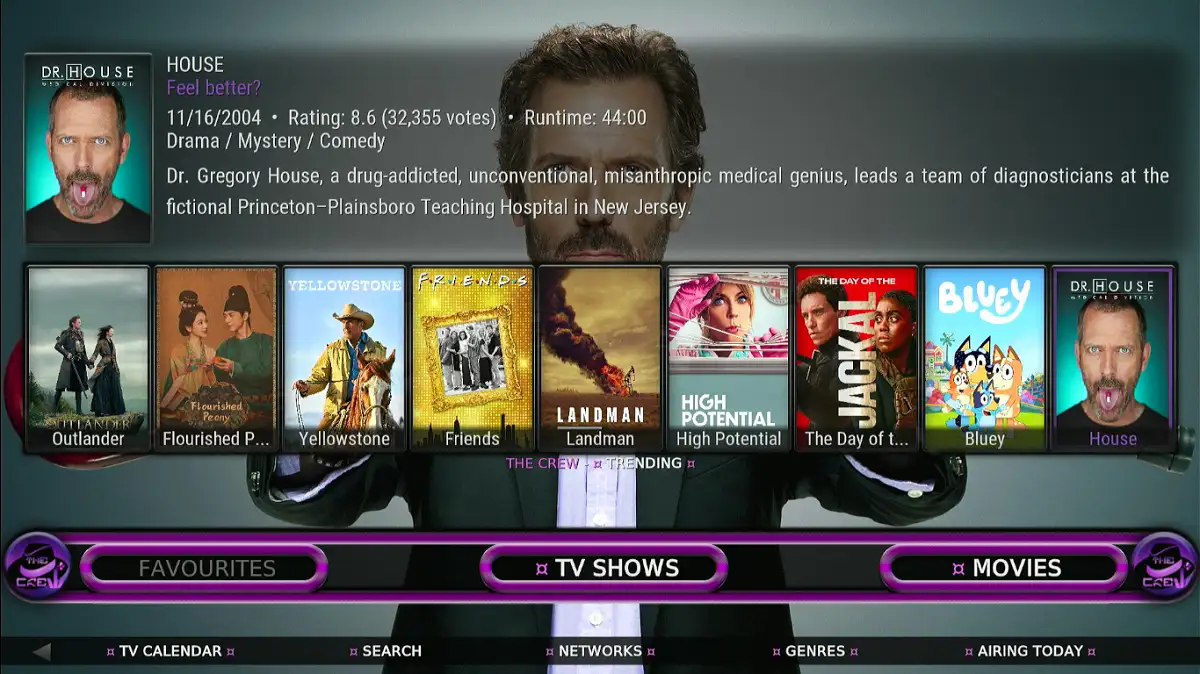
The Crew is a popular and trusted name among Kodi users, thanks to the Crew repository, which hosts a number of reliable and quality add-ons. Similarly, the Crew Wizard stands out for delivering a robust lineup of builds that allows you to tailor your Kodi experience.
You can install feature-rich builds for high-spec devices like Windows, Mac, and smartphones. Additionally, you can explore lightweight builds for less powerful devices, such as FireStick.
The Crew Wizard includes builds like Crews Odyssey, Crewzion, CrewMinent, Green Monster, and many more.
- Categories: Movies, TV Shows, IPTV, Sports, Kids, Addons.
- Top Addons: The Crew, Chains Reaction Lite, Galifrey, The Magic Dragon
- Wizard: The Crew Wizard
- Repository: The Crew Repo
- Source URL: https://team-crew.github.io
How to Install the Crew Wizard Kodi Builds
⚡ DON'T MISS THIS LIMITED-TIME 🕒 DEAL
Protect your privacy with ExpressVPN
DEAL OF THE DAY
67% DISCOUNT ON ExpressVPN and 4 EXTRA MONTHS
Risk-free with 30-day money-back guarantee
🔒 GET ExpressVPN↗️
4. Diggz Chef Wizard Kodi Builds
Kodi 21 Omega & Kodi 20 Nexus
Diggz Wizard is yet another third-party wizard that offers access to various Kodi builds. It is hosted on the Diggz Repository and is among the best places to find multiple Kodi builds. Some popular Kodi builds under this wizard include:
- Diggz FenFlix
- Diggz Xenon
- Planet Diggz
- Maddux-Kidz
- cg-MEC
These builds are packed with amazing addons and content. They offer sections like Live TV, Movies, TV Shows, Kids, and more. The multiple sections cater to a diverse audience, ranging from young to adult viewers. So, with the Diggz Chef Wizard, get ready for hours of uninterrupted entertainment.
- Categories: Movies, TV Shows, TV Guide, Kids, Family, Sports, Music.
- Top Addons: The Crew, The Magic Dragon, The Promise, Adina, Homelander
- Wizard: Chef Wizard
- Repository: Diggz Repository
- Source URL: https://diggz1.me/diggzrepo
How to Install the Diggz Chef Wizard Builds on Kodi
5. Grindhouse
Kodi 21 Omega & Kodi 20 Nexus
Grindhouse is the home to a large number of unique and popular builds. The builds vary in size; some are lightweight, while others are packed with features and facilities. Moreover, the Wizard hosts over a dozen builds to cater to a broader audience. The available options include AR Build, Blue Lite, Decades, Horror, Jaws, Pin Up, and more.
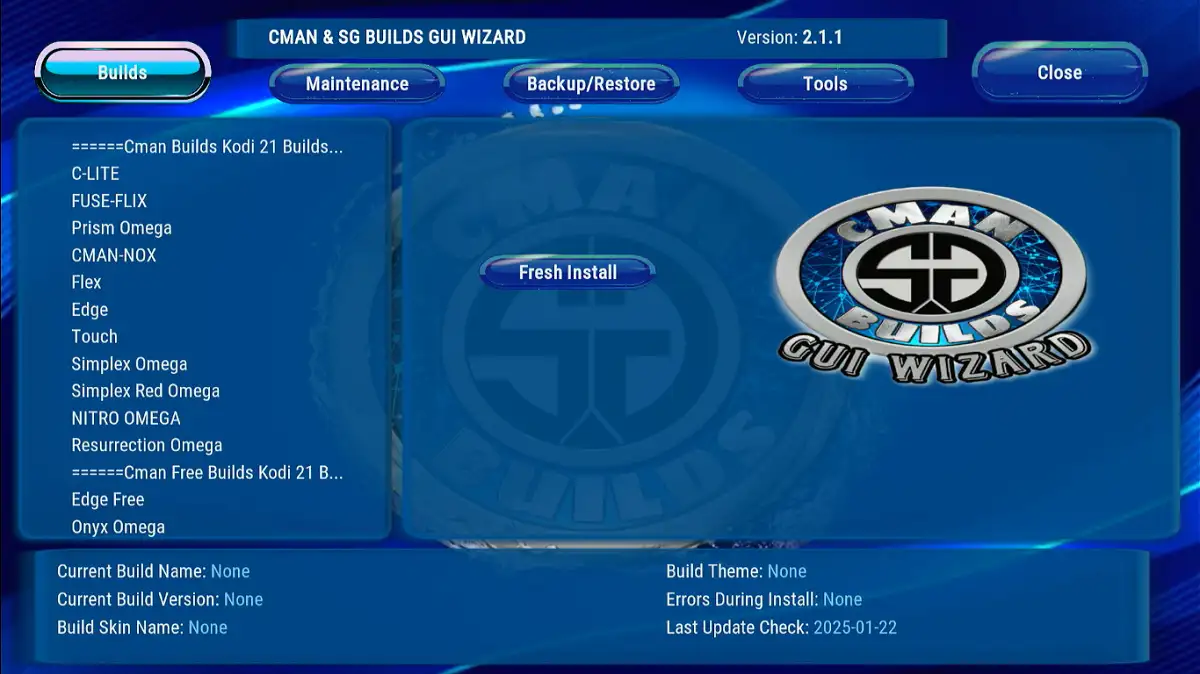
You can easily download any available build to access a wide range of addons and entertainment content. Grindhouse Wizard channels an appealing and dim theme. The sections in the Wizard include Builds, Maintenance, Backup/Restore, Tools, and Close. You can tap each button to view what it offers.
- Categories: Movies, TV, AIO, Sports, Favs.
- Top Addons: Asgard, Patriot, The Crew, Black Lightning, Odd’ n’ Ends
- Wizard: Grindhouse Wiz or MF’in Grindhouse Wizard 19
- Repository: Grindhouse Repository
- Source URL: http://grindhousekodi.us/repo
How to Install Grindhouse Builds on Kodi
6. Plutonium
Kodi 21 Omega & Kodi 20 Nexus
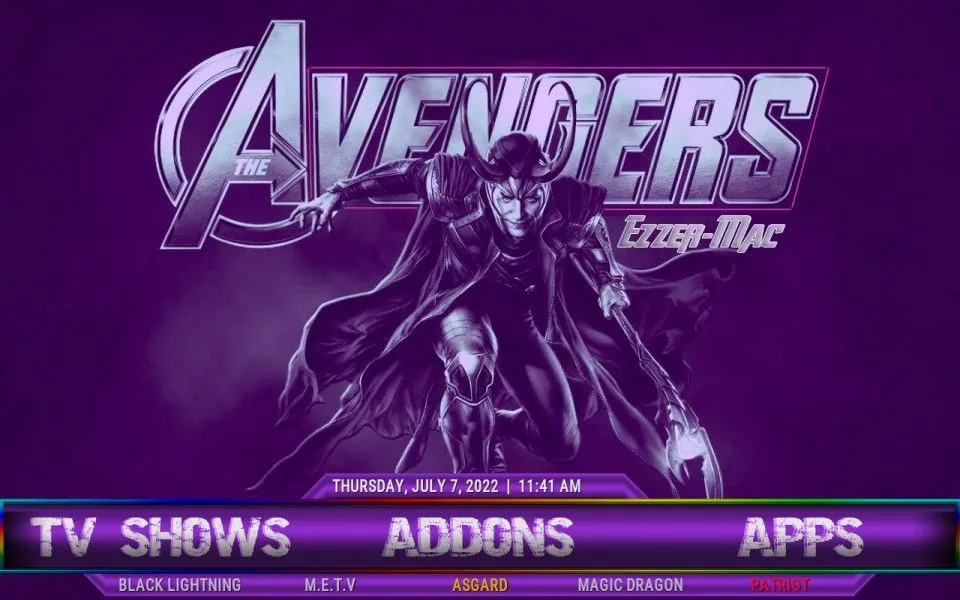
Plutonium is part of the vast arsenal of builds from EzzerMac’s Wizard. This Wizard has a massive line-up of in-house builds and catalogs third-party builds from other developers. Easily, Plutonium is one of the best Kodi builds in its collection.
Plutonium is an excellent choice for those who prefer bold, colorful themes with a vibrant visual style. But it is not just about the visuals. Like any well-crafted build, it packs an array of popular Kodi addons for Live TV, Sports, Movies, Shows, and all sorts of video content.
Plutonium is lightweight, with a download size of nearly 150 MB. Therefore, it offers top performance on all platforms, even FireStick, which is considered a low-spec media device. Since it is small, the build doesn’t have many features. Yet, it covers all the basics and ensures you are never short of content for streaming.
- Categories: Movies, TV Shows, Addons, Apps.
- Top Addons: Patriot, Asgard, Black Lightning, M.E.T.V, Magic Dragon, Shadow
- Wizard: EzzerMans Wizard
- Repository: EzzerMacs Wizard Repository
- Source URL: http://ezzer-mac.com/repo
How to Install Plutonium Kodi Build
7. EzzerMacs (also EzzerMan)
Kodi 21 Omega & Kodi 20 Nexus
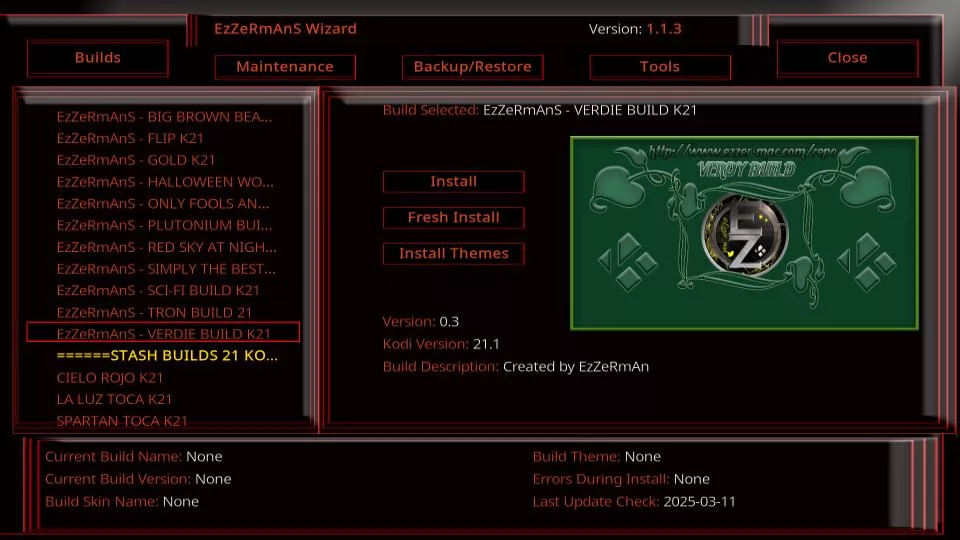
EzzerMacs Wizard, also known as EzzerMans, is one of the widely used Kodi wizards. It is a one-stop shop for dozens of Kodi builds and themes, and the wizard offers diverse builds and themes to help you personalize your Kodi interface.
Popular builds and themes under this store include Plutonium build, Verdie build, Asgard theme, SciFi theme, and Kid’s theme. They are compatible with both Kodi 21 and Kodi 20.
No matter what style of build or theme you are looking for, lightweight, full-featured, or resource-intensive, EzzerMacs has something to match your needs. If you are looking for a one-stop shop for various working builds, try EzzerMacs.
- Categories: Movies, Shows, Real Debrid, Music, Kids, Family (depending upon the build)
- Top Addons: Asgard, The Crew, Magic Dragon, Odin, Mad Titan Sports, Rising Tides
- Wizard: EzzerMan Wizard
- Repository: EzzerMacs Wizard Repository
- Source URL: http://ezzer-mac.com/repo
How to Install Ezzermacs Builds
8. Chains Wizard Kodi Builds
Kodi 21 Omega & Kodi 20 Nexus
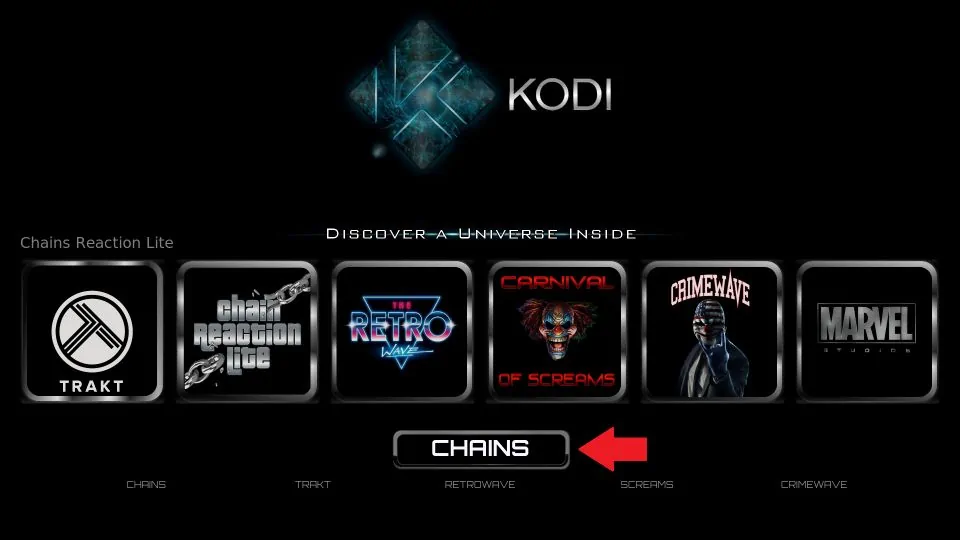
Chains Wizard is a collection of numerous exciting Kodi builds. It features builds like Gallifrey, Midnight, Chains, Xontrix, and many more. The Wizard is available in the popular Crew Repository.
Chains Wizard offers builds designed to work seamlessly across all Kodi-compatible devices, such as FireStick, PCs, mobiles, tablets, and more. The builds come with multiple preloaded Kodi addons, so you may not need to install the addons individually.
- Categories: Chains, Genocide, Movies, TV Shows, Crew.
- Top Addons: The Crew, Chains Reaction Lite, Trakt
- Wizard: ChainsMatrix Wizard or Chains Build Wizard
- Repository: The Crew Repo
- Source URL: https://team-crew.github.io
How to Install The Chains Wizard Kodi Builds
9. cMan Wizard
Kodi 21 Omega & Kodi 20 Nexus
The cMan Wizard addon provides access to a wide range of Kodi builds. One of the builds from this Wizard is already featured in our list, but many more quality builds are available for installation.
On this wizard, you will find multiple builds such as Resurrection, Edge, Simplex, Mad Dragon, Nitro, and more. In addition, cMan Wizard features numerous third-party and community builds, such as Magic Dragon, Bulls, Cowboys, and Torque.
- Categories: Movies, TV Shows, Kids, Sports, Music.
- Top Addons: Kodiverse, Homelander, Odin, Shadow
- Wizard: cMaN Wizard 19
- Repository: cMaN’s Wizard Repository
- Source URL: http://cmanbuilds.com/repo
How to Install the cMan Wizard Builds on Kodi
10. Misfit Mods Lite
Kodi 21 Omega & Kodi 20 Nexus
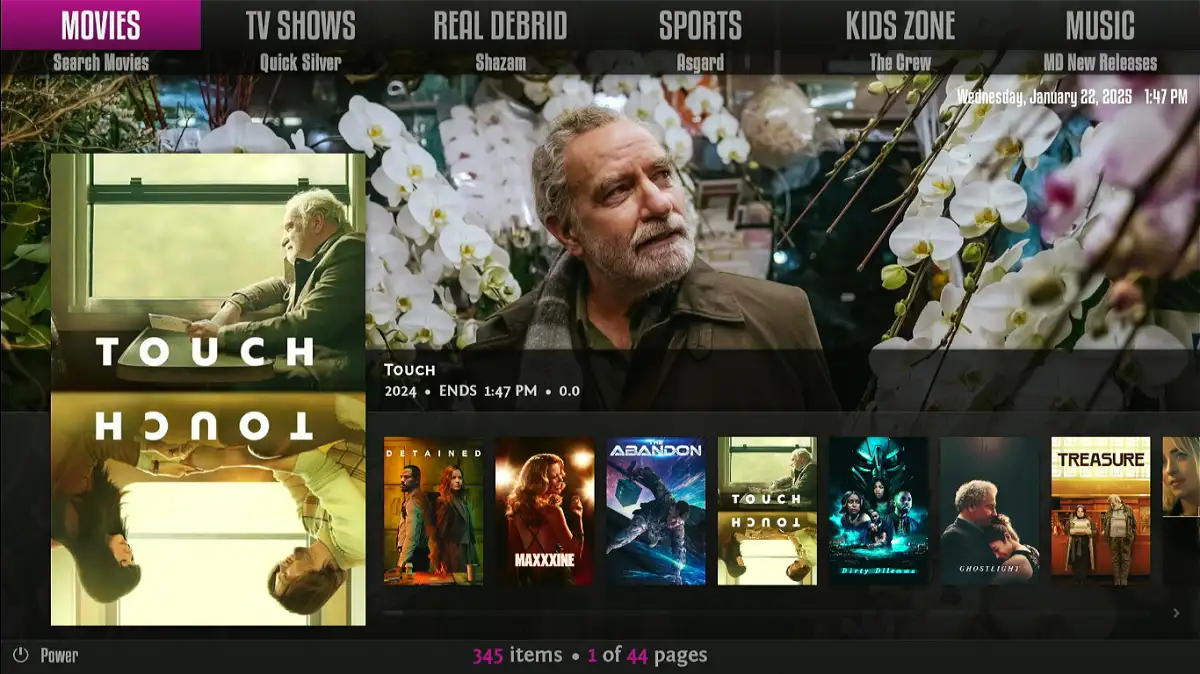
If you’re looking for a streamlined and speedy Kodi build, Misfit Mods Lite might be the perfect choice. It is the lighter version of Misfit Mods Kodi Build and is designed to deliver smooth performance, particularly on low-spec or older devices.
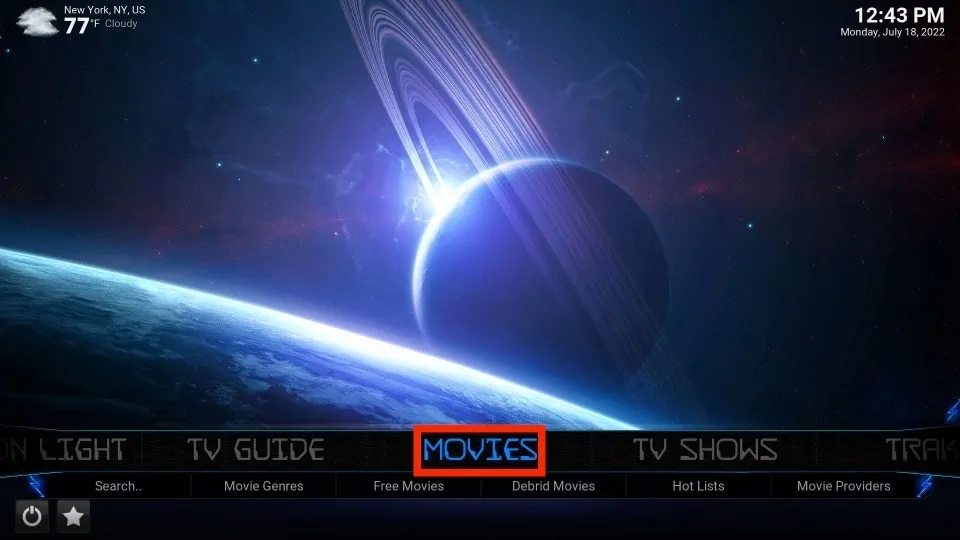
Visually, it offers a clean, modern interface with well-organized widgets and an intuitive layout. It is a nice-looking build featuring premium looks. The main page consists of the following categories:
- Movies
- TV shows
- Real Debrid
- Sports
- Kids Zone
- Music
You’ll find a wide variety of Kodi addons in this build, including movie, TV show, and live TV addons.
- Categories: Movies, TV Shows, Real Debrid, Sports, Kids Zone, Music.
- Top Addons: Kodiverse, The Crew, Rising Tides, Seren
- Wizard: Misfit Mods Wizard
- Repository: Misfit Repository
- Source URL: http://misfitmods.com/mmwiz/repo
How to Install Misfit Mods Lite Build
11. Atomic
Kodi 21 Omega & Kodi 20 Nexus
Atomic Build is another attractive build with its colorful, slick, neat, and user-friendly interface. It is from the Misfit Mods Wizard. This build hosts addons that mainly offer movies and TV shows, including The Crew, Asgard, and Magic Dragon. Sports lovers can stream their favorite events on Mad Titan Sports, The Loop, and Rising Tides.
The Atomic Kodi build is lightweight and runs smoothly even on low-spec devices. It is remote-friendly and suited for FireStick and Android TV. Additionally, it functions just as well on smartphones and computers, offering a versatile streaming experience across platforms.
- Categories: Movies, TV Series, Sports, Music, Real Debrid, Kids, Library.
- Top Addons: Kodiverse, The Crew, Magic Dragon, Mad Titan Sports, Seren, The Loop, Rising Tides
- Wizard: Misfit Mods Wizard
- Repository: Misfit Repository
- Source URL: http://misfitmods.com/mmwiz/repo
12. HardNox (Also HardNox Ultra or just Ultra)
Kodi 21 Omega & Kodi 20 Nexus
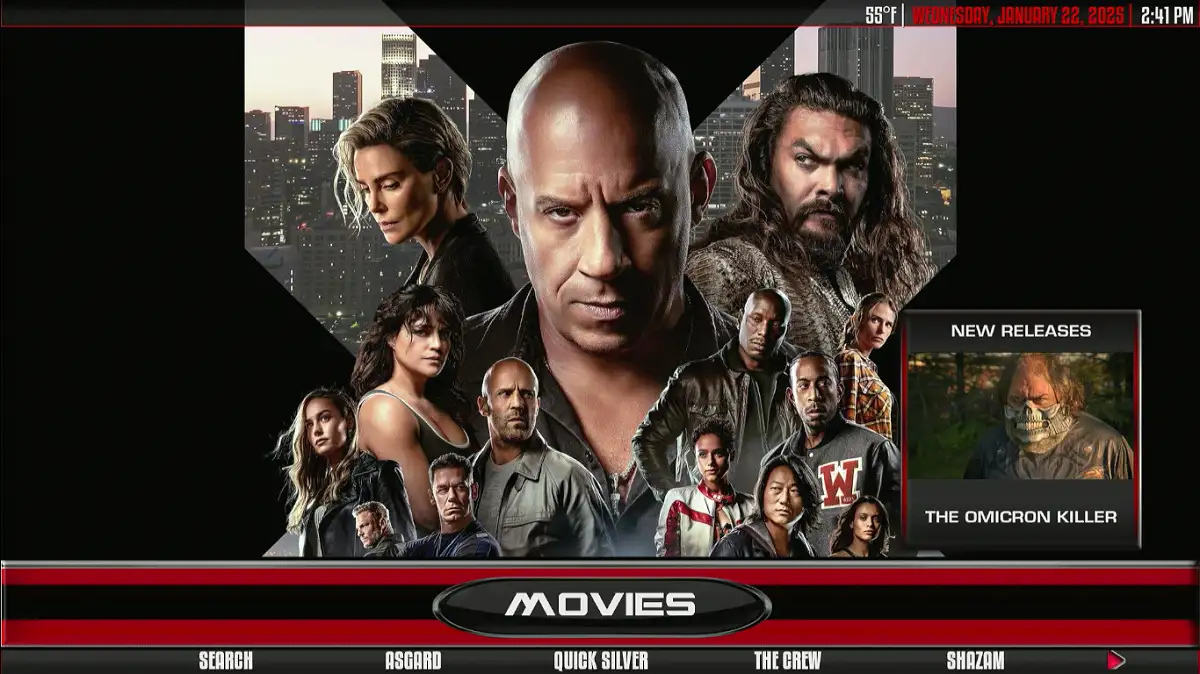
HardNox is one of the most attractive Kodi builds. Originally designed for the Kodi 19 Matrix, the developers have updated and rebranded the build to HardNox Ultra, also called Ultra. It uses the Aeon Nox 5: Silvo Skin, which is why its interface is lightweight and visually appealing.
It’s now available for the latest Kodi version and features quality features that improve your Kodi experience. This build comes pre-installed with popular VOD addons like Homelander, Asgard, and The Crew. It also features simple integration with Real Debrid, which is required for quality streaming links.
The menus are located at the lower edge of the screen, providing easy access without cluttering the main viewing area. Each section is divided into subsections tailored to enhance the user experience.
- Categories: Movies, TV Shows, Kids, Heroes, Fan Favs, Horror, Sportz, Grit, Muzic, Doc Spot, Free Stuff, After Dark, Real Debrid.
- Top Addons: Asgard, The Crew, Magic Dragon, Chains, Patriot, Black Lightning, Shadow
- Wizard: Misfit Mods Wizard
- Repository: Misfit Repository
- Source URL: http://misfitmods.com/mmwiz/repo
How to Install Hard Nox Kodi Build
13. USA
Kodi 21 Omega & Kodi 20 Nexus
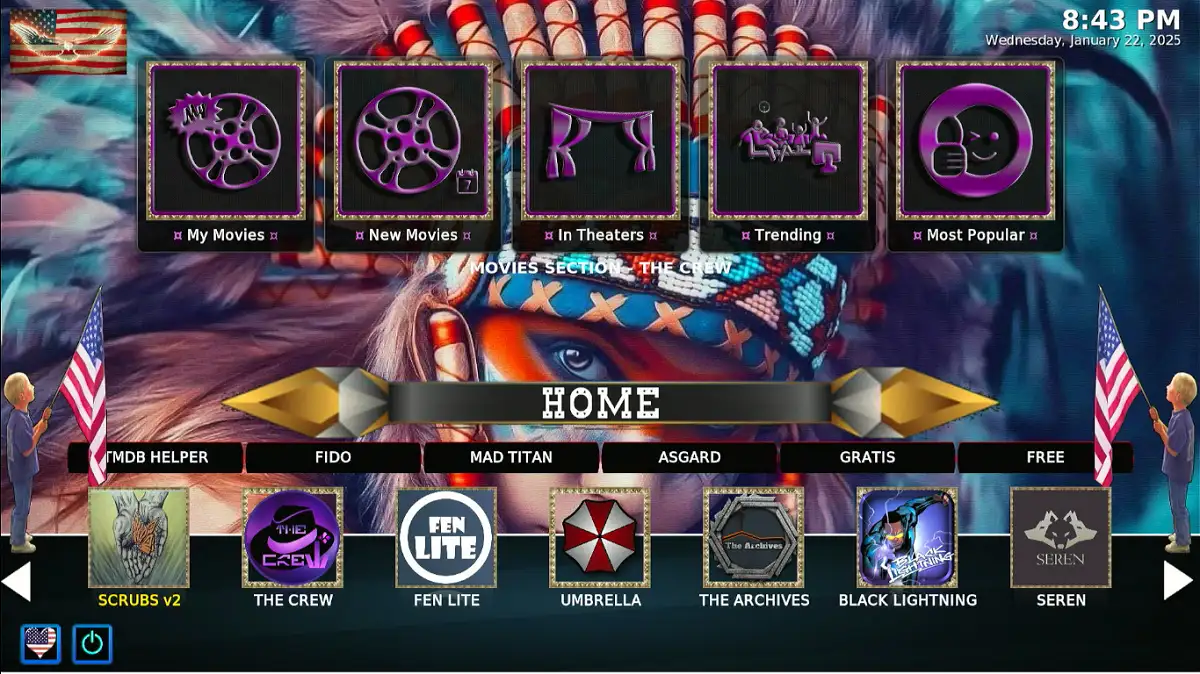
As the name suggests, the USA build is tailored for Kodi users who take pride in American-themed content and aesthetics. It is an all-in-one build from the DoomzDay repository. It is fully compatible with the latest Kodi version. It offers a vibrant visual style with a colorful interface and a visually appealing home screen.
It is home to popular VOD and live TV addons, including Scrubs V2, Asgard, The Crew, Rising Tides, and Torque Lite.
- Categories: Movies, TV Shows, Addons, Live TV, Sports, Family, Christmas, Debrid, Music, US Local, Accounts
- Top Addons: The Crew, Asgard, Rising Tides, SportHD, Scrubs V2, Black Lightning, Mad Titan Sports
- Wizard: DoomzDay Simple Wizard
- Repository: DoomzDay Repository
- Source URL: https://doomzdayteam.github.io/doomzday
14. Estuary Switch
Kodi 21 Omega & Kodi 20 Nexus
Estuary Switch is the next option on the list of the best Kodi builds. It’s an unofficial build from the THE7o9REPO. It features various movies, TV shows, documentaries, and Kids’ content. Some preinstalled addons include Umbrella, Homelander, and POV. Moreover, it supports high-quality streaming in 4K and HD quality.
The Estuary Switch is lightweight and doesn’t alter the Kodi home screen. Instead, it utilizes the Estuary switch or the Kodi interface to display the content options. It’s a great build offering tons of free content options.
How to Install Estuary Kodi Build
15. FenFlix
Kodi 21 Omega & Kodi 20 Nexus
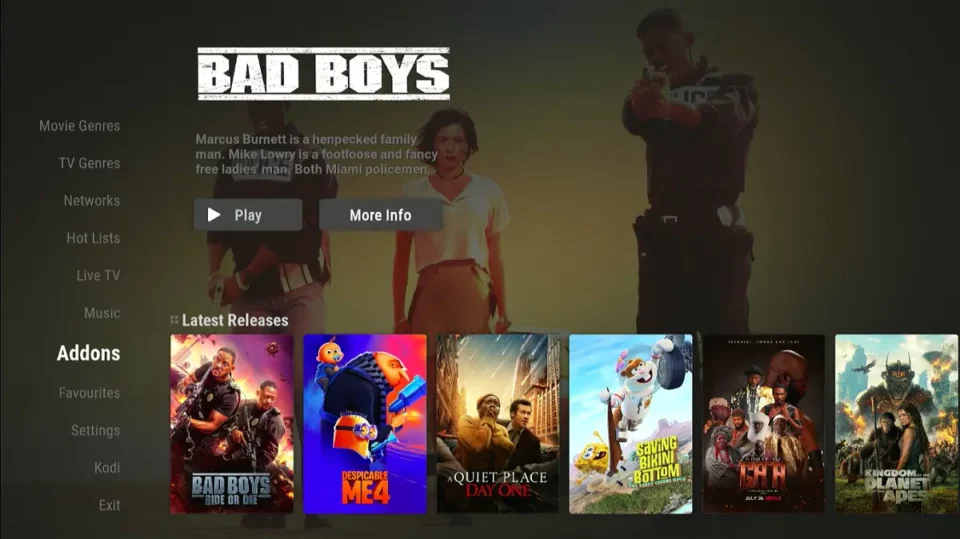
FenFlix is a top-tier Kodi build that is available through the Diggz repository. It’s a premium build that leverages the Fen Kodi addon to fetch high-quality streaming links. To access content on FenFlix, you will need to integrate your Real Debrid account.
The build offers a wide variety of entertainment options, including movies, TV series, live TV, music, and more. Moreover, it contains popular addons like Daddylive, Fen, Plex Live, and YouTube. The FenFlix main menu features a simple and easy-to-navigate design.
Additionally, you can use the Search menu to find particular shows. FenFix’s many content categories and premium design make it a fantastic option.
- Categories: Search, Movies, TV shows, Movie Genres, TV Genres, Networks, Hot Lists, Live TV, Music, Addons, Favourites, Settings, Kodi, Exit
- Top Addons: Daddylive, Fen, IMDb Trailers, Plex Live, Pluto TV, Samsung TV Plus, STIRR, The_TV_app, and YouTube
- Wizard: Diggz Chef Wizard
- Repository: Diggz Repository
- Source URL: https://diggz1.me/diggzrepo
16. Aspire
Kodi 21 Omega & Kodi 20 Nexus
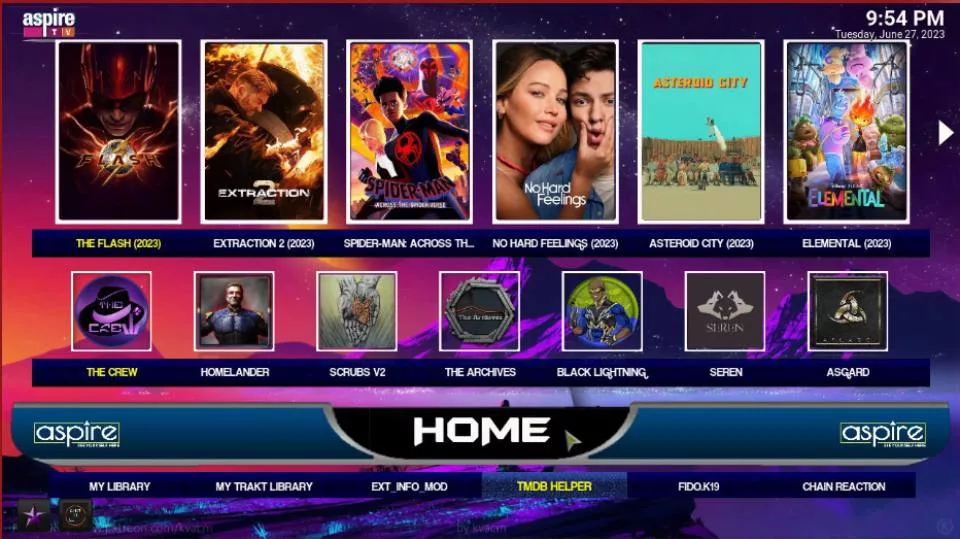
Aspire is a highly popular Kodi build and is part of the collection provided by the DoomzDay Wizard mentioned earlier. It can be installed via the DoomzDay repository and works seamlessly with the latest Kodi version, Kodi 21 Omega.
Aspire is yet another AIO Kodi build, letting you stream diverse content, from movies and TV shows to live TV, music, and sports. It offers both free and Debrid streaming options. Popular addons on Aspire include The Crew, Asgard, Rising Tides, Scrubs V2, and Seren.
These addons deliver high-quality streaming links. Overall, the smooth interface and fantastic content categories make Aspire one of the best Kodi builds.
- Categories: Home, Free Movies, Free TV, Debrid, Favourites, Sports I, Sports 2, Live TV, Family, Music, Addons/Apps, System, and Wizard
- Top Addons: Aliunde Just Click It, Asgard, Scrubs v2, Twisted TV, Twisted, THE CREW, Rising Tides, Ghost TV, Homelander, Live Net TV, and Halcyon
- Wizard: DoomzDay Wizard
- Repository: DoomzDay Repository
- Source URL: https://doomzdayteam.github.io/doomzday
17. RedFlix
Kodi 21 Omega & Kodi 20 Nexus
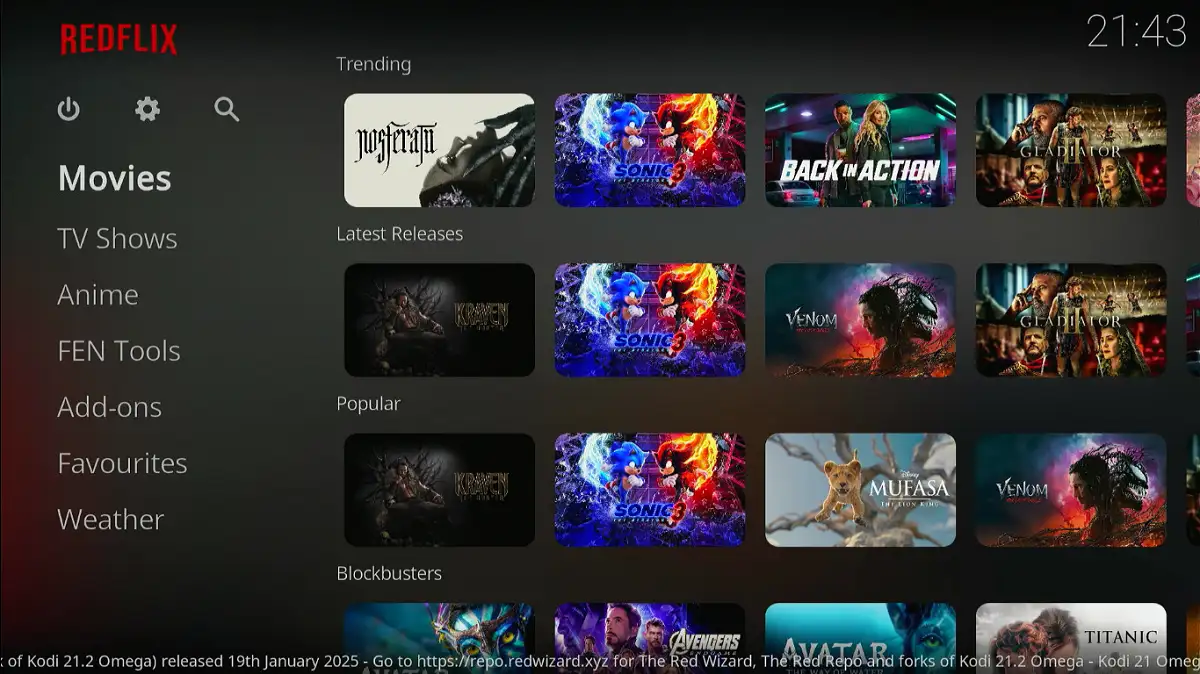
RedFlix is a Kodi build designed to replicate the look and feel of Netflix. It offers a user-friendly interface, providing many streaming options from popular addons. These addons include The Crew, Umbrella, Fen, Homelander, and Seren.
RedFlix is hosted in the Red Wizard repository. It’s a lightweight build suitable for Kodi devices with low storage. The build is compatible with all Kodi-supported devices, such as Fire TVs, FireSticks, Android smartphones, and more.
- Categories: Movies, TV Shows, Tools, Addons, Favourites, Weather
- Top Addons: FEN Lite addon
- Wizard: Red Wizard
- Repository: Red Wizard Repository
- Source URL: https://repo.redwizard.xyz/
18. SERENity
Kodi 21 Omega & Kodi 20 Nexus
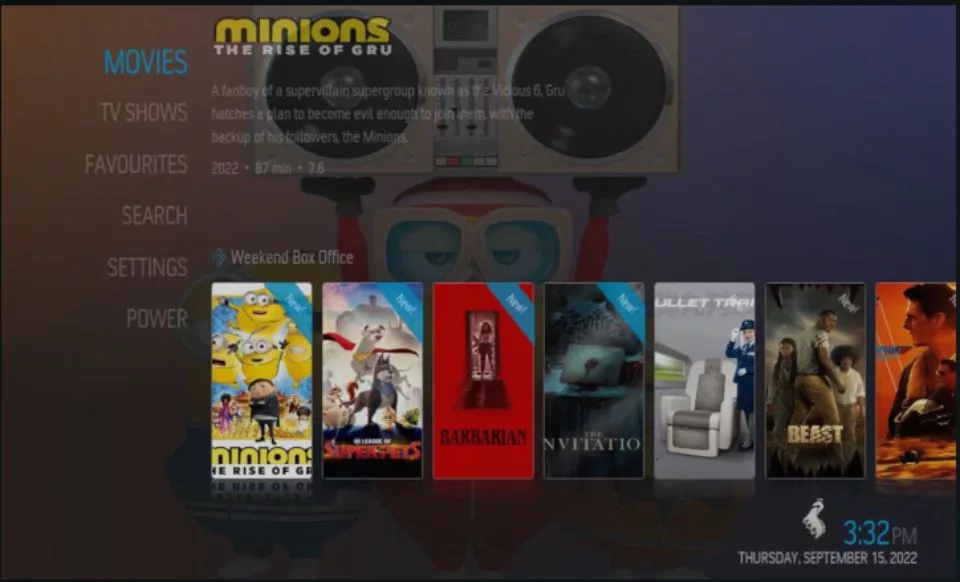
SERENity is another useful Kodi build from THE7o9REPO. It’s a free build offering VOD content, including movies and TV shows across various genres. All the content is in high definition. However, it does not provide live TV options.
You can stream movies and series in 1080p and 4 K. The lightweight and fast build ensures that users enjoy lag-free streaming. The layout of the SERENity build is simple and user-friendly. It features sections like Movies, TV Shows, Favourites, Search, Settings, and Power.
The Search option is excellent for finding particular streaming options. Overall, the smooth streaming experience and high-quality playback facility make SERENity one of the best Kodi builds.
- Categories: Movies, TV Shows, Favourites, Search, Settings, and Power
- Top Addons: Embuary Info, IMBb Trailers, Seren, The MovieDb Helper, and a4kSubtitles
- Wizard: 7o9 Wizard
- Repository: Diggz Repository
- Source URL: https://diggz1.me/diggzrepo
19. XontriX
Kodi 21 Omega & Kodi 20 Nexus
Xontrix is a Kodi build that comes preloaded with quality addons from the Crew family. Crew is popular as one of the best Kodi repositories because of its quality addons that let you stream diverse content on Kodi. Xontrix is a good choice if you want Crew addons.
These include The Crew, Ghost TV, Aliunde, Torque Lite, Rising Tides, Homelander, and Asgard. It is also one of the Kodi builds that lets you stream both live and VOD content. Main menu sections include:
- TV Shows
- Movies
- Live
- Sports
- Music
- System
- Kids
Xontrix provides the best streaming experience when paired with Real Debrid or other Debrid services. Once you’ve integrated Real Debrid, you can view content in up to 4K resolution on supported devices.
Overall, Xontrix is an excellent option for premium users, offering many content options and categories.
- Categories: TV Shows, Sports, Movies, Live, More, System, Music, Kids, & Movies
- Top Addons: Aliunde K19, Asgard, Twisted, THE CREW, Rising Tides, Ghost TV, Homelander, Replay Me, Torque Lite, and The Endzone 19
- Wizard: The Crew Wizard
- Repository: The Crew Repository
- Source URL: https://team-crew.github.io
20. Franks
Kodi 21 Omega & Kodi 20 Nexus
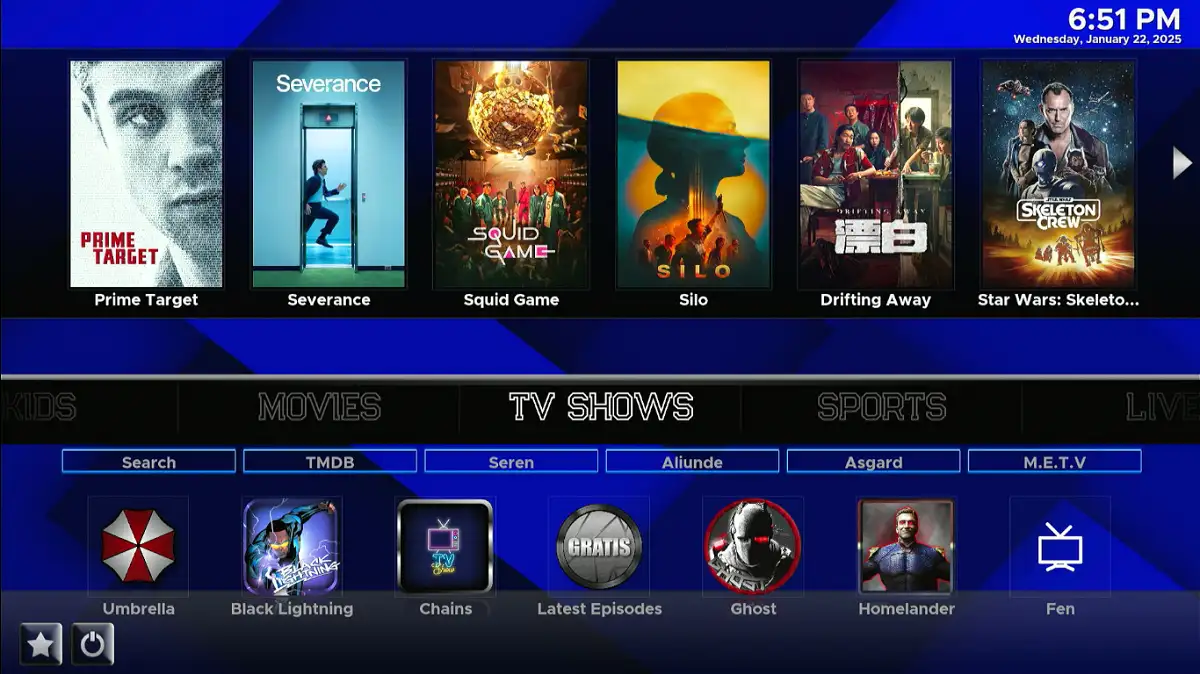
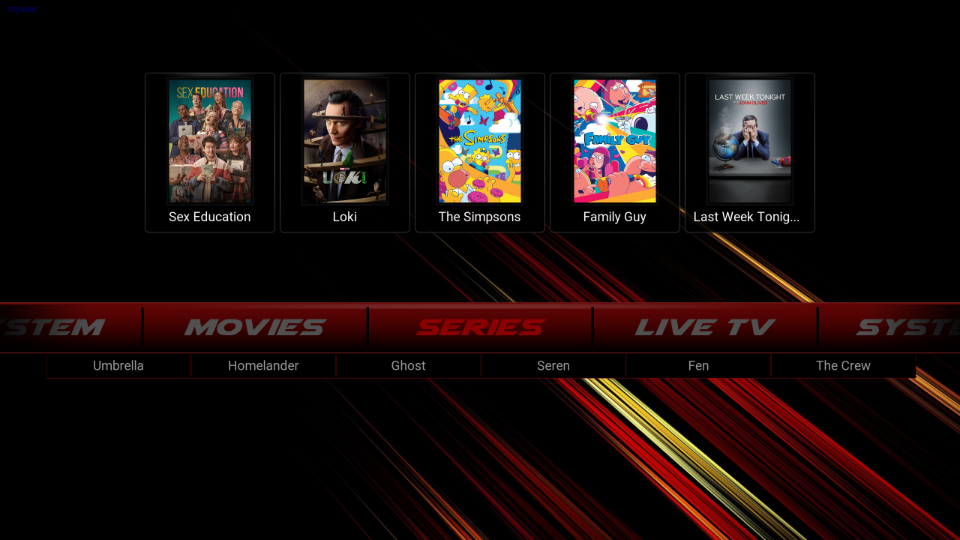
Franks is a relatively newer Kodi build from The Crew Repository. It offers various live TV and VOD content, such as music and TV series. For a smooth streaming experience, it includes reputable addons like Gratis, Homelander, and Fen.
The Franks Kodi build features a user-friendly and simple design. The main menu features sections for Series, Movies, Live TV, and System. You can easily access your preferred section to view all the streaming options. The Franks build works perfectly with all Kodi-enabled devices, such as Fire TVs, FireSticks, and more.
- Categories: Series, Movies, Live TV, & System
- Top Addons: Scrubs v2, The Crew, Ghost TV, Homelander, Daddylive, Fen, Ghost, GoGoAnime, Gratis, Haru, and Luffy
- Wizard: The Crew Wizard
- Repository: The Crew Repository
- Source URL: https://team-crew.github.io
21. POVico
Kodi 21 Omega & Kodi 20 Nexus
POVico is another popular Kodi build from the 709 repository. This Kodi build is lightweight and lightning-fast, partly because it only uses a single addon, the POV addon. POV is a Debrid-only VOD addon that offers movies, TV shows, and other on-demand content. Being a premium build means the streaming quality is 1080p and 4 K.
It is known for its easy-to-navigate interface. The main menu features sections such as Movies, TV Shows, Favorites, Addons, Power, Search, Settings, Maintenance, and Tools. You can also use the search menu to find relevant content.
- Categories: Movies, TV Shows, Favourites, Addons, Power, Search, Settings, Maintenance & Tools
- Top Addons: POV
- Wizard: 7o9 Wizard
- Repository: Diggz Repository
- Source URL: https://diggz1.me/diggzrepo
22. Green Monster
Kodi 21 Omega & Kodi 20 Nexus
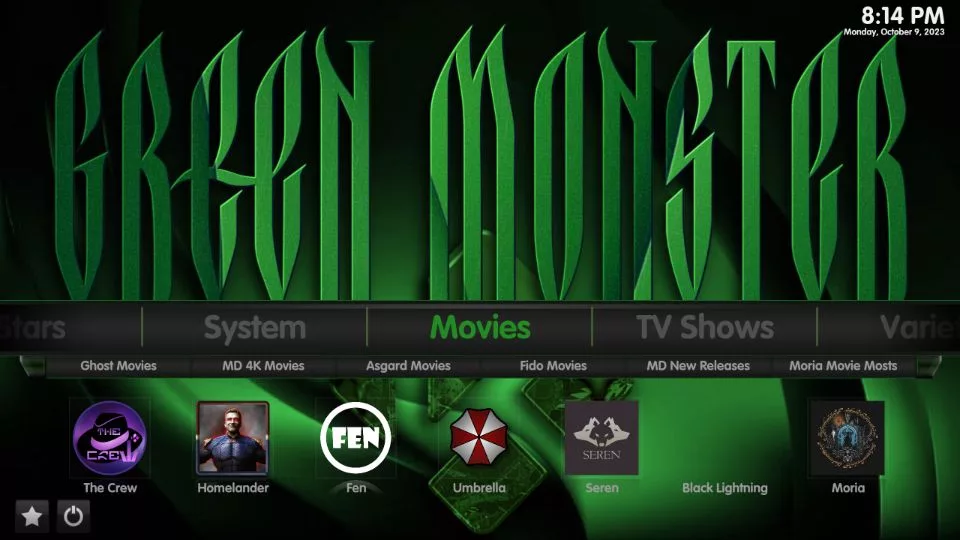
Green Monster is a visually striking Kodi Build that revamps your interface with a bold green theme, featuring dynamic widgets and well-organized menu layouts for an enhanced browsing experience. It is hosted in the Crew repository and offers popular addons that stream movies, TV shows, live TV, sports, music, and tons of other content. These addons include The Crew, Homelander, Fen, Umbrella, Seren, and Shazam.
Green Monster’s home menu is simple and unique. It features Movies, TV Shows, Variety, Sports, Live TV, Kids, Music, Stars, and System sections. The reliable video addons, fantastic theme, and content variety make Green Monster one of the best Kodi builds.
- Categories: Movies, TV Shows, Variety, Sports, Live TV, Kids, Music, Stars, & System
- Top Addons: Patriot, Mega IPTV, XTASY D, The Crew, Rising Tides, Ghost TV, Homelander, VMAXX, Shazam, and MORIA
- Wizard: The Crew Wizard
- Repository: The Crew Repository
- Source URL: https://team-crew.github.io
23. Cosmic One
Kodi 21 Omega & Kodi 20 Nexus
Cosmic One is a Kodi build from The Crew Repository. It lets you stream various content, including movies, TV shows, sports, and live performances. The preinstalled addons on Cosmic One include Daddylive, The Crew, and Asgard.
Cosmic One offers various content genres and categories. Moreover, users can also integrate Real Debrid and Trakt to stream high-quality, buffer-free videos. Overall, Cosmic One is a decent Kodi build for entertainment lovers. Whether you like watching sports or love catching up on your favorite TV shows, the build has something for everyone.
- Categories: Movies, TV shows, 1-click, Sport/Live, Favourites, Trakt, Settings, Account Manager, Funswizard, and Power
- Top Addons: Asgard, The Crew, Ghost TV, Homelander, Torque Lite, Unleashed, Chain Reaction, Daddylive, Fen and Fido.K19
- Wizard: The Crew Wizard
- Repository: The Crew Repo
- Source URL: https://team-crew.github.io
24. NOVA
Kodi 21 Omega & Kodi 20 Nexus
Nova is yet another quality Kodi build from the DoomzDay Wizard. You can install it from the DoomzDay repository on any Kodi-compatible device.
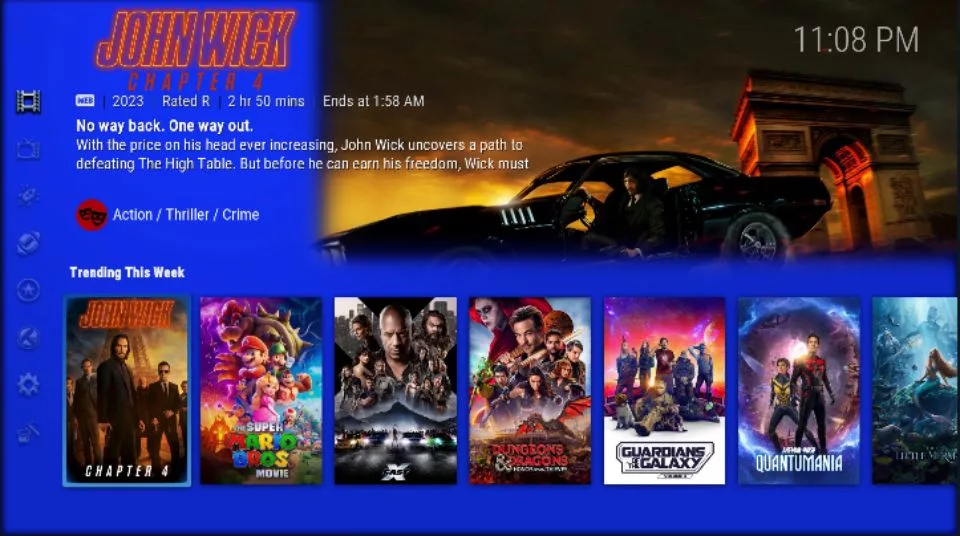
It transforms your Kodi interface into an entertainment center where all the latest movies are displayed on the main screen. Nova build comes pre-installed with VOD and live TV addons, so it’s a good option if you’re looking for an AIO build. This includes movies, TV shows, kids’ content, live TV, and sports.
Popular addons under this Nova build include Asgard, Scrubs V2, The Crew, Rising Tides, and Homelander. It pulls both free and premium links but works best when paired with a Debrid service like Real Debrid.
You can watch unique, free, Debrid content without lag or buffering.
- Categories: Home, Free Movies, Free TV Shows, Debrid/4K, For Her, Family, Nova TV, Live TV, Sports 1, Sports 2, Sports AU, Docos, Music, Favs, Wizard, Apps, System, Weather, Accounts, Power, and My Library
- Top Addons: Aliunde Just Click It, Asgard, Scrubs v2, Twisted TV, Twisted, The Crew, Rising Tides, Ghost TV, Live Net TV, Replay Me, Halcyon, and Torque Lite
- Wizard: Doomzday Simple Wizard/Doomzday Gui Wizard
- Repository: Doomzday Repository
- Source URL: https://doomzdayteam.github.io/doomzday
25. CrewNique
Kodi 21 Omega & Kodi 20 Nexus
The CrewNique build is a well-known Kodi build that is recognized for its association with The Crew, one of the best Kodi add-ons. It is available through the Crew repository and is a comprehensive platform for streaming a wide range of content.
Whether you’re into sports, movies, TV shows, or IPTV, CrewNique has it all under one build. It comes pre-loaded with several high-performing addons like The Crew, Ghost TV, Daddy Live, and Ghost, which help deliver high-quality streaming links.
CrewNique provides a new skin for Kodi. It completely changes the interface and makes it more appealing and unique. Overall, the CrewNique Kodi build is the perfect choice for streaming live content and provides multiple streaming options for users.
- Categories: Movies, Sports, TV Shows, IPTV, Purely W, Ghost, Chains, Non-Debrid, Apps, System, Power, and Favourites
- Top Addons: The Crew, Ghost TV, Chain Reaction, Daddylive, Ghost, Gratis, Purely Wrestling, and tvOne
- Wizard: The Crew Wizard
- Repository: The Crew Repository
- Source URL: https://team-crew.github.io
26. Simplex
Kodi 21 Omega and Kodi 20 Nexus
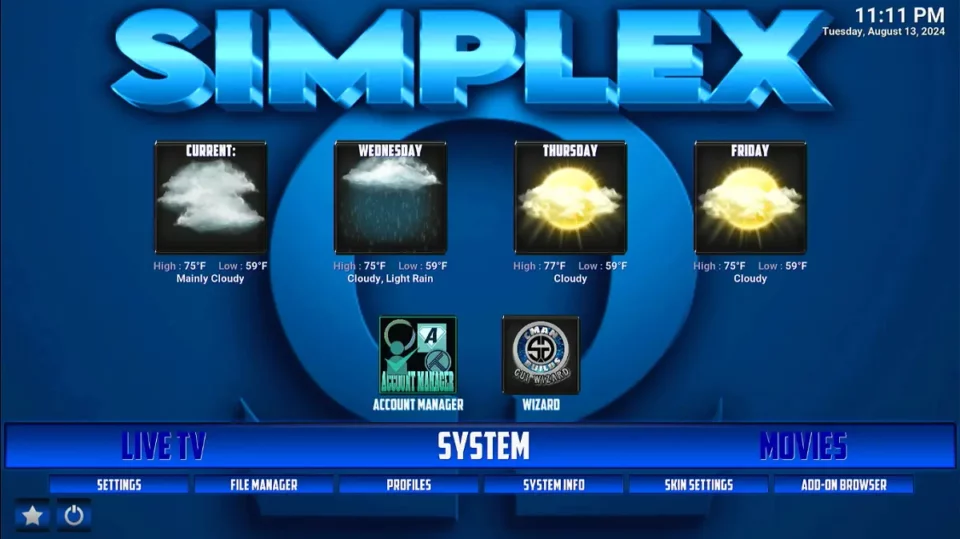
Simplex is a third-party Kodi build from the cMaN Wizard repository. This all-in-one build comes pre-installed with popular addons to stream movies, TV shows, sports, and live TV. The main navigation menu includes the following:
- Movies
- TV Shows
- Free
- Sports
- Kid’s Zone
The pre-installed addons include free and Debrid-dependent varieties. If you are looking for a reliable build that offers an extensive library of content across various categories, Simplex is an excellent option. It is supported on the latest Kodi versions, including 21 Omega and 20 Nexus.
- Categories: Movies, TV Shows, Live TV, Kids’ Zone, Sports, Free
- Top Addons: Asgard, Chains Reaction, Ghost, Magic Dragon, Quick Dragon, The Loop, Fights on Demand, Rising Tides
- Wizard: cMaN Wizard
- Repository: cMaN’s Wizard Repository
- Source URL: http://cmanbuilds.com/repo
How to Install Simplex Kodi Build
27. Smokin
Kodi 21 Omega & Kodi 20 Nexus
Smokin is another fantastic Kodi build from the DoomzDay repository. The build is lightweight and features a simple user interface with a quick-access menu. The main menu includes categories such as Movies, TV Shows, stand-up comedy Kits, Horror, Kids, and Documentaries.
Featured addons are displayed on the home screen, along with a prominent search feature. The featured addons include The Crew, Twisted, Homelander, and Scrubs V2. For the best experience, integrate the build with a Debrid service to pull premium streaming links.
Smokin works smoothly on all Kodi-compatible devices, including FireStick, Android TV, Mobile devices, PCs, and more.
- Categories: Movies, TV Shows, Documentaries, Horror, Stand Up Comedy, Kids.
- Top Addons: The Crew, Homelander, Scrubs V2
- Wizard: EzzerMacs Wizard
- Repository: EzzerMac’s Wizard Repository
- Source URL: http://ezzer-mac.com/repo
How to Install Smokin Build on Kodi
28. Xenon Burst
Kodi 21 Omega and Kodi 20 Nexus
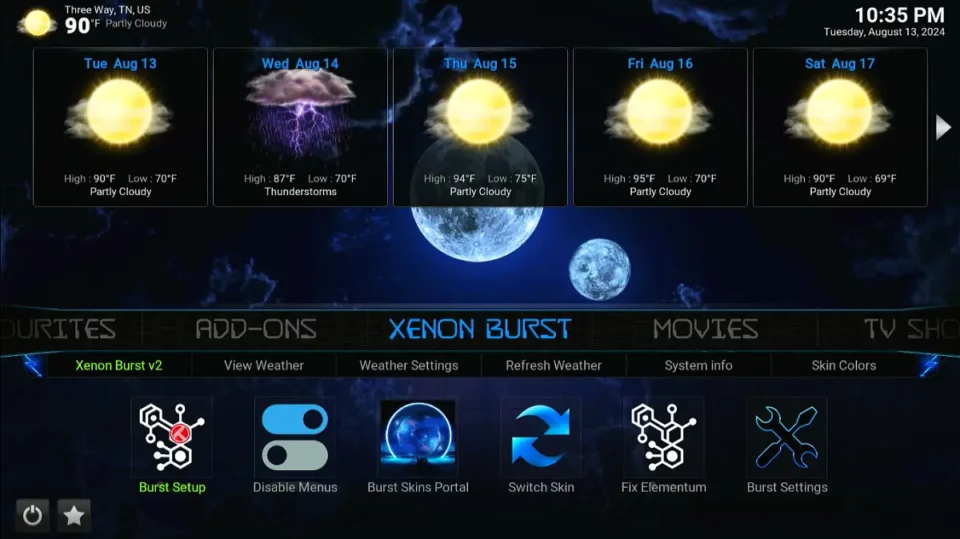
Debrid-only Kodi addons have increased, and users who prefer entirely free links feel left out. Diggz developers designed the Xenon Burst build to cater to users looking for free content. Instead of relying on Debrid sources, the addons under this build are torrent-based.
Xenon Burst is a fork of its sister build, Xenon Plus. It is an excellent choice if you want addons to stream movies, TV shows, and other free content without worrying about Debrid accounts. Like other Diggz builds, Burst’s main menu includes Movies, TV Shows, Arcade, Sports, Music, and Trakt.
- Categories: Add-ons, Movies, TV Shows, TV Guide, Favourites, Sports, Music, Arcade, and Trakt
- Top Addons: The Loop, The TV App, Mad Titan Sports, Rising Tides, Elementum, Scrubs V2, The Crew
- Wizard: Diggz Chef Wizard
- Repository: Diggz Repository
- Source URL: http://diggz1.me/diggzrepo
How to Install Diggz Chef Wizard Kodi Builds
29. Red Wizard
Kodi 21 Omega & Kodi 20 Nexus
Red Wizard is another addon that houses a solid collection of Kodi builds. The build is located in the Red Repository. Red Wizard has options for all Kodi devices, including FireStick, Android TV, mobiles, smartphones, computers, and more.
How to Install the Red Wizard Build on Kodi
30. The Beast
Kodi 21 Omega and Kodi 20 Nexus
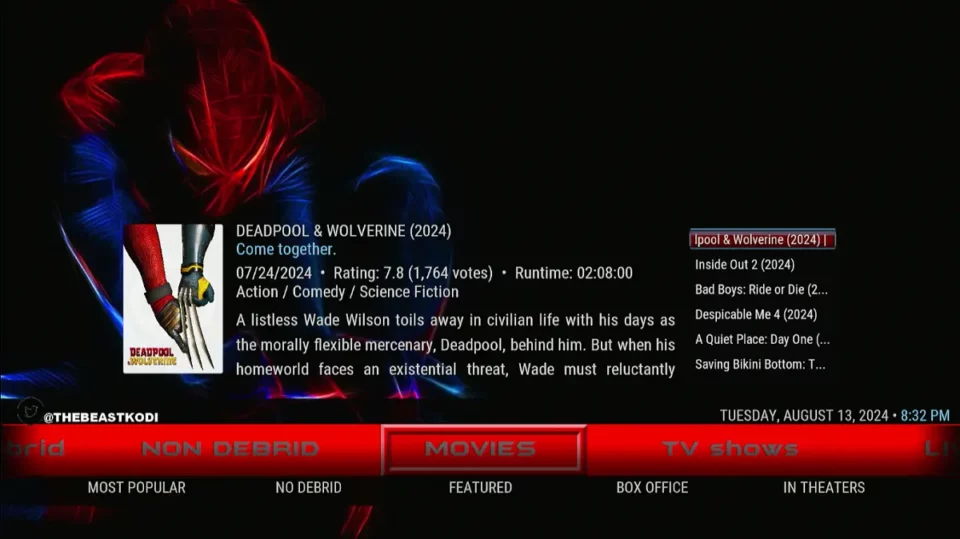
The Beast is a popular Kodi build hosted in Ezzermac’s repository. Ezzermac’s Ezzerman’s Wizard is home to multiple builds, including The Beast, Little Beast, and Plutonium. All these builds let you set up pre-installed Kodi addons to stream VOD and live content.
The Beast was once a well-known name in the Kodi community but had become dormant for a while, only working with Kodi 19. However, the developers have revived and upgraded the build, making it fully compatible with the latest Kodi versions, including 20 Nexus and 21 Omega, ensuring smooth and updated performance.
This build offers a variety of free content, from sports and live channels to movies, TV shows, and kids’ content.
- Categories: Movies, TV Shows, Non-Debrid, Live TV, Beast Sports, Kids, Best Addons,
- Top Addons: Elementum, Magic Dragon, Asgard, Rising Tides, Scrubs V2, Seren
- Wizard: EzzerMans Wizard
- Repository: EzzerMacs Wizard Repository
- Source URL: http://ezzer-mac.com/repo
How to Install a Build on Kodi
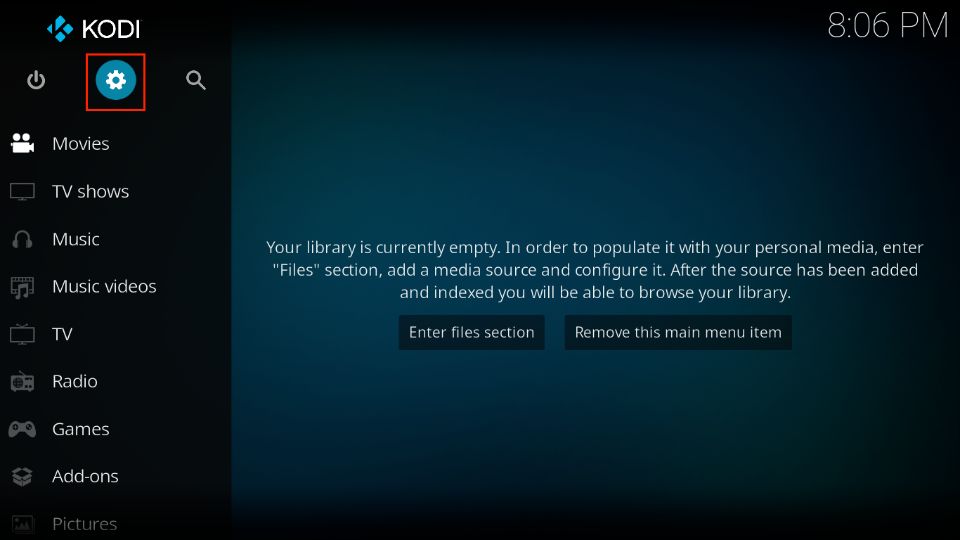
The following section will cover installing a Build on Kodi. I have used the Xontrix build as a reference. However, you can use the guide to install any other Kodi build.
1. Navigate to Settings on the Kodi home screen.
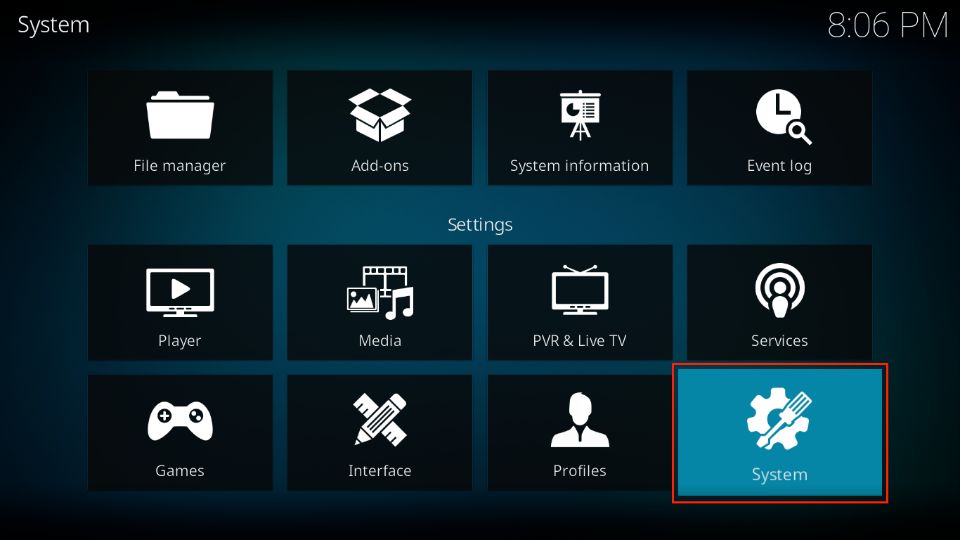
2. Select System.
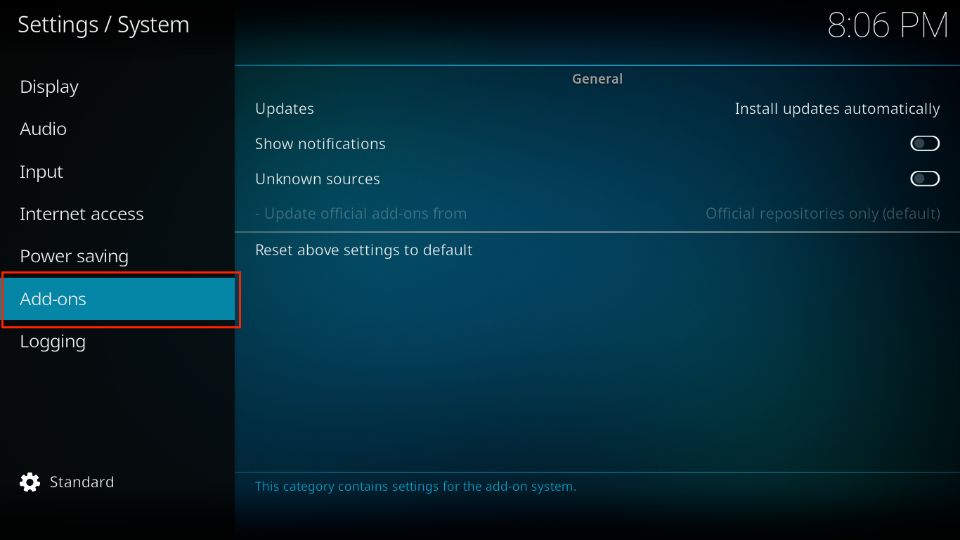
3. Click Add-ons on the left menu.
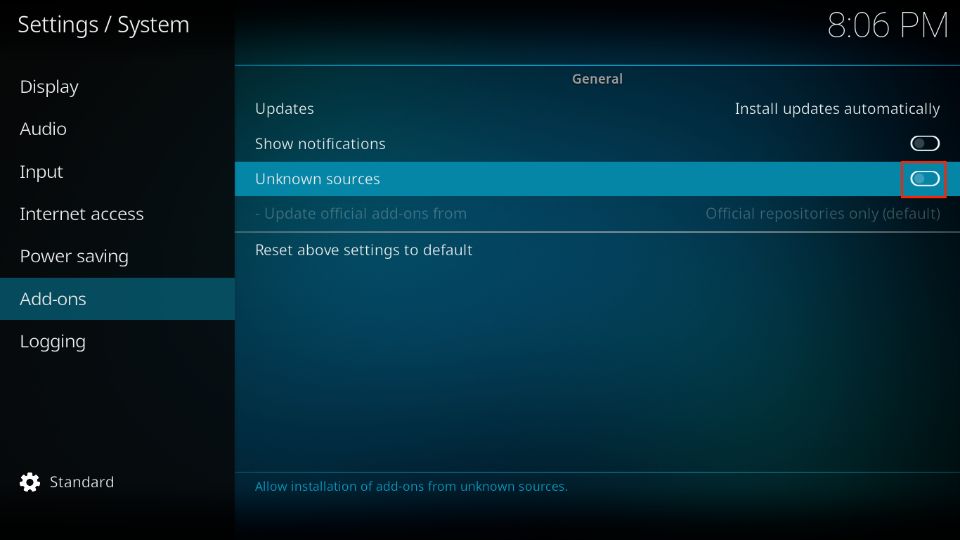
4. While still on this page, navigate to Unknown Sources and turn on the toggle.
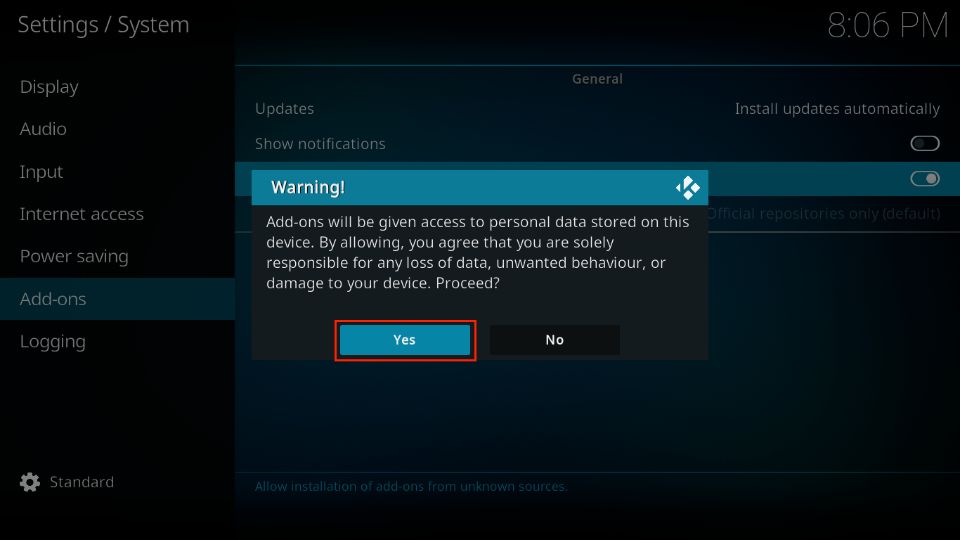
5. You’ll see a warning that you’re about to give addons access to data stored on the device. Click Yes.
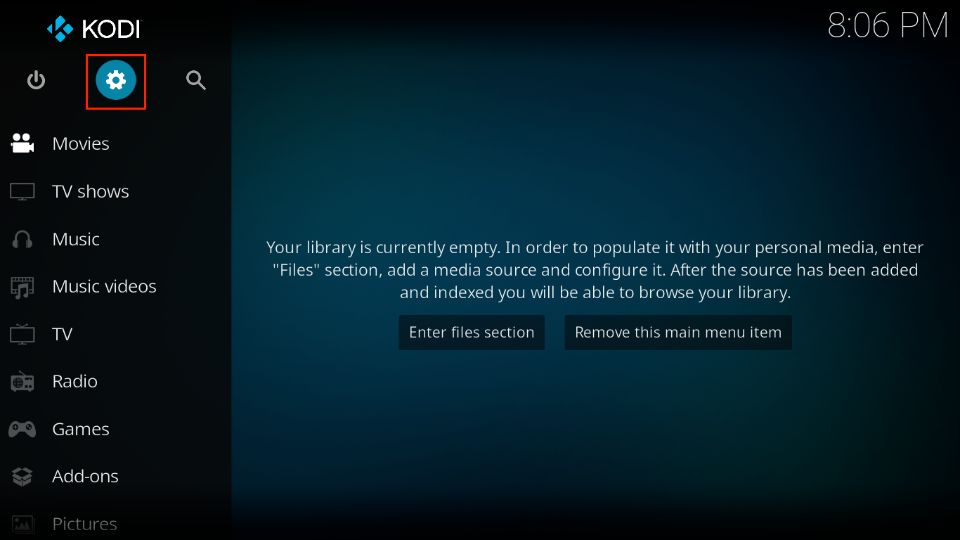
6. Return to the Kodi home screen and select Settings.
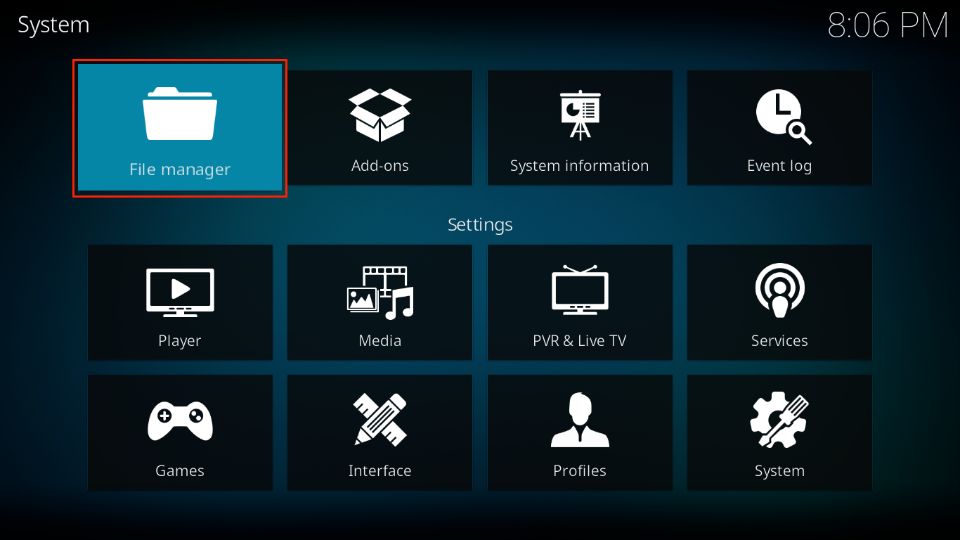
7. Select File manager.
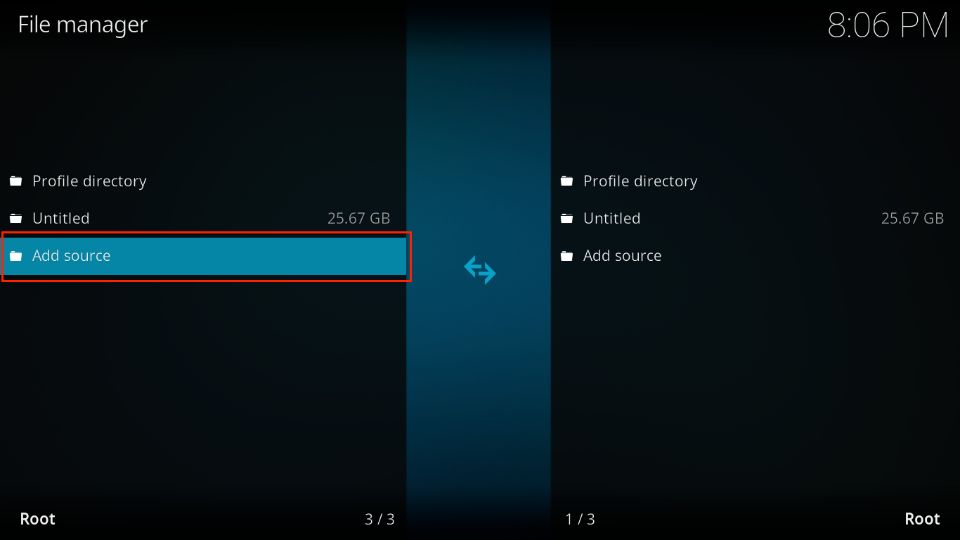
8. Click Add Source on the left menu.
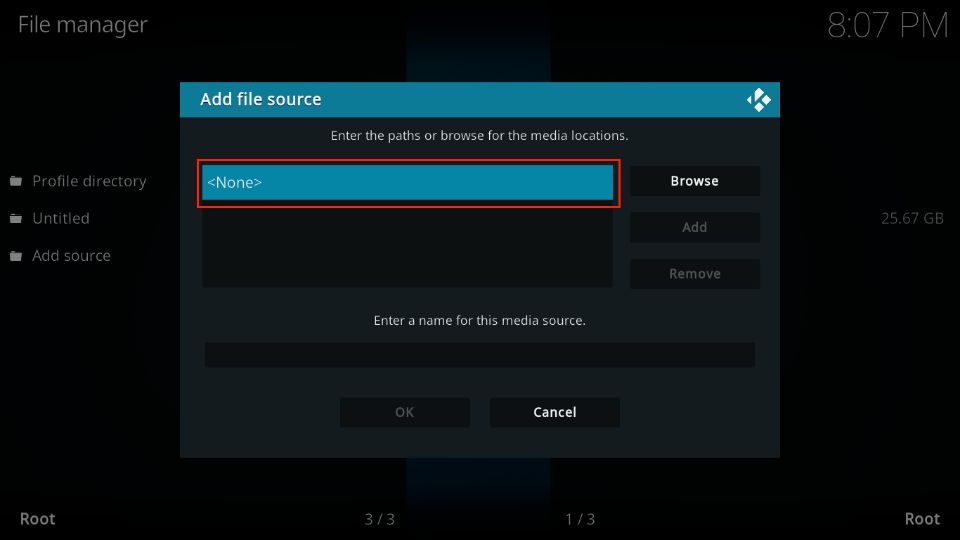
9. In the Add file source menu, click None.
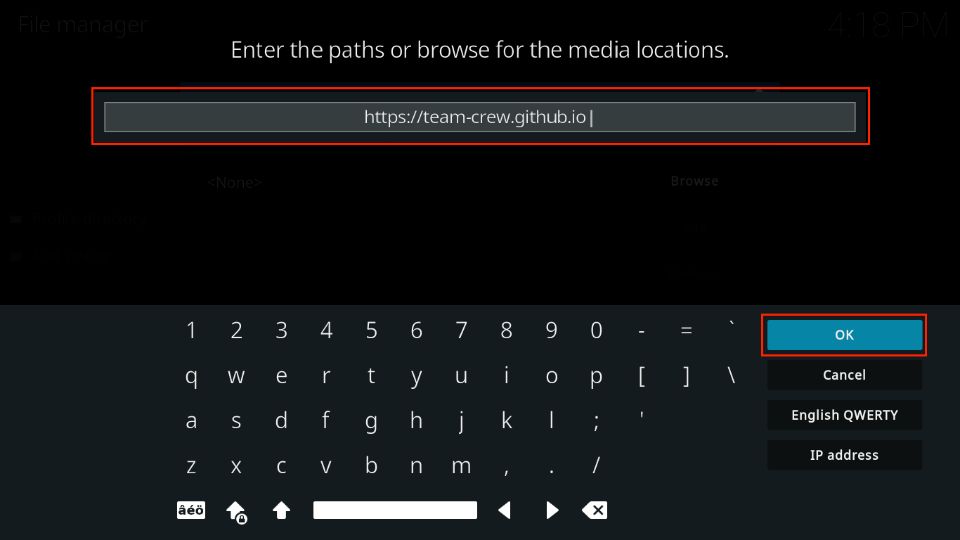
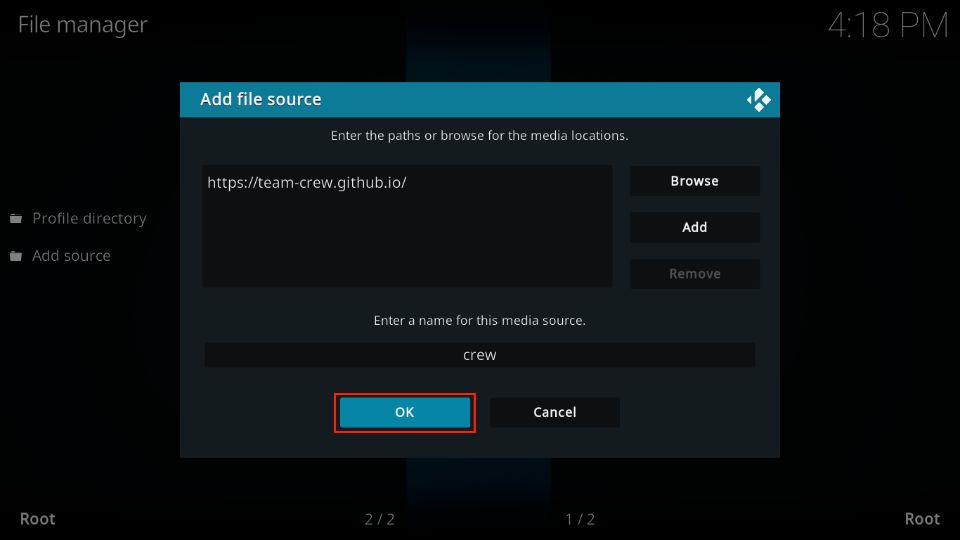
10. Enter the following link in the space provided: https://team-crew.github.io, and then click OK.
Note: It’s the URL for The Crew Repository. FireStickTricks.com is not associated with the developers of any third-party builds.
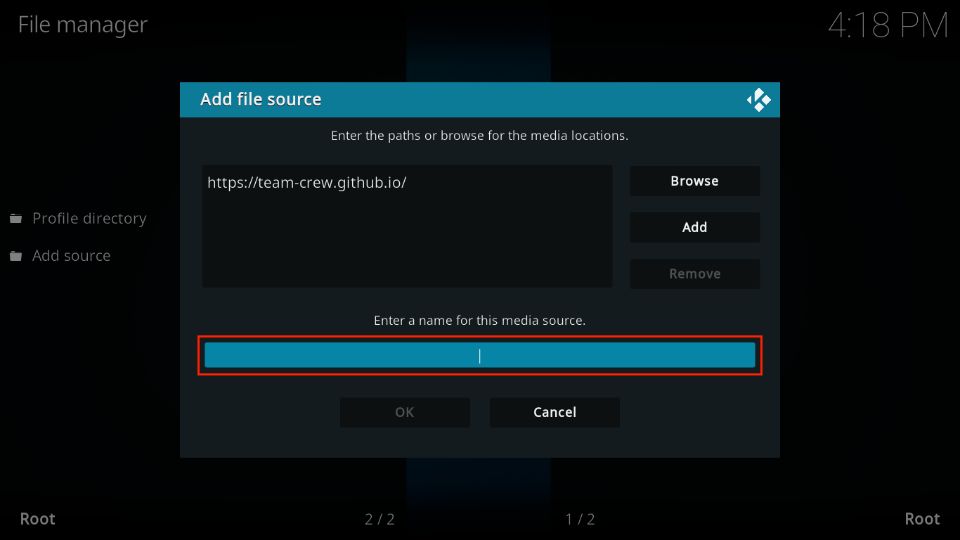
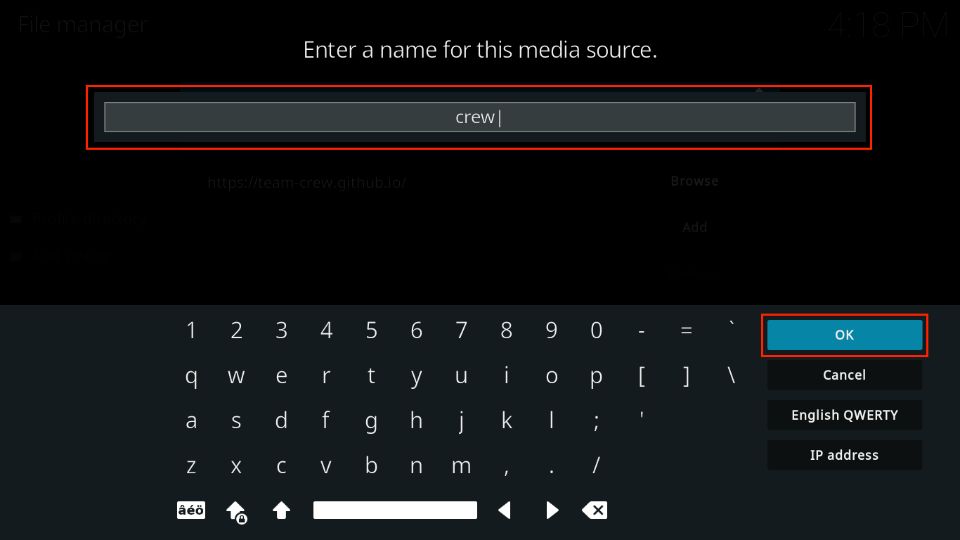
11. Select the Enter a name for this media source tab.
12. Enter your preferred name for the file source and click OK.
Note: I am entering crew as the file name.
13. Lastly, press OK again to close the menu.
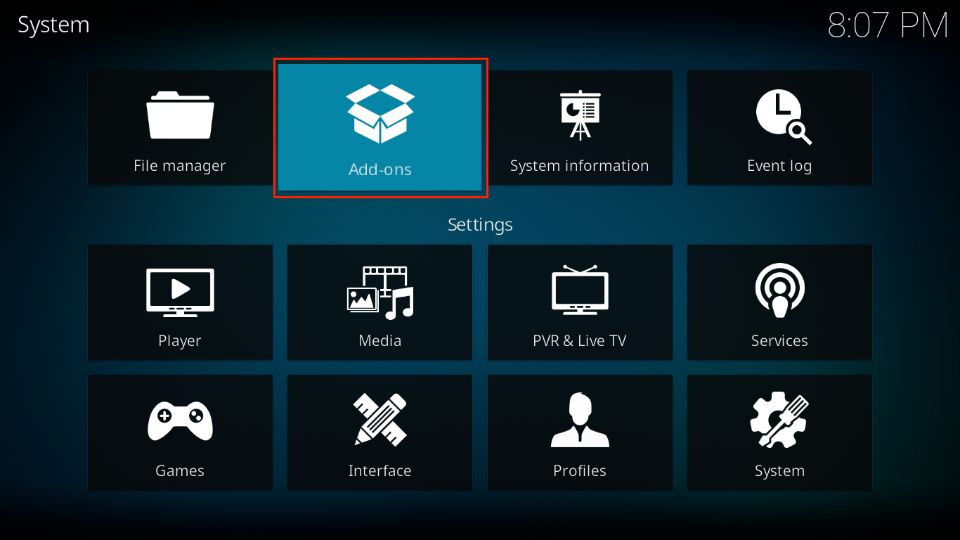
14. Open the System menu and click the Add-ons folder.
15. Select the Install from zip file tab.
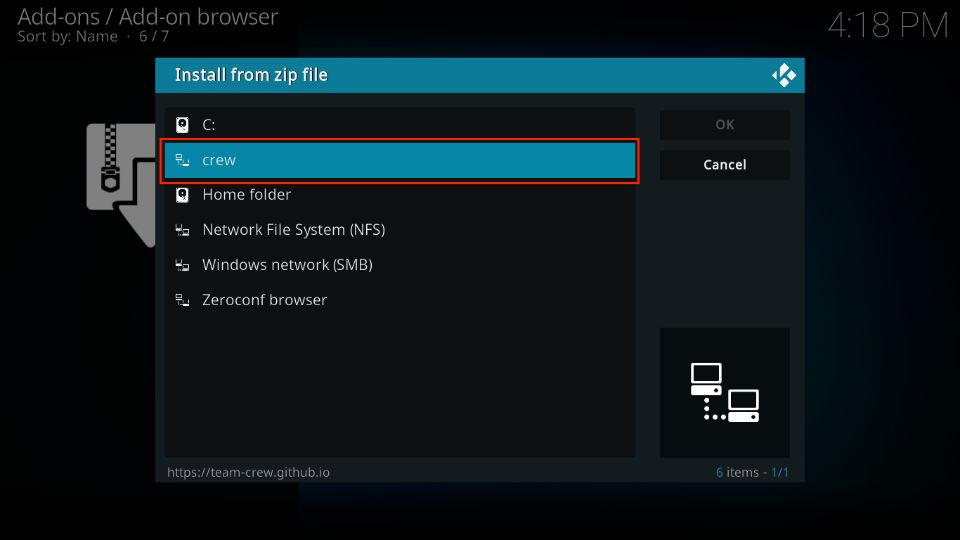
16. Click crew or the file name you entered earlier.
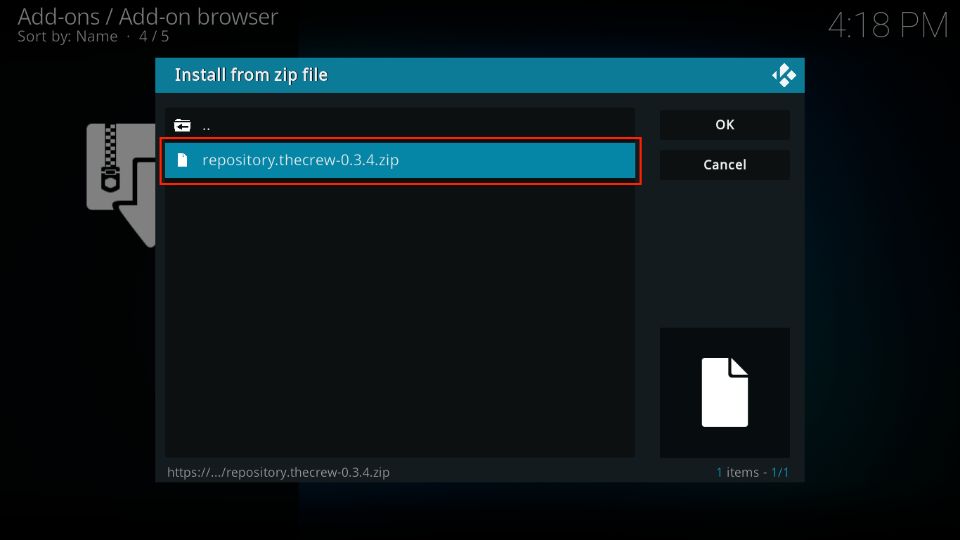
17. Select repository.thecrew-x.x.x.zip.
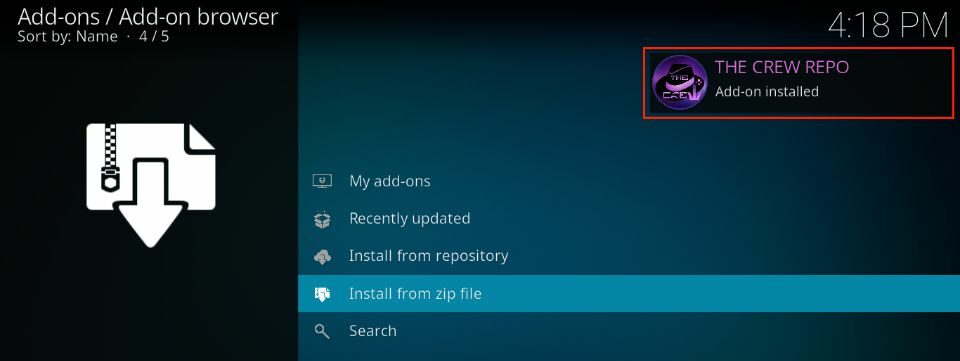
18. The Crew repo should start downloading right away. If you get an error message, confirm that you’ve entered the right source path and that your internet connection is stable. Then, wait for the Crew Repo Addon installed notification.
19. In the Addons menu, select Install from repository.
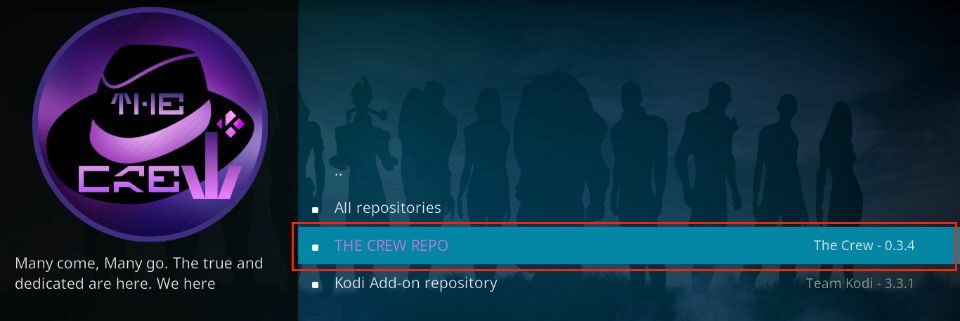
20. Select THE CREW REPO.
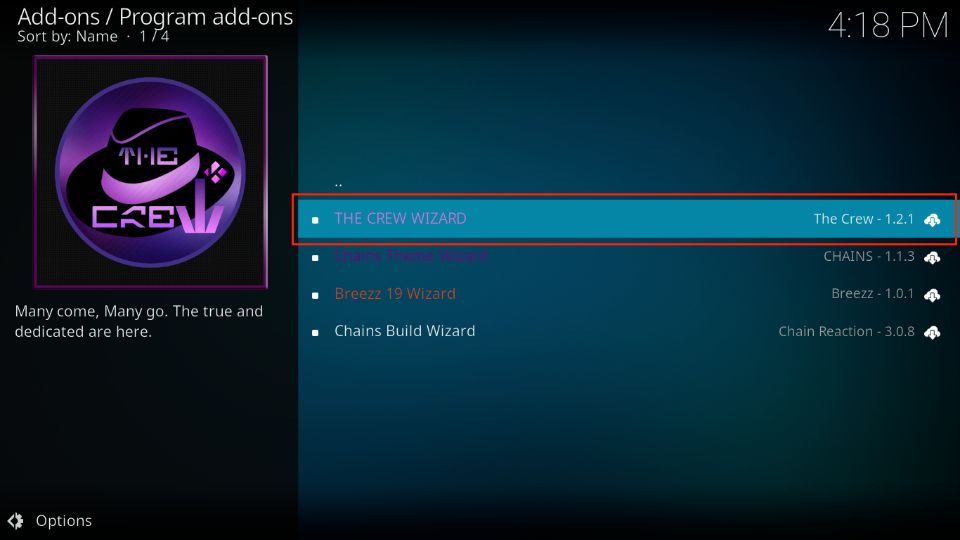
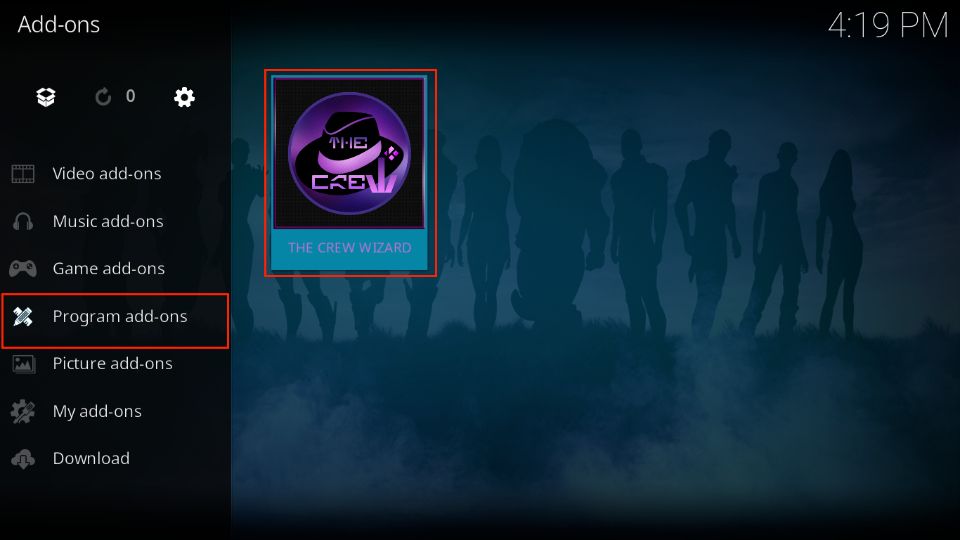
21. Select Program Addons.
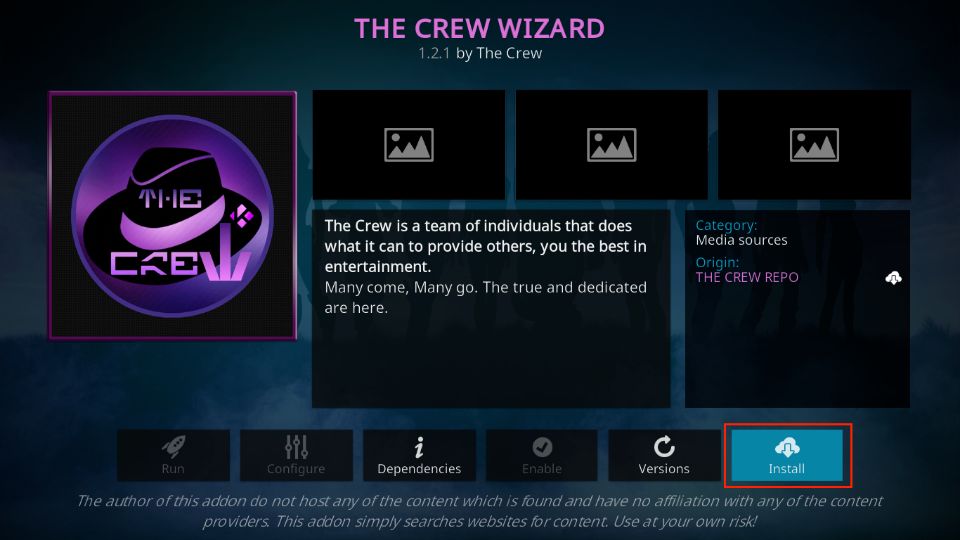
22. Choose THE CREW WIZARD.
23. Press Install via the installation dashboard.
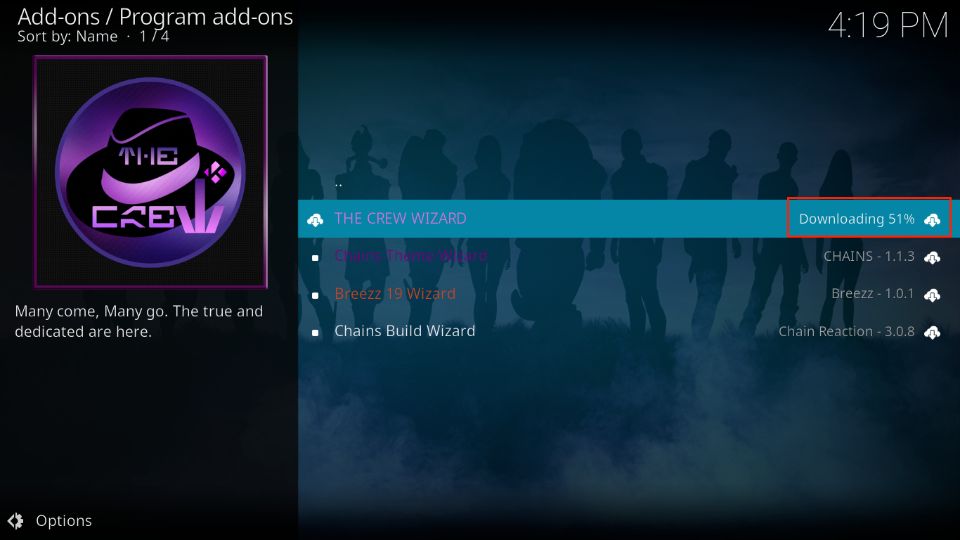
24. A Downloading sign will appear beside the ‘The Crew Wizard’.
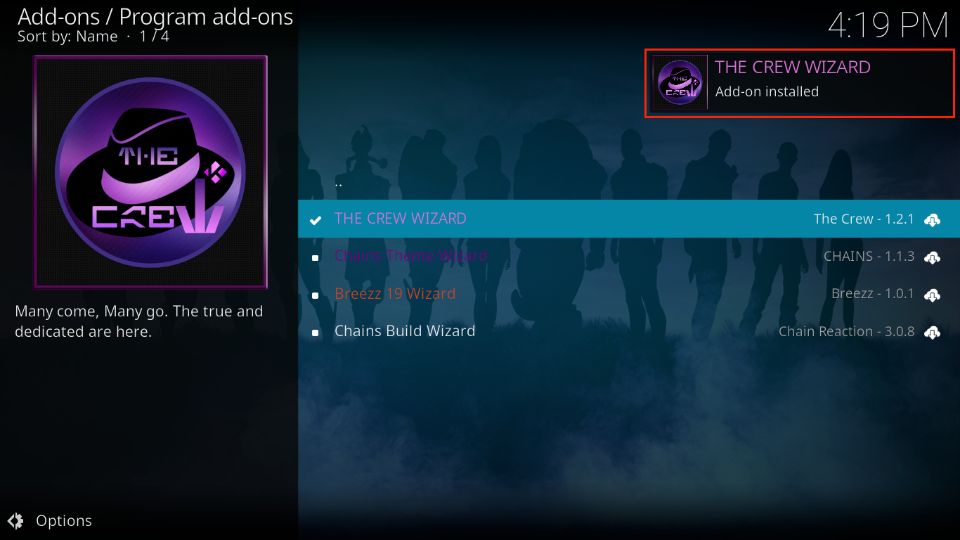
25. Wait for the addon installed alert.
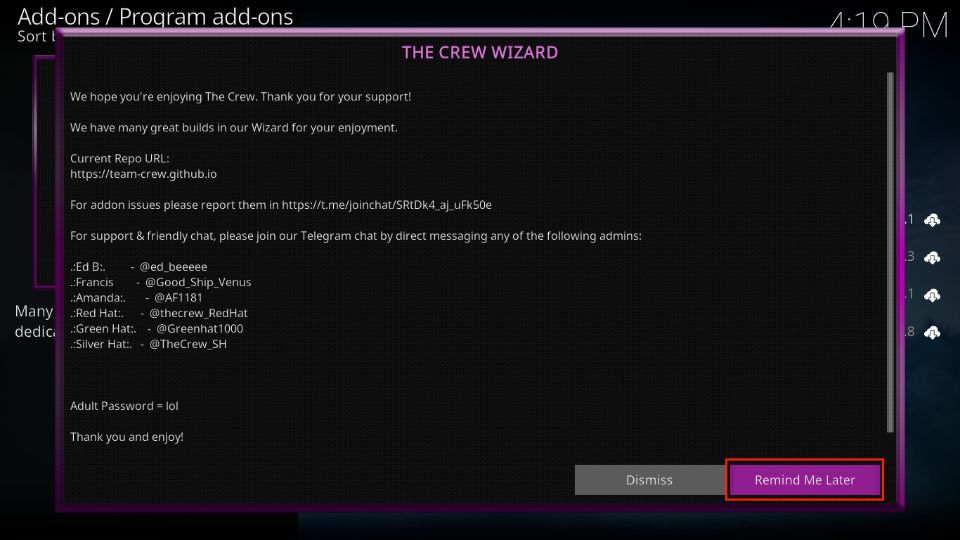
26. On the Crew Wizard information page, press Remind Me Later.
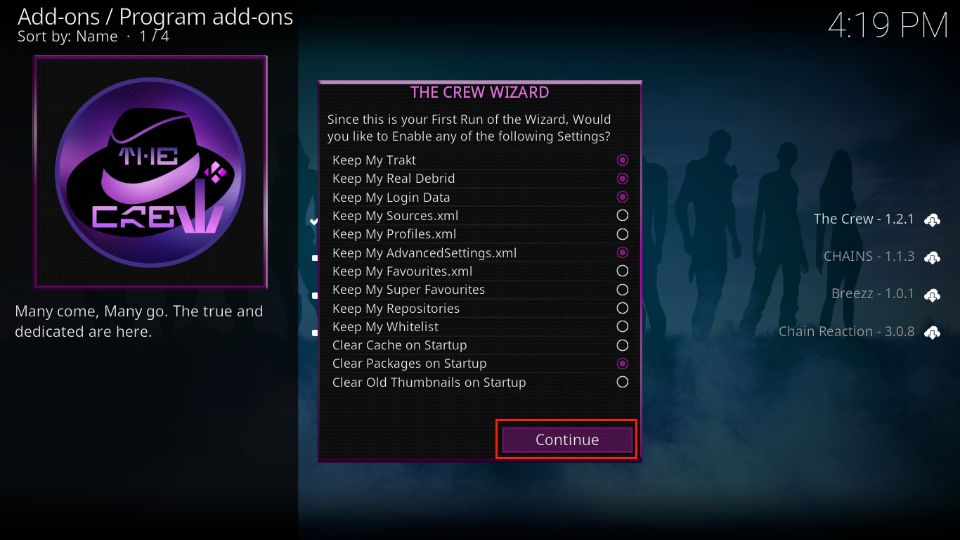
27. Enable your preferred settings and press Continue.
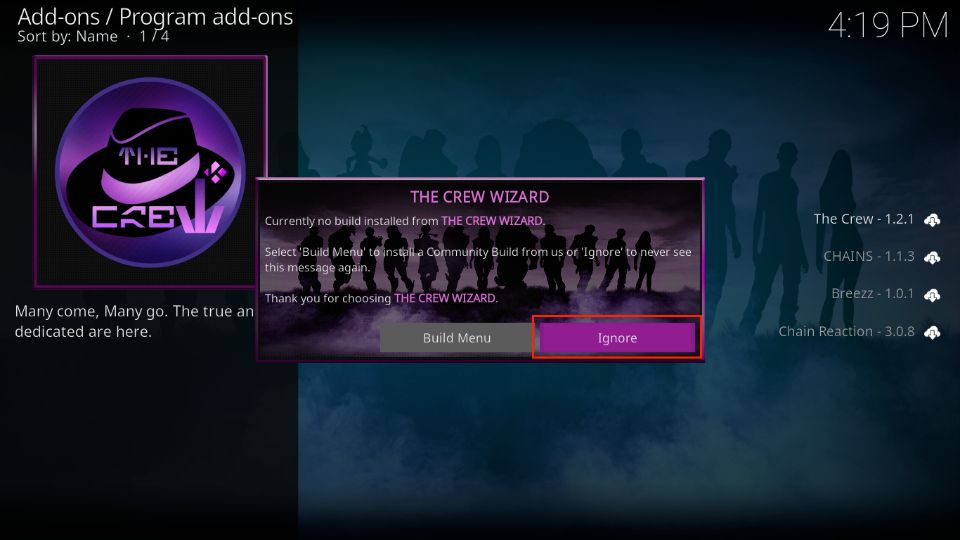
28. Press Ignore when the No build installed alert appears.
29. Access Program addons> The Crew Wizard
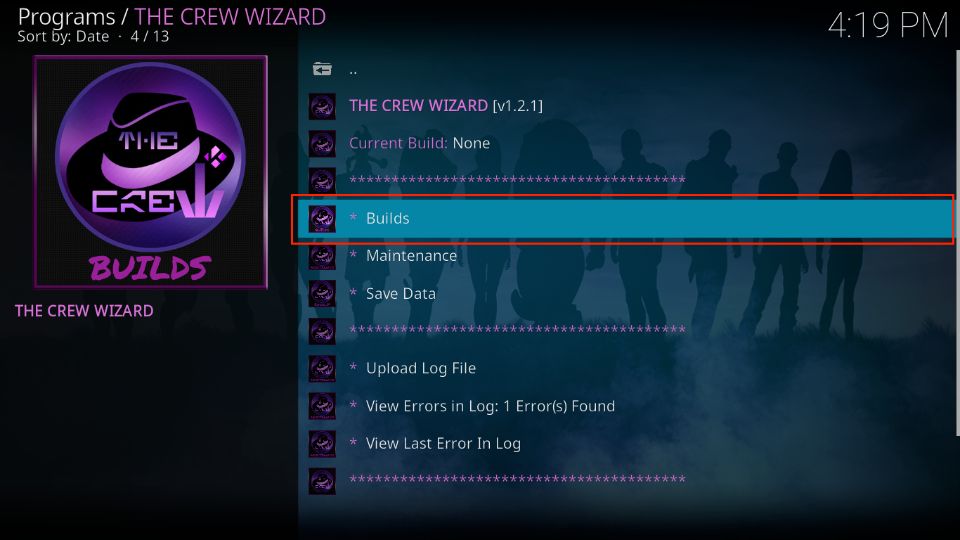
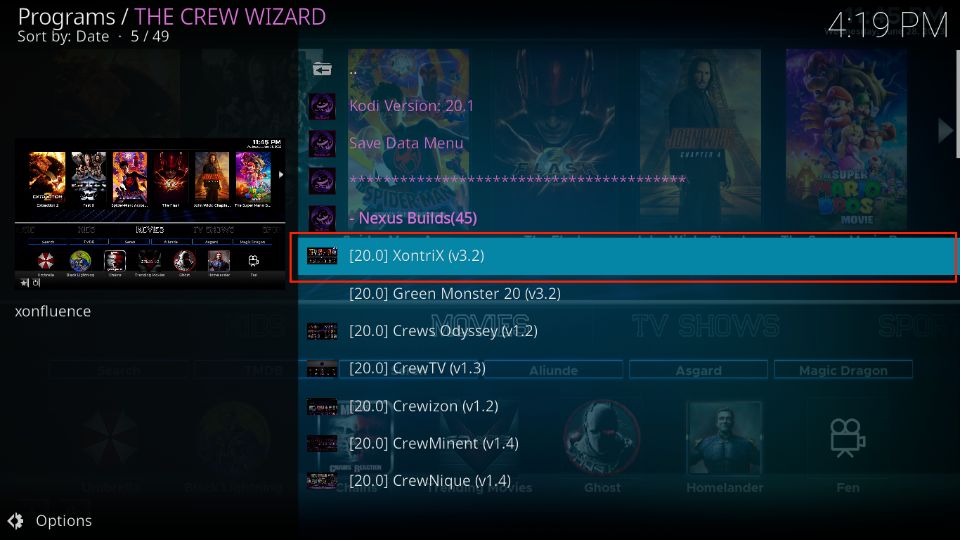
30. Select Builds.
31. Click on Xontrix.
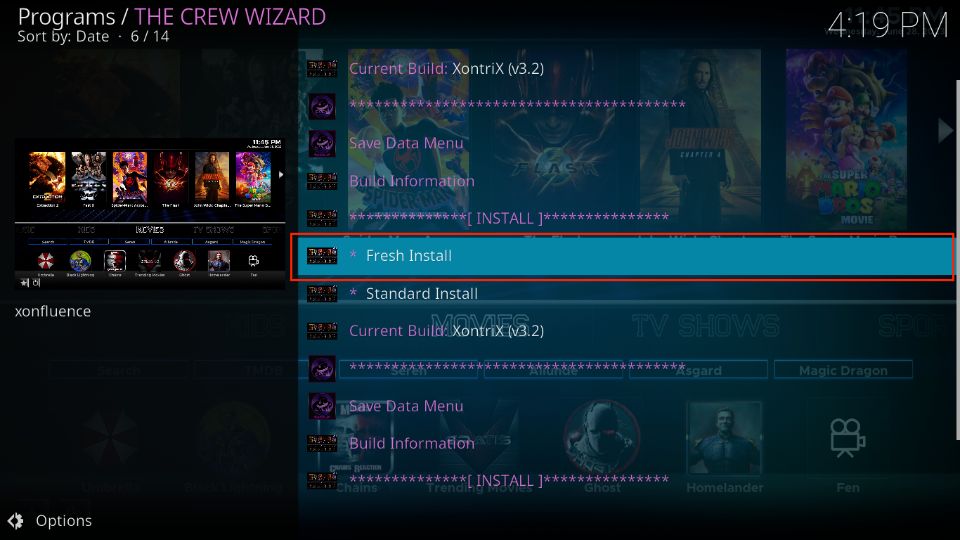
32. Select Fresh Install.
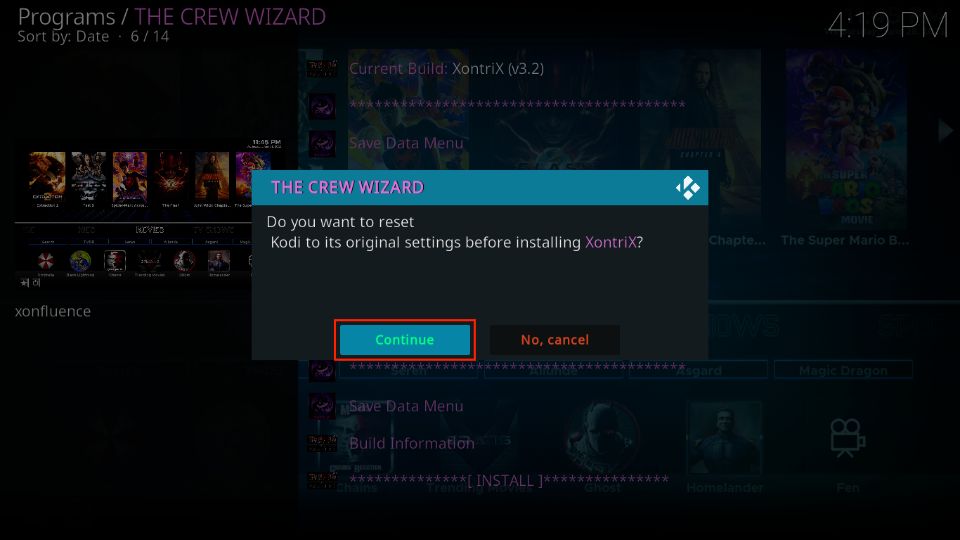
33. Press Continue to reset Kodi to the original settings.
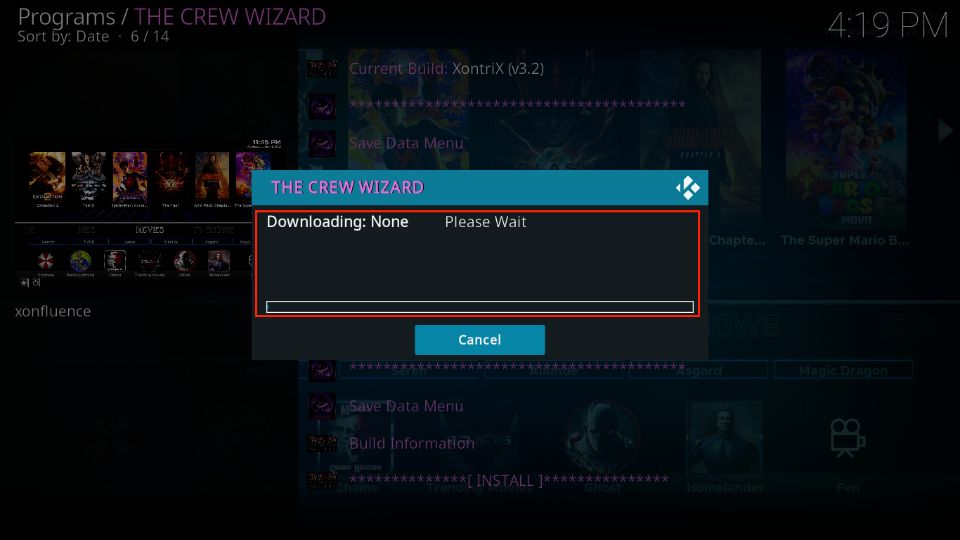
34. A Downloading menu will open. Please wait as the file starts downloading.
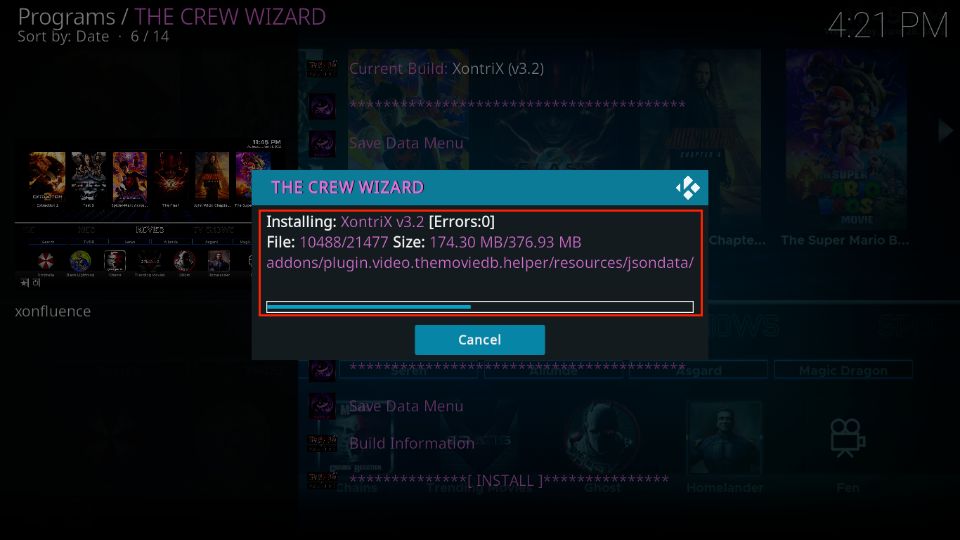
35. The pop-up menu will display the progress, Errors, and File Size. Wait for the installation to complete.
This is how you install a build on Kodi. Once the installation is complete, apply the new build and restart Kodi for the new changes to take effect.
Kodi builds come with pre-installed addons, but you’re not limited to just those. Even if you’re using a pre-configured Kodi build, you can still install extra addons to customize your experience further. You can easily install addons on any Kodi build by following the step-by-step instructions.
Before you start streaming with Kodi Addons or Builds, I would like to warn you that everything you stream on Kodi is visible to your ISP and Government. This means, streaming copyrighted content (free movies, TV shows, live TV, and Sports) might get you into legal trouble.
Thankfully, there is a foolproof way to keep all your streaming activities hidden from your ISP and the Government. All you need is a good VPN for Kodi. A VPN will mask your original IP which is and will help you bypass Online Surveillance, ISP throttling, and content geo-restrictions.
I personally use and recommend ExpressVPN, which is the fastest and most secure VPN. It is compatible with all kinds of streaming apps and devices.
NOTE: We do not encourage the violation of copyright laws. But, what if you end up streaming content from an illegitimate source unintentionally? It is not always easy to tell the difference between a legit and illegal source.
So, before you start streaming on Kodi, here's how to get VPN protection in 3 simple steps.
Step 1: Get the ExpressVPN subscription HERE. It comes with a 30-day money-back guarantee. Meaning, you can use it free for the first 30-days and if you are not satisfied with the performance (which is highly unlikely), you can ask for a full refund.
Step 2: Click HERE to download and install the ExpressVPN app on your streaming device. If you are using a FireStick, I have given the exact steps starting with Step 4 below.
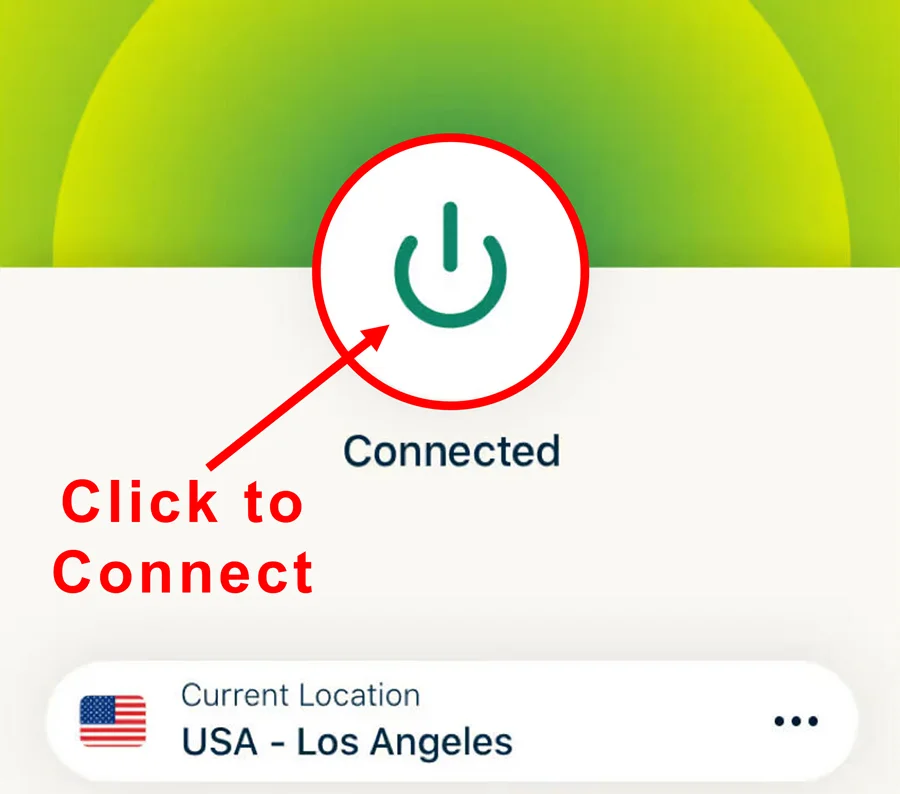
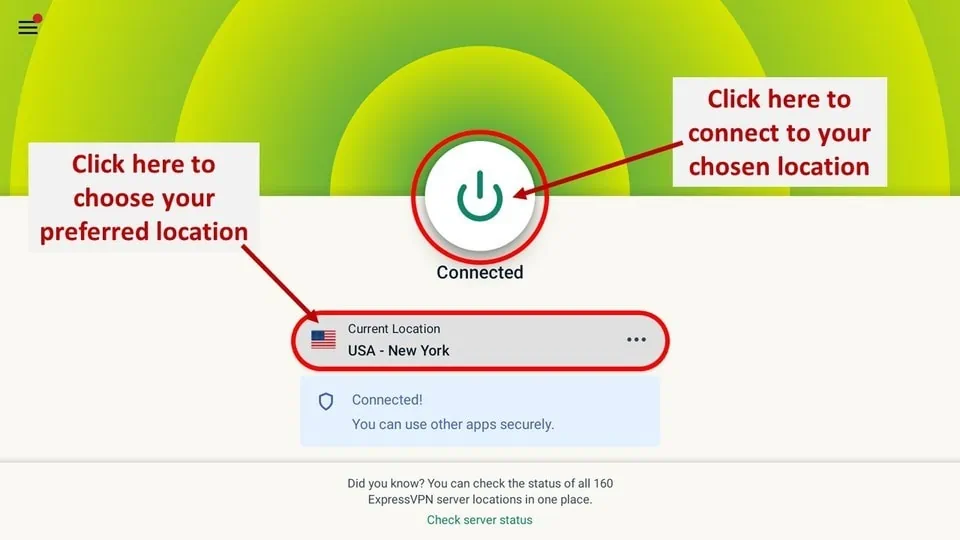
Step 3: Click the Power icon to connect to a VPN server. That's all. Your connection is now secure with the fastest and best VPN for Kodi.
The following are the steps to install Kodi VPN on your Fire TV devices. If you have other streaming devices, follow Step 1-3 above.
Step 4: Subscribe to ExpressVPN HERE (if not subscribed already).
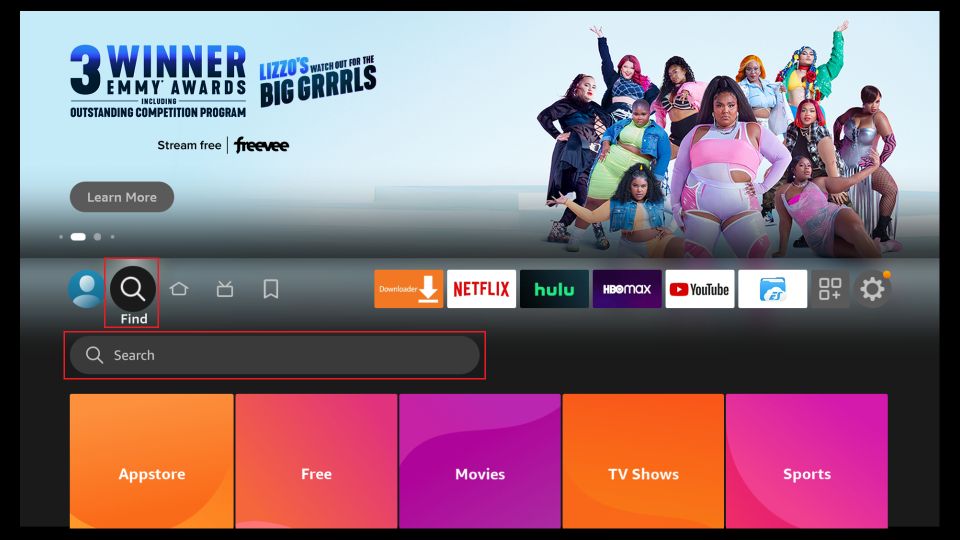
Step 5: Go to Fire TV Stick home screen. Click Find followed by Search option (see image below).
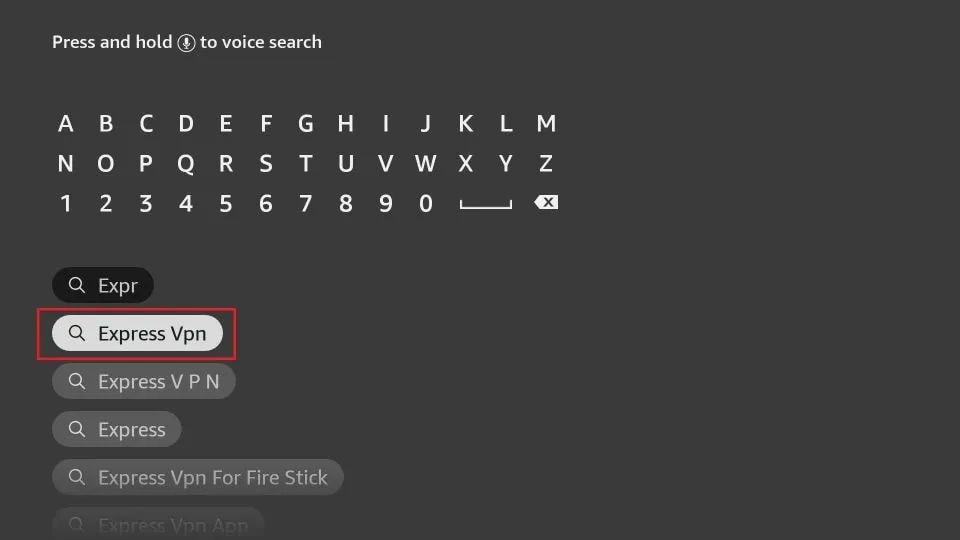
Step 6: Type Expressvpn in the search bar and select when it shows up.
Step 7: Click Download.
Step 8: Open the ExpressVPN app and Sign in using the email ID and password that you created while buying the ExpressVPN subscription.
Step 9: Click the Power icon to connect to a VPN server. That’s all. Your FireStick is now secured with the fastest VPN.
What Else Can Kodi Do?
Kodi is a versatile media player that can do much more than play multimedia content. For example, it can function as a TV when paired with an IPTV service. Moreover, you can also use Kodi as a web browser via various addons. Want to know more? Here are some additional features of the open-source media player.
Stream Music and Podcasts
You can easily stream music and podcasts on Kodi for free! The media player supports many audio file types, including MP3 and FLAC. You can also upload your music to Kodi and then play it locally.
Kodi’s user-friendly interface makes organizing your music collection, creating playlists, and enjoying your music easy. Many popular Kodi addons can turn Kodi into a music player. Some of the add-ons include Spotify, MixCloud, SoundCloud, and Tidal.
Play Video Games
Although Kodi is not a dedicated gaming platform, the media player does offer some gaming features. You can easily enjoy playing online games via some gaming addons and extensions. For example, Rom Collection Browser is a popular gaming addon.
It lets you emulate various retro games and boasts a user-friendly interface. For a smooth gaming experience, you can also get other gaming addons like Steam Launcher, PlayOn, and more.
Upload Videos and Pictures in a Library
Kodi allows users to upload videos and pictures to a library. It helps users organize and manage their multimedia files in a dedicated place. Once you’ve uploaded all the videos and photos, you can view them via Kodi, customize the view mode, and sort the options for a better user experience.
Browse Social Media Platforms
Although Kodi is not mainly designed for browsing social media platforms, its flexibility allows limited access through certain addons. You can access some social media sites with the help of these addons. However, the experience is basic, and the interface may not match the traditional browser or apps.
Discontinued Kodi Builds
Here is a list of the Kodi builds that are no longer available. I am keeping them on this list so that if you find them elsewhere, you won’t waste time trying to install them.
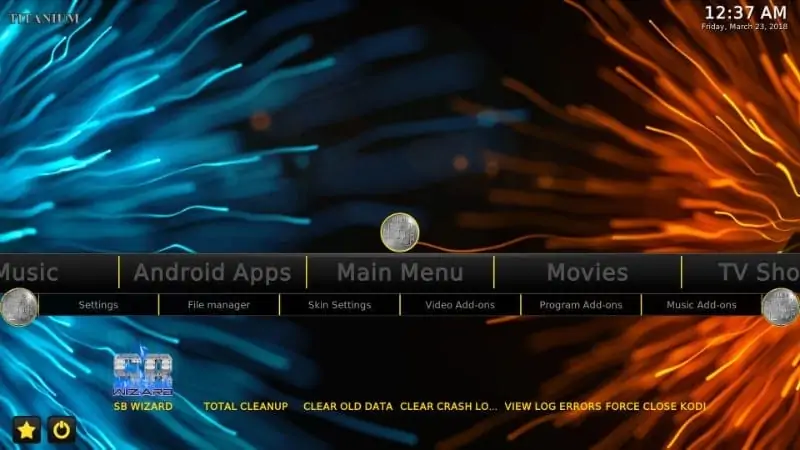
Titanium Build
Titanium Build was equipped with a whole world of entertainment, making it stand out among the top Kodi builds.
With this build, you could enjoy Live Sports, Live TV, Movies, YouTube, Kids Zone, Sports Replays and Highlights, and Live TV for the major UK and US cable TV channels.
Titanium featured numerous addons like DeathStar, Yoda, Gaia, SportsDevil, and more. Its user interface was minimalist and clean.
Xanax
The once very popular build is no longer functional. However, it was an excellent build, and many users still seek its alternative.
The Xanax build had almost the same interface design and layout as Durex, and it was nearly the same size, too. Even though I wouldn’t call Xanax a clone of Durex, it was almost alike.
The Xanax build had a solid library of top Kodi addons, such as Yoda, Exodus Redux, and The Magic Dragon, and a user-friendly interface.
SG Wizard
SG Wizard had a small but solid collection of builds for Kodi Leia 18. All its builds offered a somewhat unique layout. They were also lightweight enough to work smoothly on all Kodi-supported platforms.
With a decent library of video addons, the builds ensured you never ran out of streaming options.
Frequently Asked Questions
Diggz Xenon and Misfit Mods Lite are the most popular Kodi builds, and thousands of users use them. Xenon is extremely popular due to its incredible utilities, such as maintenance, wallpapers, and neat menu sections. It is also lightweight, making it perfect for devices with low and mid-range specs. On the other hand, Misfit Mods Lite stands out for its appealing design and host of popular VOD addons. It is lightweight and has well-marked sections for easy navigation.
Be careful when choosing Kodi builds. Most are developed by third-party developers, and some are known to pass malware to user devices. We continually test the builds to ensure we list safe picks, and the popular builds are generally safe.
Kodi is entirely safe. However, the builds are not always safe or legal. Their status primarily depends on whether they are officially available. Builds from third-party or unofficial sources may contain pirated content. It also depend on the addons and content available within the build. Pirated content may risk a user's privacy and security. Therefore, you must use a VPN if you're not entirely sure about the legal standing of a Kodi build.
If you want to add more addons to your build, open the Add-ons menu on Kodi. Now click the open box icon at the top-left corner and open the addon browser. Here, choose "Install from repository" or "Install from zip file". Follow the on-screen instructions. Do not overload your build with too many addons, it may affect speed or functionality of the build.
Winding Up
Kodi builds improve the appearance of your Kodi interface through appealing skins, menu sections, and themes. They also have pre-installed addons for streaming favorite content like movies, TV shows, kids’ content, adult videos, and music. Getting several add-ons through a build is easier than installing different add-ons individually.
This review summarizes the best Kodi builds for Amazon Fire TV Stick, Android TV Box, PC, Android mobile, and other Kodi devices.
Related:
- How to Watch IPTV on Kodi
- How to Install Multiple Kodi Builds
- How to Uninstall Kodi Build on FireStick
- How to Install Crew Kodi Addon on FireStick

Suberboost Your FireStick with My Free Guide
Stay Ahead: Weekly Insights on the Latest in Free Streaming!
No spam, ever. Unsubscribe anytime.









I downloaded the crew on my firestick and anytime I put anything on the watch it says it can’t find it? Do you know how to fix this so I can actually stream things
Hi Kari, if you’re getting “can’t find” messages when trying to watch something, make sure you’ve synced your Real-Debrid account with it. Without Real-Debrid, you’ll likely get limited or no streams. Once it’s authorized properly, you should start seeing more streaming options. Let me know if you need help with the setup steps!
i dont see any info on Diggz “Xenon Burst”….is it still to early for build info as per 11/24/23 Kodi notice ?
Hi, Diggz Xenon Burst is part of Chef Nexus Wizard. You may install the Wizard by following this guide: https://www.firesticktricks.com/diggz-chef-wizard-kodi-builds.html
can you install more then one build per device??????
Hi Jose. Yes, you can. Please take a look at our guide on how to install multiple Kodi Builds.
Slamious build is no longer available
Hi Jason, thank you for pointing this out. The Slamious build is indeed not working, we will update the article accordingly.