In this guide, I will share the best Kodi addons for the Kodi 21 Omega and Kodi 20.5 Nexus. You can use them on FireStick, FireStick 4K, 4K Max, Fire TV Cube, and FireStick Lite. They also work on Android mobiles, tablets, and Windows and Mac computers. If your device can run Kodi, these addons will work.
I have personally checked each addon, and my team and I keep this list up to date. We check every addon twice a month. If we find one that’s not working, we remove it and replace it with a better one. This way, you always have the best and most up-to-date addons to enjoy.
Most of these addons are compatible with the latest version of Kodi, 21.0 Omega. However, a handful are only compatible with the older version, Kodi 20 Nexus and Kodi 19 Matrix (even Kodi 18).
So I am assuming you’ve already installed Kodi on your streaming device (If you haven’t yet, see how to install Kodi on FireStick). That’s why you are here looking for Kodi addons.
There are thousands of Kodi addons on the internet. But many of them have been taken down by the authorities, and many Kodi repositories are no longer working. This makes it hard to find addons that still work for streaming free movies, TV shows, and other content.
I’ve compiled a list with over 50 addons from different categories like movies, TV shows, live TV, and sports. Since the last testing, all these addons have been working.
Attention, Kodi Users!
Kodi Addons and builds offer unlimited streaming content, but could also get you into legal trouble if caught streaming free movies, TV shows, or sports. Currently, your IP is visible to everyone. Kodi users are strongly advised to always connect to a VPN while streaming online. A good Kodi VPN hides your identity, bypasses government surveillance, geo-blocked content, and ISP throttling (which also helps in buffer-free streaming).
I personally use ExpressVPN, which is the fastest and most secure VPN. It is very easy to install on any device including Amazon FireStick. You get 3 months free and save 49% on its annual plans. Also, it comes with a 30-day money-back guarantee. If you are not satisfied, you can always ask for a refund.
Read: How to Install and Use the Best Kodi VPN
Best Kodi Addons 2024
Legal Disclaimer: This tutorial is purely educational. FireStickTricks.com doesn’t own, host, operate, resell, or distribute any streaming apps, addons, websites, IPTV or services. The page contains some unverified services, and we are not certain whether they hold legal licenses to distribute the content. FireStickTricks.com does not verify the legality of each app/service in all regions. Do your due diligence if you use any of the unverified apps/services, and stream only content that is available in the public domain. The end-user shall be solely responsible for the media accessed.
After using Kodi for several years, I have realized that you don’t need hundreds of addons, to watch the desired content. All you need is three to five addons for any content category. What truly matters is that the addons you pick work well and deliver high-quality streams.
Therefore, I am doing my best to ensure that our list of the best Kodi addons contains only working ones that generate playable streams.
Without further ado, here are the best Kodi addons currently working. These are must-haves if you want a total dose of movies, TV shows, music, social media, sports, and other entertainment.
Featured Addons for Kodi 21.0 Omega and Kodi 20.5 Nexus this Month
IMPORTANT: I highly recommend that you get a premium Real Debrid account. This service costs a few bucks but saves you a lot of trouble while streaming with third-party add-ons. Please refer to this guide to set up Real-debrid with Kodi addons.
- Shadow: For Movies and TV Shows.
- The Crew: Perfect multipurpose addon for Movies, Shows, Live TV, Sports, and more.
- Rising Tides: A wonderful addon to watch Live Sports, including PPV.
- Mad Titan Sports: Another decent option for watching sports, including PPV.
- Aliunde: Another very popular addon for Movies & TV Shows.
- Asgard: For Movies, Documentaries, and more.
- Nemesis AIO: All-in-one addon to stream any content.
- Patriot: One of the reliable addons for Movies and Shows.
- The Magic Dragon: For Movies, Shows, and More.
- Daddy Live: For Sports.
Best Kodi Addons for Movies & TV Shows

1. Shadow
Kodi 21 and Kodi 20
 Shadow is one of the best Kodi addons for watching movies and TV shows. It offers a collection of content and works well on all Kodi devices, including FireStick, mobile phones, PCs, and more.
It is a Real-Debrid-only addon, so it offers high-quality streaming links. The addon supports Trakt and one-click play.
Before you start streaming with Kodi Addons or Builds, I would like to warn you that everything you stream on Kodi is visible to your ISP and Government. This means, streaming copyrighted content (free movies, TV shows, live TV, and Sports) might get you into legal trouble.
Thankfully, there is a foolproof way to keep all your streaming activities hidden from your ISP and the Government. All you need is a good VPN for Kodi. A VPN will mask your original IP which is and will help you bypass Online Surveillance, ISP throttling, and content geo-restrictions.
I personally use and recommend ExpressVPN, which is the fastest and most secure VPN. It is compatible with all kinds of streaming apps and devices.
NOTE: We do not encourage the violation of copyright laws. But, what if you end up streaming content from an illegitimate source unintentionally? It is not always easy to tell the difference between a legit and illegal source.
So, before you start streaming on Kodi, here's how to get VPN protection in 3 simple steps.
Step 1: Get the ExpressVPN subscription HERE. It comes with a 30-day money-back guarantee. Meaning, you can use it free for the first 30-days and if you are not satisfied with the performance (which is highly unlikely), you can ask for a full refund.
Step 2: Click HERE to download and install the ExpressVPN app on your streaming device. If you are using a FireStick, I have given the exact steps starting with Step 4 below.
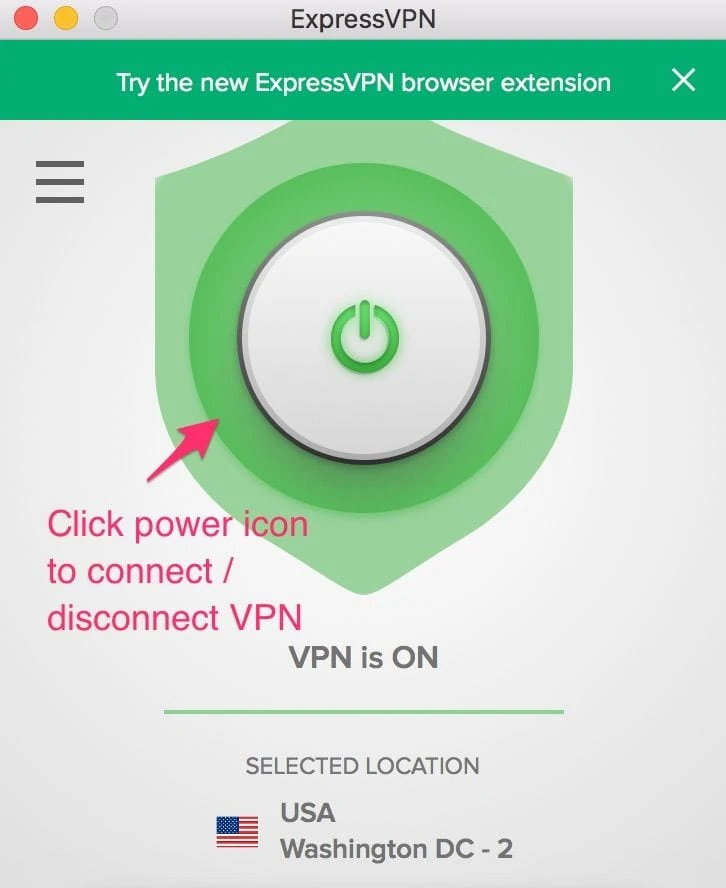
Step 3: Click the Power icon to connect to a VPN server. That's all. Your connection is now secure with the fastest and best VPN for Kodi.
The following are the steps to install Kodi VPN on your Fire TV devices. If you have other streaming devices, follow Step 1-3 above.
Step 4: Subscribe to ExpressVPN HERE (if not subscribed already).
Step 5: Go to Fire TV Stick home screen. Click Find followed by Search option (see image below).

Step 6: Type Expressvpn in the search bar and select when it shows up.

Step 7: Click Download.

Step 8: Open the ExpressVPN app and Sign in using the email ID and password that you created while buying the ExpressVPN subscription.

Step 9: Click the Power icon to connect to a VPN server. That’s all. Your FireStick is now secured with the fastest VPN.

You can install Kodi Addons confidently once a VPN protects you.
Note:
- Kodi does not show subtitles by default. Therefore, if you watch movies with subtitles, you should also read how to add subtitles to Kodi.
- If you encounter buffering for any reason on any of the addons on this page, check out our guide to eliminating buffering.
- Repository: Magnetic Repo
- Source URL: http://magnetic.website/repo
How to Install Shadow Kodi Addon.
2. Asgard
Kodi 21 and Kodi 20
 Asgard is one of the best and longest-standing Kodi add-ons. It is an all-in-one (AIO) plugin with a wide variety of content.
Popular genres you can stream on Asgard include movies, TV Shows, kids’ content, music, standup comedy, sports, and anime.
The add-on provides both free and Real Debrid links for your chosen content. If you have a Real Debrid account, you can stream high-quality and buffer-free content.
At the same time, you can watch decent streams of your favorite content for free without a subscription.
It is loved for its high-quality streams, especially the Real-Debrid sports links. The sports category offers a wide variety of sporting events for live streaming. In addition, there are replays to catch up on missed events.
- Repository: Narcacist
- Source URL: https://mylostsoulspace.co.uk/repo
How to Install Asgard Kodi Addon
3. Patriot
Kodi 21 and Kodi 20
 Patriot Kodi addon offers diverse content, including movies, shows, anime, music, and more.
You can download this addon from the renowned repository Narcacist, which hosts popular addons like Asgard and Odin.
Patriot supports Real Debrid and offers one-click playback. You can also integrate your Trakt account to sync viewing history.
- Repository: Narcacist
- Source URL: https://mylostsoulspace.co.uk/repo
How to Install Patriot Kodi Addon
4. The Magic Dragon
Kodi 21 and Kodi 20
 Here comes another incredible addon with a great library of TV episodes and flicks for never-ending entertainment. After its release, The Magic Dragon addon quickly became the favorite of many Kodi experts and casual users.
This fast, easy-to-use addon brings you all your desired content, including the latest movies and shows.
Powered by a set of effective scrapers, It scoops out the best streams that exist.
Whether you like watching movies, shows, documentaries, kids’ stuff, or sports-related videos or want to kick back and listen to music, The Magic Dragon has you covered.
- Repository: Ezzer Mac
- Source URL: http://ezzer-mac.com/repo
How to Install the Magic Dragon Kodi Addon
5. Popcornflix
Kodi 21 and Kodi 20
 Popcornflix is an official addon from the popular over-the-top streaming service Popcornflix.
The app is available for FireStick, Roku, Android, iOS, and other platforms.
However, you can install the Popcornflix addon instead if you are using Kodi.
This service primarily offers feature films from independent developers.
Popcornflix is free but ad-supported.
- Repository: Kodi Add-on Repository
- Source URL: Repository preinstalled on Kodi
How to Install Popcornflix addon on Kodi
6. Aliunde
Kodi 21 and Kodi 20
 This add-on from the Aliunde Repository is one of the best all-in-one Kodi add-ons.
It scrapes a wide range of content links, including movies, TV shows, documentaries, music, radio, and karaoke. It also provides fitness content and YouTube videos.
The add-on is lightweight and easy to navigate. Content is arranged into categories: Movies, TV Shows, Kids, Classic TV Shows, Music, Healthy Eating and Fitness, YouTube, and Adult.
Aliunde is a perfect choice if you are looking for an addon that delivers all your streams in one place. It integrates seamlessly with Trakt and Real Debrid to provide a high-quality streaming experience.
- Repository: Aliunde
- Source URL: https://fuse99.com/aliunde
How to Install Aliunde Kodi Addon
7. Nemesis AIO
Kodi 21 and Kodi 20
 Nemesis AIO is a multi-category addon that serves you on-demand content.
You will find the regular Movies and TV Shows categories and special categories like Documentaries, Webcam, Gaming Videos, Anime, Cartoons, and more.
As I write, Nemesis is working without hiccups. I hope it maintains its current performance level in the future.
If you have a Real Debrid account, remember to pair it with Nemesis AIO for a more satisfying streaming experience.
- Repository: Stream Army
- Source URL: http://streamarmy.co.uk/repo
How to Install Nemesis AIO addon on Kodi
8. Seren
Kodi 21 and Kodi 20
 As I write this, this add-on does not offer free streaming links. Instead, you must configure it with one of the three premium hosters: Real Debrid, All Debrid, or Premiumize.
Of course, Real Debrid is my favorite, not just because it is more popular but also because it is better.
Since Seren uses premium links, it offers better playback. It pulls streams fast, links are quick to play, and there are more HD streaming options.
- Repository: Nixgates
- Source URL: https://nixgates.github.io/packages
How to Install Seren Addon on Kodi
9. M-E-T-V
Kodi 21 and Kodi 20
 M-E-T-V is a popular Kodi add-on for streamers who like to have all their content in one place. This plugin provides a wide selection of movies, TV Shows, music, and concerts. Its content is high-quality and regularly updated. It’s a good choice if you want to keep up with both classic and new content.
This add-on is one of the few that use NAN scrapers. This means that even without premium services like Real Debrid, it will present high-quality streaming links. However, you can integrate M-E-T-V with Real Debrid and similar services for buffer-free and high-quality links.
M-E-T-V is located within the EzzerMacs Repository and works with both the Kodi 21 Omega and Kodi 20 Nexus.
- Repository: EzzerMac
- Source URL: http://ezzer-mac.com/repo
How to Install METV Kodi Addon
10. SealTeam 6
Kodi 21 and Kodi 20
 SealTeam is a Kodi video addon that comes from The South Paw Repository.
SealTeam 6 features a vast collection of free, constantly updated movies and TV shows.
Its user interface is based on the famous Exodus addon.
To help you pick a title, Seal Team 6 offers several sections to browse through, such as new releases, episodes, and channels.
SealTeam 6 also comes with a search tool that works pretty well.
You can integrate your Real Debrid account with this Kodi addon to unlock even more premium links. SealTeam 6 also works with Trakt.
- Repository: South Paw
- Source URL: https://southpawlefty2468rocky.com/repo
How to Install SealTeam6 Addon on Kodi
11. Elementum
Kodi 21 and Kodi 20
 Elementum is a video addon that uses BitTorrent technology to stream movies and TV shows.
This means that, unlike most other video Kodi addons, It does not stream video content directly from the host websites. Instead, it relies on the “providers,” the lightweight addons that discover and collect BitTorrent links of the videos that you want to watch.
With this addon, you can stream your favorite movies or shows directly or download them for offline viewing.
Elementum also offers Trakt syncing and library integration. The sections include Movies, TV Shows, Torrents, Search, History, and more.
I recommend using a VPN alongside this addon because Elementum helps you access video content via torrenting technology.
- Repository: Gaia
- Source URL: https://repo.gaiakodi.com
How to Install Elementum Addon on Kodi
Kodi 21 and Kodi 20
 In the SouthPaw Repository, NavySeal Platinum K19 has been rebranded as NavySeal Just Click It.
This addon allows users to stream movies and TV shows. It is compatible with both Kodi Nexus and Matrix.
NavySeal Just Click It is a Debrid addon. With a Real Debrid, All Debrid, or Premiumize account and subscription, you can access high-quality premium video links for a more enjoyable experience.
But free users are not left out. For example, NavySeal Just Click It also allows free 1-Click video content.
NavySeal Just Click It has a simple user interface. There are sections to explore, including Movies, TV Shows, Trakt, Last Played Link, Resume Playing, Search, and Settings.
- Repository: The South Paw Repository
- Source URL: https://southpawlefty2468rocky.com/repo
How to Install NavySeal Addon on Kodi
13. Scrubs
Kodi 21 and Kodi 20
 Scrubs is another on-demand addon that makes it to our list of best Kodi addons.
The Scrubs addon has three primary categories for easy navigation: Explore IMDb, Explore TMDb, and Explore Trakt.
It fetches many links rather quickly, but don’t expect to find many 1080 full HD streams.
I have noticed that many 720p and SD links do not play. So, you must check a few links before you find a working one.
This addon does not work with Real Debrid.
- Repository: Jew Repo
- Source URL: https://jewbmx.github.io
How to Install Scrubs Addon on Kodi
14. Crazy Canucks
Kodi 21 and Kodi 20
 Crazy Canucks is another video-on-demand Kodi addon featuring Movies and TV shows. It also lets you watch YouTube videos.
This third-party addon supports Trakt and Real Debrid.
It looks like a decent addon for streaming presently.
- Repository: Canuck
- Source URL: http://twiglet.esy.es/canuck
How to Install Crazy Canucks Kodi Addon
15. Base
Kodi 21 and Kodi 20
 Base is another addon for on-demand content. This addon primarily offers movies and shows, but it may also include a few documentaries and docuseries.
Additionally, you may run into some anime, cartoons, and content for family occasionally.
It has several categories with a simple interface on the home screen.
While the addon provides free streams, Real Debrid integration may change your streaming experience dramatically.
- Repository: The Crew
- Source URL: https://team-crew.github.io
How to Install Base 19 Addon on Kodi
16. Wolf Pack
Kodi 21 & Kodi 20
 Wolf Pack Kodi addon offers on-demand videos, including movies and shows. Additionally, you can watch documentaries, docuseries, music videos, content for kids, family videos, and more.
The addon has both multi-stream and one-click videos. In addition, you can stream in up to 4K resolution.
When you sign in to the addon with your Real Debrid account, most videos offer the best-quality links. However, you may still find plenty of good-quality free streams.
Trakt integration is also available if you want to sync your viewing activities across various devices.
- Repository: Where the Monsters Live
- Source URL: https://www.midian.appboxes.co/repo
How to Install Wolf Pack Kodi Addon
17. Insomnia
Kodi 21 and Kodi 20
 Insomnia is a third-party Kodi add-on that offers movies, TV shows, and documentaries. It is housed in an unofficial repository known as the Offspring Repo.
Insomnia is a worthy consideration if you are looking for a fluid and easy-to-use Kodi plugin for watching on-demand videos.
Choosing content on the platform is easy because you can filter by genre, year, artist, popularity, and awards.
The addon works best with Real Debrid. However, several decent-quality free links may also be available. Trakt integration is also available to track and customize your watch history.
- Repository: Offspring Repo
- Source URL: https://m3atp1zza.github.io/Install_OffSpring
How to Install Insomnia Kodi Addon
18. Chains Reaction Lite
Kodi 21 and Kodi 20
 Chains or Chains Reaction Lite Kodi addon lets you watch various video content, including movies, TV shows, documentaries, and standup comedy.
Chains may get you free streams.
However, I recommend using a Real Debrid premium account for infinitely more convenience and high-quality links.
- Repository: The Crew Source
- Source URL: https://team-crew.github.io
How to Install Chains Addon on Kodi
19. Xumo TV
Kodi 18 Only
 Xumo TV is a free, over-the-top streaming service currently operational in North America, Brazil, and select Western European countries.
Comcast owns this service. It is free of advertisements.
It is an official service offering video-on-demand movies and shows, news, sports, kids and family content, and more.
You can install the Xumo TV addon on various devices, including FireStick, Android, iOS, Android TV, and more.
You can also get the Xumo TV addon on Kodi from the official repository if you still use Kodi 18.
For some reason, Xumo TV is currently unavailable on Kodi 20 Nexus.
- Repository: Kodi Add-on Repository
How to Install Xumo TV Kodi Addon
20. GAIA
Kodi 21 and Kodi 20
 Gaia is an on-demand addon for your favorite movies and TV shows. Its layout is simple. The addon’s home screen organizes the content into categories: movies, shows, documentaries, and kids.
When you request a video playback, Gaia will scrape dozens of streams from several servers.
The latest version of the addon (Gaia 4) offers several enhancements and improvements over its predecessors. However, it works best when used with Real-Debrid.
- Repository: Gaia
- SourceURL: https://repo.gaiakodi.com
How to Install Gaia addon on Kodi
21. ReleaseBB
Kodi 21 and Kodi 20
 Release BB is a unique Kodi add-on for streaming movies and TV shows. It has a vast library of video-on-demand videos, including classics, box office hits, popular, and the latest releases. The library is also updated regularly to ensure variety.
The add-on has become one of the best plugins for high-quality streaming links. You can’t access free links because Release BB only has premium links. It is compatible with most premium link providers, including Premiumize, All Debrid, and Real Debrid.
- Repository: Bugatsinho
- Source URL: https://bugatsinho.github.io/repo
How to Install ReleaseBB Kodi Addon
Best Multipurpose Addons
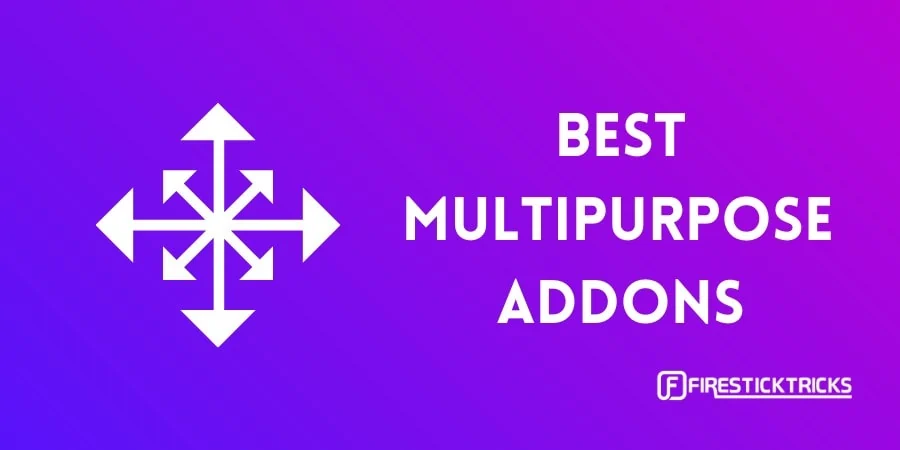
Movies, shows, live TV, sports, documentaries, kids, and music are some of the most popular types of content we look for on Kodi. Usually, there are dedicated addons for each category. For instance, the previous section discussed top on-demand video addons for movies and shows.
The following section will discuss the best live TV Kodi addons. Then, some addons serve you all these categories in one place. That is why they are multipurpose addons. So, here is our small but solid list.
22. The Crew
Kodi 21 and Kodi 20

The Crew add-on is one of the longest-running Kodi add-ons, partly because it’s an all-in-one plugin.
This Kodi multi-scraper lets you stream movies, TV shows, live TV, sports, and kids’ content. The app is lightweight and compatible with various Kodi-supported devices.
Its diverse range of content, high-quality streaming links, and smooth navigation make it a favorite among Kodi users. It is housed in a third-party repository with the same name. It is straightforward to use and easy to install.
Moreover, it integrates with third-party services like Real Debrid and Trakt to provide an optimum streaming experience. One aspect that makes The Crew one of the best Kodi add-ons is the team behind it, which provides excellent customer support.
The add-on is regularly updated to fix bugs and improve performance.
- Repository: The Crew Repo
- Source URL: https://team-crew.github.io
How to Install The Crew Kodi Addon
23. Samsung TV Plus
Kodi 21 and Kodi 20
 Samsung TV Plus is an official streaming service from Samsung.
This service offers free live TV and on-demand content.
According to the Samsung TV Plus website, everything is 100% free without strings attached.
It has over 200 channels and a vast library of on-demand movies.
- Repository: Sly Guy
- Source URL: http://k.slyguy.xyz
How to Install Samsung TV Plus Kodi Addon
24. Stirr
Kodi 21 and Kodi 20
Stirr is a free TV streaming service. It gets its content from the Sinclair TV stations.
Stirr is an official service owned by the Sinclair Broadcast Group. The Stirr app can be installed from official app stores on FireStick, Apple TV, Roku, Android TV, Android mobiles, and iOS.
However, its addon is not listed on the official Kodi repository. You must download it from a third-party repository.
Stirr addon primarily focuses on live TV. However, it also features a range of on-demand content.
- Repository: Sly Guy
- Source URL: http://k.slyguy.xyz
How to Install Stirr Kodi Addon
Top Live TV Addons
You can take a quick look at the top live Addons for Kodi. In addition, I have a separate guide covering Live TV Kodi Addons if you need more of these.
25. Pluto TV
Kodi 21 and Kodi 20

Pluto TV is a familiar name, especially for streamers who watch live TV online. With at least 250 channels on the lineup, it is a must-have to watch live TV without cable.
Besides live TV, it has a rich library of on-demand videos. You can stream your favorite content across various genres, including comedy, romance, drama, action, and crime.
Pluto TV is available on the official Kodi repository and some third-party repos like The Crew Repository.
- Repository: Kodi Add-on Repository
- Source URL: Not Required.
How to Install Pluto TV Kodi Addon
26. Catch-up-TV & More
Kodi 21 and Kodi 20
 Catch-up-TV is an official Kodi addon for watching catch-up TV, live TV, and aggregated content from websites such as Noob TV, New York Times, Taratata, and more.
The addon includes live TV channels from several countries, including the USA, UK, Canada, France, Switzerland, Japan, and others. You can add channels and videos to favorites for quick access.
- Repository: Kodi Add-on Repository
How to Install Catch-up TV & More Addon on Kodi
27. Fetch
Kodi 21 and Kodi 20
 Fetch is a Kodi addon to watch live TV. You can stream cable TV channels from the USA, UK, Canada, and other countries.
For easy browsing, the channels are organized into familiar categories. The categories include Animation, Classic, Lifestyle, Comedy, Travel, Music, News, Sports, Entertainment, and more.
The addon lets you search channels by keywords and add any channel to your favorites for quick access.
- Repository: DoomzDay Repo
- Source URL: https://doomzdayteam.github.io/doomzday
How to Install Fetch Addon on Kodi
28. NewsOn
Kodi 21 and Kodi 20
 NewsOn is a free American online news service that lets you watch on-demand and live local news. This service offers news from over 160 markets and includes over 250 channels.
You can install the NewsOn app on iOS, Android, FireStick, Roku, Apple TV, and FireStick. You can also get the NewsOn Kodi addon on Kodi 20 Nexus.
NewsOn is also included on our list of Best Live TV Addons for Kodi and Best Channels for Amazon FireStick.
- Repository: Kodi Add-on Repository
How to Install NewsOn Addon on Kodi
29. PVR IPTV Simple Client
Kodi 21 and Kodi 20
 PVR IPTV Simple Client is an IPTV add-on for connecting your existing IPTV subscription to Kodi and streaming live TV channels.
While this addon offers no content, it works with many IPTV services.
You can configure your IPTV subscription with this Kodi addon with either the M3U Playlist URL or XMLTV EPG URL. Unfortunately, it doesn’t work any other way.
You may contact the IPTV service provider about the URLs.
You may also want to check your email inbox because, usually, these URLs are sent in the email along with the login info.
- Repository: Kodi Add-on Repository
- Source URL: Not Required.
How to Install PVR IPTV Simple Client
Best Kodi Addons for Sports

30. Rising Tides
Kodi 21 and Kodi 20
 PPV: Yes
Rising Tides is one of the widely-used sports Kodi add-ons. It is free to use and has a decent content library. The content is diverse, from PPV events and live games to replays. Occasionally, you’ll also come across sports cable TV channels.
Like most sports add-ons, Rising Tides offers in-season streams. You may also encounter some offline streams or channels. Altogether, it is a decent Kodi add-on with interesting sports categories.
- Repository: Rising Tides
- Source URL: http://mullafabz.xyz/Repository/K19 & http://mullafabz.xyz/Repository
How to Install Rising Tides Addon on Kodi
31. Mad Titan Sports
Kodi 21 and Kodi 20
PPV: Yes 
If you are a fan of a wide range of sports, this Kodi add-on is the best choice.
Mad Titan Sports is a branch of the Mad Titan AIO addon.
Mad Titan has also added a Live TV and on-demand Movies section, making it a reliable, all-in-one streaming service.
The addon lets you stream virtually all the top live sporting events in the US, along with replays.
It is located in the Magnetic Repository and is compatible with Kodi 20 Nexus.
Mad Titan Sports focuses on American-based sports such as the NFL, NBA, and NHL.
However, you can also access other sports, such as fight sports (MMA and wrestling) and soccer.
There are sections for replays and highlights of already-played events. There is also a section for college sports fans.
- Repository: Magnetic
- Source URL: http://magnetic.website/repo
How to Install Mad Titan Sports Kodi Addon
32. SportHD
Kodi 21 and Kodi 20
PPV: No 
As its name suggests, SportHD is a Kodi sports add-on that provides content in high definition (HD). It is the immediate successor to the now obsolete Sport 365 sports add-on.
SportHD scrapes high-quality links from the sporthd.me website and delivers the streams in well-organized categories, including live events, alternative live events, and best leagues.
This plugin stands out from other sports add-ons because of the quality and quantity of streaming links. It has a wide array of sports, from football, motorsports, and basketball to combat sports. You can even stream events like darts, chess, and snooker. I recommend Sport HD to all sports lovers who use Kodi.
- Repository: Bugatsinho
- Source URL: https://bugatsinho.github.io/repo
How to Install SportHD Addon on Kodi
33. ApeX Sports
Kodi 21 and Kodi 20

PPV: No
ApeX Sports lets you stream a range of sports and sporting events.
However, it is not the most reliable addon. You may not find many working streamings.
If this addon doesn’t work, try another sports Kodi addon listed here.
- Repository: Arxtic Ape
- Source URL: https://arxtic-ape.github.io
How to Install ApeX Sports Kodi Addon
34. Fights on Demand
Kodi 21 and Kodi 20
 PPV: No
Fights on Demand is one of the best Kodi addons to watch combat sports at this time.
This addon comes with a range of categories to take your pick from.
It is one of the few Kodi sports addons to support Debrid streaming.
Fights on Demand has tons of options for hours of streaming.
- Repository: Narcacist
- Source URL: https://mylostsoulspace.co.uk/repo
How to Install Fights on Demand Kodi Addon
35. Wrestlers
Kodi 21 and Kodi 20
PPV: No 
Wrestlers is a combat sports-oriented Kodi addon. It scrapes streaming links from combat sports sites. It has a diverse library covering professional wrestling and martial arts to boxing.
You can also watch Wrestlers offers kick-offs, documentaries, news, rumors, and channels.
Wrestlers is a lightweight addon with a fluid interface and well-categorized content.
- Repository: Butter Fingers Repo
- Source URL: http://j1wizard.net/butter
How to Install Wrestlers addon on Kodi
36. Loop
Kodi 19 Only
 PPV: No
Loop is a sports addon for Kodi for watching live streams and on-demand videos.
It covers various sports, including football, soccer, tennis, baseball, and more.
For on-demand content, you can pair this Kodi addon with Real Debrid for superior-quality streaming links.
- Repository: The Loop
- Source URL: http://loopaddon.uk/loop
How to Install Loop Addon on Kodi
37. Fox Sports
Kodi 21 and Kodi 20

Fox Sports is a reputable name in the sports sector and is home to a wide variety of content. If the cable channel is included with your cable subscription, you can stream all sports content legally on Kodi.
The addon is hosted in the SlyGuy Repository, which is well-known in the Kodi community. It includes several sports, such as soccer, football, baseball, and athletics.
Consider installing Fox Sports addons for a wide array of high-quality sports content.
- Repository: Sly Guy
- Source URL: https://k.slyguy.xyz
How to Install Fox Sports on FireStick
38. Fight Club
Kodi 21 and Kodi 20
Fight Club is a sports addon for Kodi. The addon lets you watch many combat sports, including MMA and Wrestling.
It primarily features the recordings of various matches and live events. You can also watch limited PPV events.
While Fight Club has plenty for combat sports fans, it may not be the best Kodi addon for other sports categories.
- Repository: Stream Army
- Source URL: http://streamarmy.co.uk/repo
How to Install Fight Club Addon on Kodi
39. Torque Lite
Kodi 21 and Kodi 20
 Torque Lite is a sports addon for Kodi. As the name suggests, this addon offers racing videos.
It features videos for car and bike races from all around the world.
While the addon primarily provides on-demand videos of races, you will find some live streams.
You can also integrate your Real-Debrid account to improve the streaming quality of on-demand content.
Torque Lite is easy to install and use.
- Repository: Narcacist
- Source URL: https://mylostsoulspace.co.uk/repo
How to Install Torque Lite Addon on Kodi
Best Kodi Addons for Kids, Cartoons & Anime

40. WatchNixtoons2
Kodi 21 and Kodi 20
WatchNixtoons2 is a popular Kodi addon among animated content lovers due to its vast library and high-quality streams.
This add-on offers many anime and cartoons, from classics to the latest releases. The interface is easy to navigate, with sections like Latest Releases, Popular & Ongoing Series, Dubbed Anime, and Cartoons.
It scrapes links from various third-party sources.
- Repository: Crew Repository
- Source URL: http://team-crew.github.io
How to Install WatchNixtoons2 Addon on Kodi
41. FANime
Kodi 21 and Kodi 20
 FANime is a video addon created by the popular Nemzzy.
You can get it from the Stream Army Repository, which also offers add-ons like Nemesis AIO and EnterTain Me.
It is one of my favorite picks for the best Kodi 20 addons for anime connoisseurs worldwide.
FANime offers an extensive collection of anime movies and series.
It also has an easy-to-use interface, with sections containing the anime content sorted into various categories.
There is also a search button that helps you to find an anime title.
You will see multiple links when you find a title you are interested in streaming.
- Repository: Stream Army
- Source URL: http://streamarmy.co.uk/repo
How to Install FANime Addon on Kodi
42. Kaito
Kodi 21 and Kodi 20
 You may find this Kodi addon interesting if you are an anime fan using the Kodi 20 Nexus.
Kaito pulls links from websites hosting anime content. These anime movies and series are organized into several sections or categories. To manage your viewing, you can use the anime calendar.
Fans of dubbed anime will enjoy this addon, as an entire section is dedicated to anime dubbed into English.
You can integrate your premium Real Debrid, Premiumize, or AllDebrid account to boost the number and quality of streams.
- Repository: SwagOtaku Repo
- Source URL: https://swagotaku.github.io/repo
How to Install Kaito Kodi Addon
Best Kodi Addons for Streaming Music

43. MP3 STREAMS
Kodi 21 and Kodi 20
 MP3 Streams is a great Kodi addon for music enthusiasts.
It is a popular addon that has existed for some time now.
The media library is sorted into different categories like Billboard Top 100, top albums artists, rap, hip-hop, jazz, etc.
You can even build your favorite playlist here.
- Repository: The Crew Repo
- Source URL: https://team-crew.github.io
How to Install MP3 Streams Kodi Addon
44. YouTube
Kodi 21 and Kodi 20
 YouTube is undoubtedly the most-used video-sharing platform globally. You can watch your YouTube videos on FireStick using the official app or the Kodi add-on.
The YouTube addon works similarly to the app. You can search for content and customize the playback to suit your preference.
So, if you want to enjoy some epic fails, cute pet videos, or music from your favorite artist, you can do so on Kodi.
Install the YouTube addon from the official Kodi repository.
- Repository: Kodi Add-on Repository
- Source: Preinstalled
How to Install YouTube Addon on Kodi
Best Korean Drama Addons

45. DramaCool
Kodi 21 and Kodi 20
If you are a Korean and Asian drama fan, you may want to try DramaCool.
In addition to Korean content, you will also find Chinese, Japanese, Indian, and other videos.
DramaCool does not support Real Debrid. However, it fetches acceptable quality free links.
This addon lets you watch movies, shows, K-dramas, and more.
- Repository: Lime Repository
- Source URL: https://groggyegg.github.io
How to Install Dramacool addon on Kodi
This was our list of the best Kodi Add-Ons currently working. If you feel some other Add-Ons deserve a place on this list, please let us know in the comments box below.
Incompatible Kodi Addons
The addons in this section are not working on any version of Kodi, including Kodi 21 Omega, Kodi 20 Nexus, Kodi 19 Matrix, and Kodi 18 Leia. You can install their repositories, but you will run into the error “Could not connect to the repository.“
The repositories may be updated in the future. Therefore, I have created a separate section for these incompatible addons. If an addon on this list starts working, I will move it to the main list above.
46. Alvin
Kodi 19 Only
 Alvin Kodi addon is part of an unknown repository, Octopus (as I write this).
This addon looks like a fork of Exodus V8. Both have a similar – if not entirely the same – layout.
Alvin is pulling several quality links, many of which are in 1080p. It has an extensive content library too.
Although you won’t find many fancy categories, if you are looking for a simple add-on that makes it easy to stream movies and shows in high quality, you should consider the Alvin add-on.
- Repository: Octopus
- Source URL: http://octopus246.esy.es/octopus
How to Install Alvin Addon on Kodi
47. Taz19
Kodi 19 Only
Taz19 is another on-demand addon on our list of Kodi addons for films and TV shows.
This addon features a solid collection of content, including new and old.
You can explore the videos in multiple categories: trending, popular, latest releases, top 10, premiers, and more.
Taz19 lets you set up Real Debrid so that you may enjoy faster and high-resolution streams.
- Repository: Octopus
- Source URL: http://octopus246.esy.es/octopus
How to Install Taz19 Kodi Addon
48. Exodus Redux
Kodi 18 Only
 Exodus Redux has been around for a long time. However, it may not work anymore for some users.
It is an on-demand addon that offers movies and TV shows.
Redux used to be the most popular addon. However, its popularity has declined since Kodi updated from version 18 Leia to version 19 Matrix.
It is also not supported on Kodi 20 Nexus, and there are only a few Kodi 18 users. If you still use the older Kodi, you may want to give Exodus Redux a try.
- Repository: Exodus Redux
- Source URL: https://i-a-c.github.io
How to Install Exodus Redux Kodi Addon
49. Covenant
Kodi 18 Only
 Covenant addon has seen many ups and downs. For the longest time, its original developers abandoned it and did not provide any updates.
However, this incredibly popular Kodi addon has been revived and is working on Kodi 18 Leia.
The addon is getting a decent number of working links. It also works excellently with Real Debrid.
- Repository: Covenant
- Source URL: https://covenant01.github.io/zip
How to Install Covenant Kodi Addon
50. Tempest
Kodi 18 Only
 Tempest is another addon that works great on Kodi 18 and serves a solid library of movies and TV Shows. This addon features the latest films and aired episodes. You will also find plenty of old content here. Tempest looks like a fork of Covenant.
While Covenant is not supported any longer, Tempest is well maintained. The streaming aspect of the Tempest Kodi addon is impressive. It quickly finds the streams, fetches many of them, and just about all play.
It works even better with Real Debrid. Tempest also supports Trakt integration. I like this addon and don’t see why you wouldn’t.
- Repository: Tempest
- Source URL: https://tempest0580.github.io
How to Install Tempest Kodi Addon
51. Descent
Kodi 18 Only
 Descent is another Kodi 18 addon. It does not work on Kodi 20.
If you still use Kodi 18, the Descent add-on offers a solid collection of movies and TV shows.
It also has an IPTV section if you want to watch live TV. The Descent add-on supports Real Debrid and Trakt.
- Repository: Cy4root
- Source URL: https://cy4root2.github.io/zip
How to Install Descent Kodi Addon
52. Centry Sports
Kodi 20 and Kodi 19
PPV: No 
Centry Sports is a decent option to watch live TV (primarily) and sports.
It sources live TV streaming from Daddy Live and other websites. It offers a wide range of TV channels from the USA.
Even though the addon has ‘Sports’ in its name, the sports section is unreliable.
- Repository: Centry
- Source URL: https://centry7.github.io
How to Install Centry Sports on Kodi
Popular Addons That Do Not Work Anymore
Here is a list of popular addons that no longer work.
- The Oath
- Venom
- MTB’s Greased Lightning
- DeathStar
- UK Turks Playlist
- Exodus V8
- 709
- cloud TV
- SportsDevil
FAQ’s
The Crew is the most popular Kodi addon at this time. This addon offers on-demand streaming options, including Movies and TV Shows.
Shadow, Magic Dragon, and Asgard are also popular addons.
What are the dangers of using a Kodi Addon?
You may get into legal trouble using a third-party addon for streaming copyrighted or licensed content. Therefore, we advise our users to always stream the content in the public domain.
We also recommend using a VPN while streaming with Kodi addons to hide your IP and to have a safe streaming experience.
You can watch just about anything you want with Kodi addons. It is all about finding a suitable addon for the content you wish to stream. You will find Kodi addons for Movies, Shows, Live TV, Sports, Fitness, Anime, and more in this list.
Yes, Kodi is legal and safe to use, provided you are streaming content available in the public domain. You will have a much safer experience using a streaming VPN with Kodi.
Kodi is officially available on the Microsoft Store and Google Play Store. This vouches for its authenticity, safety, and legality.
To install a Kodi addon, you will first need the source URL. Then, you install the Kodi repository that hosts the addon from the source URL. Finally, you install the addon from the repository.
Wrap Up
This concludes our list of the best Kodi addons. These addons let you watch movies, shows, anime, live TV, documentaries, and a lot more. You can install them on Kodi 21 and Kodi 20.
Related:
- How to Watch IPTV on Kodi
- How to Reset Kodi on FireStick
- How to Update Kodi on FireStick
- How to Install Kodi on FireStick

Suberboost Your FireStick with My Free Guide
Stay Ahead: Weekly Insights on the Latest in Free Streaming!
No spam, ever. Unsubscribe anytime.
Disclosure - FireStickTricks.com is reader-supported blog. When you buy a product through links on our site, we may earn commission. Learn More

There should be separate section for Non debrid Add on. Now a days we are missing good working addon
Hi Vikas,
We have articles detailing the installation processes for various non-debrid Kodi addons, such as Aliunde, Diamond Shadow, and NavySeal Platinum K19. Look for the “one click” folders within each addon. Hope this helps!
With kodi 19.3 matrix i want to stream greek movies. What is your opinion for alivegr addon?
Hi Tuko. I have not looked into Alivegr, so I cannot offer my opinion. I will certainly look into it and keep it in mind for the future.
Newby here. The main thing preventing me from cutting the cable TV cord is no Madison Square Garden Network. I need my NY Ranger games. Do any Kodi addons or builds offer MSG access? TY, Phil
Hi Phil, here is our guide on how to get local channels on FireStick.
How can you publish this now and list dead repositories? This is a problem among many kodi pages now, I don’t know who to trust. Example: http://repo.rubyjewelwizard.com. That’s not the diamond repo, that page is dead. And your 4th build is from the Fractured Repo, which has been dead since December at least. Why are all of you giving us dead links?
Hi Dan, we are currently working on updating all of our posts to reflect the builds/addons/apps that are no longer available. It is a long process, and we want to thank everyone for their patience while we undergo this site maintenance.
dejavue will not load on kodi 19, tried many times dejavue was my best addon period. if you know of any more like it send me a email of name [email protected] thanks
Hi Sonny. Unfortunately, DejaVu is not working anymore. Please try another on this list.
Hi Patrick,
This site is great.
My question: I have 2 Fire sticks for two different TV’s. Do I need to load the VPN on both fire sticks?
Thanks,
Hi Michael, yes, I would highly recommend that. Thankfully, most VPNs provide simultaneous connections on multiple devices. For instance, ExpressVPN lets you connect up to 6 devices at a time. Therefore, you just need one subscription for both your FireSticks.
Hi. Every time on Exodus is says no steam available, on every on le on the list. Please help.
Hi Grant, are you using a VPN? Also, do you use Real Debrid. Here are some guides that might help:
https://www.firesticktricks.com/best-vpn-kodi.html
https://www.firesticktricks.com/real-debrid-kodi.html